【Mini-F5265-OB开发板试用测评】1、串口printf输出
测试串口printf输出。
一、硬件电路部分
开发板自带仿真器上有虚拟串口,插上USB仿真器可以找到串口设备号。
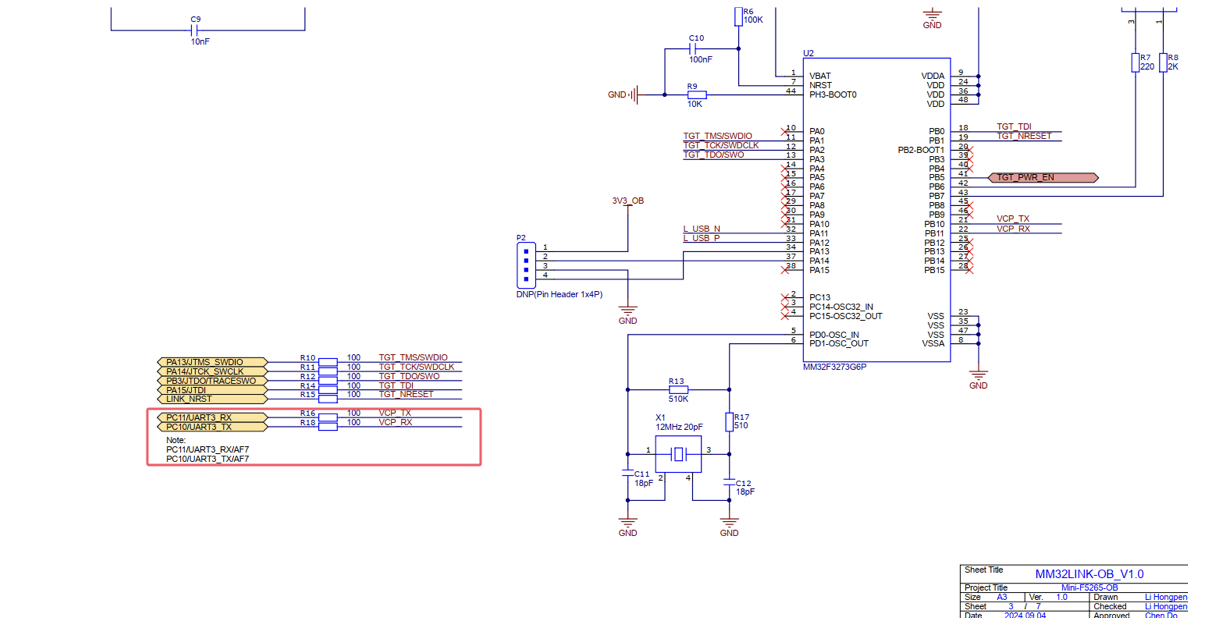
仿真器串口连接到MM32F5265芯片的PC10和PC11引脚(UART3功能)。
二、串口3功能
看手册串口3引脚的功能映射图
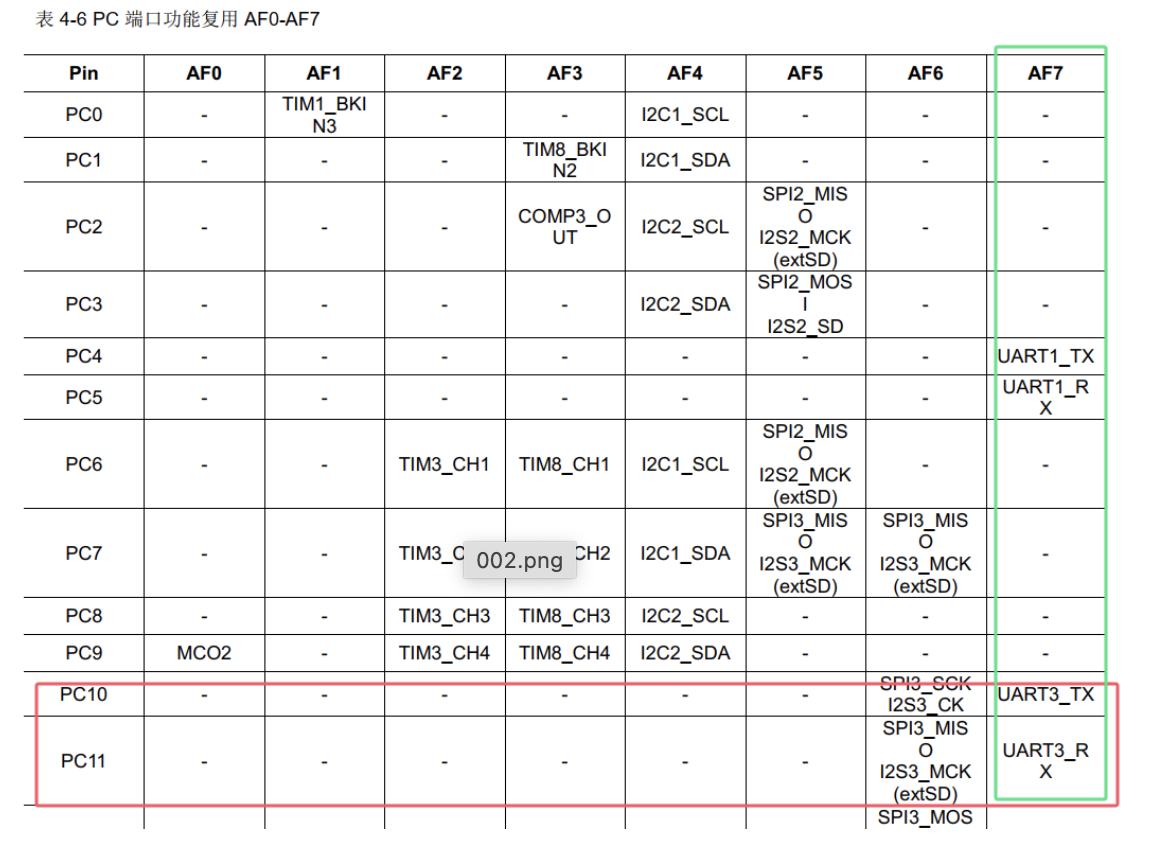
串口3映射到AF7,需要在程序中配置到此映射。
三、程序部分
3.1、usart.c
#include "main.h"void init_usart(uint32_t Baudrate)
{GPIO_InitTypeDef GPIO_InitStruct;UART_InitTypeDef UART_InitStruct;RCC_APB1PeriphClockCmd(RCC_APB1Periph_UART3, ENABLE);UART_StructInit(&UART_InitStruct);UART_InitStruct.BaudRate      = Baudrate;UART_InitStruct.WordLength    = UART_WordLength_8b;UART_InitStruct.StopBits      = UART_StopBits_1;UART_InitStruct.Parity        = UART_Parity_No;UART_InitStruct.HWFlowControl = UART_HWFlowControl_None;UART_InitStruct.Mode          = UART_Mode_Tx;UART_Init(UART3, &UART_InitStruct);UART_Cmd(UART3, ENABLE);RCC_AHBPeriphClockCmd(RCC_AHBPeriph_GPIOC, ENABLE);GPIO_PinAFConfig(GPIOC, GPIO_PinSource10, GPIO_AF_7);GPIO_PinAFConfig(GPIOC, GPIO_PinSource11, GPIO_AF_7);GPIO_StructInit(&GPIO_InitStruct);GPIO_InitStruct.GPIO_Pin   = GPIO_Pin_10;GPIO_InitStruct.GPIO_Speed = GPIO_Speed_High;GPIO_InitStruct.GPIO_Mode  = GPIO_Mode_AF_PP;GPIO_Init(GPIOC, &GPIO_InitStruct);GPIO_StructInit(&GPIO_InitStruct);GPIO_InitStruct.GPIO_Pin   = GPIO_Pin_11;GPIO_InitStruct.GPIO_Speed = GPIO_Speed_High;GPIO_InitStruct.GPIO_Mode  = GPIO_Mode_AF_PP;GPIO_Init(GPIOC, &GPIO_InitStruct);
}#if   defined (__ICCARM__)#if   (__VER__ >= 9030001)/* Files include */
#include <stddef.h>
#include <LowLevelIOInterface.h>/************************************************************************************************************************ @brief  redefine __write function* @note   for printf* @param  handle* @param  *buf* @param  bufSize* @retval nChars*********************************************************************************************************************/
size_t __write(int handle, const unsigned char *buf, size_t bufSize)
{size_t nChars = 0;/* Check for the command to flush all handles */if (-1 == handle){return (0);}/* Check for stdout and stderr (only necessary if FILE descriptors are enabled.) */if ((_LLIO_STDOUT != handle) && (_LLIO_STDERR != handle)){return (-1);}for (/* Empty */; bufSize > 0; --bufSize){UART_SendData(UART2, *buf);while (RESET == UART_GetFlagStatus(UART2, UART_FLAG_TXC)){}++buf;++nChars;}return (nChars);
}#else/************************************************************************************************************************ @brief  redefine fputc function* @note   for printf* @param  ch* @param  f* @retval ch*********************************************************************************************************************/
int fputc(int ch, FILE *f)
{UART_SendData(UART2, (uint8_t)ch);while (RESET == UART_GetFlagStatus(UART2, UART_FLAG_TXC)){}return (ch);
}#endif#elif defined (__GNUC__)/************************************************************************************************************************ @brief  redefine fputc function* @note   for printf* @param  ch* @param  f* @retval ch*********************************************************************************************************************/
int fputc(int ch, FILE *f)
{UART_SendData(UART3, (uint8_t)ch);while (RESET == UART_GetFlagStatus(UART3, UART_FLAG_TXC)){}return (ch);
}#else/************************************************************************************************************************ @brief  redefine fputc function* @note   for printf* @param  ch* @param  f* @retval ch*********************************************************************************************************************/
int fputc(int ch, FILE *f)
{UART_SendData(UART2, (uint8_t)ch);while (RESET == UART_GetFlagStatus(UART2, UART_FLAG_TXC)){}return (ch);
}#endif
3.2、main.c
#include "main.h"int main(void)
{SysTick_Init();init_usart(115200);init_led();while (1){led1_tog();led2_tog();SysTick_Delay_ms(100);printf("mm32F5265_ob_printf_test!\r\n");}
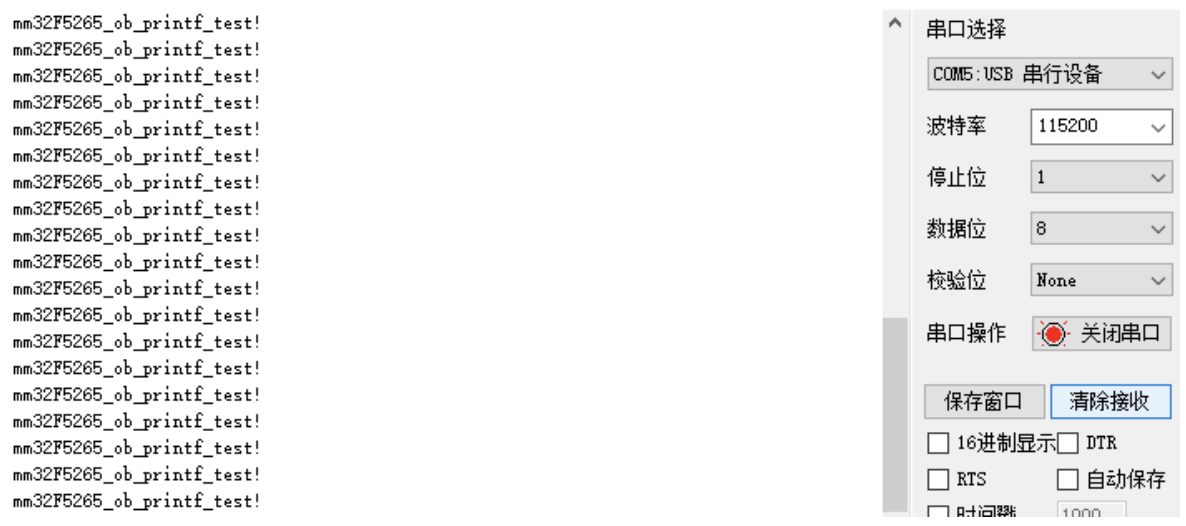
}四、运行结果
下载程序后,串口输出内容: