C++_哈希表
本篇文章是对C++学习的哈希表部分的学习分享
相信一定会对你有所帮助~
那咱们废话不多说,直接开始吧!
一、基础概念
1. 哈希核心思想:
- 哈希函数的作用:通过此函数建立一个Key与存储位置之间的映射关系。
- 理想目标:实现O(1)时间复杂度的查找
2.直接定址法
本质:⽤关键字计算出⼀个绝对位置或者相对位置
适用场景:Key 范围集中(如 [0,99])
二、关键问题与解决方案
1.哈希冲突:
-
根本原因:不同 Key 映射到同一位置
-
负载因子(Load Factor):
α = N/M(N为已映射存储的值,M为哈希表的大小)-
α↑→ 冲突概率↑,空间利用率↑ -
α↓→ 冲突概率↓,空间利用率↓
-
2. 哈希函数设计原则:
-
目标:均匀分布、减少冲突
-
除法散列法 / 除留余数法(重点):
-
h(key) = key % M -
M的选择:避免2^n或10^n,因为 key%M 会仅保留 key 的最后 n 位(二进制或十进制),导致不同 key 可能映射到同一位置。例如:
-
M=16(2^4)时,63(00111111)和31(00011111)的后4位均为 1111,哈希值均为15。
M=100(10^2)时,112和12312的后两位均为12,哈希值相同。
-
理论上建议选择远离 2^n 的质数作为哈希表大小 M,以减少冲突。但实践中可灵活优化,如 Java 的
HashMap采用 2^16 作为 M,通过位运算((key ^ (key >> 16)) & (M-1))替代取模,既提升效率又让高位参与计算,分散哈希值。核心在于均匀分布,而非机械套用理论。 -
其他方法(了解):乘法散列法、全域散列法
3. 非整数Key的处理
有些数据类型无法直接用整形的哈希函数,比如string字符串类型,这时我们便可以尝试将字符串转证书(BKDR哈希思路)
size_t hash = 0;
for (char c : str) {hash = hash * 131 + c;  // 质数 131 减少冲突
}
三、 冲突解决策略
1. 开放定址法
线性探测:
- 从发⽣冲突的位置开始,依次线性向后探测,直到寻找到下⼀个没有存储数据的位置为⽌,如果⾛ 到哈希表尾,则回绕到哈希表头的位置
- 冲突后公式:
hashi = (hash0 + i) % M - 缺点:易产生聚集(Clustering)
二次探测:
-
从发⽣冲突的位置开始,依次左右按⼆次⽅跳跃式探测,直到寻找到下⼀个没有存储数据的位置为 ⽌,如果往右⾛到哈希表尾,则回绕到哈希表头的位置;如果往左⾛到哈希表头,则回绕到哈希表 尾的位置
- 公式:
hashi = (hash0 ± i²) % M - 缓解聚集,但可能错过空位
删除优化:
-
状态标记(
EXIST/EMPTY/DELETE)
-
EXIST:当前槽位存储有效数据。 -
EMPTY:槽位从未使用过,查找时可终止探测。 -
DELETE:槽位数据已删除,但探测链不能中断(需继续向后查找)。
enum STATE
{EMPTY,DELETE,EXIST
};
扩容机制
1. 负载因子与扩容条件
-
负载因子(Load Factor):
α = 元素数量 / 哈希表大小 -
扩容阈值:当
α ≥ 0.7时扩容,以降低冲突概率。 -
扩容倍数:通常扩容为原大小的 2倍。
2. 质数大小的必要性
-
理论要求:哈希表大小
M应为质数,使key % M分布更均匀(减少聚集)。 -
问题:若初始
M是质数(如 7),2倍扩容后(14)不再是质数,可能引发更多冲突。
3.解决方案
-
SGI 版本的质数表:
预定义质数表:按近似2倍递增的质数序列扩容
//写出来的28个素数(每一个都差不多为前一个的两倍)
static const int __stl_num_primes = 28;
static const unsigned long __stl_prime_list[__stl_num_primes] =
{53,         97,         193,       389,       769,1543,       3079,       6151,      12289,     24593,49157,      98317,      196613,    393241,    786433,1572869,    3145739,    6291469,   12582917,  25165843,50331653,   100663319,  201326611, 402653189, 805306457,1610612741, 3221225473, 4294967291
};//取素数的函数
inline unsigned long __stl_next_prime(unsigned long n)
{const unsigned long* first = __stl_prime_list;const unsigned long* last = __stl_prime_list + __stl_num_primes;const unsigned long* pos = lower_bound(first, last, n);return pos == last ? *(last - 1) : *pos;
}-
扩容步骤:
-
当前大小为
53(质数),负载因子 ≥0.7 时,从表中取下一个质数97(≈53×1.8)。 -
重新哈希所有元素到新表。
-
-
例子:在插入函数中,发现负载因子>=0.7后的操作:
-
bool Insert(const pair<K, V>& kv)
{//Check(_tables);//如果负载因子 >=0.7 时就需要扩容了if ((double)_n / (double)_tables.size() >= 0.7){HashTable<K, V,Hash> newHT(__stl_next_prime(_tables.size()+1));for (size_t i = 0; i < _tables.size(); i++){if (_tables[i]._state == EXIST){newHT.Insert(_tables[i]._kv);}}_tables.swap(newHT._tables);return true;}
完整代码实现
-
#pragma once #include<iostream> #include<vector> using namespace std;//写出来的28个素数(每一个都差不多为前一个的两倍) static const int __stl_num_primes = 28; static const unsigned long __stl_prime_list[__stl_num_primes] = {53, 97, 193, 389, 769,1543, 3079, 6151, 12289, 24593,49157, 98317, 196613, 393241, 786433,1572869, 3145739, 6291469, 12582917, 25165843,50331653, 100663319, 201326611, 402653189, 805306457,1610612741, 3221225473, 4294967291 };//取素数的函数 inline unsigned long __stl_next_prime(unsigned long n) {const unsigned long* first = __stl_prime_list;const unsigned long* last = __stl_prime_list + __stl_num_primes;const unsigned long* pos = lower_bound(first, last, n);return pos == last ? *(last - 1) : *pos; }enum STATE {EMPTY,DELETE,EXIST };template<class K,class V> struct HashData {pair<K, V> _kv;STATE _state; };template<class K> struct HashFunc {size_t operator()(const K& key){return (size_t)key;} };//因为用string类型的数值做key的情况十分常见,但是在unordered_map中却没有在另外写一个仿函数 //是因为直接将HashFunc 特化 了 template<> struct HashFunc<string> {size_t operator()(const string& s){size_t hashi = 0;for (auto e : s){hashi += e;}return hashi;} };template<class K,class V,class Hash = HashFunc<K>> class HashTable { public://构造函数HashTable(size_t size = __stl_next_prime(0)):_n(0), _tables(size){}//将一些非整形的数值强转成整形一次方便映射关系的计算void Check(vector<HashData<K,V>>& table){double fuzai = _n / table.size();if (fuzai >= 0.7){cout << "负载过大" << endl;}else{cout << "负载正常" << endl;}}bool Insert(const pair<K, V>& kv){//Check(_tables);//如果负载因子 >=0.7 时就需要扩容了if ((double)_n / (double)_tables.size() >= 0.7){HashTable<K, V,Hash> newHT(__stl_next_prime(_tables.size()+1));for (size_t i = 0; i < _tables.size(); i++){if (_tables[i]._state == EXIST){newHT.Insert(_tables[i]._kv);}}_tables.swap(newHT._tables);return true;}Hash hs;size_t hash0 = hs(kv.first) % _tables.size();size_t hashi = hash0;size_t i = 1;//如果映射的位置已经被占用了while (_tables[hashi]._state == EXIST){hashi = (hashi + i) % _tables.size();++i;}_tables[hashi]._kv = kv;_tables[hashi]._state = EXIST;++_n;return true;}HashData<K,V>* Find(const K& key){Hash hs;size_t hash0 = hs(key) % _tables.size();size_t hashi = hash0;size_t i = 1;while (_tables[hashi]._state != EMPTY){if (_tables[hashi]._kv.first == key && _tables[hashi]._state != DELETE){return &_tables[hashi];}hashi = (hashi + i) % _tables.size();++i;}cout << " 找不到找不到 " ;return nullptr;}bool Erase(const K& key ){HashData<K, V>* ret = Find(key);if (ret){ret->_state = DELETE;cout << "成功删除!" << endl;return true;}else{cout << "删除失败奥" << endl;return false;}}private:vector<HashData<K, V>> _tables;size_t _n; }; -
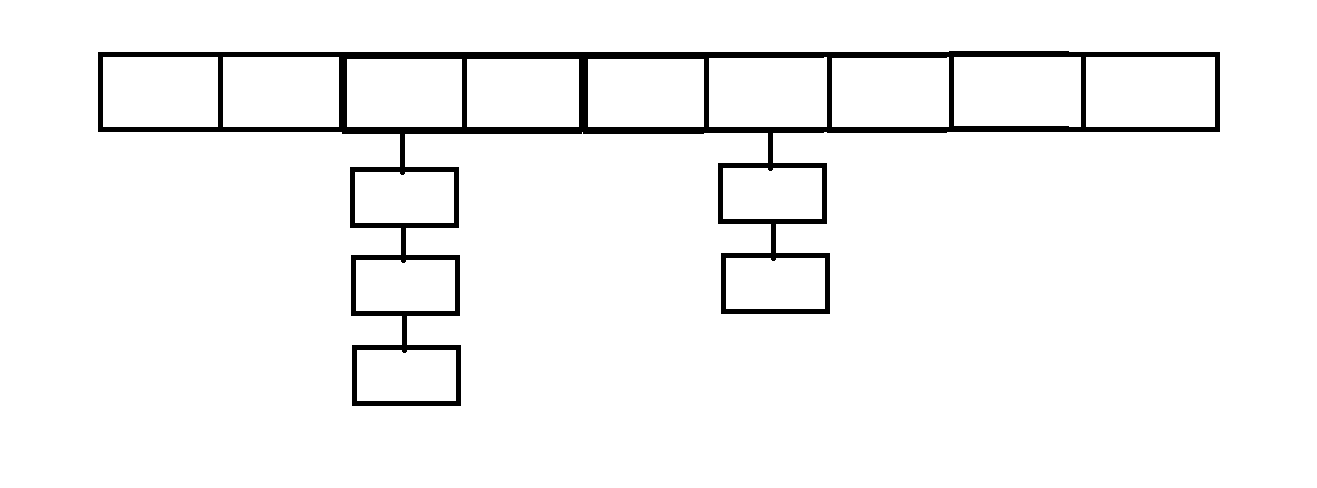
2.链地址法
-
核心思想:冲突位置挂链表(桶)
-
扩容时机:负载因子
α ≥ 1(STL 风格) -
极端场景优化:
-
链表过长 → 转红黑树(Java 8 HashMap 策略)
-
-
扩容技巧:
-
直接移动旧节点(避免重复创建):
-
// 旧节点重新映射到新表
cur->_next = newTable[hashi];
newTable[hashi] = cur;- 例子:在哈希桶版本的Insert函数中发现负载因子过大
-
bool Insert(const pair<K, V>& kv)
{if (_n == _tables.size()){vector<Node*> newTables(__stl_next_prime(0), nullptr);for (size_t i = 0; i < _tables.size(); i++){Node* cur = _tables[i];while (cur){Node* next = cur->_next;size_t hashi = cur->_kv.first % newTables.size();cur->_next = newTables[hashi];newTables[hashi] = cur;cur = next;}_tables[i] = nullptr;}_tables.swap(newTables);}size_t hashi = kv.first % _tables.size();Node* newnode = new Node(kv);newnode->_next = _table[hashi];_tables[hashi] = newnode;++_n;return true;
}
完整代码实现
-
template<class K, class V>
struct HashNode
{pair<K, V> _kv;HashNode* _next;HashNode(const pair<K,V>& key):_kv(key),_next(nullptr){}
};template<class K,class V>
class HashTable
{typedef HashNode<K, V> Node;
public:HashTable(size_t size = __stl_next_prime(0)):_tables(size,nullptr){}~HashTable(){for (size_t i = 0; i < _tables.size(); i++){Node* cur = _tables[i];while (cur){Node* next = cur->_next;delete cur;cur = next;}_tables[i] = nullptr;}}bool Insert(const pair<K, V>& kv){if (_n == _tables.size()){vector<Node*> newTables(__stl_next_prime(0), nullptr);for (size_t i = 0; i < _tables.size(); i++){Node* cur = _tables[i];while (cur){Node* next = cur->_next;size_t hashi = cur->_kv.first % newTables.size();cur->_next = newTables[hashi];newTables[hashi] = cur;cur = next;}_tables[i] = nullptr;}_tables.swap(newTables);}size_t hashi = kv.first % _tables.size();Node* newnode = new Node(kv);newnode->_next = _table[hashi];_tables[hashi] = newnode;++_n;return true;}Node* Find(const K& key){size_t hashi = key % _tables.size();Node* cur = _tables[hashi];while (cur){if (cur->_kv.first == key){return cur;}cur = cur->_next;}return nullptr;}bool Erase(const K& key) {size_t hashi = key % _tables.size();Node* prev = nullptr;Node* cur = _tables[hashi];while (cur){if (cur->_kv.first == key){if (prev == nullptr){cur->_next = _tables[hashi];}else{prev->_next = cur->_next;}delete cur;return true;}prev = cur;cur = cur->_next;}return false;}
private:vector<Node*> _tables;size_t _n = 0;
};
那么本次关于哈希表的知识分享就此结束了~
非常感谢你能够看到这里~
如果感觉对你有些许的帮助也请给我三连 这会给予我莫大的鼓舞!
之后依旧会继续更新C++学习分享
那么就让我们
下次再见~