Python----目标检测(YOLO数据集)
一、YOLO数据集
YOLO(You Only Look Once)是一种实时目标检测系统,其数据集格式 与 COCO 数据集格式不同。YOLO 数据集格式相对简单,主要包括图像文 件和对应的标签文件。
二、YOLO 数据集结构
YOLO 数据集的目录结构通常如下:
/dataset_root/
├── images/
│   ├── train/
│   │   ├── img1.jpg
│   │   ├── img2.jpg
│   │   └── ...
│   ├── val/
│   │   ├── img101.jpg
│   │   ├── img102.jpg
│   │   └── ...
│   └── test/  (可选)
│       ├── img201.jpg
│       └── ...
├── labels/
│   ├── train/
│   │   ├── img1.txt
│   │   ├── img2.txt
│   │   └── ...
│   ├── val/
│   │   ├── img101.txt
│   │   ├── img102.txt
│   │   └── ...
│   └── test/  (如果有测试集标签)
│       ├── img201.txt
│       └── ...
└── data.yaml  (数据集配置文件)
1. 图像文件:
图像通常为 .jpg 或 .png 格式,存储在一个单独的目录中。
2. 标签文件:
每个图像有一个对应的标签文件,文件扩展名为 .txt。
标签文件与图像文件同名,但扩展名不同。
每个标签文件包含多个标注,每个标注对应图像中的一个对象。
21、标签文件详细说明
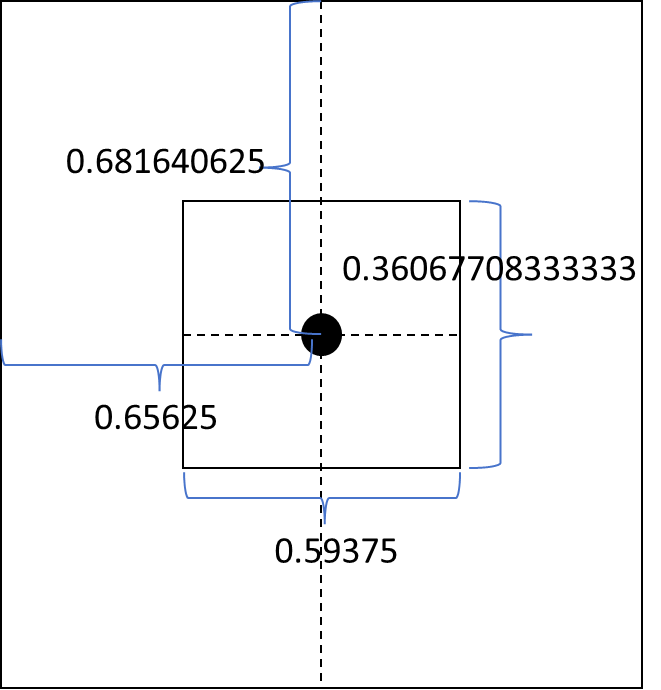
 每行表示一个对象,行内容格式为:<object-class><x_center><y_center> <width> <height>。
<object-c1ass>:对象的类别,从0开始的整数。例如,类别0可能代表"person",类别1可能代表"bicycle"等。
<x_center>:边界框中心的x坐标,相对于图像宽度进行归一化,取值范围 [0, 1]。
<y_center>:边界框中心的y坐标,相对于图像高度进行归一化,取值范围[0,1]。
<width>:边界框的宽度,相对于图像宽度进行归一化,取值范围[0,1]。
<height>:边界框的高度,相对于图像高度进行归一化,取值范围 [0,1].
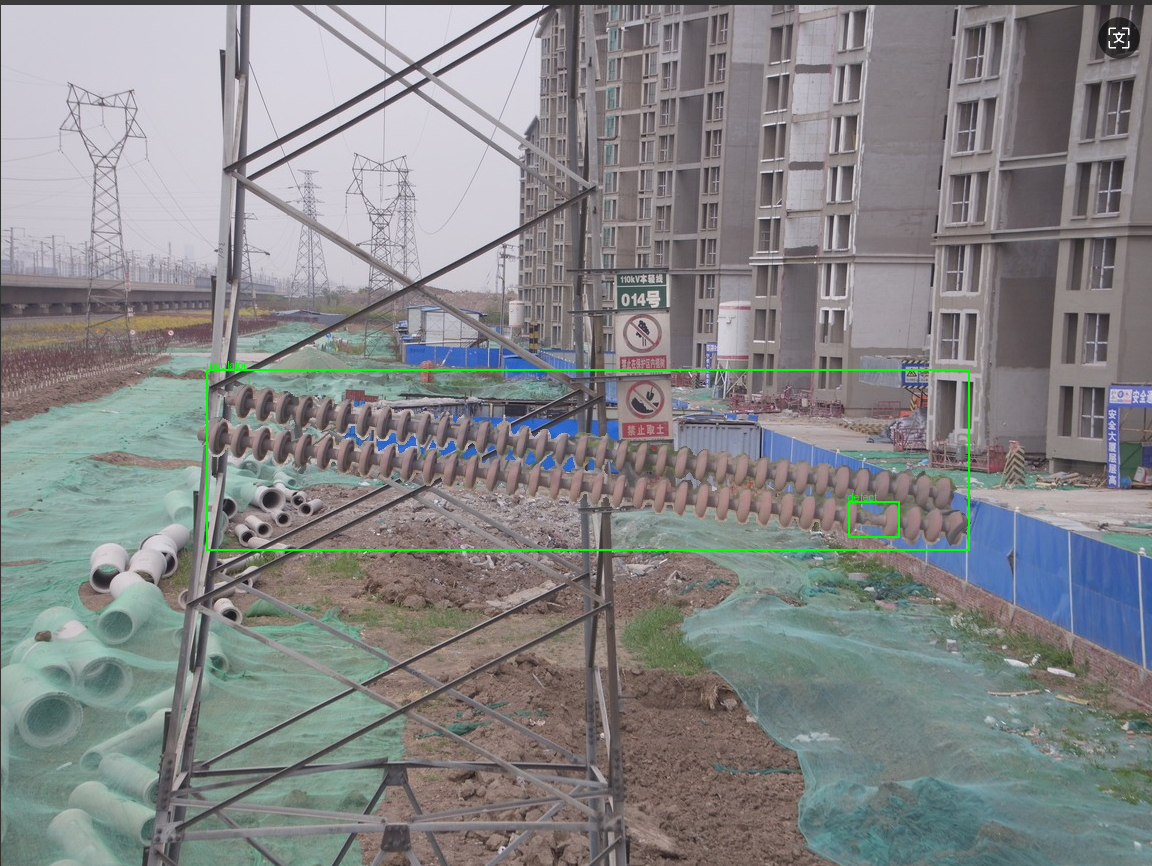
假设有一张图像 image1.jpg,其对应的标签文件为 文件可能包含以下内容:
0 0.5 0.5 0.2 0.3
1 0.3 0.7 0.1 0.2
这表示图像中有两个对象:
1. 第一个对象的类别为 0,中心位于图像的 (0.5, 0.5) 处,宽度为图像宽 度的 20%,高度为图像高度的 30%。
2. 第二个对象的类别为 1,中心位于图像的 (0.3, 0.7) 处,宽度为图像宽 度的 10%,高度为图像高度的 20%。
三、YOLOV8的数据结构
在YOLOV8中,除了图像和标签文件外,还需要一个配置文件 mydata.yaml 来定义数据集的路径、类别和其他相关信息。这个 YAML 文 件用于配置训练和验证过程中的数据集信息。
# peach
train: dataset/train
val: dataset/valid
test: dataset/test # Classes
names:0: insulator1: defect
四、示例
import os
from PIL import Image, ImageDraw, ImageFont  # 导入PIL库中相关模块
import yaml# 读取mydata.yaml配置
with open('./dataset/mydata.yaml', 'r', encoding='utf-8') as file:config = yaml.safe_load(file)train_path = config['train']
val_path = config['val']
test_path = config['test']# 类别名称映射
class_names = config['names']# 数据集路径
img_path = os.path.join(train_path, "images")
label_path = os.path.join(train_path, "labels")
print(img_path)# 处理前1张图像
for img_file in os.listdir(img_path)[:1]:if img_file.endswith('.jpg') or img_file.endswith('.png'):print(os.path.join(img_path, img_file))# 打开图像img = Image.open(os.path.join(img_path, img_file))draw = ImageDraw.Draw(img)width, height = img.size# 打开对应的标签文件label_file = os.path.join(label_path, img_file.replace('.jpg', '.txt').replace('.png', '.txt'))with open(label_file, 'r') as f:lines = f.readlines()for line in lines:parts = line.strip().split()class_id = int(parts[0])x_center, y_center, bbox_width, bbox_height = map(float, parts[1:])# 计算边界框的坐标x_min = int((x_center - bbox_width / 2) * width)y_min = int((y_center - bbox_height / 2) * height)x_max = int((x_center + bbox_width / 2) * width)y_max = int((y_center + bbox_height / 2) * height)# 绘制边界框draw.rectangle([(x_min, y_min), (x_max, y_max)], outline=(0, 255, 0), width=2)# 绘制类别标签class_name = class_names[class_id]draw.text((x_min, y_min - 10), class_name, fill=(0, 255, 0))# 显示图像img.show()