基于 art 下的类加载机制,实现函数抽取壳
版权归作者所有,如有转发,请注明文章出处:https://cyrus-studio.github.io/blog/
ART 下类加载流程
类加载的时机
1、隐式加载:
-
创建类的实例
-
访问类的静态变量,或者为静态变量赋值
-
调用类的静态方法
-
使用反射方式来强制创建某个类或接口对应的 java.lang.Class 对象
-
初始化某个类的子类
2、显示加载:
-
使用 loadClass() 加载
-
使用 forName() 加载
两者又有所不同。
类加载的流程
loadClass 和 forName 也是有区别的;
loadClass 只完成了第一步,就是加载;
Class.forName 是完成了3步,加载、链接和初始化。
| 阶段 | 发生了什么 |
|---|---|
| 加载 | 字节码文件 -> Class 对象 |
| 验证 | 检查字节码合法性 |
| 准备 | 静态变量分配内存,默认值 |
| 解析 | 符号引用 → 真实引用 |
| 初始化 | 调用 <clinit> 函数,static 代码块执行,静态变量赋值 |
一个类从“加载” 到 “可以使用” 的完整生命周期:加载(Loading)→ 连接(Linking)→ 初始化(Initialization)。
加载(Loading)↓
连接(Linking)→ 验证(Verification)→ 准备(Preparation)→ 解析(Resolution)↓
初始化(Initialization)↓
使用(Use)↓
卸载(Unload)
相关文章:Android 下的 ClassLoader 与 双亲委派机制
ClassLinker::LoadMethod
ClassLinker::LoadMethod 是 ART 中负责将 dex 文件中的方法信息解析并填充到 ArtMethod 结构体中的关键函数,是抽取壳的实现基础。
从 ClassLoader.loadClass() 开始,逐步分析 ART 下类加载的完整流程。

https://cs.android.com/android/platform/superproject/main/+/main:libcore/ojluni/src/main/java/java/lang/ClassLoader.java;l=557
ClassLoader 的 loadClass(String name, boolean resolve) 方法的核心实现,它正是 双亲委派机制(Parent Delegation Model) 的体现。
protected Class<?> loadClass(String name, boolean resolve)throws ClassNotFoundException
{// 1️⃣ 首先检查类是否已经加载过Class<?> c = findLoadedClass(name);if (c == null) {try {if (parent != null) {c = parent.loadClass(name, false); // 2️⃣ 向父类加载器请求加载} else {c = findBootstrapClassOrNull(name); // 3️⃣ 否则用 BootstrapClassLoader}} catch (ClassNotFoundException e) {// ClassNotFoundException thrown if class not found// from the non-null parent class loader}if (c == null) {// 4️⃣ 父加载器找不到,当前类加载器自己尝试加载c = findClass(name);}}return c;
}
https://cs.android.com/android/platform/superproject/main/+/main:libcore/ojluni/src/main/java/java/lang/ClassLoader.java;l=617
https://cs.android.com/android/platform/superproject/main/+/main:libcore/dalvik/src/main/java/dalvik/system/BaseDexClassLoader.java;l=245
ClassLoader.loadClass → ClassLinker::LoadMethod 调用路径
ClassLoader.loadClass(name)↓
BaseDexClassLoader.findClass(name)↓
DexPathList.findClass(name)↓
Element.findClass(name)↓
DexFile.loadClassBinaryName(name)↓
DexFile.defineClass(name)↓
DexFile.defineClassNative(name)↓
→ ClassLinker::DefineClass(Thread* self, const char* descriptor, size_t hash, Handle<mirror::ClassLoader> class_loader, const DexFile& dex_file, const dex::ClassDef& dex_class_def)→ ClassLinker::LoadClass(Thread* self, const DexFile& dex_file, const dex::ClassDef& dex_class_def, Handle<mirror::Class> klass)→ LoadField(field, klass, ...)→ LoadMethod(dex_file, method, klass, art_method)  ←🎯目标函数
https://cs.android.com/android/platform/superproject/+/android-10.0.0_r47:art/runtime/native/dalvik_system_DexFile.cc;l=456
https://cs.android.com/android/platform/superproject/+/android-10.0.0_r47:art/runtime/class_linker.cc;l=3094
https://cs.android.com/android/platform/superproject/+/android-10.0.0_r47:art/runtime/class_linker.cc;l=3732
ClassLinker::LoadMethod 真正进入到对类中 java 函数对应的 ArtMethod 对象的初始化,ArtMethod 包含了当前指向内存中 CodeItem 的偏移
调用 SetCodeItemOffset 方法设置 ArtMethod 中 CodeItem 的偏移
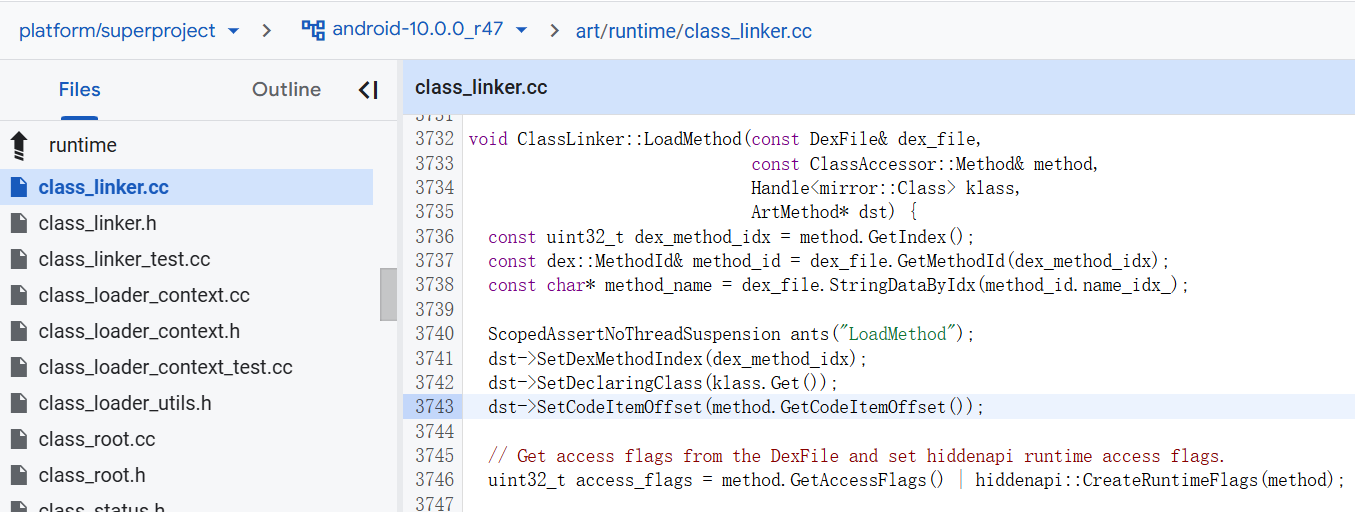
https://cs.android.com/android/platform/superproject/+/android-10.0.0_r47:art/runtime/class_linker.cc;l=3743
如果拿到了 CodeItemOffset 我们是不是就可以通过打补丁的方式恢复被抽取的 CodeItem 了。
hook execve 函数,禁用 dex2oat
ART 下实现抽取壳的另一个难点:dex2oat 编译流程。
如果 dex2oat 对抽取的 dex 进行编译生成了 oat 文件,那么我们动态修改的 dex 中的 smali 指令流就不会生效!
因此,ART 下的抽取壳首要解决的就是禁用掉 dex2oat!怎么禁用掉呢?
-
通过 hook dex2oat 调用来禁用 dex2oat;
-
或者直接使用 InMemoryDexClassLoader 。
怎么禁用掉 dex2oat 的编译过程?
根本原理:阻断 DexClassLoader 加载 dex 文件的一些关键流程即可!
比如:在 8.0 中的 GenerateOatFileNoChecks 函数最终通过 libc 当中的 execve 函数完成对 dex2oat 程序的调用,因此,可以通过 hook 该函数,阻止 dex2oat 对 dex 的编译流程。
通过 InlineHook 禁用掉 dex2oat,参考:Android PLT hook 与 Inline hook
execve 函数源码:
#include <unistd.h>
#include "syscall.h"int execve(const char *path, char *const argv[], char *const envp[])
{
/* do we need to use environ if envp is null? */
return syscall(SYS_execve, path, argv, envp);
}
https://cs.android.com/android/platform/superproject/+/android10-release:bionic/libc/include/unistd.h;l=95
https://cs.android.com/android/platform/superproject/main/+/main:external/musl/src/process/execve.c
dex2oat 是 Android ART 在安装 APK 或运行时优化 dex 时调用的工具,通常通过 execve 执行。我们可以 Hook 掉这个 execve,当它的第一个参数包含 dex2oat 时直接返回一个错误码(如 -1),从而实现 跳过 dex2oat 执行。
cyrus_studio_hook.cpp
#include <unistd.h>
#include <android/log.h>
#include <jni.h>
#include <string>
#include <stddef.h>
#include "shadowhook.h"#define LOG_TAG "cyrus_studio_hook"
#define LOGI(...) __android_log_print(ANDROID_LOG_INFO, LOG_TAG, __VA_ARGS__)
#define LOGW(...) __android_log_print(ANDROID_LOG_WARN, LOG_TAG, __VA_ARGS__)
#define LOGE(...) __android_log_print(ANDROID_LOG_ERROR, LOG_TAG, __VA_ARGS__)// 原始 execve 函数指针
int (*orig_execve)(const char *__file, char *const *__argv, char *const *__envp);// 替代 execve 实现
int my_execve(const char *__file, char *const *__argv, char *const *__envp) {LOGI("execve called: %s", __file);if (__file && strstr(__file, "dex2oat")) {LOGW("Blocked dex2oat execution: %s", __file);// 返回失败,模拟 dex2oat 调用失败return -1;}// 调用原始 execvereturn orig_execve(__file, __argv, __envp);
}extern "C"
JNIEXPORT void JNICALL
Java_com_cyrus_example_hook_CyrusStudioHook_hookExecve(JNIEnv *, jclass) {void *handle = shadowhook_hook_sym_name("libc.so",  // 函数所在模块"execve", // 要 hook 的符号名reinterpret_cast<void *>(my_execve),reinterpret_cast<void **>(&orig_execve));if (handle != nullptr) {LOGI("Successfully hooked execve");} else {LOGW("Failed to hook execve");}
}
kotlin 代码如下:
package com.cyrus.example.hookimport com.bytedance.shadowhook.ShadowHook
import com.bytedance.shadowhook.ShadowHook.ConfigBuilderobject CyrusStudioHook {init {System.loadLibrary("cyrus_studio_hook") // 加载 native 实现}fun init(){// 初始化 ShadowHookShadowHook.init(ConfigBuilder()// 设置 hook 模式:// UNIQUE 模式:同一个 hook 点只能被 hook 一次(unhook 后可以再次 hook)。// SHARED 模式:可对同一个 hook 点并发执行多个 hook 和 unhook,彼此互不干扰。.setMode(ShadowHook.Mode.UNIQUE)// 启用调试日志,方便开发阶段查看 hook 的行为.setDebuggable(true)// 启用 hook 记录功能,可以记录每一次 hook 的详细信息,开发调试有用(建议发布时设为 false).setRecordable(true)// 构建配置对象.build())}@JvmStaticexternal fun hookExecve()
}
执行 hookExecve() 方法,日志输出如下:
2025-05-07 00:14:51.790 21783-21783 shadowhook_tag          com.cyrus.example                    I  shadowhook: hook_sym_name(libc.so, execve, 0x7a178a9874) ...
2025-05-07 00:14:51.790 21783-21783 shadowhook_tag          com.cyrus.example                    I  exit: alloc out library, exit 7aaa27b020, pc 7aabaa5f70, distance 182af50, range [-8000000, 7fffffc]
2025-05-07 00:14:51.790 21783-21783 shadowhook_tag          com.cyrus.example                    I  a64 rewrite: type 0, inst d2801ba8
2025-05-07 00:14:51.790 21783-21783 shadowhook_tag          com.cyrus.example                    I  a64: hook (WITH EXIT) OK. target 7aabaa5f70 -> exit 7aaa27b020 -> new 7a178a9874 -> enter 7aaa2e7200 -> remaining 7aabaa5f74
2025-05-07 00:14:51.790 21783-21783 shadowhook_tag          com.cyrus.example                    I  switch: hook in UNIQUE mode OK: target_addr 7aabaa5f70, new_addr 7a178a9874
2025-05-07 00:14:51.791 21783-21783 shadowhook_tag          com.cyrus.example                    I  shadowhook: hook_sym_name(libc.so, execve, 0x7a178a9874) OK. return: 0x7aacaa2a80. 0 - OK
2025-05-07 00:14:51.791 21783-21783 cyrus_studio_hook       com.cyrus.example                    I  Successfully hooked execve
Successfully hooked execve
函数抽取
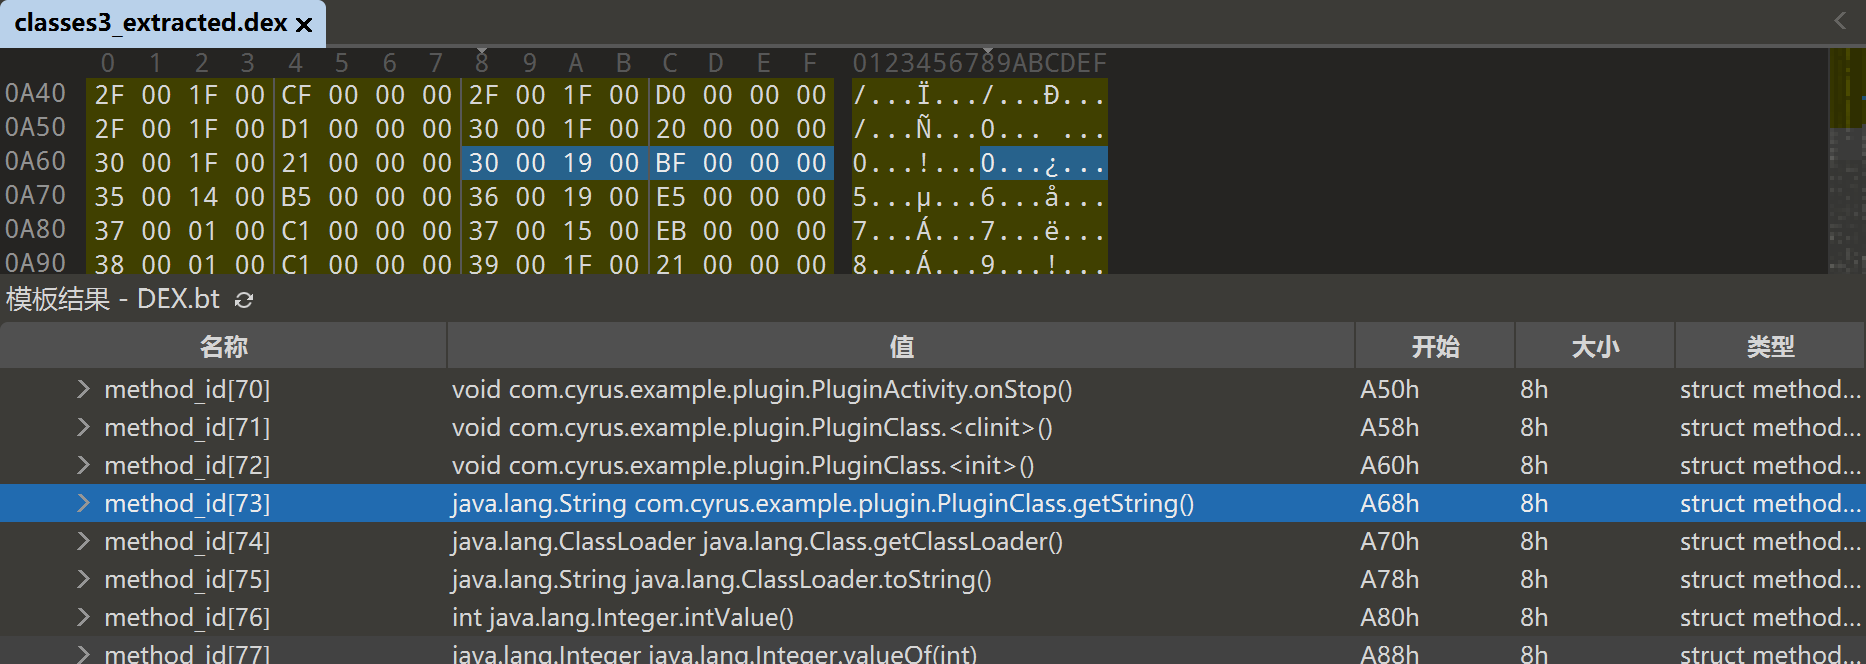
1. 找到目标函数的 CodeItem
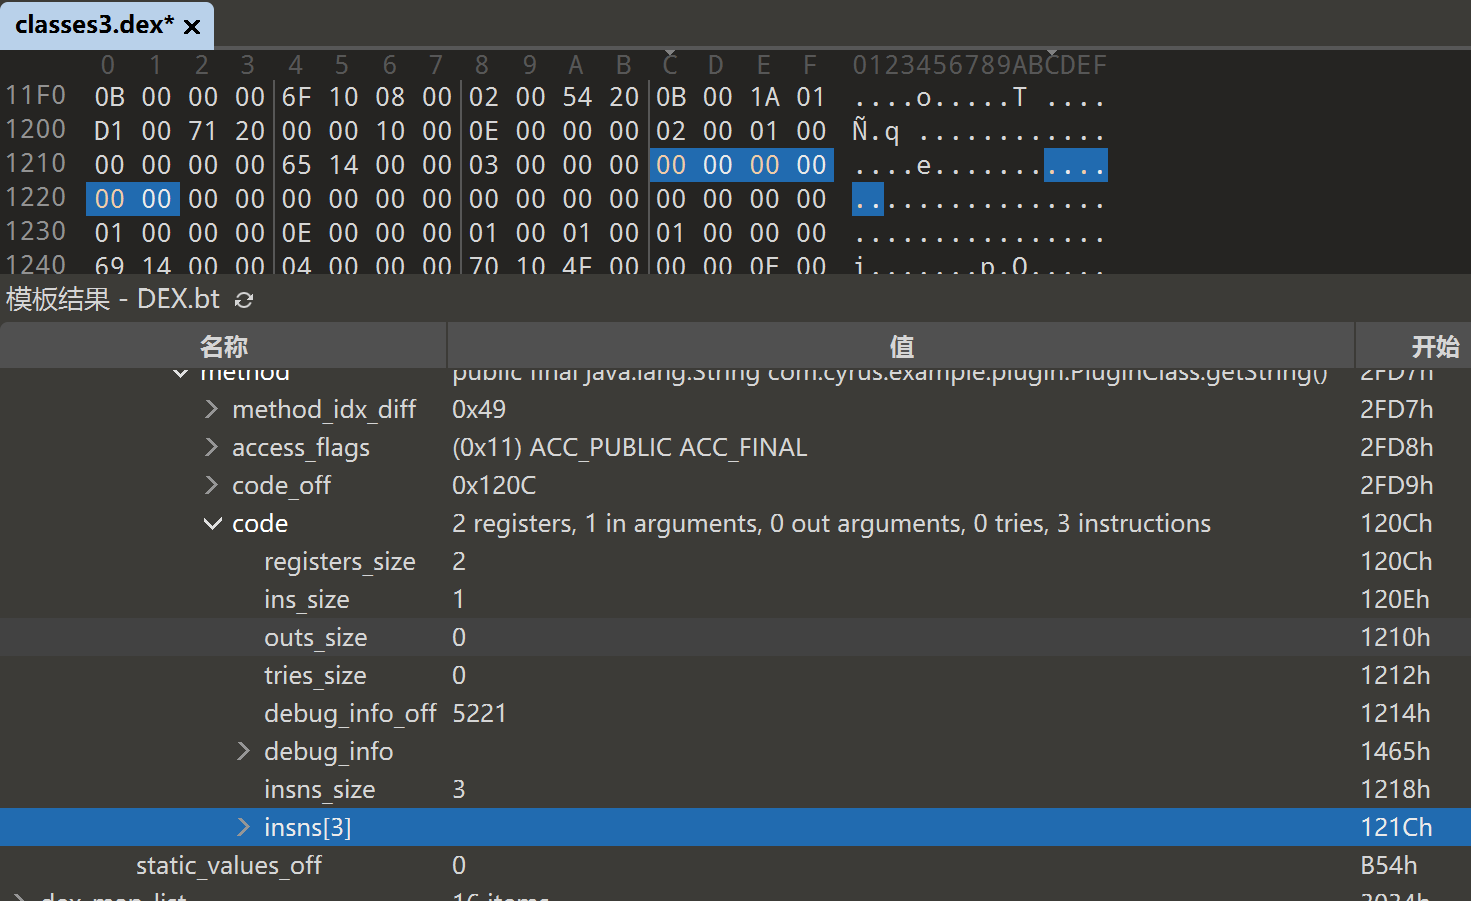
比如目标函数是 dex 中 PluginClass 的 getString 方法
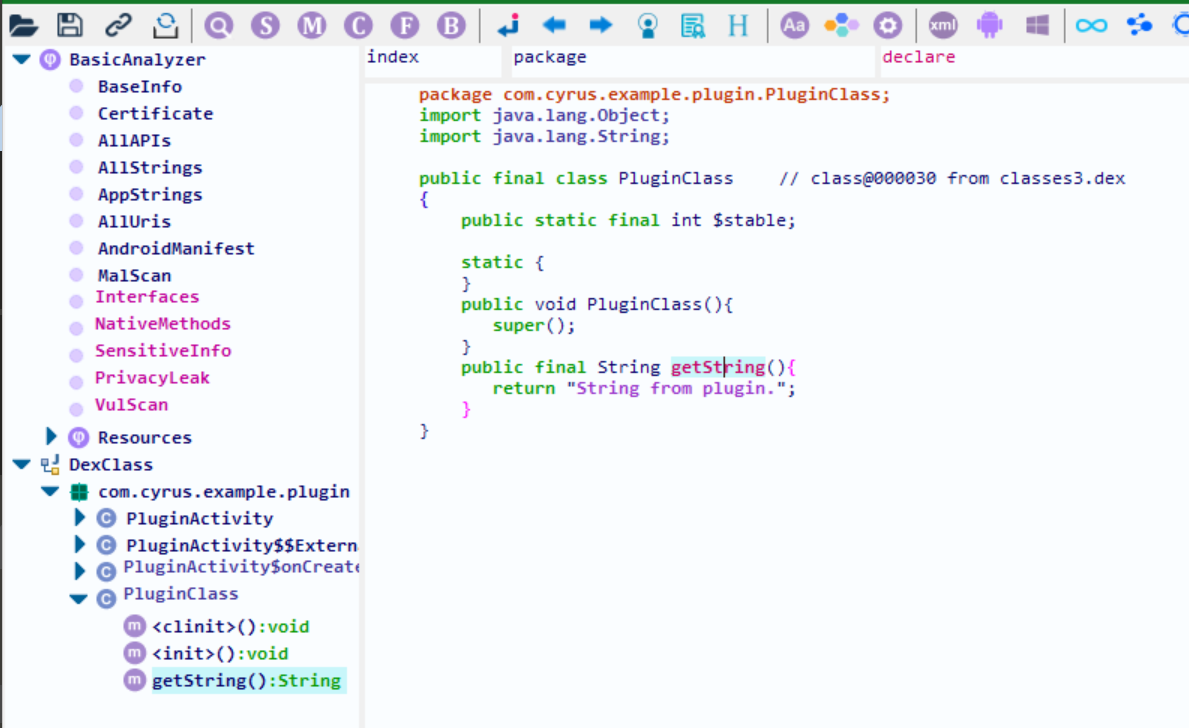
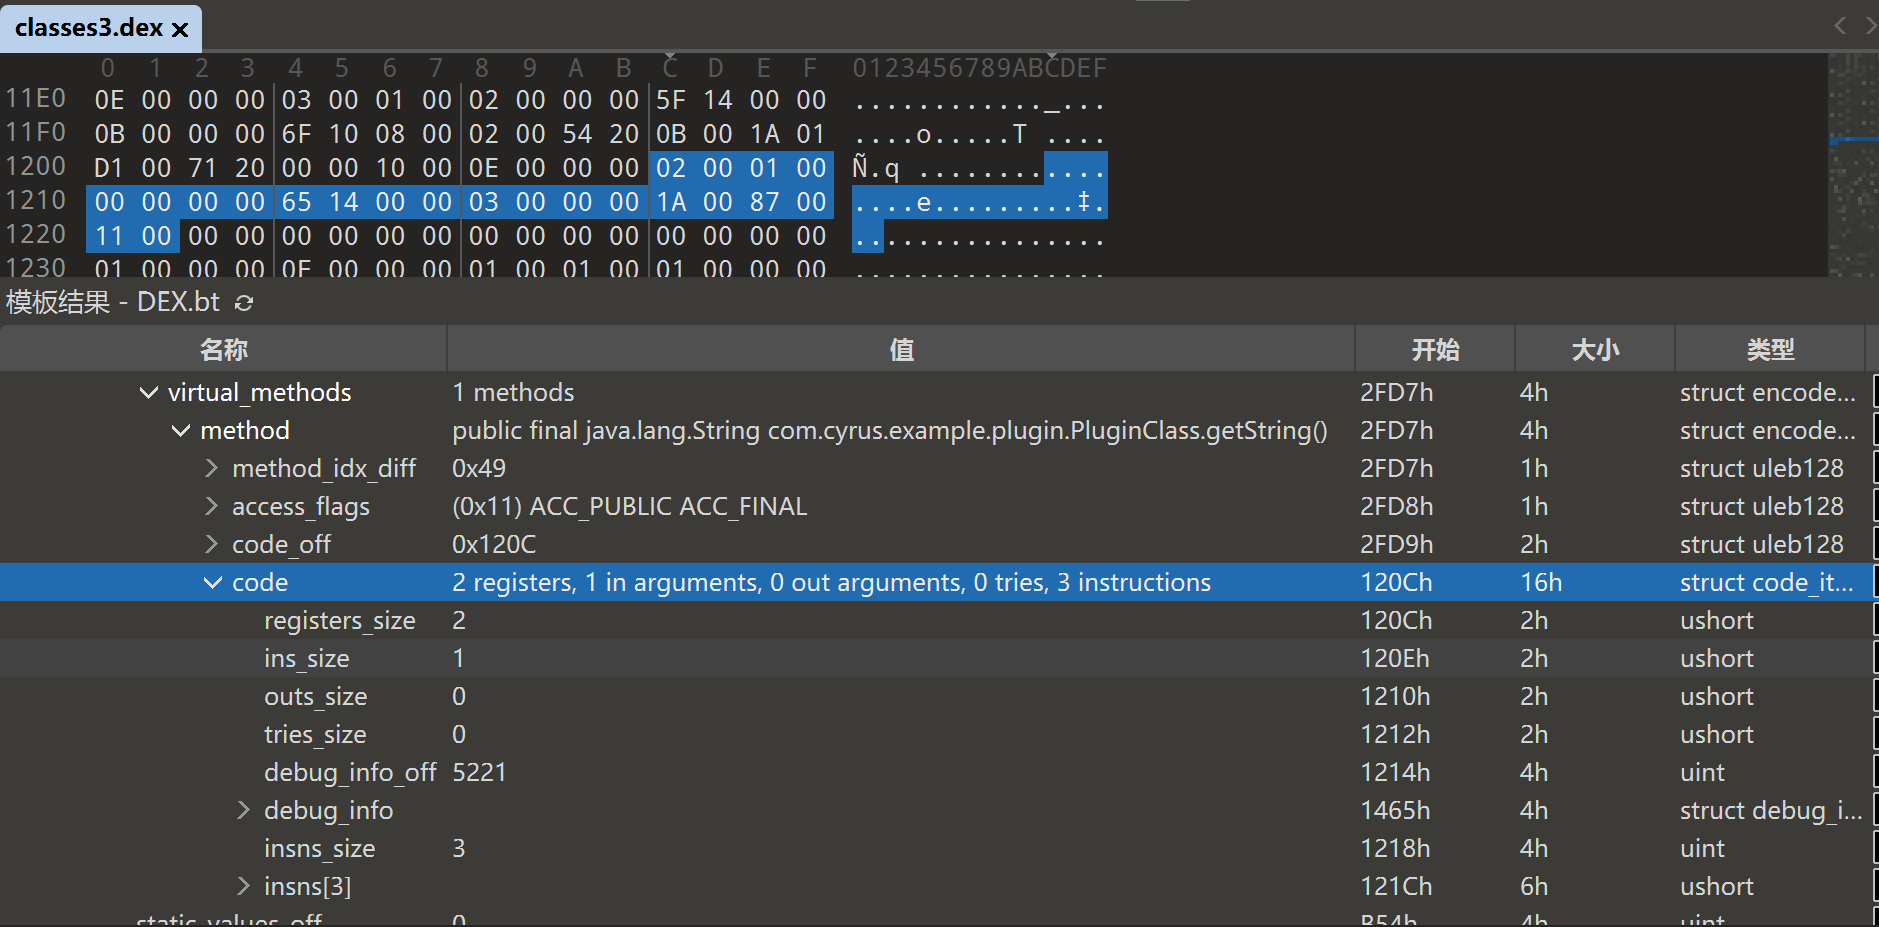
使用 010editor 打开 dex,应用 DEX 模板,找到 CodeItem
2. 编辑 CodeItem
CodeItem 是 ART 中表示 DEX 方法字节码、寄存器布局和调试信息的结构体,包含方法运行所需的所有核心元数据。
ArtMethod 通过 GetCodeItem 方法获取到 CodeItem
const dex::CodeItem* GetCodeItem() REQUIRES_SHARED(Locks::mutator_lock_);
https://cs.android.com/android/platform/superproject/+/android10-release:art/runtime/art_method.h;l=592
Android 源码中 CodeItem 的结构定义如下:
struct CodeItem : public dex::CodeItem {// DEX 字节码必须按照 4 字节对齐static constexpr size_t kAlignment = 4;private:// 方法使用的虚拟寄存器数量(包括本地变量和参数)uint16_t registers_size_;// 方法的入参占用的寄存器数量uint16_t ins_size_;// 方法调用其他方法时所需的最大出参寄存器数量(即调用其他方法时的参数空间)uint16_t outs_size_;// try-catch 块的数量。如果不为 0,则在 insns_ 后紧跟 try_item 和 catch_handler。uint16_t tries_size_;// 调试信息在 DEX 文件中的偏移,指向 debug_info 结构// 包括局部变量名、源码行号映射等uint32_t debug_info_off_;// 指令(insns_)数组长度,单位是 2 字节(code units)// 每条指令通常是 2 字节对齐,有些指令占用多个 code unituint32_t insns_size_in_code_units_;// 指令数组(实际大小是可变的,柔性数组)// 存放 DEX 字节码指令,insns_size_in_code_units_ 表示其长度uint16_t insns_[1];
};
https://cs.android.com/android/platform/superproject/+/android10-release:art/libdexfile/dex/standard_dex_file.h;l=35
https://cs.android.com/android/platform/superproject/+/android10-release:art/libdexfile/dex/compact_dex_file.h;l=87
CodeItem 前 16 字节是固定结构
| 字节偏移 | 字段名 | 含义说明 | 大小(字节) |
|---|---|---|---|
| 0x00 | registers_size_ | 方法使用的寄存器数(本地变量 + 参数) | 2 |
| 0x02 | ins_size_ | 方法参数占用的寄存器数(入参) | 2 |
| 0x04 | outs_size_ | 调用其他方法所需的最大出参寄存器数(临时参数空间) | 2 |
| 0x06 | tries_size_ | try-catch 块数量,非 0 时表示有异常处理结构 | 2 |
| 0x08 | debug_info_off_ | 调试信息在 DEX 文件中的偏移 | 4 |
| 0x0C | insns_size_in_code_units_ | 指令数组长度(单位为 2 字节 code unit) | 4 |
| 共计 | 16 字节 |
CodeItem 前 16 字节是方法的执行元信息,后面的 insns_ 是变长的字节码数组,长度由 insns_size_in_code_units_ 决定,之后可能还有异常处理相关结构(try_items 和 catch_handlers)。
从 GDA 反汇编信息 insnsSize 3 (16-bit) 可以知道,函数指令为 6 个字节。

前16个字节是固定的,后 6 个字节才是指令部分,所以在 010editor 中看到 CodeItem 是 22 个字节
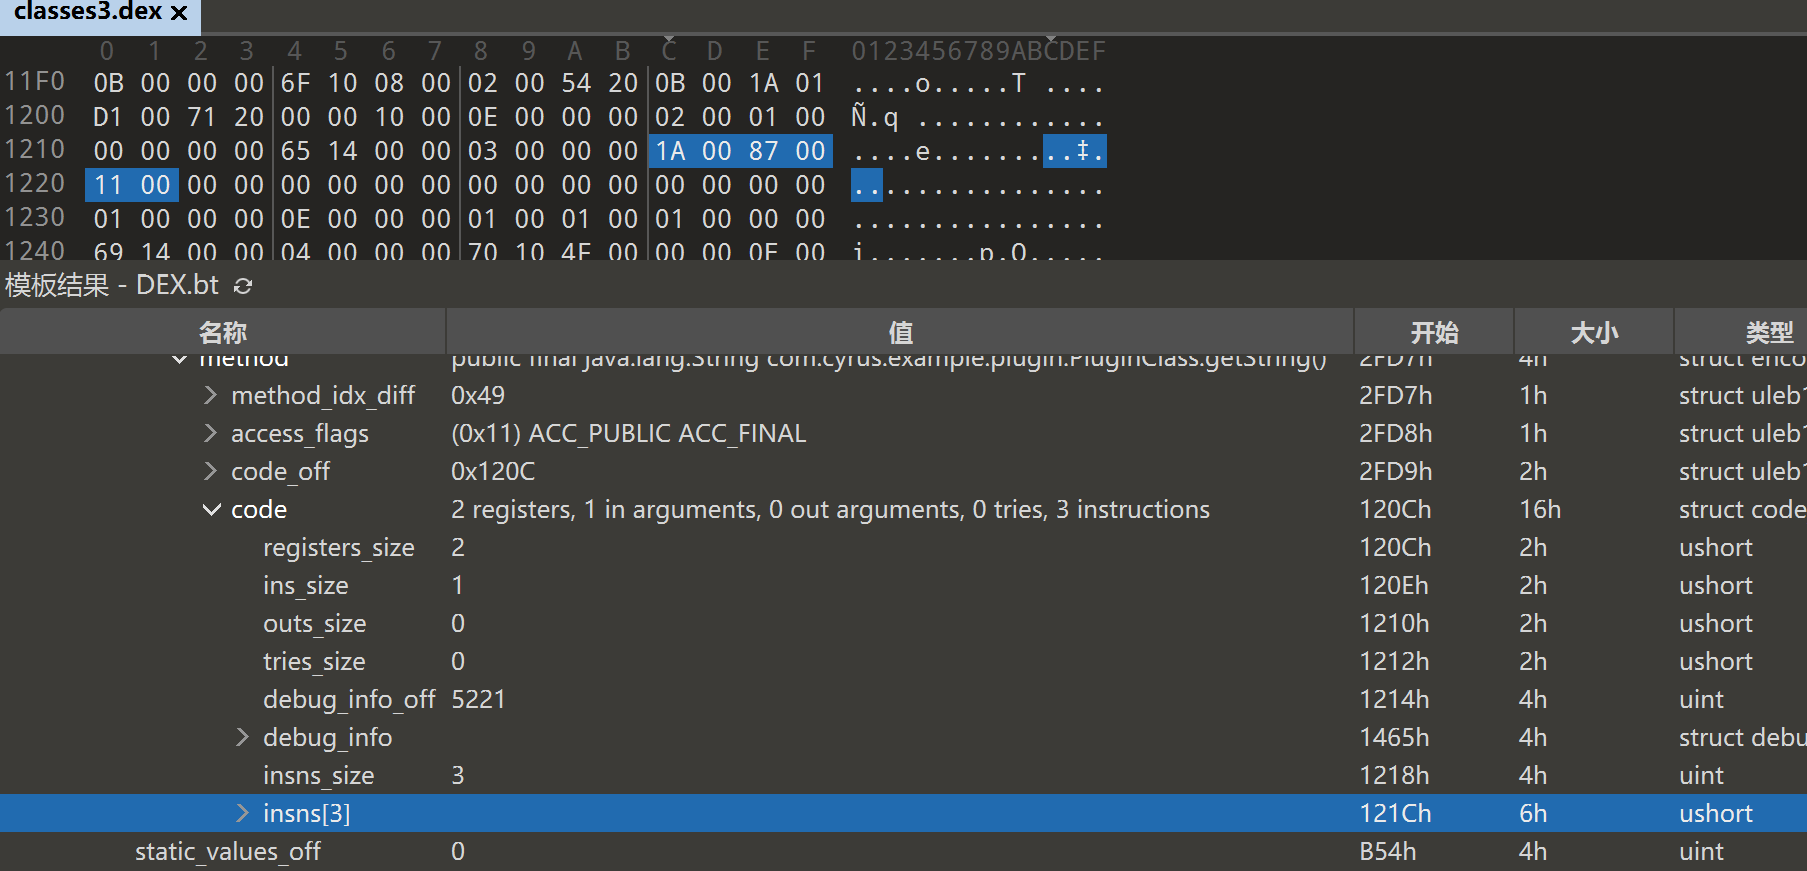
把 dex 中 目标函数指令流复制出来
1A 00 87 00 11 00
把 dex 中 目标函数指令流全改成 0,相当于把函数的指令流 nop 掉了
修改后另存为 classes3_extracted.dex
3. 修复 cheksum
但是这样改完后 dex 的 cheksum 会校验不合法
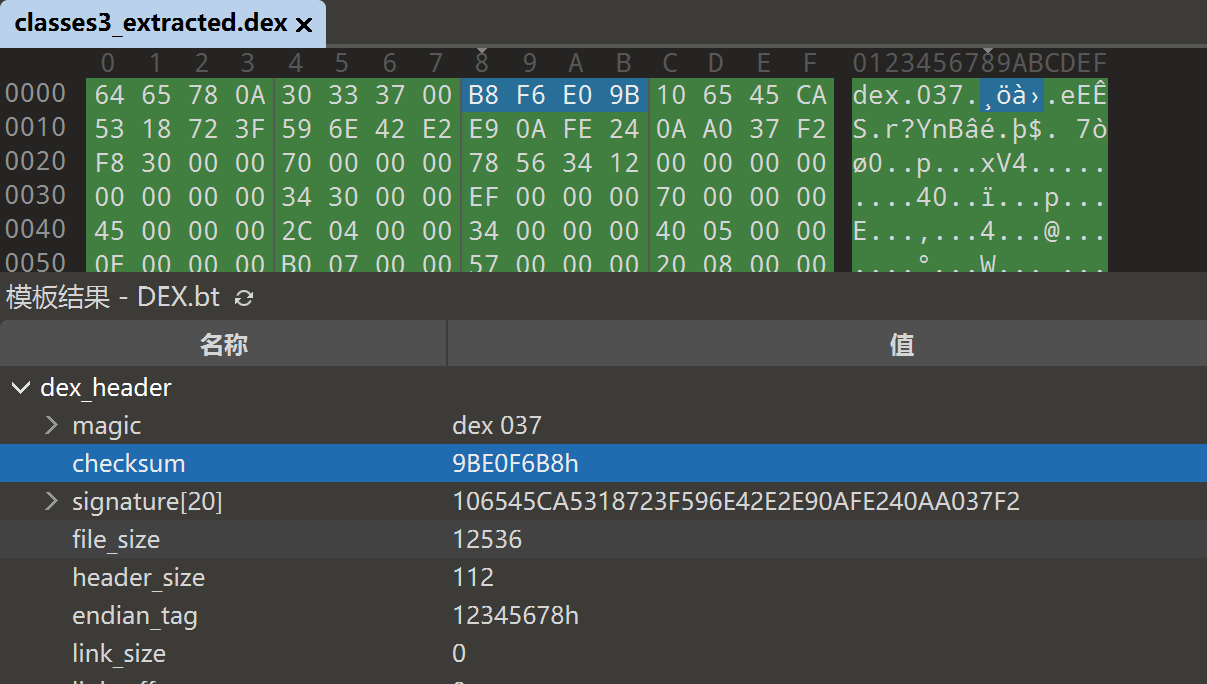
使用 python 脚本重新计算一下 checksum
#!/usr/bin/python
# -*- coding: utf-8 -*-def calculate_vars(src_bytes, var_a, var_b):a = var_ab = var_bfor ch in src_bytes:a = (a + ch) % 65521b = (b + a) % 65521return [a, b]def get_checksum(a, b):return (b << 16) + adef write_checksum(filename, checksum):with open(filename, 'rb+') as f:f.seek(8)f.write(checksum.to_bytes(4, byteorder='little'))if __name__ == '__main__':filename = 'classes3_extracted.dex'with open(filename, 'rb') as f:f.seek(0x0C)  # 跳过头部前 12 字节var_a = 1var_b = 0checksum = 0reached_eof = Falsewhile True:src_bytes = []for _ in range(1024):  # 每次读取 1024 字节ch = f.read(1)if not ch:reached_eof = Truebreakch = int.from_bytes(ch, byteorder='big')src_bytes.append(ch)var_a, var_b = calculate_vars(src_bytes, var_a, var_b)if reached_eof:checksum = get_checksum(var_a, var_b)breakprint('[*] DEX FILENAME: ' + filename)print('[+] CheckSum = ' + hex(checksum))write_checksum(filename, checksum)print('[+] CheckSum written to offset 0x08.')
输出如下:
[*] DEX FILENAME: classes3_extracted.dex
[+] CheckSum = 0x26fff606
[+] CheckSum written to offset 0x08.
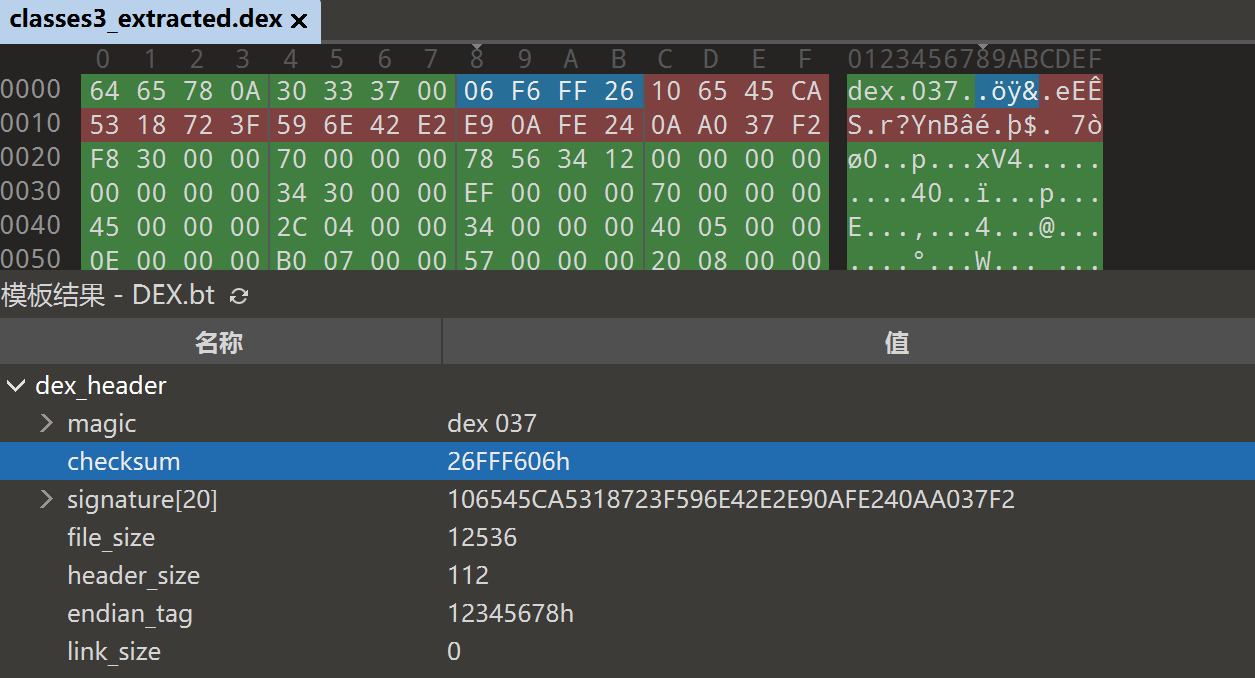
0x26fff606 大小端转换后 0x06f6ff26
使用 010editor 打开 classes3_extracted.dex 可以看到 checksum 已经改为 0x06f6ff26
4. 检查抽取结果
对比 classes3_extracted.dex 和 classes3.dex 的 hex ,checksum 和 insns 都已经修改完成
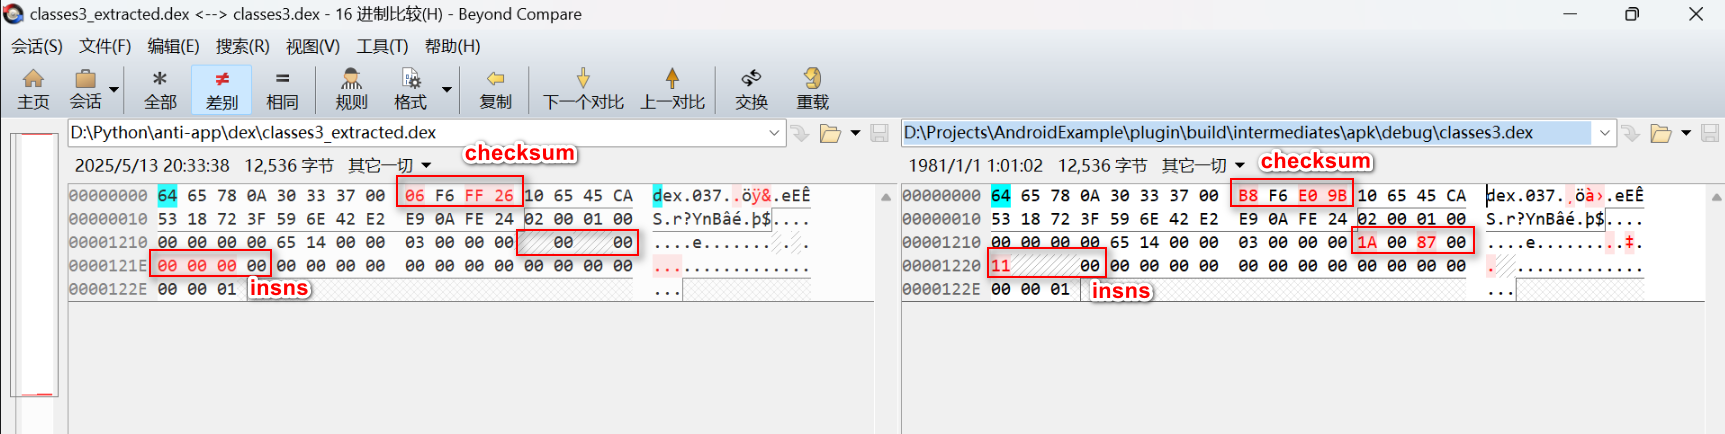
用 GDA 打开 dex 查看目标函数的指令流可以看到都是 nop

使用 InMemoryDexClassLoader 加载 dex 文件
将 DEX 文件放入 assets 目录
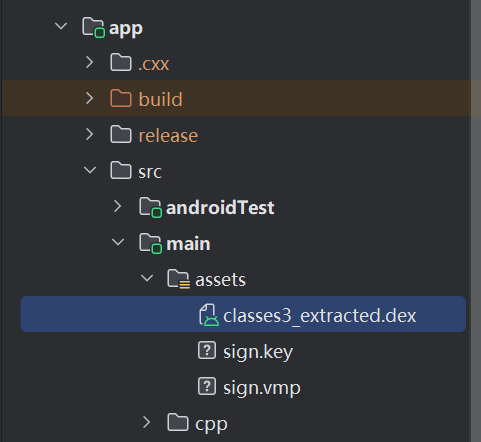
使用 InMemoryDexClassLoader 加载 dex 文件:
// 1. 读取 assets 中的 dex 文件内容
val dexBytes = context.assets.open("classes3_extracted.dex").use { inputStream ->inputStream.readBytes()
}// 2. 包装成 ByteBuffer
val dexBuffer = ByteBuffer.wrap(dexBytes)// 3. 创建 InMemoryDexClassLoader
classLoader = InMemoryDexClassLoader(dexBuffer, context.classLoader)
回填 CodeItem
目标函数 的 dex_method_index_ 是 73
回填的数据:
1A 00 87 00 11 00
使用 Inline Hook 把 ClassLinker::LoadMethod 函数替换成自定义的 my_LoadMethod 函数。(具体参考:Android PLT hook 与 Inline hook)
extern "C"
JNIEXPORT void JNICALL
Java_com_cyrus_example_hook_CyrusStudioHook_hookLoadMethod(JNIEnv *, jclass) {void *handle = shadowhook_hook_sym_name("libart.so","_ZN3art11ClassLinker10LoadMethodERKNS_7DexFileERKNS_13ClassAccessor6MethodENS_6HandleINS_6mirror5ClassEEEPNS_9ArtMethodE", // 要 hook 的符号名reinterpret_cast<void *>(my_LoadMethod),reinterpret_cast<void **>(&orig_LoadMethod));if (handle != nullptr) {LOGI("Successfully hooked LoadMethod");} else {LOGW("Failed to hook LoadMethod");}
}
检测到目标函数 的 dex_method_index_ 后,打 patch 回填 CodeItem 指令流字节码
void hexdump(const void *addr, size_t size) {const unsigned char *ptr = (const unsigned char *) addr;char line[100];for (size_t i = 0; i < size; i += 16) {char *p = line;p += sprintf(p, "%08zx  ", i);for (size_t j = 0; j < 16; ++j) {if (i + j < size)p += sprintf(p, "%02x ", ptr[i + j]);elsep += sprintf(p, "   ");}p += sprintf(p, " |");for (size_t j = 0; j < 16; ++j) {if (i + j < size) {unsigned char c = ptr[i + j];*p++ = (c >= 32 && c <= 126) ? c : '.';}}*p++ = '|';*p = '\0';LOGI("%s", line);}
}typedef unsigned char byte;void *(*orig_LoadMethod)(void *, void *, void *, void *, void *);void *my_LoadMethod(void *linker, void *dex_file, void *method, void *klass_handle, void *dst) {// DexFilestd::string location;uint8_t *begin = nullptr;uint64_t dexSize = 0;if (g_sdkLevel >= 35) {auto *dexFileV35 = (V35::DexFile *) dex_file;location = dexFileV35->location_;begin = (uint8_t *) dexFileV35->begin_;dexSize = dexFileV35->header_->file_size_;} else if (g_sdkLevel >= __ANDROID_API_P__) {auto *dexFileV28 = (V28::DexFile *) dex_file;location = dexFileV28->location_;begin = (uint8_t *) dexFileV28->begin_;dexSize = dexFileV28->size_ == 0 ? dexFileV28->header_->file_size_ : dexFileV28->size_;} else {auto *dexFileV21 = (V21::DexFile *) dex_file;location = dexFileV21->location_;begin = (uint8_t *) dexFileV21->begin_;dexSize = dexFileV21->size_ == 0 ? dexFileV21->header_->file_size_ : dexFileV21->size_;}// 打印 DexFile 信息LOGI("[pid=%d][API=%d] my_LoadMethod:\n  DexFile Base    = %p\n  DexFile Size    = %zu bytes\n  DexFile Location= %s",getpid(), g_sdkLevel, begin, dexSize, location.c_str());// 调用原始函数,使 ArtMethod 数据填充完成void *result = orig_LoadMethod(linker, dex_file, method, klass_handle, dst);// ArtMethoduint32_t dex_code_item_offset_ = -1;uint32_t dex_method_index_;if (g_sdkLevel >= 31) {auto *dstV31 = (V31::ArtMethod *) dst;auto classAccessor_method = reinterpret_cast<Method &>(method);dex_code_item_offset_ = classAccessor_method.code_off_;dex_method_index_ = dstV31->dex_method_index_;} else {auto *dstV28 = (V28::ArtMethod *) dst;dex_code_item_offset_ = dstV28->dex_code_item_offset_;dex_method_index_ = dstV28->dex_method_index_;}// 打印 Method 信息LOGI("[pid=%d][API=%d] my_LoadMethod:\n""  ArtMethod.dex_code_item_offset_ = 0x%x\n""  ArtMethod.dex_method_index_     = %d",getpid(), g_sdkLevel, dex_code_item_offset_, dex_method_index_);if (dex_method_index_ == 73) { // method_id[73] java.lang.String com.cyrus.example.plugin.PluginClass.getString()// 设置 dex 内存可写int result = mprotect(begin, dexSize, PROT_WRITE);if (result == 0) {LOGI("mprotect succeeded: begin=%p, size=%zu", begin, dexSize);} else {LOGI("mprotect failed: begin=%p, size=%zu, errno=%d", begin, dexSize, errno);}// CodeItem 地址byte *code_item_addr = (byte *) begin + dex_code_item_offset_;// insns 地址, 跳过 CodeItem 前 16 字节byte *code_item_start = static_cast<byte *>(code_item_addr) + 16;LOGI("[pid=%d] my_LoadMethod: \n""  dex_begin      = %p\n""  dex_size       = %lu\n""  code_item_off  = 0x%x\n""  code_item_addr = %p\n""  code_item_start= %p (addr + 16)",getpid(), begin, dexSize, dex_code_item_offset_, code_item_addr, code_item_start);// 打印修改前的字节码hexdump(code_item_start, 6);// 回填 CodeItem 指令byte inst[6] = {0x1A, 0x00, 0x87, 0x00, 0x11, 0x00};for (int i = 0; i < sizeof(inst); i++) {code_item_start[i] = inst[i];}LOGI("[pid=%d] CodeItem patched successfully at %p", getpid(), code_item_start);// 打印修改后的字节码hexdump(code_item_start, 6);}return result;
}
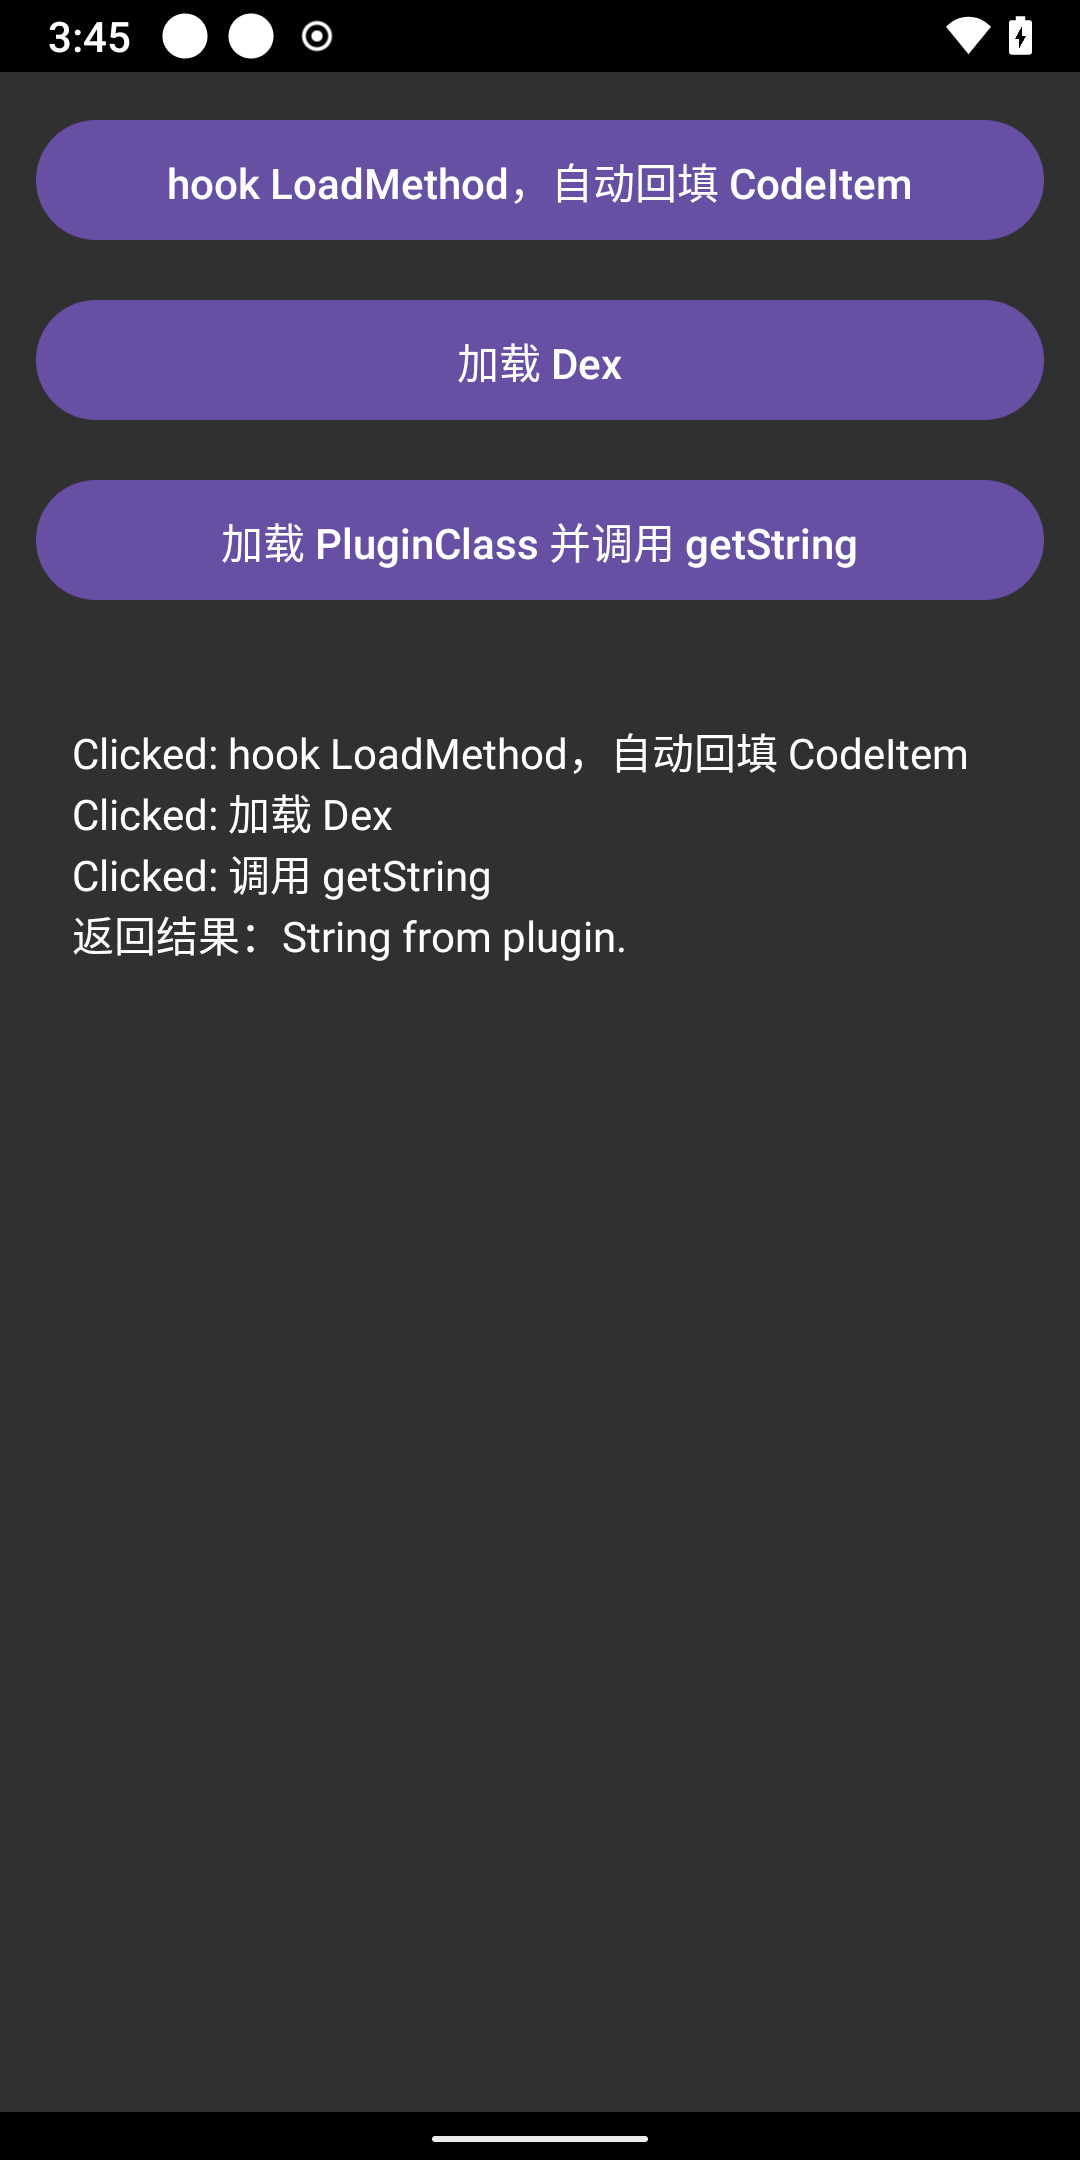
测试
通过 loadClass 加载 PluginClass 创建对象并调用 getString 方法
fun getString(): String? {// 通过反射加载目标类try {// classLoader 加载 com.cyrus.example.plugin.PluginClass 类并通过反射调用 getString 方法val pluginClass = classLoader!!.loadClass("com.cyrus.example.plugin.PluginClass")val constructor = pluginClass.getDeclaredConstructor()constructor.isAccessible = trueval instance = constructor.newInstance()val method = pluginClass.getDeclaredMethod("getString")method.isAccessible = truereturn method.invoke(instance) as? String} catch (e: Exception) {e.printStackTrace()}return null
}
日志输出如下:
2025-05-14 15:30:46.789  1465-1465  cyrus_studio_hook       com.cyrus.example                    I  [pid=1465][API=29] my_LoadMethod:DexFile Base    = 0x7e85565000DexFile Size    = 12536 bytesDexFile Location= /data/user/0/com.cyrus.example/Anonymous-DexFile@654308870.jar
2025-05-14 15:30:46.789  1465-1465  cyrus_studio_hook       com.cyrus.example                    I  [pid=1465][API=29] my_LoadMethod:ArtMethod.dex_code_item_offset_ = 0x1224ArtMethod.dex_method_index_     = 71
2025-05-14 15:30:46.789  1465-1465  cyrus_studio_hook       com.cyrus.example                    I  [pid=1465][API=29] my_LoadMethod:DexFile Base    = 0x7e85565000DexFile Size    = 12536 bytesDexFile Location= /data/user/0/com.cyrus.example/Anonymous-DexFile@654308870.jar
2025-05-14 15:30:46.789  1465-1465  cyrus_studio_hook       com.cyrus.example                    I  [pid=1465][API=29] my_LoadMethod:ArtMethod.dex_code_item_offset_ = 0x1238ArtMethod.dex_method_index_     = 72
2025-05-14 15:30:46.789  1465-1465  cyrus_studio_hook       com.cyrus.example                    I  [pid=1465][API=29] my_LoadMethod:DexFile Base    = 0x7e85565000DexFile Size    = 12536 bytesDexFile Location= /data/user/0/com.cyrus.example/Anonymous-DexFile@654308870.jar
2025-05-14 15:30:46.789  1465-1465  cyrus_studio_hook       com.cyrus.example                    I  [pid=1465][API=29] my_LoadMethod:ArtMethod.dex_code_item_offset_ = 0x120cArtMethod.dex_method_index_     = 73
2025-05-14 15:30:46.789  1465-1465  cyrus_studio_hook       com.cyrus.example                    I  mprotect succeeded: begin=0x7e85565000, size=12536
2025-05-14 15:30:46.789  1465-1465  cyrus_studio_hook       com.cyrus.example                    I  [pid=1465] my_LoadMethod: dex_begin      = 0x7e85565000dex_size       = 12536code_item_off  = 0x120ccode_item_addr = 0x7e8556620ccode_item_start= 0x7e8556621c (addr + 16)
2025-05-14 15:30:46.789  1465-1465  cyrus_studio_hook       com.cyrus.example                    I  00000000  00 00 00 00 00 00                                |......|
2025-05-14 15:30:46.789  1465-1465  cyrus_studio_hook       com.cyrus.example                    I  [pid=1465] CodeItem patched successfully at 0x7e8556621c
2025-05-14 15:30:46.789  1465-1465  cyrus_studio_hook       com.cyrus.example                    I  00000000  1a 00 87 00 11 00                                |......|
从 hexdump 可以看出 nop 字节流
00 00 00 00 00 00
已经成功修改为
1a 00 87 00 11 00
PluginClass 的 getString() 也正常调用并返回结果。
总结
函数抽取壳其实就是基于 art 下的类加载机制,只有 ArtMethod 初始化完成后,java 函数才能被调用,所以通过劫持 ClassLinker::LoadMethod 函数对 ArtMethod 中的 CodeItem 打补丁的方式实现脱壳。
完整源码
开源地址:https://github.com/CYRUS-STUDIO/AndroidExample
相关文章:
-
分享一个自己做的函数抽取壳
-
https://github.com/luoyesiqiu/dpt-shell/blob/main/README.zh-CN.md
-
Android PLT hook 与 Inline hook