SpringBoot-Web开发
1.Web场景
1.自动配置
1、整合web场景
org.springframework.boot spring-boot-starter-web2、引入了 autoconfigure功能
3、@EnableAutoConfiguration注解使用@Import(AutoConfigurationImportSelector.class)批量导入组件
4、加载 META-INF/spring/org.springframework.boot.autoconfigure.AutoConfiguration.imports 文件中配置的所有组件
5、所有自动配置类如下
org.springframework.boot.autoconfigure.web.client.RestTemplateAutoConfiguration
org.springframework.boot.autoconfigure.web.embedded.EmbeddedWebServerFactoryCustomizerAutoConfiguration
====以下是响应式web场景和现在的没关系======
org.springframework.boot.autoconfigure.web.reactive.HttpHandlerAutoConfiguration
org.springframework.boot.autoconfigure.web.reactive.ReactiveMultipartAutoConfiguration
org.springframework.boot.autoconfigure.web.reactive.ReactiveWebServerFactoryAutoConfiguration
org.springframework.boot.autoconfigure.web.reactive.WebFluxAutoConfiguration
org.springframework.boot.autoconfigure.web.reactive.WebSessionIdResolverAutoConfiguration
org.springframework.boot.autoconfigure.web.reactive.error.ErrorWebFluxAutoConfiguration
org.springframework.boot.autoconfigure.web.reactive.function.client.ClientHttpConnectorAutoConfiguration
org.springframework.boot.autoconfigure.web.reactive.function.client.WebClientAutoConfiguration
================以上没关系=================
org.springframework.boot.autoconfigure.web.servlet.DispatcherServletAutoConfiguration
org.springframework.boot.autoconfigure.web.servlet.ServletWebServerFactoryAutoConfiguration
org.springframework.boot.autoconfigure.web.servlet.error.ErrorMvcAutoConfiguration
org.springframework.boot.autoconfigure.web.servlet.HttpEncodingAutoConfiguration
org.springframework.boot.autoconfigure.web.servlet.MultipartAutoConfiguration
org.springframework.boot.autoconfigure.web.servlet.WebMvcAutoConfiguration
6、绑定了配置文件的一堆配置项
- 1、SpringMVC的所有配置 spring.mvc
- 2、Web场景通用配置 spring.web
- 3、文件上传配置 spring.servlet.multipart
- 4、服务器的配置 server: 比如:编码方式
2.默认效果
默认配置:
- 包含了 ContentNegotiatingViewResolver 和 BeanNameViewResolver 组件,方便视图解析
- 默认的静态资源处理机制: 静态资源放在 static 文件夹下即可直接访问
- 自动注册了 Converter,GenericConverter,Formatter组件,适配常见数据类型转换和格式化需求
- 支持 HttpMessageConverters,可以方便返回json等数据类型
- 注册 MessageCodesResolver,方便国际化及错误消息处理
- 支持 静态 index.html
- 自动使用ConfigurableWebBindingInitializer,实现消息处理、数据绑定、类型转化、数据校验等功能
重要:
- 如果想保持 boot mvc 的默认配置,并且自定义更多的 mvc 配置,如:interceptors, formatters, view controllers 等。可以使用@Configuration注解添加一个 WebMvcConfigurer 类型的配置类,并不要标注 @EnableWebMvc
- 如果想保持 boot mvc 的默认配置,但要自定义核心组件实例,比如:RequestMappingHandlerMapping, RequestMappingHandlerAdapter, 或ExceptionHandlerExceptionResolver,给容器中放一个 WebMvcRegistrations 组件即可
- 如果想全面接管 Spring MVC,@Configuration 标注一个配置类,并加上 @EnableWebMvc注解,实现 WebMvcConfigurer 接口
2.静态资源
1.默认规则
1.静态资源映射
静态资源映射规则在 WebMvcAutoConfiguration 中进行了定义:
- /webjars/** 的所有路径 资源都在 classpath:/META-INF/resources/webjars/
- /** 的所有路径 资源都在 classpath:/META-INF/resources/、classpath:/resources/、classpath:/static/、classpath:/public/
- 所有静态资源都定义了缓存规则。【浏览器访问过一次,就会缓存一段时间】,但此功能参数无默认值
- period: 缓存间隔。 默认 0S;
- cacheControl:缓存控制。 默认无;
- useLastModified:是否使用lastModified头。 默认 false;
2.静态资源缓存 - 所有静态资源都定义了缓存规则。【浏览器访问过一次,就会缓存一段时间】,但此功能参数无默认值
- period: 缓存间隔。 默认 0S;
- cacheControl:缓存控制。 默认无;
- useLastModified:是否使用lastModified头。 默认 false;
3.欢迎页
欢迎页规则在 WebMvcAutoConfiguration 中进行了定义: - 在静态资源目录下找 index.html
- 没有就在 templates下找index模板页
4.Favicon - 在静态资源目录下找 favicon.ico
5.缓存实验
server.port=9000

#1、spring.web:
# 1.配置国际化的区域信息
# 2.静态资源策略(开启、处理链、缓存)

#开启静态资源映射规则
spring.web.resources.add-mappings=true

#设置缓存
#spring.web.resources.cache.period=3600
##缓存详细合并项控制,覆盖period配置:
## 浏览器第一次请求服务器,服务器告诉浏览器此资源缓存7200秒,7200秒以内的所有此资源访问不用发给服务器请求,7200秒以后发请求给服务器
spring.web.resources.cache.cachecontrol.max-age=7200
#使用资源 last-modified 时间,来对比服务器和浏览器的资源是否相同没有变化。相同返回 304
spring.web.resources.cache.use-last-modified=true
2.自定义静态资源规则
自定义静态资源路径、自定义缓存规则
1.配置方式
spring.mvc: 静态资源访问前缀路径
spring.web:
- 静态资源目录
- 静态资源缓存策略
#1、spring.web:
# 1.配置国际化的区域信息
# 2.静态资源策略(开启、处理链、缓存)

#开启静态资源映射规则
spring.web.resources.add-mappings=true

#设置缓存
spring.web.resources.cache.period=3600
##缓存详细合并项控制,覆盖period配置:
## 浏览器第一次请求服务器,服务器告诉浏览器此资源缓存7200秒,7200秒以内的所有此资源访问不用发给服务器请求,7200秒以后发请求给服务器
spring.web.resources.cache.cachecontrol.max-age=7200
## 共享缓存
spring.web.resources.cache.cachecontrol.cache-public=true
#使用资源 last-modified 时间,来对比服务器和浏览器的资源是否相同没有变化。相同返回 304
spring.web.resources.cache.use-last-modified=true

#自定义静态资源文件夹位置
spring.web.resources.static-locations=classpath:/a/,classpath:/b/,classpath:/static/

#2、 spring.mvc
## 2.1. 自定义webjars路径前缀
spring.mvc.webjars-path-pattern=/wj/**
## 2.2. 静态资源访问路径前缀
spring.mvc.static-path-pattern=/static/**
2.代码方式
容器中只要有一个 WebMvcConfigurer 组件。配置的底层行为都会生效 @EnableWebMvc //禁用boot的默认配置
@Configuration //这是一个配置类
public class MyConfig implements WebMvcConfigurer {


    @Override
    public void addResourceHandlers(ResourceHandlerRegistry registry) {
        //保留以前规则
        //自己写新的规则。
        registry.addResourceHandler("/static/**")
                .addResourceLocations("classpath:/a/","classpath:/b/")
                .setCacheControl(CacheControl.maxAge(1180, TimeUnit.SECONDS));
    }
}
@Configuration //这是一个配置类,给容器中放一个 WebMvcConfigurer 组件,就能自定义底层
public class MyConfig  /*implements WebMvcConfigurer*/ {


    @Bean
    public WebMvcConfigurer webMvcConfigurer(){
        return new WebMvcConfigurer() {
            @Override
            public void addResourceHandlers(ResourceHandlerRegistry registry) {
                registry.addResourceHandler("/static/**")
                        .addResourceLocations("classpath:/a/", "classpath:/b/")
                        .setCacheControl(CacheControl.maxAge(1180, TimeUnit.SECONDS));
            }
        };
    }

}
3.路径匹配
1.Ant风格路径匹配
Ant 风格的路径模式语法具有以下规则:
- *:表示任意数量的字符。
- ?:表示任意一个字符。
- **:表示任意数量的目录。
- {}:表示一个命名的模式占位符。
- []:表示字符集合,例如[a-z]表示小写字母。
例如:
- *.html 匹配任意名称,扩展名为.html的文件。
- /folder1//.java 匹配在folder1目录下的任意两级目录下的.java文件。
- /folder2/**/*.jsp 匹配在folder2目录下任意目录深度的.jsp文件。
- /{type}/{id}.html 匹配任意文件名为{id}.html,在任意命名的{type}目录下的文件。
注意:Ant 风格的路径模式语法中的特殊字符需要转义,如:
- 要匹配文件路径中的星号,则需要转义为\*。
- 要匹配文件路径中的问号,则需要转义为\?。
2.模式切换
AntPathMatcher 与 PathPatternParser
- PathPatternParser 在 jmh 基准测试下,有 6~8 倍吞吐量提升,降低 30%~40%空间分配率
- PathPatternParser 兼容 AntPathMatcher语法,并支持更多类型的路径模式
- PathPatternParser “**” 多段匹配的支持仅允许在模式末尾使用
 @GetMapping("/a*/b?/{p1:[a-f]+}")
    public String hello(HttpServletRequest request,
                        @PathVariable("p1") String path) {

        log.info("路径变量p1: {}", path);
        //获取请求路径
        String uri = request.getRequestURI();
        return uri;
    }
总结:
- 使用默认的路径匹配规则,是由 PathPatternParser 提供的
- 如果路径中间需要有 **,替换成ant风格路径
# 改变路径匹配策略:
# ant_path_matcher 老版策略;
# path_pattern_parser 新版策略;
spring.mvc.pathmatch.matching-strategy=ant_path_matcher
4.内容协商
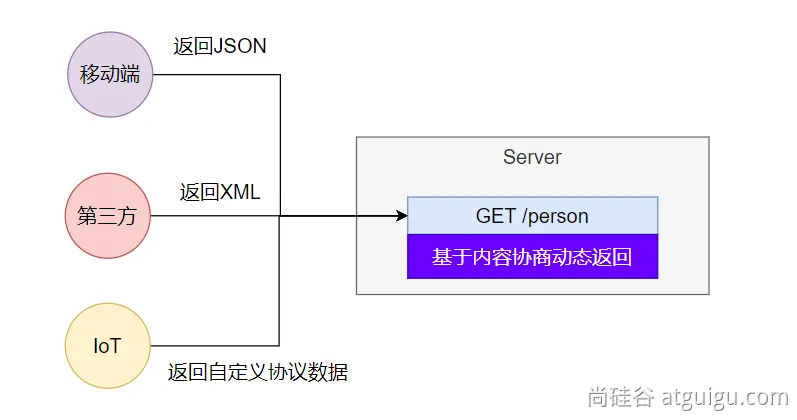
1.多端内容适配
1.默认规则
- SpringBoot 多端内容适配。
- 基于请求头内容协商:(默认开启)
1. 客户端向服务端发送请求,携带HTTP标准的Accept请求头。
- Accept: application/json、text/xml、text/yaml
- 服务端根据客户端请求头期望的数据类型进行动态返回
- 基于请求参数内容协商:(需要开启)
1. 发送请求 GET /projects/spring-boot?format=json
2. 匹配到 @GetMapping(“/projects/spring-boot”)
3. 根据参数协商,优先返回 json 类型数据【需要开启参数匹配设置】
4. 发送请求 GET /projects/spring-boot?format=xml,优先返回 xml 类型数据
2.效果演示
请求同一个接口,可以返回json和xml不同格式数据
1. 引入支持写出xml内容依赖
<dependency>
    <groupId>com.fasterxml.jackson.dataformat</groupId>
    <artifactId>jackson-dataformat-xml</artifactId>
</dependency>
2. 标注注解
@JacksonXmlRootElement  // 可以写出为xml文档
@Data
public class Person {
    private Long id;
    private String userName;
    private String email;
    private Integer age;
}
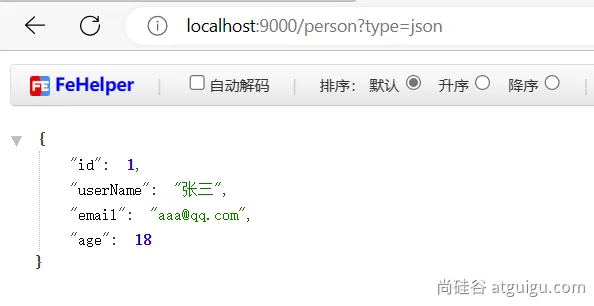
3. 开启基于请求参数的内容协商
# 开启基于请求参数的内容协商功能。 默认参数名:format。 默认此功能不开启
spring.mvc.contentnegotiation.favor-parameter=true
# 指定内容协商时使用的参数名。默认是 format
spring.mvc.contentnegotiation.parameter-name=type
4. 效果
3.配置协商规则与支持类型
- 修改内容协商方式
#使用参数进行内容协商
spring.mvc.contentnegotiation.favor-parameter=true
#自定义参数名,默认为format
spring.mvc.contentnegotiation.parameter-name=myparam
- 大多数 MediaType 都是开箱即用的。也可以自定义内容类型,如:
spring.mvc.contentnegotiation.media-types.yaml=text/yaml
2.自定义内容返回
1.增加yaml返回支持
导入依赖
<dependency>
    <groupId>com.fasterxml.jackson.dataformat</groupId>
    <artifactId>jackson-dataformat-yaml</artifactId>
</dependency>
把对象写出成YAML
 public static void main(String[] args) throws JsonProcessingException {
        Person person = new Person();
        person.setId(1L);
        person.setUserName("张三");
        person.setEmail("aaa@qq.com");
        person.setAge(18);

        YAMLFactory factory = new YAMLFactory().disable(YAMLGenerator.Feature.WRITE_DOC_START_MARKER);
        ObjectMapper mapper = new ObjectMapper(factory);

        String s = mapper.writeValueAsString(person);
        System.out.println(s);
    }
编写配置
#新增一种媒体类型
spring.mvc.contentnegotiation.media-types.yaml=text/yaml
增加HttpMessageConverter组件,专门负责把对象写出为yaml格式
 @Bean
    public WebMvcConfigurer webMvcConfigurer(){
        return new WebMvcConfigurer() {
            @Override //配置一个能把对象转为yaml的messageConverter
            public void configureMessageConverters(List<HttpMessageConverter<?>> converters) {
                converters.add(new MyYamlHttpMessageConverter());
            }
        };
    }
5.模板引擎
- 由于 SpringBoot 使用了嵌入式 Servlet 容器。所以 JSP 默认是不能使用的。
- 如果需要服务端页面渲染,优先考虑使用 模板引擎。
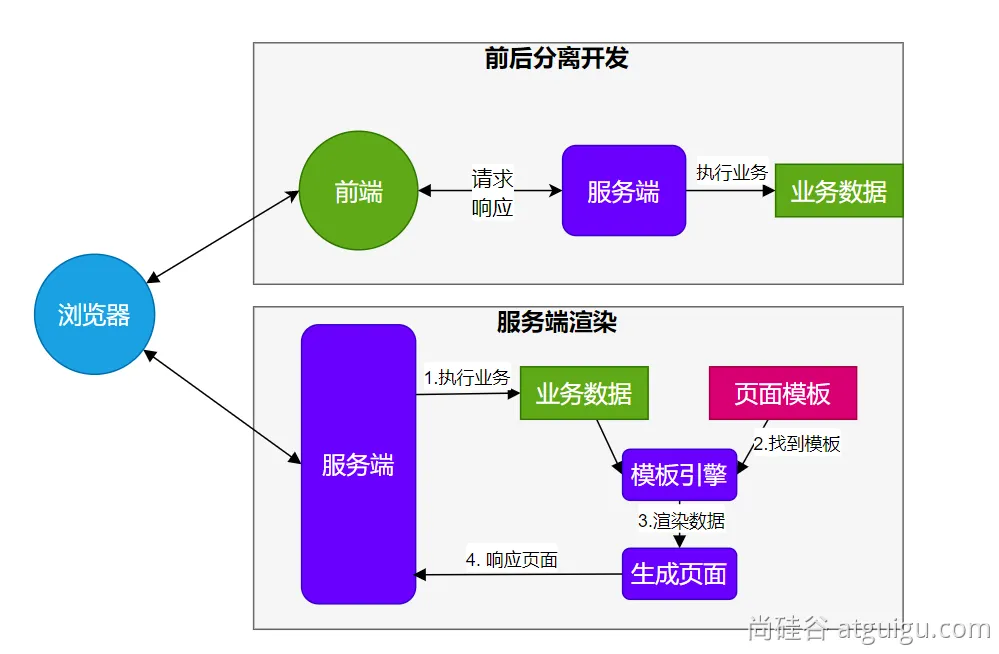
模板引擎页面默认放在 src/main/resources/templates
1.Thymeleaf整合
<dependency>
    <groupId>org.springframework.boot</groupId>
    <artifactId>spring-boot-starter-thymeleaf</artifactId>
</dependency>
自动配置原理
- 开启了 org.springframework.boot.autoconfigure.thymeleaf.ThymeleafAutoConfiguration 自动配置
- 属性绑定在 ThymeleafProperties 中,对应配置文件 spring.thymeleaf 内容
- 所有的模板页面默认在 classpath:/templates文件夹下
- 默认效果
- 所有的模板页面在 classpath:/templates/下面找
- 找后缀名为.html的页面
2.基础语法
1.核心用法
th:xxx:动态渲染指定的 html 标签属性值、或者th指令(遍历、判断等)
- th:text:标签体内文本值渲染
- th:utext:不会转义,显示为html原本的样子。
- th:属性:标签指定属性渲染
- th:attr:标签任意属性渲染
- th:ifth:each…:其他th指令
- 例如:
原内容
登录 **表达式:用来动态取值**
- :变量取值;使用 m o d e l 共享给页面的值都直接用 {}:变量取值;使用model共享给页面的值都直接用 :变量取值;使用model共享给页面的值都直接用{}
- @{}:url路径;
- #{}:国际化消息
- ~{}:片段引用
- *{}:变量选择:需要配合th:object绑定对象
系统工具&内置对象:
- param:请求参数对象
- session:session对象
- application:application对象
- #execInfo:模板执行信息
- #messages:国际化消息
- #uris:uri/url工具
- #conversions:类型转换工具
- #dates:日期工具,是java.util.Date对象的工具类
- #calendars:类似#dates,只不过是java.util.Calendar对象的工具类
- #temporals: JDK8+ java.time API 工具类
- #numbers:数字操作工具
- #strings:字符串操作
- #objects:对象操作
- #bools:bool操作
- #arrays:array工具
- #lists:list工具
- #sets:set工具
- #maps:map工具
- #aggregates:集合聚合工具(sum、avg)
- #ids:id生成工具
<!DOCTYPE html>
<html lang="en" xmlns:th="http://www.thymeleaf.org">
<head>
    <meta charset="UTF-8">
    <title>Title</title>
</head>
<body>
<h1>Hello <span th:text="${msg}"></span></h1>
<hr/>
<h1 th:text="${msg}">haha</h1>
<h1 th:utext="${msg}">hello</h1>
<hr/>
<img th:src="${imgUrl}" src="1.jpeg" style="width:300px"/>
<hr/>
<img th:src="@{${imgUrl}} " style="width: 300px" th:attr="style=${style}">
</body>
</html>
2.语法示例
表达式:
- 变量取值:${…}
- url 取值:@{…}
- 国际化消息:#{…}
- 变量选择:*{…}
- 片段引用: ~{…}
常见:
- 文本: ‘one text’,‘another one!’,…
- 数字: 0,34,3.0,12.3,…
- 布尔:true、false
- null: null
- 变量名: one,sometext,main…
文本操作:
- 拼串: +
- 文本替换:| The name is ${name} | 布尔操作:
- 二进制运算: and,or
- 取反:!,not
比较运算:
- 比较:>,<,<=,=(gt,lt,ge,le)
- 等值运算:==,!=(eq,ne)
条件运算:
- if-then: (if)?(then)
- if-then-else: (if)?(then):(else)
- default: (value)?:(defaultValue)
特殊语法:
- 无操作:_
所有以上都可以嵌套组合
'User is of type ' + (${user.isAdmin()} ? 'Administrator' : (${user.type} ?: 'Unknown'))
3.属性设置
- th:href=“@{/product/list}”
- th:attr=“class=${active}”
- th:attr=“src=@{/images/gtvglogo.png},title=${logo},alt=#{logo}”
- th:checked=“${user.active}”
<p th:text="${content}">原内容</p>
<a th:href="${url}">登录</a>
<img src="../../images/gtvglogo.png"
     th:attr="src=@{/images/gtvglogo.png},title=#{logo},alt=#{logo}" />
4.遍历
语法: th:each=“元素名,迭代状态 : ${集合}”
<tr th:each="prod : ${prods}">
  <td th:text="${prod.name}">Onions</td>
  <td th:text="${prod.price}">2.41</td>
  <td th:text="${prod.inStock}? #{true} : #{false}">yes</td>
</tr>

<tr th:each="prod,iterStat : ${prods}" th:class="${iterStat.odd}? 'odd'">
  <td th:text="${prod.name}">Onions</td>
  <td th:text="${prod.price}">2.41</td>
  <td th:text="${prod.inStock}? #{true} : #{false}">yes</td>
</tr>
iterStat 有以下属性:
- index:当前遍历元素的索引,从0开始
- count:当前遍历元素的索引,从1开始
- size:需要遍历元素的总数量
- current:当前正在遍历的元素对象
- even/odd:是否偶数/奇数行
- first:是否第一个元素
- last:是否最后一个元素
5.判断
th:if
<a
  href="comments.html"
  th:href="@{/product/comments(prodId=${prod.id})}"
  th:if="${not #lists.isEmpty(prod.comments)}"
  >view</a>
th:switch
<div th:switch="${user.role}">
  <p th:case="'admin'">User is an administrator</p>
  <p th:case="#{roles.manager}">User is a manager</p>
  <p th:case="*">User is some other thing</p>
</div>
6.属性优先级
- 片段
- 遍历
- 判断
<ul>
  <li th:each="item : ${items}" th:text="${item.description}">Item description here...</li>
</ul>
| Order | Feature | Attributes |
|---|---|---|
| 1 | 片段包含 | th:insert th:replace |
| 2 | 遍历 | th:each |
| 3 | 判断 | th:if th:unless th:switch th:case |
| 4 | 定义本地变量 | th:object th:with |
| 5 | 通用方式属性修改 | th:attr th:attrprepend th:attrappend |
| 6 | 指定属性修改 | th:value th:href th:src … |
| 7 | 文本值 | th:text th:utext |
| 8 | 片段指定 | th:fragment |
| 9 | 片段移除 | th:remove |
7.行内写法
[[…]] or [(…)]
<p>Hello, [[${session.user.name}]]!</p>
8.变量选择
<div th:object="${session.user}">
  <p>Name: <span th:text="*{firstName}">Sebastian</span>.</p>
  <p>Surname: <span th:text="*{lastName}">Pepper</span>.</p>
  <p>Nationality: <span th:text="*{nationality}">Saturn</span>.</p>
</div>
等同于
<div>
  <p>Name: <span th:text="${session.user.firstName}">Sebastian</span>.</p>
  <p>Surname: <span th:text="${session.user.lastName}">Pepper</span>.</p>
  <p>Nationality: <span th:text="${session.user.nationality}">Saturn</span>.</p>
</div>
9.模板布局
- 定义模板: th:fragment
- 引用模板:~{templatename::selector}
- 插入模板:th:insert、th:replace
<footer th:fragment="copy">© 2011 The Good Thymes Virtual Grocery</footer>
<body>
<div th:insert="~{footer :: copy}"></div>
<div th:replace="~{footer :: copy}"></div>
</body>
<body>
结果:
<body>
<div>
<footer>© 2011 The Good Thymes Virtual Grocery</footer>
</div>
<footer>© 2011 The Good Thymes Virtual Grocery</footer>
</body>
</body>
10.devtools
<dependency>
    <groupId>org.springframework.boot</groupId>
    <artifactId>spring-boot-devtools</artifactId>
  </dependency>
6.国际化
国际化的自动配置参照MessageSourceAutoConfiguration
实现步骤:
- Spring Boot 在类路径根下查找messages资源绑定文件。文件名为:messages.properties
- 多语言可以定义多个消息文件,命名为messages_区域代码.properties。如:
- messages.properties:默认
- messages_zh_CN.properties:中文环境
- messages_en_US.properties:英语环境
- 在程序中可以自动注入 MessageSource组件,获取国际化的配置项值
- 在页面中可以使用表达式 #{}获取国际化的配置项值
@Autowired  //国际化取消息用的组件
MessageSource messageSource;
@GetMapping("/haha")
public String haha(HttpServletRequest request){

    Locale locale = request.getLocale();
    //利用代码的方式获取国际化配置文件中指定的配置项的值
    String login = messageSource.getMessage("login", null, locale);
    return login;
}
7.错误处理
1.默认机制
错误处理的自动配置都在ErrorMvcAutoConfiguration中,两大核心机制:
- SpringBoot 会自适应处理错误,响应页面或JSON数据
- SpringMVC的错误处理机制依然保留,MVC处理不了,才会交给boot进行处理

- 发生错误以后,转发给/error路径,SpringBoot在底层写好一个 BasicErrorController的组件,专门处理这个请求
        @RequestMapping(produces = MediaType.TEXT_HTML_VALUE) //返回HTML
        public ModelAndView errorHtml(HttpServletRequest request, HttpServletResponse response) {
                HttpStatus status = getStatus(request);
                Map<String, Object> model = Collections
                        .unmodifiableMap(getErrorAttributes(request, getErrorAttributeOptions(request, MediaType.TEXT_HTML)));
                response.setStatus(status.value());
                ModelAndView modelAndView = resolveErrorView(request, response, status, model);
                return (modelAndView != null) ? modelAndView : new ModelAndView("error", model);
        }

        @RequestMapping  //返回 ResponseEntity, JSON
        public ResponseEntity<Map<String, Object>> error(HttpServletRequest request) {
                HttpStatus status = getStatus(request);
                if (status == HttpStatus.NO_CONTENT) {
                        return new ResponseEntity<>(status);
                }
                Map<String, Object> body = getErrorAttributes(request, getErrorAttributeOptions(request, MediaType.ALL));
                return new ResponseEntity<>(body, status);
        }
规则:
- 解析一个错误页
- 如果发生了500、404、503、403 这些错误
1. 如果有模板引擎,默认在 classpath:/templates/error/精确码.html
2. 如果没有模板引擎,在静态资源文件夹下找 精确码.html - 如果匹配不到精确码.html这些精确的错误页,就去找5xx.html,4xx.html模糊匹配
1. 如果有模板引擎,默认在 classpath:/templates/error/5xx.html
2. 如果没有模板引擎,在静态资源文件夹下找 5xx.html - 如果模板引擎路径templates下有 error.html页面,就直接渲染