Vue3+Vite+TypeScript+Element Plus开发-12.动态路由-动态增加路由
系列文档目录
Vue3+Vite+TypeScript安装
Element Plus安装与配置
主页设计与router配置
静态菜单设计
Pinia引入
Header响应式菜单缩展
Mockjs引用与Axios封装
登录设计
登录成功跳转主页
多用户动态加载菜单
Pinia持久化
动态路由 -动态增加路由
动态路由-动态删除路由
路由守卫
文章目录
目录
系列文档目录
文章目录
前言
一、模拟资料建立
二、修改存储
三、删除子路由
1、删除子路由
2.演示效果
四、测试与调试
1.登录账号
2.点击刷新
3.查找原因
4.修改存储
5.修改main.ts
6.演示结果
7.顺序调整
五、测试成功编辑
后续
参考文献
前言
前一章节主要讲解了 Pinia 的持久化处理,而本章节则重点聚焦于动态路由的实现。在调试过程中,由于涉及较多细节,因此相关截图中包含了调试界面的内容。
一、模拟资料建立
在模拟数据中对菜单进行调整,为 admin 角色的菜单项新增了 path 属性。
1.文件路径:src/mock/mockData/menuData.ts
2.模拟数据中的 admin 角色菜单项进行了修改,为其新增了 path 属性,而未对 user 角色的菜单项进行任何改动,目的是为了便于后续测试。
 { index: 'UserInfo', label: '个人资料',path: 'views/SysSettings/UserInfo' },
            { index: 'AccountSetting', label: '账户设置',path: 'views/SysSettings/AccountSetting' },
完整代码:
// src/mock/mockData/menuData.ts
import Mock from 'mockjs';
import { Document, Setting } from '@element-plus/icons-vue'; // 假设你使用的是 Element Plus 的图标


// 模拟菜单数据,改为后面动态
/*
const menuData = Mock.mock({
  data: [
    { index: 'Home', label: '首页', icon: Document },
    {
      index: 'SysSettings',
      label: '系统设置',
      icon: Setting,
      children: [
        { index: 'UserInfo', label: '个人资料' },
        { index: 'AccountSetting', label: '账户设置' },
      ],
    },
  ],
});
*/


// 动态生成菜单数据
export default (data: any) => {
  // 解析传入的 data 参数
  const { username, password } = data;


  // 根据用户名和密码生成不同的响应
  if (username === 'admin') {
    return Mock.mock({
      status_code: 200,
      status: 'success',
      message: 'Operation successful.',
      data:  [
        { index: 'Home', label: '首页', icon: Document },
        {
          index: 'SysSettings',
          label: '系统设置',
          icon: Setting,
          children: [
            { index: 'UserInfo', label: '个人资料',path: 'views/SysSettings/UserInfo' },
            { index: 'AccountSetting', label: '账户设置',path: 'views/SysSettings/AccountSetting' },
          ],
        },
      ],
    });
  } else if (username === 'user' ) {
    return Mock.mock({
      status_code: 200,
      status: 'success',
      message: 'Operation successful.',
      data: [
        { index: 'Home', label: '首页', icon: Document },
        {
          index: 'SysSettings',
          label: '系统设置',
          icon: Setting,
          children: [
            { index: 'UserInfo', label: '个人资料' },

          ],
        },
      ],
    });
  } else {
    return Mock.mock({
      status_code: 401,
      status: 'fail',
      message: 'Invalid username ,No Menu Data.',
      data: [],
    });
  }
};
二、修改存储
1. setMenuData 方法进行了优化,增加了动态路由的处理逻辑,使其能够根据用户菜单动态生成对应的路由配置
// src/stores/index.ts
import { defineStore } from 'pinia';
import router from '../router';
import type { Component } from 'vue';
type Modules = Record<string, () => Promise<{ default: Component }>>;
// 定义公共 store
export const useAllDataStore = defineStore('useAllData', {
// 定义状态
state: () => ({
isCollapse: false, // 定义初始状态
username: '',
token_key: '',
menuData:[],
}),
// 定义 actions
actions: {
// 设置用户名
setUsername(username: string) {
this.username = username;
},
// 获取用户名
getUsername(): string {
return this.username;
},
// 设置 token_key
setTokenKey(token_key: string) {
this.token_key = token_key;
},
// 获取 token_key
getTokenKey(): string {
return this.token_key;
},
// 设置菜单数据
setMenuData(menuData: any){
const routerList=router.getRoutes()
const modules: Modules = import.meta.glob('../views/**/*.vue') as Modules;
const routerArr=[]
menuData.forEach((item:any) => {
// console.log(item)
if(item.children){
item.children.forEach((child:any) => {
console.log(child)
const componentPath = `../${child.path}.vue`;
const module = modules[componentPath];
console.log(module)
if (module) {
/*
module().then(({ default: component }) => {
child.component = component;
});
*/
child.component = module;
routerArr.push(child)
}
});
}
else
{
const componentPath = `../${item.path}.vue`;
const module = modules[componentPath];
if(module)
{
item.component = module;
routerArr.push(item)
}
}
});
routerArr.forEach((item:any) => {
router.addRoute('main',
{
path: item.index,
name: item.name,
component: item.component,
});
})
const routerListLast=router.getRoutes()
console.log(routerListLast)
this.menuData = menuData
},
// 获取菜单数据
getMenuData(): [] {
return this.menuData;
},
},
persist: {
enabled: true,
strategies: [
{
key: 'useAllData-store',
storage: localStorage,
paths: ['token_key','menuData'], // 指定需要持久化的字段
},
],
},
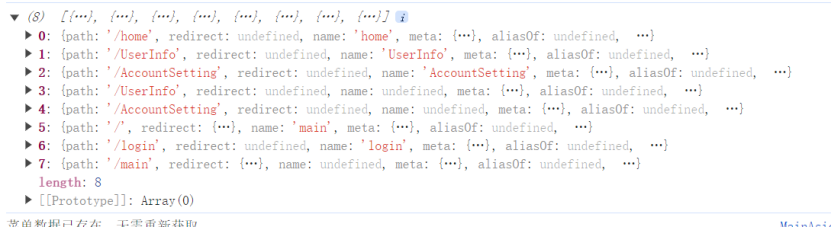
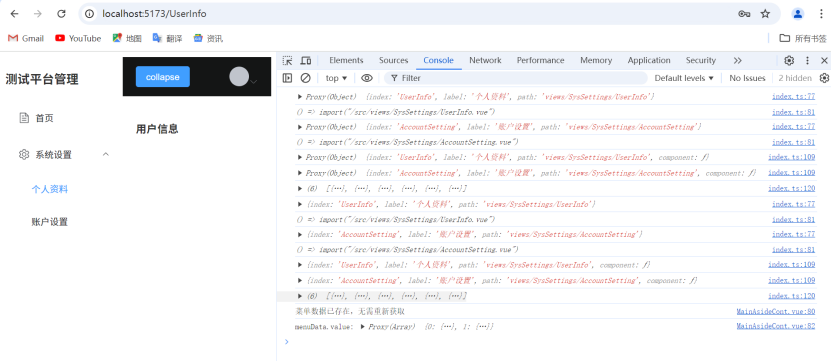
});2.运行调试效果:
UserInfo与AccountSetting两行记录,说明存在问题
三、删除子路由
1、删除子路由
1.1、打开文档router/index.ts
1.2、删除除了home以外路由即UserInfo与AccountSetting路由
import { createRouter, createWebHistory, RouteRecordRaw } from 'vue-router';
import Main from '@/views/Main.vue'; //
import Home from '@/views/Home.vue';
import UserInfo from '@/views/SysSettings/UserInfo.vue';
import AccountSetting from '@/views/SysSettings/AccountSetting.vue';
import Login from '@/views/Login.vue';
// 定义路由配置
const routes: RouteRecordRaw[] = [
{
path: '/',
name: 'main',
component: Main,
redirect: { name: 'login' }, // 默认重定向到 login 子路由
children: [
{
path: 'home',
name: 'home',
component: Home,
}
],
},
{
path: '/login',
name: 'login',
component: Login,
},
{
path: '/main', // 如果确实需要 /main 路径
redirect: { name: 'home' }, // 仅保留重定向规则
},
];
// 创建路由器
const router = createRouter({
history: createWebHistory(),
routes, // 使用已定义的路由配置
});
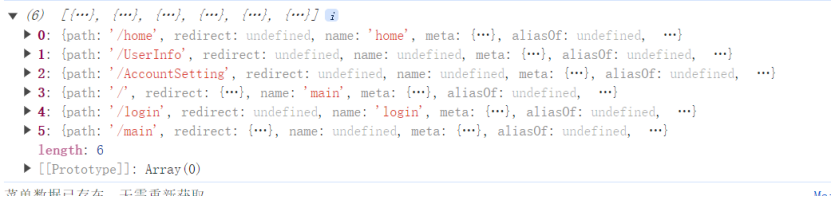
export default router;2.演示效果

调试结果:UserInfo与AccountSetting未重复
四、测试与调试
c's
1.登录账号
进入 main 页面后,选择了“个人信息”菜单项。
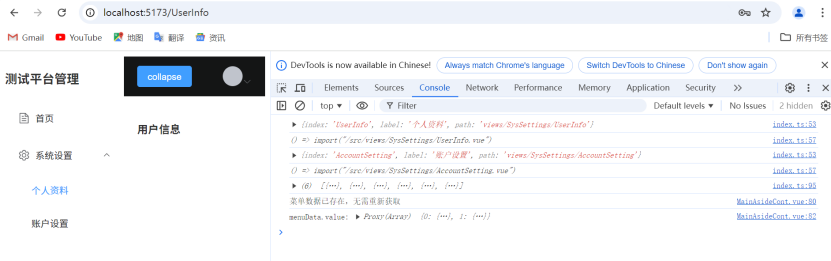
2.点击刷新
在尝试刷新 userInfo 页面时,系统提示无法找到该页面。
3.查找原因
苦思冥想很久,才想通是main.ts加载router的时候,router没有文件不存在该路由因为该路由是动态增加的,而在页面刷新时,这些动态添加的路由信息会被丢失。因此,我们需要在每次页面加载时重新动态添加这些路由。
4.修改存储
增加了 ReloadData 函数用于刷新数据,优化代码结构并提高可维护性,将动态添加路由的逻辑封装为公共函数 addRouter
// src/stores/index.ts
import { defineStore } from 'pinia';
import router from '../router';
import type { Component } from 'vue';
type Modules = Record<string, () => Promise<{ default: Component }>>;
// 定义公共 store
export const useAllDataStore = defineStore('useAllData', {
// 定义状态
state: () => ({
isCollapse: false, // 定义初始状态
username: '',
token_key: '',
menuData:[],
}),
// 定义 actions
actions: {
// 设置用户名
setUsername(username: string) {
this.username = username;
},
// 获取用户名
getUsername(): string {
return this.username;
},
// 设置 token_key
setTokenKey(token_key: string) {
this.token_key = token_key;
},
// 获取 token_key
getTokenKey(): string {
return this.token_key;
},
// 设置菜单数据
setMenuData(menuData: any){
addRouter(menuData)
this.menuData = menuData
},
// 获取菜单数据
getMenuData(): [] {
return this.menuData;
},
},
persist: {
enabled: true,
strategies: [
{
key: 'useAllData-store',
storage: localStorage,
paths: ['token_key','menuData'], // 指定需要持久化的字段
},
],
},
});
function addRouter(menuData: any){
const routerList=router.getRoutes()
const modules: Modules = import.meta.glob('../views/**/*.vue') as Modules;
const routerArr=[]
menuData.forEach((item:any) => {
// console.log(item)
if(item.children){
item.children.forEach((child:any) => {
console.log(child)
const componentPath = `../${child.path}.vue`;
const module = modules[componentPath];
console.log(module)
if (module) {
/*
module().then(({ default: component }) => {
child.component = component;
});
*/
child.component = module;
routerArr.push(child)
}
});
}
else
{
const componentPath = `../${item.path}.vue`;
const module = modules[componentPath];
if(module)
{
item.component = module;
routerArr.push(item)
}
}
});
routerArr.forEach((item:any) => {
console.log(item)
router.addRoute('main',
{
path: item.index,
name: item.label,
component: item.component,
});
})
const routerListLast=router.getRoutes()
console.log(routerListLast)
}
export function ReloadData() {
const store = useAllDataStore();
const menuData = store.getMenuData();
addRouter(menuData);
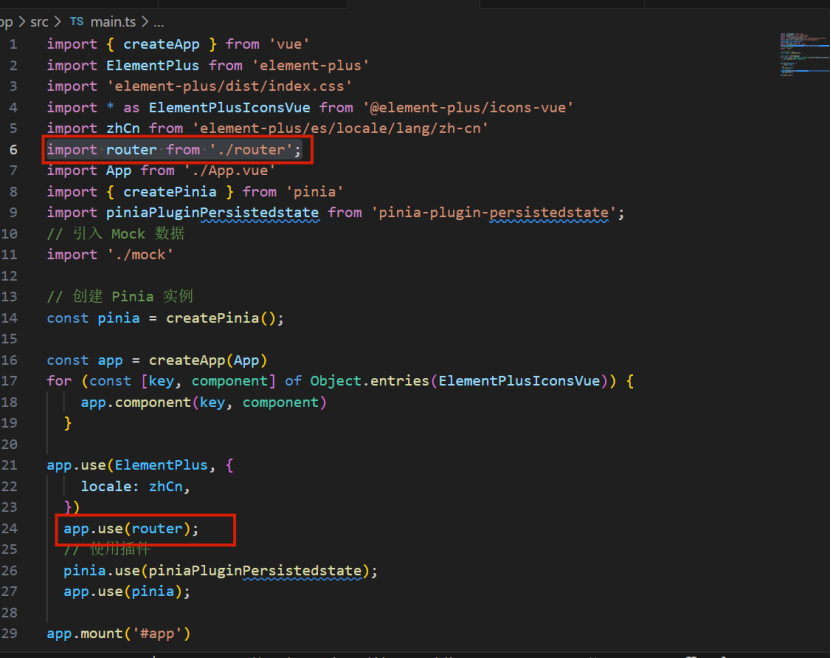
}5.修改main.ts
增加刷新路由
import { createApp } from 'vue'
import ElementPlus from 'element-plus'
import 'element-plus/dist/index.css'
import * as ElementPlusIconsVue from '@element-plus/icons-vue'
import zhCn from 'element-plus/es/locale/lang/zh-cn'
import router from './router';
import App from './App.vue'
import { createPinia } from 'pinia'
import piniaPluginPersistedstate from 'pinia-plugin-persistedstate';
// 引入 Mock 数据
import './mock'
import { ReloadData } from '@/stores';

// 创建 Pinia 实例
const pinia = createPinia();

const app = createApp(App)
for (const [key, component] of Object.entries(ElementPlusIconsVue)) {
    app.component(key, component)
  }

app.use(ElementPlus, {
    locale: zhCn,
  })
  app.use(router);
  // 使用插件
  pinia.use(piniaPluginPersistedstate);
  app.use(pinia);

  ReloadData();

app.mount('#app')
6.演示结果
点击刷新后,页面丢失但是调试路由有存在。

啥问题呢?经过半小时折腾,改了很多中写法都没有成功,原来当我看到[Vue Router warn]: No match found for location with path "/UserInfo"定位到具体行数的时,才突然明白,是不是语句顺序问题,

7.顺序调整

import { createApp } from 'vue'
import ElementPlus from 'element-plus'
import 'element-plus/dist/index.css'
import * as ElementPlusIconsVue from '@element-plus/icons-vue'
import zhCn from 'element-plus/es/locale/lang/zh-cn'
import router from './router';
import App from './App.vue'
import { createPinia } from 'pinia'
import piniaPluginPersistedstate from 'pinia-plugin-persistedstate';
// 引入 Mock 数据
import './mock'
import { ReloadData } from '@/stores';

// 创建 Pinia 实例
const pinia = createPinia();

const app = createApp(App)
for (const [key, component] of Object.entries(ElementPlusIconsVue)) {
    app.component(key, component)
  }

app.use(ElementPlus, {
    locale: zhCn,
  })

  //  app.use(router);
  // 使用插件
  pinia.use(piniaPluginPersistedstate);
  app.use(pinia);

  ReloadData();
  app.use(router);


app.mount('#app')
五、测试成功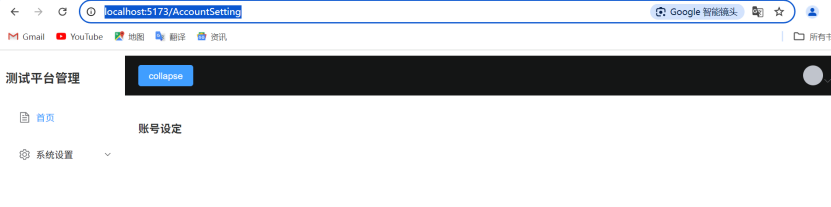
后续
参考文献
动态路由 | Vue RouterVue.js 的官方路由![]() https://router.vuejs.org/zh/guide/advanced/dynamic-routing.html
https://router.vuejs.org/zh/guide/advanced/dynamic-routing.html