网站200m虚拟主机能放多少东西社区网站的推广方案
1.什么是bootloader
Bootloader(引导加载程序) 是存储在设备非易失性存储器(如 ROM、Flash)中的一段特殊程序,负责在设备上电后初始化硬件、加载操作系统(OS)或用户应用程序,并最终将控制权移交给它们。它是设备启动过程中第一个运行的软件,扮演着“启动管理者”的角色。
2.bootloader的用途
1.在启动应用程序之前,对硬件外设进行初始化,可以在某种程度上做到应用层和硬件层分离的作用
2.在启动时对硬件或者Mcu自身进行检测,在运行程序之前对异常状态进行警报
3.通过Bootloader实现在线升级,第一,接收客户端软件发来的程序;第二将接收到的程序写入mcu的flash中,片内flash编程;第二,跳转到APP运行
3.S32K144的Bootloader的分配
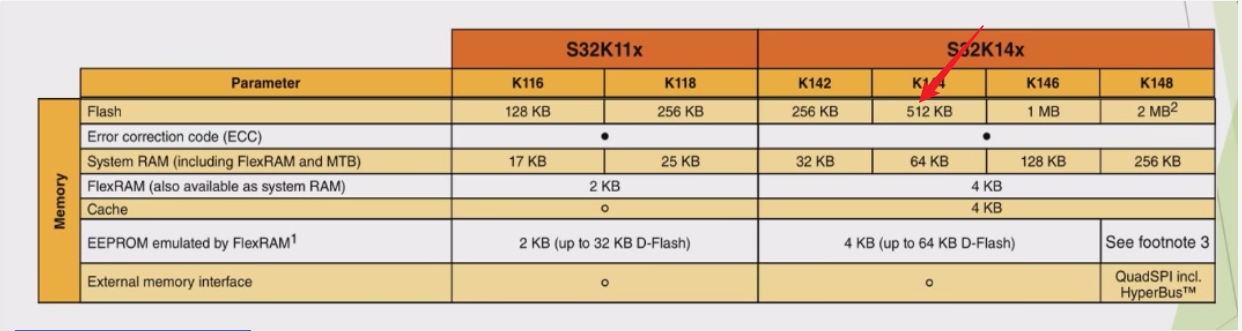
1.S32k144的Flash容量
2.MCU上电复位流程

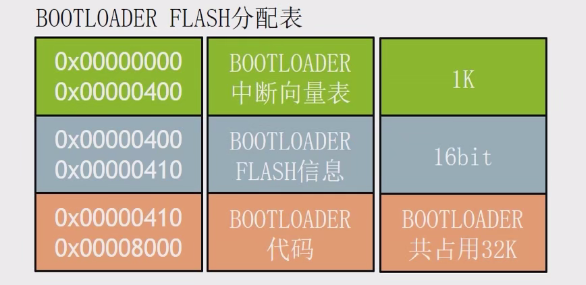
3.地址分配
Bootloader 分配
App Flash分配表
向量表重映射,之前失效

4.实验流程
通过按键从bootloader跳转APP
5.S32 编译器软件配置
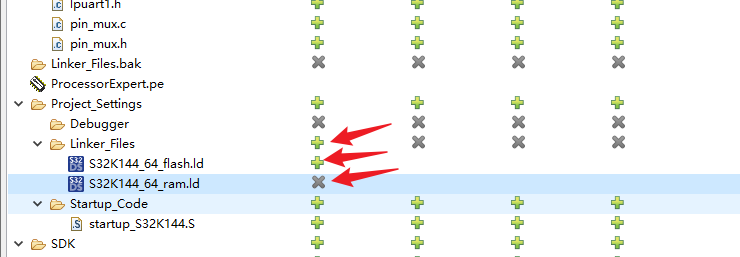
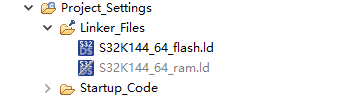
1. 解锁flash默认配置
进人构建配置
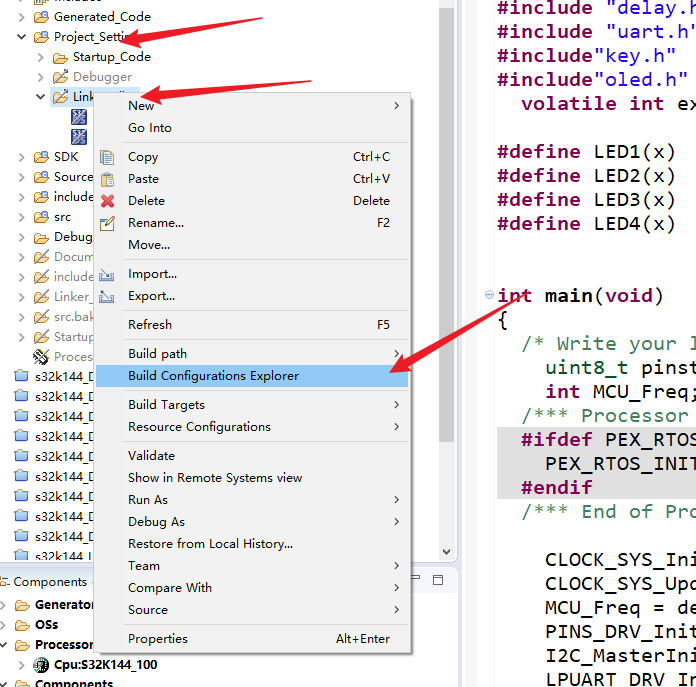
使能Flash配置,取消RAM勾选
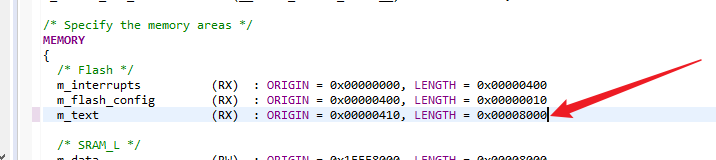
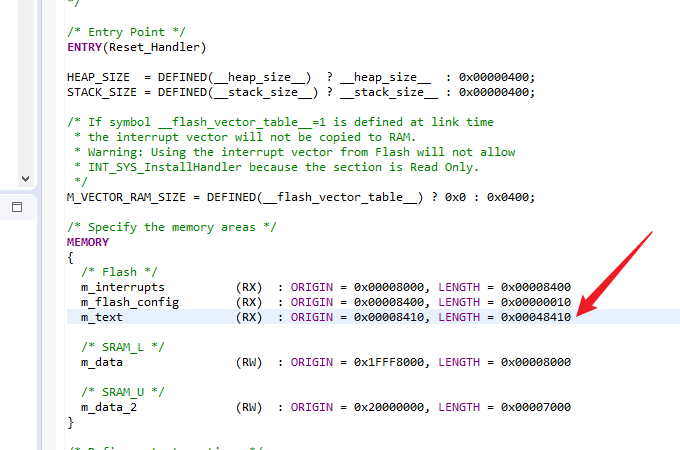
配置ld文件的MEMORY区
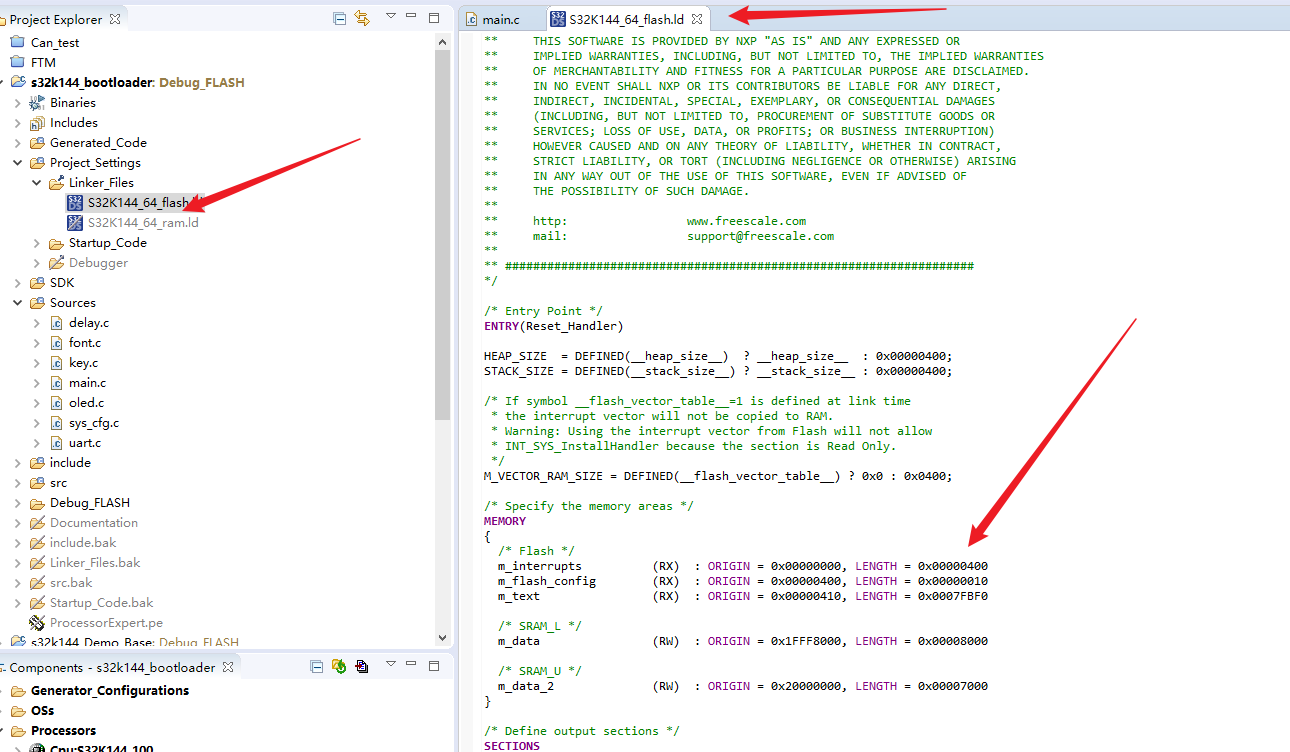
bootloader针对性修改 32k
app 空间分配 256k
6.部分代码
1.bootloader应用程序的代码:
 * IO配置* KEY1 PTC12* KEY2 PTC13* KEY3 PTB2* LED1 PTD16* LED2 PTD15* LED3 PTD1* LED4 PTD0
*/
#include "Cpu.h"
#include "delay.h"
#include "uart.h"
#include"key.h"
#include"oled.h"
#include <stdio.h>volatile int exit_code = 0;#define LED1(x)  PINS_DRV_WritePin(PTD,16,!x);
#define LED2(x)  PINS_DRV_WritePin(PTD,15,!x);
#define LED3(x)  PINS_DRV_WritePin(PTD,1,!x);
#define LED4(x)  PINS_DRV_WritePin(PTD,0,!x);#define APP_START_ADDRESS 0x00008000 //应用程序起始地址// Bootup application function
void Bootup_Application(uint32_t appEntry, uint32_t appStack)
{static void (*jump_to_application)(void);	//指向应用函数的指针static uint32_t stack_pointer;		//应用程序栈指针jump_to_application = (void (*)(void))appEntry;	//函数指针指向应用程序的复位向量表地址,强转函数指针stack_pointer = appStack;	//应用程序栈指针赋值S32_SCB->VTOR = (uint32_t) APP_START_ADDRESS;	//设置中断向量表地址为应用程序的起始地址__asm volatile ("cpsie i" : : : "memory");	// 关闭全局中断__asm volatile ("msr msp, %0\n" : : "r" (stack_pointer): "sp");	//设置主栈指针__asm volatile ("msr psp, %0\n" : : "r" (stack_pointer): "sp"); //设置进程栈指针jump_to_application();	//跳转到应用程序的复位向量表地址执行应用程序
}	int main(void)
{/* Write your local variable definition here */uint8_t pinstate;int MCU_Freq;uint32_t appEntry,appStack;	//应用程序入口地址和栈指针地址/*** Processor Expert internal initialization. DON'T REMOVE THIS CODE!!! ***/#ifdef PEX_RTOS_INITPEX_RTOS_INIT();                   /* Initialization of the selected RTOS. Macro is defined by the RTOS component. */#endif/*** End of Processor Expert internal initialization.                    ***/CLOCK_SYS_Init(g_clockManConfigsArr, CLOCK_MANAGER_CONFIG_CNT,g_clockManCallbacksArr, CLOCK_MANAGER_CALLBACK_CNT);CLOCK_SYS_UpdateConfiguration(0U, CLOCK_MANAGER_POLICY_AGREEMENT);MCU_Freq = delay_init();//初始化delay函数PINS_DRV_Init(NUM_OF_CONFIGURED_PINS, g_pin_mux_InitConfigArr); //初始化IOI2C_MasterInit(&i2c1_instance, &i2c1_MasterConfig0);//初始化I2C外设,用于OLED通讯LPUART_DRV_Init(INST_LPUART1, &lpuart1_State, &lpuart1_InitConfig0); //初始化串口oled_init(); //OLED配置参数初始化OLED_TITLE((uint8_t*)"S32K144",(uint8_t*)"01_BASE");//OLED显示标题u1_printf("初始化完毕,MCU运行频率为 %d Mhz \r\n",MCU_Freq);while(1){pinstate = KEY_Proc (0);if(pinstate ==BTN1_PRES ){u1_printf("KEY1 Pressed 2s enter app\r\n");u1_printf("Enter App\r\n");u1_printf("in 2 seconds\r\n");delay_ms(1000);u1_printf("in 1 seconds\r\n");delay_ms(1000);u1_printf("in 0 seconds\r\n");appStack  = *(uint32_t *)(APP_START_ADDRESS + 0x00);	//读取应用程序栈指针地址appEntry  = *(uint32_t *)(APP_START_ADDRESS + 0x04);	//读取应用程序入口地址Bootup_Application(appEntry,appStack);	//跳转到应用程序}}/*** Don't write any code pass th5is line, or it will be deleted during code generation. ***//*** RTOS startup code. Macro PEX_RTOS_START is defined by the RTOS component. DON'T MODIFY THIS CODE!!! ***/#ifdef PEX_RTOS_STARTPEX_RTOS_START();                  /* Startup of the selected RTOS. Macro is defined by the RTOS component. */#endif/*** End of RTOS startup code.  ***//*** Processor Expert end of main routine. DON'T MODIFY THIS CODE!!! ***/for(;;) {if(exit_code != 0) {break;}}return exit_code;/*** Processor Expert end of main routine. DON'T WRITE CODE BELOW!!! ***/
} /*** End of main routine. DO NOT MODIFY THIS TEXT!!! ***/
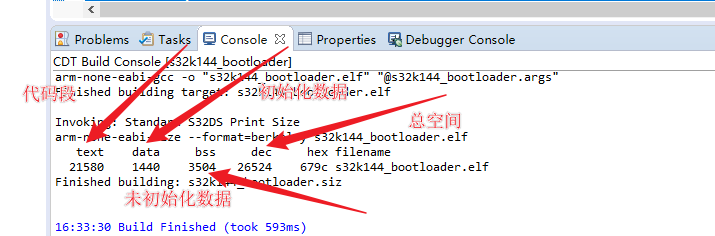
编译后:未超出32k空间
2.app代码
 * IO配置* KEY1 PTC12* KEY2 PTC13* KEY3 PTB2* LED1 PTD16* LED2 PTD15* LED3 PTD1* LED4 PTD0
*/
#include "Cpu.h"
#include "delay.h"
#include "uart.h"
#include"key.h"
#include"oled.h"volatile int exit_code = 0;#define LED1(x)  PINS_DRV_WritePin(PTD,16,!x);
#define LED2(x)  PINS_DRV_WritePin(PTD,15,!x);
#define LED3(x)  PINS_DRV_WritePin(PTD,1,!x);
#define LED4(x)  PINS_DRV_WritePin(PTD,0,!x);int main(void)
{/* Write your local variable definition here */uint8_t pinstate;int MCU_Freq;/*** Processor Expert internal initialization. DON'T REMOVE THIS CODE!!! ***/#ifdef PEX_RTOS_INITPEX_RTOS_INIT();                   /* Initialization of the selected RTOS. Macro is defined by the RTOS component. */#endif/*** End of Processor Expert internal initialization.                    ***/CLOCK_SYS_Init(g_clockManConfigsArr, CLOCK_MANAGER_CONFIG_CNT,g_clockManCallbacksArr, CLOCK_MANAGER_CALLBACK_CNT);CLOCK_SYS_UpdateConfiguration(0U, CLOCK_MANAGER_POLICY_AGREEMENT);MCU_Freq = delay_init();//初始化delay函数PINS_DRV_Init(NUM_OF_CONFIGURED_PINS, g_pin_mux_InitConfigArr); //初始化IOI2C_MasterInit(&i2c1_instance, &i2c1_MasterConfig0);//初始化I2C外设,用于OLED通讯LPUART_DRV_Init(INST_LPUART1, &lpuart1_State, &lpuart1_InitConfig0); //初始化串口LED1(0);LED2(0);LED3(0);LED4(0);//LED熄灭oled_init(); //OLED配置参数初始化OLED_TITLE((uint8_t*)"S32K144",(uint8_t*)"01_BASE");//OLED显示标题u1_printf("初始化完毕,MCU运行频率为 %d Mhz \r\n",MCU_Freq);while(1){u1_printf("App Running...\r\n");PINS_DRV_TogglePins(PTD, 1 << 0);delay_ms(1000);u1_printf("App Running...\r\n");PINS_DRV_TogglePins(PTD, 1 << 1);delay_ms(1000);}/*** Don't write any code pass th5is line, or it will be deleted during code generation. ***//*** RTOS startup code. Macro PEX_RTOS_START is defined by the RTOS component. DON'T MODIFY THIS CODE!!! ***/#ifdef PEX_RTOS_STARTPEX_RTOS_START();                  /* Startup of the selected RTOS. Macro is defined by the RTOS component. */#endif/*** End of RTOS startup code.  ***//*** Processor Expert end of main routine. DON'T MODIFY THIS CODE!!! ***/for(;;) {if(exit_code != 0) {break;}}return exit_code;/*** Processor Expert end of main routine. DON'T WRITE CODE BELOW!!! ***/
} /*** End of main routine. DO NOT MODIFY THIS TEXT!!! ***/
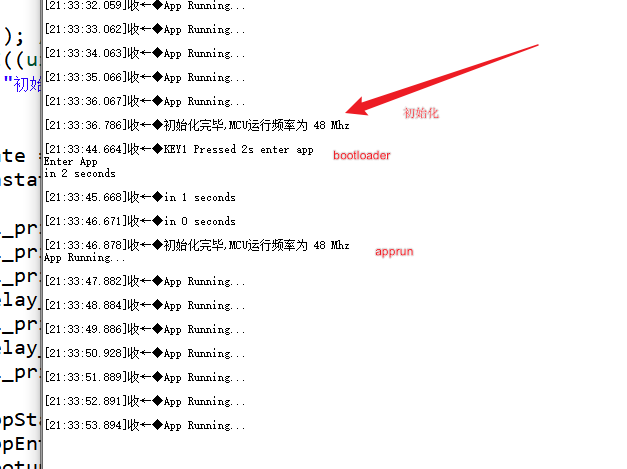
7.实验现象
将两份代码都下载进芯片中,芯片先进入bootloader.main 从定向到0x8000
再指向app_main