新塘网站seo优化哪个网站可以免费建站啊免费建网站
《Pytorch深度学习框架实战教程09:模型的保存和加载相关文章:
《Pytorch深度学习框架实战教程01:深度学习框架简介》
《Pytorch深度学习框架实战教程02:开发环境部署》
《Pytorch深度学习框架实战教程09:模型的保存和加载》
====================================================================
Tensor 是 PyTorch 的基石数据结构,理解其创建、属性、操作和转换是掌握 PyTorch 进行深度学习、科学计算的关键第一步。本文将深入探讨这些核心概念。
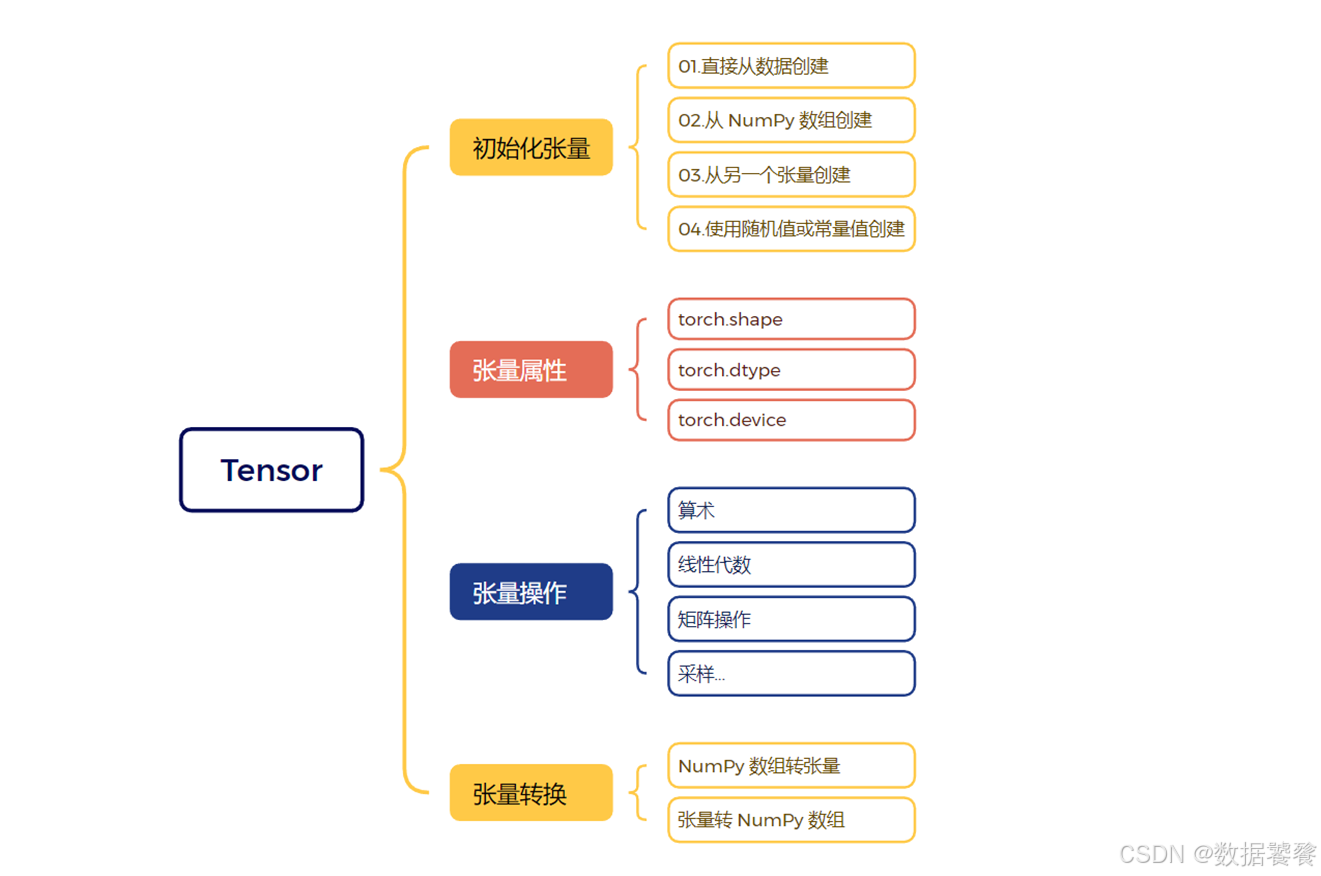
一、Tensor:PyTorch 的核心多维数组
Tensor 本质上是多维数组,是 NumPy ndarray 在 GPU 上加速计算的进化版本。它不仅是存储数据的容器,更是构建动态计算图、实现自动微分(Autograd)的基础。
-
标量 (Scalar):0维 Tensor(单个数值)
-
向量 (Vector):1维 Tensor
-
矩阵 (Matrix):2维 Tensor
-
高阶张量 (Higher-order Tensor):3维及以上的 Tensor
二、Tensor 的创建:多种方式灵活构建
1. 从 Python 列表或序列创建
import torch# 创建标量 (0维)
scalar = torch.tensor(3.1415)
print(scalar, scalar.dim()) # 输出: tensor(3.1415) 0# 创建向量 (1维)
vector = torch.tensor([1, 2, 3, 4])
print(vector, vector.shape) # 输出: tensor([1, 2, 3, 4]) torch.Size([4])# 创建矩阵 (2维)
matrix = torch.tensor([[1., 2.], [3., 4.], [5., 6.]])
print(matrix, matrix.shape) # 输出: tensor([[1., 2.], [3., 4.], [5., 6.]]) torch.Size([3, 2])# 创建3维张量
tensor_3d = torch.tensor([[[1, 2], [3, 4]], [[5, 6], [7, 8]]])
print(tensor_3d, tensor_3d.shape) # 输出: tensor([[[1, 2], [3, 4]], [[5, 6], [7, 8]]]) torch.Size([2, 2, 2])
2. 使用工厂函数创建特定形状/内容
# 全零张量 (指定形状)
zeros = torch.zeros(2, 3) # 2行3列
print(zeros) # tensor([[0., 0., 0.], [0., 0., 0.]])# 全一张量
ones = torch.ones(3, 2) # 3行2列
print(ones) # tensor([[1., 1.], [1., 1.], [1., 1.]])# 单位矩阵 (方阵)
eye = torch.eye(3) # 3x3单位矩阵
print(eye) # tensor([[1., 0., 0.], [0., 1., 0.], [0., 0., 1.]])# 未初始化张量 (内容取决于内存状态,慎用!)
empty = torch.empty(2, 2)
print(empty) # 可能输出任意值,例如: tensor([[1.3907e-36, 0.0000e+00], [       nan, 0.0000e+00]])# 等差序列张量
arange = torch.arange(0, 10, 2) # 从0开始(包含),到10结束(不包含),步长2
print(arange) # tensor([0, 2, 4, 6, 8])# 均匀分布张量 (区间 [0, 1))
rand = torch.rand(2, 2) # 2x2,元素在[0, 1)均匀分布
print(rand) # 例如: tensor([[0.4387, 0.4984], [0.9087, 0.5797]])# 标准正态分布张量
randn = torch.randn(3, 3) # 3x3,元素服从标准正态分布(均值为0,方差为1)
print(randn) # 例如: tensor([[ 0.1872, -0.5601,  1.3439], [-0.8948, -0.6880, -0.0981], [ 0.0409, -1.2070, -0.7091]])# 特定值填充
full = torch.full((2, 2), 7) # 2x2,所有元素为7
print(full) # tensor([[7, 7], [7, 7]])
3. 从 NumPy 数组创建 (无缝互操作)
import numpy as np# 创建NumPy数组
np_array = np.array([[1, 2], [3, 4]])# 从NumPy数组创建Tensor (共享内存或不共享取决于操作)
tensor_from_np = torch.from_numpy(np_array)
print(tensor_from_np) # tensor([[1, 2], [3, 4]], dtype=torch.int32)# Tensor转回NumPy数组
np_array_back = tensor_from_np.numpy()
print(np_array_back) # [[1 2] [3 4]]
4. 基于现有 Tensor 创建 (继承属性)
x = torch.tensor([[1, 2], [3, 4]], dtype=torch.float32, device='cuda')# 继承x的dtype和device属性
y = torch.zeros_like(x) # 形状和x相同,内容为0
z = torch.ones_like(x)  # 形状和x相同,内容为1
rand_like = torch.rand_like(x) # 形状和x相同,内容为[0,1)均匀分布
5. 指定数据类型 (dtype) 和设备 (device)
# 创建时指定dtype (常用: torch.float32, torch.float64, torch.int32, torch.int64, torch.bool)
int_tensor = torch.tensor([1, 2], dtype=torch.int32)
float_tensor = torch.tensor([1.0, 2.0], dtype=torch.float64)# 创建时指定设备 (CPU 或 GPU)
cpu_tensor = torch.tensor([1, 2], device='cpu')
if torch.cuda.is_available():gpu_tensor = torch.tensor([1, 2], device='cuda') # 或 device='cuda:0' 指定GPU索引
三、Tensor 的关键属性:理解数据的基础
x = torch.randn(2, 3, 4) # 创建一个2x3x4的随机Tensor# 1. 形状 (Shape/Dimensions): 每个维度的大小
print(x.shape)  # 输出: torch.Size([2, 3, 4])
print(x.size()) # 与x.shape等价
print(x.size(0)) # 第0维的大小: 2
print(x.size(-1)) # 最后一维的大小: 4# 2. 数据类型 (Data Type - dtype): 元素的数据类型
print(x.dtype) # 输出: torch.float32 (torch.randn的默认类型)# 3. 设备 (Device): Tensor所在的位置 (CPU 或 GPU)
print(x.device) # 输出: device(type='cpu') (默认在CPU上)# 4. 维度数量 (Number of Dimensions - ndim)
print(x.ndim) # 输出: 3 (因为x是2x3x4)# 5. 元素总数 (Number of Elements - numel())
print(x.numel()) # 输出: 2 * 3 * 4 = 24# 6. 底层存储 (Storage - .storage()): 一维连续内存块 (高级)
# 注意: 不同形状的Tensor可能共享相同的storage,通过不同的stride访问
storage = x.storage()
print(storage) # 输出一个包含24个值的一维存储对象
四、Tensor 的操作:运算与变换的利器
1. 数学运算
a = torch.tensor([1, 2, 3])
b = torch.tensor([4, 5, 6])# 逐元素加法 (Element-wise)
c = a + b  # 等价于 torch.add(a, b)
print(c) # tensor([5, 7, 9])# 逐元素减法
d = a - b
print(d) # tensor([-3, -3, -3])# 逐元素乘法
e = a * b
print(e) # tensor([4, 10, 18])# 逐元素除法
f = b / a
print(f) # tensor([4.0000, 2.5000, 2.0000])# 标量运算 (广播)
g = a * 2
print(g) # tensor([2, 4, 6])# 矩阵乘法 (@ 或 torch.mm 或 torch.matmul)
matA = torch.randn(2, 3)
matB = torch.randn(3, 4)
matC = matA @ matB  # 等价于 torch.matmul(matA, matB)
print(matC.shape) # torch.Size([2, 4])# 幂运算
h = a ** 2
print(h) # tensor([1, 4, 9])# 常用函数
print(torch.exp(a)) # 指数
print(torch.log(a)) # 自然对数
print(torch.sin(a)) # 正弦
print(torch.sqrt(a)) # 平方根
print(torch.sum(a)) # 所有元素求和: 6
print(torch.mean(a.float())) # 所有元素求平均 (注意类型): 2.0
print(torch.max(a)) # 最大值: 3
print(torch.argmax(a)) # 最大值索引: 2
2. 索引、切片和选择
操作语法与 NumPy 高度一致。
x = torch.tensor([[1, 2, 3], [4, 5, 6], [7, 8, 9]])# 索引单个元素 (第0行第1列)
elem = x[0, 1] # tensor(2)# 切片行 (第1行到最后一行)
rows = x[1:] # tensor([[4, 5, 6], [7, 8, 9]])# 切片列 (所有行,第0列)
col = x[:, 0] # tensor([1, 4, 7])# 选择子区域 (第0、1行,第1、2列)
sub = x[0:2, 1:3] # tensor([[2, 3], [5, 6]])# 布尔索引 (选择大于5的元素)
mask = x > 5
selected = x[mask] # tensor([6, 7, 8, 9])# 花式索引 (选择第2行和第0行)
fancy = x[[2, 0]] # tensor([[7, 8, 9], [1, 2, 3]])
3. 形状操作 (Reshaping)
x = torch.arange(12) # tensor([0, 1, 2, 3, 4, 5, 6, 7, 8, 9, 10, 11])# 改变形状 (Reshape - 返回新视图,如果可能)
y = x.view(3, 4) # 变成3x4矩阵
print(y)
# tensor([[ 0,  1,  2,  3],
#         [ 4,  5,  6,  7],
#         [ 8,  9, 10, 11]])# 改变形状 (Reshape - 确保返回新张量)
z = x.reshape(4, 3) # 变成4x3矩阵
print(z)
# tensor([[ 0,  1,  2],
#         [ 3,  4,  5],
#         [ 6,  7,  8],
#         [ 9, 10, 11]])# 增加一个维度 (Unsqueeze)
a = torch.tensor([1, 2, 3])
b = a.unsqueeze(0) # 在第0维增加一个维度 (形状: [1, 3])
c = a.unsqueeze(1) # 在第1维增加一个维度 (形状: [3, 1])
print(b.shape, c.shape) # torch.Size([1, 3]) torch.Size([3, 1])# 减少一个维度 (Squeeze) - 只能压缩长度为1的维度
d = torch.zeros(2, 1, 3)
e = d.squeeze() # 压缩所有长度为1的维度 (形状: [2, 3])
f = d.squeeze(1) # 只压缩第1维 (形状: [2, 3])
print(e.shape, f.shape) # torch.Size([2, 3]) torch.Size([2, 3])# 维度置换 (Transpose / Permute)
mat = torch.randn(2, 3)
t_mat = mat.t() # 转置 (只适用于2维张量, 形状: [3, 2])
perm_mat = mat.permute(1, 0) # 与.t()效果相同
high_dim = torch.randn(2, 3, 4)
perm_high = high_dim.permute(2, 0, 1) # 新维度顺序 (形状: [4, 2, 3])
viewvsreshape核心区别:
view():要求原张量在内存中是连续的 (x.is_contiguous() == True),并且返回的通常是原数据的视图(共享内存)。如果原张量不连续,调用view()会报错。
reshape():更通用。如果原张量连续,其行为等同于view()(返回视图)。如果原张量不连续,它会先尝试返回视图(如果可能),否则会复制数据并返回一个连续的新张量。优先使用reshape更安全。
4. 连接与堆叠 (Concatenation & Stacking)
a = torch.tensor([1, 2, 3])
b = torch.tensor([4, 5, 6])# 沿现有维度连接 (Concatenate)
c_cat0 = torch.cat((a, b), dim=0) # 沿第0维连接 (默认)
print(c_cat0) # tensor([1, 2, 3, 4, 5, 6])matA = torch.tensor([[1, 2], [3, 4]])
matB = torch.tensor([[5, 6]])
c_cat1 = torch.cat((matA, matB), dim=0) # 沿行(第0维)连接 (形状: [3, 2])
print(c_cat1)
# tensor([[1, 2],
#         [3, 4],
#         [5, 6]])# 创建新维度堆叠 (Stack)
c_stack = torch.stack((a, b)) # 默认在dim=0创建新维度 (形状: [2, 3])
print(c_stack)
# tensor([[1, 2, 3],
#         [4, 5, 6]])
d_stack = torch.stack((a, b), dim=1) # 在dim=1创建新维度 (形状: [3, 2])
print(d_stack)
# tensor([[1, 4],
#         [2, 5],
#         [3, 6]])
五、Tensor 的转换:数据处理的桥梁
1. 数据类型转换 (Casting)
x = torch.tensor([1, 2, 3], dtype=torch.int32)# 使用 .to(dtype) 方法 (推荐)
y_float = x.to(dtype=torch.float32)
print(y_float, y_float.dtype) # tensor([1., 2., 3.]) torch.float32# 使用类型特定的方法
z_double = x.double() # 等价于 .to(torch.float64)
print(z_double.dtype) # torch.float64# 使用 torch.type()
w_long = x.type(torch.LongTensor) # 等价于 .to(torch.int64)
print(w_long.dtype) # torch.int64
2. 设备转换 (CPU <-> GPU)
x = torch.randn(2, 2)# 移动到GPU (如果可用)
if torch.cuda.is_available():device = torch.device("cuda")y_gpu = x.to(device) # 或 x.cuda()print(y_gpu.device) # device(type='cuda', index=0)# 移回CPU
z_cpu = y_gpu.to("cpu") # 或 y_gpu.cpu()
print(z_cpu.device) # device(type='cpu')
3. Tensor 与 NumPy 数组互转
# Tensor -> NumPy (如果Tensor在CPU上,通常共享内存;在GPU上会复制)
a = torch.ones(3)
b_np = a.numpy()
print(type(b_np), b_np) # <class 'numpy.ndarray'> [1. 1. 1.]# NumPy -> Tensor (通常共享内存)
c_np = np.array([4, 5, 6])
d_tensor = torch.from_numpy(c_np)
print(type(d_tensor), d_tensor) # <class 'torch.Tensor'> tensor([4, 5, 6], dtype=torch.int32)# 重要: 共享内存意味着修改一方会影响另一方
a[0] = 2
print(b_np[0]) # 输出: 2.0 (因为a和b_np共享内存)
c_np[0] = 7
print(d_tensor[0]) # 输出: tensor(7, dtype=torch.int32) (因为c_np和d_tensor共享内存)# 避免共享内存: 使用 .copy()
e_tensor = torch.tensor(c_np) # 总是复制数据创建新Tensor
f_np = a.detach().cpu().numpy() # 如果a在GPU或requires_grad=True, detach()和cpu()确保安全复制
4. 转换为 Python 标量
scalar_tensor = torch.tensor(5.0)
python_float = scalar_tensor.item() # 对于单元素Tensor
print(python_float, type(python_float)) # 5.0 <class 'float'># 对于多元素Tensor不能直接.item()
vector = torch.tensor([1, 2])
# vector.item() # 会报错: ValueError
5. 连续性 (Contiguity) 与 contiguous()
内存布局对性能(尤其是涉及 view 或某些操作)至关重要。
x = torch.arange(12).view(3, 4) # 创建连续张量
print(x.is_contiguous()) # True# 转置操作通常破坏连续性
y = x.t() # 转置 (形状变为[4, 3])
print(y.is_contiguous()) # False# 尝试对非连续张量使用view会报错
try:z = y.view(12) # 报错: RuntimeError
except RuntimeError as e:print(e) # 提示需要 contiguous 内存# 使用contiguous()创建数据的连续副本
y_cont = y.contiguous()
print(y_cont.is_contiguous()) # True
w = y_cont.view(12) # 成功
print(w) # tensor([0, 4, 8, 1, 5, 9, 2, 6, 10, 3, 7, 11])
六、总结
PyTorch Tensor 是深度学习模型构建和训练的核心数据结构。熟练掌握以下方面至关重要:
-
创建:使用
torch.tensor()、工厂函数 (zeros,ones,randn,arange)、从 NumPy 转换。 -
属性:深刻理解
shape、dtype、device、ndim、numel()的含义。 -
操作:
-
数学运算(逐元素、矩阵乘法、归约)。
-
索引、切片、选择(与 NumPy 类似)。
-
形状操作(
view,reshape,unsqueeze,squeeze,permute),特别注意view和reshape的区别。 -
连接与堆叠(
cat,stack)。
-
-
转换:
-
数据类型转换(
.to(dtype))。 -
设备转换(
.to(device))。 -
与 NumPy 互转(
numpy(),from_numpy()),注意内存共享问题。 -
单元素 Tensor 转 Python 标量(
.item())。 -
处理内存连续性(
is_contiguous(),contiguous())。
-
理解并熟练运用 Tensor 是高效利用 PyTorch 进行模型开发、数据处理和性能优化的基础。这些操作是构建复杂神经网络模型和训练流程的基石。继续深入学习和实践,你将能更自如地驾驭 PyTorch 的强大功能。