自己做的网站如何上传网上肇庆网站制作
完成商品的布局,完成商品的属性添加,最后的目的还是要完成数据添加,将我们前台的数据添加后台的数据库。
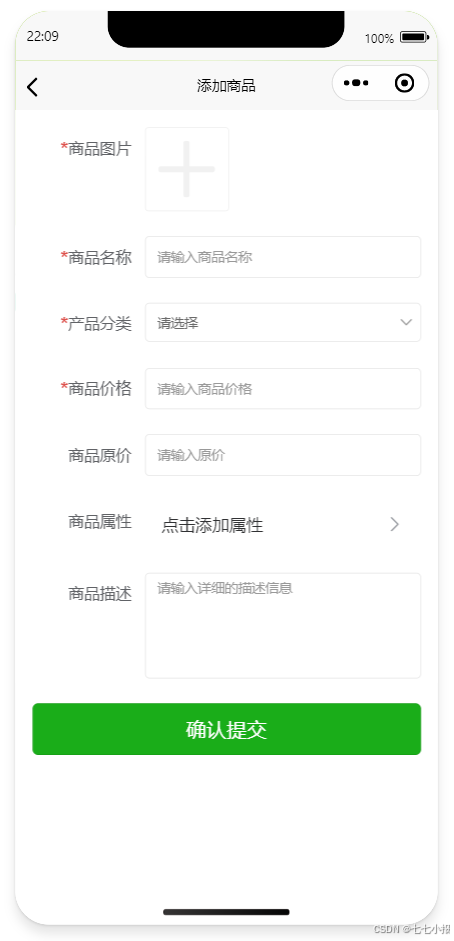
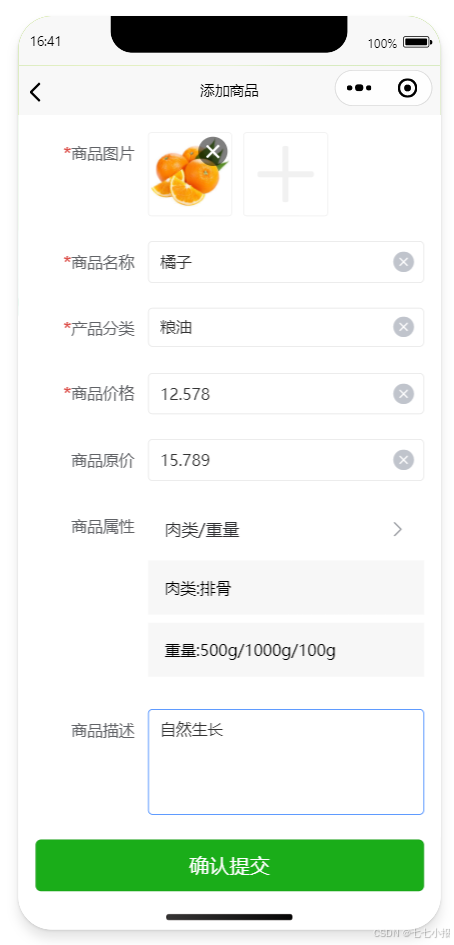
1、界面
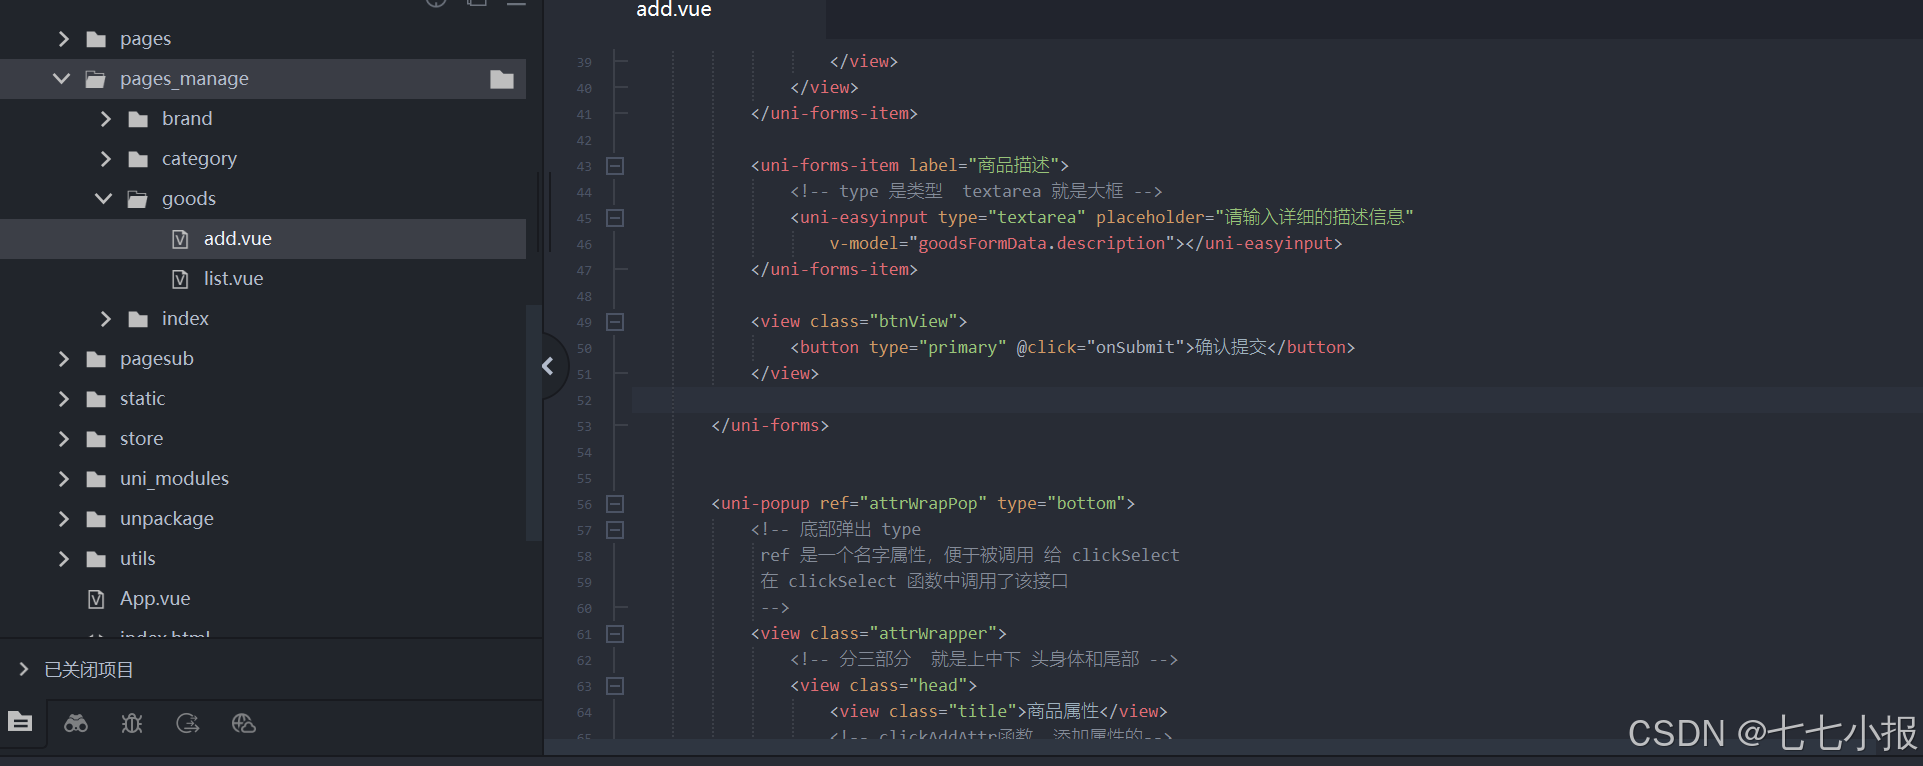
2、点击提交完成商品添加
点击下方的提交按钮,将数据添加到数据库。
onSubmit 使用该函数---见3
<view class="btnView">
<button type="primary" @click="onSubmit">确认提交</button>
</view>
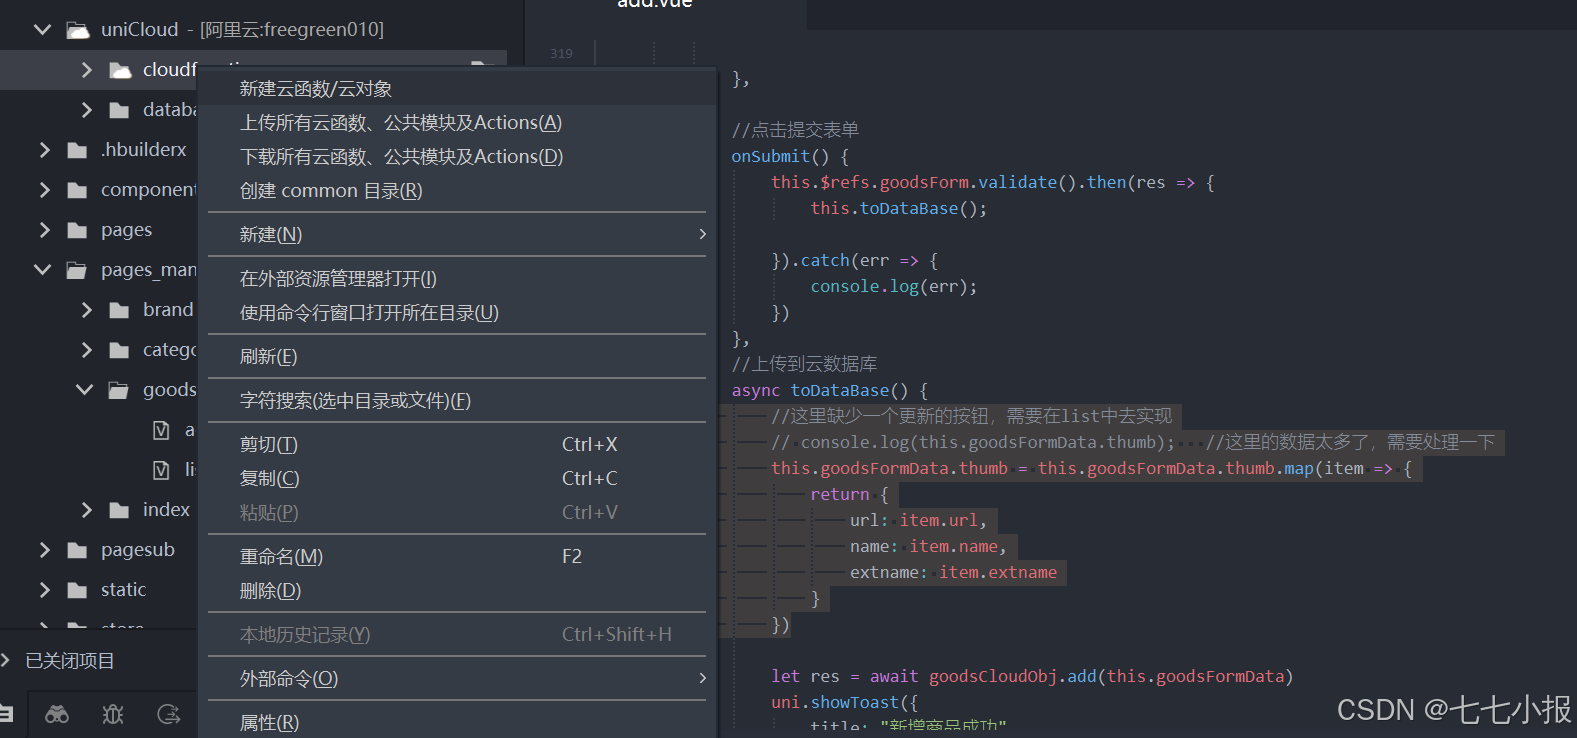
3、提交按钮的处理逻辑
3.1 onSubmit接口
//点击提交表单
onSubmit() {
this.$refs.goodsForm.validate().then(res => {
this.toDataBase(); //调用toDataBase ---见 3.2
}).catch(err => {
console.log(err);
})
},
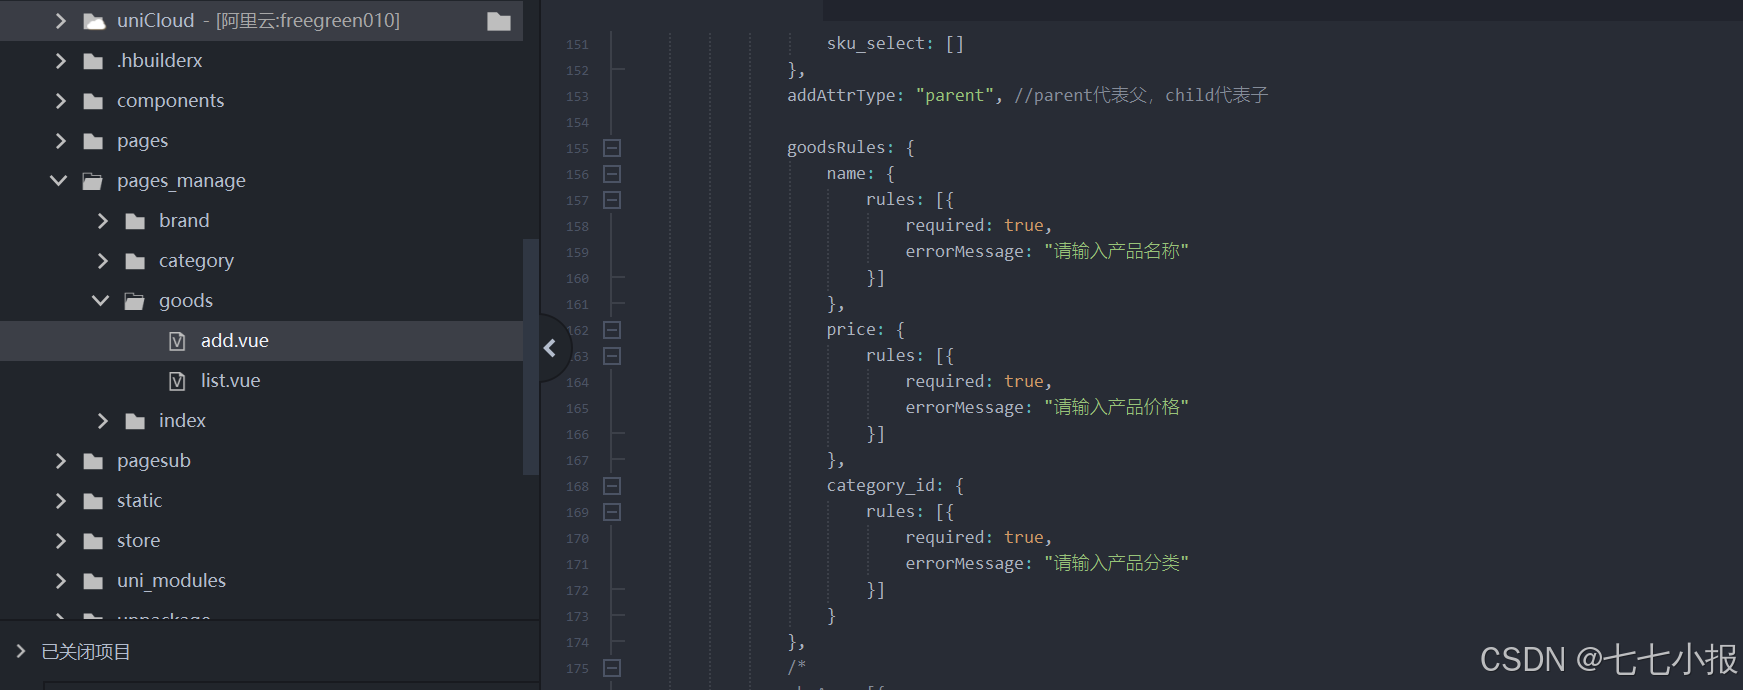
这里看出,先找到了 goodsForm的表单名,进行验证,通过验证就执行 toDataBase
表单 goodsForm 在代码的开始部分已经定义了

验证采用的规则也在前面讲过了
3.2 toDataBase 接口到数据库保存
//上传到云数据库
async toDataBase() {
//这里缺少一个更新的按钮,需要在list中去实现
// console.log(this.goodsFormData.thumb); //这里的数据太多了,需要处理一下
this.goodsFormData.thumb = this.goodsFormData.thumb.map(item => {
return {
url: item.url,
name: item.name,
extname: item.extname
}
})
let res = await goodsCloudObj.add(this.goodsFormData) //使用云对象处理
uni.showToast({
title: "新增商品成功"
})
setTimeout(() => {
uni.navigateBack()
}, 1500)
}
3.2.1 处理图片 this.goodsFormData.thumb
前面商家信息 也遇到这个问题,商家信息也要处理 ,主要默认上传的图片的数据太多了,需要清理一下,截取我们需要的数据。
//这里缺少一个更新的按钮,需要在list中去实现
// console.log(this.goodsFormData.thumb); //这里的数据太多了,需要处理一下
this.goodsFormData.thumb = this.goodsFormData.thumb.map(item => {
return {
url: item.url,
name: item.name,
extname: item.extname
}
})
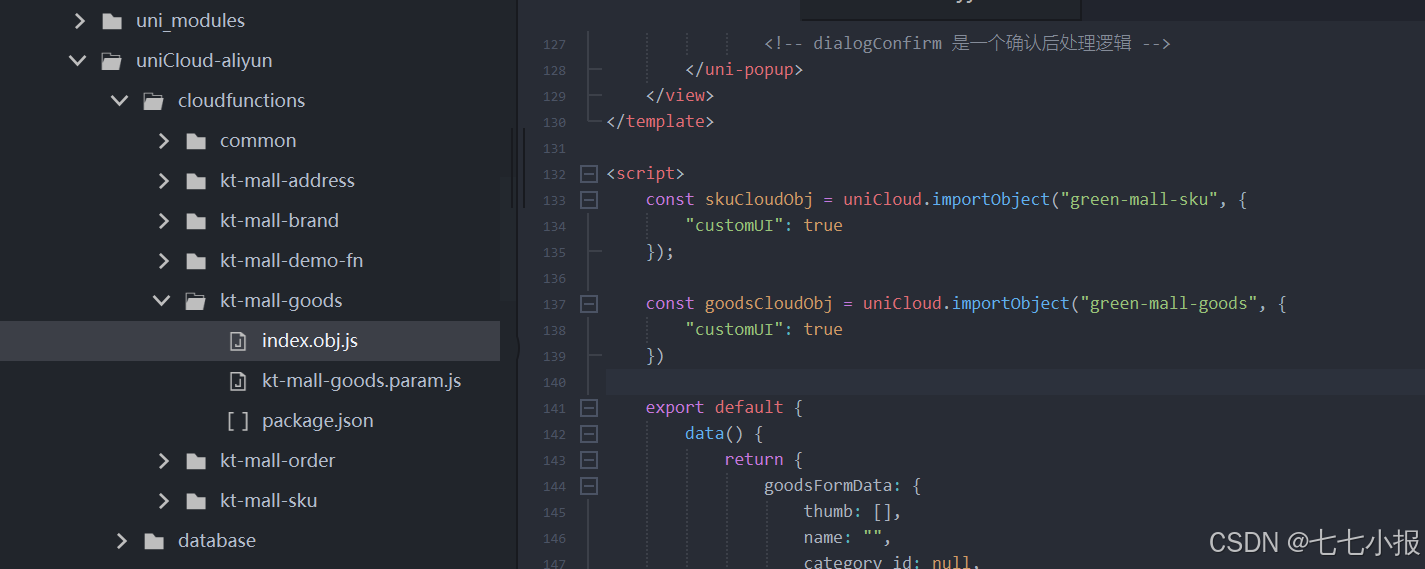
3.2.2 云对象上传商品数据
3.2.2.1、 创建云对象 green-mall-goods
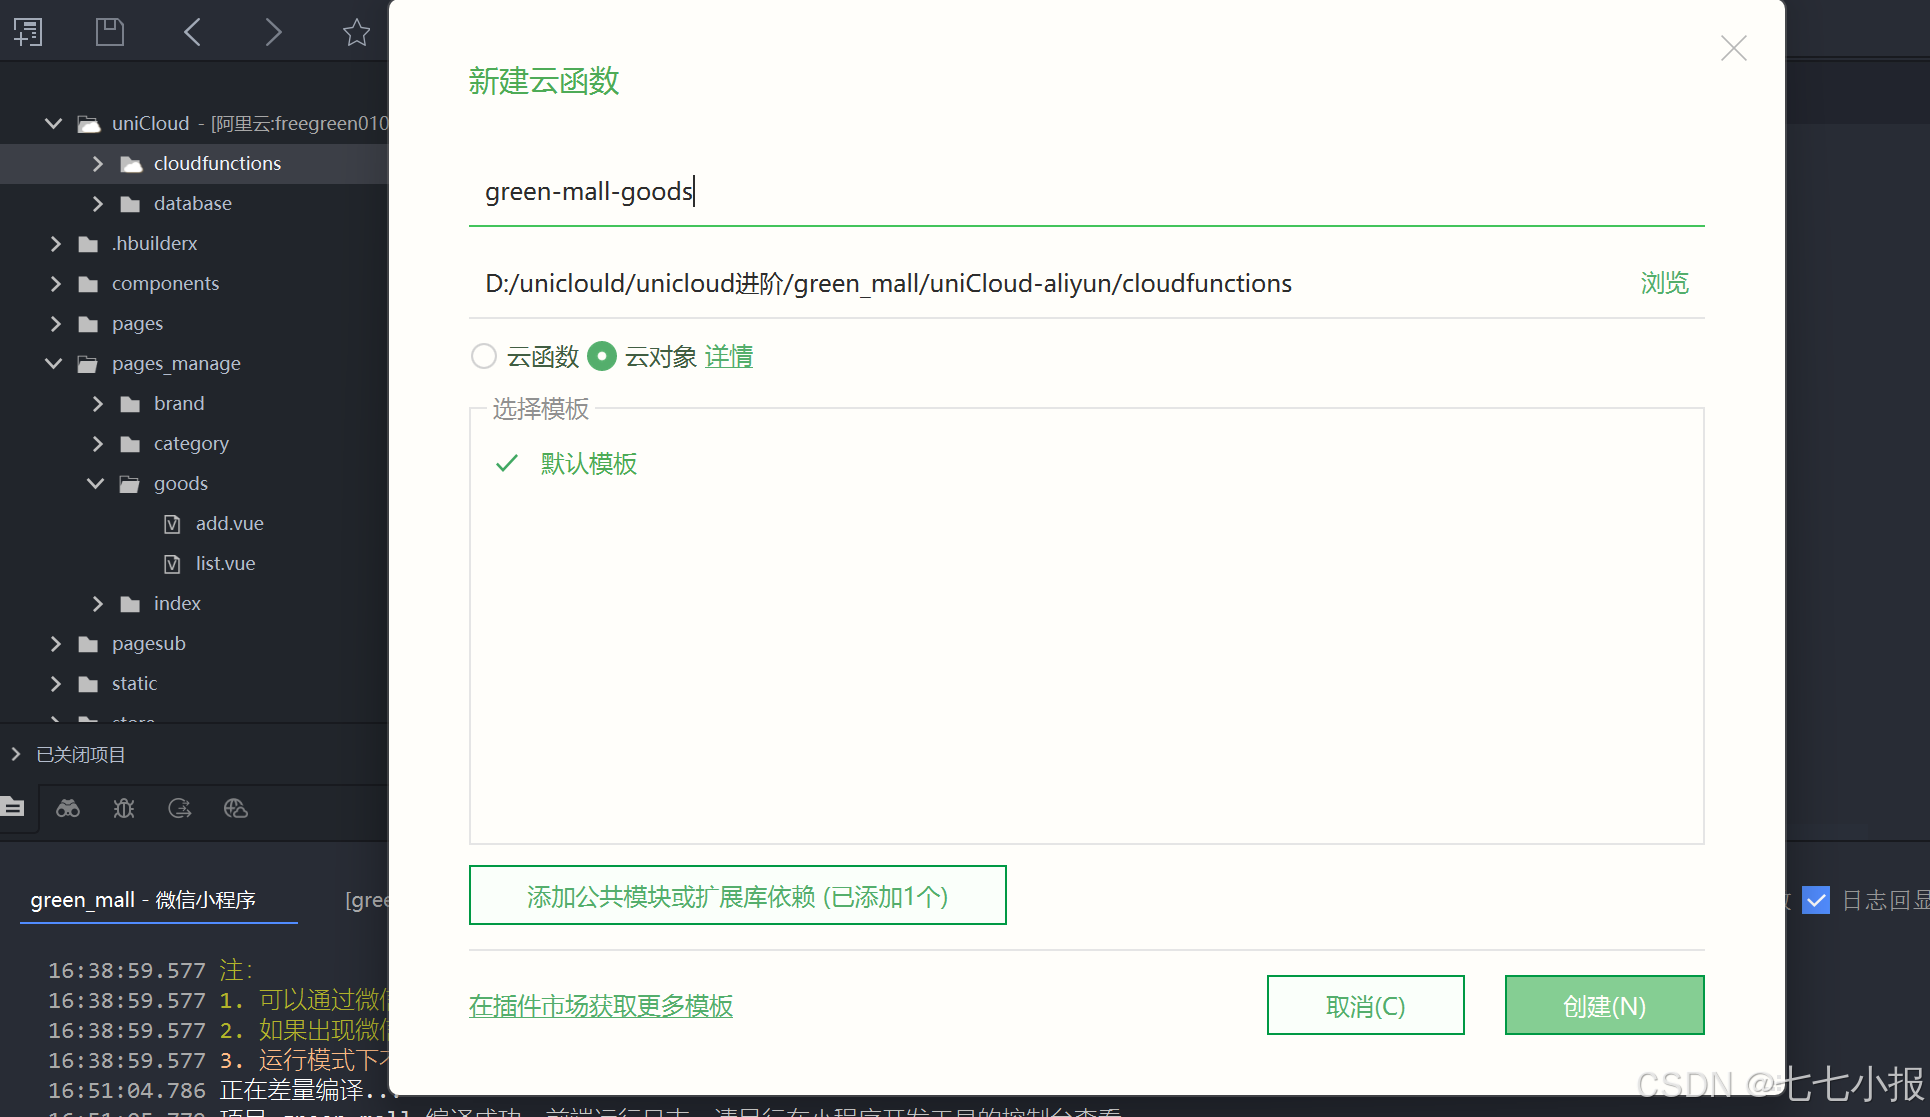
代码:
const db = uniCloud.database();
async add(params){
params.price = Number(params.price).toFixed(2)*100
params.before_price = params.before_price ? Number(params.before_price).toFixed(2)*100 : null
return await db.collection("green-mall-goods").add(params);
},
3.2.2.2 页面逻辑引入
在页面引入:
const goodsCloudObj = uniCloud.importObject("green-mall-goods", {
"customUI": true
})
4、整体代码
<template><view class="goodsView"><!-- 添加商品 --><uni-forms ref="goodsForm" :model="goodsFormData" :rules="goodsRules" :label-width="100" label-align="right"><uni-forms-item label="商品图片" required="true"><uni-file-picker v-model="goodsFormData.thumb" fileMediatype="image" mode="grid" ></uni-file-picker></uni-forms-item><uni-forms-item label="商品名称" required name="name" ><!-- trim 去空格 --><uni-easyinput v-model="goodsFormData.name" placeholder="请输入商品名称" trim="both"></uni-easyinput></uni-forms-item><uni-forms-item label="产品分类" required name="category_id"><!-- 云端数据  下拉框获取  field 就是获取的内容  一定要写成 value text 这是官方定义的  value选中的值,text显示的文本,也就是value后台用,text前台用 --><!-- 利用这个组件就实现了后端数据库的读取 --><uni-data-select collection="green-mall-categories" field="_id as value, name as text"v-model="goodsFormData.category_id"></uni-data-select></uni-forms-item><uni-forms-item label="商品价格" required name="price"><!-- trim 去空格 --><uni-easyinput type="number" v-model="goodsFormData.price" placeholder="请输入商品价格"trim="both"></uni-easyinput></uni-forms-item><uni-forms-item label="商品原价"><!-- trim 去空格 --><uni-easyinput type="number" v-model="goodsFormData.before_price" placeholder="请输入原价"trim="both"></uni-easyinput></uni-forms-item><uni-forms-item label="商品属性" ><u-cell :title="skuTitle" isLink :border="false" @click="clickSelect"></u-cell><view class="skuList"><view class="item" v-for="item in goodsFormData.sku_select" @click="clickSelect"><view class="left">{{item.skuName}}:</view><view class="right">{{skuChildName(item.children)}}</view></view></view></uni-forms-item><uni-forms-item label="商品描述"><!-- type 是类型  textarea 就是大框 --><uni-easyinput type="textarea" placeholder="请输入详细的描述信息"v-model="goodsFormData.description"></uni-easyinput></uni-forms-item><view class="btnView"><button type="primary" @click="onSubmit">确认提交</button></view></uni-forms><uni-popup ref="attrWrapPop" type="bottom"><!-- 底部弹出 type ref 是一个名字属性,便于被调用 给 clickSelect 在 clickSelect 函数中调用了该接口--><view class="attrWrapper"><!-- 分三部分  就是上中下 头身体和尾部 --><view class="head"><view class="title">商品属性</view><!-- clickAddAttr函数  添加属性的--><view class="addAttr" @click="clickAddAttr()">+ 添加属性</view></view><view class="body"><!-- 读取 skuArr 循环显示 分两部分显示 top 和 btngroup--><view class="item" v-for="(item,index) in skuArr"><view class="top"><checkbox :checked="item.checked" @click="changeCheckbox(index)"></checkbox><!-- changeCheckbox  选中就做这个操作 --><!-- checked 是否被选中的属性标识 --><view class="font">{{item.skuName}}</view></view><view class="btnGroup" v-if="item.checked"><!-- 需要判断checked 是不是true  是不是选中,选中了就展示--><view class="btn" :class="child.checked?'active':''" v-for="(child,cIdx) in item.children"@click="clickChlidBtn(index,cIdx)">{{child.name}}</view><!-- btn 读取skuArr ,循环显示选中就加class 为active  点击 就执行 clickChlidBtn函数--><view class="btn" @click="clickAddAttr(index)"><!-- btn 该盒子就是一个 + 号,用来添加该属性下的选项 clickAddAttr 点就执行uicon就一个 + 号图标  --><u-icon name="plus"></u-icon></view></view></view></view><view class="foot"><button type="primary" @click="clickConfirmSelect">确认选择</button><!-- 按钮 ,蓝色提交按钮type 就是颜色格式点击就是确认该商品的属性clickConfirmSelect--></view></view><view class="safe-area-bottom"></view><!--防止被苹果虚拟home键 挡住 --><!-- 这里就是直接调用的app.vue的全局样式。什么是全局样式:就是样式那里没有scoped 的,所以在以前老是要写一个表示局部样式,就怕vue 中class名字一样了如果你不些scoped ,就要把全局的view 的class 写在最前面。不知道懂不懂,慢慢悟吧--></uni-popup><!-- 这里是点击的添加属性的弹窗 --><!-- 你可能懵逼了那个添加属性的弹窗?两个弹窗都要用一个是第一个弹窗中的右上角的添加属性  class名字 addAttr一个是属性规格下的选项中的 + class的名字就是btn--><uni-popup ref="addAttrPop"><uni-popup-dialog mode="input" title="新增" placeholder="请输入新增的内容"@confirm="dialogConfirm"></uni-popup-dialog><!-- dialogConfirm 是一个确认后处理逻辑 --></uni-popup></view>
</template><script>const skuCloudObj = uniCloud.importObject("green-mall-sku", {"customUI": true});const goodsCloudObj = uniCloud.importObject("green-mall-goods", {"customUI": true})export default {data() {return {goodsFormData: {thumb: [],name: "",category_id: null,price: null,before_price: null,description: "",sku_select: []},addAttrType: "parent", //parent代表父,child代表子goodsRules: {name: {rules: [{required: true,errorMessage: "请输入产品名称"}]},price: {rules: [{required: true,errorMessage: "请输入产品价格"}]},category_id: {rules: [{required: true,errorMessage: "请输入产品分类"}]}},/*skuArr: [{_id:1,skuName:"颜色",checked:false,children:[{name:"红",checked:false},{name:"蓝",checked:false}]},{_id:2,skuName:"规格",checked:false,children:[{name:"M",checked:false},{name:"S",checked:false}]}],*/// 上面是一个数据结构例子,后台数据就应该着这样存// 实际是下面的[]skuArr: [],};},onLoad() {},computed: {skuTitle() {if (this.goodsFormData.sku_select.length) {let arr = this.goodsFormData.sku_select.map(item => {return item.skuName})console.log(arr);return arr.join("/")} else {return "点击添加属性"}}},methods: {//属性返回子元素的名称skuChildName(arr) {let nsArr = arr.map(item => {return item.name})return nsArr.join("/")},//点击确认选择 是在弹出框上选//some 数组至少有一个满足 没有就是false   every就是每一个都要满足,不满足就是false// 这里filter 选出父级属性 checked =true 被选中的 且子级属性有一个被选中的数组对象;// 然后再对选中的对象,逐一进行map运算//运算就是filter 过滤出来选中的子级元素//返回一个 数组 arr 且元素为一个对象,对象展开了item ,然后将children的值放到里面,覆盖item中的childrenclickConfirmSelect() {let arr = this.skuArr.filter(item => {let state = item.children.some(child => child.checked)  return item.checked && state}).map(item => {let children = item.children.filter(child => {return child.checked})// console.log(item,11111111);// console.log(children,2222222);return {...item,// children   //覆盖了item中children}})this.goodsFormData.sku_select = arr   //赋值后,页面在使用这个数组来显示  立即回显this.$refs.attrWrapPop.close();   //关闭掉弹窗},//获取sku列表async getSkuData() {let res = await skuCloudObj.get();this.skuArr = res.data// console.log(res);},//点击添加属性 index 存在就是嵌套下 父类属性的子类选项 ,不存在就是添加父类属性clickAddAttr(index = null) {if (index == null) {this.addAttrType = "parent"this.attrIndex = null} else {this.addAttrType = "child"this.attrIndex = index}this.$refs.addAttrPop.open();},//添加属性弹窗的确认按钮async dialogConfirm(e) {if (!e) return;if (this.addAttrType == "parent") {let obj = {skuName: e,checked: true,children: []}let res = await skuCloudObj.add(obj)obj._id = res.id;this.skuArr.push(obj)//向数组中添加一个元素,就弹窗的确认按钮} else if (this.addAttrType == "child") {let obj = {name: e,checked: true}let id = this.skuArr[this.attrIndex]._id;let res = await skuCloudObj.updateChild(id, obj)this.skuArr[this.attrIndex].children.push(obj)}},//点击属性的复选框	改变了值,也相应改变了显示 后面也把值存到了数据库changeCheckbox(index) {this.skuArr[index].checked = !this.skuArr[index].checked},//点击属性值的子元素  改变了值,也相应改变了显示 后面也把值存到了数据库clickChlidBtn(index, cIdx) {this.skuArr[index].children[cIdx].checked = !this.skuArr[index].children[cIdx].checked},//点击选择属性clickSelect() {this.$refs.attrWrapPop.open(); //使用open方法弹出来if (this.skuArr.length) return;this.getSkuData();},//点击提交表单onSubmit() {this.$refs.goodsForm.validate().then(res => {this.toDataBase();}).catch(err => {console.log(err);})},//上传到云数据库async toDataBase() {//这里缺少一个更新的按钮,需要在list中去实现// console.log(this.goodsFormData.thumb);   //这里的数据太多了,需要处理一下this.goodsFormData.thumb = this.goodsFormData.thumb.map(item => {return {url: item.url,name: item.name,extname: item.extname}})let res = await goodsCloudObj.add(this.goodsFormData)uni.showToast({title: "新增商品成功"})setTimeout(() => {uni.navigateBack()}, 1500)}}}
</script><style lang="scss" scoped>.goodsView {padding: 30rpx;.skuList {.item {padding: 30rpx;background: $page-bg-color;margin: 15rpx 0;@include flex-box-set(start);}}}.attrWrapper {padding: 30rpx;background: #fff;border-radius: 20rpx 20rpx 0 0;.head {@include flex-box();font-size: 34rpx;margin-bottom: 30rpx;.title {font-weight: bold;}.addAttr {color: $brand-theme-color-aux;}}.body {.item {border-top: 1px solid $border-color-light;&:last-child {border-bottom: 1px solid $border-color-light;}.top {padding: 30rpx 0;@include flex-box-set(start);.font {padding-left: 10rpx;font-weight: bold;}}.btnGroup {padding: 10rpx 0 30rpx;@include flex-box-set(start);flex-wrap: wrap;.btn {padding: 0rpx 25rpx;height: 60rpx;border: 1rpx solid $border-color-light;margin-right: 20rpx;border-radius: 10rpx;color: $text-font-color-2;margin-bottom: 20rpx;@include flex-box-set();&.active {border-color: $brand-theme-color;color: $brand-theme-color;background: rgba(236, 87, 79, 0.1);}}}}}.foot {padding: 50rpx 200rpx;}}
</style>