《C++Linux编程进阶:从0实现muduo 》-第6讲.C++死锁问题如何分析调试-原子操作,互斥量,条件变量的封装
重点内容

视频讲解:《C++Linux编程进阶:从0实现muduo C++网络框架系列》-第6讲.C++死锁问题如何分析调试-原子操作,互斥量,条件变量的封装
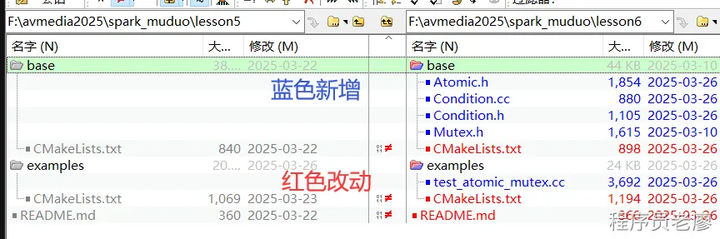
代码改动
lesson6代码
-
实现:base/Atomic.h
-
实现:base/Mutex.h
-
实现:base/Condition.h/cc
-
examples/test_atomic_mutex.cc
1 AtomicIntegerT原子操作封装
1.1 封装意义
目的是更符号项目的用法,用起来更得心应手。
这种封装在网络库中特别有用,因为网络库经常需要处理并发场景,比如:
-
统计连接数
-
管理连接状态
-
处理引用计数
-
实现无锁队列
-
实现线程安全的计数器
1.2 类图
AtomicIntegerT<T>
├── 私有成员
│   └── volatile T value_
├── 构造/析构
│   ├── AtomicIntegerT()	// 默认构造函数,初始值为0
│   └── explicit AtomicIntegerT(T x)	// 构造函数,禁止隐式类型转换
├── 原子读取操作
│   └── T get() // 原子性地读取value_的值
├── 原子修改操作
│   ├── T getAndSet(T newValue) // 原子性地将value_设置为newValue,并返回之前的值
│   ├── T getAndAdd(T x)// 原子性地将value_加上x,并返回之前的值
│   ├── T addAndGet(T x)// 原子性地将value_加上x,并返回新的值
│   ├── T incrementAndGet()	// 原子性地将value_加1,并返回之前的值
│   └── T decrementAndGet()	// 原子性地将value_减1,并返回之前的值
└── 便捷操作
    ├── void add(T x)	// 原子性地将value_加上x
    ├── void increment()	// 原子性地将value_加1
    └── void decrement()	// 原子性地将value_减1
使用typedef 定义了AtomicInt32 AtomicInt64
// 定义32位和64位原子整数类型
typedef detail::AtomicIntegerT<int32_t> AtomicInt32;
typedef detail::AtomicIntegerT<int64_t> AtomicInt64;
1.3 原子操作实现原理
-
使用GCC内置的原子操作函数:
__sync_val_compare_and_swap  // CAS操作
__sync_lock_test_and_set     // 原子交换
__sync_fetch_and_add         // 原子加法

// 原子性地读取value_的值
T get()
{
    return __sync_val_compare_and_swap(&value_, 0, 0);
}

// 原子性地将value_设置为newValue,并返回之前的值
T getAndSet(T newValue)
{
    return __sync_lock_test_and_set(&value_, newValue);
}

// 原子性地将value_加上x,并返回之前的值
T getAndAdd(T x)
{
    return __sync_fetch_and_add(&value_, x);
}-
这些函数在编译时会被转换为CPU的原子指令
-
比如x86平台会使用lock前缀的指令
1.4 在muduo中的使用场景
class Thread : noncopyable
{
   static AtomicInt32 numCreated_;  //静态变量,用来计算创建的线程序号
};


void Thread::setDefaultName()
{
  int num = numCreated_.incrementAndGet();   //创建的线程序号
  if (name_.empty())
  {
    char buf[32];
    snprintf(buf, sizeof buf, "Thread%d", num);  //设置唯一的线程名字
    name_ = buf;
  }
}
class TcpServer {
AtomicInt32 started_; // 标记服务是否启动
};
void TcpServer::start()
{
if (started_.getAndSet(1) == 0) // 默认值是0,获取之前的值并设置新值,避免程序二次启动
{
threadPool_->start(threadInitCallback_);
assert(!acceptor_->listening());
loop_->runInLoop(
std::bind(&Acceptor::listen, get_pointer(acceptor_)));
}
}class Timer : noncopyable
{
static AtomicInt64 s_numCreated_; //创建的定时器序号
Timer(TimerCallback cb, Timestamp when, double interval)
: callback_(std::move(cb)),
expiration_(when),
interval_(interval),
repeat_(interval > 0.0),
sequence_(s_numCreated_.incrementAndGet()) //当前定时器的序号
{ }
}1.5 使用示例
// 测试原子操作
void testAtomic()
{
    printf("Testing Atomic operations...\n");

    AtomicInt32 a0;
    assert(a0.get() == 0);
    assert(a0.getAndAdd(1) == 0);
    assert(a0.get() == 1);
    assert(a0.addAndGet(2) == 3);
    assert(a0.get() == 3);
    assert(a0.incrementAndGet() == 4);
    assert(a0.get() == 4);
    assert(a0.decrementAndGet() == 3);
    assert(a0.get() == 3);

    printf("Atomic test passed!\n");
}
2 MutexLock/MutexLockGuard互斥量封装
2.1 封装意义
-
提供RAII风格的互斥锁管理
-
追踪锁的持有者,方便调试
-
防止误用和死锁
2.2 类图
MutexLock
├── 私有成员
│   ├── pthread_mutex_t mutex_
│   └── pid_t holder_
├── 构造/析构
│   ├── MutexLock()
│   └── ~MutexLock()
├── 锁操作
│   ├── void lock()
│   └── void unlock()
├── 调试功能
│   ├── bool isLockedByThisThread()
│   └── void assertLocked()
└── 友元类
    └── Condition

MutexLockGuard
├── 私有成员
│   └── MutexLock& mutex_
├── 构造/析构
│   ├── MutexLockGuard(MutexLock& mutex)
│   └── ~MutexLockGuard()
└── 禁止拷贝
    └── noncopyable
2.3 实现原理
-
使用pthread_mutex作为底层实现
-
通过RAII自动管理锁的获取和释放
-
通过gettid()追踪锁的持有者
2.4 在muduo中的使用场景
使用的场景较多,这里只展示了在EventLoop,ThreadPool中的使用。
void EventLoop::queueInLoop(Functor cb)
{
    {
        MutexLockGuard lock(mutex_);  //加锁
        pendingFunctors_.push_back(std::move(cb));
    }

    if (!isInLoopThread() || callingPendingFunctors_)
    {
        wakeup();
    }
}
size_t ThreadPool::queueSize() const
{
MutexLockGuard lock(mutex_); //加锁
return queue_.size();
}2.4 使用示例
muduo库封装的Mutex功能很多,但我们目前知道调用
MutexLockGuard lock(mutex); 加锁就行,其他的用法不做要求。isLockedByThisThread 是一个用于调试和断言的重要函数,让我详细解释它的使用:
1.基本用法(掌握这里就行)
MutexLock mutex;
{
    MutexLockGuard lock(mutex);
}
2.常见使用场景(不做要求)
class ThreadSafeClass {
public:
    void method1() {
        MutexLockGuard lock(mutex_);
        // 确保在持有锁的情况下调用method2
        method2();  // 内部方法调用
    }

private:
    void method2() {
        // 确保调用此方法时已经持有锁
        mutex_.assertLocked();  // 如果未持有锁,会触发断言
        // 执行操作...
    }

    MutexLock mutex_;
};
3.调试死锁(不做要求)
class Resource {
public:
    void access() {
        MutexLockGuard lock(mutex_);
        // 检查是否真的持有锁
        if (!mutex_.isLockedByThisThread()) {
            printf("Warning: Lock not held by current thread!\n");
        }
        // 执行操作...
    }

private:
    MutexLock mutex_;
};
4.防止误用(不做要求)
class SafeCounter {
public:
    void increment() {
        // 确保在持有锁的情况下修改数据
        if (!mutex_.isLockedByThisThread()) {
            printf("Error: Must hold lock to modify counter!\n");
            return;
        }
        count_++;
    }

private:
    MutexLock mutex_;
    int count_;
};
5.实际应用示例(不做要求)
class ThreadSafeQueue {
public:
    void push(int value) {
        MutexLockGuard lock(mutex_);
        // 确保在持有锁的情况下调用内部方法
        doPush(value);
    }

private:
    void doPush(int value) {
        // 确保调用此方法时已经持有锁
        mutex_.assertLocked();
        queue_.push(value);
    }

    MutexLock mutex_;
    std::queue<int> queue_;
};
3 Condition条件变量的封装
3.1 封装意义
-
提供线程间的同步机制
-
实现生产者-消费者模式
-
支持超时等待功能
-
与MutexLock配合使用,确保线程安全
3.2 类图
Condition
├── 私有成员
│   ├── MutexLock& mutex_      // 互斥锁引用
│   └── pthread_cond_t pcond_  // 条件变量
├── 构造/析构
│   ├── explicit Condition(MutexLock& mutex)
│   └── ~Condition()
├── 等待操作
│   ├── void wait()           // 等待通知
│   └── bool waitForSeconds(double seconds)  // 超时等待
└── 通知操作
    ├── void notify()         // 通知一个等待线程
    └── void notifyAll()      // 通知所有等待线程
3.3 实现原理
本质是调用pthread线程库的接口 以及封装的MutexLock。
class Condition : noncopyable
    ....
    MutexLock& mutex_;        // 互斥锁引用
    pthread_cond_t pcond_;    // 条件变量
};
3.4 在muduo中的使用场景
用于ThreadPool任务队列的生产者-消费者模型。
用于EventLoopThread等等IO Loop线程创建成功。
class ThreadPool : noncopyable
{
    mutable MutexLock mutex_;
    Condition notEmpty_ GUARDED_BY(mutex_);
    Condition notFull_ GUARDED_BY(mutex_);  //用来处理任务队列(生产者消费者模式)
}
EventLoop* EventLoopThread::startLoop()
{
assert(!thread_.started());
thread_.start();
EventLoop* loop = NULL;
{
MutexLockGuard lock(mutex_);
while (loop_ == NULL)
{
cond_.wait(); //等等loop线程创建成功
}
loop = loop_;
}
return loop;
}
void EventLoopThread::threadFunc()
{
EventLoop loop;
if (callback_)
{
callback_(&loop);
}
{
MutexLockGuard lock(mutex_);
loop_ = &loop;
cond_.notify(); //发通知,io loop线程已经准备好了
}
loop.loop();
//assert(exiting_);
MutexLockGuard lock(mutex_);
loop_ = NULL;
}使用示例
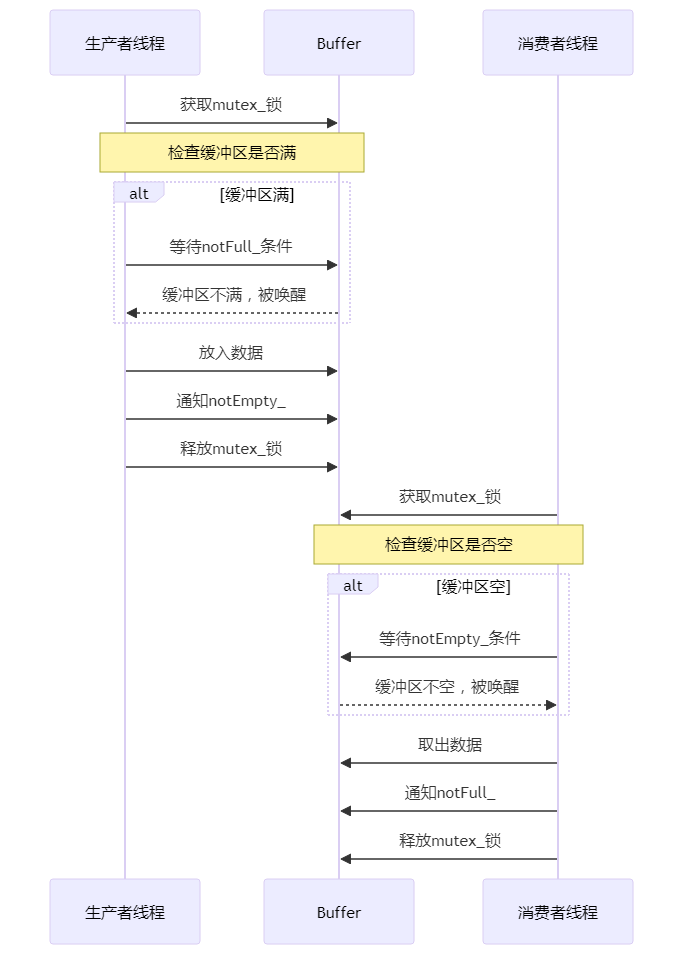
// 生产者-消费者模式
class Buffer {
public:
    Buffer(int size) : size_(size), notEmpty_(mutex_), notFull_(mutex_) {}

    void put(int item) {
        MutexLockGuard lock(mutex_);
        while (queue_.size() == size_) {
            notFull_.wait();  // 等待队列不满
        }
        queue_.push(item);
        notEmpty_.notify();  // 通知消费者
    }

    int get() {
        MutexLockGuard lock(mutex_);
        while (queue_.empty()) {
            notEmpty_.wait();  // 等待队列不空
        }
        int item = queue_.front();
        queue_.pop();
        notFull_.notify();  // 通知生产者
        return item;
    }

private:
    MutexLock mutex_;
    Condition notEmpty_;
    Condition notFull_;
    std::queue<int> queue_;
    int size_;
};
关键特性
-
与MutexLock配合使用
-
支持超时等待
-
提供广播通知
-
自动管理锁的释放和获取
使用建议
-
总是与MutexLock配合使用
-
使用while循环检查条件
-
注意通知的时机
-
合理使用notify和notifyAll
-
考虑使用超时机制避免死锁
这种封装在网络库中特别有用,因为:
-
需要处理异步事件
-
需要实现任务队列
-
需要处理定时器
-
需要实现线程池
-
需要处理生产者-消费者模式
4 完整的测试范例
完整测试代码:examples/test_atomic_mutex.cc
4.1 测试框架图
test_atomic_mutex.cc
├── 基础功能测试
│   ├── testAtomic()     // 原子操作测试
│   └── testMutex()      // 互斥锁测试
└── 条件变量测试
    └── testCondition()  // 生产者-消费者模式测试
        ├── Buffer类
        ├── producer线程
        └── consumer线程
4.2 原子操作测试流程图
testAtomic()
├── 初始化测试
│   └── AtomicInt32 a0
├── 基本操作测试
│   ├── get() == 0
│   ├── getAndAdd(1) == 0
│   └── get() == 1
├── 复合操作测试
│   ├── addAndGet(2) == 3
│   └── get() == 3
└── 自增自减测试
    ├── incrementAndGet() == 4
    ├── get() == 4
    ├── decrementAndGet() == 3
    └── get() == 3
4.3 互斥锁测试流程图
testMutex()
├── 创建互斥锁
│   └── MutexLock mutex
├── 加锁测试
│   ├── MutexLockGuard lock(mutex)
│   └── assert(mutex.isLockedByThisThread())
└── 解锁测试
    └── 作用域结束自动解锁
4.4 生产者-消费者模式原理图
[生产者线程1]     [生产者线程2]
      ↓               ↓
      └──────┐    ┌──┘
             ↓    ↓
         [Buffer缓冲区]
             ↓    ↓
      ┌──────┘    └──┐
      ↓               ↓
[消费者线程1]  [消费者线程2]  [消费者线程3]
4.5 Buffer类结构图
Buffer类
├── 私有成员
│   ├── size_t size_           // 缓冲区大小
│   ├── MutexLock mutex_       // 互斥锁
│   ├── Condition notEmpty_    // 不空条件变量
│   ├── Condition notFull_     // 不满条件变量
│   └── std::queue<int> queue_ // 数据队列
└── 公共方法
    ├── put(int item)          // 生产者方法
    └── get()                  // 消费者方法
4.6 线程同步流程图
4.6 测试输出
具体看代码打印
lesson6/build$ ./bin/test_atomic_mutex
5 章节总结
重点:
-
原子封装的目的是提供对于项目更易用的接口,并大致了解下
-
gcc原子操作相关的函数,比如__sync_fetch_and_add
-
了解Atomic MutexLock和Condition等封装在muduo网络库的使用。
-
掌握MutexLock类里保存获得锁的线程ID的作用,这样更方便分析死锁问题。