nest学习(5)
前端监控 RabbitMQ
前端监控系统是采集 用户端的异常,性能,业务埋点等数据上班,在服务端坐存储,并支持可视化分析的平台。
用户量大,采集的数据可能会比较多,服务端并发压力也会上升,要是直接存入数据库,数据库服务可能会崩掉。

要怎么保证面对大量并发请求的时候,服务不崩呢?
答案就是消息队列,比如常用的RabbitMQ

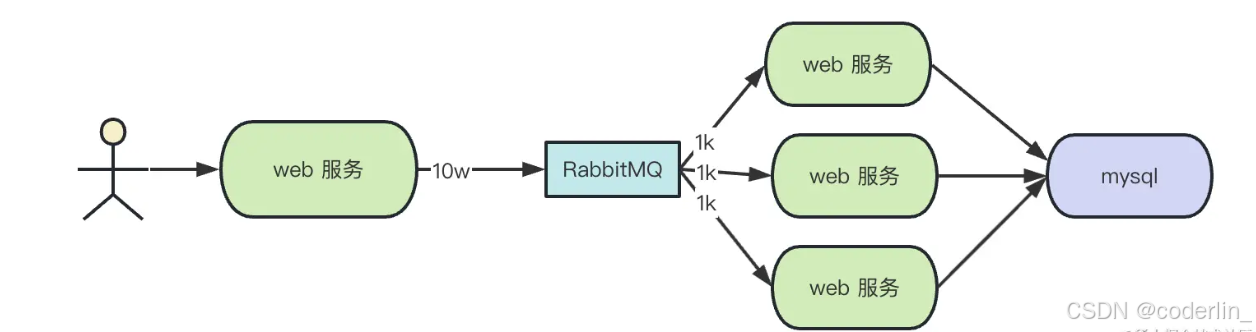
第一个web服务接受请求,将消息存入RabbiMQ,然后另一个web服务从MQ中取出消息存入数据库。
MQ的并发量比数据库高很多。

10w的消息进来,每次只取1k条数据来消费,这就是MQ的流量削峰功能。
而且可以多加几个web服务来同时消费MQ的消息
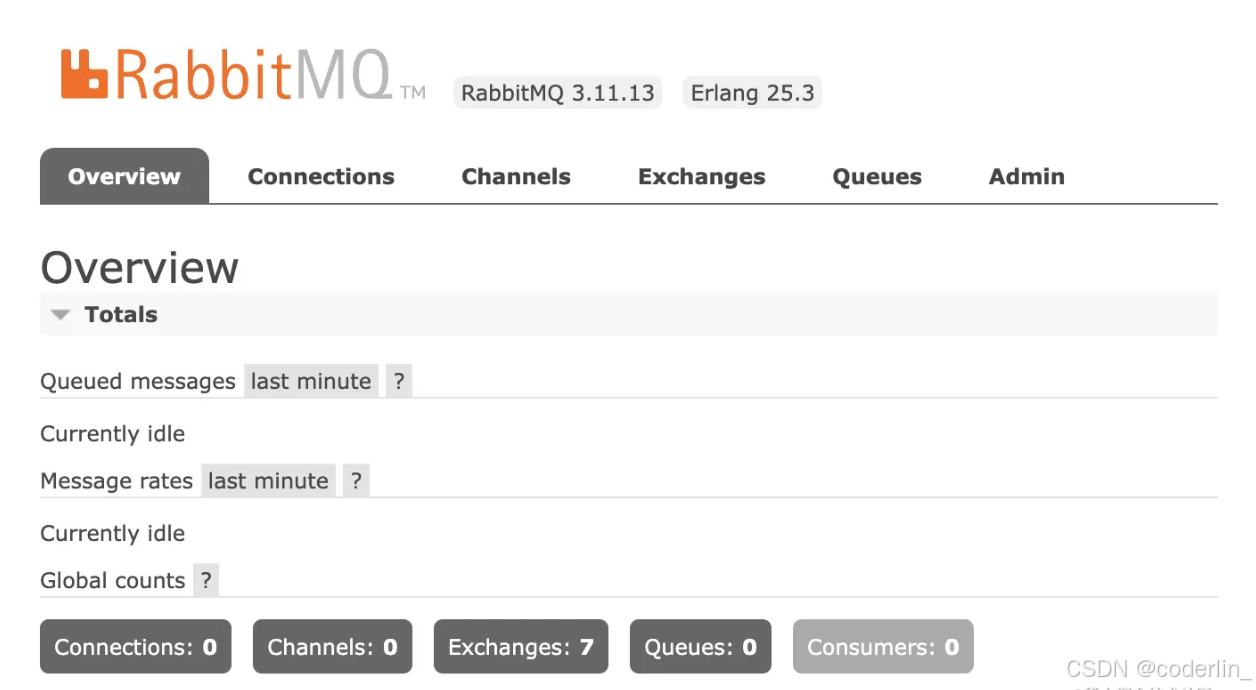
用docker跑一个MQ服务
import * as amqp from 'amqplib'

const connect = await amqp.connect(`amqp://localhost:5672`);
const channel = await connect.createChannel();

await channel.assertQueue('aaa');
await channel.sendToQueue('aaa',Buffer.from('hello'))
amqplib是rabbitmq的node客户端,上面代码链接了mq服务,
创建了一个aaa的队列,并向队列中发送了一个消息。
在管理界面就可以看到这个消息了

然后来消费他
import * as amqp from 'amqplib'

const connect = await amqp.connect(`amqp://localhost:5672`);
const channel = await connect.createChannel();

const { queue } = await channel.assertQueue('aaa');
channel.consume(queue, msg => {
    console.log(msg.content.toString())
}, { noAck: true });
assertQueue 是如果没有就创建队列,有的话就直接返回。
打印出就是hello。
模拟一下流量削峰功能。
import * as amqp from 'amqplib'

const connect = await amqp.connect(`amqp://localhost:5672`);
const channel = await connect.createChannel();

await channel.assertQueue('aaa', {durable: false});

let i = 1;
setInterval(async () => {
    const msg = 'hello' + i;
    console.log('发送消息:', msg);
    await channel.sendToQueue('aaa',Buffer.from(msg))
    i++;
}, 500);
没0.5s向aaa队列发送消息。
然后
import * as amqp from 'amqplib'

const connect = await amqp.connect(`amqp://localhost:5672`);
const channel = await connect.createChannel();

const { queue } = await channel.assertQueue('aaa');
channel.prefetch(3);

const currentTask = [];
channel.consume(queue, msg => {
    currentTask.push(msg);
    console.log('收到消息:', msg.content.toString());
}, { noAck: false });

setInterval(() => {
    const curMsg = currentTask.pop();
    channel.ack(curMsg);
}, 1000);
消费者每1s处理一条消息。
每条消息消费者要确认之后才会在MQ里删除,noACK为false表示不自动确认。
上述把收到的消息放入数组中,一秒确认一次。
prefetch为3表示最多并发处理3条。
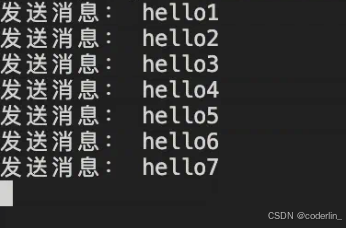
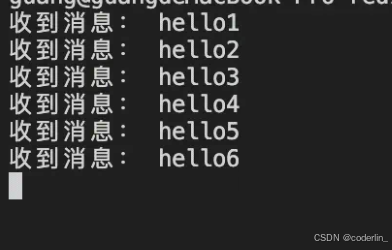
生产者每0.5s网往队列发送一条消息,而消费者一开始取出三条,然后每处理完一条取一条,保证最多并发处理3条。这就是流量削峰的功能。
不同服务之间的速度差异可以通过MQ缓冲。
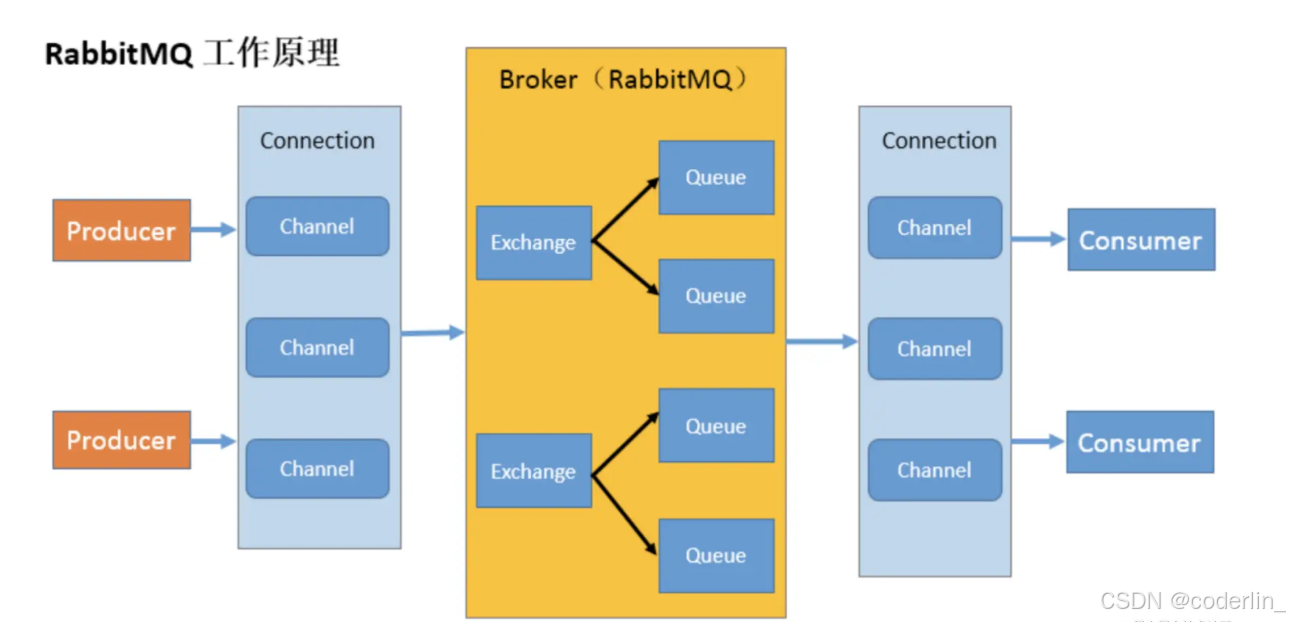
Connection是连接,但不会每用一次 rabbitmq 就创建一个单独的 Connection,而是在一个 Connection 里做一下划分,叫做 Channel,每个 Channel 做自己的事情。
Queue 就是两端存取消息的地方了。
整个接收消息和转发消息的服务就叫做 Broker。
Exchange,我们前面的例子没有用到,这个是把消息放到不同的队列里用的,叫做交换机。
前面的例子,生产者和消费者都是一对一的情况,指定从哪个队列读取数据,那如果是一对多场景呢?
不能一个一个调用sendQueue发消息,而是需要一个Exchange,来帮我们把消息按照规则放入不同的queue工作。
Exchange一共有四种
- fanout:把消息放到这个交换机的所有 Queue
- direct:把消息放到交换机的指定 key 的队列
- topic:把消息放到交换机的指定 key 的队列,支持模糊匹配
- headers:把消息放到交换机的满足某些 header 的队列
direct
import * as amqp from 'amqplib'

const connect = await amqp.connect(`amqp://localhost:5672`);
const channel = await connect.createChannel();

await channel.assertExchange('direct-test-exchange', 'direct');

channel.publish('direct-test-exchange', 'aaa',  Buffer.from('hello1'));
channel.publish('direct-test-exchange', 'bbb',  Buffer.from('hello2'));
channel.publish('direct-test-exchange', 'ccc',  Buffer.from('hello3'));
这里i我们创建一个exchange,然后调用publish往这个exchange发送消息。第二个参数是rouing kye,也就是消息路由到哪个队列。
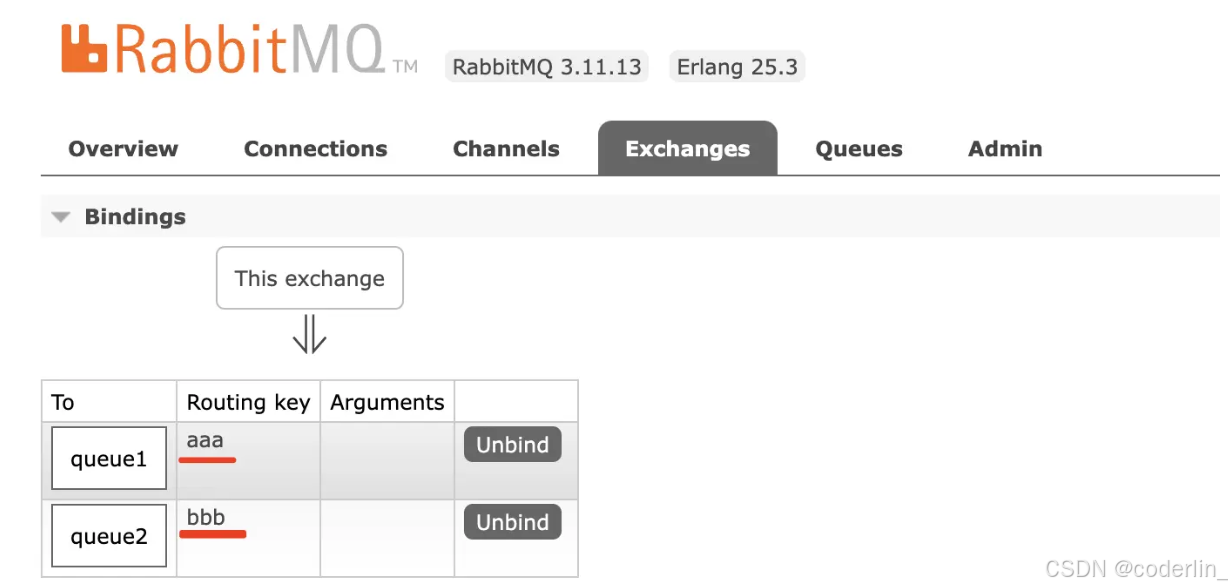
包括 exchange 下的两个 queue 以及各自的 routing key。
然后创建两个消费者
1
import * as amqp from 'amqplib'

const connect = await amqp.connect(`amqp://localhost:5672`);
const channel = await connect.createChannel();

const { queue } = await channel.assertQueue('queue1');
await channel.bindQueue(queue,  'direct-test-exchange', 'aaa');

channel.consume(queue, msg => {
    console.log(msg.content.toString())
}, { noAck: true });
2
import * as amqp from 'amqplib'

const connect = await amqp.connect(`amqp://localhost:5672`);
const channel = await connect.createChannel();

const { queue } = await channel.assertQueue('queue2');
await channel.bindQueue(queue,  'direct-test-exchange', 'bbb');

channel.consume(queue, msg => {
    console.log(msg.content.toString())
}, { noAck: true });
通过bindQueue绑定到交换机上,然后指定路由key分别是aaa和bbb然后执行

分别读取到了。
topic支持key模糊匹配
import * as amqp from 'amqplib'

const connect = await amqp.connect(`amqp://localhost:5672`);
const channel = await connect.createChannel();

await channel.assertExchange('direct-test-exchange2', 'topic');

channel.publish('direct-test-exchange2', 'aaa.1',  Buffer.from('hello1'));
channel.publish('direct-test-exchange2', 'aaa.2',  Buffer.from('hello2'));
channel.publish('direct-test-exchange2', 'bbb.1',  Buffer.from('hello3'));
消费者可以通过
import * as amqp from 'amqplib'

const connect = await amqp.connect(`amqp://localhost:5672`);
const channel = await connect.createChannel();

await channel.assertExchange('direct-test-exchange2', 'topic');

const { queue } = await channel.assertQueue('queue1');
await channel.bindQueue(queue,  'direct-test-exchange2', 'aaa.*');

channel.consume(queue, msg => {
    console.log(msg.content.toString())
}, { noAck: true });
aaa.*来匹配所有的aaa的routing key。
fanout
往所有的queue中发送消息,指定了key也没用
channel.publish('direct-test-exchange3', '',  Buffer.from('hello1'));
channel.publish('direct-test-exchange3', '',  Buffer.from('hello2'));
channel.publish('direct-test-exchange3', '',  Buffer.from('hello3'));
headers
不是根据routing key来制定,而是通过headers
channel.publish('direct-test-exchange4', '',  Buffer.from('hello1'), {
    headers: {
        name: 'guang'
    }
});
channel.publish('direct-test-exchange4', '',  Buffer.from('hello2'), {
    headers: {
        name: 'guang'
    }
});
channel.publish('direct-test-exchange4', '',  Buffer.from('hello3'), {
    headers: {
        name: 'dong'
    }
});
消费
await channel.bindQueue(queue,  'direct-test-exchange4', '', {
    name: 'guang'
});
也是指定header。
小结
rabbimq解决了什么问题
- 流量削峰,把大流量的消息放到mq,按照一定流量上限慢慢消费。虽然慢点,但不会崩溃
- 应用解耦,应用之间不再直接依赖,某个应用挂掉了,也可以再恢复后继续从mq中消费消息。
前端监控系统的后端服务,就很适合使用 mq 来做流量削峰。
当一对多的时候,还要加一个 Exchange 交换机来根据不同的规则转发消息:
- direct 交换机:根据 routing key 转发消息到队列
- topic 交换机:根据 routing key 转发消息到队列,支持模糊匹配
- headers 交换机:根据 headers 转发消息到队列
- fanout 交换机:广播消息到交换机下的所有队列
消费者可以通过prefetch设置并发上线,保证不会并发过高而崩溃。
基于Redis实现关注关系。
在抖音,知乎,掘金等平台,可以关注其他用户,也可以被其他用户关注,如果彼此关注,就会标出互相关注。
这些一般是用redis的Set实现的。
Set是集合,有很多命令
SADD:添加元素

SMEMBERS:查看所有元素

SISMEMBER:某个 key 是否在集合中

SCARD:集合中某个 key 的元素数量

SMOVE:移动元素从一个集合到另一个集合

SDIFF:两个集合的差集

SINTER:两个集合的交集

SUNION:两个集合的并集

SINTERSTORE:两个集合的交集,存入新集合

SUNIONSTORE:两个集合的并集,存入新集合

SDIFFSTORE:两个集合的差集,存入新集合
关注关系的redis实现思路
张三的userId是1,然后用一个set集合存储他的关注者,followers:1。再用一个集合存储他关注的人:following:1
那么相互关注就是两个集合的交警结果,存入心集合,比如follow-each-other:1
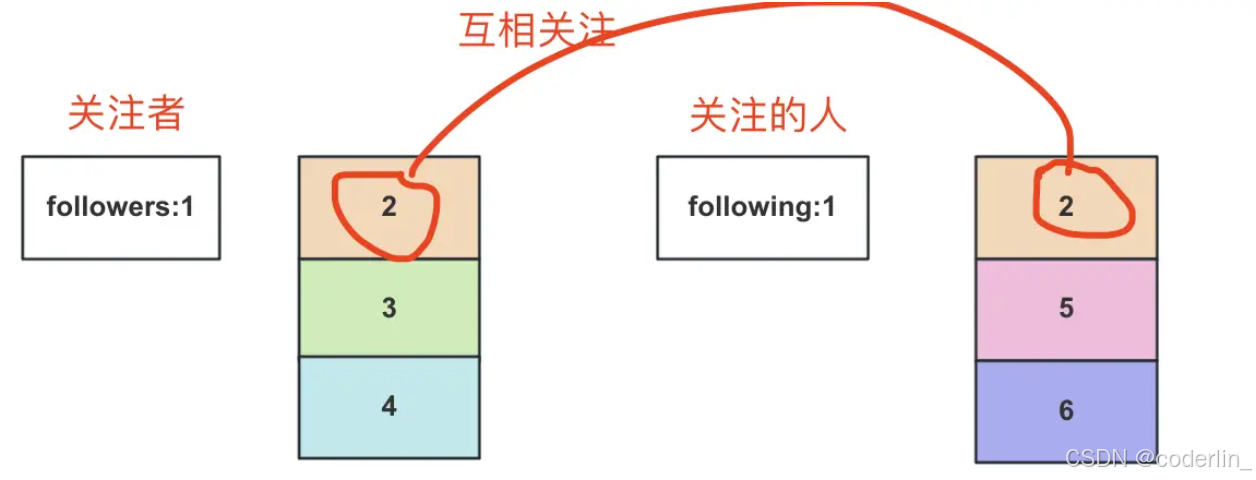
返回关注者或者关注的人的时候,用SISMEMBER判断用户是否在交集之中,是的话,就返回特殊标识,标记互相关注。
代码实现
创建Redis Module
import { Global, Module } from '@nestjs/common';
import { createClient } from 'redis';
import { RedisService } from './redis.service';

@Global()
@Module({
  providers: [
    RedisService,
    {
      provide: 'REDIS_CLIENT',
      async useFactory() {
        const client = createClient({
            socket: {
                host: 'localhost',
                port: 6379
            }
        });
        await client.connect();
        return client;
      }
    }
  ],
  exports: [RedisService]
})
import { Inject, Injectable } from '@nestjs/common';
import { RedisClientType } from 'redis';

@Injectable()
export class RedisService {

    @Inject('REDIS_CLIENT')
    private redisClient: RedisClientType;

    async sAdd(key: string, ...members: string[]) {
        return this.redisClient.sAdd(key, members);
    }

    async sInterStore(newSetKey: string, set1: string, set2: string) {
        return this.redisClient.sInterStore(newSetKey, [set1, set2]);
    }

    async sIsMember(key: string, member: string) {
        return this.redisClient.sIsMember(key, member);
    }

    async sMember(key: string) {
        return this.redisClient.sMembers(key);
    }

    async exists(key: string) {
        const result =  await this.redisClient.exists(key);
        return result > 0
    }
}
封装 SADD、SINTERSTORE、SISMEMBER、SMEMBER 命令,分别用来往集合中添加元素,求两个集合的交集创建新集合,判断元素是否在某个集合中、返回集合中的所有元素。
还有 EXISTS 用来判断某个 key 是否存在,返回 1 代表存在,返回 0 代表不存在。
然后
@Inject(RedisService)
redisService: RedisService;

// 传入userId,查询对应的User信息返回
async findUserByIds(userIds: string[] | number[]) {
  let users = [];

  for(let i = 0; i< userIds.length; i ++) {
    const user = await this.entityManager.findOne(User, {
      where: {
        id: +userIds[i]
      }
    });
    users.push(user);
  }

  return users;
}

// 获取集合关系
async getFollowRelationship(userId: number) {
// 判断该集合是否存在
  const exists = await this.redisService.exists('followers:' + userId);
  if(!exists) {
  // 查处用户
    const user = await this.entityManager.findOne(User, {
      where: {
        id: userId
      },
      relations: ['followers', 'following']
    });

// 如果关注和被关注有一个为空,就不存在互相关注。
    if(!user.followers.length || !user.following.length) {
      return {
        followers: user.followers,
        following: user.following,
        followEachOther: []
      }
    }

// 往followers集合添加所有关注他的人
    await this.redisService.sAdd('followers:' + userId, ...user.followers.map(item => item.id.toString()));

// 往following结集合天啊急所有他关注的人
    await this.redisService.sAdd('following:' + userId, ...user.following.map(item => item.id.toString()))

// 创建并集。
    await this.redisService.sInterStore('follow-each-other:' + userId, 'followers:' + userId, 'following:' + userId);

// 获取所有交集中的人
    const followEachOtherIds = await this.redisService.sMember('follow-each-other:' + userId);

    // 获取所有交集中的人的信息
    const followEachOtherUsers = await this.findUserByIds(followEachOtherIds);

// 返回,根据followEachOther即可判断是否是互相关注的人
    return {
      followers: user.followers,
      following: user.following,
      followEachOther: followEachOtherUsers
    }
  } else {

// 如果集合存在了,只需要拿出集合的用户id,然后获取对应的用户信息返回即可。
    const followerIds = await this.redisService.sMember('followers:' + userId);

    const followUsers = await this.findUserByIds(followerIds);

    const followingIds = await this.redisService.sMember('following:' + userId);

    const followingUsers = await this.findUserByIds(followingIds);

    const followEachOtherIds = await this.redisService.sMember('follow-each-other:' + userId);

    const followEachOtherUsers =await this.findUserByIds(followEachOtherIds);

    return {
      followers: followUsers,
      following: followingUsers,
      followEachOtherUsers: followEachOtherUsers
    }
  }
}
使用
@Get('follow-relationship')
async followRelationShip(@Query('id') id: string) {
    if(!id) {
      throw new BadRequestException('userId 不能为空');
    }
    return this.userService.getFollowRelationship(+id);
}
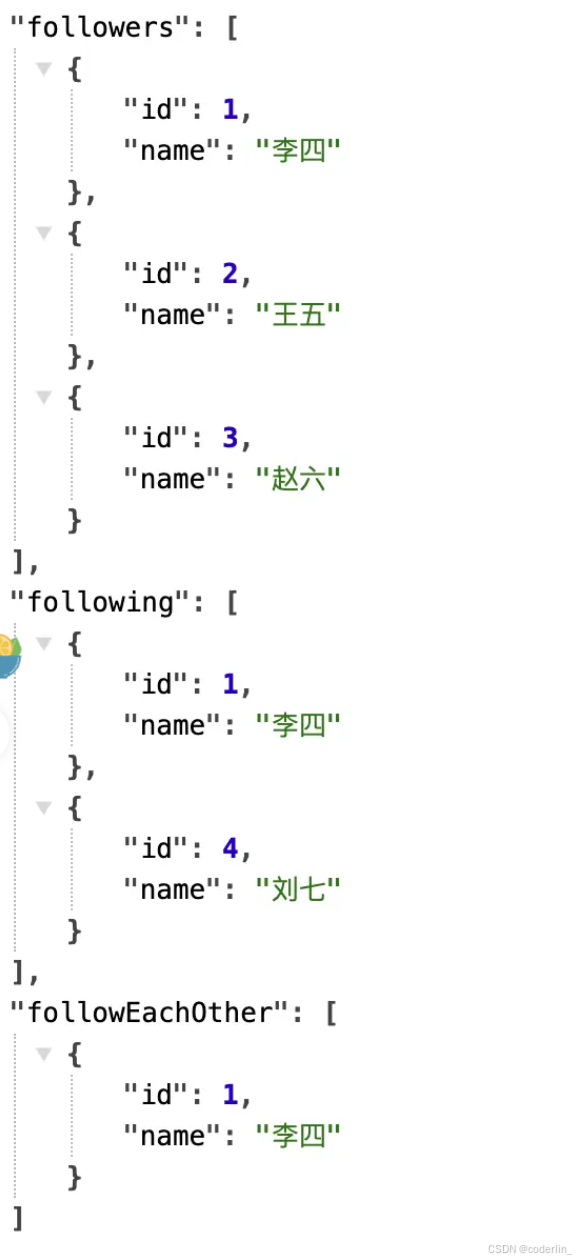
李四是互相关注的人。
Redis也可以看到这三个集合
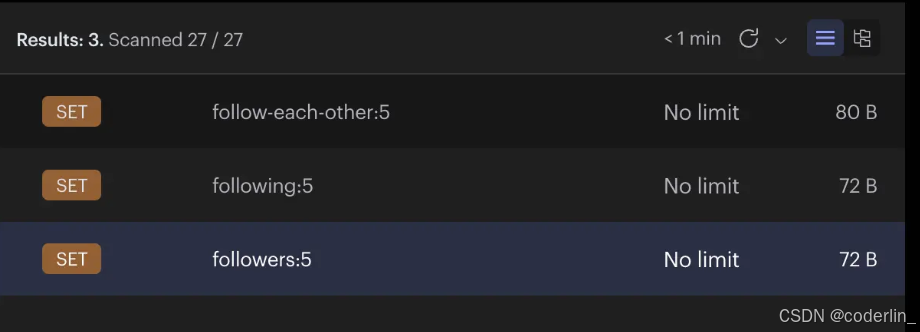
有了新的关注者,就需要更新集合信息。
async follow(userId: number, userId2: number){
  const user = await this.entityManager.findOne(User, {
    where: {
      id: userId
    },
    relations: ['followers', 'following']
  });

  const user2 = await this.entityManager.findOne(User, {
    where: {
      id: userId2
    }
  });


  user.followers.push(user2);

  await this.entityManager.save(User, user);

// 判断该集合是否存在
  const exists = await this.redisService.exists('followers:' + userId);

  if(exists) {
  // 存在,更新followers中的信息
    await this.redisService.sAdd('followers:' + userId, userId2.toString());
    // 更新follow-each-other的信息
    await this.redisService.sInterStore('follow-each-other:' + userId, 'followers:' + userId, 'following:' + userId);
  }

  // 判断userId2是否也有following
 const exists2 = await this.redisService.exists('following:' + userId2);

 if(exists2) {
 //有的话,往user2的followinguser1
    await this.redisService.sAdd('following:' + userId2, userId.toString());
    // 更新user2的follow-each-other
    await this.redisService.sInterStore('follow-each-other:' + userId2, 'followers:' + userId2, 'following:' + userId2);
  }
}
这里user1和user2的集合都要查询更新下。
- 在 mysql 里用中间表来存储 user 和 user 的关系。
- 互相关注用redis的Set实现,把user的followers和following存储到集合中。
- 取出交集,放入一个新的集合,该集合就是互相关注的人
- 当有新的关注和取消关注的时候,除了更新数据库,也顺便更新下redis。
基于redis实现排行榜
生活中很多排行榜,比如微信步数,热搜等。如果用mysql做,加一个排序字段,这样效率很低,mysql的读写性能比redis低很多,而且排序依据可能只是一个临时数据,不需要存在数据库里。
一般涉及到排行榜,都使用Redis来做,因为他有一个专为排行榜准备的数据结构,有序集合ZSET。
涉及命令:
ZADD:往集合中添加成员

ZREM:从集合中删除成员

ZCARD:集合中的成员个数

ZSCORE:某个成员的分数

ZINCRBY:增加某个成员的分数

ZRANK:成员在集合中的排名

ZRANGE:打印某个范围内的成员

ZRANGESTORE:某个范围内的成员,放入新集合

ZCOUNT:集合中分数在某个返回的成员个数

ZDIFF:打印两个集合的差集

ZDIFFSTORE:两个集合的差集,放入新集合

ZINTER:打印两个集合的交集

ZINTERSTORE:两个集合的交集,放入新集合

ZINTERCARD:两个集合的交集的成员个数

ZUNION:打印两个集合的并集

ZUNIONSTORE:两个集合的并集,放回新集合
ZUNIONSTORE,并集然后放入新集合,此时相同key的分数会相加,月榜就是周榜的合并,年榜就是月榜的合并。
用nest实现类似排行榜功能。
新建RedisModule,上面有。
针对ZSet新建方法。
import { Inject, Injectable } from '@nestjs/common';
import { RedisClientType } from 'redis';

@Injectable()
export class RedisService {

    @Inject('REDIS_CLIENT')
    private redisClient: RedisClientType;

// 打印集合成员
    async zRankingList(key: string, start: number = 0, end: number = -1) {
        const keys = await this.redisClient.zRange(key, start, end, {
            REV: true
        });
        const rankingList = {};
        for(let i = 0; i< keys.length; i++){
            rankingList[keys[i]] = await this.zScore(key, keys[i]);
        }
        return rankingList;
    }

    async zAdd(key: string, members: Record<string, number>) {
        const mems = [];
        for(let key in members) {
            mems.push({
                value: key,
                score: members[key]
            });
        }
        return  await this.redisClient.zAdd(key, mems);
    }

// 查询某个成员分数
    async zScore(key: string, member: string) {
        return  await this.redisClient.zScore(key, member);
    }

    async zRank(key: string, member: string) {
        return  await this.redisClient.zRank(key, member);
    }

    async zIncr(key: string, member: string, increment: number) {
        return  await this.redisClient.zIncrBy(key, increment, member)
    }

    async zUnion(newKey: string, keys: string[]) {
        if(!keys.length) {
            return []
        };
        if(keys.length === 1) {
            return this.zRankingList(keys[0]);
        }

        await this.redisClient.zUnionStore(newKey, keys);

        return this.zRankingList(newKey);
    }

    async keys(pattern: string) {
        return this.redisClient.keys(pattern);
    }
}
实现排行模块RankingSerice
import { RedisService } from './../redis/redis.service';
import { Inject, Injectable } from '@nestjs/common';
import * as dayjs from 'dayjs';

@Injectable()
export class RankingService {

    @Inject(RedisService)
    redisService: RedisService;

    private getMonthKey() {
        const dateStr = dayjs().format('YYYY-MM');
        return `learning-ranking-month:${dateStr}`;
    }

    private getYearKey() {
        const dateStr = dayjs().format('YYYY');
        return `learning-ranking-year:${dateStr}`;
    }

// 增加key
    async join(name: string) {
        await this.redisService.zAdd(this.getMonthKey(), { [name]: 0 });
    }

// 增加 分数
    async addLearnTime(name:string, time: number) {
        await this.redisService.zIncr(this.getMonthKey(), name, time);
    }

// 获取月榜前10
    async getMonthRanking() {
        return this.redisService.zRankingList(this.getMonthKey(), 0, 10);
    }

// 获取年榜,先获取redis中的当年的所有月份,然后创建新的集合返回。
    async getYearRanking() {
        const dateStr = dayjs().format('YYYY');
        const keys = await this.redisService.keys(`learning-ranking-month:${dateStr}-*`);

        return this.redisService.zUnion(this.getYearKey(), keys);
    }
}
月份的榜单就是 learning-ranking-mongth:2024-01、learning-ranking-mongth:2024-02 的格式
年份就是 learning-ranking-mongth:2023、learning-ranking-mongth:2024
年份的榜单是拿到用 learning-ranking-month:当前年份- 开头的所有 zset,也就是每个月,然后合并返回。
加一下controller
import { Controller, Get, Inject, Query } from '@nestjs/common';
import { RankingService } from './ranking.service';

@Controller('ranking')
export class RankingController {

    @Inject(RankingService)
    rankingService: RankingService;

// 加入成员
    @Get('join')
    async join(@Query('name') name: string) {
        await this.rankingService.join(name);
        return 'success';
    }

// 增加时长
    @Get('learn')
    async addLearnTime(@Query('name') name:string, @Query('time') time: string) {
        await this.rankingService.addLearnTime(name, parseFloat(time));
        return 'success';
    }

// 获取月份榜单
    @Get('monthRanking')
    async getMonthRanking() {
        return this.rankingService.getMonthRanking();
    }

// 获取年份榜单
    @Get('yearRanking')
    async getYearRanking() {
        return this.rankingService.getYearRanking();
    }
}
调用相关接口就行了
微服务实战项目-考试系统(问卷星)
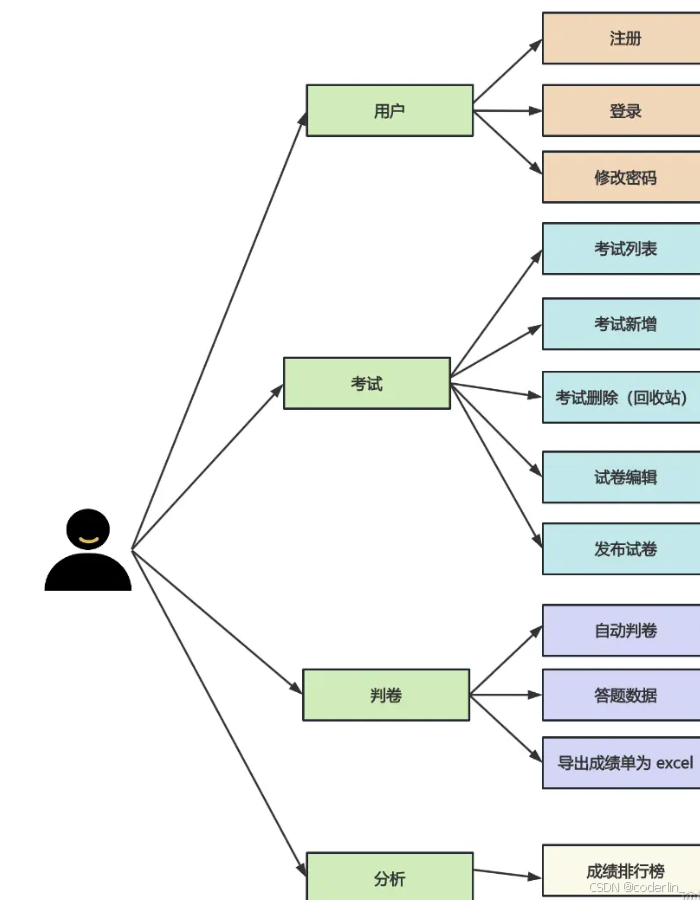
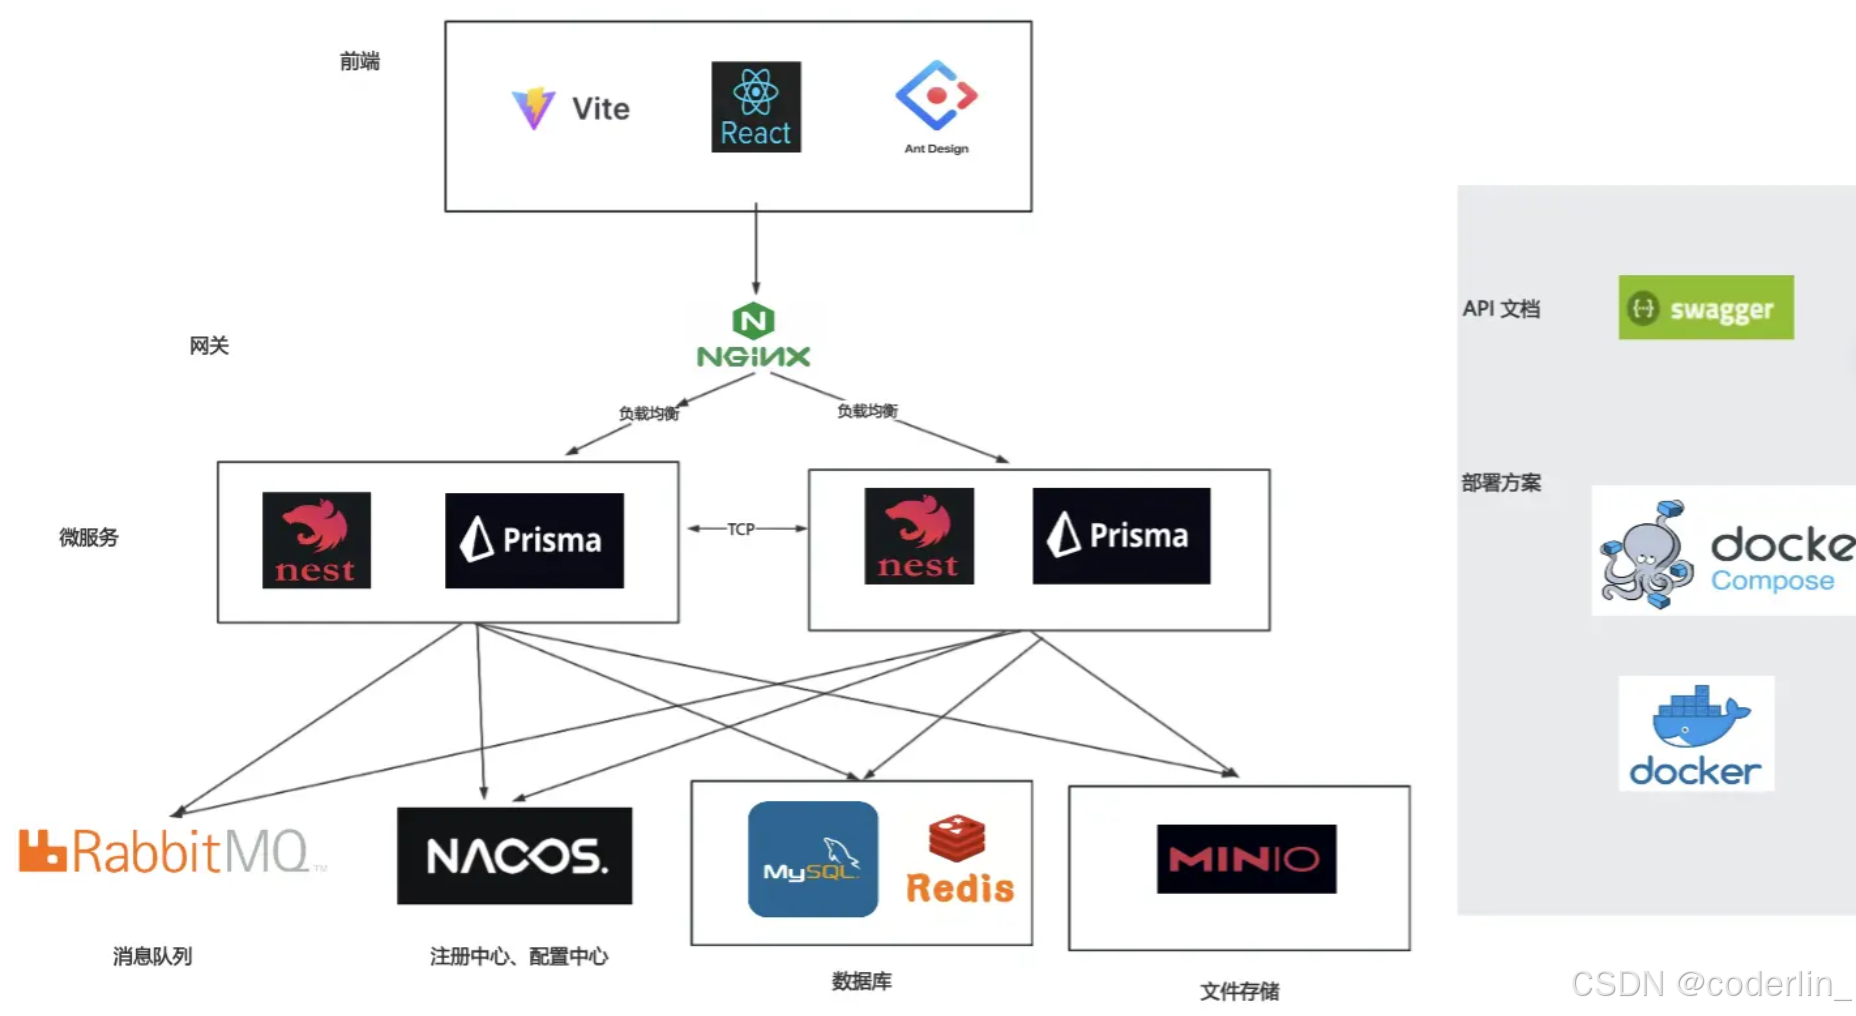
nacos做注册配置中心,统一管理所有的配置,服务的注册地址。rabbitMq做消息队列,用于微服务之间的异步通信。
根据上述模块,拆分为四个微服务
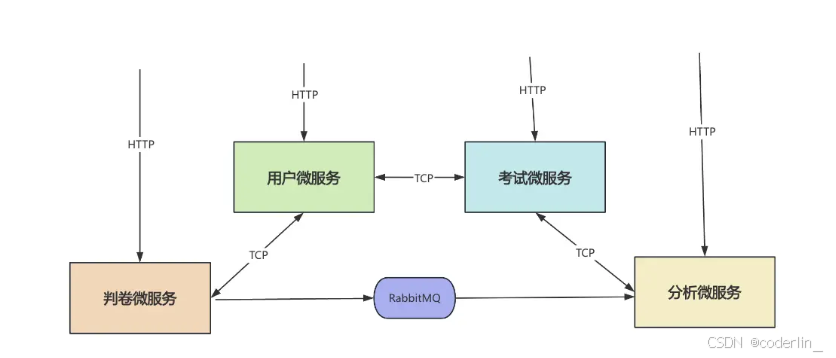
数据库表
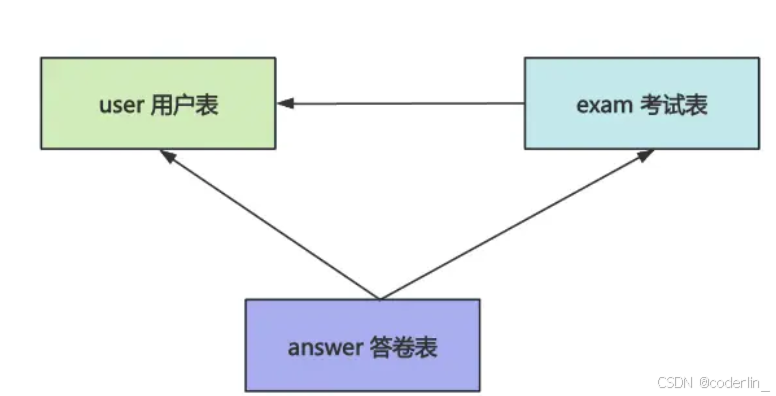
考试表跟用户表是多对一的关系,一个用户可以创建多个考试,但是一个考试只能由一个用户创建。
答卷表跟用户表示多对一关系。
答卷表跟考试表是多对一关系。
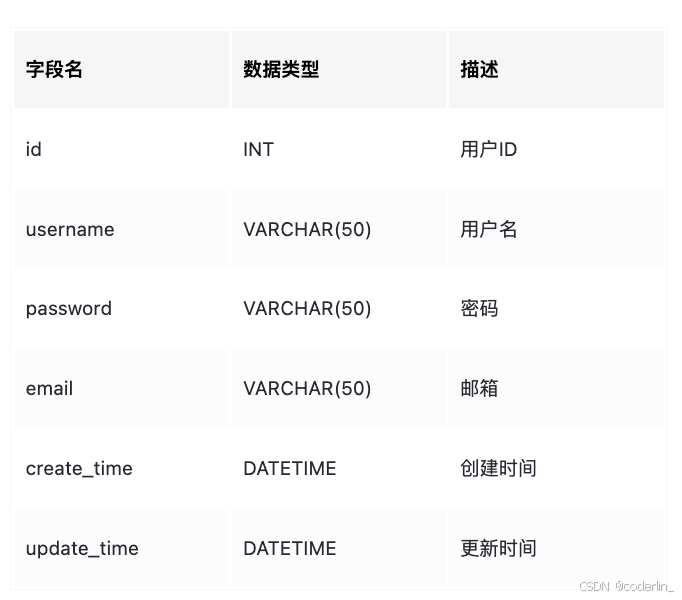
user
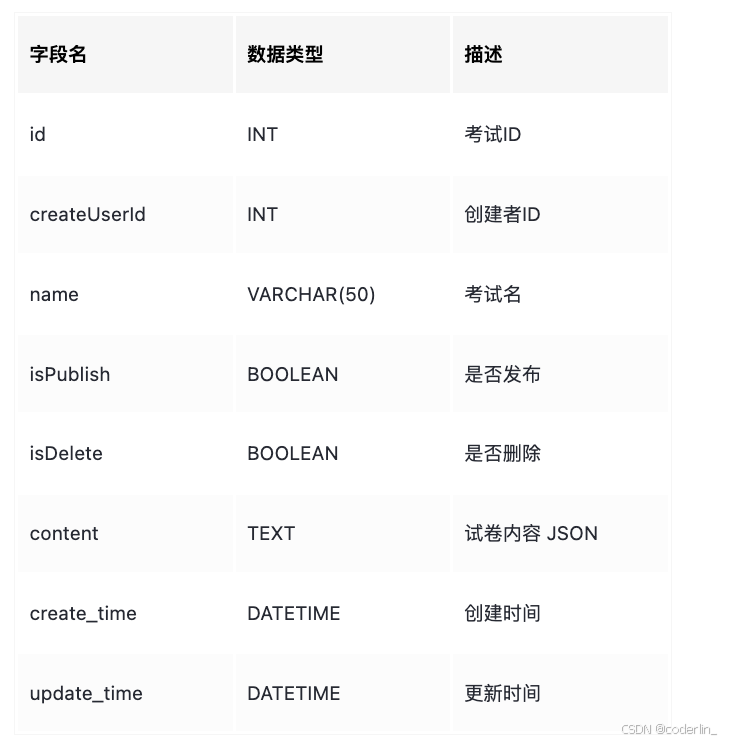
考试表
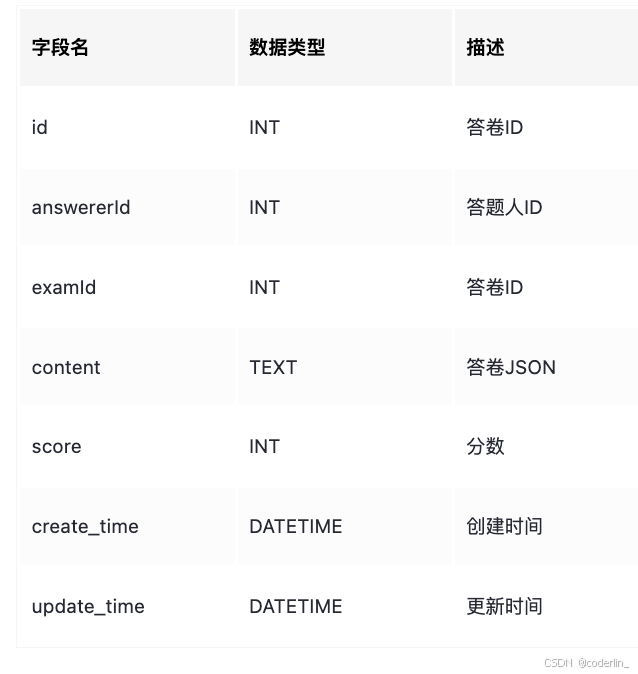
答卷表
然后是模块划分,分别为用户模块,
用户模块使用github登陆即可。
/user/login POST 用户登录,用户github跳转回来拿到token再继续拿用户信息保存到数据库。
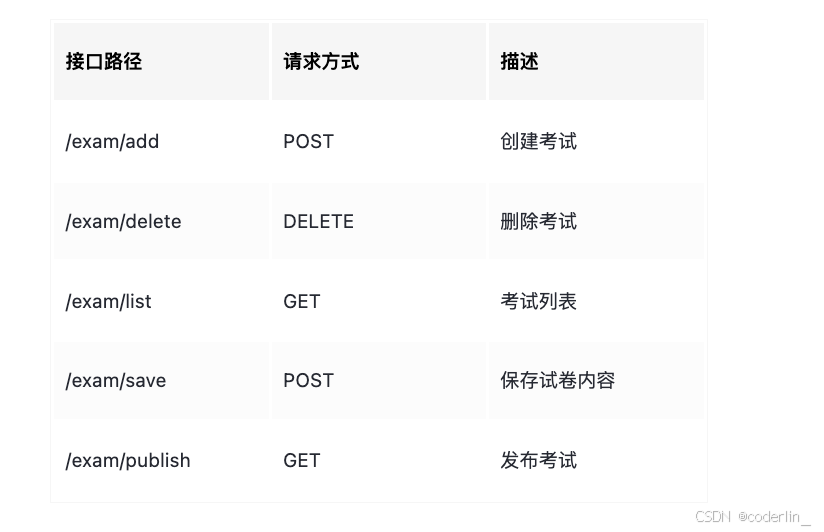
试卷模块
答卷模块

分析模块
