Java-01-源码篇-并发编程-多线程常见接口讲解
目录
一,Thread 的继承结构
目录
一,Thread 的继承结构
二,Runnable 接口
三,Callable 接口
四,Future 接口
4.1 Future 讲解
4.2 批量查询用户账户余额
4.3 ScheduledFuture 异步任务调度
4.4 ScheduledFuture 使用案例
五,系列文章推荐
上一章节,讲到了多线程基础,以及一些常用接口的基本使用,这一章讲解多线程的相关继承结构,以及java在线程方面的一些设计。
在使用Thread 线程的时候,我们会发现,其run方法是没有返回值的,那遇到一些需要返回的任务怎么实现。Java又提供哪些标准接口。
public class Thread implements Runnable { /** 忽略代码*/ }

@FunctionalInterface
public interface Runnable {
    public abstract void run();
}
二,Runnable 接口
从Thread 继承结构可以看得出来,其 Thread 的 run() 方法来自于 Runnable 接口。也就是说线程任务的业务逻辑的标准接口是 Runnable
public class RunnableExample {
    public static void main(String[] args) {
        Runnable task = () -> System.out.println("Runnable Task is running...");
        Thread thread = new Thread(task);
        thread.start();
    }
}
// 输出结果
// Runnable Task is running...
继续观察 Thread 的构造器
public Thread(Runnable target) {
    this(null, target, "Thread-" + nextThreadNum(), 0);
}

public Thread(ThreadGroup group, Runnable target, String name, long stackSize) {
    this(group, target, name, stackSize, null, true);
}

private Thread(ThreadGroup g, Runnable target, String name,
                   long stackSize, AccessControlContext acc,
                   boolean inheritThreadLocals) {
        /** 忽略其他代码 */
        this.target = target;
        /** 忽略其他代码 */
}
可以发现其Thread 中的Runnable target 属性 从构造器中获取。继续观察Thread 的run()方法
@Override
public void run() {
    if (target != null) {
        target.run();
    }
}
可以发现,其实 Thread 的实现是通过委托 Runnable 来实现。这样就更能很好的理解Runnable为何是运行任务逻辑的标准接口。而Thread 更为重要的是可以通过start()方法开辟一条新的线程来运行这个任务。也可以不开辟新线程,就直接委托给当前线程执行。
EmployeeThread thread1 = new EmployeeThread("张三");
        // 方式一,开辟一条新线程,线程名称为张三,来执行任务。
        thread1.start();
        // 方式二,将任务直接委托给当前main线程执行
        thread1.run();
三,Callable 接口
Runable 接口是任务运行时业务逻辑标准入口接口。其业务逻辑代码编写在run()方法之中。但是 run()方法并没有返回值。如果遇到需要运行处理有返回值的任务。Java里面提供一个 Callable 接口。见名知意,Callable 表达实现这个接口将会拥有返回值的能力。
观察接口
package java.util.concurrent;

@FunctionalInterface
public interface Callable<V> {
    V call() throws Exception;
}
继续回顾 Thread 构造方法,所有的Thread构造方法都不提供接收Callable。那这个Callable 怎么使用?
    public Thread() {
        this(null, null, "Thread-" + nextThreadNum(), 0);
    }

    public Thread(Runnable target) {
        this(null, target, "Thread-" + nextThreadNum(), 0);
    }

    Thread(Runnable target, @SuppressWarnings("removal") AccessControlContext acc) {
        this(null, target, "Thread-" + nextThreadNum(), 0, acc, false);
    }

    public Thread(ThreadGroup group, Runnable target) {
        this(group, target, "Thread-" + nextThreadNum(), 0);
    }

    public Thread(String name) {
        this(null, null, name, 0);
    }

    public Thread(ThreadGroup group, String name) {
        this(group, null, name, 0);
    }

    public Thread(Runnable target, String name) {
        this(null, target, name, 0);
    }

    public Thread(ThreadGroup group, Runnable target, String name) {
        this(group, target, name, 0);
    }


    public Thread(ThreadGroup group, Runnable target, String name, long stackSize) {
        this(group, target, name, stackSize, null, true);
    }

    public Thread(ThreadGroup group, Runnable target, String name,
                  long stackSize, boolean inheritThreadLocals) {
        this(group, target, name, stackSize, null, inheritThreadLocals);
    }
继续观察 Callable 接口的继承结构。

1.3 Callable 案例代码
public class CallableExample {
    public static void main(String[] args) {

        Callable<Integer> task = () -> { // 通过 lambda表达式定义一个Callable任务
            System.out.println("Callable Task is running...");
            return 42;
        };

        RunnableFuture<Integer> future = new FutureTask<>(task); // 创建一个FutureTask对象,将Callable任务包装进去
        Thread thread = new Thread(future);
        try {
            thread.start();
            Integer result = future.get(); // 阻塞等待结果
            System.out.println("Result: " + result);
        } catch (InterruptedException | ExecutionException e) {
            e.printStackTrace();
        }
    }
}
使用Callable,装载到 Thread 里面比Runnable多了一步,就是需要通过Future 来包装一层。而 Future 接口有一个 RunnableFuture 子类接口,RunnableFuture 还有实现父类 Runnable 接口。这样RunnableFuture就拥有Runnable和Callable 两个接口的能力,一个运行任务业务逻辑的能力,一个获取返回值的能力。然后再配合Thread 开辟一条新线程即可。
四,Future 接口
4.1 Future 讲解
Future<V> 是 Java 并发编程中的一个接口,用于表示异步任务的结果。 当我们提交一个Callable 的任务之后,可以通过Future 的get() 获取异步任务的结果。
package java.util.concurrent;

public interface Future<V> {

    /**
     * 尝试取消任务
     * - 任务尚未启动时,取消后任务不会运行。
     * - 任务已启动:
     *   - `mayInterruptIfRunning = true`:会尝试中断正在运行的任务线程。
     *   - `mayInterruptIfRunning = false`:允许任务继续执行,不能取消。
     *
     * @param mayInterruptIfRunning 是否允许中断正在运行的任务
     * @return `true`:任务成功取消;`false`:任务已经完成,无法取消
     */
    boolean cancel(boolean mayInterruptIfRunning);

    /**
     * 判断任务是否被取消
     * - 如果 `cancel()` 方法成功执行,则返回 `true`。
     * - 如果任务正常执行完成或未被取消,则返回 `false`。
     *
     * @return `true`:任务被取消;`false`:任务未被取消
     */
    boolean isCancelled();

    /**
     * 判断任务是否已经完成(无论是正常完成、异常终止或被取消)都会返回 `true`。
     * - 任务仍在执行时,返回 `false`。
     *
     * @return `true`:任务完成;`false`:任务仍在执行
     */
    boolean isDone();

    /**
     * 获取任务结果(阻塞)
     * - 如果任务未完成,会一直阻塞直到任务完成。
     * - 任务正常完成,返回计算结果。
     * - 任务被取消,抛出 `CancellationException`。
     * - 任务执行时发生异常,抛出 `ExecutionException`。
     * - 线程在等待时被中断,抛出 `InterruptedException`。
     *
     * @return 任务的计算结果
     * @throws InterruptedException 线程等待过程中被中断
     * @throws ExecutionException 任务执行时抛出异常
     * @throws CancellationException 任务被取消
     */
    V get() throws InterruptedException, ExecutionException;

    /**
     * 获取任务结果(带超时)
     * - 如果任务在超时时间内完成,返回结果。
     * - 如果超时,抛出 `TimeoutException`。
     * - 其他异常情况与 `get()` 方法相同。
     *
     * @param timeout 等待的最大时间
     * @param unit 时间单位(如 `TimeUnit.SECONDS`)
     * @return 任务的计算结果
     * @throws InterruptedException 线程等待过程中被中断
     * @throws ExecutionException 任务执行时抛出异常
     * @throws CancellationException 任务被取消
     * @throws TimeoutException 超时时间到但任务仍未完成
     */
    V get(long timeout, TimeUnit unit)
        throws InterruptedException, ExecutionException, TimeoutException;
}
4.2 批量查询用户账户余额
假设我们有一个银行账户管理系统,需要查询多个用户的账户余额,并且这些查询操作是耗时的(模拟网络或数据库请求)。我们希望:
- 并发执行 这些查询,提高效率。
- 限制超时时间,防止单个查询卡住整个系统。
- 合并结果,统一处理成功和超时的情况。
/**
 * @author liuwq
 * @time 2025/3/20
 * @remark
 */
public class BankAccountBalanceChecker {

    private static final ExecutorService executor = Executors.newFixedThreadPool(5);

    /**
     * 模拟获取银行账户余额(可能会有延迟)
     */
    private static Double getAccountBalance(String userId) throws InterruptedException {
        Random random = new Random();
        int delay = random.nextInt(5); // 模拟不同请求时间(0~4秒)
        TimeUnit.SECONDS.sleep(delay);
        return 1000 + random.nextDouble() * 9000; // 模拟余额($1000 - $10000)
    }

    public static void main(String[] args) {
        // 假设要查询的用户 ID 列表
        List<String> userIds = List.of("User-1001", "User-1002", "User-1003", "User-1004", "User-1005");

        // 记录 Future 结果
        Map<String, Future<Double>> futureResults = new HashMap<>();

        // 提交查询任务
        for (String userId : userIds) {
            Future<Double> future = executor.submit(() -> getAccountBalance(userId));
            futureResults.put(userId, future);
        }

        // 处理查询结果
        for (Map.Entry<String, Future<Double>> entry : futureResults.entrySet()) {
            String userId = entry.getKey();
            Future<Double> future = entry.getValue();
            try {
                // 设定超时时间,防止任务无限等待
                Double balance = future.get(3, TimeUnit.SECONDS);
                System.out.println("用户: " + userId + " 余额: $" + balance);
            } catch (TimeoutException e) {
                System.out.println("用户: " + userId + " 查询超时!");
                future.cancel(true); // 取消超时任务
            } catch (Exception e) {
                System.out.println("用户: " + userId + " 查询失败:" + e.getMessage());
            }
        }
        // 关闭线程池
        executor.shutdown();
    }
}
输出结果:
用户: User-1005 查询超时!
用户: User-1003 余额: $9891.340788275347
用户: User-1004 余额: $8241.616524360365
用户: User-1001 余额: $9001.709331170101
用户: User-1002 余额: $6964.019723608261
线程池用习惯了,使用原生的Thread实现代码如下:
/**
 * @author liuwq
 * @time 2025/3/20
 * @remark
 */
public class BankAccountBalanceCheckerThread {

    private static final List<Thread> threads = new ArrayList<>();

    /**
     * 模拟获取银行账户余额(可能会有延迟)
     */
    private static Double getAccountBalance(String userId) throws InterruptedException {
        Random random = new Random();
        int delay = random.nextInt(7); // 模拟不同请求时间(0~6秒)
        TimeUnit.SECONDS.sleep(delay);
        return 1000 + random.nextDouble() * 9000; // 模拟余额($1000 - $10000)
    }

    public static void main(String[] args) {
        // 假设要查询的用户 ID 列表
        List<String> userIds = Arrays.asList("User-1001", "User-1002", "User-1003", "User-1004", "User-1005");

        // 记录 Future 结果
        Map<String, Future<Double>> futureResults = new HashMap<>();

        // 提交查询任务
        for (String userId : userIds) {
            RunnableFuture<Double> future = new FutureTask<Double>(() -> getAccountBalance(userId));
            futureResults.put(userId, future);
            threads.add(new Thread(future));
        }

        // 启动线程
        for (Thread thread : threads) thread.start();

        // 处理查询结果
        for (Map.Entry<String, Future<Double>> entry : futureResults.entrySet()) {
            String userId = entry.getKey();
            Future<Double> future = entry.getValue();
            try {
                // 设定超时时间,防止任务无限等待
                Double balance = future.get(1, TimeUnit.SECONDS);
                System.out.println("用户: " + userId + " 余额: $" + balance);
            } catch (TimeoutException e) {
                System.out.println("用户: " + userId + " 查询超时!");
                future.cancel(true); // 取消超时任务
            } catch (Exception e) {
                System.out.println("用户: " + userId + " 查询失败:" + e.getMessage());
            }
        }
    }
}
输出结果:
用户: User-1005 查询超时!
用户: User-1003 余额: $1346.73490904229
用户: User-1004 查询超时!
用户: User-1001 余额: $3315.0111402279495
用户: User-1002 查询超时!
4.3 ScheduledFuture 异步任务调度
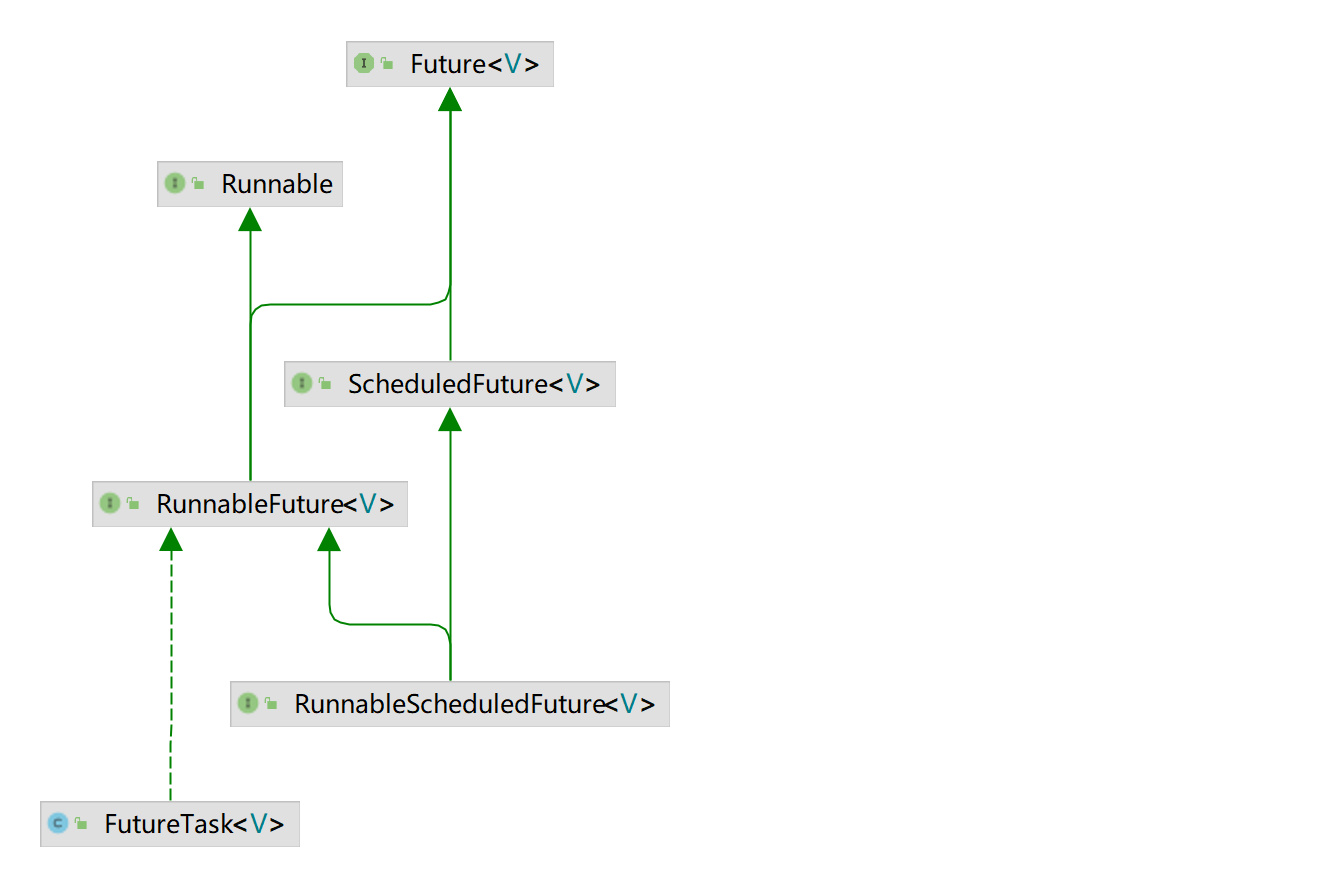
在Future 接口的子类下,还有一个提供定时任务的接口,就是 ScheduledFuture 接口。继承结构如下:
package java.util.concurrent;

/**
 * 延迟执行任务:可以在指定的延迟时间后执行任务。(由Delayed接口体现)
 * 周期性执行任务:
 *     固定速率(scheduleAtFixedRate):任务按照固定的时间间隔执行(不考虑任务执行时间)。
 *     固定延迟(scheduleWithFixedDelay):任务在上一次执行完成后,等待固定时间后再执行。
 * 可以取消任务:通过 future.cancel(true) 取消定时任务。
 * @since 1.5
 * @author Doug Lea
 * @param <V> The result type returned by this Future
 */
public interface ScheduledFuture<V> extends Delayed, Future<V> {
}
package java.util.concurrent;
/**
* @since 1.6 JDK 1.6 提供
* @author Doug Lea
*/
public interface RunnableScheduledFuture<V> extends RunnableFuture<V>, ScheduledFuture<V> {
/**
* 如果此任务是定期任务,则返回 true。定期任务可能会根据某个计划重新运行。
* 非周期性任务只能运行一次。
*
* @return {@code true} 如果此任务是定期任务,则返回: true
*/
boolean isPeriodic();
}4.4 ScheduledFuture 使用案例
/**
 * @author liuwq
 * @time 2025/3/20
 * @remark
 */
public class ScheduledFutureExample {

    public static void main(String[] args) throws InterruptedException {
        // 创建一个调度线程池
        ScheduledExecutorService scheduler = Executors.newScheduledThreadPool(2);

        // 创建任务:检查系统状态
        Runnable checkSystemStatus = () -> {
            System.out.println(Thread.currentThread().getName() + ":系统状态正常,时间:" + System.currentTimeMillis());
        };

        // 提交任务,初始延迟 1 秒,每 2 秒执行一次
        ScheduledFuture<?> scheduledFuture = scheduler.scheduleAtFixedRate(checkSystemStatus, 1, 2, TimeUnit.SECONDS);

        // 运行 10 秒后取消任务
        TimeUnit.SECONDS.sleep(10);
        scheduledFuture.cancel(true);
        System.out.println("任务已取消");

        // 关闭调度器
        scheduler.shutdown();
    }
}
输出结果:
/**
 * @author liuwq
 * @time 2025/3/20
 * @remark
 */
public class ScheduledFutureExample {

    public static void getSystemResource() {
        OperatingSystemMXBean osBean = (OperatingSystemMXBean) ManagementFactory.getOperatingSystemMXBean();

        String prefixName = Thread.currentThread().getName() + ":";
        // 获取 CPU 占用率
        double cpuLoad = osBean.getSystemCpuLoad() * 100;
        double processCpuLoad = osBean.getProcessCpuLoad() * 100;
        System.out.println(prefixName + "系统 CPU 使用率: " + String.format("%.2f", cpuLoad) + "%");
        System.out.println(prefixName + "进程 CPU 使用率: " + String.format("%.2f", processCpuLoad) + "%");

        // 获取物理内存信息
        long totalMemory = osBean.getTotalPhysicalMemorySize() / (1024 * 1024);
        long freeMemory = osBean.getFreePhysicalMemorySize() / (1024 * 1024);
        System.out.println(prefixName + "总物理内存: " + totalMemory + " MB");
        System.out.println(prefixName + "空闲物理内存: " + freeMemory + " MB");

        // 获取 JVM 内存使用情况
        Runtime runtime = Runtime.getRuntime();
        long maxMemory = runtime.maxMemory() / (1024 * 1024);
        long allocatedMemory = runtime.totalMemory() / (1024 * 1024);
        long freeJvmMemory = runtime.freeMemory() / (1024 * 1024);
        System.out.println(prefixName + "JVM 最大可用内存: " + maxMemory + " MB");
        System.out.println(prefixName + "JVM 已分配内存: " + allocatedMemory + " MB");
        System.out.println(prefixName + "JVM 空闲内存: " + freeJvmMemory + " MB");
    }

    public static void main(String[] args) throws InterruptedException {
        // 创建一个调度线程池
        ScheduledExecutorService scheduler = Executors.newScheduledThreadPool(2);

        // 创建任务:检查系统状态
        Runnable checkSystemStatus = () -> {
            System.out.println("检查系统状态检查中...");
            getSystemResource();
        };

        // 提交任务,初始延迟 1 秒,每 2 秒执行一次
        ScheduledFuture<?> scheduledFuture = scheduler.scheduleAtFixedRate(checkSystemStatus, 1, 2, TimeUnit.SECONDS);

        // 运行 10 秒后取消任务
        TimeUnit.SECONDS.sleep(10);
        scheduledFuture.cancel(true);
        System.out.println("任务已取消");

        // 关闭调度器
        scheduler.shutdown();
    }
}
五,系列文章推荐
最后,如果这篇文章对你有帮助,欢迎 点赞👍、收藏📌、关注👀!
我会持续分享 Java、Spring Boot、MyBatis-Plus、微服务架构 相关的实战经验,记得关注,第一时间获取最新文章!🚀
这篇文章是 【Java SE 17源码】系列 的一部分,详细地址:
java SE 17 源码篇_吐司呐的博客-CSDN博客
记得 关注我,后续还会更新更多高质量技术文章!
你在实际开发中遇到过类似的问题吗?
欢迎在评论区留言交流,一起探讨 Java 开发的最佳实践! 🚀