18.HTTP协议(三)
一.概念回顾
建议先学上篇博客,再向下学习,上篇博客的链接如下:
https://blog.csdn.net/weixin_60668256/article/details/154868139?fromshare=blogdetail&sharetype=blogdetail&sharerId=154868139&sharerefer=PC&sharesource=weixin_60668256&sharefrom=from_link
二.其他字段的添加
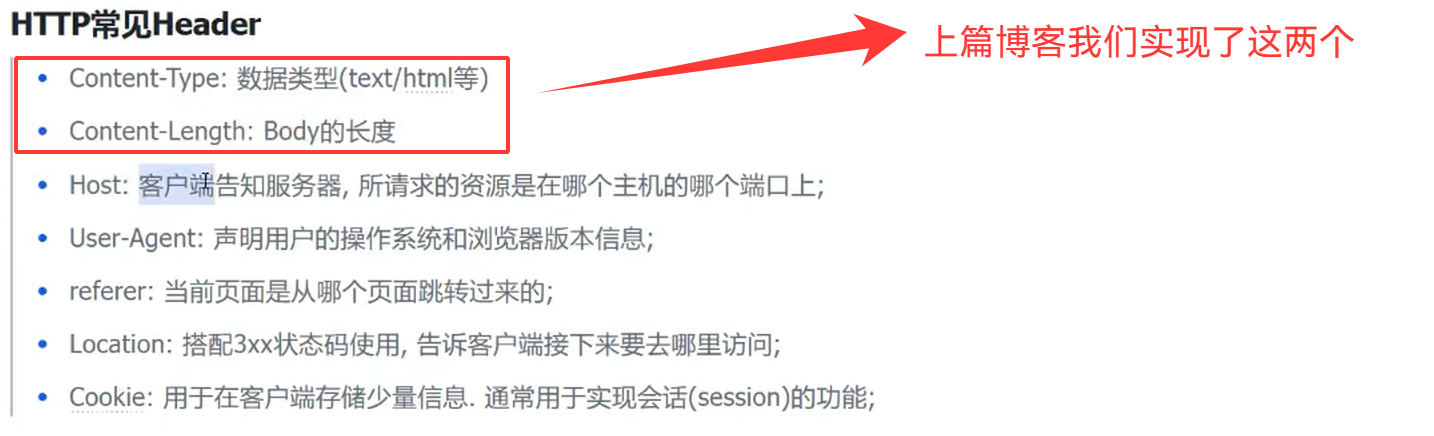
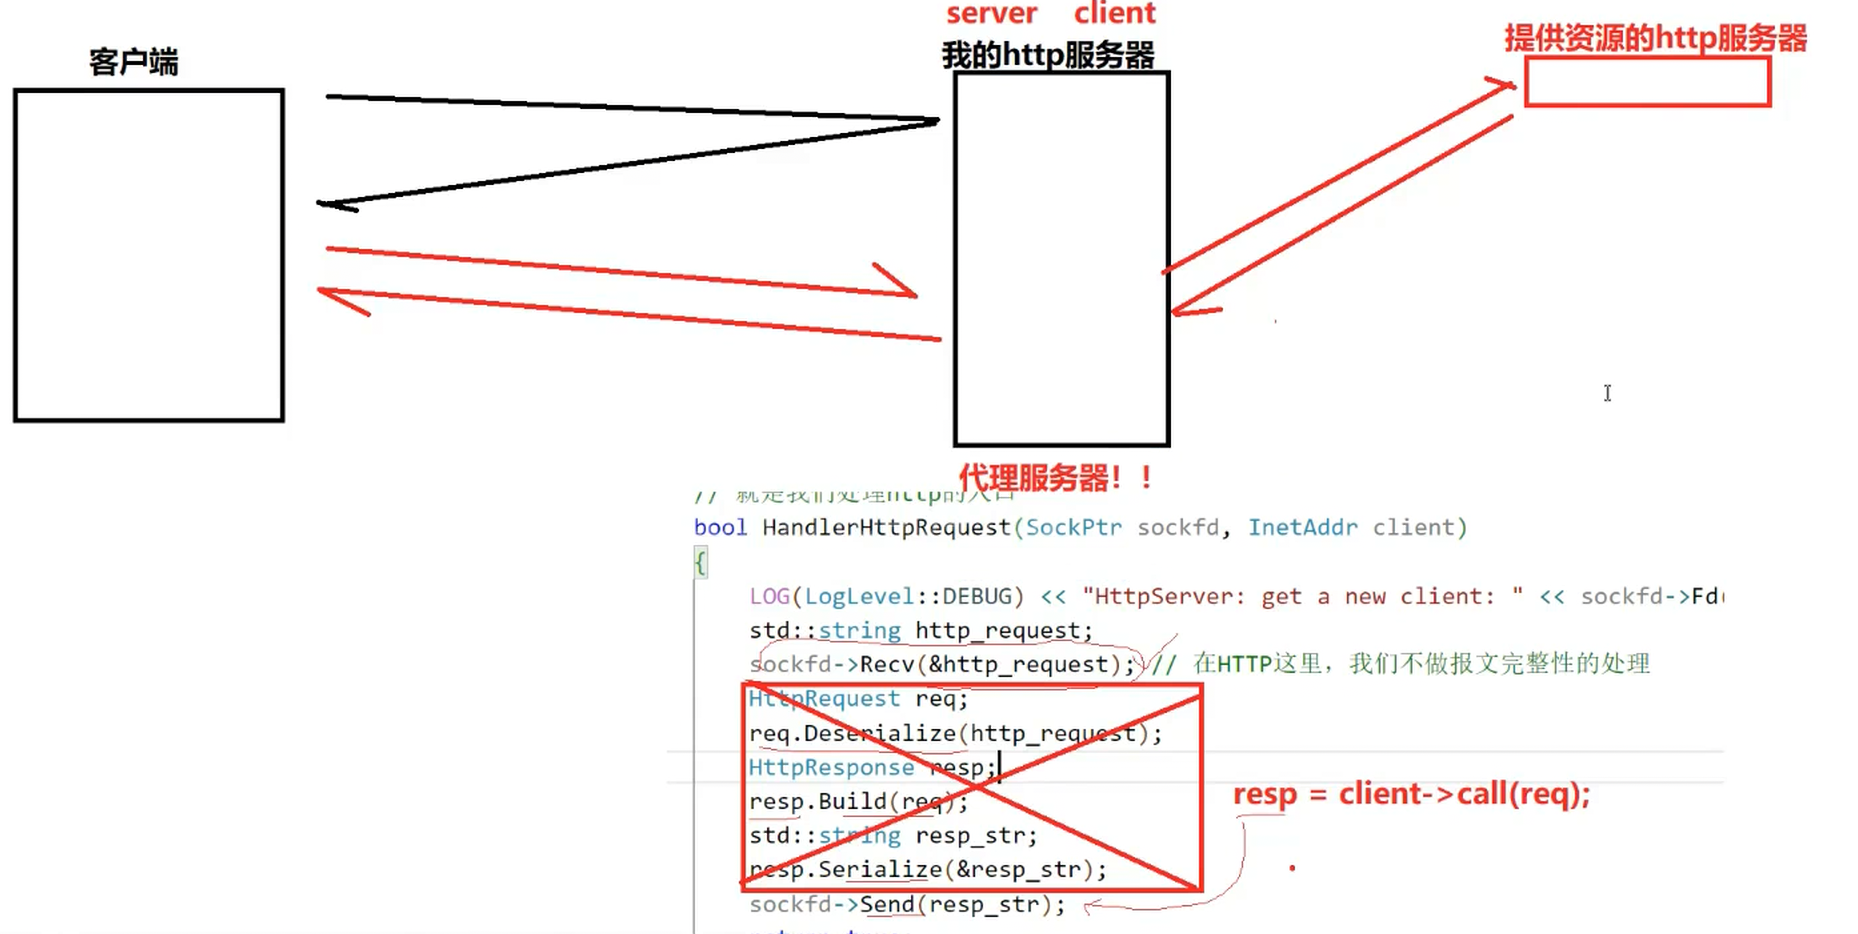
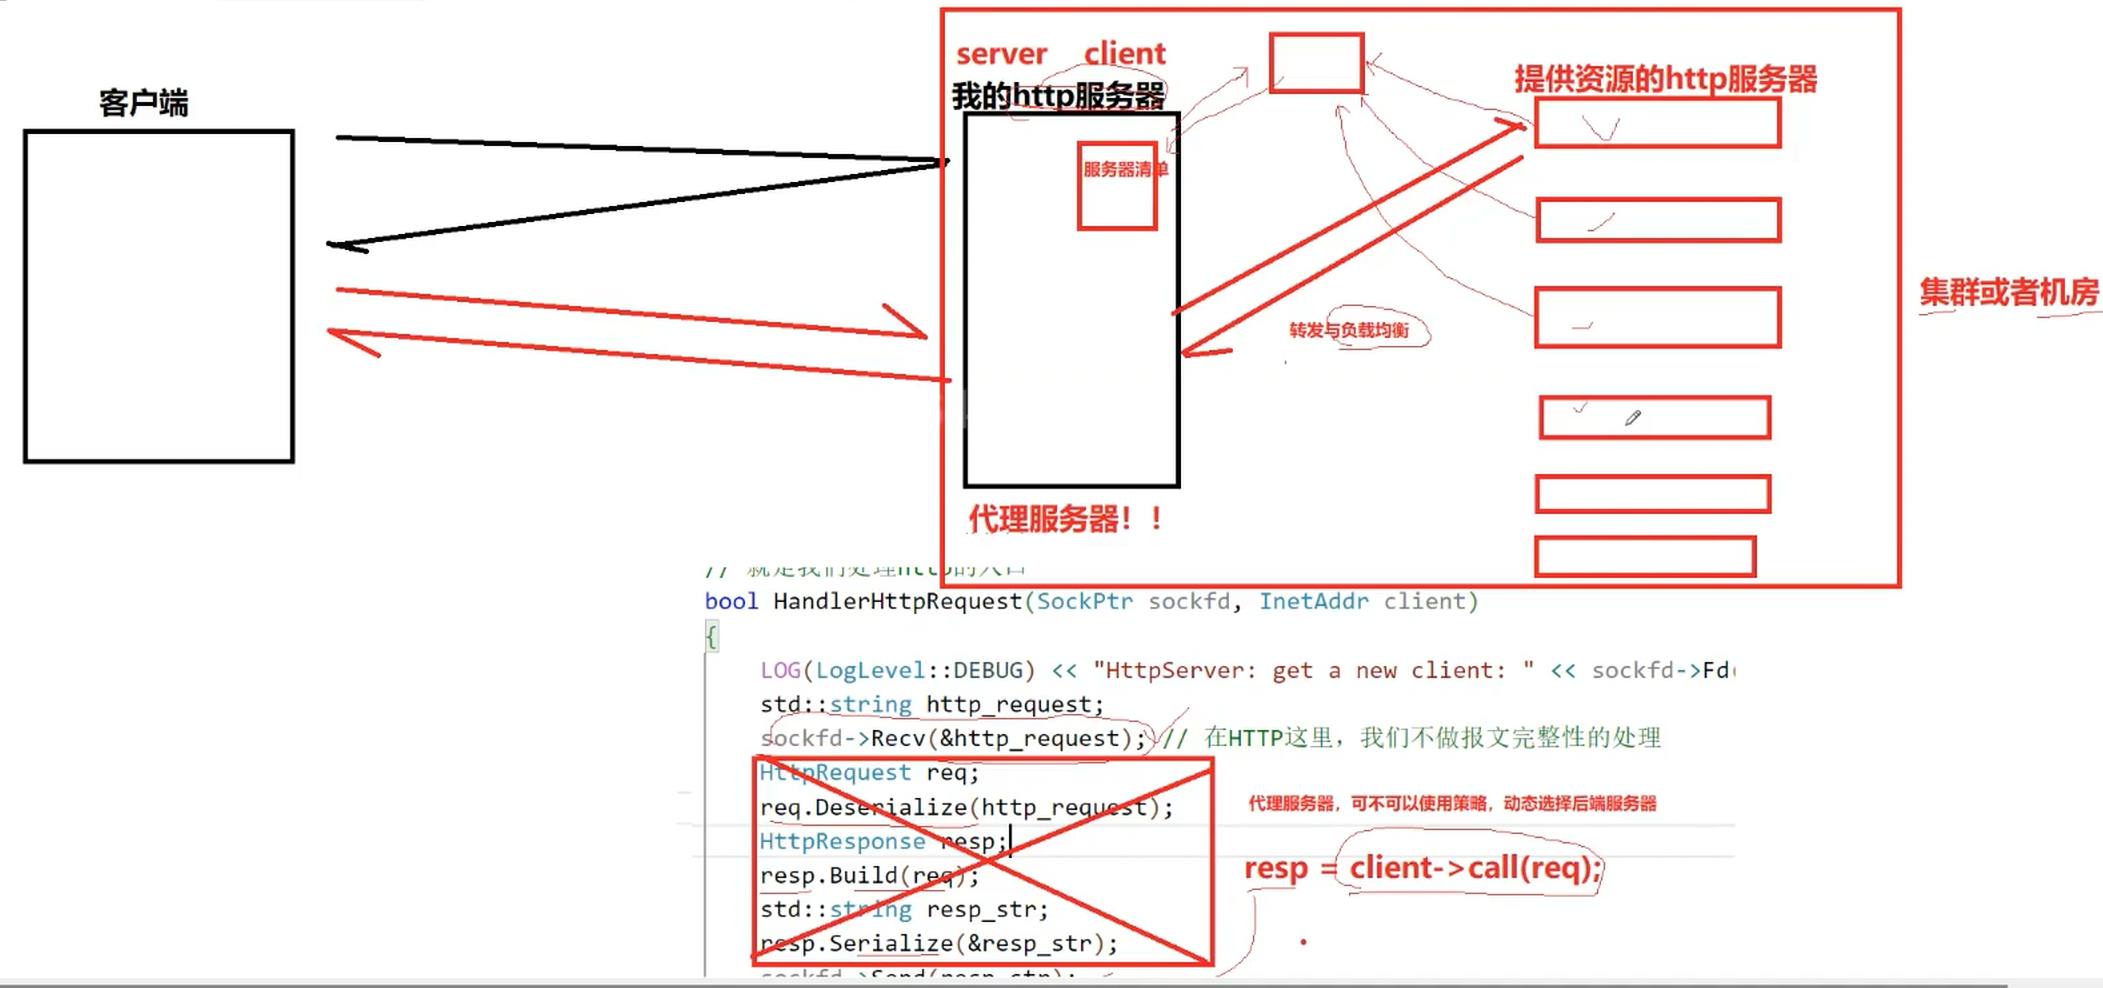
所以,一个服务器可以自己充当服务器,也可以充当代理服务器
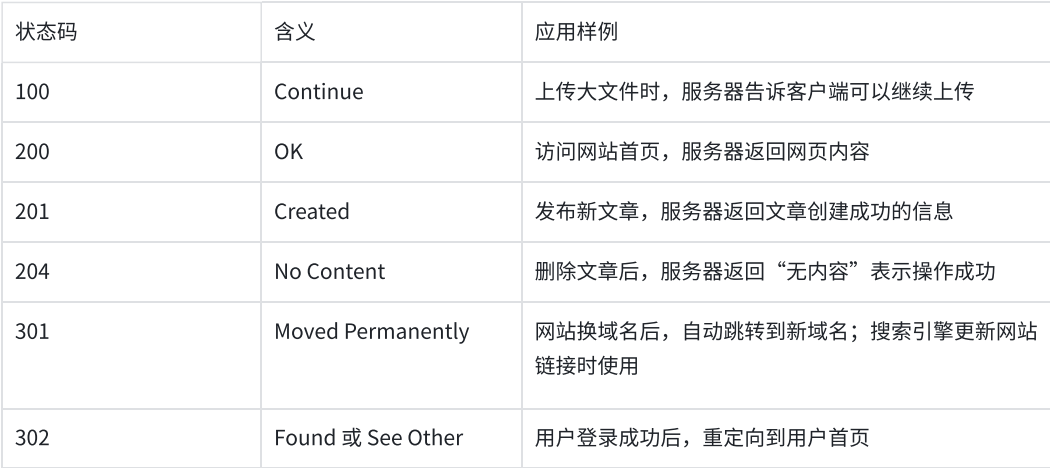

这个状态码,不是硬性的标准,所以就算是404状态码,也是能够显示的
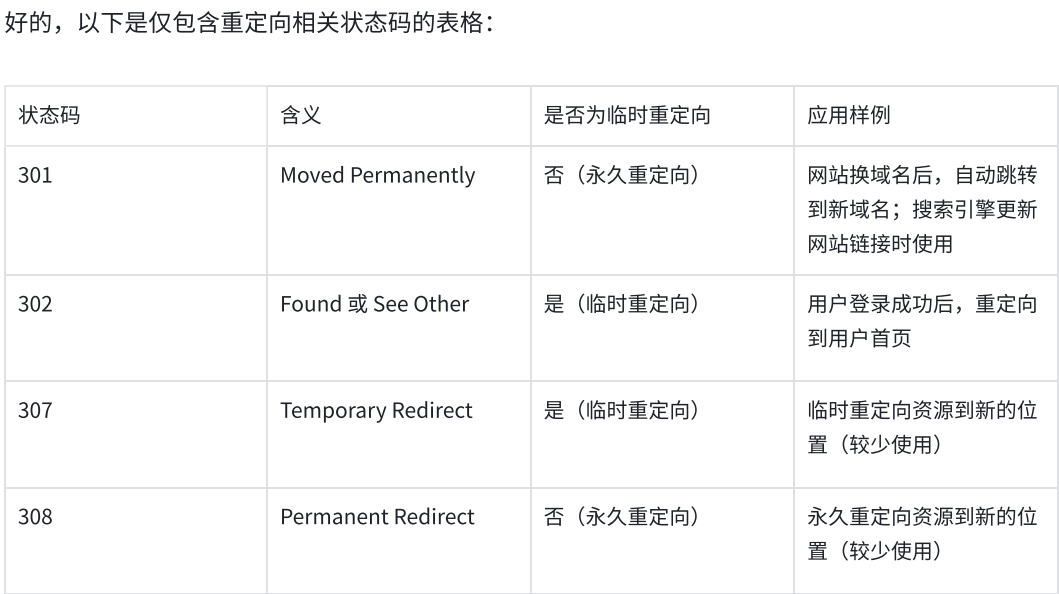
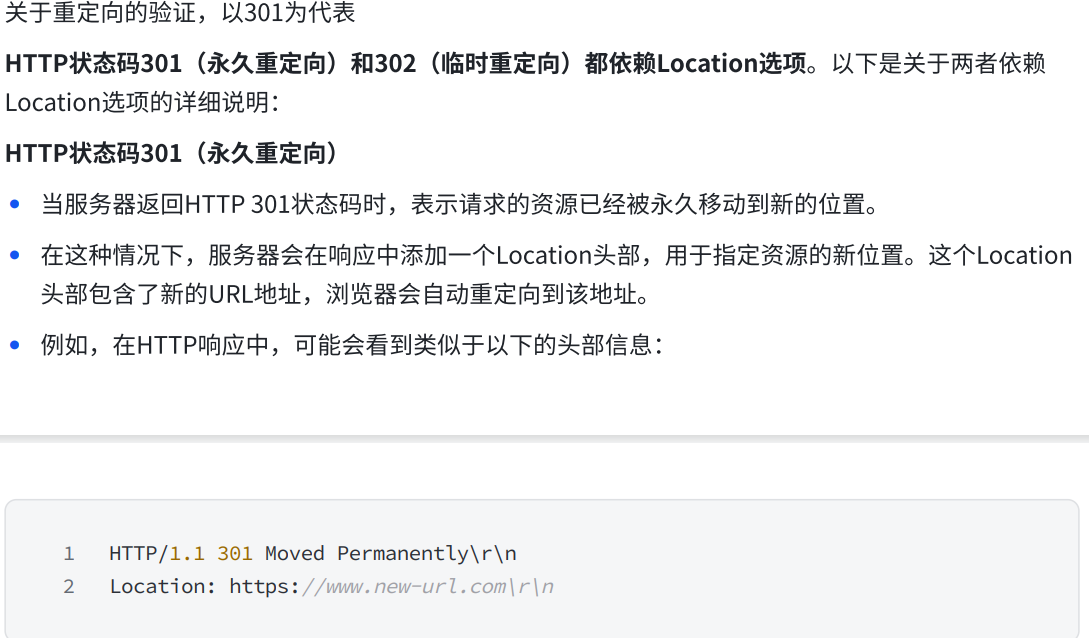
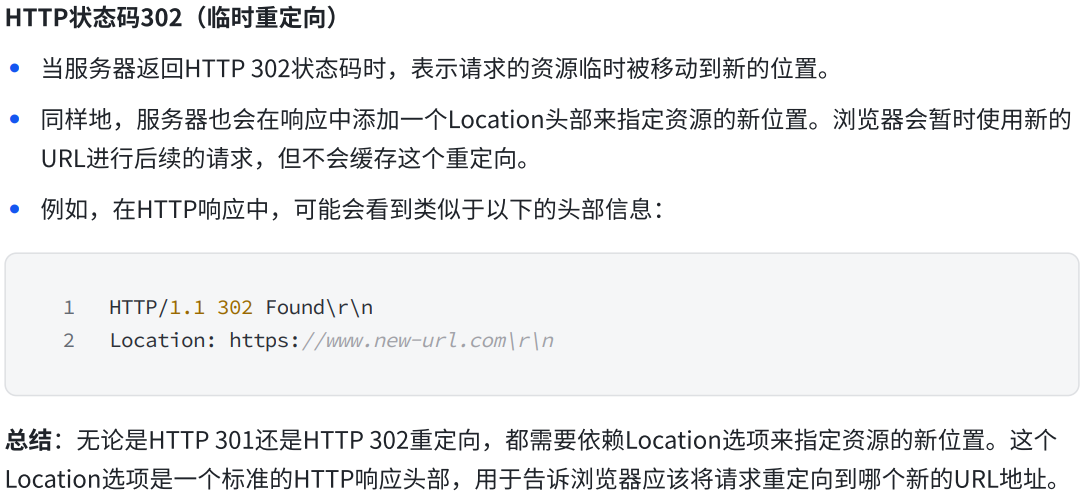
1.重定向功能
    void Build(HttpRequest& req){
#define TestRedir 1
#ifdef TestRedir_status_code = 302;_status_desc = CodeToDesc(_status_code);SetHeader("Location","https://www.qq.com/");
#elsestd::string uri = req.Uri();// wwwroot/     ->  wwwroot/index.html// wwwroot/a/b  ->  wwwroot/a/b/index.htmlif(uri.back() == '/'){uri += firstpage;req.SetUri(uri);}_content = req.GetContent();if(_content.empty()){//当前用户请求资源不存在_status_code = 404;req.SetUri(page404);_content = req.GetContent();}else{_status_code = 200;}LOG(LogLevel::DEBUG) << "------客户端在请求: " << req.Uri();req.Print();LOG(LogLevel::DEBUG) << "---------------------\n";_status_desc = CodeToDesc(_status_code);if(!_content.empty()){SetHeader("Content-Length",std::to_string(_content.size()));}std::string mime_type = SuffixToDesc(req.Suffix());SetHeader("Content-Type",mime_type);
#endiffor(auto& header : _header_kv){_resp_header.push_back(header.first + HeaderLineSep + header.second);}}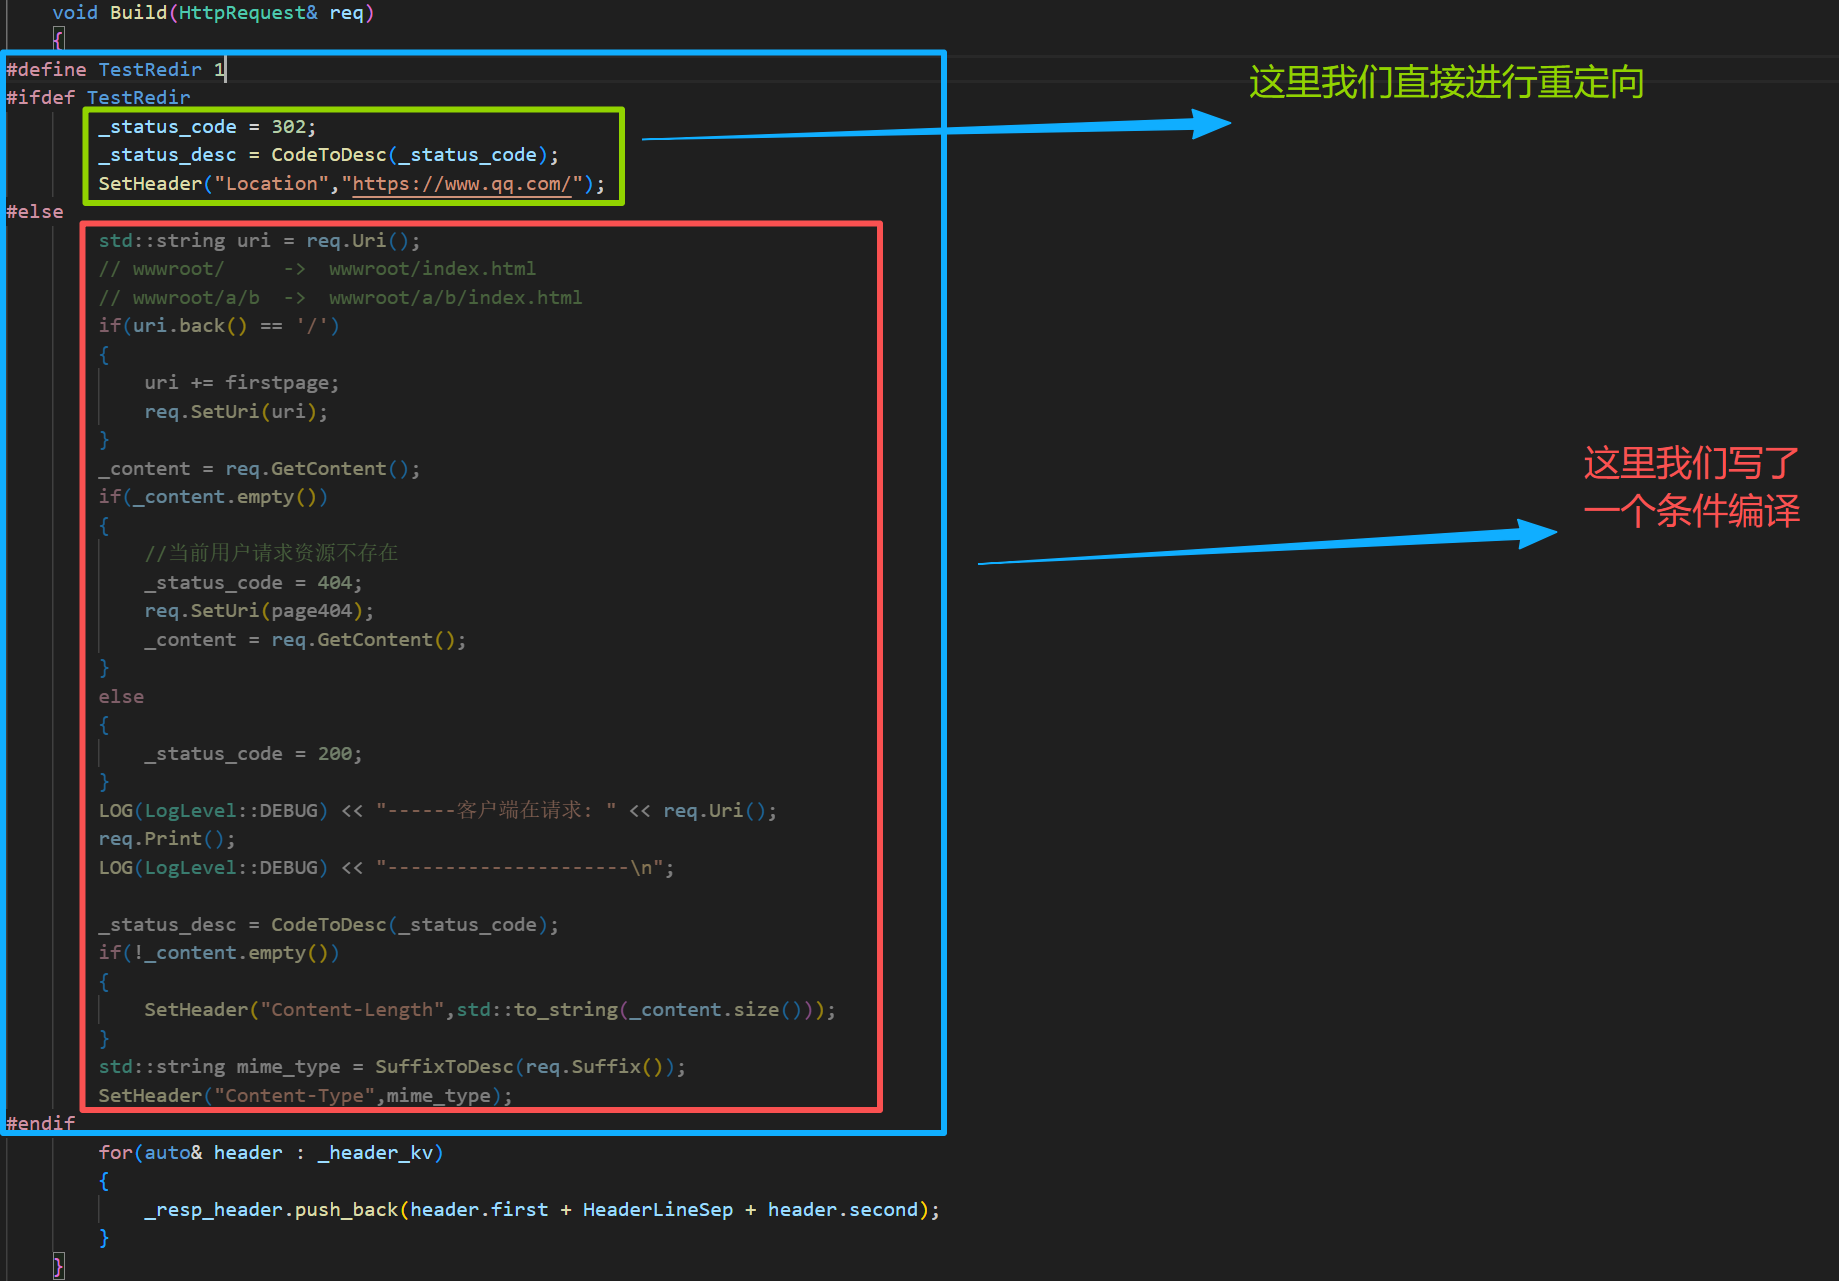

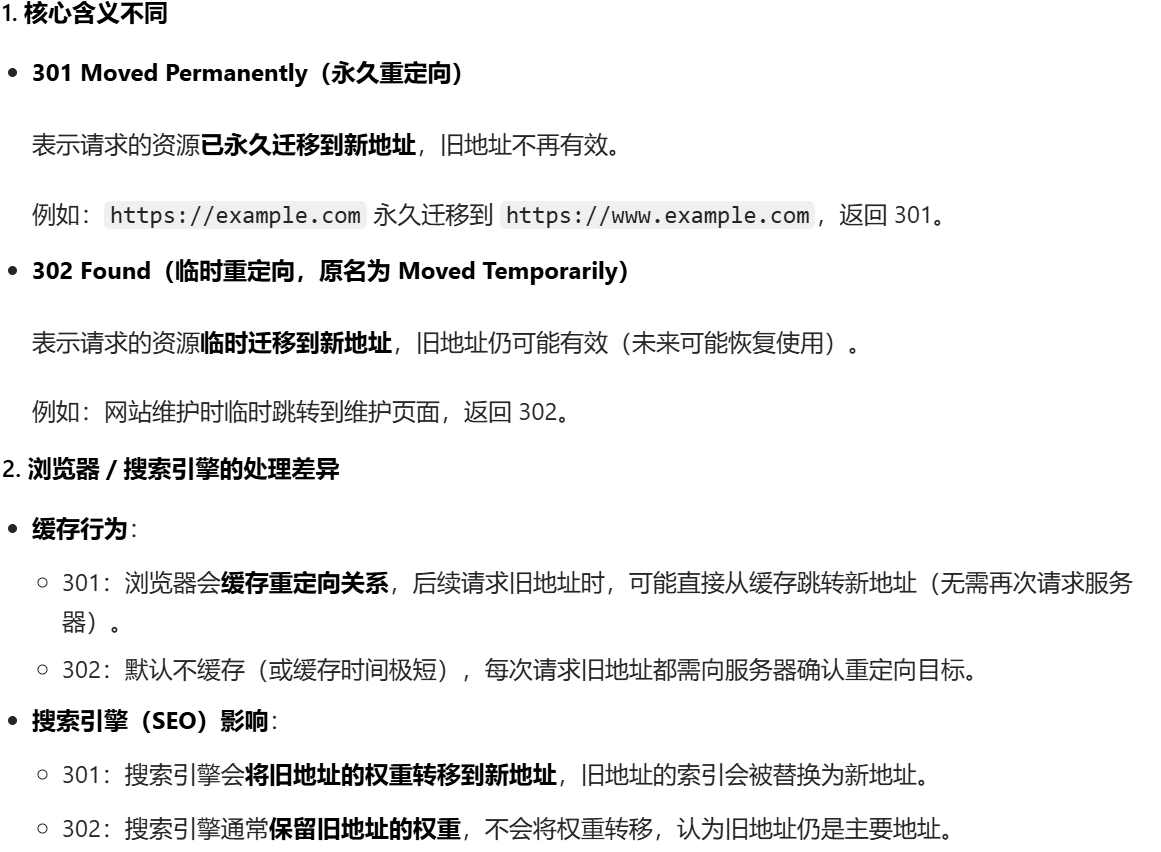
我们无论访问哪一个页面,都会直接被转到qq.com网页

重定向一般要带全路径,301和302功能差不多

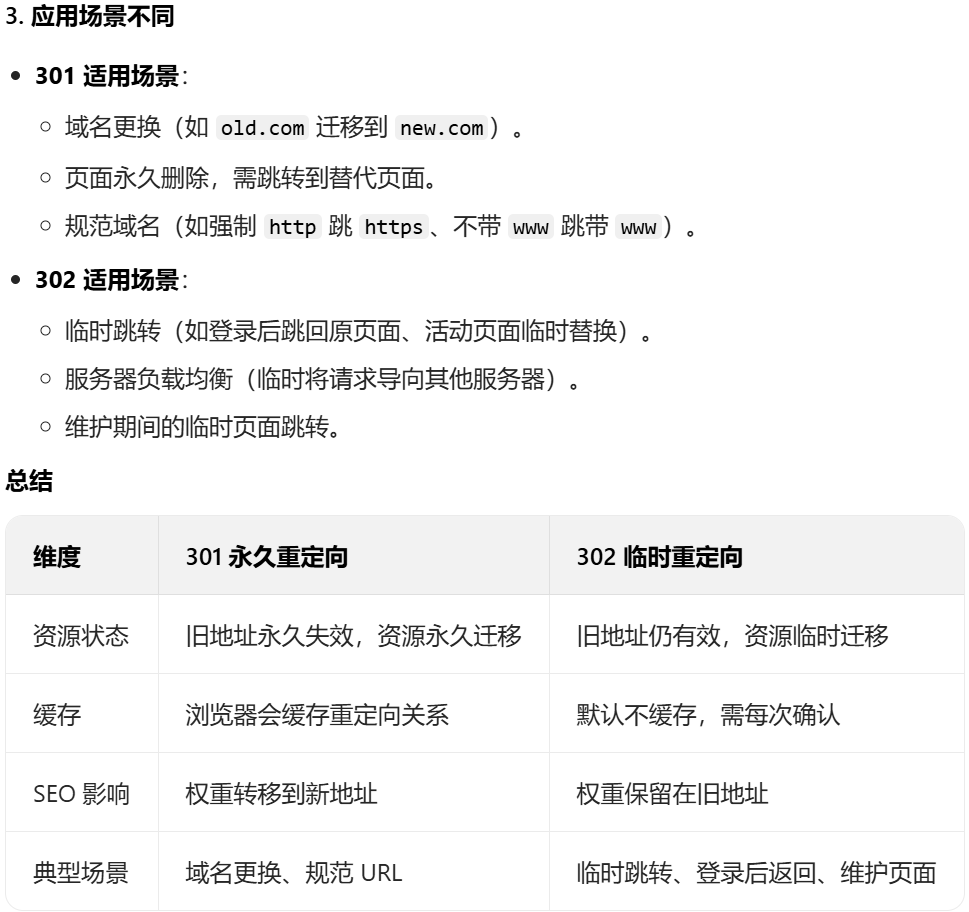
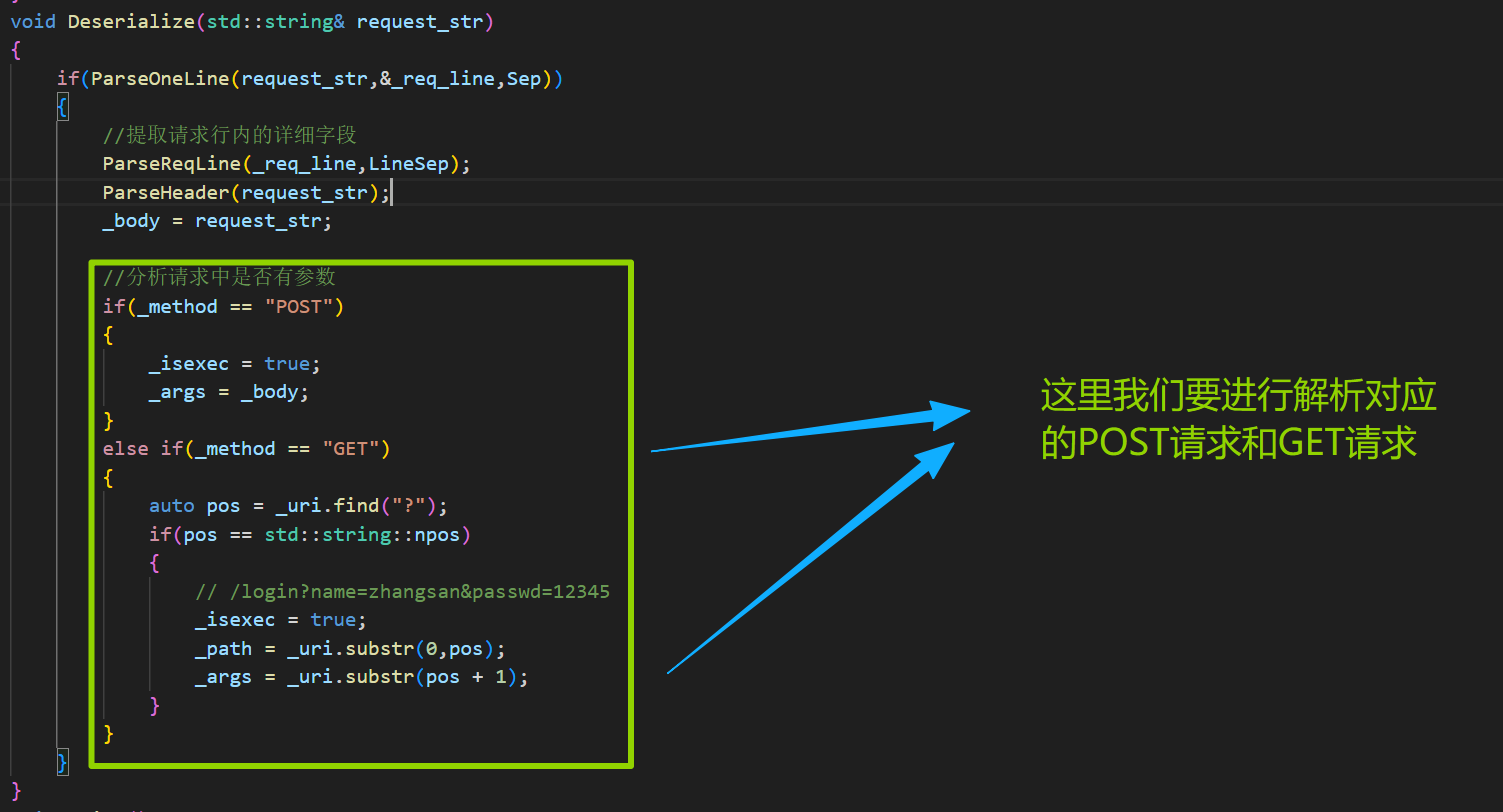
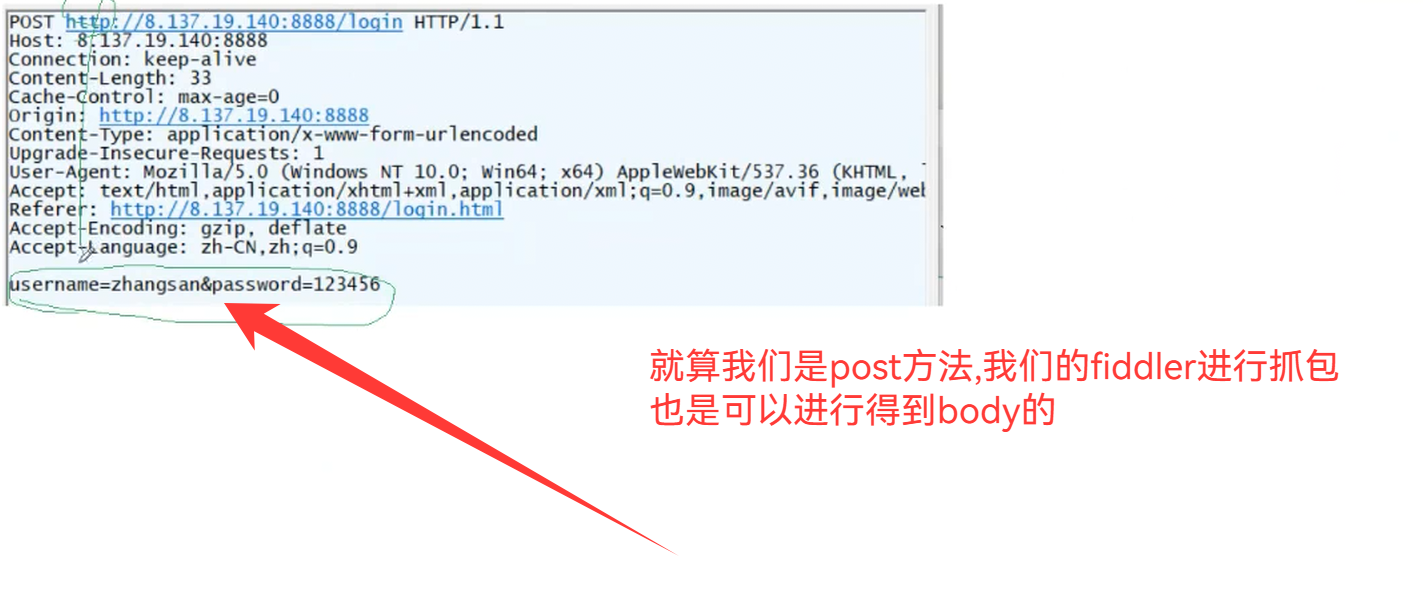
2.http的请求方法
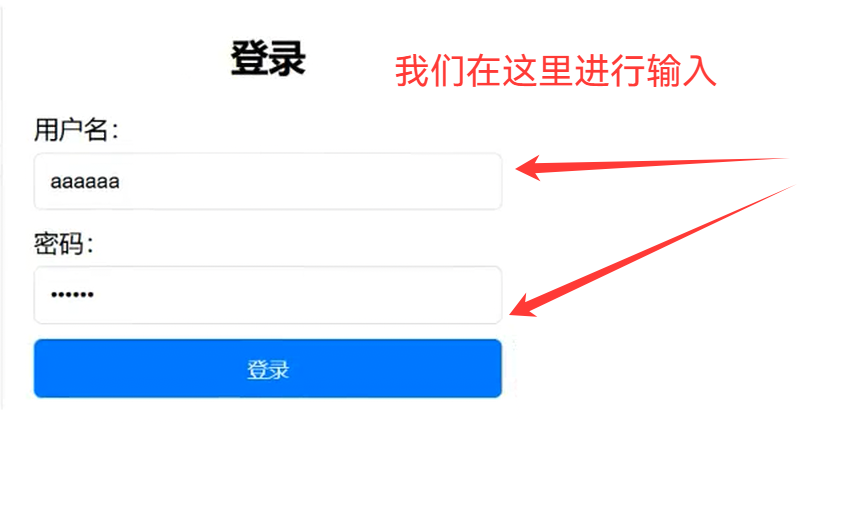

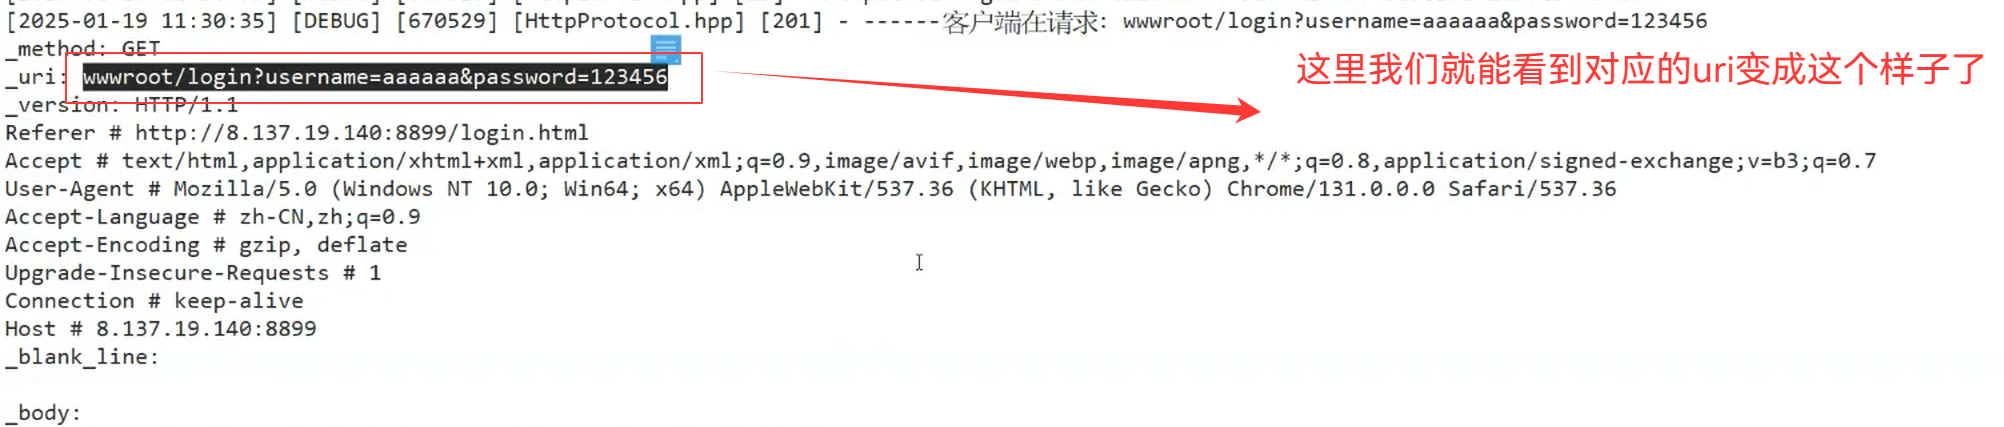

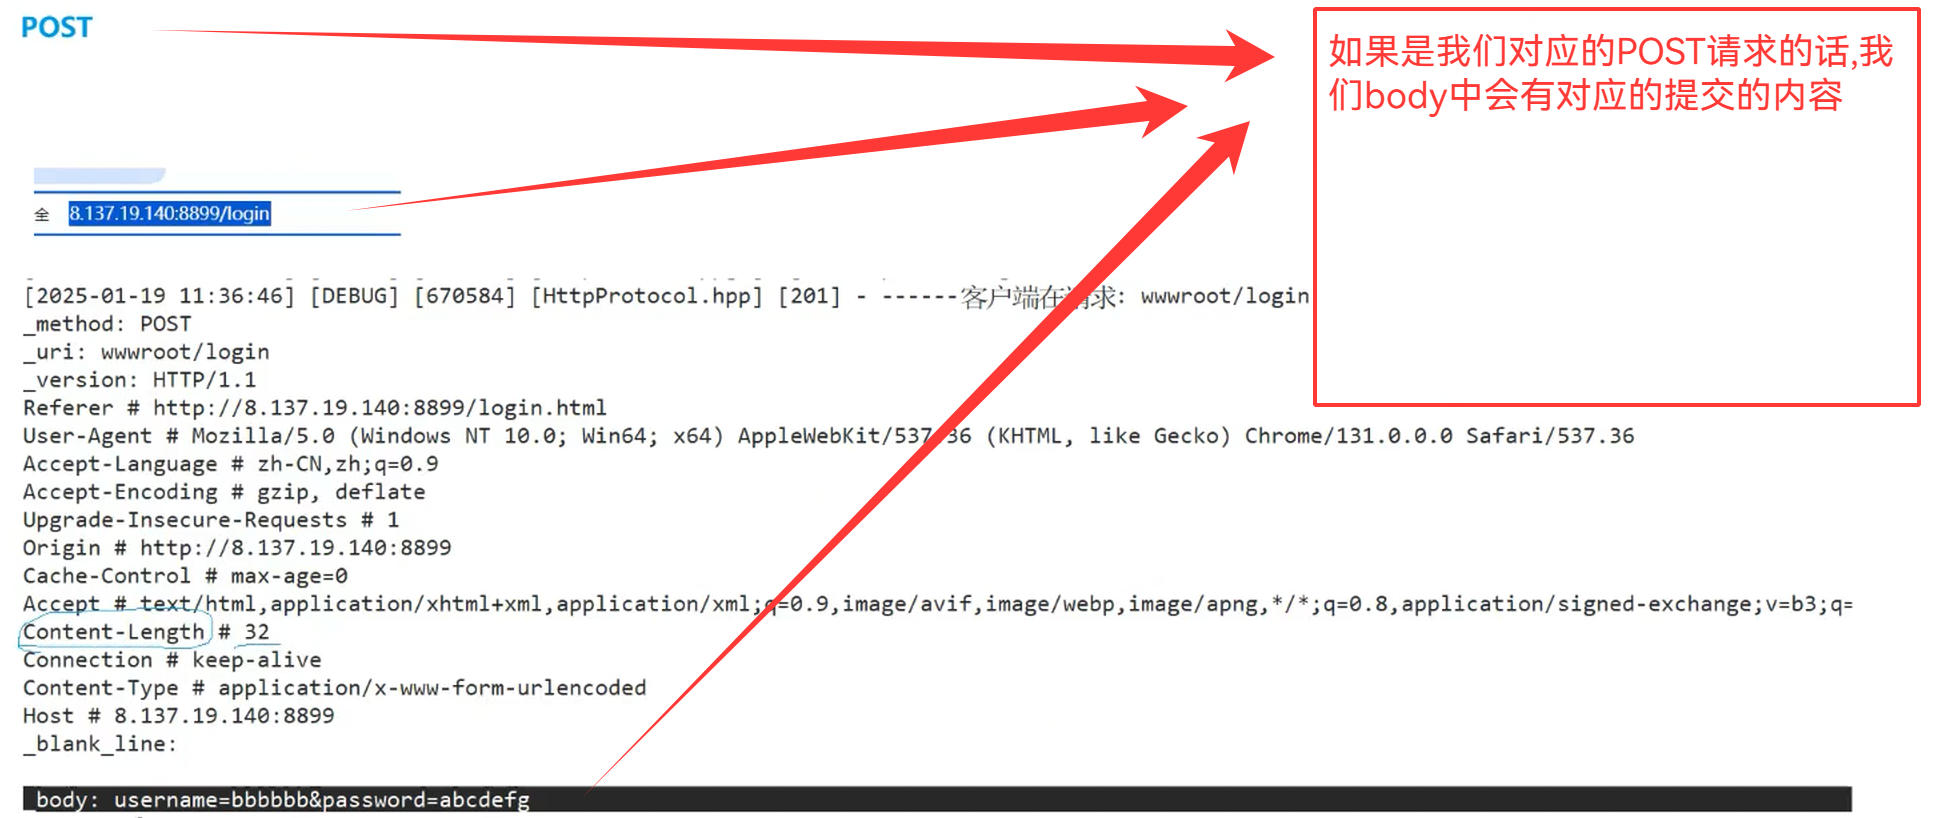

GET传参有数字限制并且不私密,而我们对应的POST传参可以传递的参数更多并且数据私密性更好
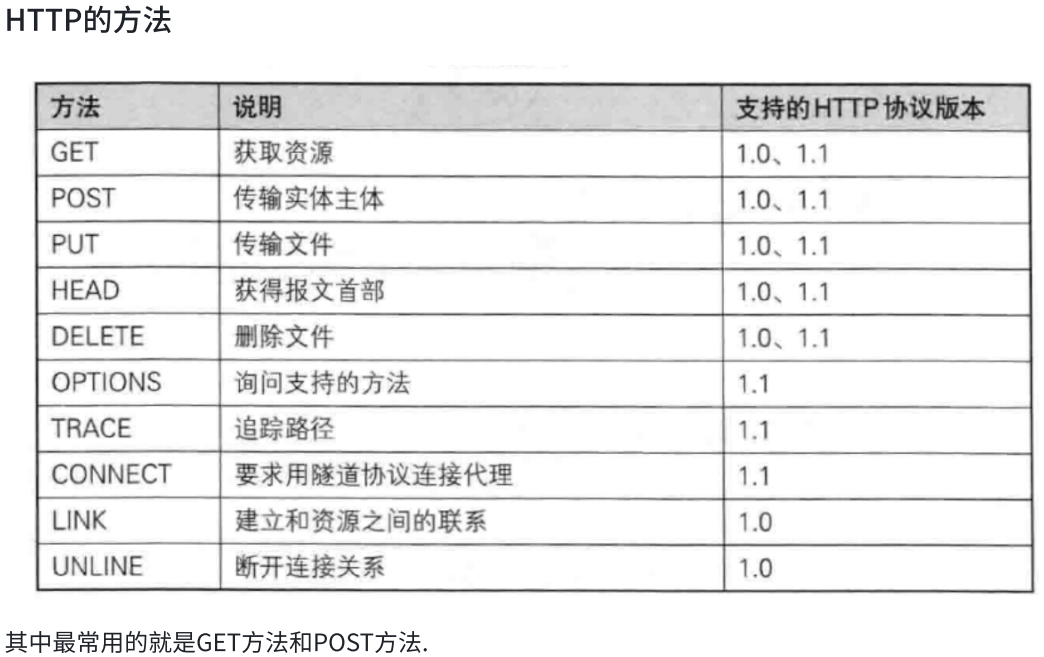
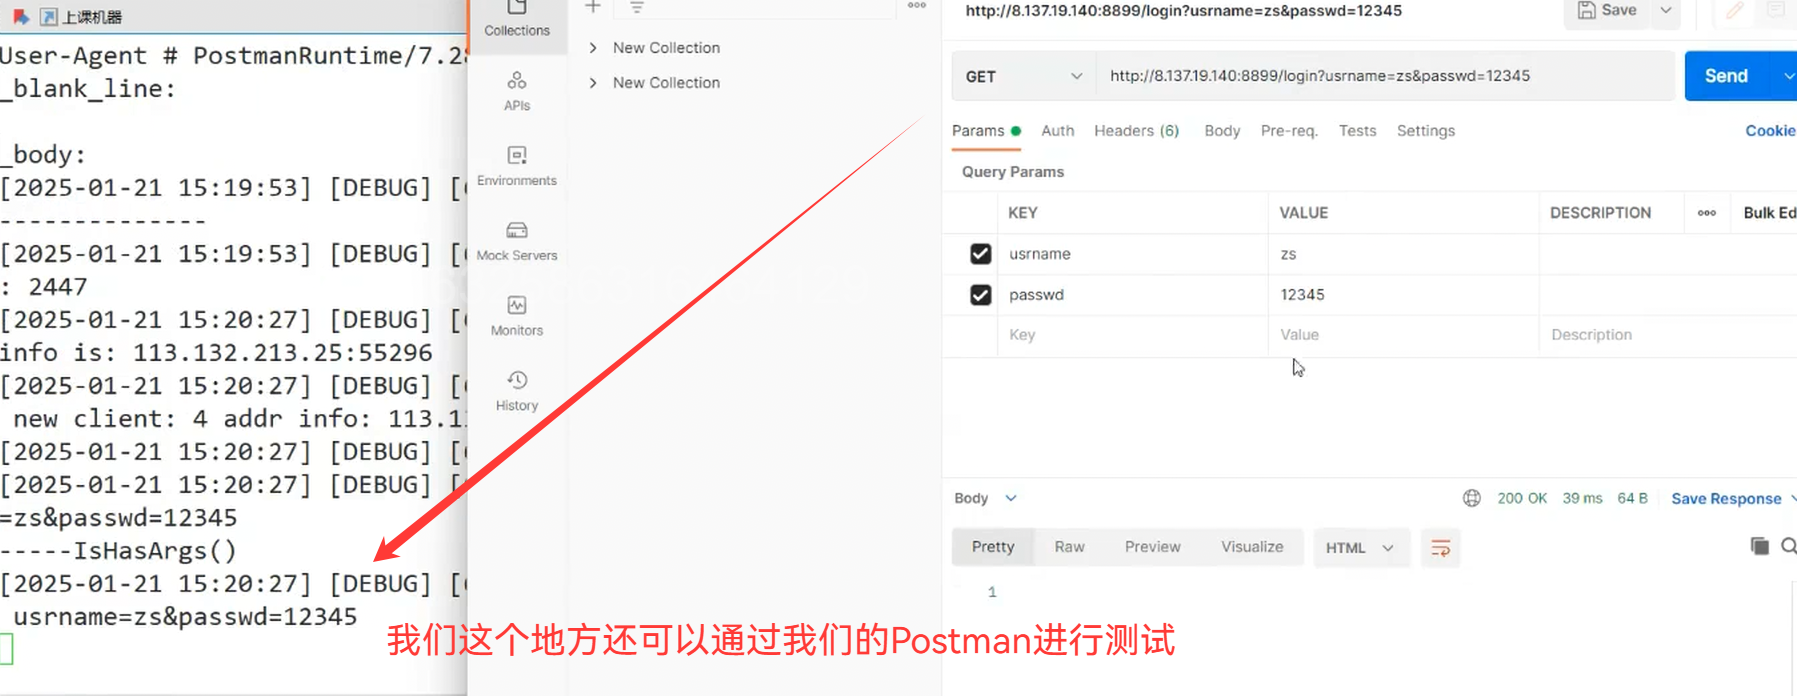
那我们拿到对应的数据了,我们应该怎么弄呢?
所以我们要进行设置登录功能
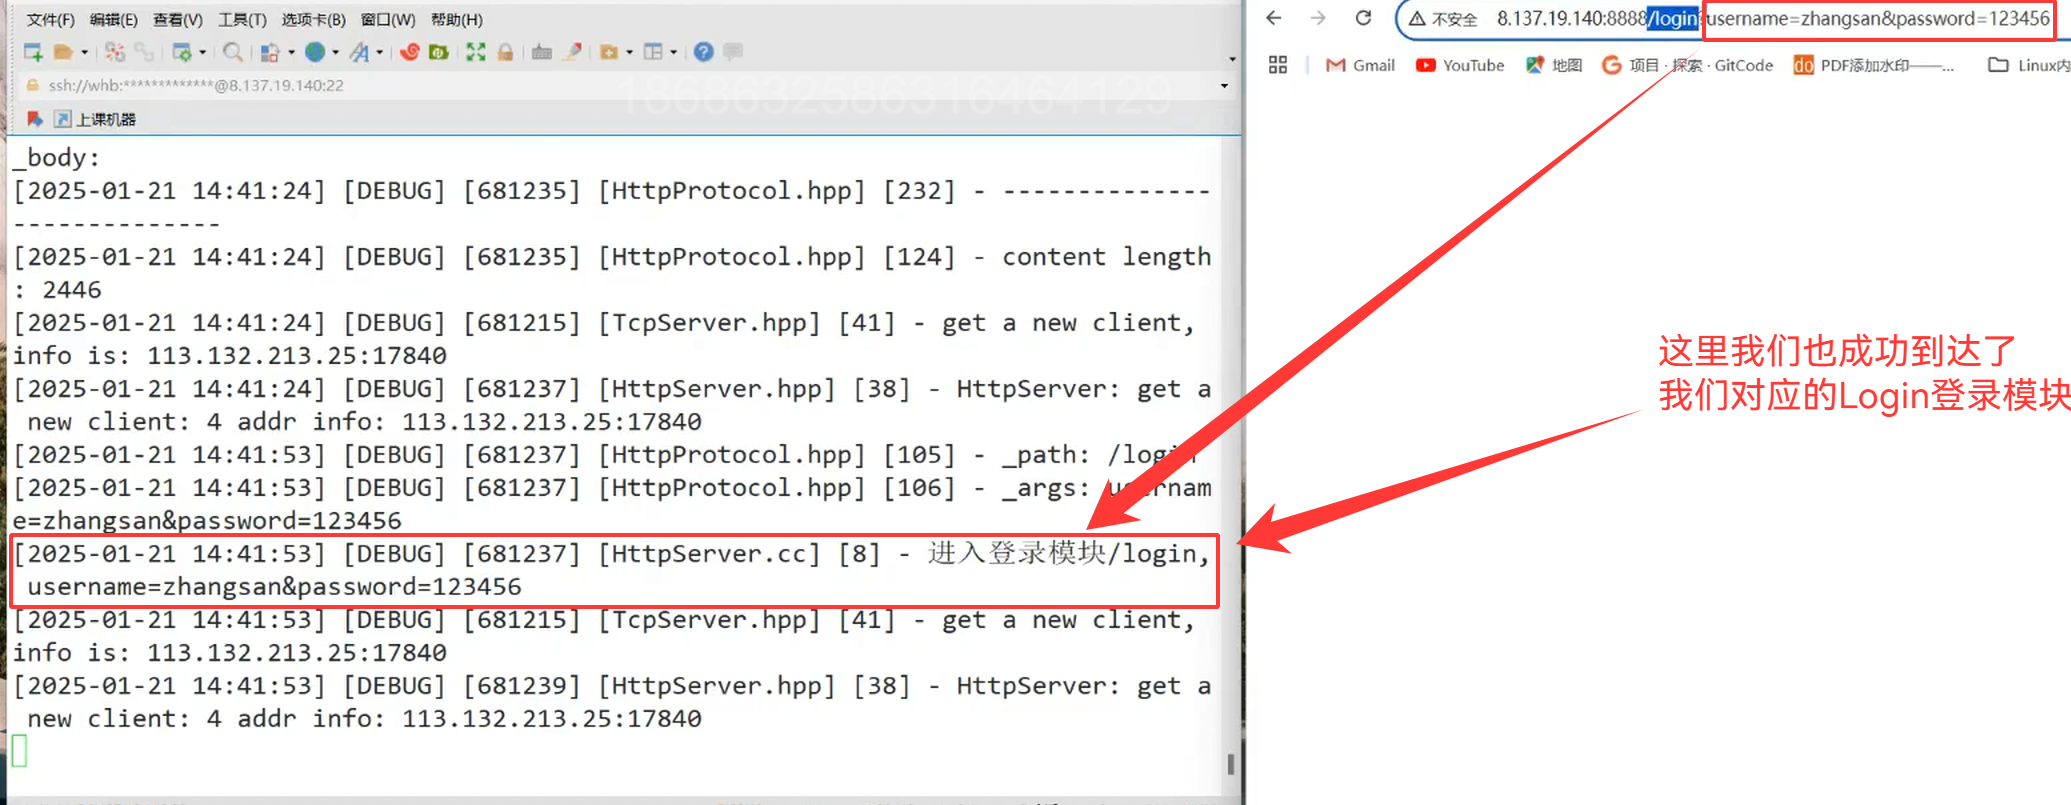
bool HandlerHttpRequest(SockPtr sockfd,InetAddr client){LOG(LogLevel::DEBUG) << "HttpServer: get a new client: " << sockfd->Fd() << " addr info: " << client.Addr();std::string http_request;//目前我们读取到的是最原始的信息sockfd->Recv(&http_request);HttpRequest req;req.Deserialize(http_request);HttpResponse resp;//1.请求静态资源//2.提交参数,交互设置if(req.IsHasArgs()){std::string service = req.Path();if(SafeCheck(service)){_route[service](req,resp);//login}else{resp.Build(req);}}else{resp.Build(req);}std::string resp_str;resp.Serialize(&resp_str);sockfd->Send(resp_str);return true;}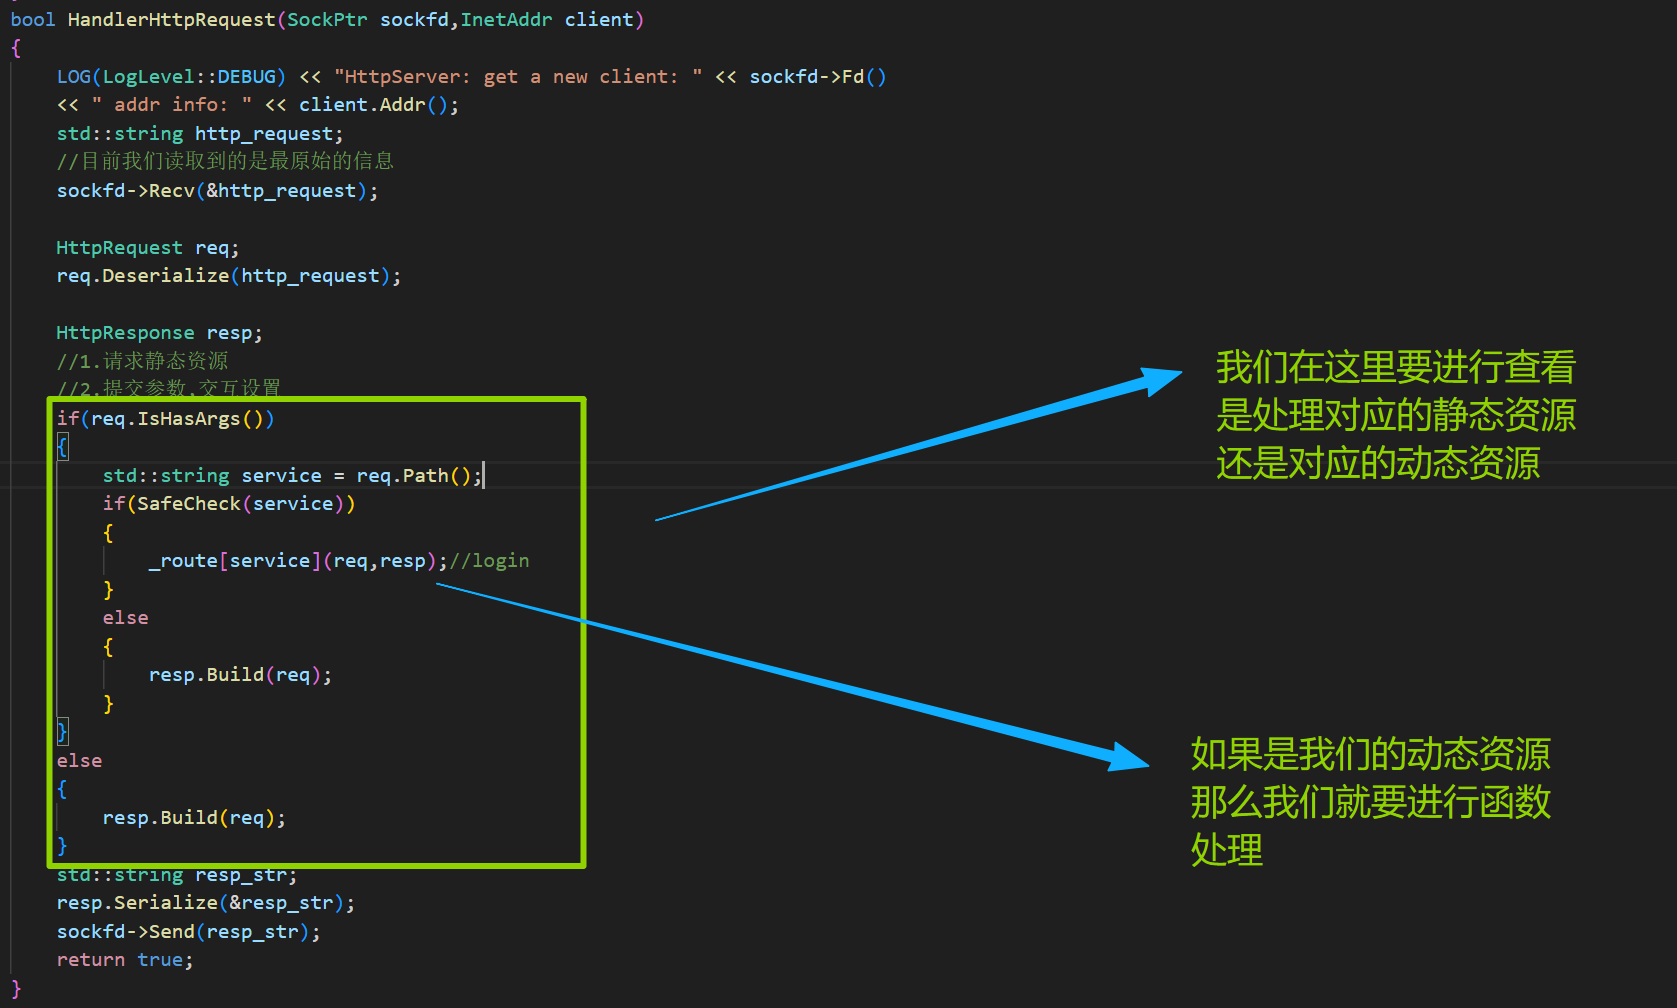

在进行函数处理之前,我们要先处理反序列化

然后我们在上层将方法放入
#include "HttpServer.hpp"void Login(HttpRequest& req,HttpResponse& resp)
{//根据req,动态构建respLOG(LogLevel::DEBUG) << "进入登录模块" << req.Path() << ", " << req.Args();
}
void Register(HttpRequest& req,HttpResponse& resp)
{LOG(LogLevel::DEBUG) << "进入注册模块" << req.Path() << ", " << req.Args();
}int main(int argc,char* argv[])
{if(argc != 2){std::cout << "Usage: " << argv[0] << " port" << std::endl;return 1;}auto httpserver = std::make_unique<HttpServer>(std::stoi(argv[1]));//服务器的登录功能httpserver->Resigster("/login",Login);httpserver->Resigster("/Register",Register);httpserver->Start();return 0;
}
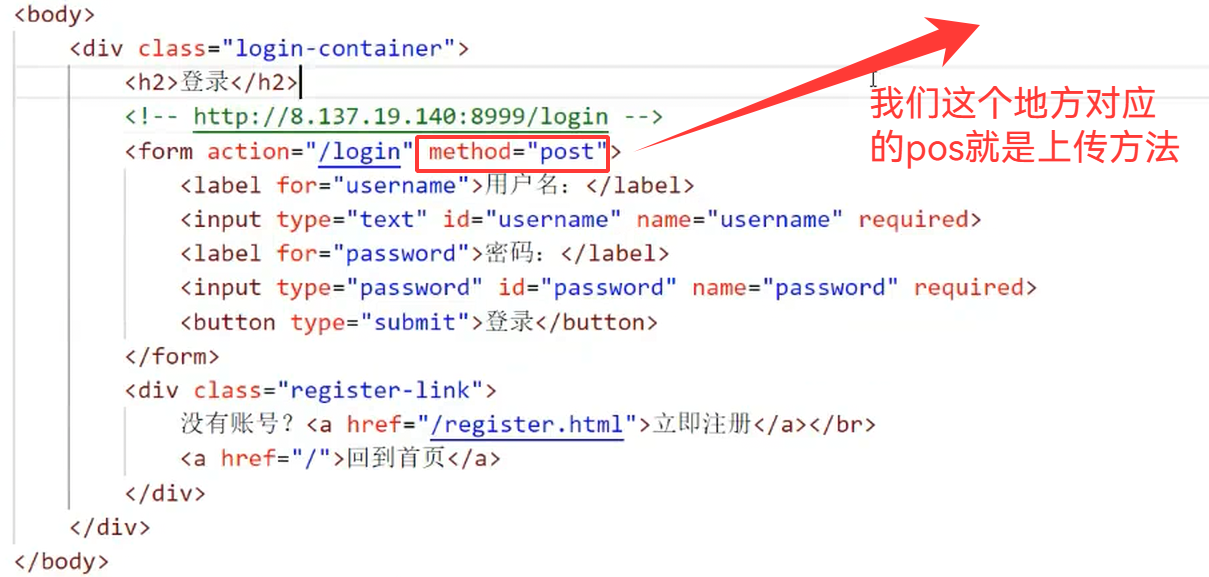
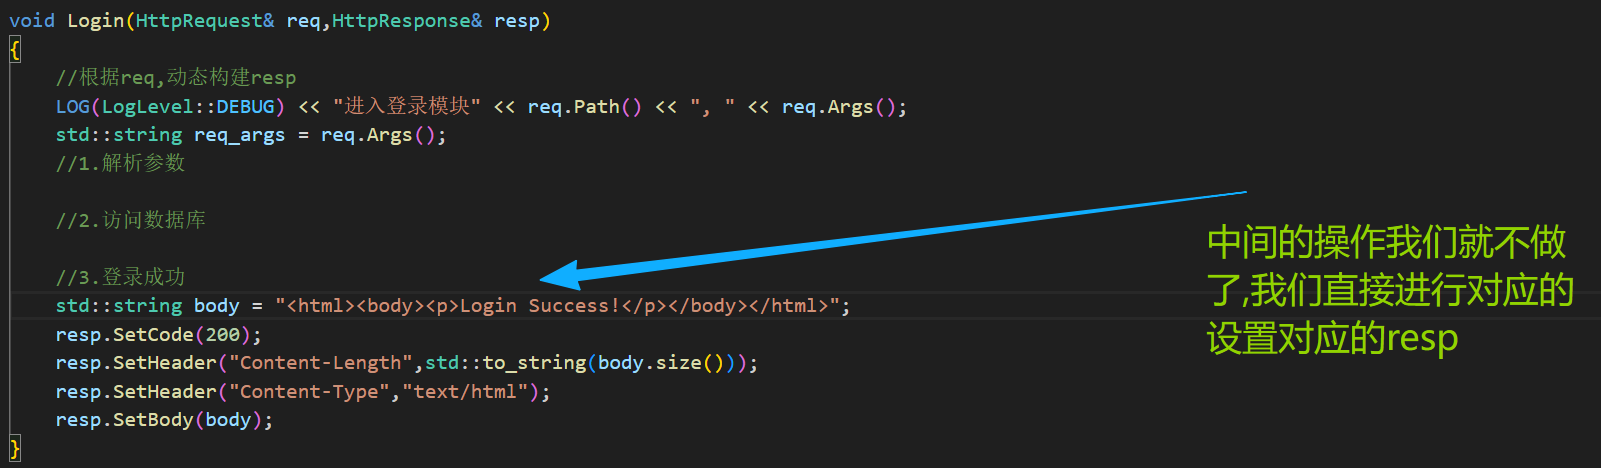
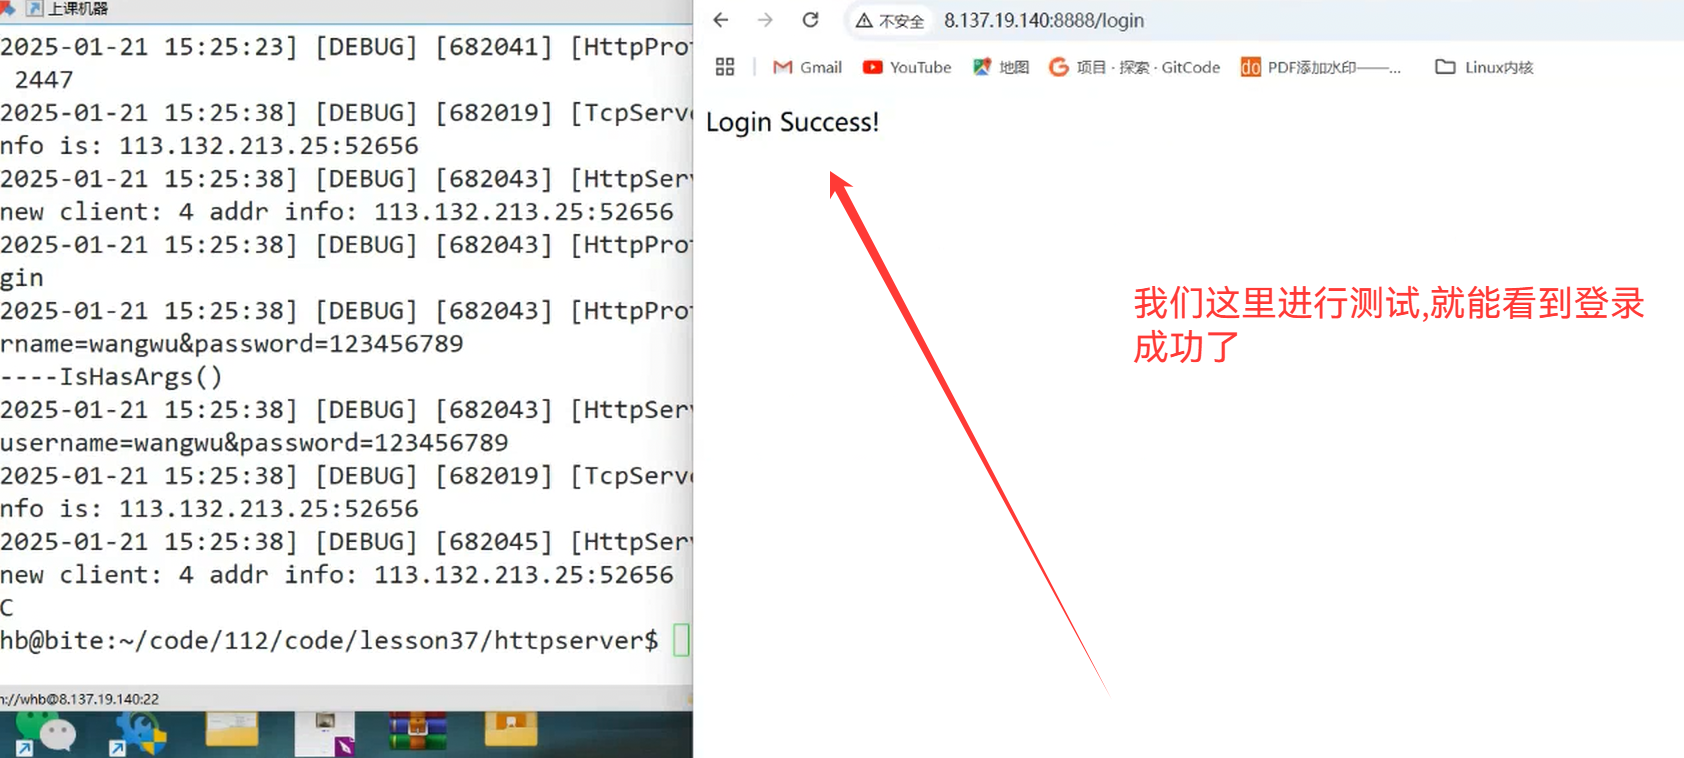
这样上传传入的/login的时候,就自动到我们对应的Login()中了


后续的操作,就是在我们的Login里面进行Request和Response之间的操作了
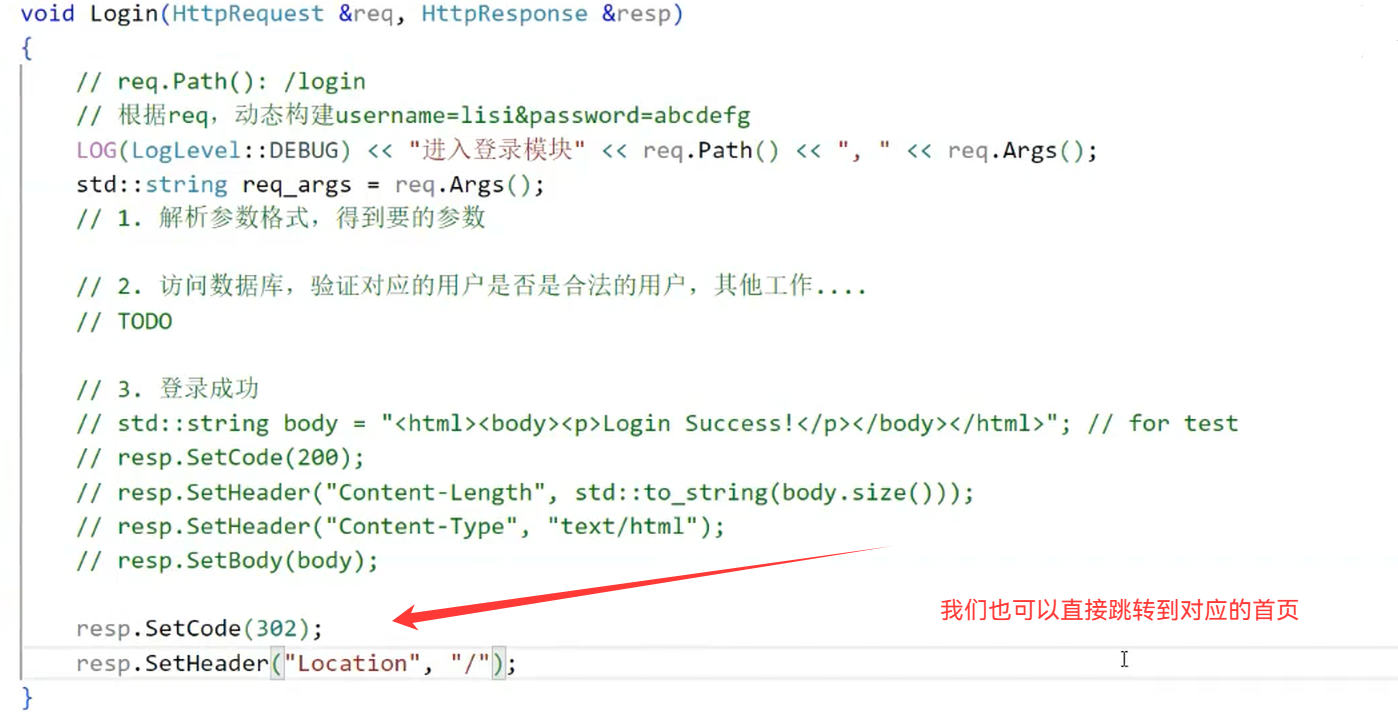
void Login(HttpRequest& req,HttpResponse& resp)
{//根据req,动态构建respLOG(LogLevel::DEBUG) << "进入登录模块" << req.Path() << ", " << req.Args();std::string req_args = req.Args();//1.解析参数//2.访问数据库//3.登录成功std::string body = "<html><body><p>Login Success!</p></body></html>";resp.SetCode(200);resp.SetHeader("Content-Length",std::to_string(body.size()));resp.SetHeader("Content-Type","text/html");resp.SetBody(body);
}

这样我们一启动就立马跳转到我们对应的首页了
这里我们形成对应的跳转页面:
<!DOCTYPE html>
<html lang="en">
<head><meta charset="UTF-8"><meta name="viewport" content="width=device-width, initial-scale=1.0"><title>登录成功</title><style>body {font-family: Arial, sans-serif;text-align: center;margin-top: 50px;}.message {font-size: 20px;color: green;}.countdown {font-size: 24px;font-weight: bold;margin-top: 20px;}</style>
</head>
<body><div class="message">登录成功!</div><div class="countdown" id="countdown">5秒后自动跳转到首页</div><script>// 设置倒计时时间(秒)let countdownTime = 5;// 获取倒计时显示元素const countdownElement = document.getElementById('countdown');// 倒计时函数const countdown = () => {countdownElement.textContent = `${countdownTime}秒后自动跳转到首页`;countdownTime--;if (countdownTime < 0) {// 倒计时结束,跳转到首页window.location.href = 'http://8.130.24.157:8888'; // 替换为你的首页地址}};// 每秒调用一次倒计时函数setInterval(countdown, 1000);</script>
</body>
</html>
void Login(HttpRequest& req,HttpResponse& resp)
{//根据req,动态构建respLOG(LogLevel::DEBUG) << "进入登录模块" << req.Path() << ", " << req.Args();std::string req_args = req.Args();//1.解析参数//2.访问数据库//3.登录成功// std::string body = "<html><body><p>Login Success!</p></body></html>";std::string body = req.GetContent("wwwroot/success.html");resp.SetCode(200);resp.SetHeader("Content-Length",std::to_string(body.size()));resp.SetHeader("Content-Type","text/html");resp.SetBody(body);}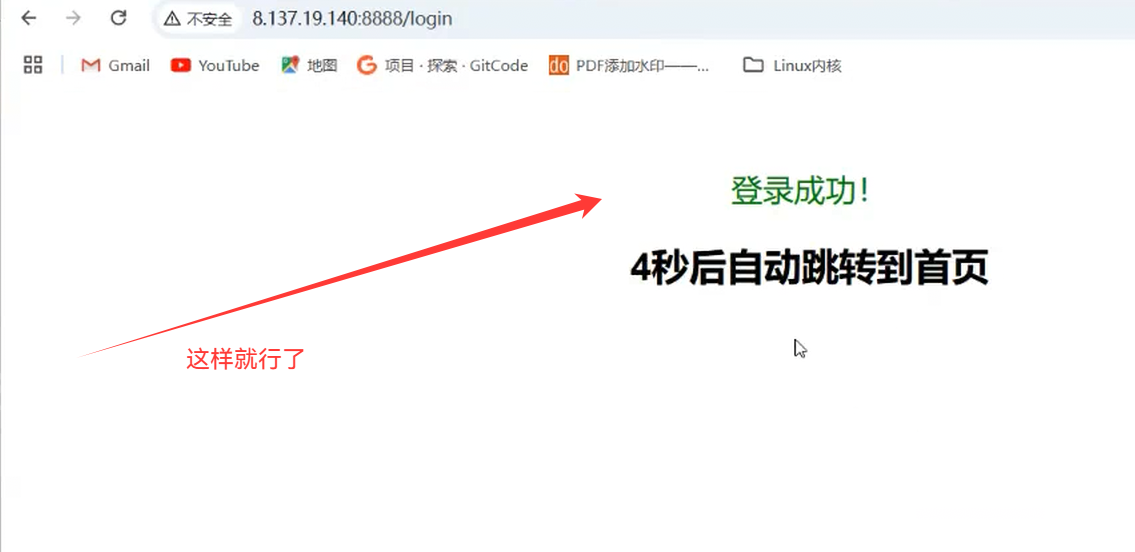
3.bind error的解决
当我们先进行断开的时候,客户端可能还连着我们呢(四次挥手)
我们的服务器处于time_wait状态,导致我们无法继续启动(60s / 120s)

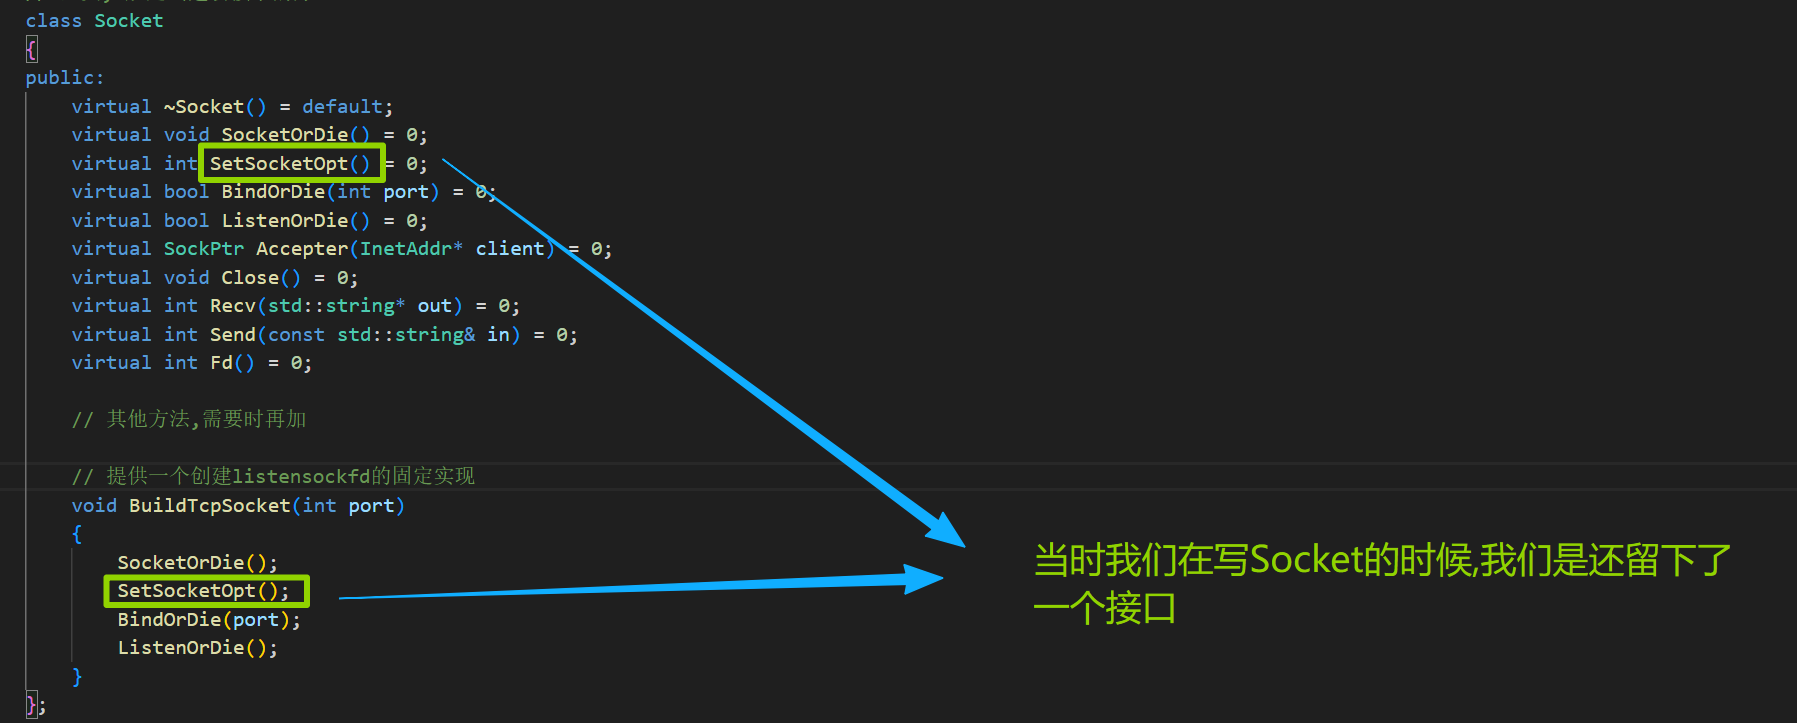
virtual int SetSocketOpt()override{//保证我们服务器在异常断开的时候,可以立即重启,不会有bind问题int opt = 1;int n = ::setsockopt(_sockfd,SOL_SOCKET,SO_REUSEADDR,&opt,sizeof(opt));(void)n;}4.cookie和session
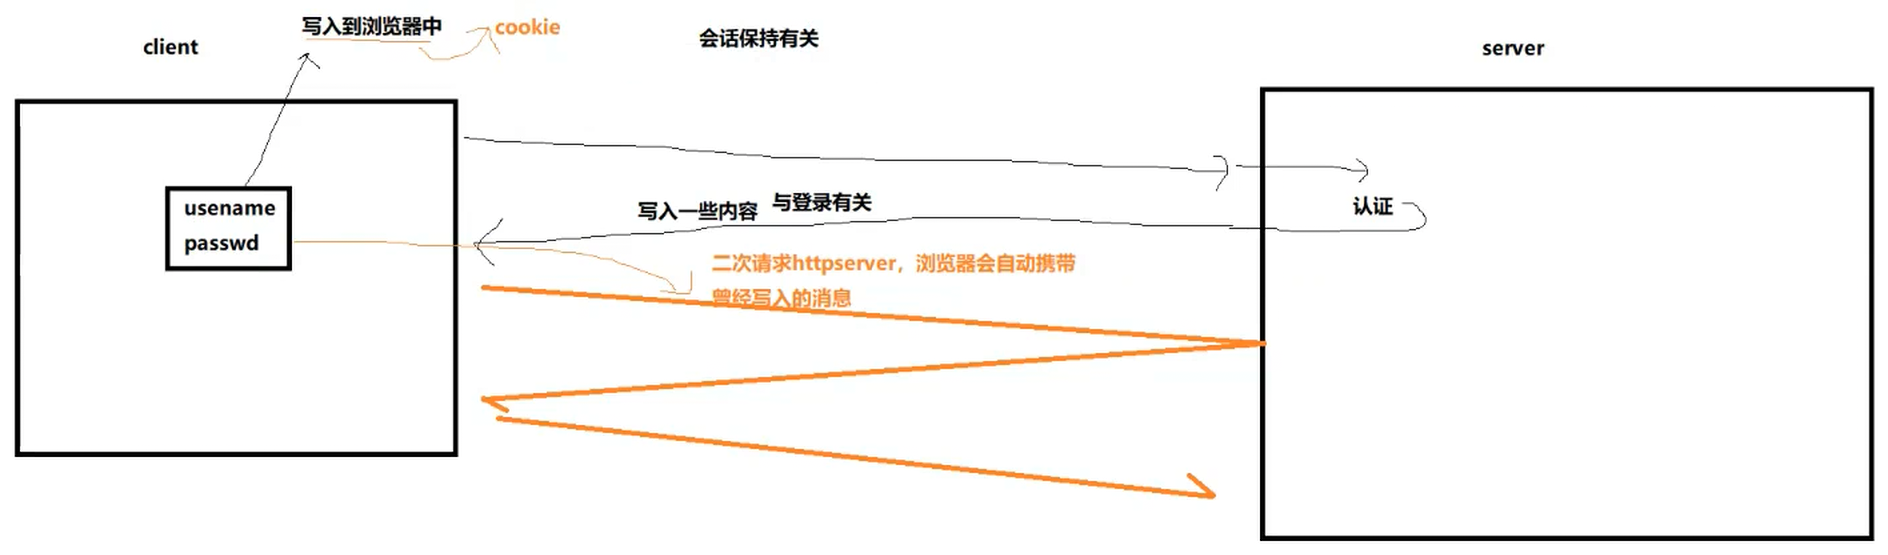
cookie保存有两种(1.内存级 2.文件级)
内存级:进程关闭之后,再进行登录,还认识你
文件级:进程退出之后,就不认识你了
这就是基于cookie的会话保持功能
那么我们怎么进行设置我们的cookie呢?
void Login(HttpRequest& req,HttpResponse& resp)
{//根据req,动态构建respLOG(LogLevel::DEBUG) << "进入登录模块" << req.Path() << ", " << req.Args();std::string req_args = req.Args();//1.解析参数//2.访问数据库//3.登录成功// std::string body = "<html><body><p>Login Success!</p></body></html>";std::string body = req.GetContent("wwwroot/success.html");resp.SetCode(200);resp.SetHeader("Content-Length",std::to_string(body.size()));resp.SetHeader("Content-Type","text/html");resp.SetHeader("Set-Cookie","username=zhangsan;passwd=1111111111;");resp.SetBody(body);}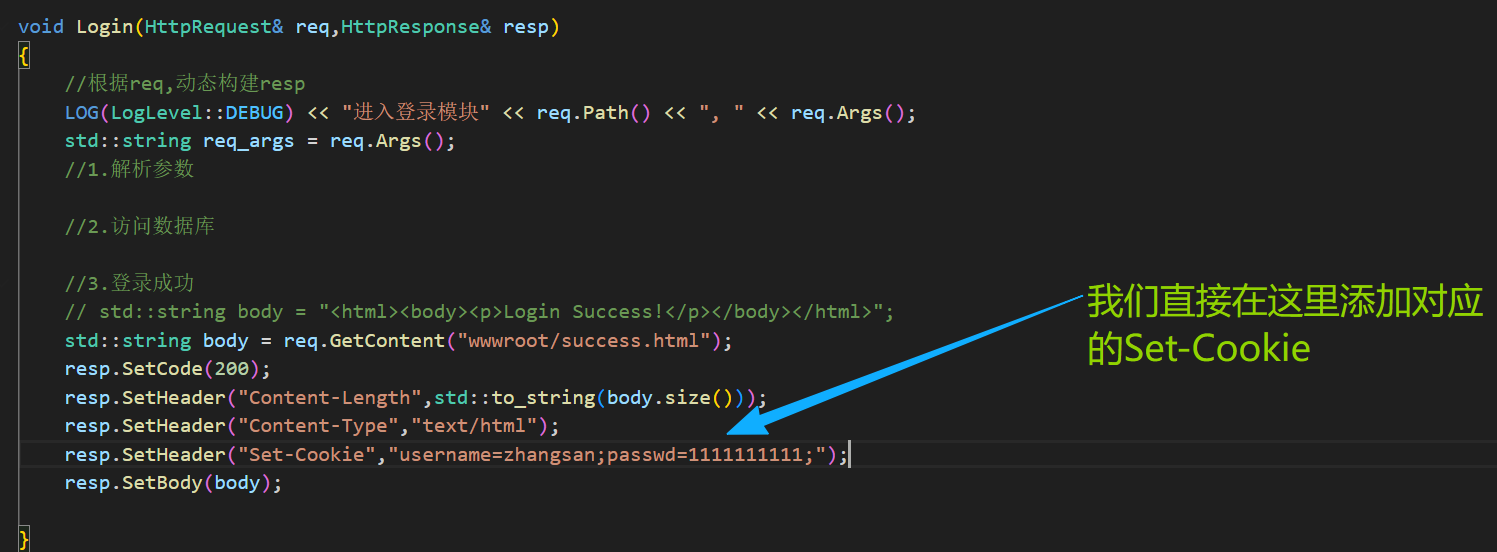
这样我们每一次进行请求的时候,都会自动携带我们的Cookie
如果我们不带我们的Cookie的话,我们就要一直进行身份验证
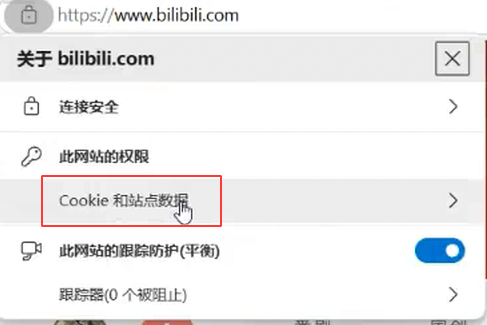
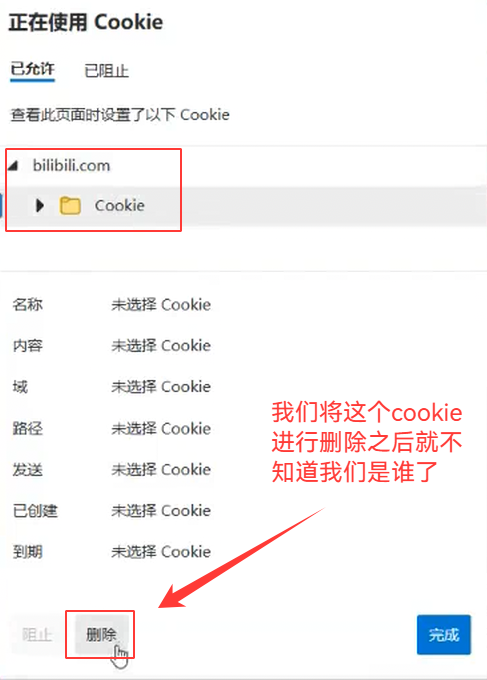
但是我们的Cookie被盗走了怎么办?
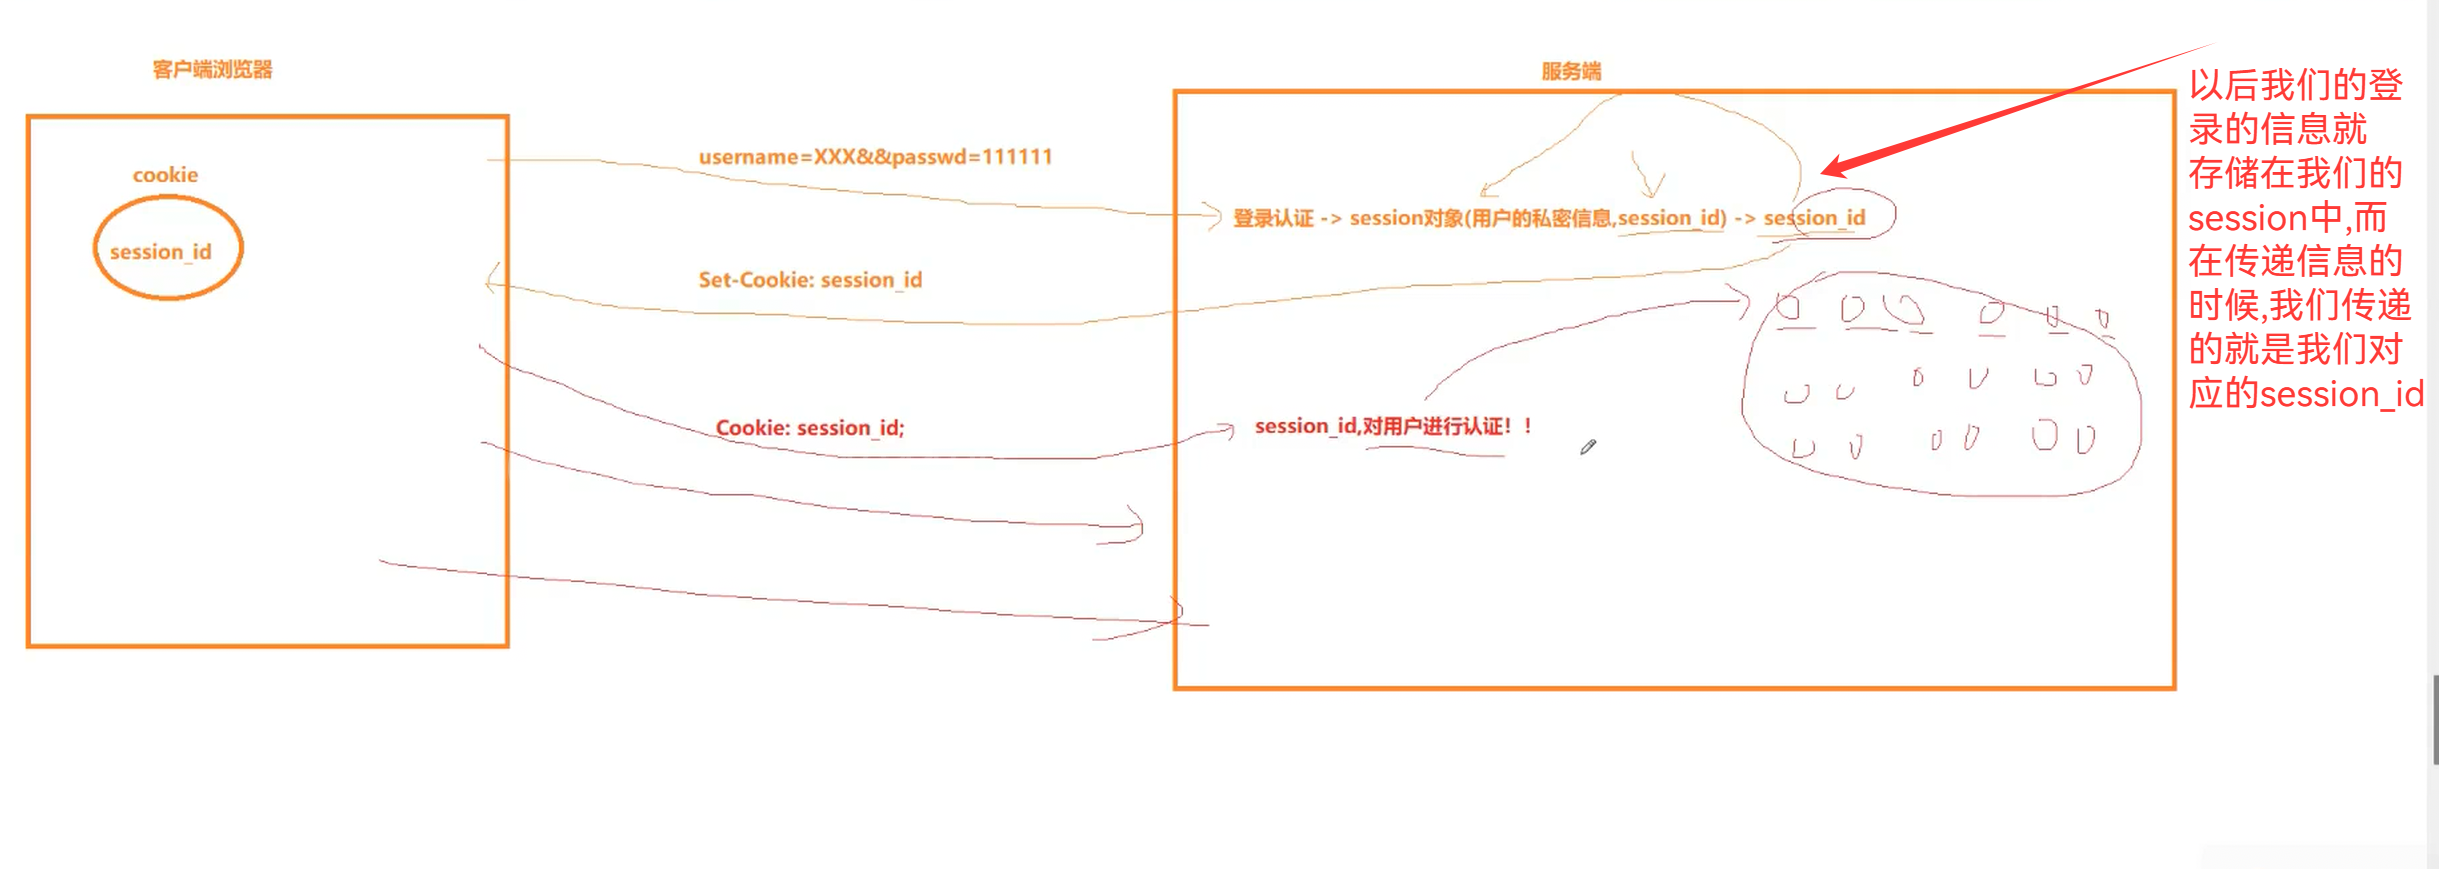
但是我们的session_id被盗取不也可以进行登录吗?

请求ip的变化,用户行为等变化,可以将我们的session进行失效,进行重新登录
所以我们的session + cookie才是我们进行会话保持的首选
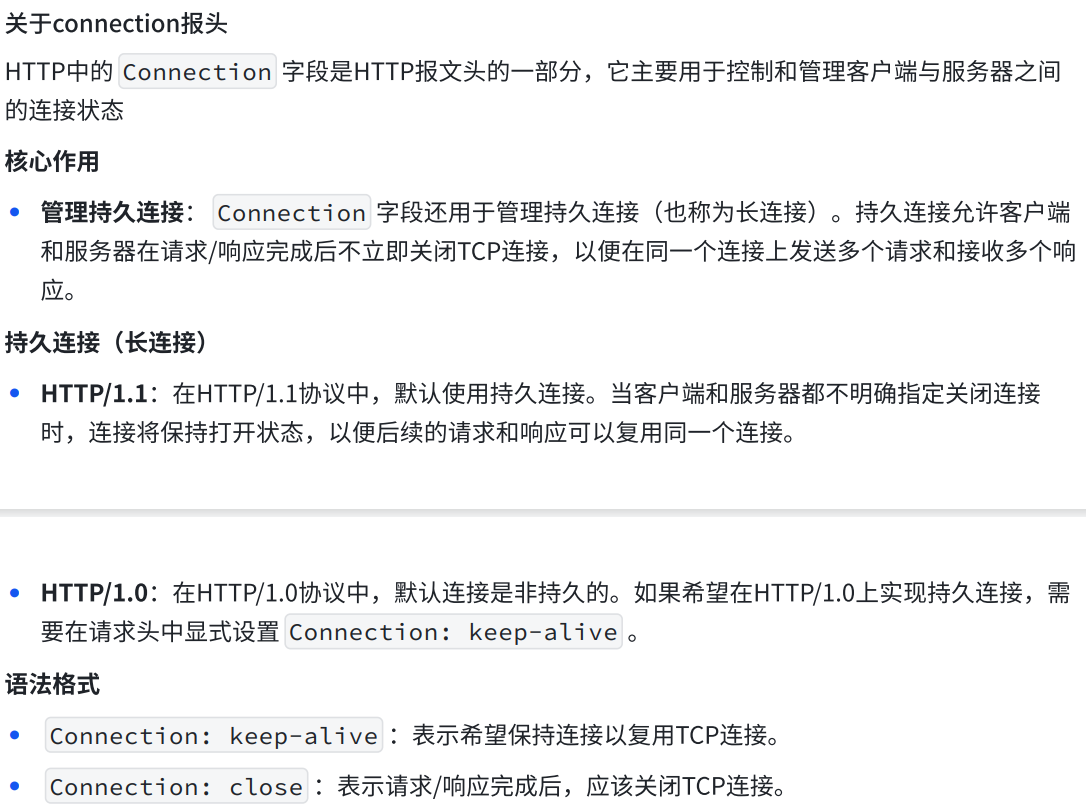
5.connection字段
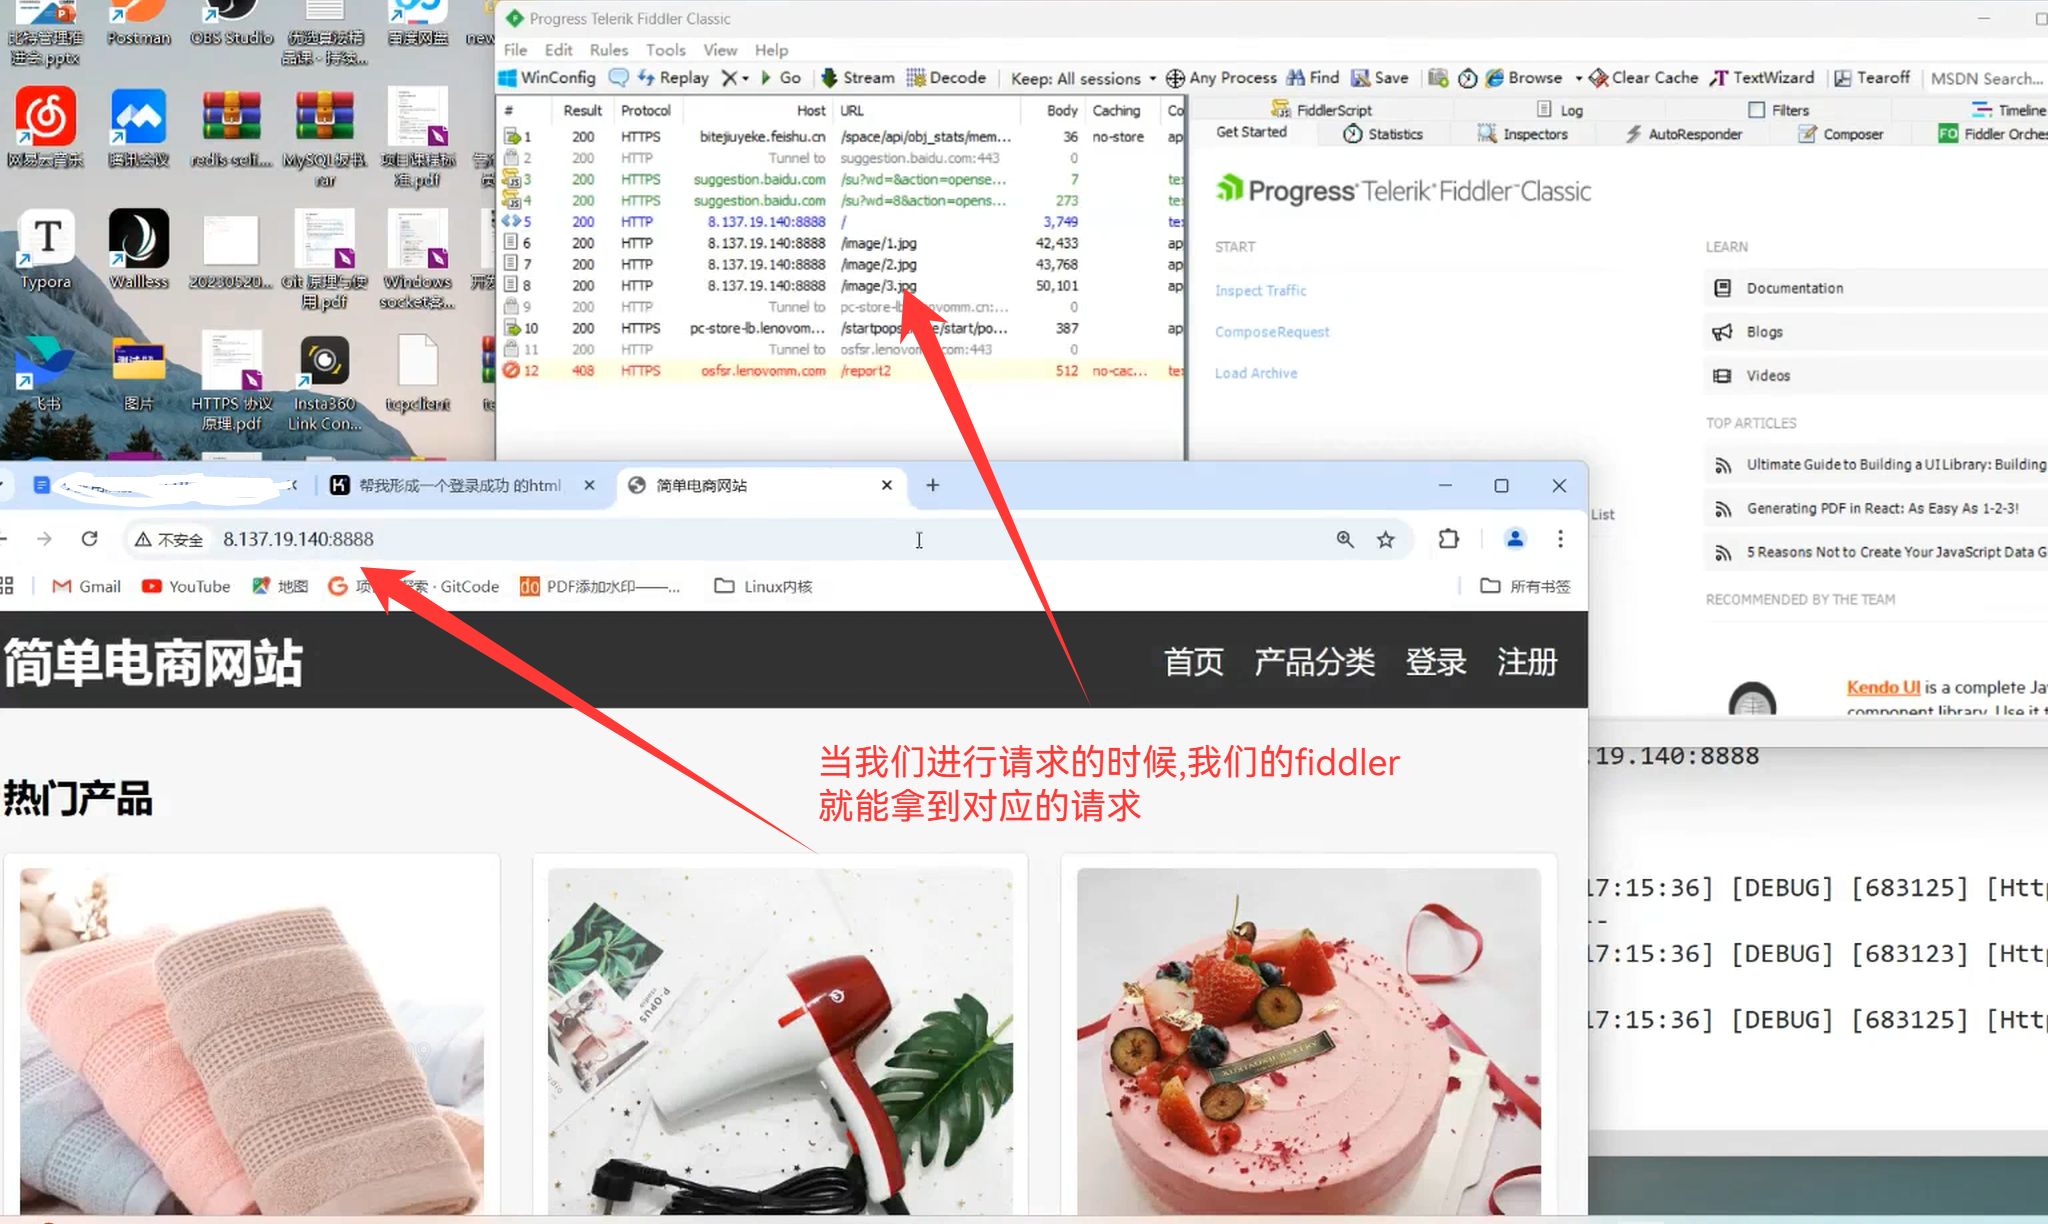
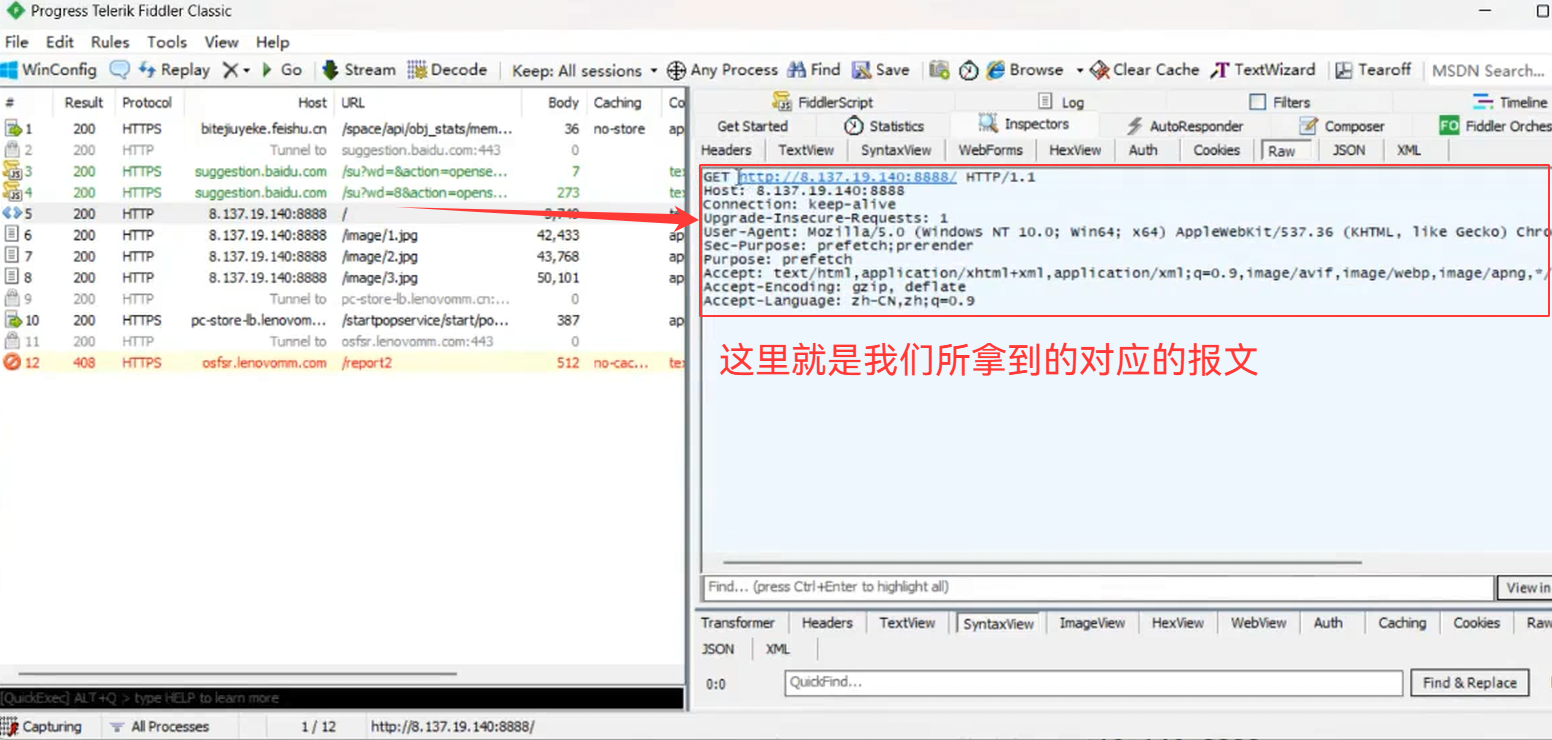
三.fiddler抓包
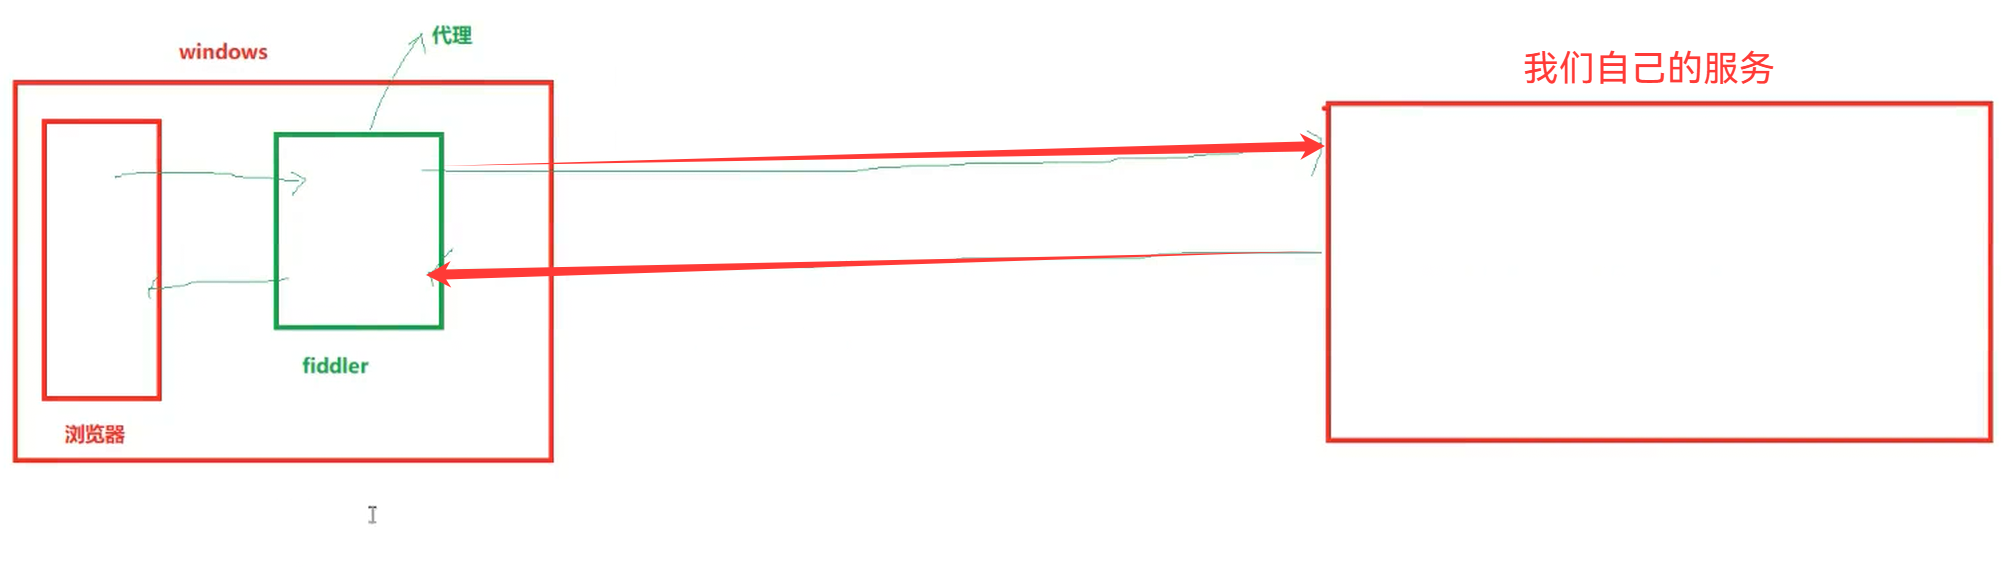
fiddler是专门进行我们的http请求的
所以post也是不安全的,所以我们的https就产生了
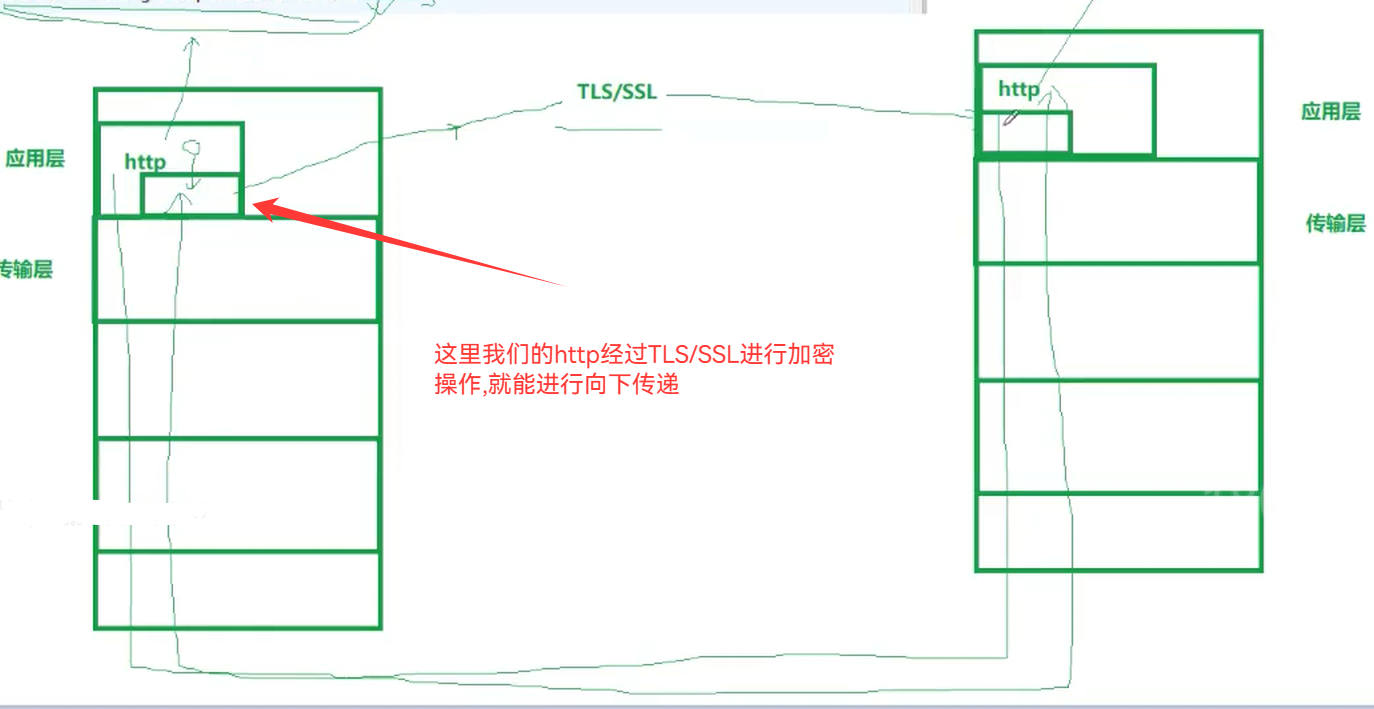
如果有公司层面进行保证我们的通信安全,我们可以省去对应的加密过程,通过http,以便于我们更快的进行通信
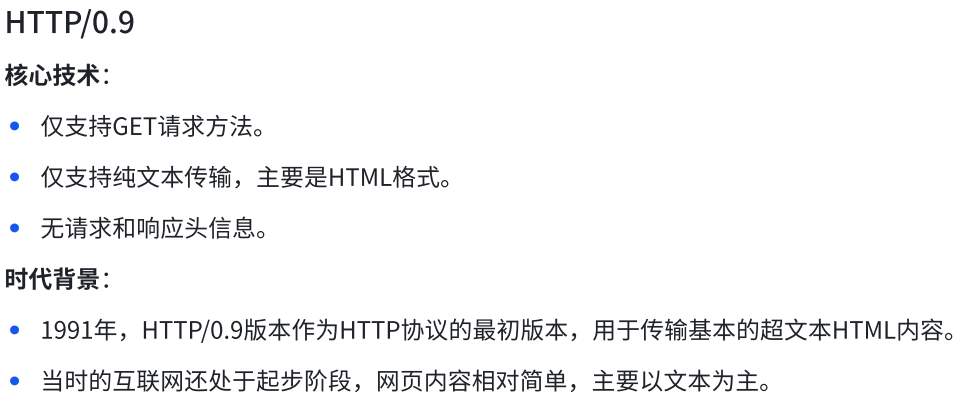
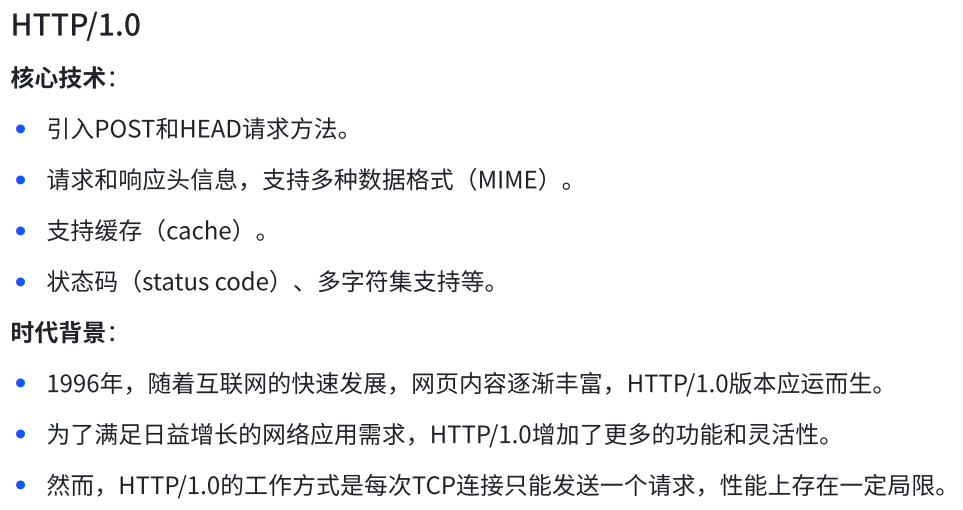
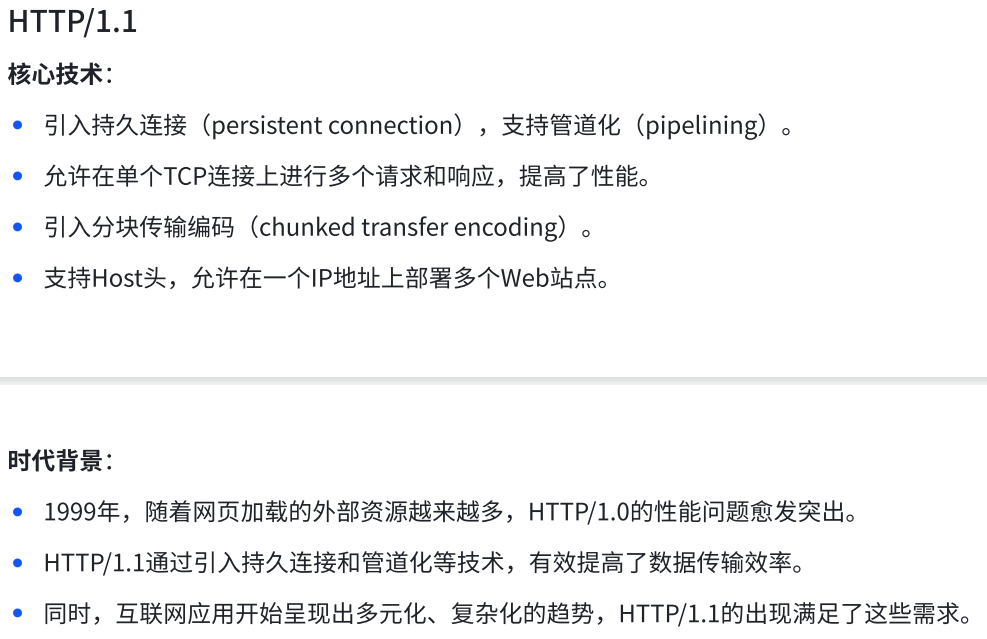
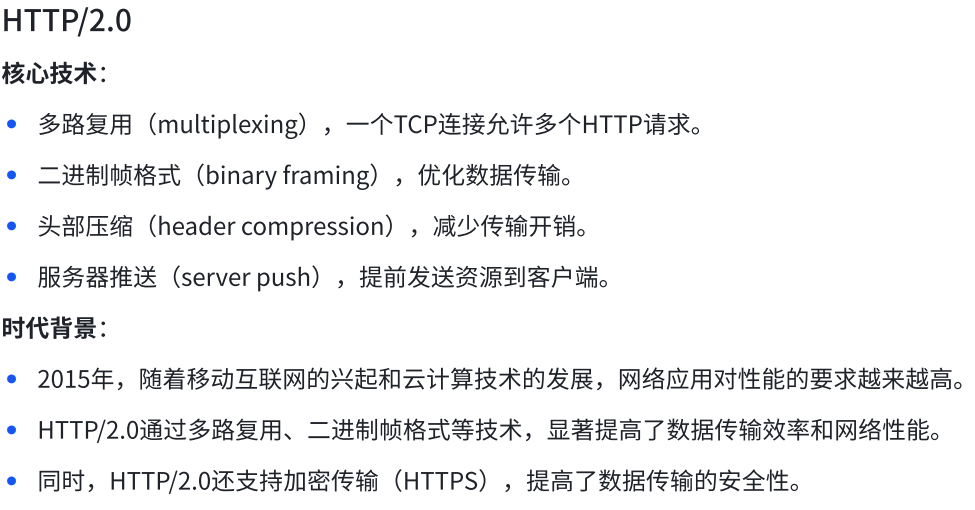
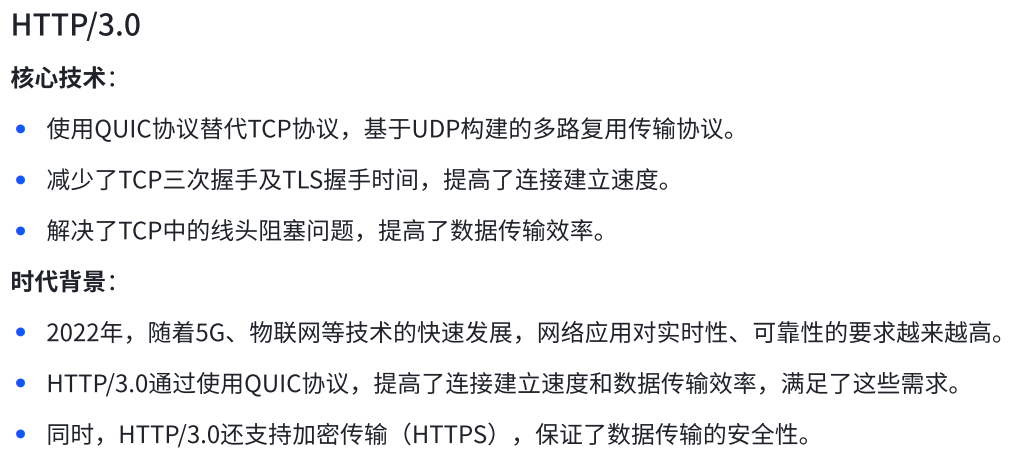
四.HTTP历史及版本核心技术与时代背景

五.代码
刘TW/Linux