gitlab cicd首次操作
接上篇,本篇尝试设置一个pipeline。
此时我们的代码库还没有设置过.gitlab-ci.yml,所以我们先去editor创建一个.gitlab-ci.yml。
这里gitlab会创建一个默认的样本
# This file is a template, and might need editing before it works on your project.
# This is a sample GitLab CI/CD configuration file that should run without any modifications.
# It demonstrates a basic 3 stage CI/CD pipeline. Instead of real tests or scripts,
# it uses echo commands to simulate the pipeline execution.
#
# A pipeline is composed of independent jobs that run scripts, grouped into stages.
# Stages run in sequential order, but jobs within stages run in parallel.
#
# For more information, see: https://docs.gitlab.com/ee/ci/yaml/index.html#stages
#
# You can copy and paste this template into a new `.gitlab-ci.yml` file.
# You should not add this template to an existing `.gitlab-ci.yml` file by using the `include:` keyword.
#
# To contribute improvements to CI/CD templates, please follow the Development guide at:
# https://docs.gitlab.com/ee/development/cicd/templates.html
# This specific template is located at:
# https://gitlab.com/gitlab-org/gitlab/-/blob/master/lib/gitlab/ci/templates/Getting-Started.gitlab-ci.ymlstages:          # List of stages for jobs, and their order of execution- build- test- deploybuild-job:       # This job runs in the build stage, which runs first.stage: buildscript:- echo "Compiling the code..."- echo "Compile complete."unit-test-job:   # This job runs in the test stage.stage: test    # It only starts when the job in the build stage completes successfully.script:- echo "Running unit tests... This will take about 60 seconds."- sleep 60- echo "Code coverage is 90%"lint-test-job:   # This job also runs in the test stage.stage: test    # It can run at the same time as unit-test-job (in parallel).script:- echo "Linting code... This will take about 10 seconds."- sleep 10- echo "No lint issues found."deploy-job:      # This job runs in the deploy stage.stage: deploy  # It only runs when *both* jobs in the test stage complete successfully.environment: productionscript:- echo "Deploying application..."- echo "Application successfully deployed."
有3个阶段,build/test/deploy。
我们拉到下面保存一下:
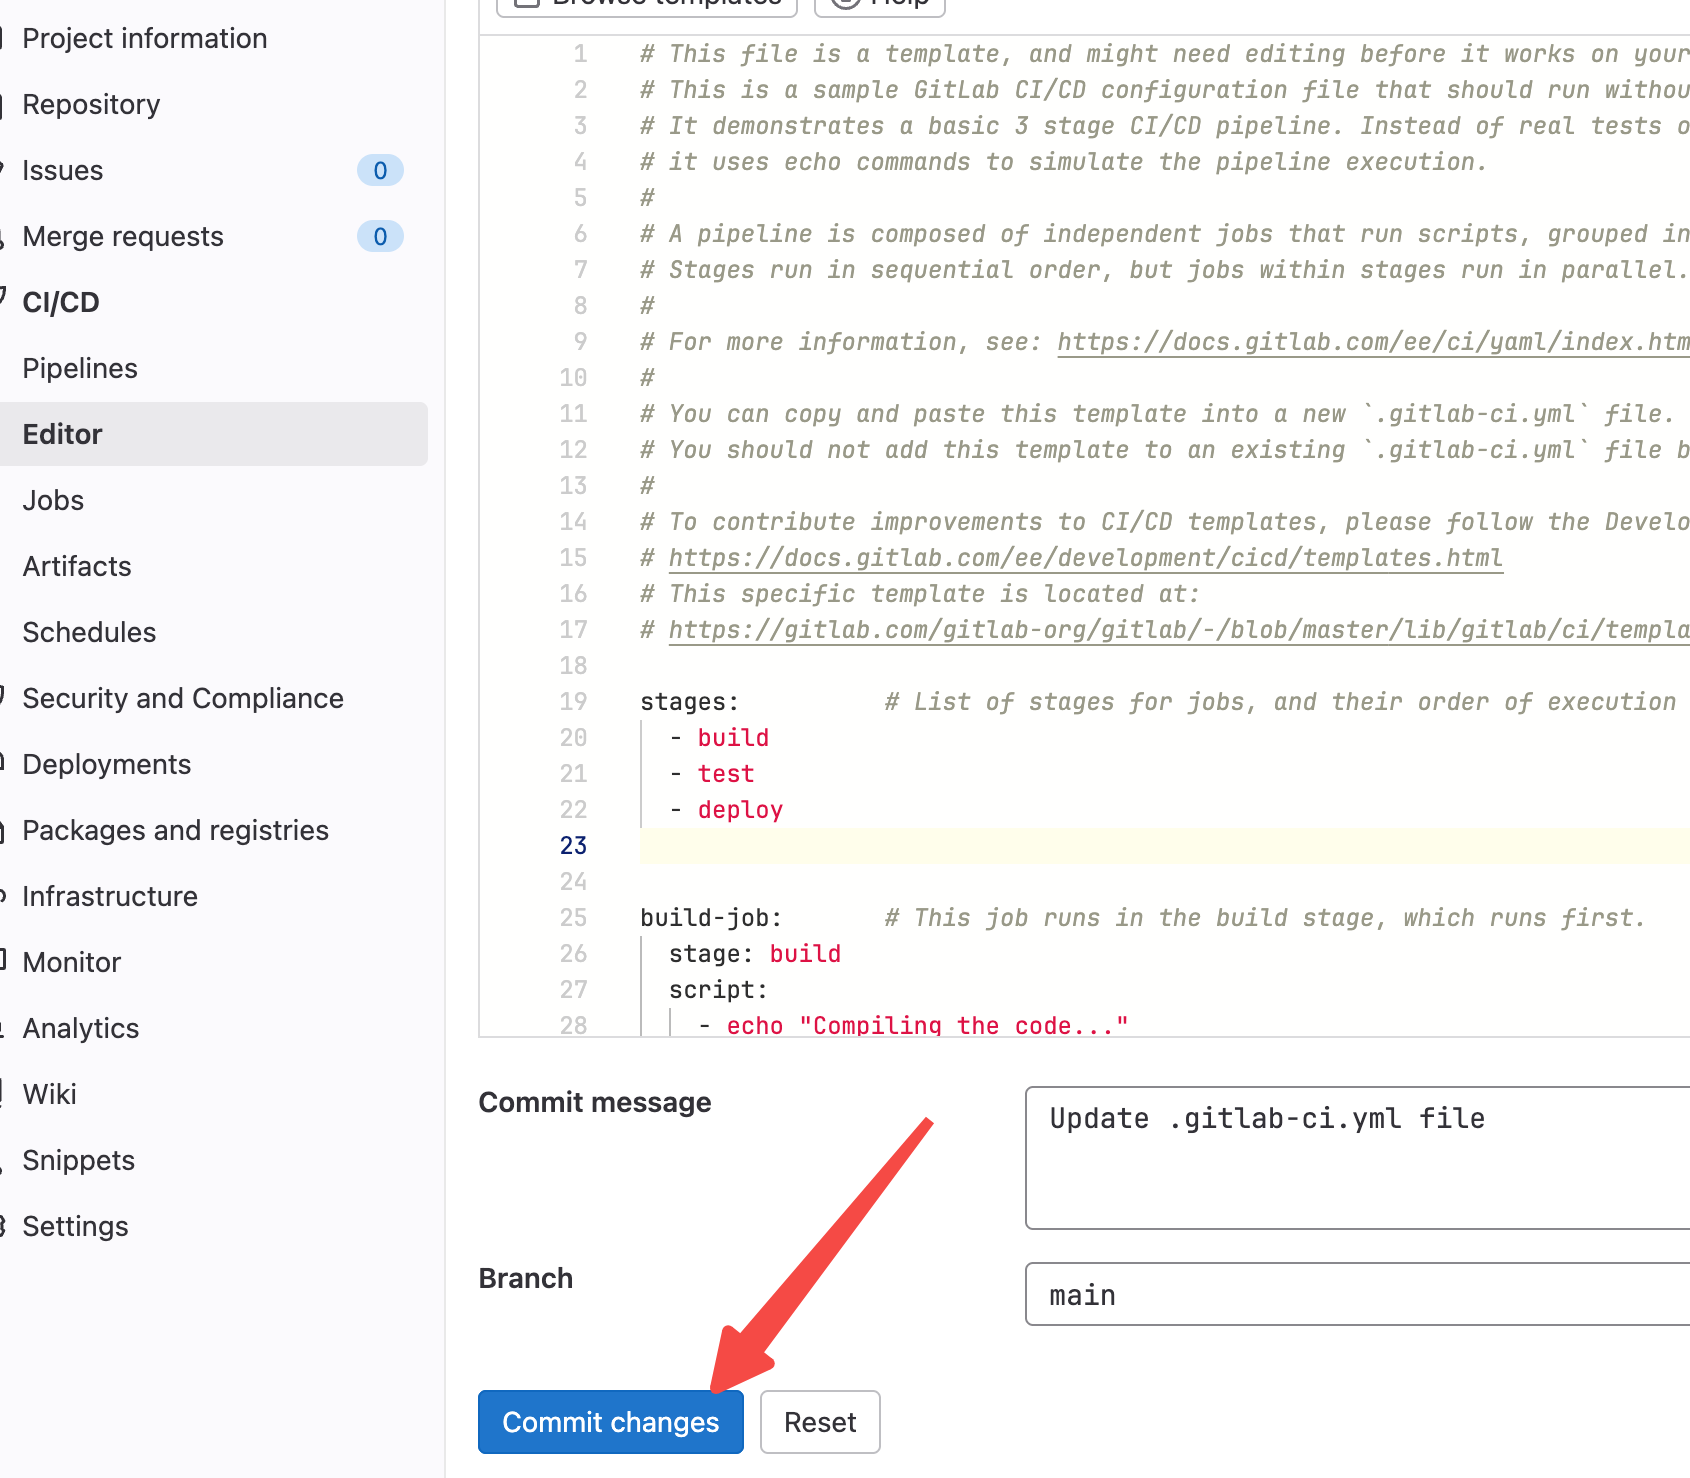
提交后会在pipelines里有一条状态:
显示有一条pending的流水线,并且stages是在第一阶段,也就是build阶段。

我们再去jobs里看一下:
这里有一个name是build-job的job在pending中。

我们点进去看下pending在哪里了,毕竟我们默认的.gitlab-ci.yml里啥都没写。
点击#3334,进入该job的详情:
显示这个job还没开始执行,因为咱们没有active runner,没有active runner就无法执行这个job。
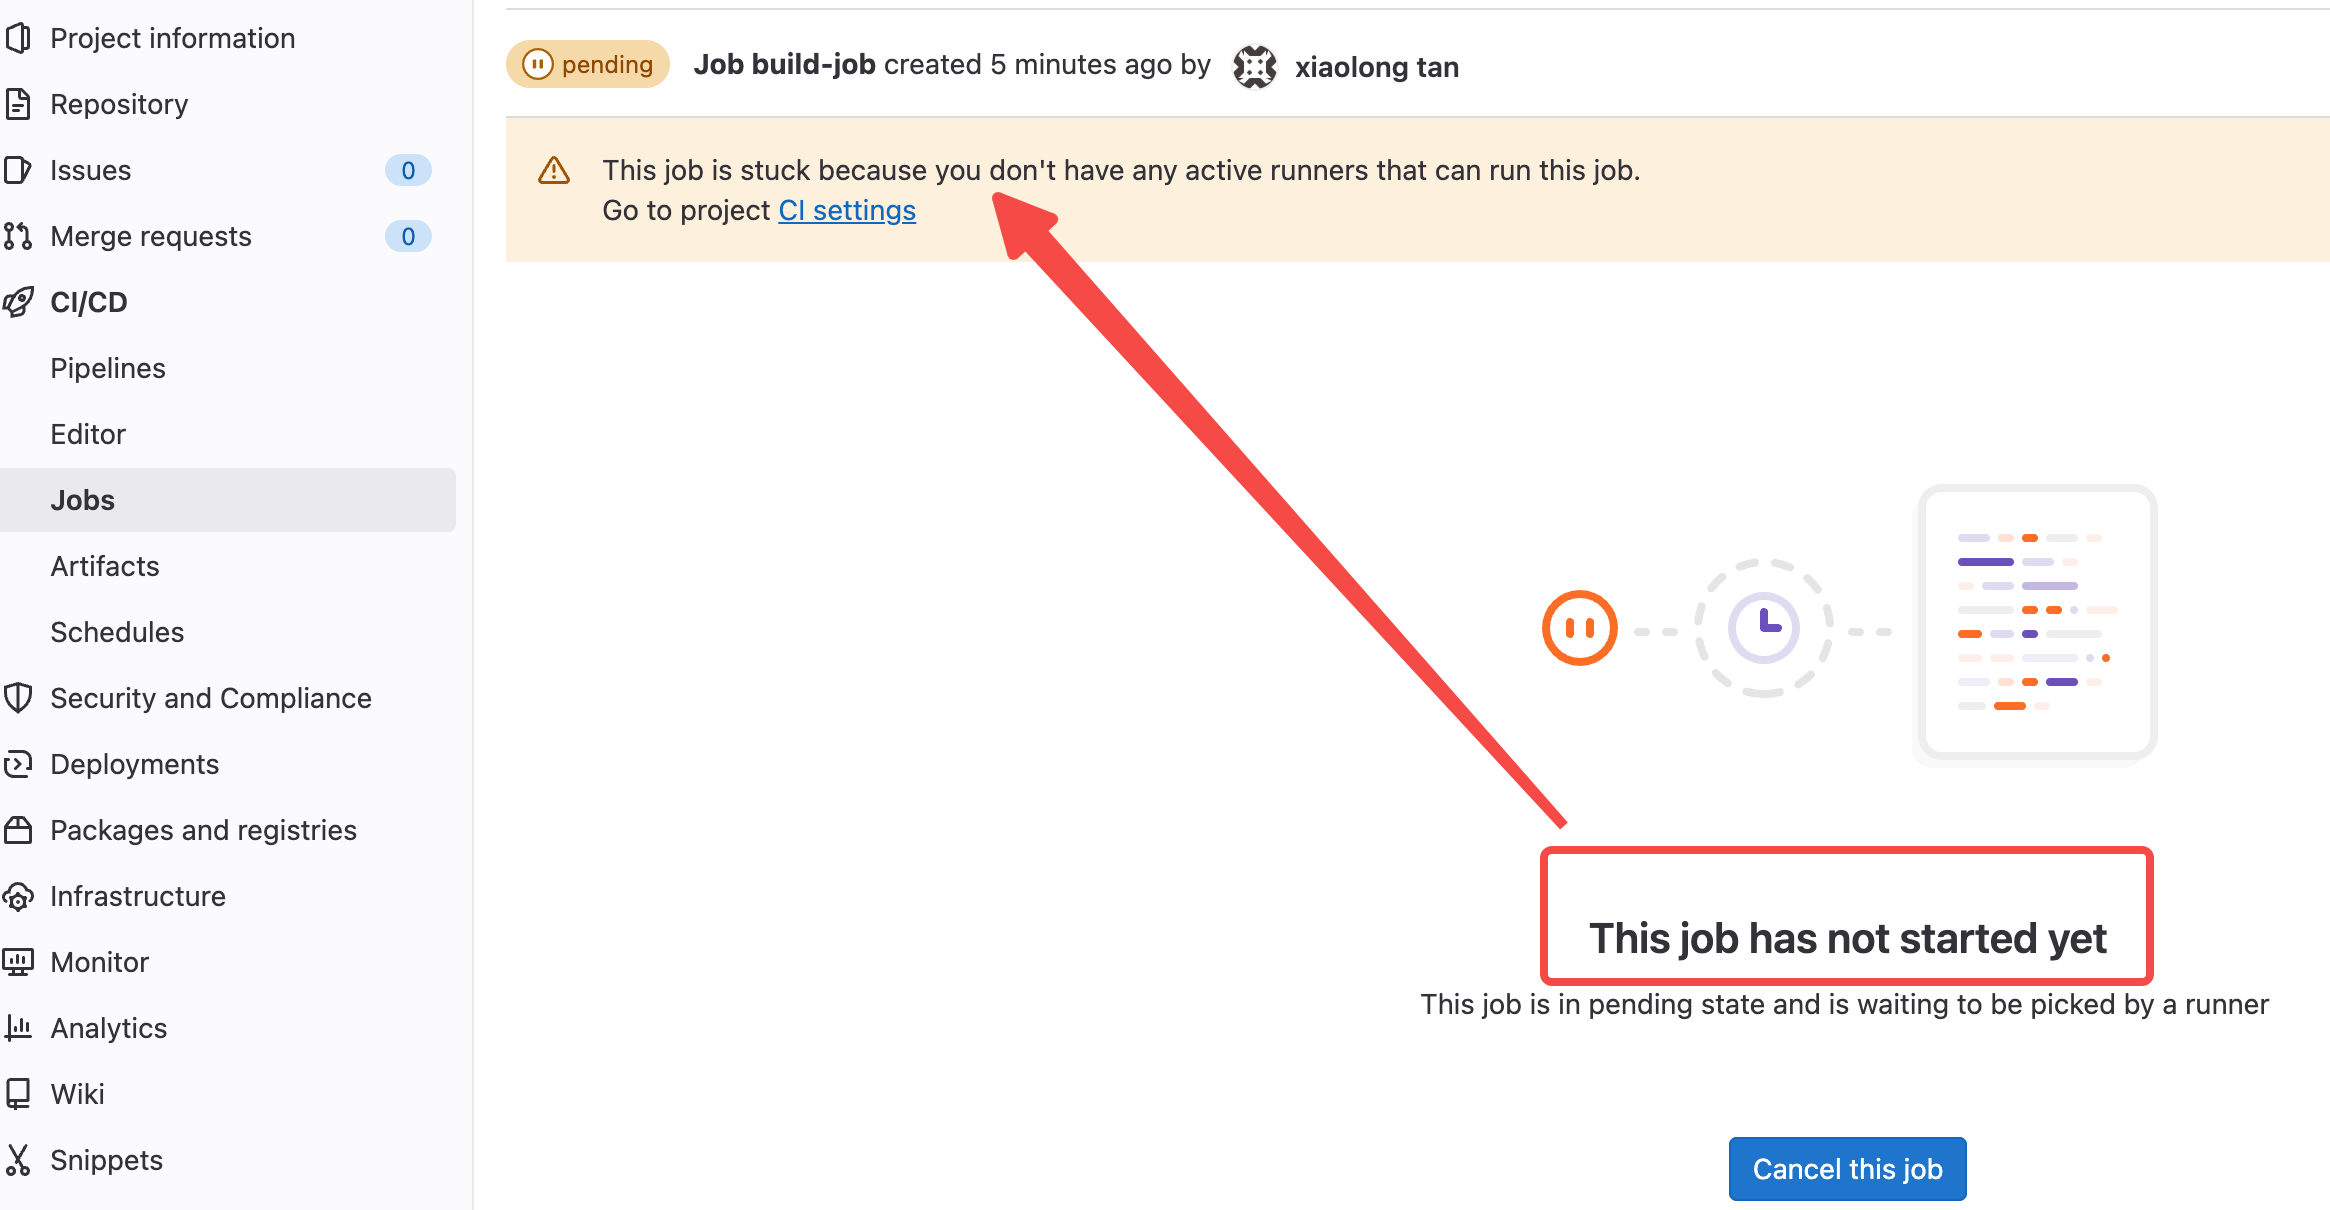
runner我理解应该就是worker的概念,类似什么调度会安排某个runner来执行job,但调度器发现没有可用的runner。
我们按照提示点击一下CI settings看下怎么个事儿。
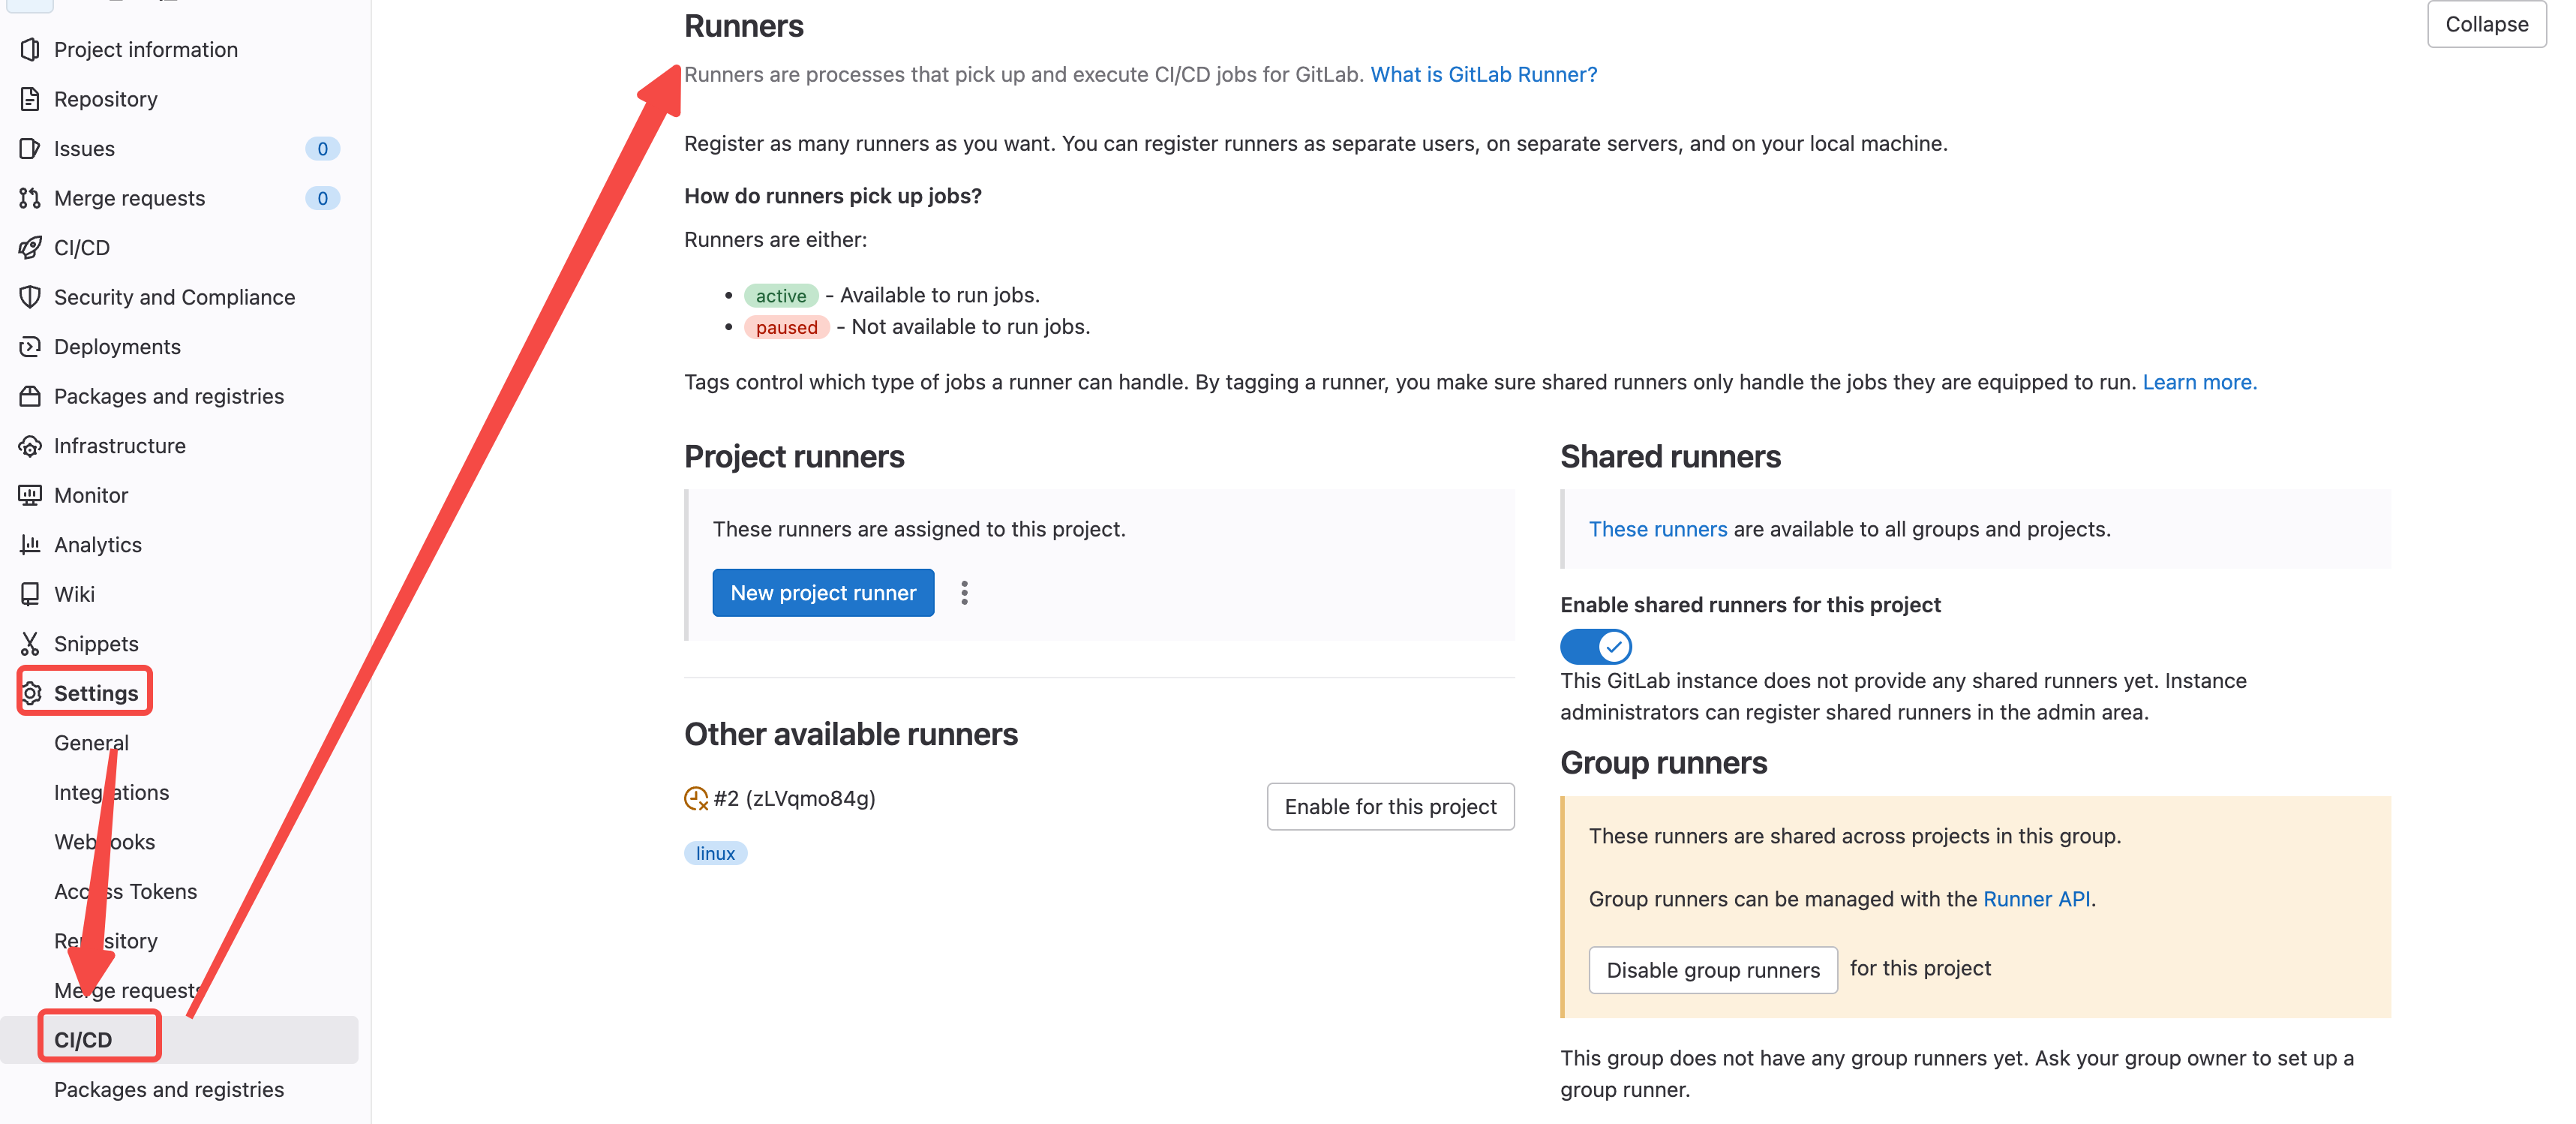
这里说runner就是一些执行cicd的job的程序。
这里有3个来源:
1/ Project runners 创建属于本项目的专用runner
2/ Shared runners 共享runner,用于所有的group和project。图里看本group和project没有共享的runner
3/ Other available runners 其他可用的runner,图里可以看到有一个可用的runner
这里我尝试创建一个本project专用的runner,我选择New project runner:
创建没什么好选的,我选了linux,服务器是ubuntu的
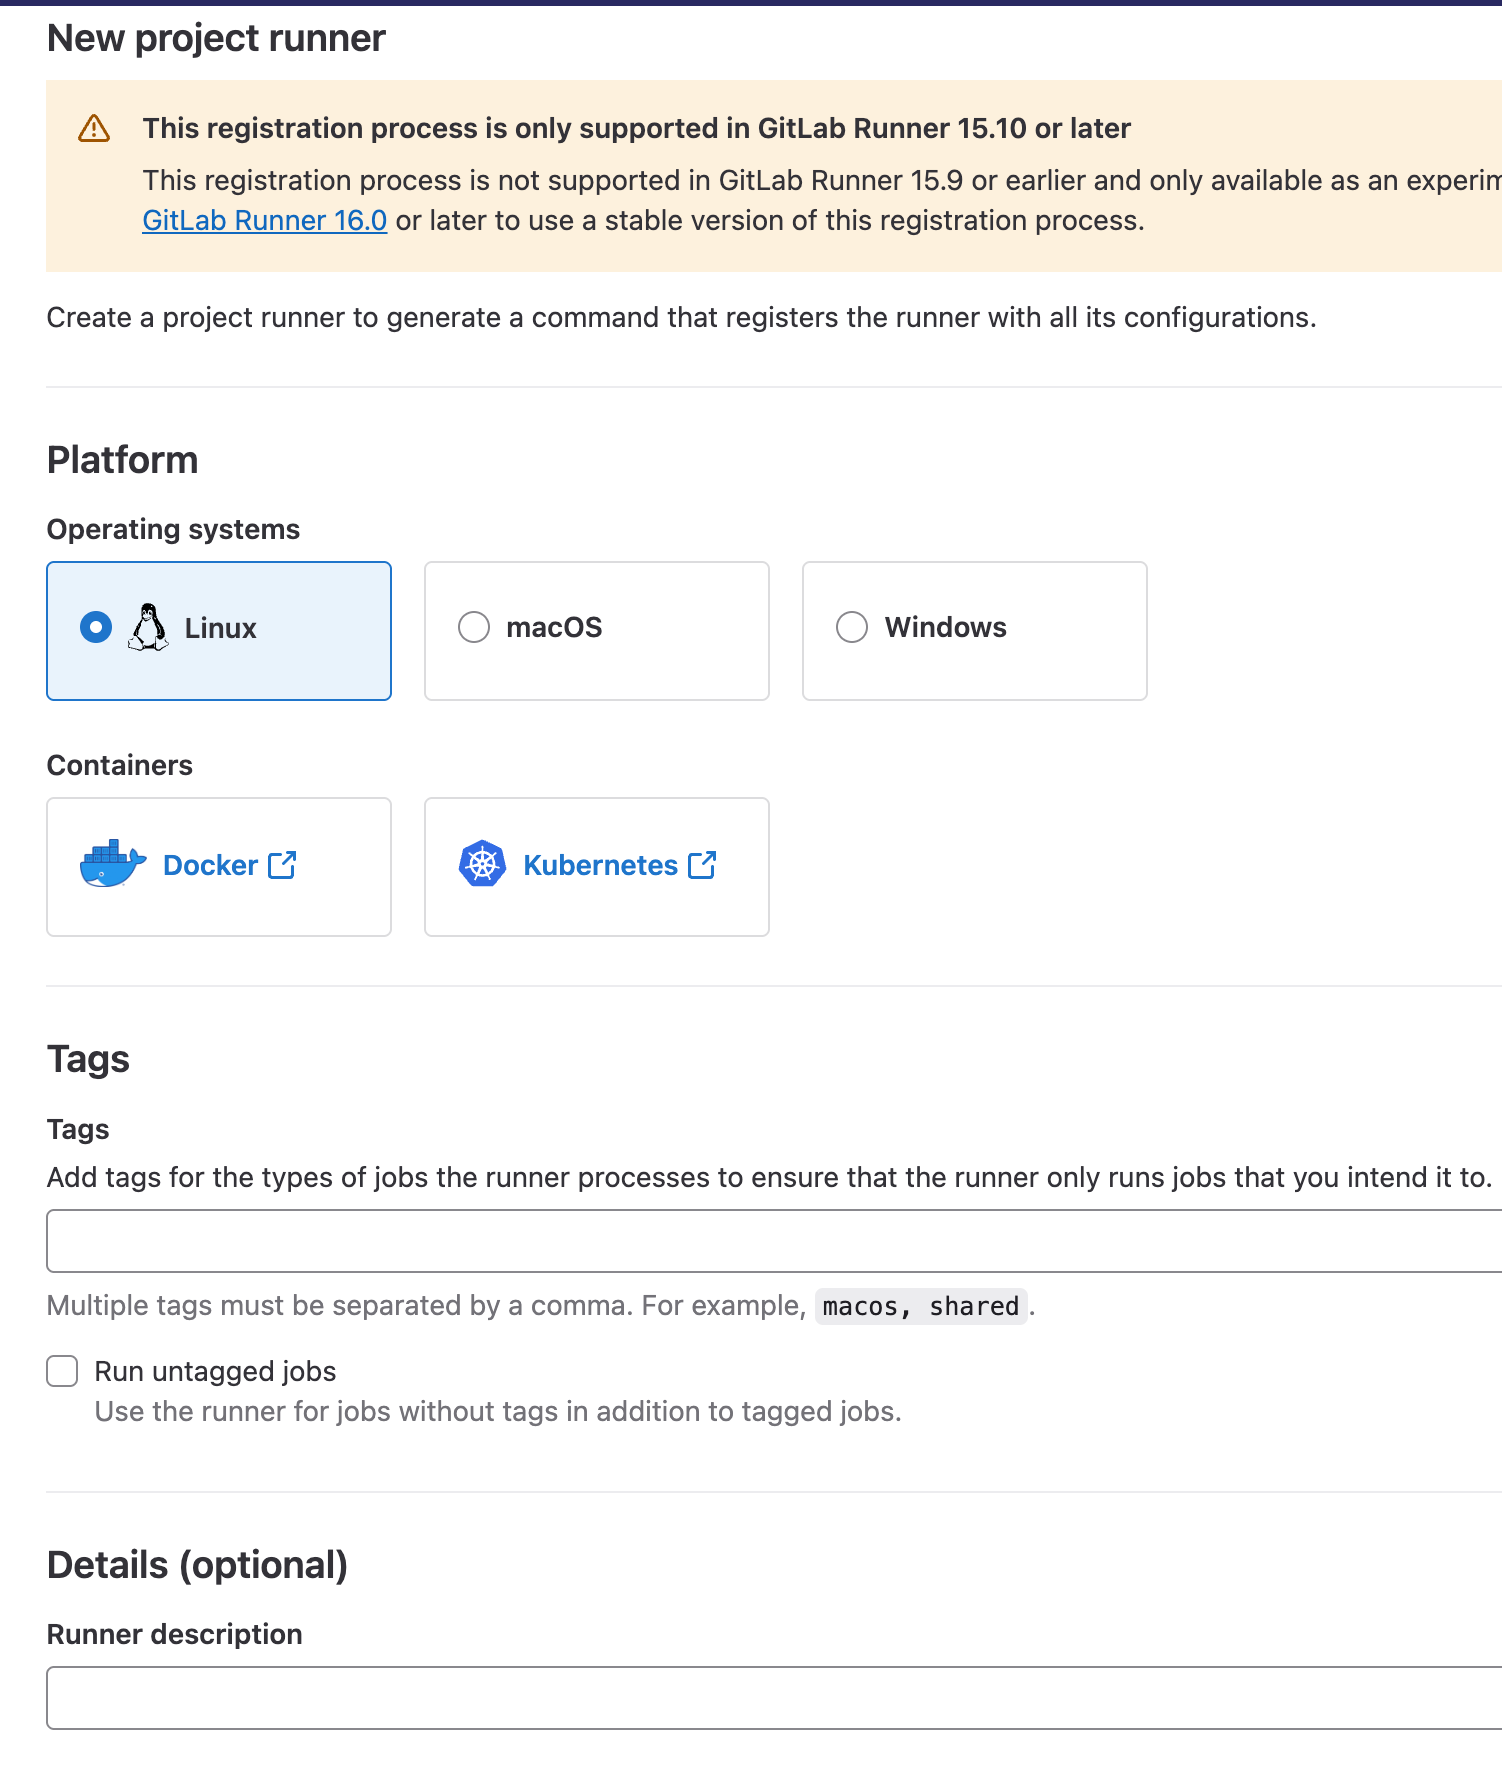
点了确认后会跳到下一页:
这里需要你在随便一台linux上按步骤注册runner。这里对在哪个linux上注册没有限制,唯一的要求就是要能访问gitlab的内网地址。
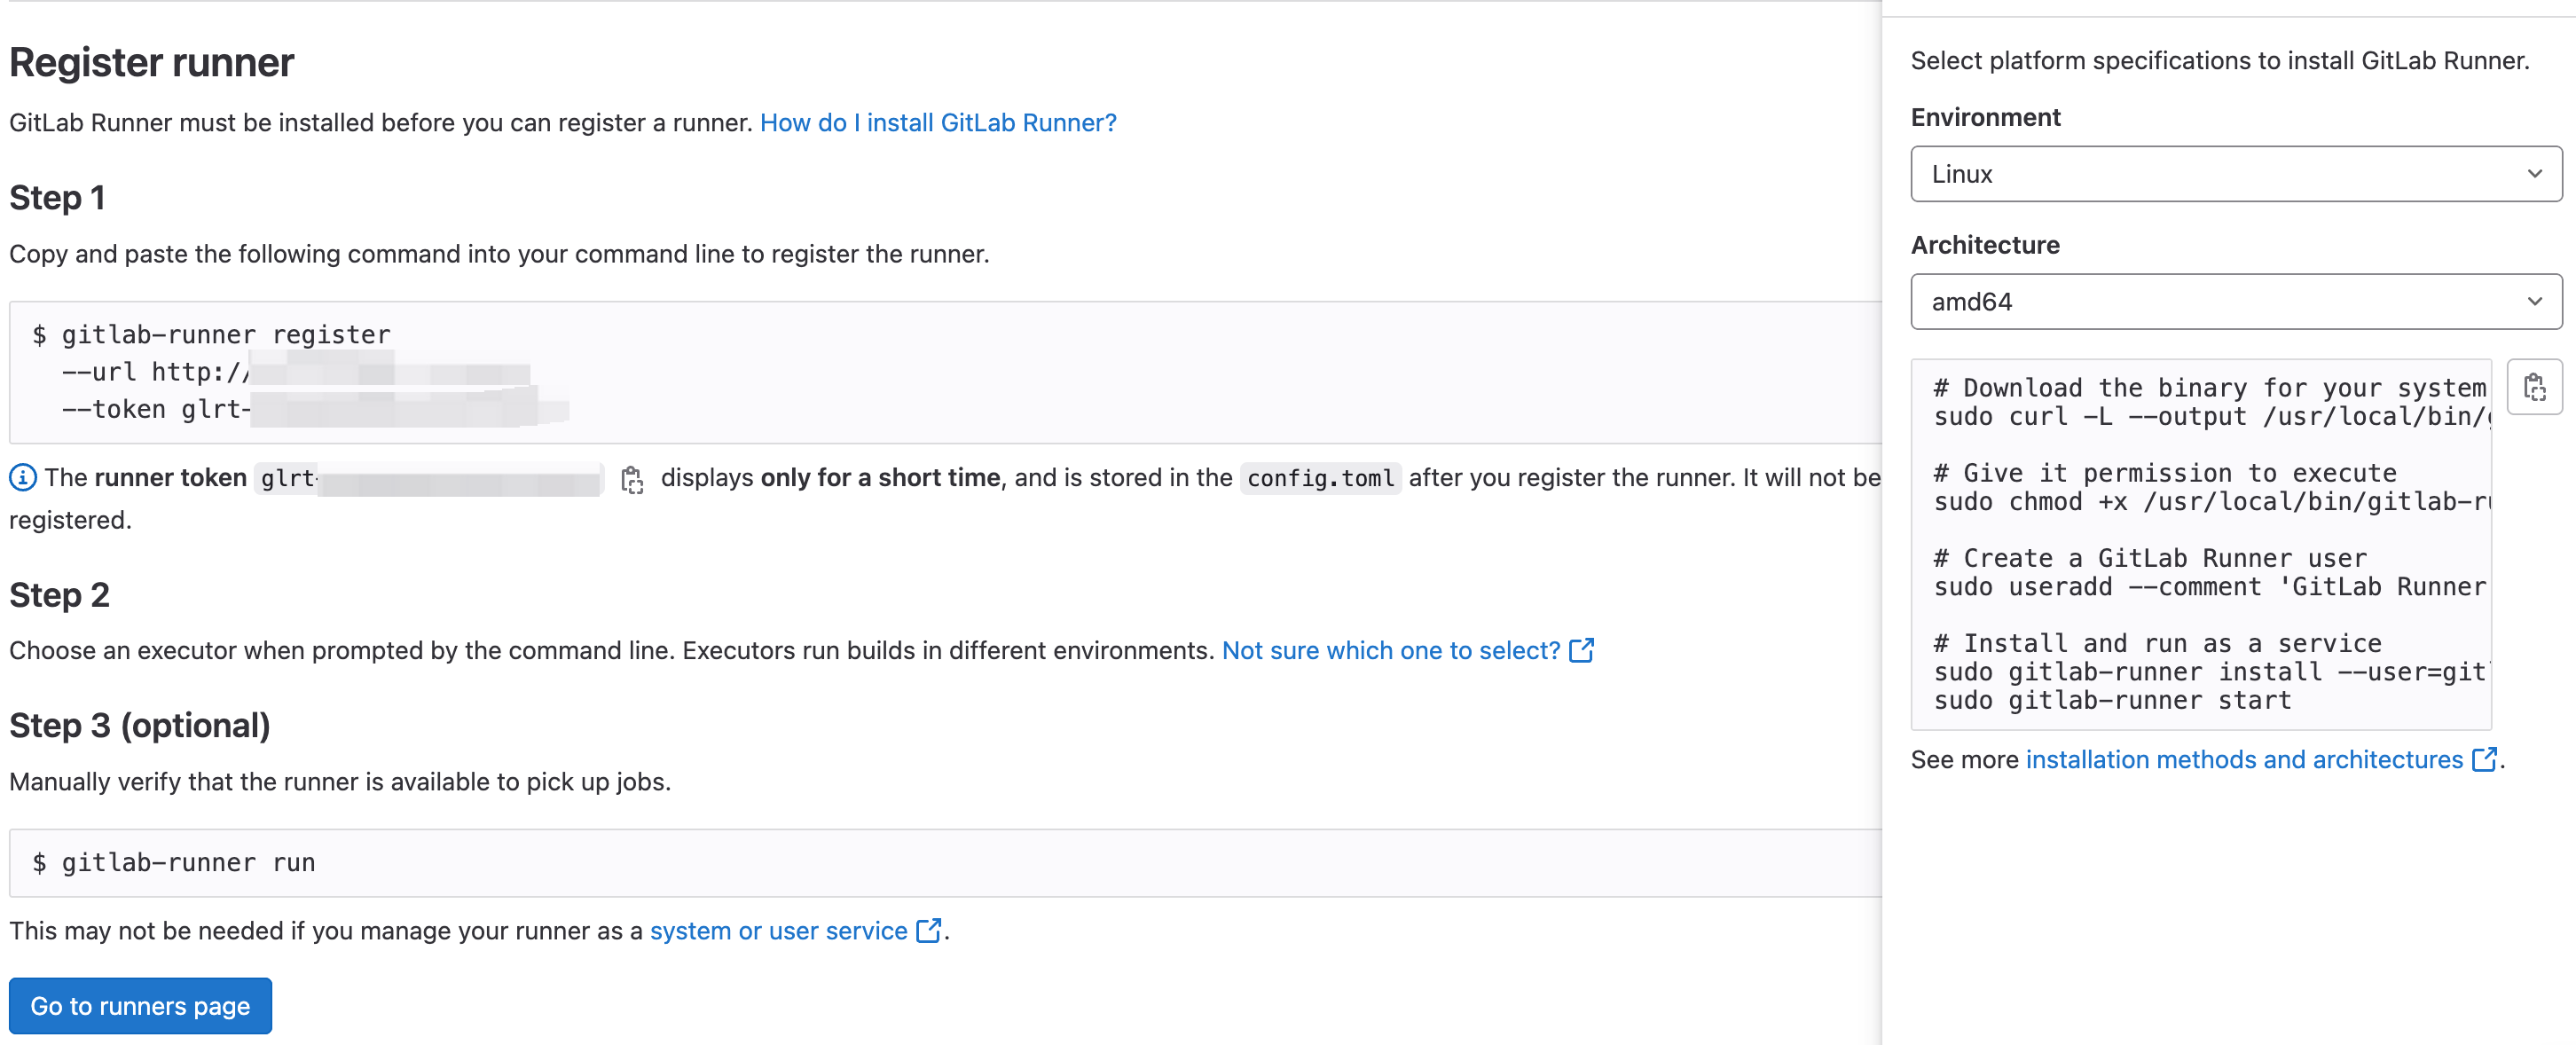
由于我没有gitlab内网的权限,但我有可以访问gitlab的机器,所以我先去我们的测试机上执行一下右边的命令。
# Download the binary for your system
sudo curl -L --output /usr/local/bin/gitlab-runner https://gitlab-runner-downloads.s3.amazonaws.com/latest/binaries/gitlab-runner-linux-amd64# Give it permission to execute
sudo chmod +x /usr/local/bin/gitlab-runner# Create a GitLab Runner user
sudo useradd --comment 'GitLab Runner' --create-home gitlab-runner --shell /bin/bash# Install and run as a service
sudo gitlab-runner install --user=gitlab-runner --working-directory=/home/gitlab-runner
sudo gitlab-runner start
下面是执行过程以及每一步的输出:
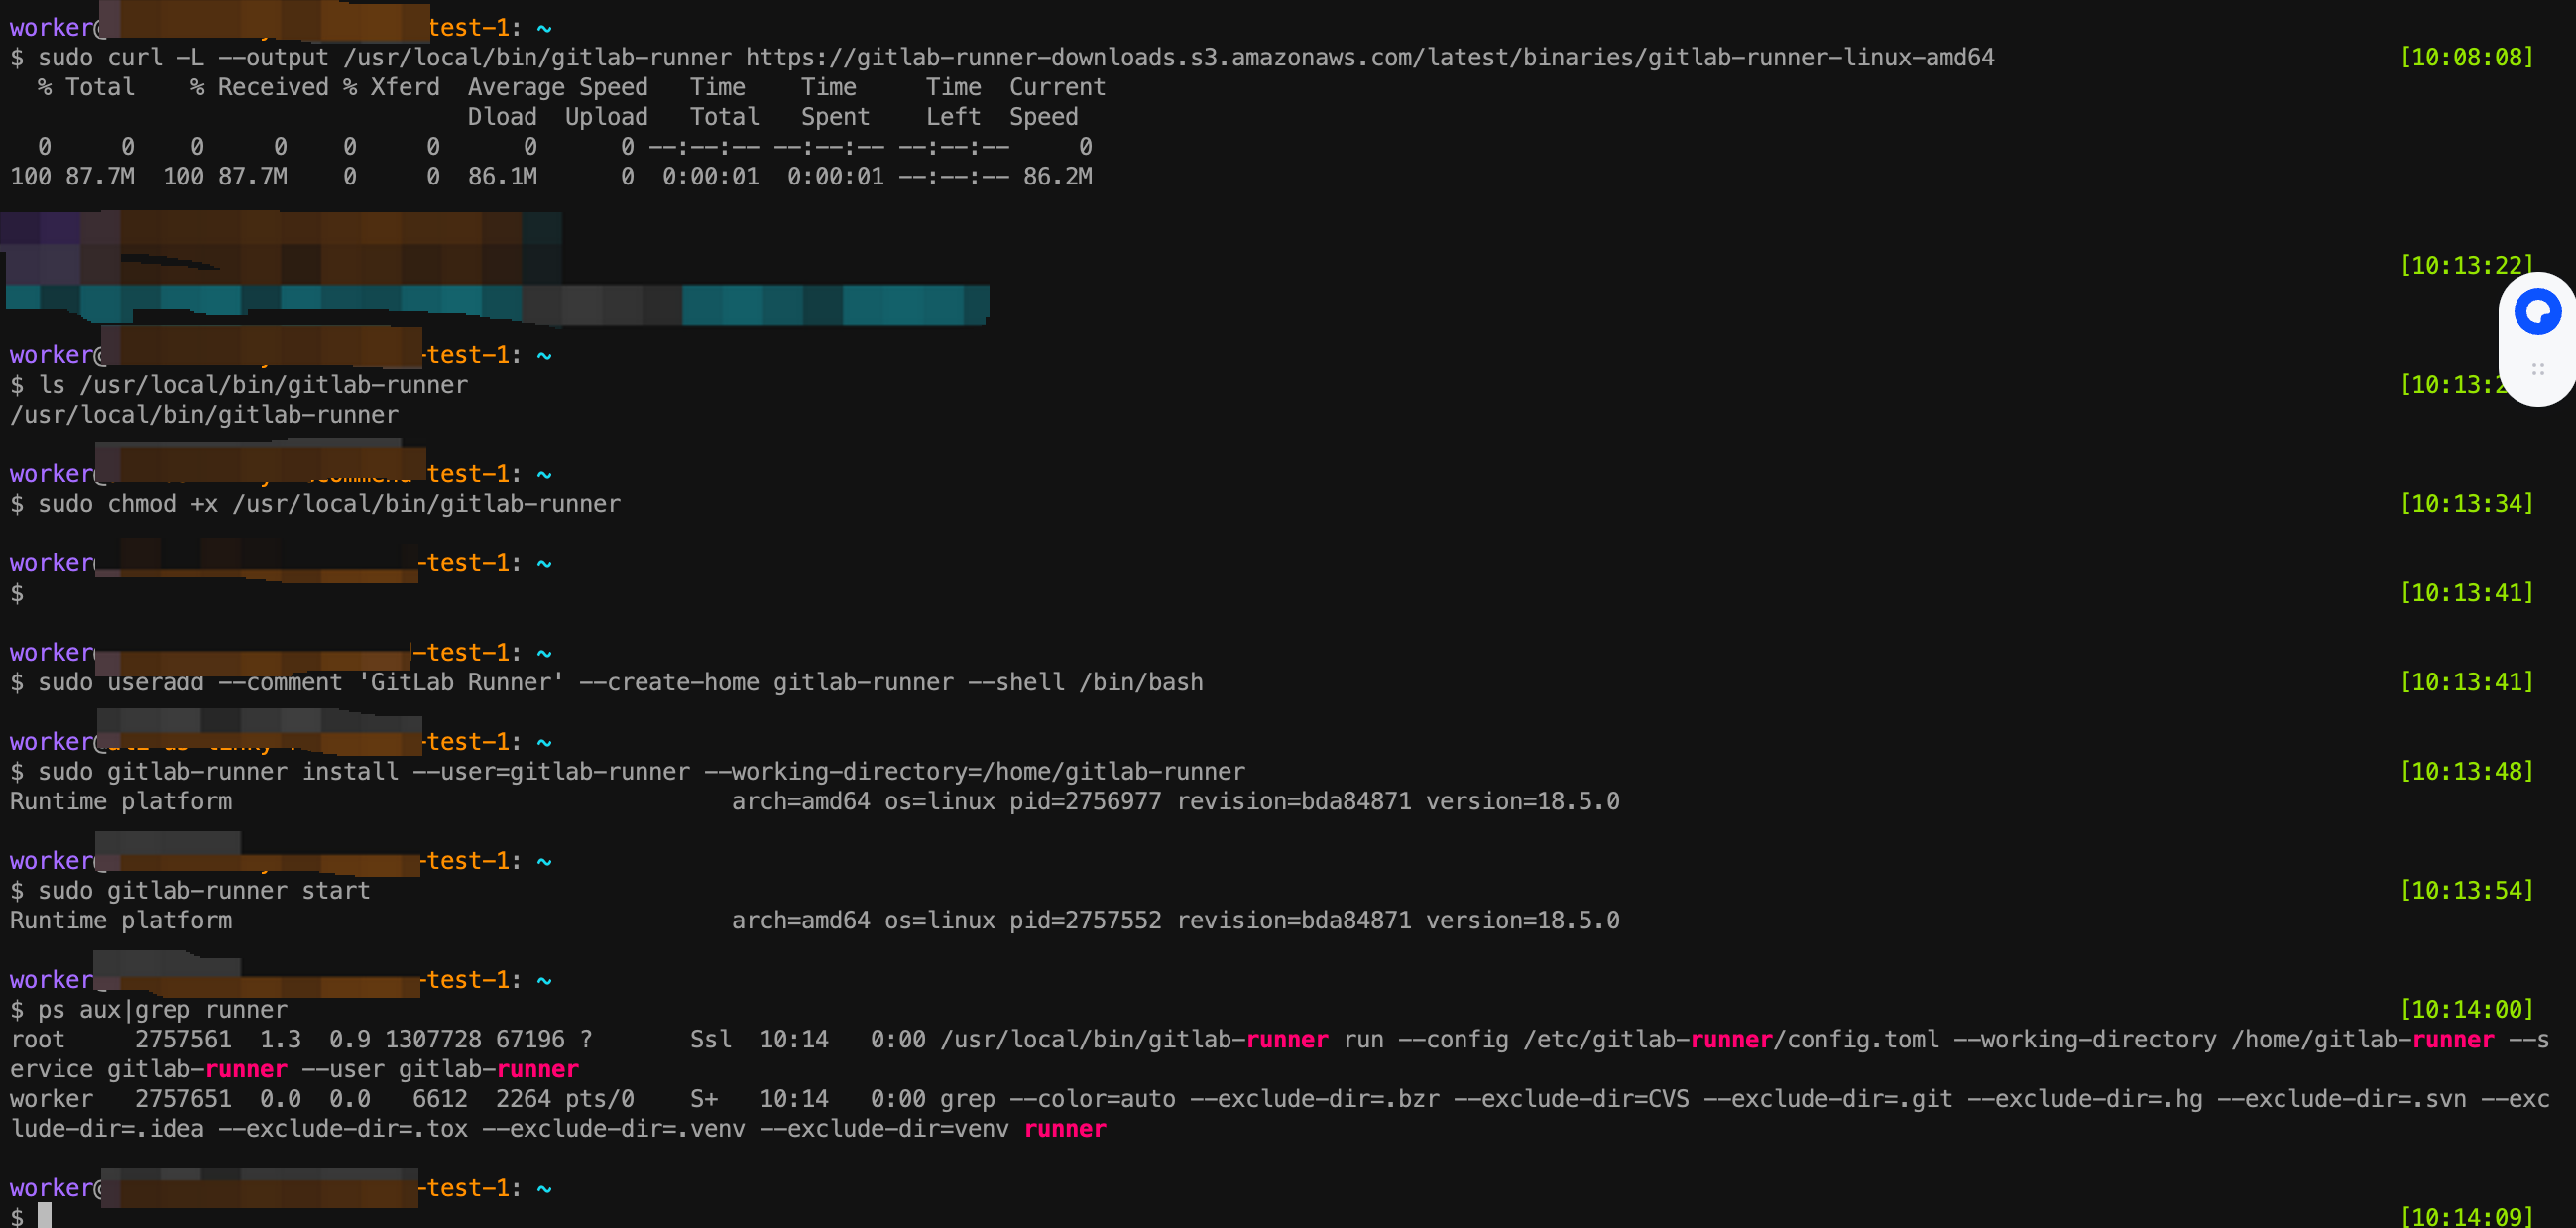
worker@test-1: ~
$ gitlab-runner --version                                                                                                                                                   [10:16:43]
Version:      18.5.0
Git revision: bda84871
Git branch:   18-5-stable
GO version:   go1.24.6 X:cacheprog
Built:        2025-10-13T19:20:30Z
OS/Arch:      linux/amd64
我执行一下Step1里的命令:
gitlab-runner register --url http://1.2.3.4:9281 --token glrt-xxxxxxxxxx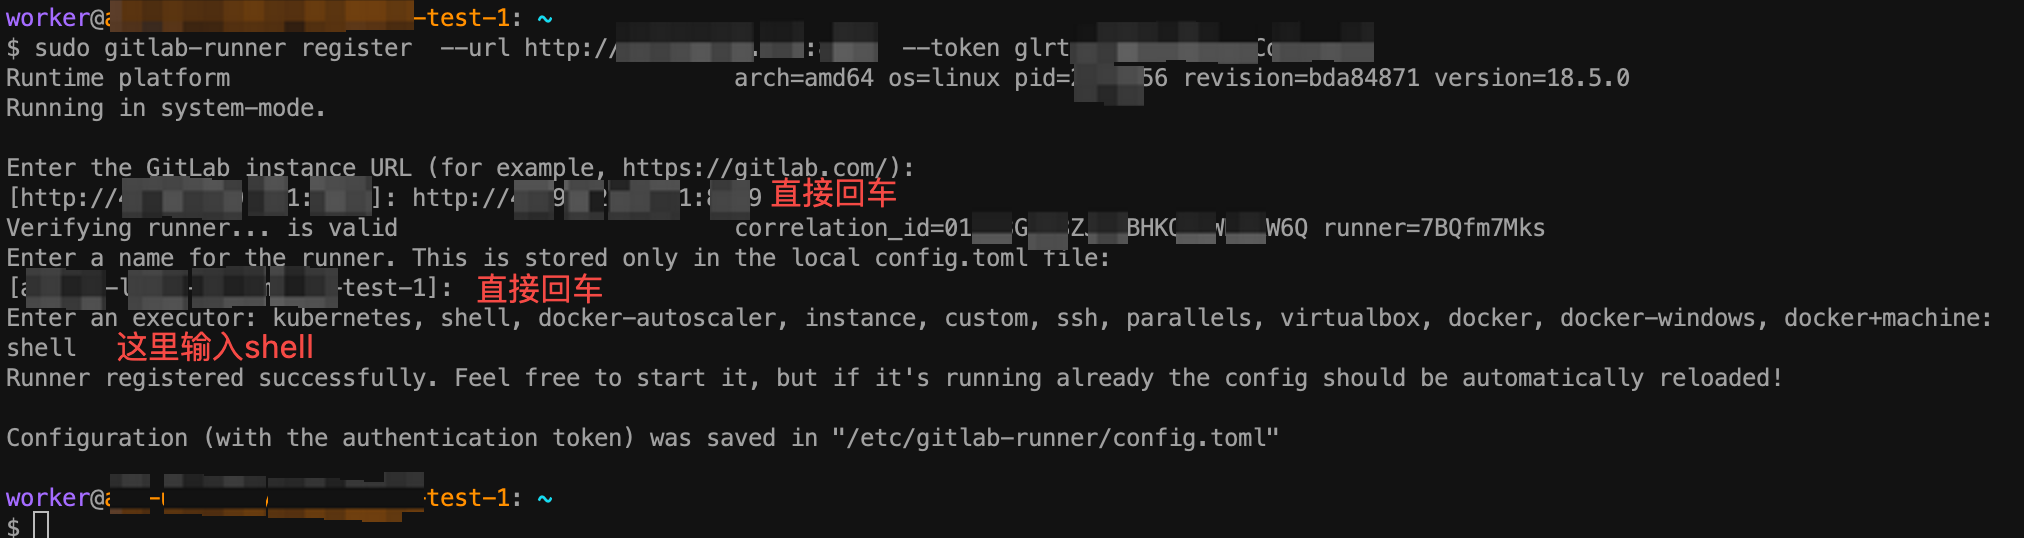
执行完之后,原页面已经检测到了:
这个you've created a new runner是之前没有的。说明自动检测到了,并且runner注册成功了。
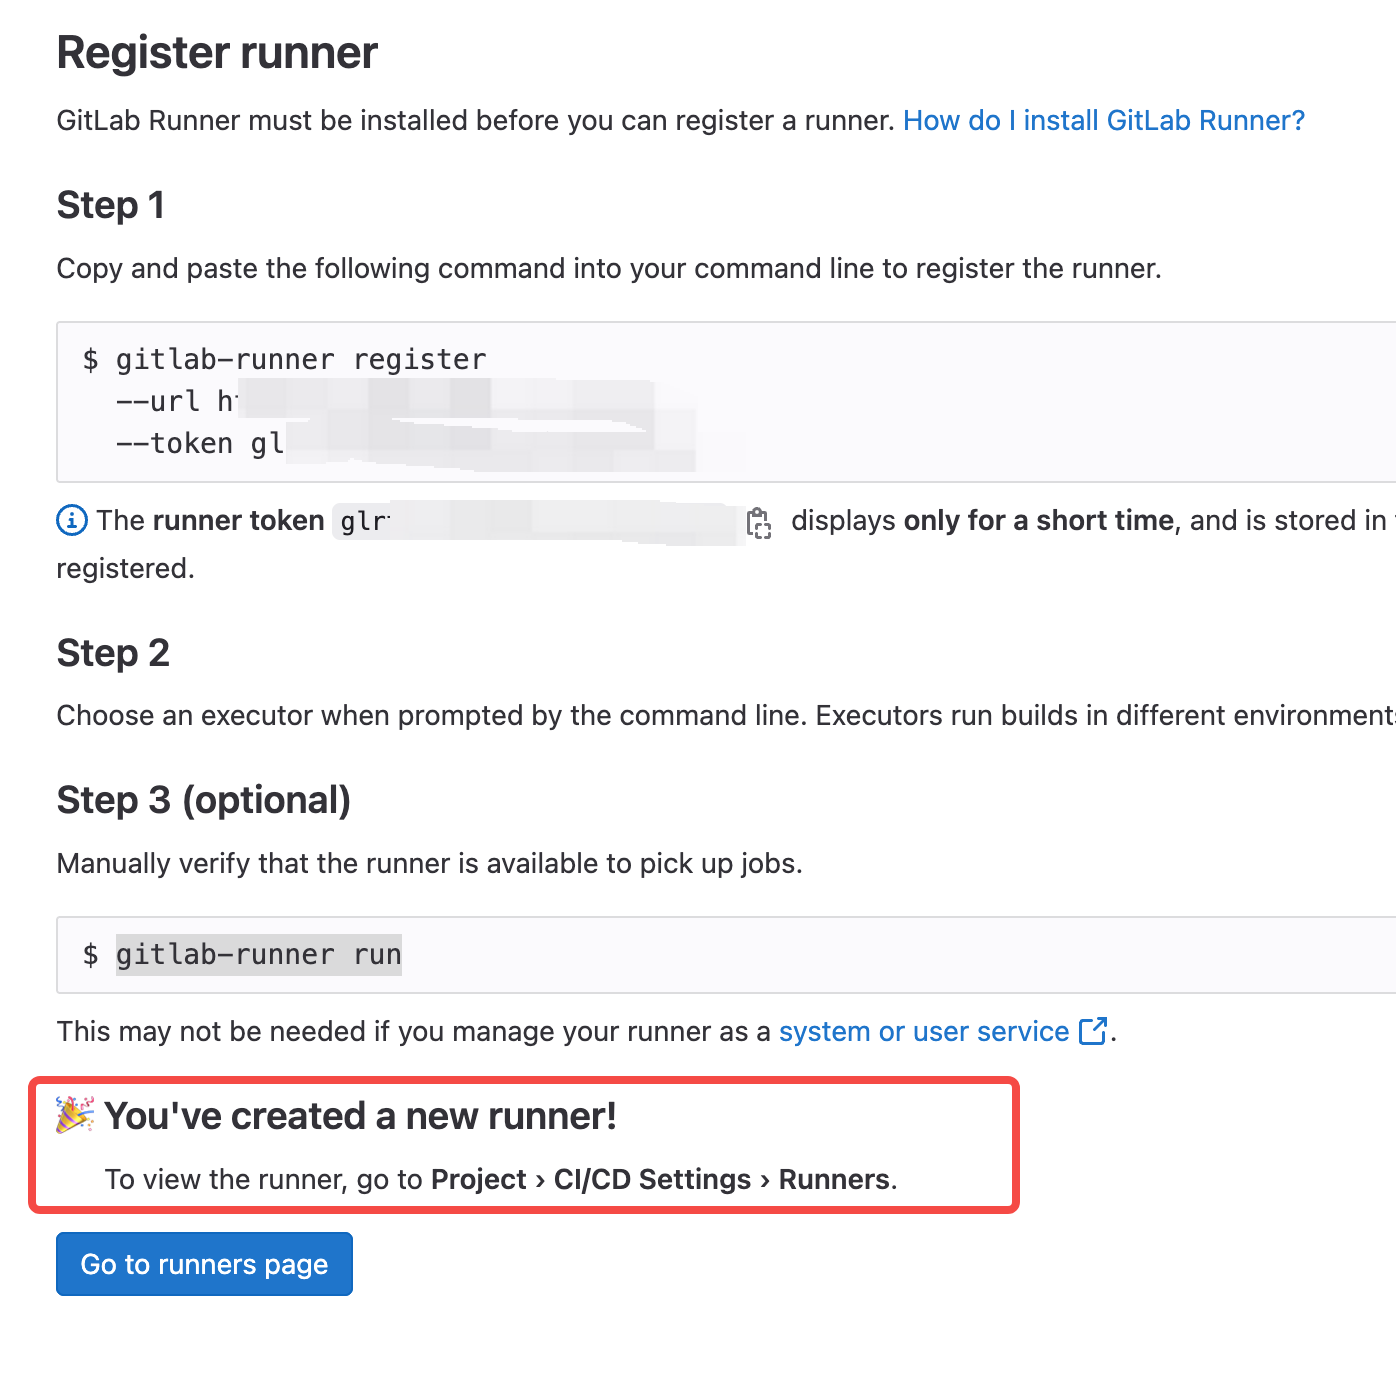
点击Go to runners page后,看到刚创建的runner已经绿色可用了:
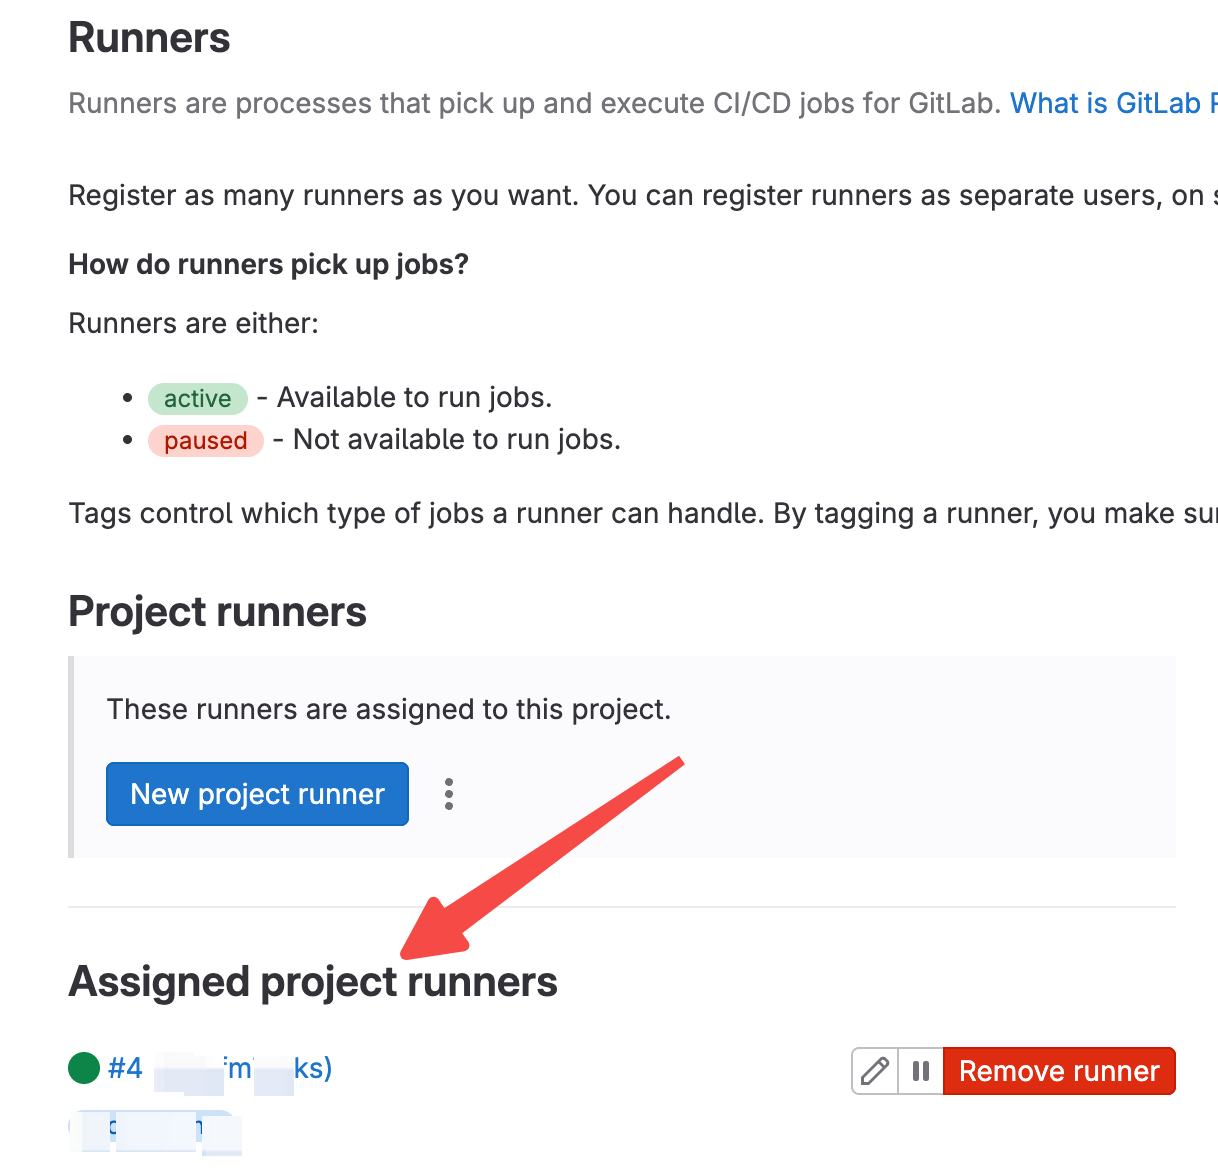
至此,我们成功创建了一个runner!🎉🎉🎉🎉🎉🎉🎉🎉
现在我们回头再重新执行一下之前的job。
我发现仍然报这个错:

奇怪,明明已经创建了runner。经过咨询发现job和runner可以通过tag关联。我在创建runner的时候已经有tag了,那下面需要给job关联tag,修改.gitlab-ci.yml,给job新增tags:
build-job: # This job runs in the build stage, which runs first.stage: buildtags:- tag1script:- echo "Compiling the code..."- echo "Compile complete."保存后再次commit changes,再去jobs里看下:
报错更新了,至少不再pending了😑😑😑😑

我们根据提示去看看需要哪些shell相关的设置。
按照提示去runner的机器上执行一下:
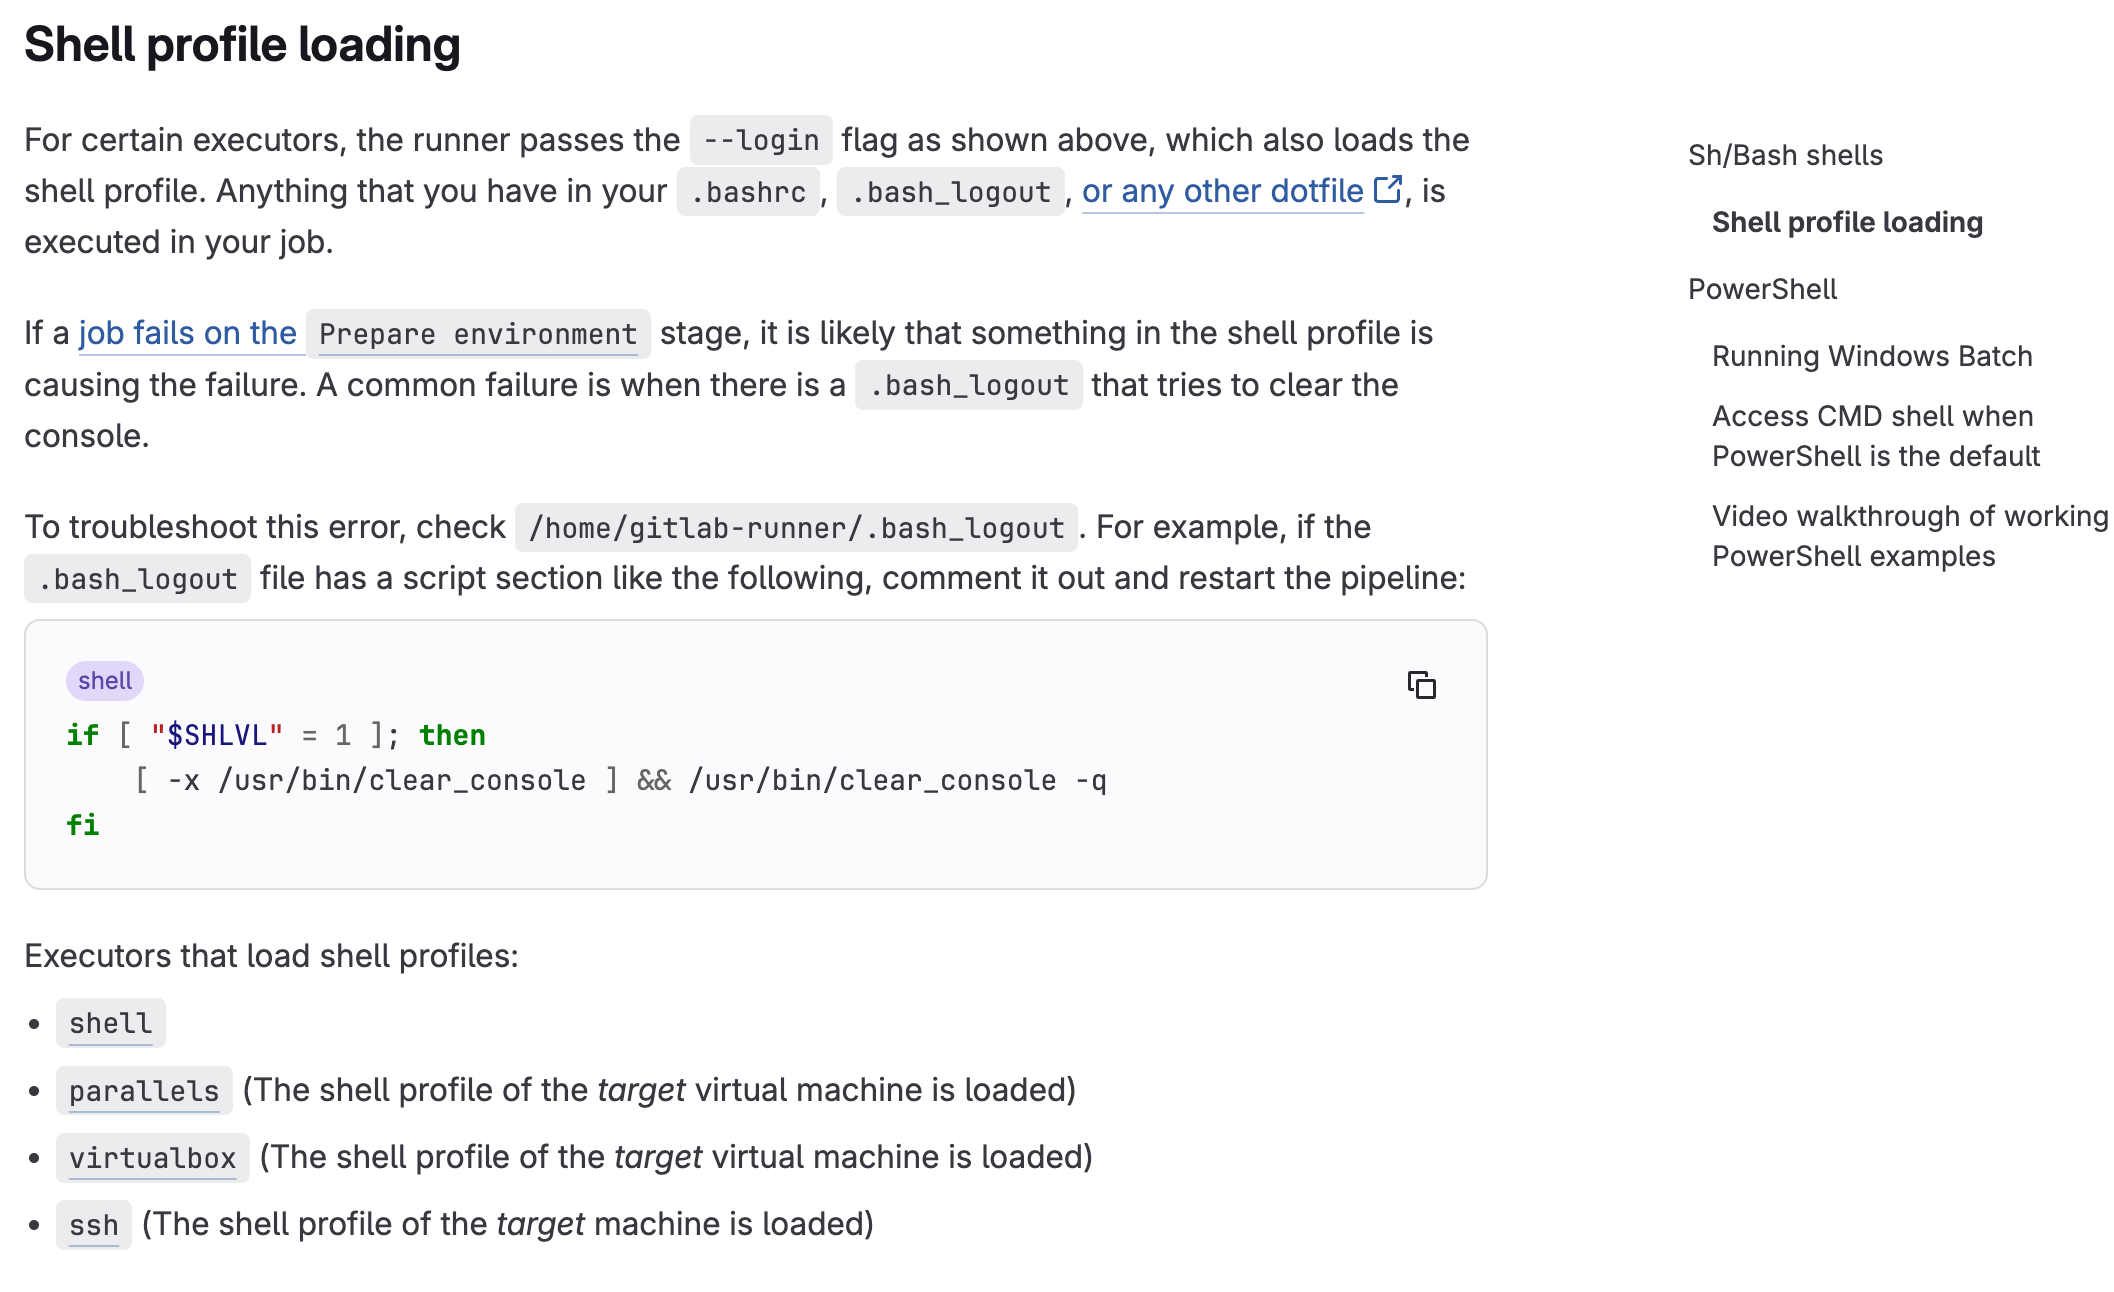
果然,按照提示注释掉这段shell:
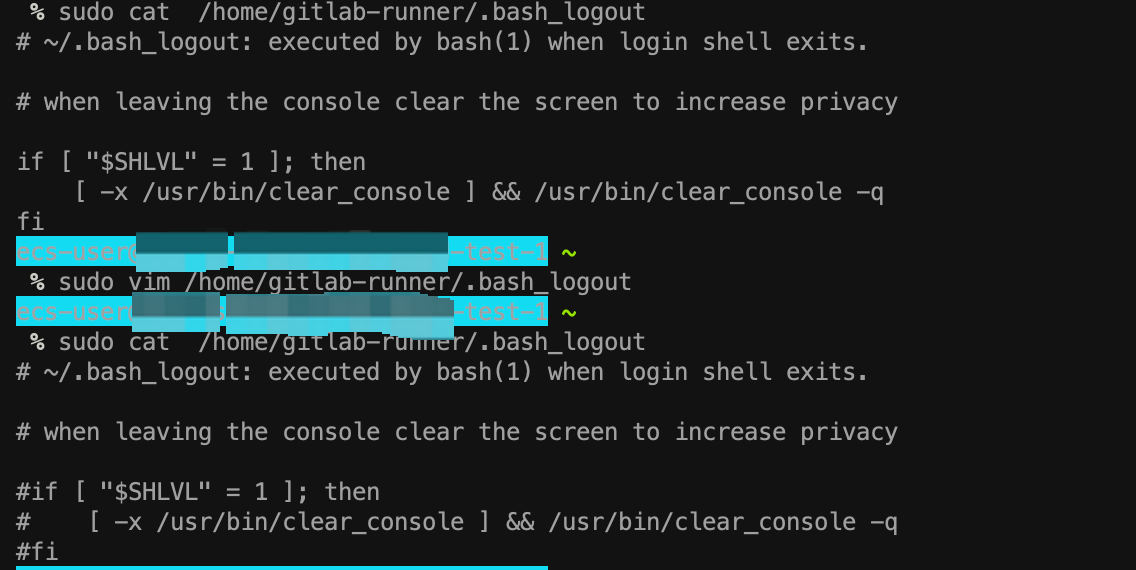
注释掉后保存退出,然后重新执行流水线,果然通过了:
从stages可以看出build阶段已经通过。卡在了test阶段是因为我没有给其他阶段增加tags。

给其他阶段加上tags之后,流水线顺利跑完。
