Spring AI Alibaba 学习之最简单的快速入门
Spring AI Alibaba 简介
首先我们还是得访问下官网 戳这里访问,Spring AI Alibaba(SAA) 是一款以 Spring AI 为基础,深度集成百炼平台,支持 ChatBot、工作流、多智能体应用开发模式的 AI 框架。
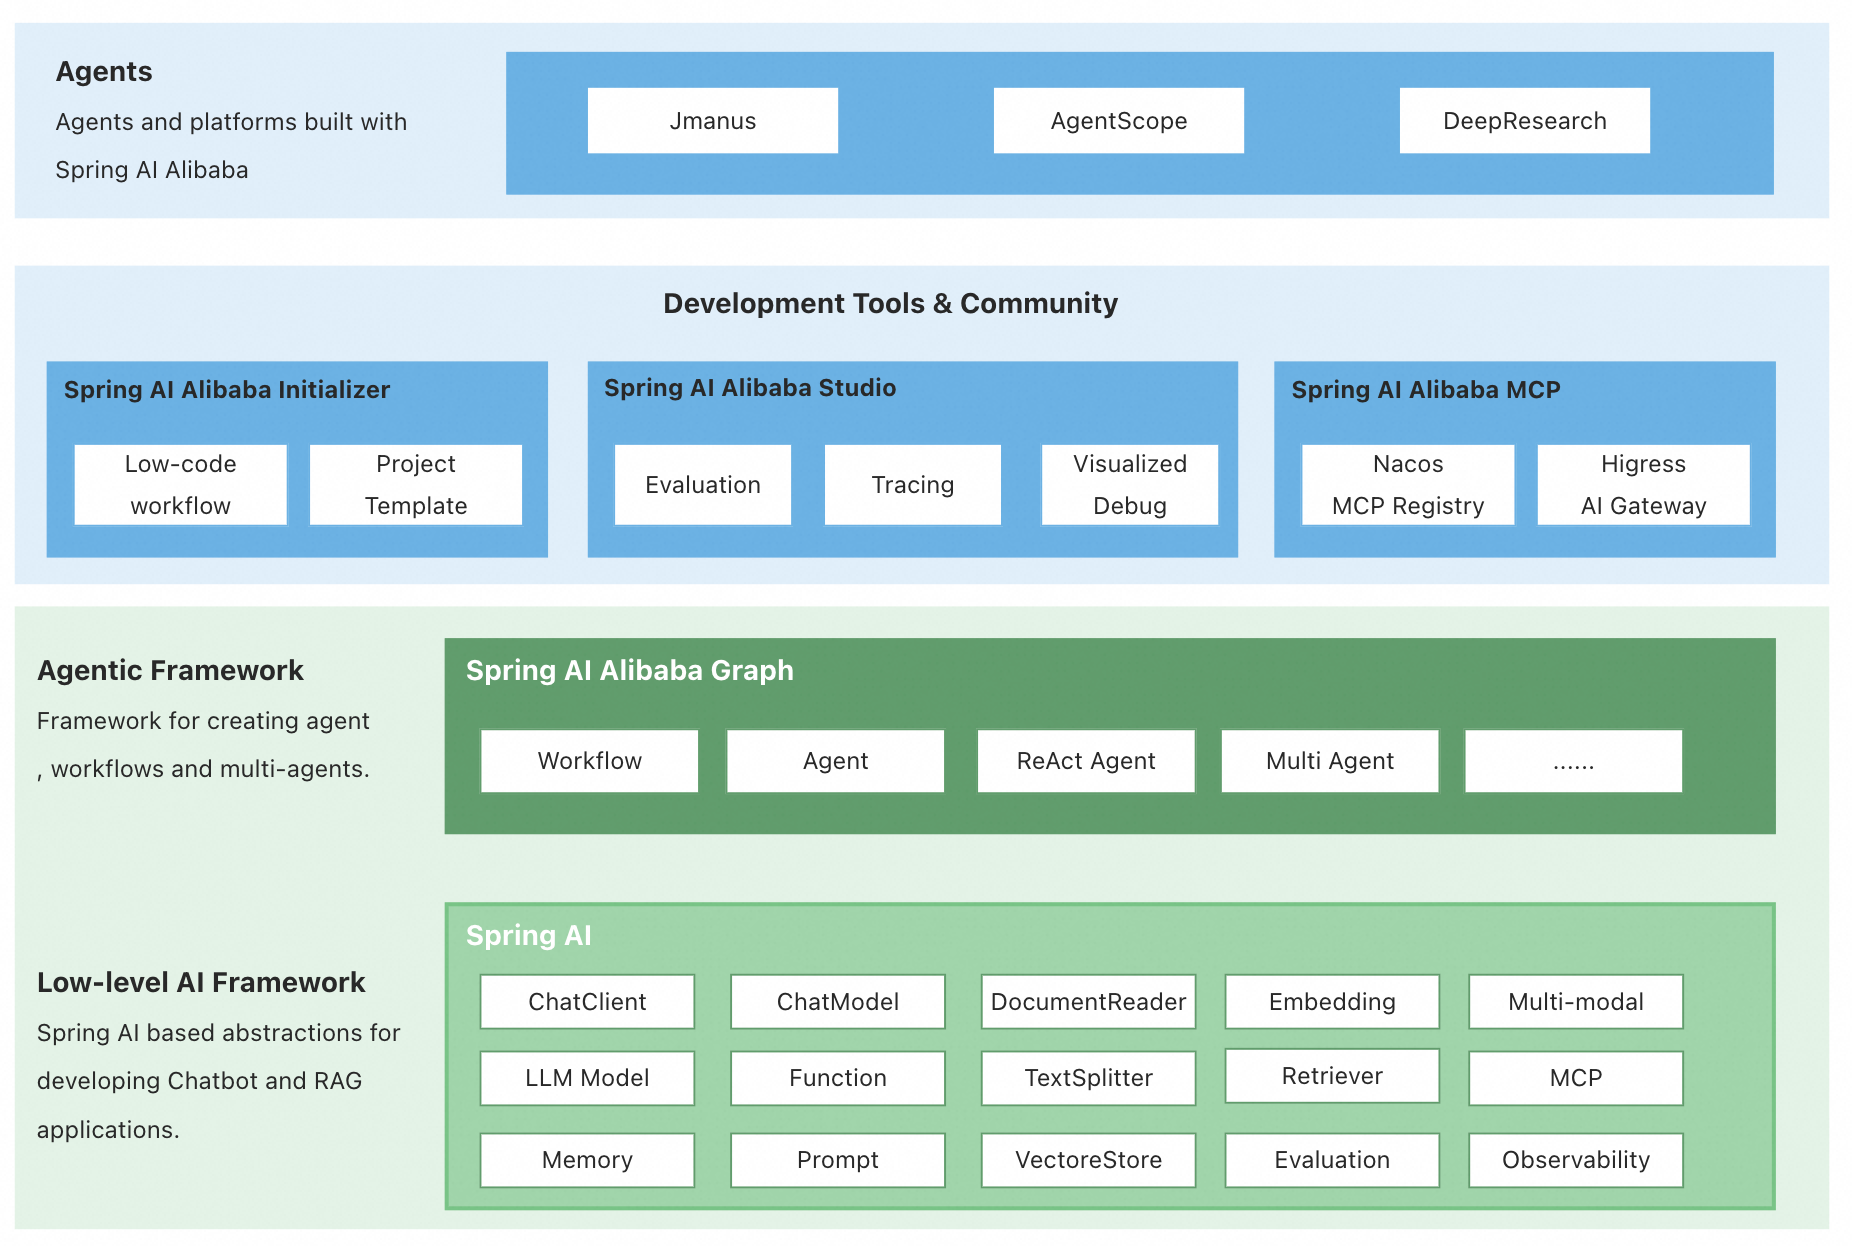
Spring AI 和 Spring AI Alibaba 是 生态关联但定位、范围、主导方完全不同 的两个技术体系,核心区别在于「是否为官方生态」「覆盖范围」「适配场景」,以下是详细对比和解析:
一、核心定位与主导方(最本质区别)
| 维度 | Spring AI | Spring AI Alibaba |
|---|---|---|
| 官方属性 | Spring 官方生态项目(由 Pivotal/Spring 团队主导) | 阿里云基于 Spring AI 扩展的 第三方适配方案(非 Spring 官方) |
| 核心定位 | 通用 AI 应用开发框架:为 Spring 生态提供统一的 AI 能力抽象(LLM、向量存储、函数调用等),适配多厂商 AI 服务 | 阿里云 AI 服务的 Spring 生态集成方案:基于 Spring AI 的接口规范,专门适配阿里云自有 AI 产品,降低阿里云用户的接入成本 |
| 主导团队 | Spring 社区(如 Josh Long 等核心贡献者) | 阿里云技术团队 |
| 生态归属 | Spring 官方核心生态(与 Spring Boot、Spring Cloud 同级) | 阿里云开源生态(依附于 Spring AI 官方规范) |
二、覆盖范围与适配能力
1. Spring AI:「通用抽象 + 多厂商适配」
Spring AI 的核心目标是 “屏蔽不同 AI 厂商的接口差异”,提供一套统一的 Java API(如 ChatClient、EmbeddingClient、VectorStore),让开发者无需修改代码即可切换不同 AI 服务。
- 适配的 AI 厂商/服务(官方支持):
- 大模型(LLM):OpenAI、Anthropic、Google Gemini、Azure OpenAI、Hugging Face 本地模型等;
- 向量存储:Redis、Milvus、Chroma、PostgreSQL(pgvector)等;
- 其他:AWS Bedrock、Google Vertex AI 等云厂商 AI 平台。
- 核心能力:通用 LLM 调用、函数调用(Function Calling)、向量检索、AI 流式响应、提示词模板(Prompt Template)、AI 工作流(Chain)等。
- 适用场景:需要跨 AI 厂商适配、追求技术中立性的通用 AI 应用(如多模态聊天、企业知识库、跨云 AI 服务集成)。
2. Spring AI Alibaba:「阿里云专属适配」
Spring AI Alibaba 并非独立框架,而是 基于 Spring AI 的官方接口,为阿里云 AI 产品提供的“专属适配器”。它不提供通用抽象,仅聚焦阿里云生态内的 AI 服务集成。
- 适配的 AI 服务(仅阿里云):
- 大模型:通义千问(Qwen)、通义视觉、通义听悟等;
- 阿里云向量数据库(VectorDB);
- 阿里云其他 AI 服务(如 OCR、语音识别、内容安全等)。
- 核心能力:复用 Spring AI 的统一 API,快速接入阿里云 AI 服务,同时补充阿里云专属特性(如阿里云 AK/SK 鉴权、地域路由、服务限流适配等)。
- 适用场景:已使用阿里云生态(如 ECS、RDS、OSS),且需要接入阿里云 AI 产品的 Spring 应用(如阿里云上的企业知识库、基于通义千问的聊天机器人)。
三、技术架构与依赖关系
- 依赖关系:Spring AI Alibaba 必须依赖 Spring AI 的核心包(如
spring-ai-core、spring-ai-chat),本质是 Spring AI 的“厂商适配模块”(类似 Spring Cloud 中不同厂商的注册中心适配器)。 - 架构层次:
应用层(你的 Spring Boot 应用) ↓ 适配层:Spring AI Alibaba(阿里云专属适配器) ↓ 核心层:Spring AI(统一抽象 API + 核心能力) ↓ 底层:阿里云 AI SDK / 其他厂商 AI SDK - 独立性:Spring AI 可独立使用(无需任何云厂商适配);Spring AI Alibaba 不能独立使用,必须搭配 Spring AI 核心依赖。
四、关键差异总结表
| 对比维度 | Spring AI | Spring AI Alibaba |
|---|---|---|
| 官方属性 | Spring 官方项目 | 阿里云第三方适配方案 |
| 覆盖范围 | 多厂商 AI 服务 + 开源 AI 组件 | 仅阿里云 AI 服务(通义千问、阿里云向量库等) |
| 核心价值 | 统一 AI 编程接口,技术中立 | 简化阿里云 AI 服务接入,适配阿里云生态 |
| 依赖关系 | 可独立使用 | 必须依赖 Spring AI 核心包 |
| 适用场景 | 跨厂商 AI 适配、开源 AI 项目、中立技术选型 | 阿里云生态用户、仅使用阿里云 AI 服务的项目 |
| 迭代主导 | Spring 社区 | 阿里云团队 |
| 扩展能力 | 支持自定义 AI 厂商适配器 | 仅支持阿里云服务的扩展(如专属鉴权、地域) |
对于国内咱们 Java 程序员来说,使用 Spring AI Alibaba 上手是比较容易的,申请一个阿里云百炼的 Key 就可以去做测试了,省下了很多不必要的麻烦事。
申请阿里云百炼 Api Key
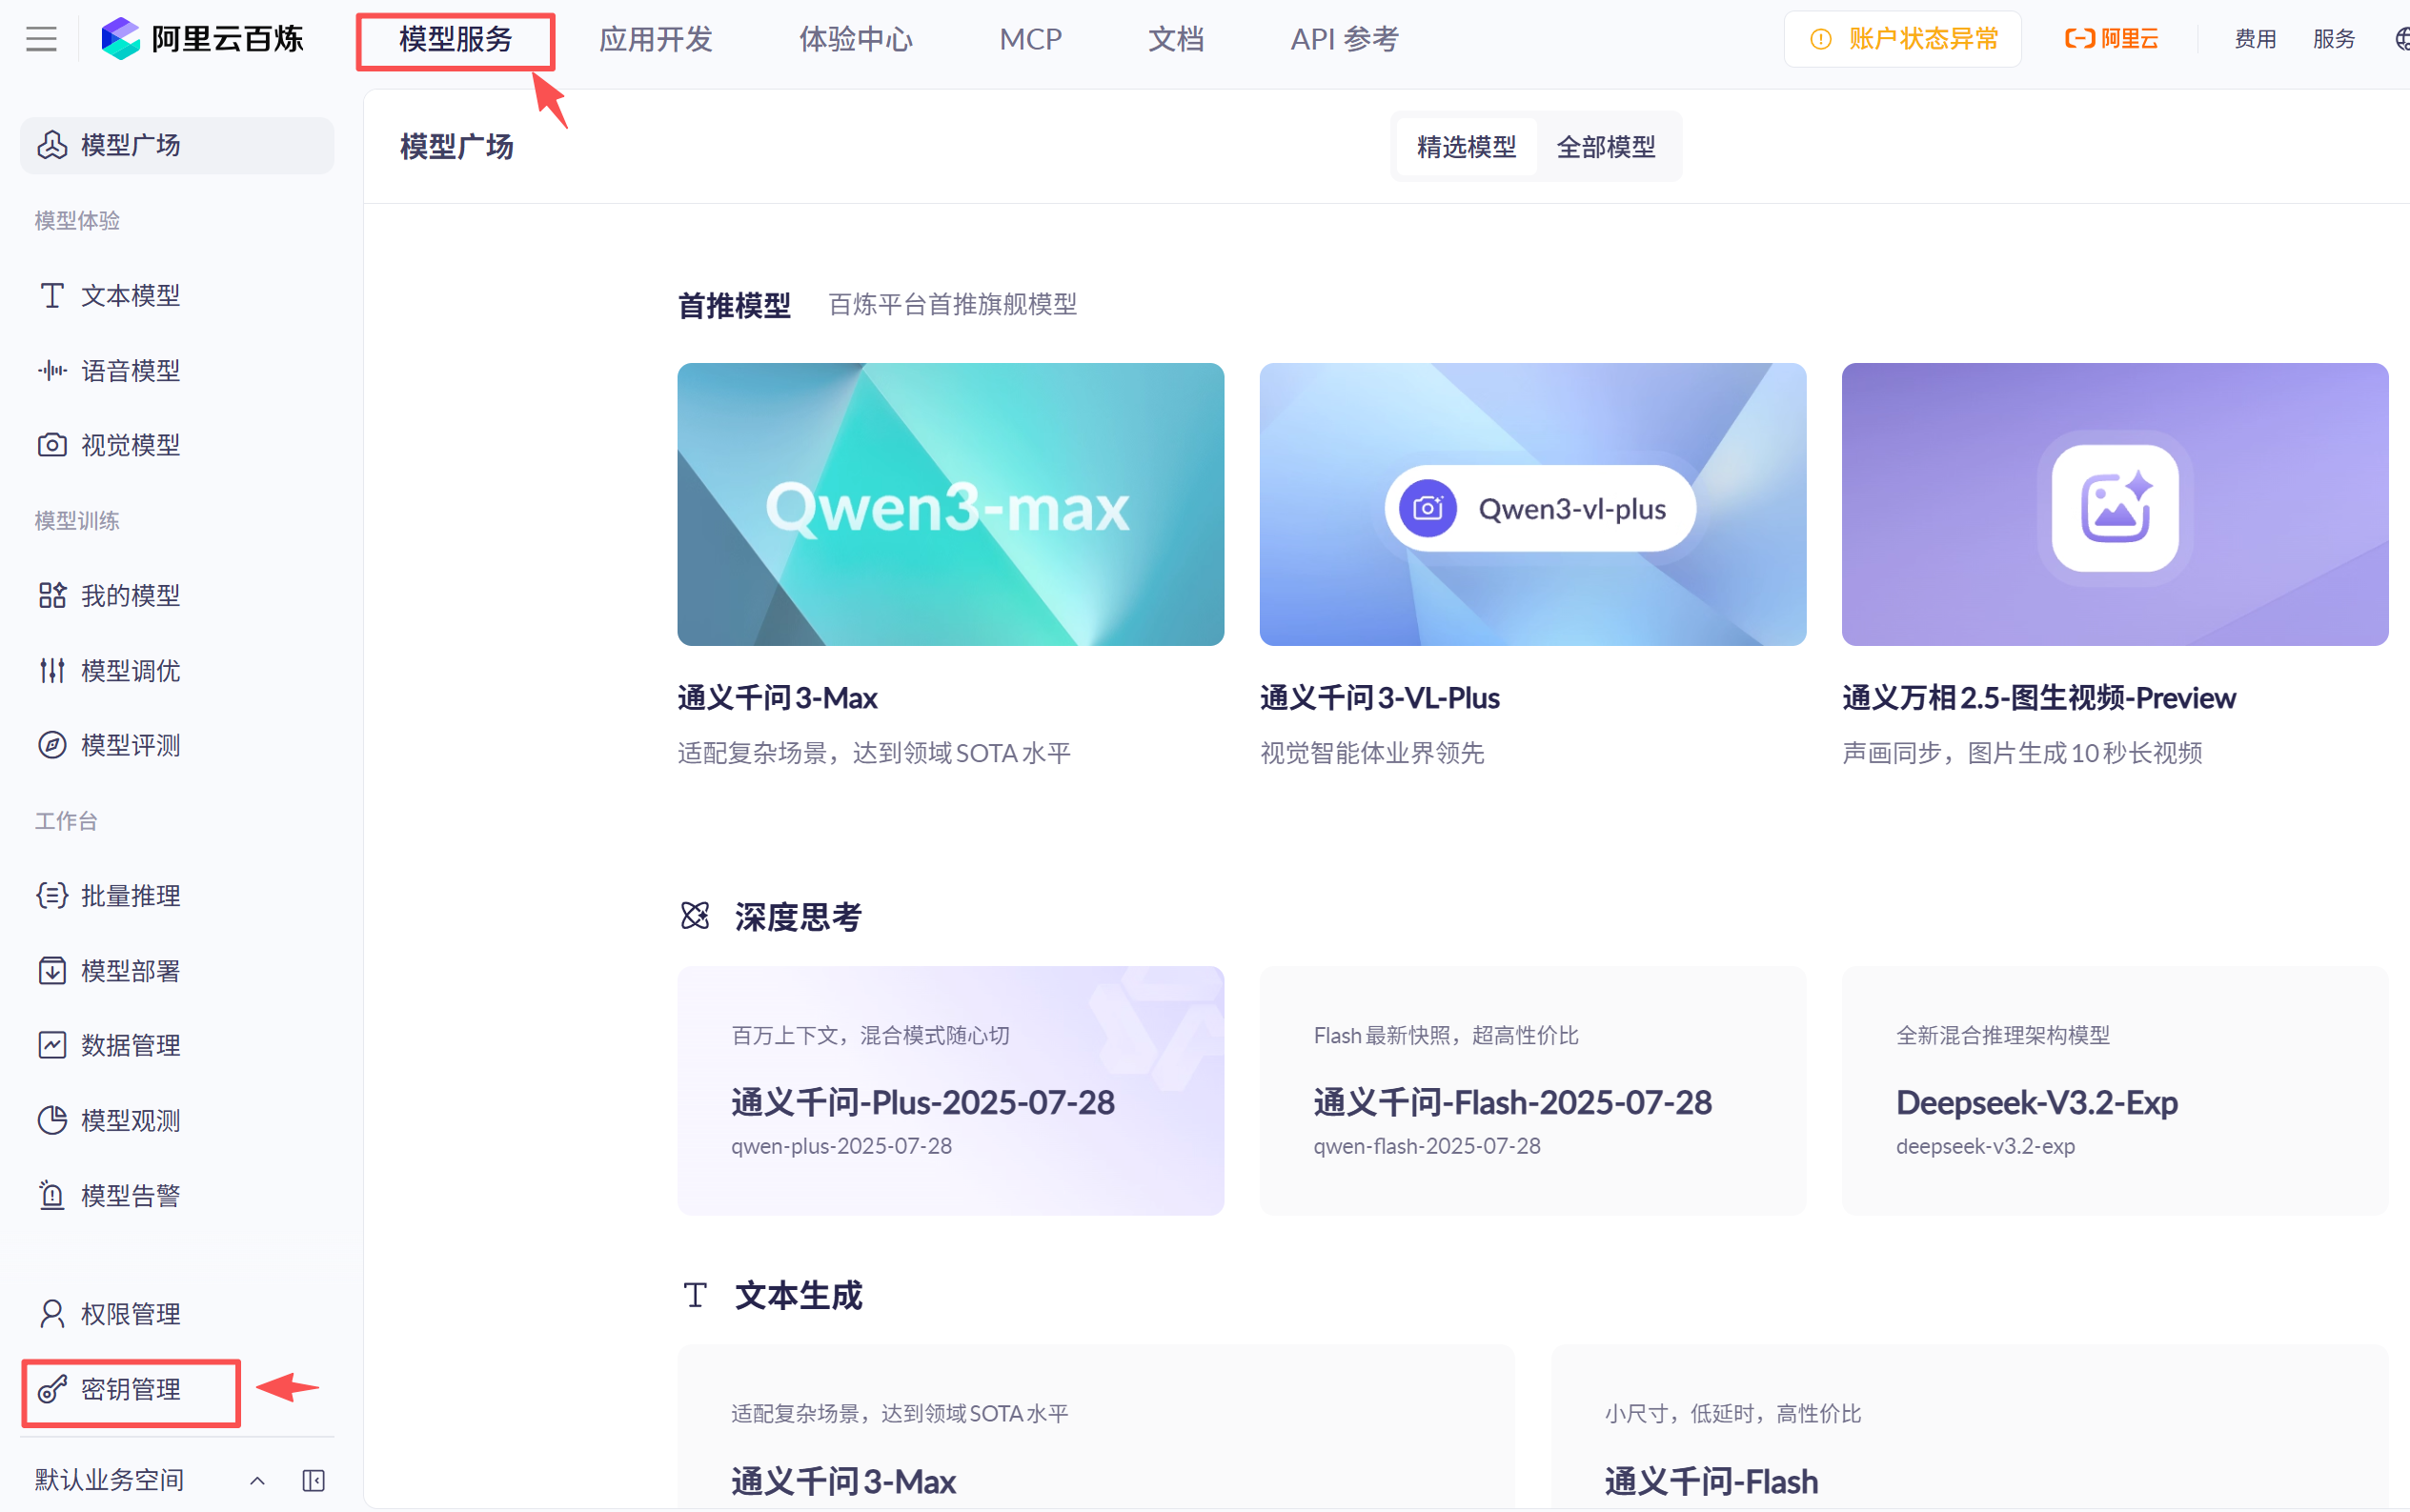
我们先访问下官网 点击这里访问百炼平台,我们使用自己的阿里旗下账号登录,俺使用的是支付宝登录的。

登录进去了之后,选择 模型服务 里面 密钥管理,
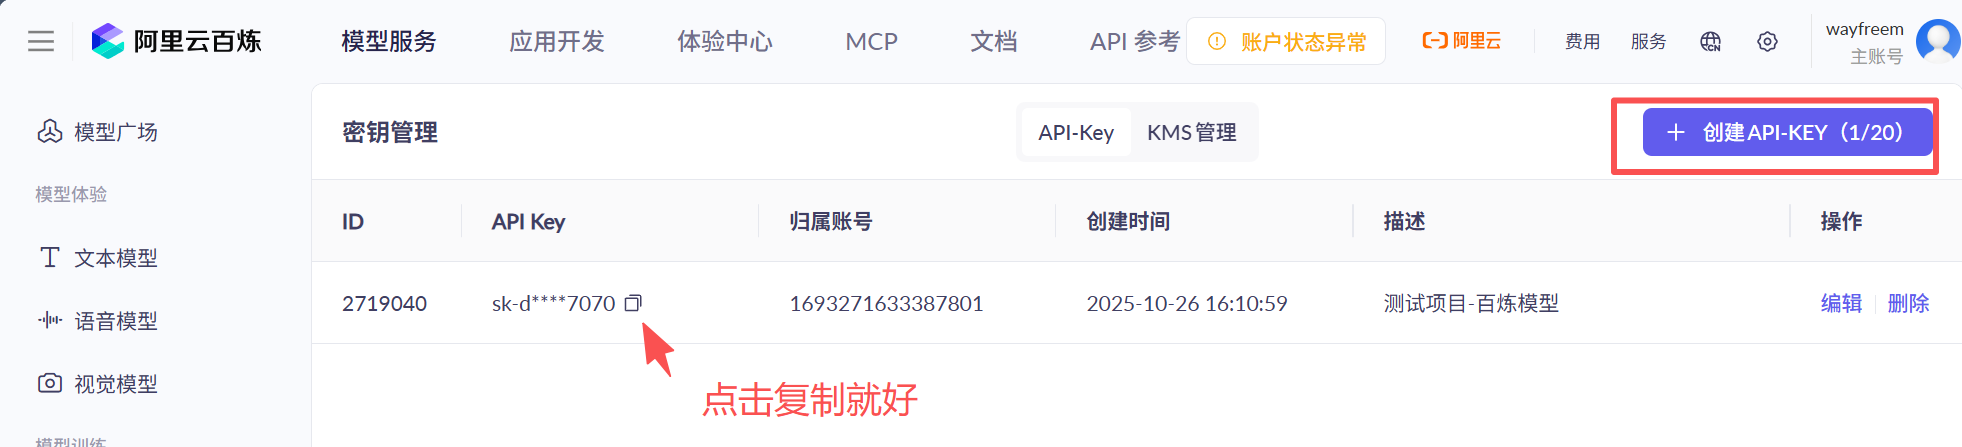
接下来,我们创建一个 API Key,创建完了之后,这个 API Key 就是我们以后需要频繁用到的了。
首次调用百炼大模型的时候可以看下这里 官方文档:首次调用通义千问API
项目搭建
这里先给大家一个能快速搭建的方案,我是直接访问的 spring-ai-alibaba-examples 工程 (最开始搭建的时候,也看了好多别人写的博客,但是由于 AI 几乎每天都会有新的东西,担心自己的版本出 bug,就卡在了第一步版本上面,所以索性找官方的例子还来的快一点),大家也可以去 git clone 下来,然后本地学习下
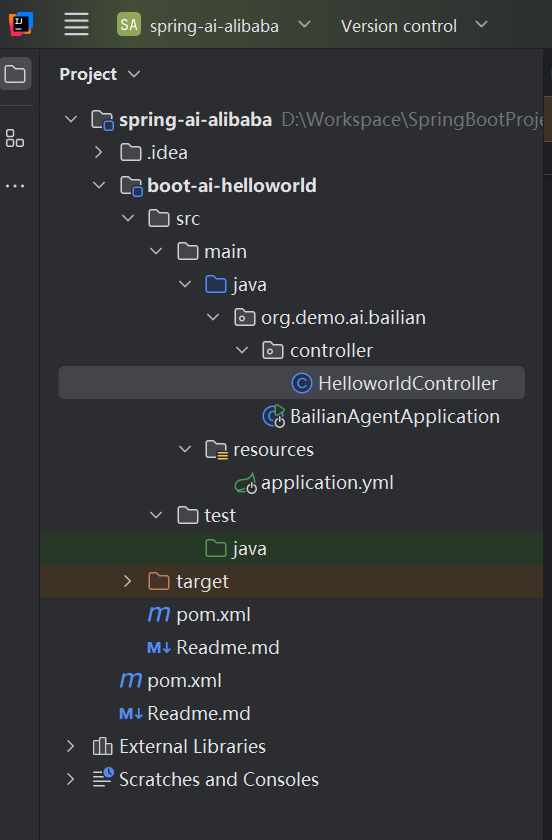
项目结构
项目搭建
父 pom 文件
根据项目文件来,在父 pom 文件中做项目依赖包的版本管理,这里父 pom 文件的内容如下,,都是咱们熟悉的一些配置,就不多赘述了:
<?xml version="1.0" encoding="UTF-8"?>
<project xmlns:xsi="http://www.w3.org/2001/XMLSchema-instance"xmlns="http://maven.apache.org/POM/4.0.0"xsi:schemaLocation="http://maven.apache.org/POM/4.0.0 http://maven.apache.org/xsd/maven-4.0.0.xsd"><modelVersion>4.0.0</modelVersion><groupId>org.demo.ai</groupId><artifactId>spring-ai-alibaba</artifactId><version>${revision}</version><packaging>pom</packaging><description>Spring AI Alibaba Examples</description><name>Spring AI Alibaba Examples</name><url>https://github.com/springaialibaba/spring-ai-alibaba-examples</url><properties><!-- Project revision --><revision>1.0.0</revision><project.build.sourceEncoding>UTF-8</project.build.sourceEncoding><project.reporting.outputEncoding>UTF-8</project.reporting.outputEncoding><java.version>17</java.version><maven.compiler.source>17</maven.compiler.source><maven.compiler.target>17</maven.compiler.target><!-- Spring AI --><spring-ai.version>1.0.0</spring-ai.version><!-- Spring AI Alibaba --><!-- Install Spring AI Alibaba in your local. --><spring-ai-alibaba.version>1.0.0.3</spring-ai-alibaba.version><!-- Spring Boot --><spring-boot.version>3.5.5</spring-boot.version><!-- maven plugin --><maven-deploy-plugin.version>3.1.1</maven-deploy-plugin.version><flatten-maven-plugin.version>1.3.0</flatten-maven-plugin.version><maven-compiler-plugin.version>3.8.1</maven-compiler-plugin.version></properties><modules><module>boot-ai-helloworld</module></modules><dependencyManagement><dependencies><dependency><groupId>org.springframework.boot</groupId><artifactId>spring-boot-dependencies</artifactId><version>${spring-boot.version}</version><type>pom</type><scope>import</scope></dependency><dependency><groupId>org.springframework.ai</groupId><artifactId>spring-ai-bom</artifactId><version>${spring-ai.version}</version><type>pom</type><scope>import</scope></dependency><dependency><groupId>com.alibaba.cloud.ai</groupId><artifactId>spring-ai-alibaba-bom</artifactId><version>${spring-ai-alibaba.version}</version><type>pom</type><scope>import</scope></dependency></dependencies></dependencyManagement><build><plugins><plugin><groupId>org.springframework.boot</groupId><artifactId>spring-boot-maven-plugin</artifactId><version>${spring-boot.version}</version></plugin><plugin><groupId>org.apache.maven.plugins</groupId><artifactId>maven-deploy-plugin</artifactId><version>${maven-deploy-plugin.version}</version><configuration><skip>true</skip></configuration></plugin><plugin><groupId>org.apache.maven.plugins</groupId><artifactId>maven-compiler-plugin</artifactId><version>${maven-compiler-plugin.version}</version><configuration><release>${java.version}</release><compilerArgs><compilerArg>-parameters</compilerArg></compilerArgs></configuration></plugin></plugins></build><repositories><repository><id>spring-milestones</id><name>Spring Milestones</name><url>https://repo.spring.io/milestone</url><snapshots><enabled>false</enabled></snapshots></repository><repository><id>spring-snapshots</id><name>Spring Snapshots</name><url>https://repo.spring.io/snapshot</url><releases><enabled>false</enabled></releases></repository><repository><id>sonatype</id><name>OSS Sonatype</name><url>https://oss.sonatype.org/content/groups/public/</url><releases><enabled>true</enabled></releases><snapshots><enabled>true</enabled></snapshots></repository><repository><id>aliyunmaven</id><name>aliyun</name><url>https://maven.aliyun.com/repository/public</url></repository></repositories><pluginRepositories><pluginRepository><id>public</id><name>aliyun nexus</name><url>https://maven.aliyun.com/repository/public</url><releases><enabled>true</enabled></releases><snapshots><enabled>false</enabled></snapshots></pluginRepository></pluginRepositories></project>
子模块 boot-ai-helloworld
子模块就相对来说简单很多了,涉及到的就一个启动类,一个访问使用的 controller
子 pom 文件
<?xml version="1.0" encoding="UTF-8"?>
<project xmlns:xsi="http://www.w3.org/2001/XMLSchema-instance"xmlns="http://maven.apache.org/POM/4.0.0"xsi:schemaLocation="http://maven.apache.org/POM/4.0.0 http://maven.apache.org/xsd/maven-4.0.0.xsd"><modelVersion>4.0.0</modelVersion><parent><groupId>org.demo.ai</groupId><artifactId>spring-ai-alibaba</artifactId><version>${revision}</version><relativePath>../pom.xml</relativePath></parent><artifactId>boot-ai-helloworld</artifactId><version>${revision}</version><description>Spring AI Alibaba Helloworld Example</description><name>Spring AI Alibaba Helloworld Examples</name><dependencies><dependency><groupId>org.springframework.boot</groupId><artifactId>spring-boot-starter-web</artifactId></dependency><dependency><groupId>com.alibaba.cloud.ai</groupId><artifactId>spring-ai-alibaba-starter-dashscope</artifactId></dependency></dependencies><build><plugins><plugin><groupId>org.springframework.boot</groupId><artifactId>spring-boot-maven-plugin</artifactId><version>${spring-boot.version}</version><executions><execution><goals><goal>repackage</goal></goals></execution></executions></plugin><plugin><groupId>org.apache.maven.plugins</groupId><artifactId>maven-deploy-plugin</artifactId><version>${maven-deploy-plugin.version}</version></plugin></plugins></build></project>
配置文件
server:port: 18080spring:application:name: spring-ai-alibaba-helloworldai:dashscope:api-key: {替换成阿里云百炼上的 API Key}
启动类
这个启动类也是正常的 Spring-boot 项目的启动类,没有增加额外的配置
package org.demo.ai.bailian;import org.springframework.boot.SpringApplication;
import org.springframework.boot.autoconfigure.SpringBootApplication;@SpringBootApplication
public class BailianAgentApplication {public static void main(String[] args) {SpringApplication.run(BailianAgentApplication.class, args);}
}
controller 层
我们使用的是 ChatClient 类来与大模型交互,这里先给大家一个初始的印象,后面再写几篇文章出来详细介绍下 ChatClient 与 ChatModel 这两种用法(先直接给一个答案:ChatClient 是基于 ChatModel 创建)。
package org.demo.ai.bailian.controller;import com.alibaba.cloud.ai.dashscope.chat.DashScopeChatOptions;
import jakarta.servlet.http.HttpServletResponse;
import org.springframework.ai.chat.client.ChatClient;
import org.springframework.ai.chat.client.advisor.MessageChatMemoryAdvisor;
import org.springframework.ai.chat.client.advisor.SimpleLoggerAdvisor;
import org.springframework.ai.chat.memory.ChatMemory;
import org.springframework.ai.chat.memory.MessageWindowChatMemory;
import org.springframework.web.bind.annotation.*;
import reactor.core.publisher.Flux;@RestController
@RequestMapping("/helloworld")
public class HelloworldController {// 默认的系统提示词private static final String DEFAULT_PROMPT = "你是一个博学的智能聊天助手,请根据用户提问回答!";private final ChatClient dashScopeChatClient;// 也可以使用如下的方式注入 ChatClientpublic HelloworldController(ChatClient.Builder chatClientBuilder) {this.dashScopeChatClient = chatClientBuilder.defaultSystem(DEFAULT_PROMPT).defaultAdvisors(MessageChatMemoryAdvisor.builder(MessageWindowChatMemory.builder().build()).build()).defaultAdvisors(new SimpleLoggerAdvisor())// 设置 ChatClient 中 ChatModel 的 Options 参数.defaultOptions(DashScopeChatOptions.builder().withTopP(0.7).build()).build();}/*** ChatClient 简单调用*/@GetMapping("/simple/chat")public String simpleChat(@RequestParam(value = "query", defaultValue = "你好,很高兴认识你,能简单介绍一下自己吗?") String query) {return dashScopeChatClient.prompt(query).call().content();}/*** ChatClient 流式调用*/@GetMapping("/stream/chat")public Flux<String> streamChat(@RequestParam(value = "query", defaultValue = "你好,很高兴认识你,能简单介绍一下自己吗?") String query,HttpServletResponse response) {response.setCharacterEncoding("UTF-8");return dashScopeChatClient.prompt(query).stream().content();}/*** ChatClient 使用自定义的 Advisor 实现功能增强.* eg:* http://127.0.0.1:18080/helloworld/advisor/chat/123?query=你好,我叫jack,之后的会话中都带上我的名字* 你好,jack!很高兴认识你。在接下来的对话中,我会记得带上你的名字。有什么想聊的吗?* http://127.0.0.1:18080/helloworld/advisor/chat/123?query=我叫什么名字?* 你叫jack呀。有什么事情想要分享或者讨论吗,jack?* <p>* refer: https://docs.spring.io/spring-ai/reference/api/chat-memory.html#_memory_in_chat_client*/@GetMapping("/advisor/chat/{conversationId}")public Flux<String> advisorChat(HttpServletResponse response, @PathVariable String conversationId, @RequestParam String query) {// 通过设置 conversationId 参数,将对话历史记录存储到 ChatMemory 中// 后续的对话中,会将之前的对话历史记录作为上下文,继续生成响应response.setCharacterEncoding("UTF-8");return this.dashScopeChatClient.prompt(query).advisors(a -> a.param(ChatMemory.CONVERSATION_ID, conversationId)).stream().content();}
}
测试
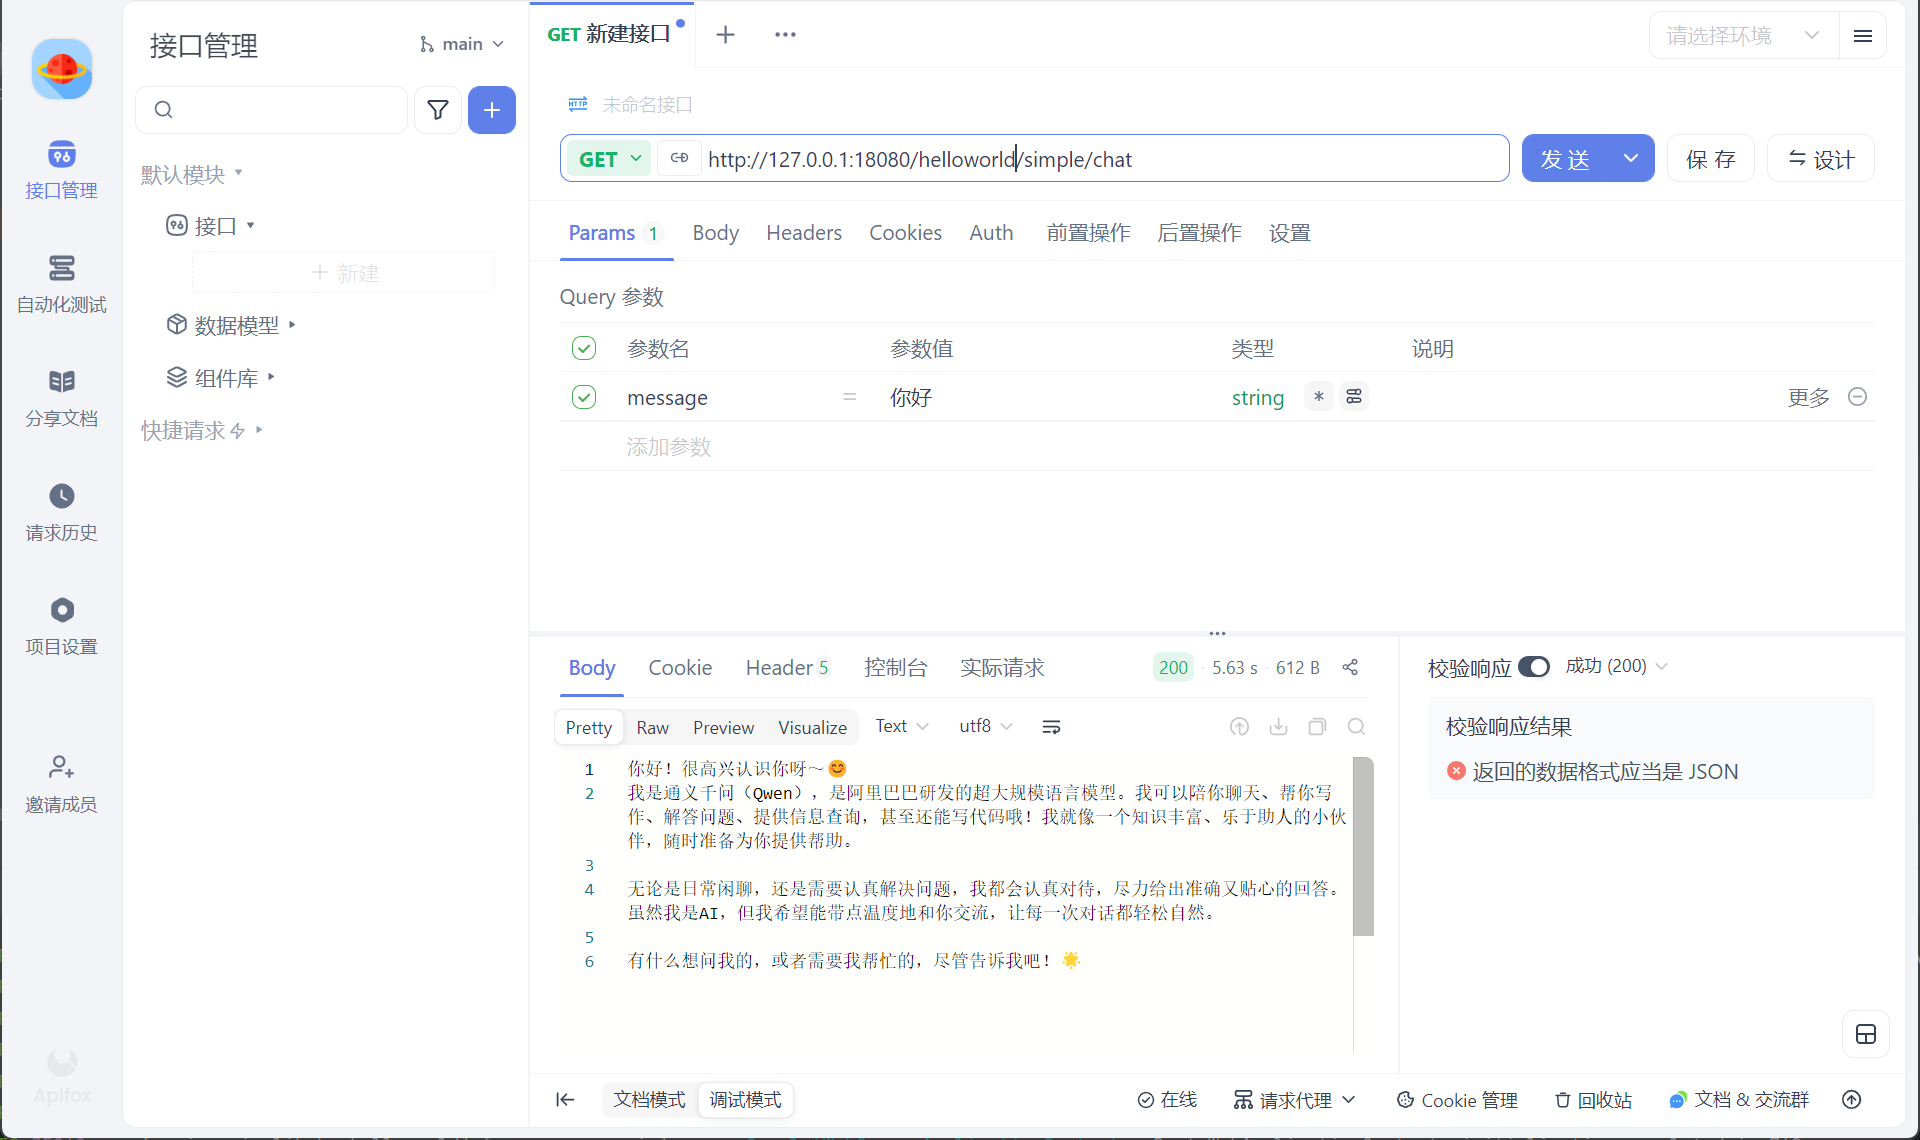
测试一:访问简单 chat
首先,我们访问下第一个链接:http://127.0.0.1:18080/helloworld/simple/chat,这里可以不用 ApiFox 访问的,直接浏览器访问就行了。
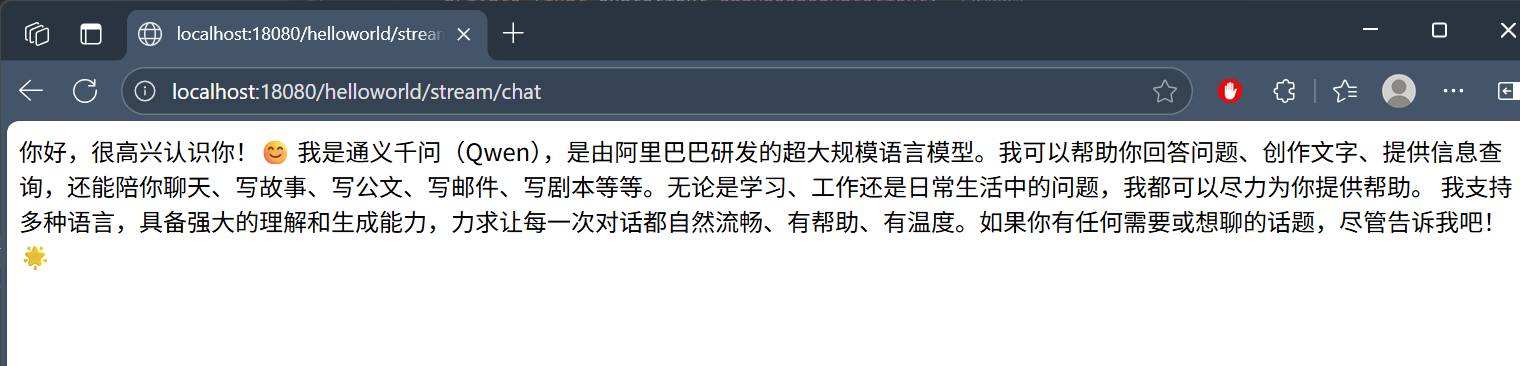
测试二:访问流式输出
当我们在AI 工具的聊天框上面输入问题之后,大模型返回的时候,是一点点的返回的,这种就是流式输出。那么我们访问下第二个链接:http://127.0.0.1:18080/helloworld/stream/chat
测试三:带有记忆的输出
我们在和 AI 对话的时候,一般是多轮对话,那么也就说明 AI 会记录我们之前的聊天内容,有了这个理解之后,我们访问第三个链接:
- 先访问:
http://127.0.0.1:18080/helloworld/advisor/chat/123?query=你好,我叫jack,之后的会话中都带上我的名字 - 再访问:
http://127.0.0.1:18080/helloworld/advisor/chat/123?query=我叫什么名字?

