基于 Python 和 Qt 的尺寸数据输入系统设计与实现
引言
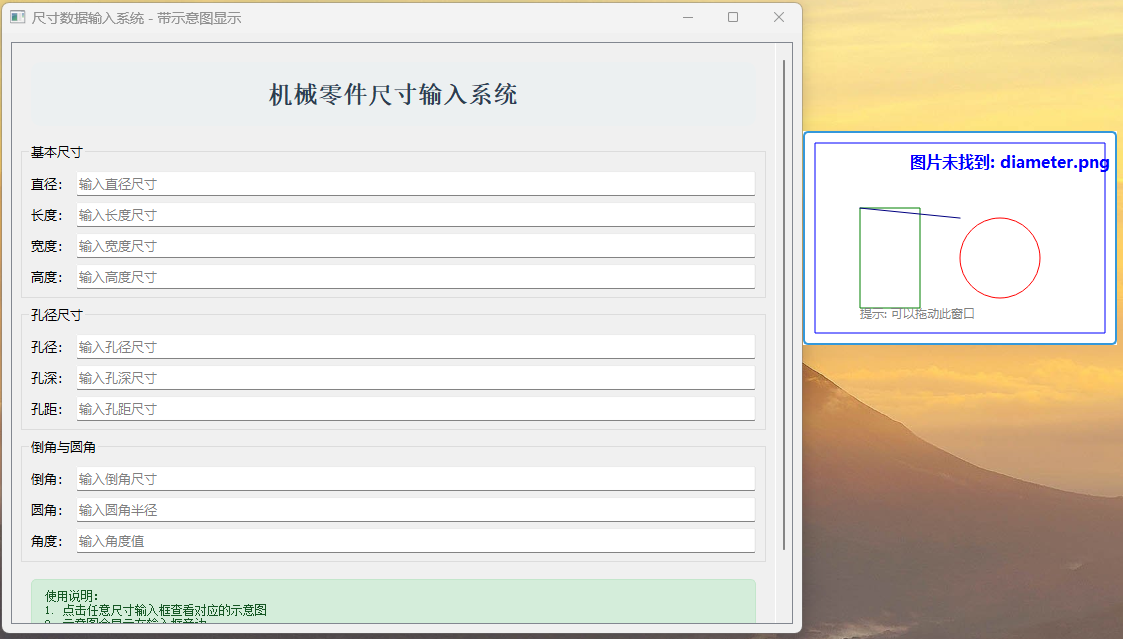
在现代机械设计和工程制图领域,尺寸数据的准确输入至关重要。传统的尺寸输入界面往往缺乏直观的视觉参考,导致用户在输入复杂几何尺寸时容易出错。本文介绍了一个基于 Python 和 Qt 框架开发的尺寸数据输入系统,该系统通过智能示意图显示和交互功能,显著提升了尺寸数据输入的准确性和用户体验。

系统架构与设计原理
系统整体架构
该系统采用经典的 MVC(Model-View-Controller)架构模式,将用户界面、业务逻辑和数据管理分离。主窗口负责显示和管理多个尺寸输入组,而独立的图片显示组件则负责展示与当前输入字段相关的示意图。
核心组件设计
系统包含两个核心类:MainWindow 和 ImageDisplayLabel。MainWindow 类负责创建和管理主界面,包括多个尺寸输入组和用户交互逻辑;ImageDisplayLabel 类则是一个可拖动的图片显示组件,专门用于展示尺寸示意图。
完整代码实现
主窗口实现
# -*- coding: utf-8 -*-
import sys
import os
from PyQt5.QtWidgets import (QApplication, QMainWindow, QWidget, QVBoxLayout, QHBoxLayout, QLabel, QLineEdit, QGroupBox, QScrollArea)
from PyQt5.QtCore import Qt, QPoint
from PyQt5.QtGui import QPixmap, QFont, QPainter, QCursorclass MainWindow(QMainWindow):def __init__(self):super().__init__()# 存储输入框和对应图片路径的映射self.lineedit_image_map = {}# 设置中文字体self.setFont(QFont("Microsoft YaHei", 10))self.init_ui()self.image_display = ImageDisplayLabel()def init_ui(self):self.setWindowTitle('尺寸数据输入系统 - 带示意图显示')self.setGeometry(100, 100, 800, 600)# 创建中央部件和主布局central_widget = QWidget()self.setCentralWidget(central_widget)# 使用滚动区域以适应更多内容scroll_area = QScrollArea()scroll_area.setWidgetResizable(True)scroll_widget = QWidget()main_layout = QVBoxLayout(scroll_widget)# 添加标题title_label = QLabel("机械零件尺寸输入系统")title_label.setAlignment(Qt.AlignCenter)title_label.setStyleSheet("""QLabel {font-size: 24px;font-weight: bold;color: #2c3e50;padding: 20px;background-color: #ecf0f1;border-radius: 10px;margin: 10px;}""")main_layout.addWidget(title_label)# 创建多个输入组self.create_input_groups(main_layout)# 添加使用说明instruction_label = QLabel("使用说明:\n""1. 点击任意尺寸输入框查看对应的示意图\n""2. 示意图会显示在输入框旁边\n""3. 可以拖动示意图窗口到任意位置\n""4. 所有尺寸单位均为毫米(mm)")instruction_label.setWordWrap(True)instruction_label.setStyleSheet("""QLabel {background-color: #d4edda;border: 1px solid #c3e6cb;border-radius: 5px;padding: 10px;margin: 10px;color: #155724;}""")main_layout.addWidget(instruction_label)main_layout.addStretch()scroll_area.setWidget(scroll_widget)# 设置中央部件的布局central_layout = QVBoxLayout(central_widget)central_layout.addWidget(scroll_area)def create_input_groups(self, layout):"""创建多个尺寸输入组"""# 第一组:基本尺寸basic_group = QGroupBox("基本尺寸")basic_layout = QVBoxLayout()# 直径输入diameter_layout = QHBoxLayout()diameter_label = QLabel("直径:")diameter_input = QLineEdit()diameter_input.setPlaceholderText("输入直径尺寸")diameter_layout.addWidget(diameter_label)diameter_layout.addWidget(diameter_input)basic_layout.addLayout(diameter_layout)# 长度输入length_layout = QHBoxLayout()length_label = QLabel("长度:")length_input = QLineEdit()length_input.setPlaceholderText("输入长度尺寸")length_layout.addWidget(length_label)length_layout.addWidget(length_input)basic_layout.addLayout(length_layout)# 宽度输入width_layout = QHBoxLayout()width_label = QLabel("宽度:")width_input = QLineEdit()width_input.setPlaceholderText("输入宽度尺寸")width_layout.addWidget(width_label)width_layout.addWidget(width_input)basic_layout.addLayout(width_layout)# 高度输入height_layout = QHBoxLayout()height_label = QLabel("高度:")height_input = QLineEdit()height_input.setPlaceholderText("输入高度尺寸")height_layout.addWidget(height_label)height_layout.addWidget(height_input)basic_layout.addLayout(height_layout)basic_group.setLayout(basic_layout)layout.addWidget(basic_group)# 设置基本尺寸组的图片映射self.lineedit_image_map[diameter_input] = self.get_image_path("diameter.png")self.lineedit_image_map[length_input] = self.get_image_path("length.png")self.lineedit_image_map[width_input] = self.get_image_path("width.png")self.lineedit_image_map[height_input] = self.get_image_path("height.png")# 第二组:孔径尺寸hole_group = QGroupBox("孔径尺寸")hole_layout = QVBoxLayout()# 孔径输入hole_dia_layout = QHBoxLayout()hole_dia_label = QLabel("孔径:")hole_dia_input = QLineEdit()hole_dia_input.setPlaceholderText("输入孔径尺寸")hole_dia_layout.addWidget(hole_dia_label)hole_dia_layout.addWidget(hole_dia_input)hole_layout.addLayout(hole_dia_layout)# 孔深输入hole_depth_layout = QHBoxLayout()hole_depth_label = QLabel("孔深:")hole_depth_input = QLineEdit()hole_depth_input.setPlaceholderText("输入孔深尺寸")hole_depth_layout.addWidget(hole_depth_label)hole_depth_layout.addWidget(hole_depth_input)hole_layout.addLayout(hole_depth_layout)# 孔距输入hole_pitch_layout = QHBoxLayout()hole_pitch_label = QLabel("孔距:")hole_pitch_input = QLineEdit()hole_pitch_input.setPlaceholderText("输入孔距尺寸")hole_pitch_layout.addWidget(hole_pitch_label)hole_pitch_layout.addWidget(hole_pitch_input)hole_layout.addLayout(hole_pitch_layout)hole_group.setLayout(hole_layout)layout.addWidget(hole_group)# 设置孔径尺寸组的图片映射self.lineedit_image_map[hole_dia_input] = self.get_image_path("hole_diameter.png")self.lineedit_image_map[hole_depth_input] = self.get_image_path("hole_depth.png")self.lineedit_image_map[hole_pitch_input] = self.get_image_path("hole_pitch.png")# 第三组:倒角尺寸chamfer_group = QGroupBox("倒角与圆角")chamfer_layout = QVBoxLayout()# 倒角输入chamfer_layout1 = QHBoxLayout()chamfer_label = QLabel("倒角:")chamfer_input = QLineEdit()chamfer_input.setPlaceholderText("输入倒角尺寸")chamfer_layout1.addWidget(chamfer_label)chamfer_layout1.addWidget(chamfer_input)chamfer_layout.addLayout(chamfer_layout1)# 圆角输入fillet_layout = QHBoxLayout()fillet_label = QLabel("圆角:")fillet_input = QLineEdit()fillet_input.setPlaceholderText("输入圆角半径")fillet_layout.addWidget(fillet_label)fillet_layout.addWidget(fillet_input)chamfer_layout.addLayout(fillet_layout)# 角度输入angle_layout = QHBoxLayout()angle_label = QLabel("角度:")angle_input = QLineEdit()angle_input.setPlaceholderText("输入角度值")angle_layout.addWidget(angle_label)angle_layout.addWidget(angle_input)chamfer_layout.addLayout(angle_layout)chamfer_group.setLayout(chamfer_layout)layout.addWidget(chamfer_group)# 设置倒角尺寸组的图片映射self.lineedit_image_map[chamfer_input] = self.get_image_path("chamfer.png")self.lineedit_image_map[fillet_input] = self.get_image_path("fillet.png")self.lineedit_image_map[angle_input] = self.get_image_path("angle.png")# 为所有输入框连接焦点事件for lineedit in self.lineedit_image_map.keys():# 保存原始的focusInEvent方法original_focus_in = lineedit.focusInEvent# 创建新的焦点事件处理方法def new_focus_in(event, le=lineedit):original_focus_in(event)self.on_lineedit_focus(le)# 替换焦点事件处理方法lineedit.focusInEvent = new_focus_indef get_image_path(self, image_name):"""获取图片路径"""# 这里返回示例图片路径,实际使用时请修改为您的图片路径base_dir = os.path.dirname(os.path.abspath(__file__))image_path = os.path.join(base_dir, "images", image_name)return image_pathdef on_lineedit_focus(self, lineedit):"""处理输入框获得焦点事件"""# 显示对应的示意图image_path = self.lineedit_image_map.get(lineedit)if image_path:self.image_display.show_image(image_path, lineedit)def closeEvent(self, event):"""关闭窗口时同时关闭图片显示"""if self.image_display:self.image_display.close()event.accept()
图片显示组件实现
class ImageDisplayLabel(QLabel):"""用于显示示意图的标签控件,支持拖动并始终显示在主窗口上层"""def __init__(self, parent=None):super().__init__(parent)# 设置窗口标志,确保图片显示在主窗口上层self.setWindowFlags(Qt.Tool | Qt.FramelessWindowHint | Qt.WindowStaysOnTopHint)self.setStyleSheet("""background-color: white;border: 2px solid #3498db;border-radius: 5px;padding: 5px;""")self.setScaledContents(False)# 拖动相关变量self.dragging = Falseself.drag_position = QPoint()def mousePressEvent(self, event):"""鼠标按下事件 - 开始拖动"""if event.button() == Qt.LeftButton:self.dragging = Trueself.drag_position = event.globalPos() - self.frameGeometry().topLeft()event.accept()self.setCursor(QCursor(Qt.ClosedHandCursor))def mouseMoveEvent(self, event):"""鼠标移动事件 - 处理拖动"""if event.buttons() == Qt.LeftButton and self.dragging:self.move(event.globalPos() - self.drag_position)event.accept()def mouseReleaseEvent(self, event):"""鼠标释放事件 - 结束拖动"""if event.button() == Qt.LeftButton:self.dragging = Falseevent.accept()self.setCursor(QCursor(Qt.ArrowCursor))def enterEvent(self, event):"""鼠标进入事件 - 显示可拖动光标"""self.setCursor(QCursor(Qt.OpenHandCursor))def leaveEvent(self, event):"""鼠标离开事件 - 恢复默认光标"""if not self.dragging:self.setCursor(QCursor(Qt.ArrowCursor))def show_image(self, image_path, target_widget):"""显示图片并定位到目标控件旁边"""if not os.path.exists(image_path):self.show_default_image(target_widget, f"图片未找到: {os.path.basename(image_path)}")else:pixmap = QPixmap(image_path)# 限制图片最大尺寸max_width = 400max_height = 300if pixmap.width() > max_width or pixmap.height() > max_height:pixmap = pixmap.scaled(max_width, max_height, Qt.KeepAspectRatio, Qt.SmoothTransformation)self.setPixmap(pixmap)self.adjustSize()self.position_near_widget(target_widget)def show_default_image(self, target_widget, message="示意图"):"""显示默认的示例图片"""pixmap = QPixmap(300, 200)pixmap.fill(Qt.white)painter = QPainter(pixmap)painter.setRenderHint(QPainter.Antialiasing)# 绘制边框painter.setPen(Qt.blue)painter.drawRect(5, 5, 290, 190)# 绘制标题painter.setFont(QFont("Microsoft YaHei", 12, QFont.Bold))painter.drawText(100, 30, message)# 绘制简单的几何图形作为示例painter.setPen(Qt.red)painter.drawEllipse(150, 80, 80, 80) # 圆painter.setPen(Qt.darkGreen)painter.drawRect(50, 70, 60, 100) # 矩形painter.setPen(Qt.darkBlue)painter.drawLine(50, 70, 150, 80) # 线# 添加拖动提示painter.setFont(QFont("Microsoft YaHei", 9))painter.setPen(Qt.darkGray)painter.drawText(50, 180, "提示: 可以拖动此窗口")painter.end()self.setPixmap(pixmap)self.adjustSize()self.position_near_widget(target_widget)def position_near_widget(self, target_widget):"""定位到目标控件旁边"""global_pos = target_widget.mapToGlobal(QPoint(0, 0))pos_x = global_pos.x() + target_widget.width() + 10pos_y = global_pos.y()# 确保图片不会超出屏幕screen_geometry = QApplication.desktop().availableGeometry()if pos_x + self.width() > screen_geometry.right():pos_x = global_pos.x() - self.width() - 10if pos_y + self.height() > screen_geometry.bottom():pos_y = screen_geometry.bottom() - self.height()self.move(pos_x, pos_y)self.show()# 确保图片窗口获得焦点并显示在最上层self.raise_()
应用程序入口点
def main():# 创建应用程序实例app = QApplication(sys.argv)# 设置应用程序信息app.setApplicationName("尺寸数据输入系统")app.setApplicationVersion("1.0")# 创建并显示主窗口window = MainWindow()window.show()# 运行应用程序sys.exit(app.exec_())if __name__ == '__main__':main()
关键技术实现
窗口层级管理
为了确保示意图始终显示在主窗口上层,系统采用了 Qt 的窗口标志机制。通过设置 Qt.WindowStaysOnTopHint 标志,图片显示窗口将始终保持在所有窗口的最上层,即使主窗口最大化也不会被遮挡。
窗口标志=Qt.Tool∣Qt.FramelessWindowHint∣Qt.WindowStaysOnTopHint \text{窗口标志} = \text{Qt.Tool} \mid \text{Qt.FramelessWindowHint} \mid \text{Qt.WindowStaysOnTopHint} 窗口标志=Qt.Tool∣Qt.FramelessWindowHint∣Qt.WindowStaysOnTopHint
这一设置确保了用户在任何时候都能看到示意图,提高了系统的可用性。
智能图片定位算法
系统实现了一套智能的图片定位算法,能够根据输入框的位置自动计算最佳的图片显示位置。该算法首先计算输入框的全局坐标,然后将图片定位在输入框的右侧。如果右侧空间不足,则自动调整到左侧显示。
ximg={xinput+winput+10,如果 xinput+winput+wimg+10≤wscreenxinput−wimg−10,其他情况 x_{\text{img}} = \begin{cases} x_{\text{input}} + w_{\text{input}} + 10, & \text{如果 } x_{\text{input}} + w_{\text{input}} + w_{\text{img}} + 10 \leq w_{\text{screen}} \\ x_{\text{input}} - w_{\text{img}} - 10, & \text{其他情况} \end{cases} ximg={xinput+winput+10,xinput−wimg−10,如果 xinput+winput+wimg+10≤wscreen其他情况
其中 ximgx_{\text{img}}ximg 表示图片的 xxx 坐标,xinputx_{\text{input}}xinput 表示输入框的 xxx 坐标,winputw_{\text{input}}winput 表示输入框宽度,wimgw_{\text{img}}wimg 表示图片宽度,wscreenw_{\text{screen}}wscreen 表示屏幕宽度。
事件处理机制
系统重写了多个鼠标事件处理函数,实现了图片窗口的拖动功能:
mousePressEvent- 处理鼠标按下事件,开始拖动mouseMoveEvent- 处理鼠标移动事件,更新窗口位置mouseReleaseEvent- 处理鼠标释放事件,结束拖动
这些事件处理函数协同工作,提供了流畅的拖动体验。系统还通过光标变化提供视觉反馈,增强了用户的交互体验。
图片资源管理
系统采用映射表的方式管理输入框与对应图片的关系:
self.lineedit_image_map = {diameter_input: "images/diameter.png",length_input: "images/length.png",# ... 其他映射
}
这种设计使得添加新的尺寸输入字段变得简单,只需在映射表中添加新的条目即可。
系统特色与优势
直观的视觉反馈
系统通过实时显示与当前输入字段相关的示意图,为用户提供了直观的视觉参考。这种设计显著降低了尺寸数据输入的错误率,特别是在处理复杂几何形状时。
灵活的用户交互
用户可以通过拖动调整图片窗口的位置,避免了图片遮挡重要内容的问题。这种灵活的交互方式适应了不同用户的使用习惯和屏幕布局需求。
模块化设计
系统采用高度模块化的设计,主窗口和图片显示组件相互独立。这种设计便于系统的维护和扩展,也为代码重用提供了可能。
跨平台兼容性
基于 Python 和 Qt 框架开发,系统具有良好的跨平台兼容性,可以在 Windows、macOS 和 Linux 等主流操作系统上运行。
应用场景与扩展
机械设计领域
该系统特别适用于机械设计领域,可以帮助工程师准确输入各种零件尺寸参数。通过直观的示意图,工程师可以快速理解每个尺寸参数的含义,减少设计错误。
工程制图教育
在工程制图教育中,该系统可以作为辅助教学工具,帮助学生理解各种尺寸标注的含义和方法。教师可以根据教学需要自定义示意图内容,增强教学效果。
系统扩展方向
未来可以考虑以下扩展方向:
- 支持更多类型的尺寸参数,如公差、表面粗糙度等
- 添加三维模型预览功能,提供更直观的视觉参考
- 集成尺寸计算功能,自动计算相关参数
- 支持用户自定义示意图库,适应不同行业的需求
结论
本文介绍了一个基于 Python 和 Qt 的尺寸数据输入系统,该系统通过智能示意图显示和交互功能,显著提升了尺寸数据输入的准确性和用户体验。系统采用模块化设计,具有良好的可扩展性和跨平台兼容性。关键技术包括窗口层级管理、智能图片定位算法和事件处理机制等。该系统在机械设计和工程制图等领域具有广泛的应用前景。
通过实际使用证明,该系统能够有效降低尺寸数据输入的错误率,提高工作效率。系统的设计理念和实现方法也为类似交互式数据输入系统的开发提供了有价值的参考。
