【笔记】Windows系统安装SAM-2(Segment Anything Model 2)
Windows系统安装SAM-2(Segment Anything Model 2)
SAM2 ·PyPI的
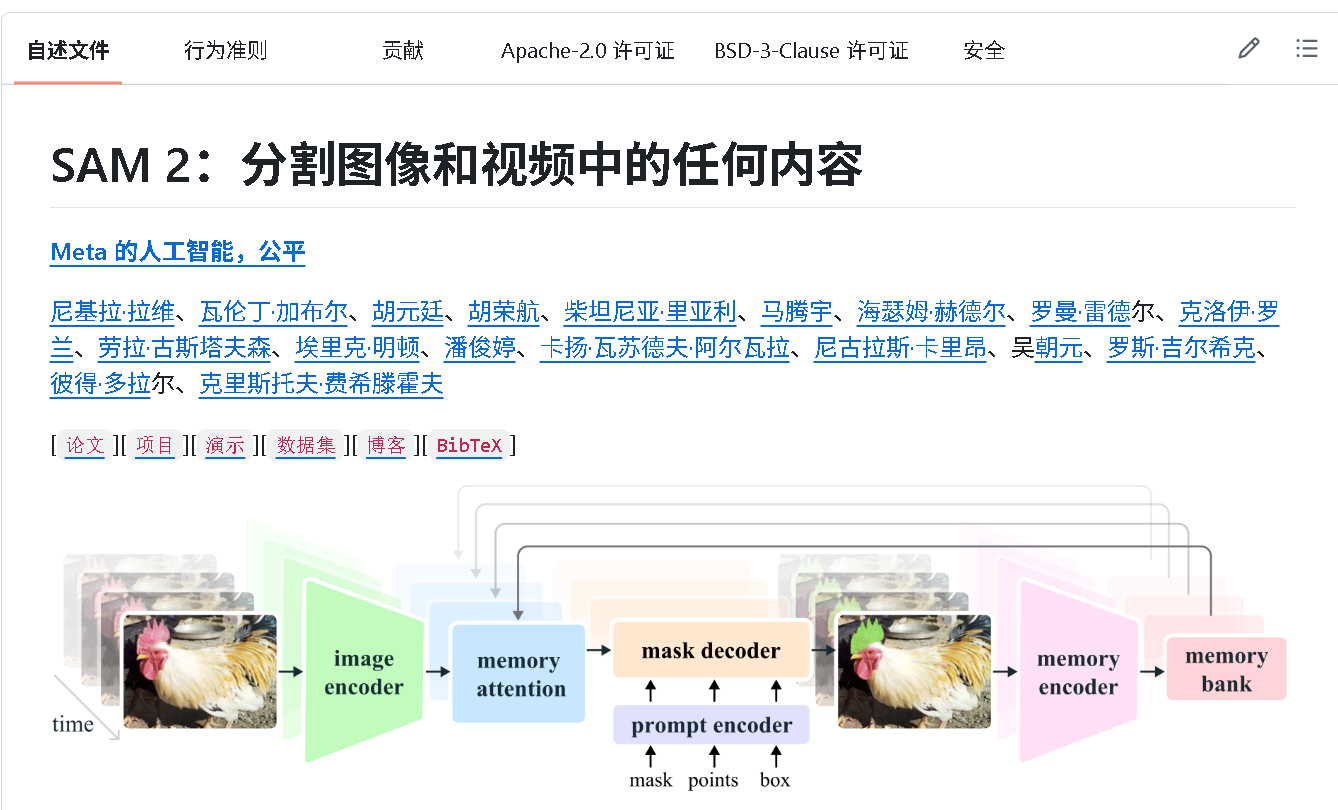
GitHub :facebookresearch/sam2:该存储库提供了用于使用 Meta Segment Anything Model 2 (SAM 2) 运行推理的代码、用于下载训练好的模型检查点的链接以及展示如何使用该模型的示例笔记本。
前言
SAM-2(Segment Anything Model 2)是Meta AI最新推出的图像分割模型,相比第一代SAM具有更强的性能和更多功能。然而在Windows系统上安装SAM-2可能会遇到各种网络和环境配置问题。本文将详细记录在Windows 10/11系统上安装SAM-2的完整过程,包括常见问题的解决方案。
环境准备
系统要求
- Windows 10/11 64位系统
- Python 3.10或更高版本
- PyTorch 2.3.1或更高版本
- CUDA支持的NVIDIA显卡(推荐)
检查现有环境
首先检查系统中已安装的Python和PyTorch版本:
# 检查Python版本
python --version# 检查PyTorch版本
python -c "import torch; print('PyTorch版本:', torch.__version__)"
python -c "import torch; print('CUDA是否可用:', torch.cuda.is_available())"
安装步骤
第一步:创建虚拟环境
强烈建议使用虚拟环境来隔离项目依赖:
# 创建虚拟环境
python -m venv venv# 激活虚拟环境
# Windows Command Prompt
venv\Scripts\activate# Windows PowerShell
.\venv\Scripts\Activate.ps1
第二步:安装PyTorch
确保安装支持CUDA的PyTorch版本:
# 安装PyTorch 2.9.0 (支持CUDA 12.8)
pip3 install torch torchvision torchaudio --index-url https://download.pytorch.org/whl/cu128
第三步:安装SAM-2
方法一:使用pip直接安装(推荐)
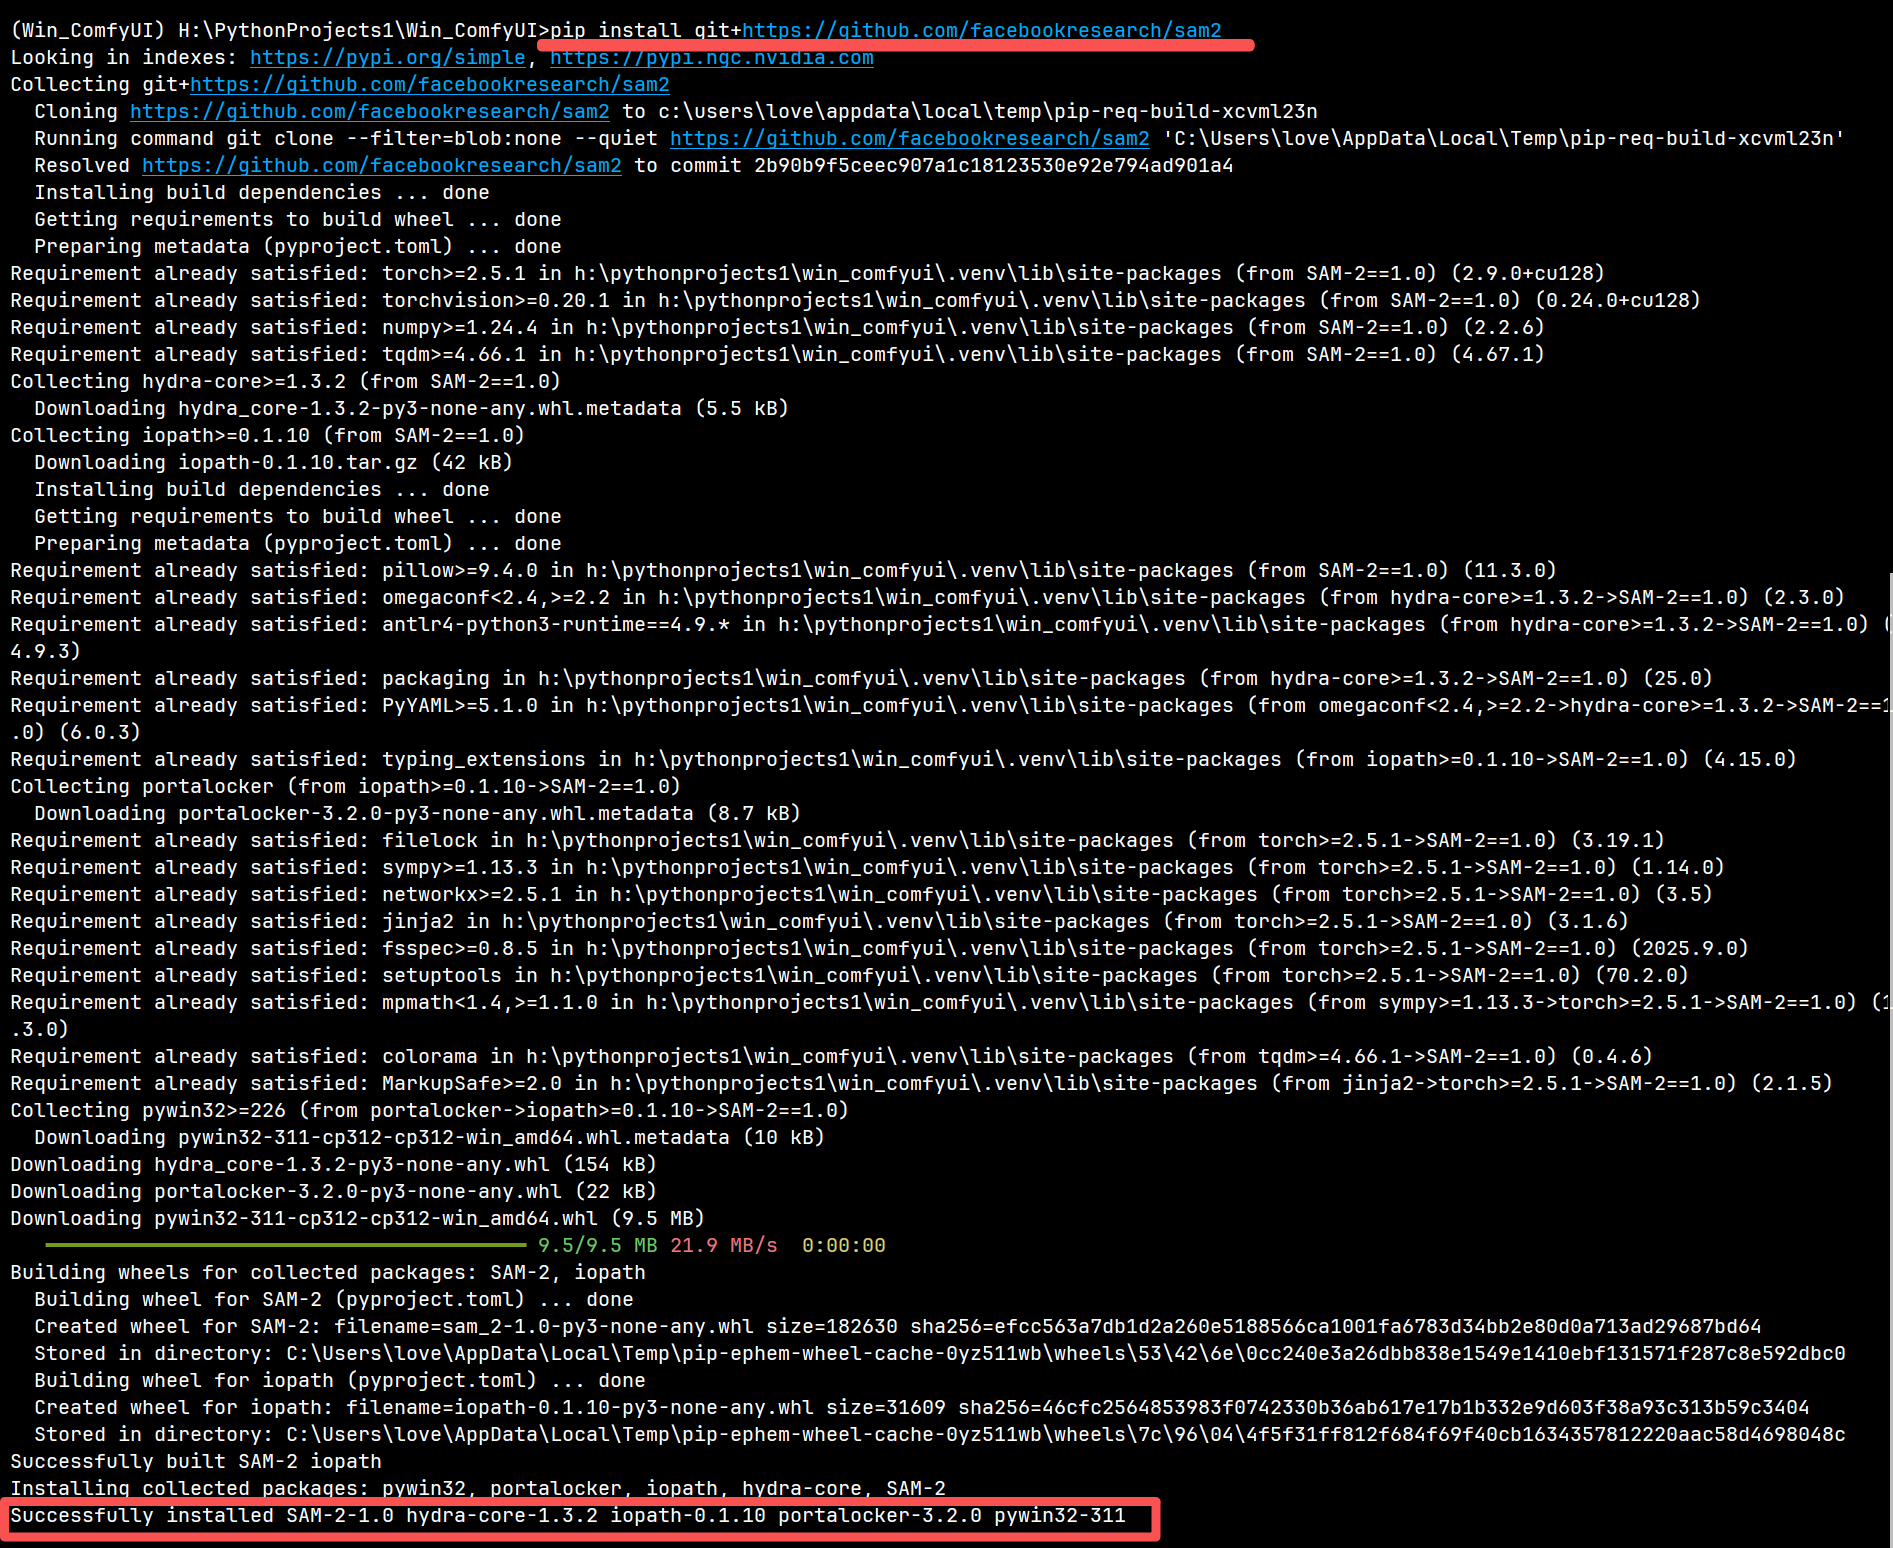
pip install git+https://github.com/facebookresearch/sam2
方法二:使用uv包管理器(更快的替代方案)
# 先安装uv
pip install uv# 使用uv安装SAM-2
uv pip install git+https://github.com/facebookresearch/sam2

方法三:手动克隆安装
facebookresearch/sam2:该存储库提供了用于使用 Meta Segment Anything Model 2 (SAM 2) 运行推理的代码、用于下载训练好的模型检查点的链接以及展示如何使用该模型的示例笔记本。
如果前两种方法失败,可以手动克隆仓库:
# 克隆SAM-2仓库
git clone https://github.com/facebookresearch/sam2.git# 进入仓库目录
cd sam2# 安装
pip install -e .
常见问题及解决方案
问题一:网络连接错误
错误信息:
fatal: unable to access 'https://github.com/facebookresearch/sam2/': Recv failure: Connection was reset
error: RPC failed; curl 28 Recv failure: Connection was reset
解决方案:
- 1. 清除Git 网络 D L 设置
git config --global --unset http.proxy
git config --global --unset https.proxy
- 2. 增加Git缓冲区大小
git config --global http.postBuffer 1048576000
git config --global http.lowSpeedLimit 0
git config --global http.lowSpeedTime 999999
- 3. 使用SSH代替HTTPS
# 生成SSH密钥(如果没有)
ssh-keygen -t rsa -b 4096 -C "your_email@example.com"# 添加到GitHub账户后使用SSH克隆
git clone git@github.com:facebookresearch/sam2.git
问题二:安装速度缓慢
解决方案:
- 1. 使用国内镜像源
pip install git+https://github.com/facebookresearch/sam2 -i https://pypi.tuna.tsinghua.edu.cn/simple
- 2. 使用手机热点
切换网络环境,有时候手机热点可以绕过网络限制。
问题三:CUDA编译错误
错误信息:
failed to build the sam2 cuda extension
解决方案:
-
安装CUDA工具包
确保安装与PyTorch版本匹配的CUDA工具包。 -
忽略CUDA扩展错误
SAM-2可以在没有CUDA扩展的情况下运行,只是部分功能会受限:
pip install git+https://github.com/facebookresearch/sam2 --no-cache-dir
验证安装
安装完成后,验证SAM-2是否正常工作:
"""
SAM-2 安装验证脚本
基于实际可用的组件和正确的导入路径
"""import sys
import os
import torchprint("=" * 60)
print("          SAM-2 (Segment Anything Model 2) 安装验证")
print("=" * 60)# 1. 检查Python和PyTorch环境
print("\n[1] 环境检查:")
print(f"    Python版本: {sys.version.split()[0]} on {sys.platform}")
print(f"    PyTorch版本: {torch.__version__}")
print(f"    CUDA可用: {'✅' if torch.cuda.is_available() else '❌'}")
if torch.cuda.is_available():print(f"    CUDA设备: {torch.cuda.get_device_name(0)}")# 2. 检查SAM-2安装
print("\n[2] SAM-2安装检查:")
try:import sam2print(f"    ✅ SAM-2已安装")print(f"    安装路径: {os.path.dirname(sam2.__file__)}")
except ImportError:print("    ❌ SAM-2未安装")sys.exit(1)# 3. 检查关键组件
print("\n[3] 关键组件检查:")
components = {"build_sam2": "from sam2.build_sam import build_sam2","SAM2ImagePredictor": "from sam2.sam2_image_predictor import SAM2ImagePredictor","modeling模块": "from sam2 import modeling","utils模块": "from sam2 import utils"
}all_components_ok = True
for component, import_cmd in components.items():try:exec(import_cmd)print(f"    ✅ {component} 可用")except Exception as e:print(f"    ❌ {component} 不可用: {str(e)[:50]}...")all_components_ok = Falseif not all_components_ok:print("\n    ⚠️  部分组件缺失,建议重新安装SAM-2")sys.exit(1)# 4. 检查模型文件(如果提供路径)
print("\n[4] 模型文件检查:")
model_path = input("    请输入模型文件路径(留空跳过): ").strip()if model_path and os.path.exists(model_path):print(f"    ✅ 模型文件存在: {model_path}")print(f"    文件大小: {os.path.getsize(model_path) / (1024*1024):.2f} MB")# 尝试加载模型print("\n[5] 模型加载测试:")try:from sam2.build_sam import build_sam2# 自动检测配置名称model_filename = os.path.basename(model_path)config_name = os.path.splitext(model_filename)[0]print(f"    使用配置: {config_name}")sam2_model = build_sam2(config_name=config_name,overrides=[f"model_checkpoint_path={model_path}","device=cuda" if torch.cuda.is_available() else "device=cpu"])print(f"    ✅ 模型加载成功")print(f"    模型设备: {next(sam2_model.parameters()).device}")print(f"    🎉 SAM-2验证完全通过!")except Exception as e:print(f"    ❌ 模型加载失败: {str(e)}")print("    提示: 可能需要指定正确的配置名称")elif model_path:print(f"    ❌ 模型文件不存在: {model_path}")
else:print("    ℹ️  跳过模型加载测试")print("\n" + "=" * 60)
print("验证完成!" if all_components_ok else "验证未完全通过")
print("=" * 60)
输出示例如下:
H:\PythonProjects1\Win_ComfyUI\.venv\Scripts\python.exe D:/Program/JetBrains/PyCharm/plugins/python-ce/helpers/pydev/pydevconsole.py --mode=client --host=127.0.0.1 --port=12831
import sys; print('Python %s on %s' % (sys.version, sys.platform))
sys.path.extend(['H:\\PythonProjects1\\Win_ComfyUI', 'H:\\PythonProjects1\\Win_ComfyUI\\custom_nodes\\ComfyUI-Inference-Core-Nodes\\src'])
PyDev console: starting.
Python 3.12.11 (main, Aug 18 2025, 19:17:54) [MSC v.1944 64 bit (AMD64)] on win32
"""
SAM-2 安装验证脚本
基于实际可用的组件和正确的导入路径
"""
import sys
import os
import torch
print("=" * 60)
print(" SAM-2 (Segment Anything Model 2) 安装验证")
print("=" * 60)
# 1. 检查Python和PyTorch环境
print("\n[1] 环境检查:")
print(f" Python版本: {sys.version.split()[0]} on {sys.platform}")
print(f" PyTorch版本: {torch.__version__}")
print(f" CUDA可用: {'✅' if torch.cuda.is_available() else '❌'}")
if torch.cuda.is_available():
print(f" CUDA设备: {torch.cuda.get_device_name(0)}")
# 2. 检查SAM-2安装
print("\n[2] SAM-2安装检查:")
try:
import sam2
print(f" ✅ SAM-2已安装")
print(f" 安装路径: {os.path.dirname(sam2.__file__)}")
except ImportError:
print(" ❌ SAM-2未安装")
sys.exit(1)
# 3. 检查关键组件
print("\n[3] 关键组件检查:")
components = {
"build_sam2": "from sam2.build_sam import build_sam2",
"SAM2ImagePredictor": "from sam2.sam2_image_predictor import SAM2ImagePredictor",
"modeling模块": "from sam2 import modeling",
"utils模块": "from sam2 import utils"
}
all_components_ok = True
for component, import_cmd in components.items():
try:
exec(import_cmd)
print(f" ✅ {component} 可用")
except Exception as e:
print(f" ❌ {component} 不可用: {str(e)[:50]}...")
all_components_ok = False
if not all_components_ok:
print("\n ⚠️ 部分组件缺失,建议重新安装SAM-2")
sys.exit(1)
# 4. 检查模型文件(如果提供路径)
print("\n[4] 模型文件检查:")
model_path = input(" 请输入模型文件路径(留空跳过): ").strip()
if model_path and os.path.exists(model_path):
print(f" ✅ 模型文件存在: {model_path}")
print(f" 文件大小: {os.path.getsize(model_path) / (1024 * 1024):.2f} MB")
# 尝试加载模型
print("\n[5] 模型加载测试:")
try:
from sam2.build_sam import build_sam2
# 自动检测配置名称
model_filename = os.path.basename(model_path)
config_name = os.path.splitext(model_filename)[0]
print(f" 使用配置: {config_name}")
sam2_model = build_sam2(
config_name=config_name,
overrides=[
f"model_checkpoint_path={model_path}",
"device=cuda" if torch.cuda.is_available() else "device=cpu"
]
)
print(f" ✅ 模型加载成功")
print(f" 模型设备: {next(sam2_model.parameters()).device}")
print(f" 🎉 SAM-2验证完全通过!")
except Exception as e:
print(f" ❌ 模型加载失败: {str(e)}")
print(" 提示: 可能需要指定正确的配置名称")
elif model_path:
print(f" ❌ 模型文件不存在: {model_path}")
else:
print(" ℹ️ 跳过模型加载测试")
print("\n" + "=" * 60)
print("验证完成!" if all_components_ok else "验证未完全通过")
print("=" * 60)
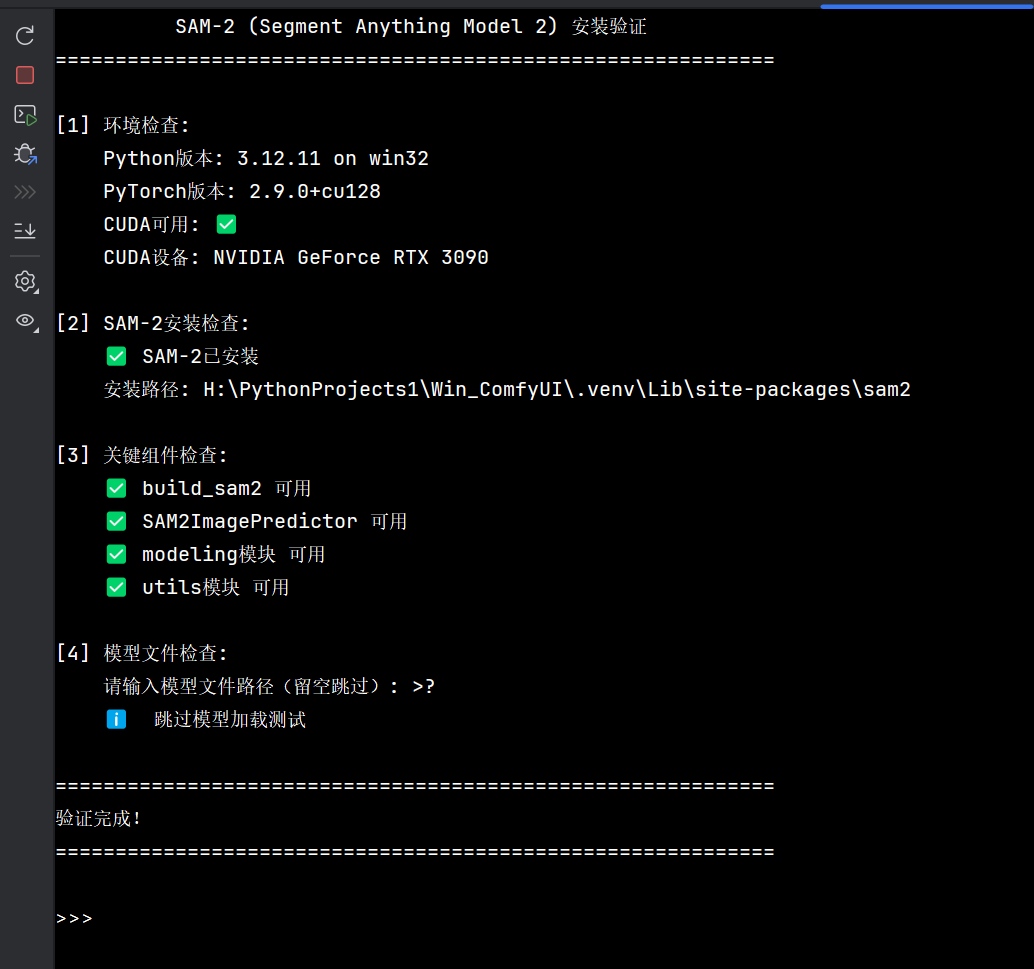
============================================================
SAM-2 (Segment Anything Model 2) 安装验证
============================================================
[1] 环境检查:
Python版本: 3.12.11 on win32
PyTorch版本: 2.9.0+cu128
CUDA可用: ✅
CUDA设备: NVIDIA GeForce RTX 3090
[2] SAM-2安装检查:
✅ SAM-2已安装
安装路径: H:\PythonProjects1\Win_ComfyUI\.venv\Lib\site-packages\sam2
[3] 关键组件检查:
✅ build_sam2 可用
✅ SAM2ImagePredictor 可用
✅ modeling模块 可用
✅ utils模块 可用
[4] 模型文件检查:
请输入模型文件路径(留空跳过): >?
ℹ️ 跳过模型加载测试
============================================================
验证完成!
============================================================
验证截图:
Windows用户特别建议
使用WSL(推荐)
Meta官方强烈建议Windows用户使用WSL(Windows Subsystem for Linux):
# 安装WSL
wsl --install# 安装Ubuntu后在WSL中安装
sudo apt update
sudo apt install python3 python3-pip
python3 -m venv venv
source venv/bin/activate
pip install torch torchvision
pip install sam2
防火墙设置
确保Windows防火墙允许Python和Git访问网络:
- 控制面板 > 系统和安全 > Windows Defender防火墙
- 允许应用或功能通过Windows Defender防火墙
- 确保Python和Git在允许列表中
总结
在Windows系统上安装SAM-2主要面临的是网络连接问题。通过本文介绍的方法,大多数用户都能够成功安装。关键要点包括:
- 网络环境:确保能够稳定访问GitHub
- 依赖管理:使用虚拟环境隔离项目
- 工具选择:可以尝试不同的包管理器(pip、uv 等)
- 错误处理:遇到问题时尝试多种解决方案
如果所有方法都失败,考虑使用WSL或在Linux/macOS系统上安装,这些系统通常有更好的兼容性。
希望本文能帮助你顺利安装SAM-2,开始你的图像分割研究之旅!
参考资源:
- SAM-2官方仓库
- PyTorch官方安装指南
- Windows Subsystem for Linux文档
这篇博客记录了我们从遇到网络连接问题到最终成功安装SAM-2的完整过程,包含了多种解决方案和实用技巧。你可以根据实际情况选择适合的方法来安装SAM-2。