实现qq邮箱发送验证码登录
实现qq邮箱发送验证码登录
一、前提准备(获取授权码)
打开qq邮箱,选择账号与安全
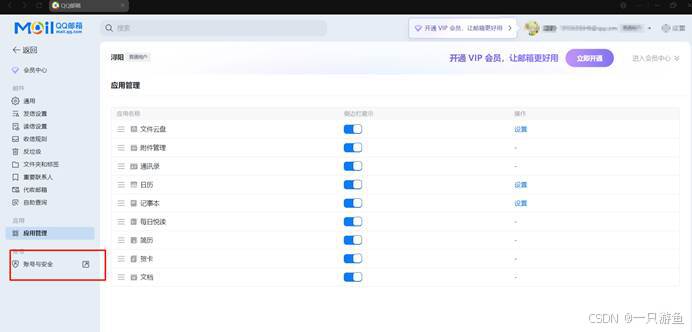
选择安全设置,设置打开POP3/IMAP/SMTP/Exchange/CardDAV/CalDAV服务,点击获取授权码,之后按照要求验证获取即可。

二、需要的依赖和配置
除了正常的数据库连接依赖、MyBatis Plus和redis依赖以外还需要spring boot 内置的邮件依赖:
<!-- 邮件 -->
<dependency><groupId>org.springframework.boot</groupId><artifactId>spring-boot-starter-mail</artifactId>
</dependency>
配置需要的配置:
mail:host: smtp.qq.comport: 465username: (你的qq邮箱)password: (你的授权码)protocol: smtpsproperties:mail.smtp.auth: truemail.smtp.ssl.enable: truedata:redis:host: localhostport: 6379三、邮件的工具类
创建MailUtil 工具类
@Component
public class MailUtil {@Autowiredprivate JavaMailSender mailSender;
// 发送邮件public void sendMail(String to, String subject, String text) {SimpleMailMessage message = new SimpleMailMessage();message.setFrom("(你的qq邮箱)");message.setTo(to);message.setSubject(subject);message.setText(text);mailSender.send(message);}
}四、创建控制类、服务类、mapper层
为了考虑到效率,这里用到了redis 临时存储钥匙:
控制器:
@GetMapping("/sendCode")
public String sendCode(@RequestParam String email) {String key = "login:code:" + email;String cooldownKey = "login:cooldown:" + email;// 生成验证码String code = String.valueOf(100000 + new Random().nextInt(900000));if (Boolean.TRUE.equals(redisTemplate.hasKey(cooldownKey))) {return "发送过于频繁,请稍后再试。";}// 检查 Redis 中是否已有未过期验证码if (Boolean.TRUE.equals(redisTemplate.hasKey(key))) {return "验证码未过期,请检查您的邮箱。";}redisTemplate.opsForValue().set(cooldownKey, "1", 60, TimeUnit.SECONDS);try {// 发送邮件mailUtil.sendMail(email, "登录验证码", "您的验证码是:" + code + ",5分钟内有效。");// 邮件发送成功后再写入 RedisredisTemplate.opsForValue().set(key, code, 5, TimeUnit.MINUTES);} catch (Exception e) {e.printStackTrace();return "邮件发送失败,请稍后重试。";}return "验证码已发送到 " + email;
}@PostMapping("/login")
public String login(@RequestParam String email, @RequestParam String code) {String redisCode = redisTemplate.opsForValue().get("login:code:" + email);if (redisCode == null) {return "验证码已过期";}if (!redisCode.equals(code)) {return "验证码错误";}User user = userService.getOrCreateByEmail(email);redisTemplate.delete("login:code:" + email);return "登录成功,欢迎 " + user.getNickname();
}
Mapper
@Mapper
public interface UserMapper extends BaseMapper<User> {
}
服务类:
public interface UserService extends IService<User> {User getOrCreateByEmail(String email);
}
@Service
public class UserServiceImpl extends ServiceImpl<UserMapper, User> implements UserService {@Overridepublic User getOrCreateByEmail(String email) {User user = getOne(new QueryWrapper<User>().eq("email", email));if (user == null) {user = new User();user.setEmail(email);user.setNickname("用户" + email.substring(0, email.indexOf('@')));user.setStatus(1);user.setCreateTime(LocalDateTime.now());user.setUpdateTime(LocalDateTime.now());save(user);}return user;}
}
实体类:
@Data
@TableName("user")
public class User {@TableId(type = IdType.AUTO)private Long id;private String email;private String nickname;private String avatar;private Integer status;private LocalDateTime createTime;private LocalDateTime updateTime;
}
自然也需要创建相应的表用来持久化存储、jwt token验证等等,,不过,这里我们只将如何实现关联qq邮箱的逻辑。。就不多说了。
五、试验
启动redis 与项目,
在浏览器中请求
http://localhost:9060/login/sendCode?email=你要发送邮件的qq号
查看邮箱的验证码:
比如我这里是 939544
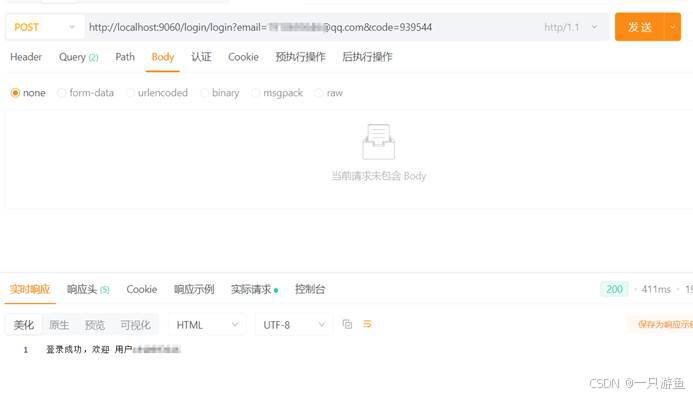
任意一个api测试工具,postman什么都可以,我这里是apipost:
http://localhost:9060/login/login?email=你的邮箱&code=939544
发送post请求,可以看到登录成功:
六、自定义邮件样式
有时候大家会看到一些有着自定义布局的邮件,比如:
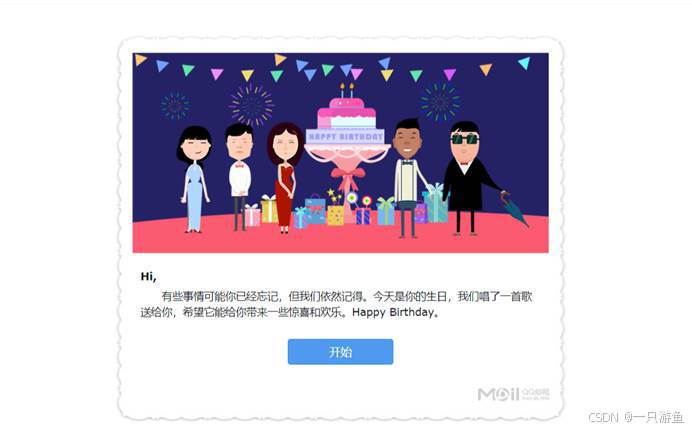
那么如何实现这样的效果呢?
大家可以看看我的另一篇文章邮件登录之自定义邮件-CSDN博客