Spring AI Alibaba 【三】
1. 格式化输出(Structured Output)
如果您想从 LLM 接收结构化输出,Structured Output 可以协助将 ChatModel/ChatClient 方法的返回类型从 String 更改为其他类型。
LLM 生成结构化输出的能力对于依赖可靠解析输出值的下游应用程序非常重要。开发人员希望快速将 AI 模型的结果转换为可以传递给其他应用程序函数和方法的数据类型,例如 JSON、XML 或 Java 类。Spring AI 结构化输出转换器有助于将 LLM 输出转换为结构化格式。
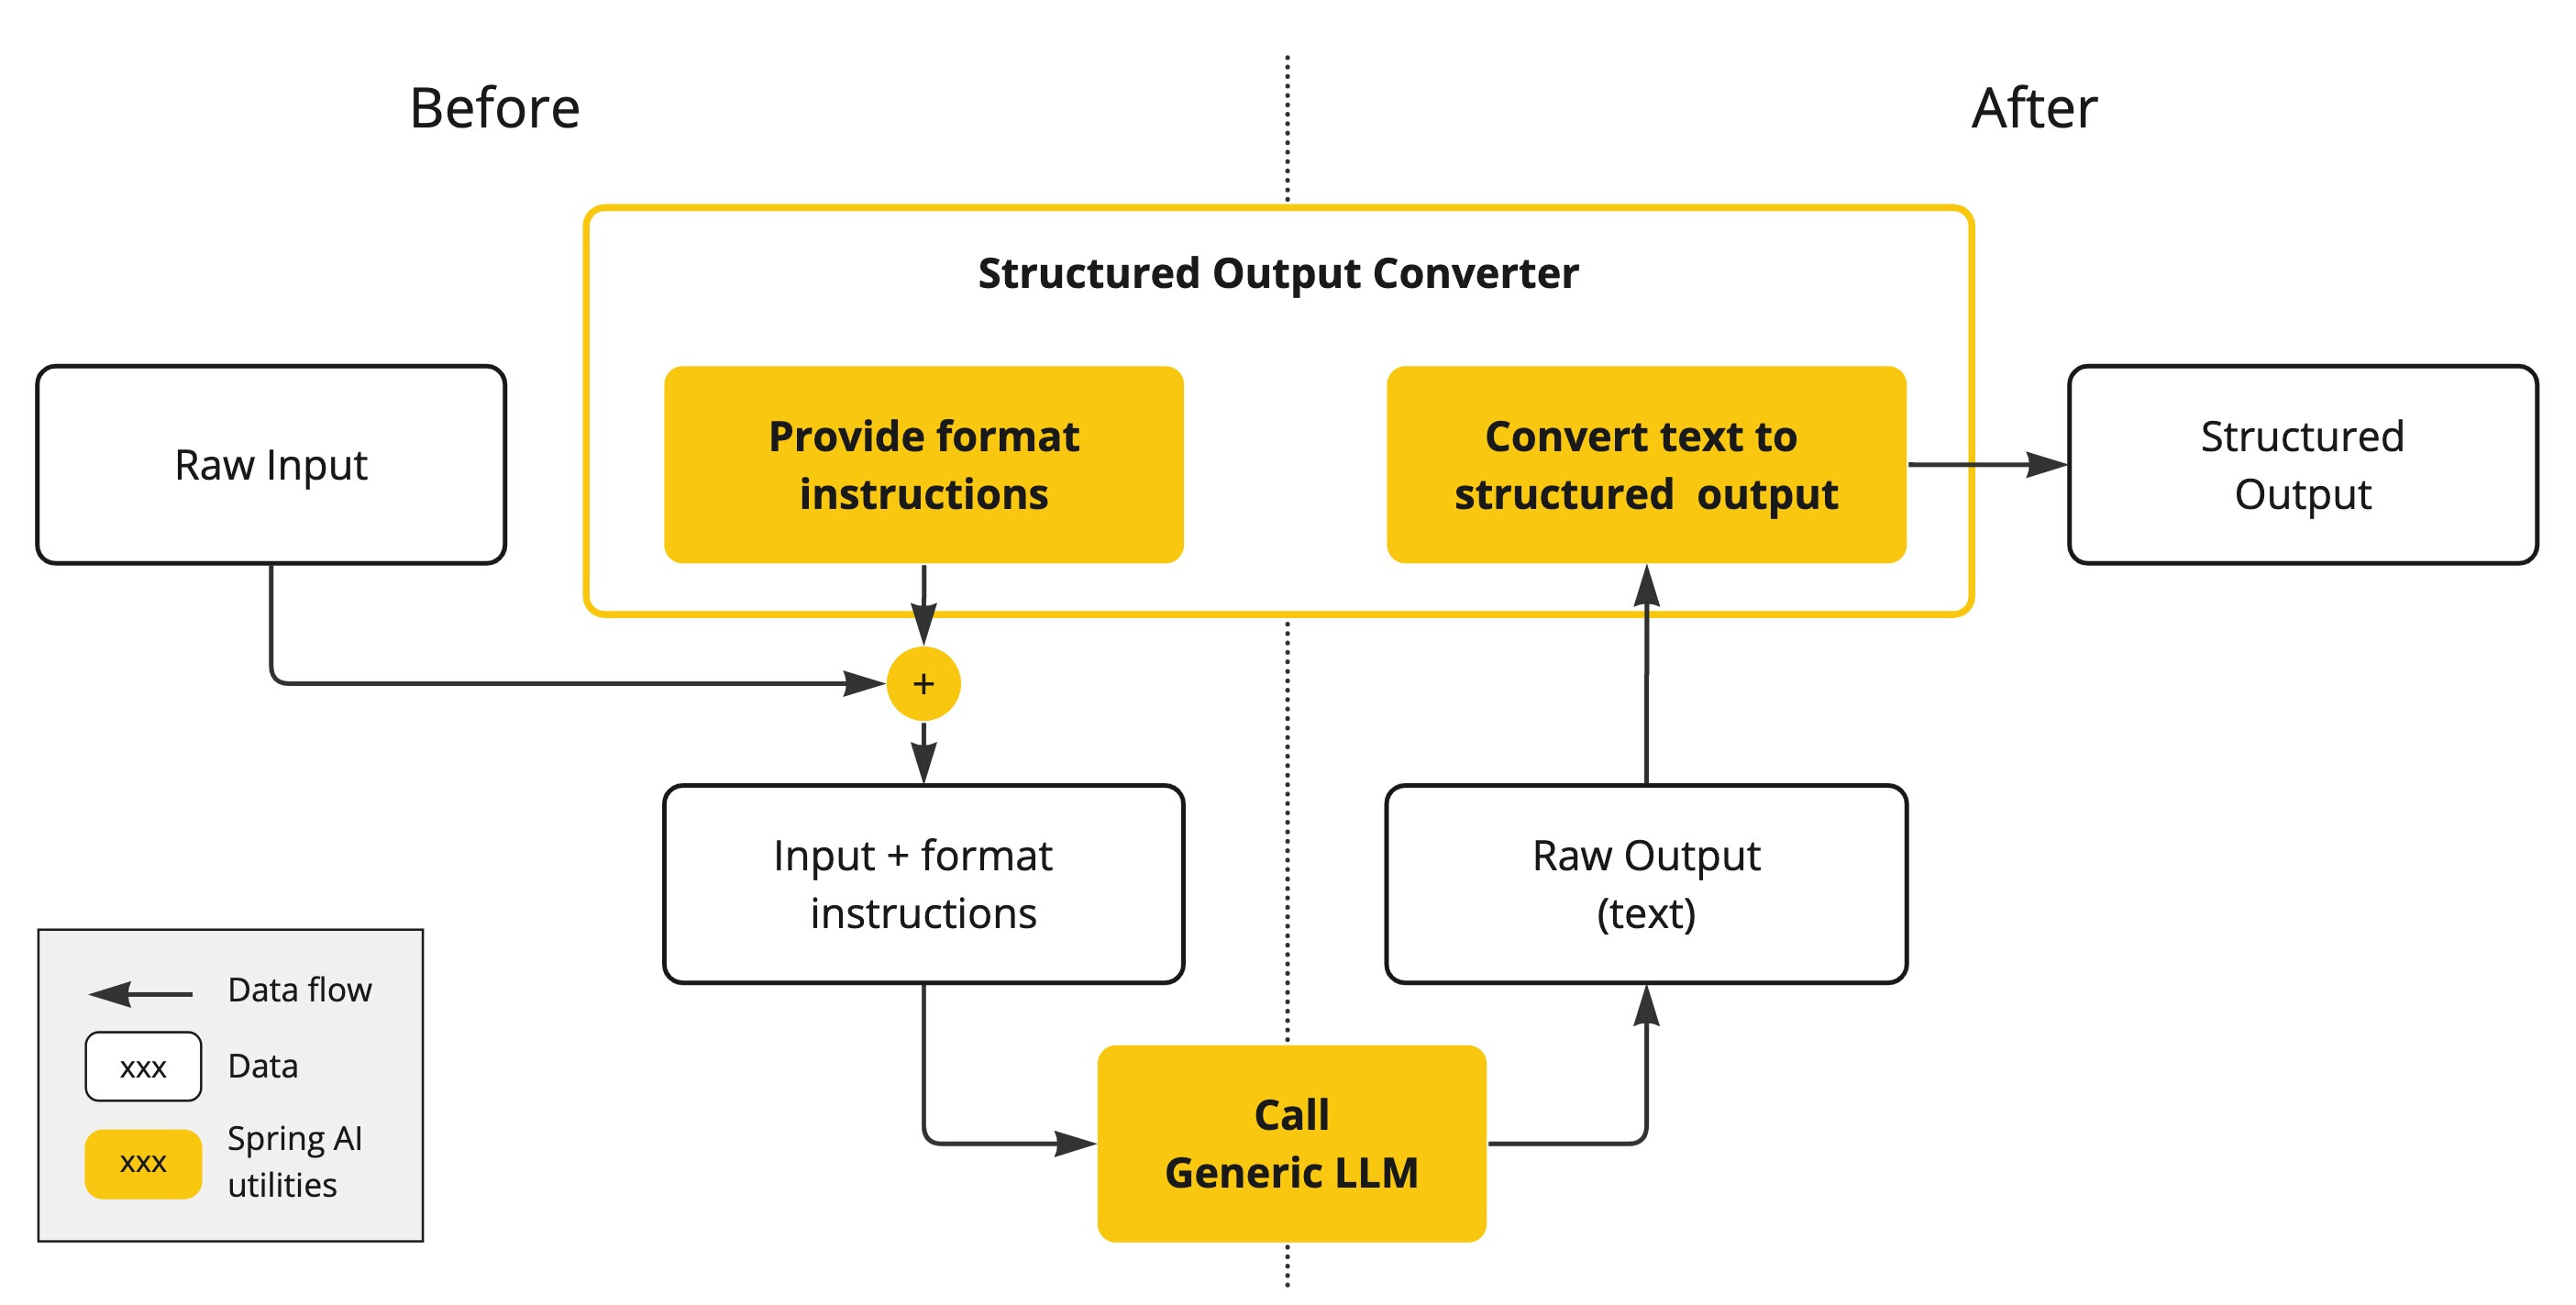
在 LLM 调用之前,转换器会将期望的输出格式(output format instruction)附加到 prompt 中,为模型提供生成所需输出结构的明确指导,这些指令充当蓝图,塑造模型的响应以符合指定的格式。以下是此类格式说明的示例:
Your response should be in JSON format.
The data structure for the JSON should match this Java class: java.util.HashMap
Do not include any explanations, only provide a RFC8259 compliant JSON response following this format without deviation.
1.1 编码实战
1.1.1 新建Module
可以命名为StructuredOutput
1.1.2 修改POM文件
在依赖配置节点修改为以下配置:
<dependencies><dependency><groupId>org.springframework.boot</groupId><artifactId>spring-boot-starter-web</artifactId></dependency><!--spring-ai-alibaba dashscope--><dependency><groupId>com.alibaba.cloud.ai</groupId><artifactId>spring-ai-alibaba-starter-dashscope</artifactId></dependency><!--hutool--><dependency><groupId>cn.hutool</groupId><artifactId>hutool-all</artifactId><version>5.8.22</version></dependency><!--lombok--><dependency><groupId>org.projectlombok</groupId><artifactId>lombok</artifactId><version>1.18.38</version></dependency><dependency><groupId>org.springframework.boot</groupId><artifactId>spring-boot-starter-test</artifactId><scope>test</scope></dependency></dependencies><build><plugins><plugin><groupId>org.springframework.boot</groupId><artifactId>spring-boot-maven-plugin</artifactId></plugin><plugin><groupId>org.apache.maven.plugins</groupId><artifactId>maven-compiler-plugin</artifactId><version>3.11.0</version><configuration><compilerArgs><arg>-parameters</arg></compilerArgs><source>21</source><target>21</target></configuration></plugin></plugins></build><repositories><repository><id>spring-milestones</id><name>Spring Milestones</name><url>https://repo.spring.io/milestone</url><snapshots><enabled>false</enabled></snapshots></repository></repositories>1.1.3 编写配置文件
在resources目录下新建application.properties配置文件,内容如下:
server.port=8007#解决中文乱码
server.servlet.encoding.enabled=true
server.servlet.encoding.force=true
server.servlet.encoding.charset=UTF-8spring.application.name=StructuredOutput# ====SpringAIAlibaba Config=============
spring.ai.dashscope.api-key=${DASHSCOPE_API_KEY}
1.1.4 编写主启动类
新建主启动类,并编写如下内容:
import org.springframework.boot.SpringApplication;
import org.springframework.boot.autoconfigure.SpringBootApplication;/*** @Description 知识出处,https://java2ai.com/docs/1.0.0.2/tutorials/basics/structured-output/?spm=5176.29160081.0.0.2856aa5cPJ9Ha8*/
@SpringBootApplication
public class StructuredOutputApplication{public static void main(String[] args){SpringApplication.run(StructuredOutputApplication.class, args);}}
1.1.5 编写配置类
新建子包config,并在其中新建配置类SaaLLMConfig
import com.alibaba.cloud.ai.dashscope.api.DashScopeApi;
import com.alibaba.cloud.ai.dashscope.chat.DashScopeChatModel;
import com.alibaba.cloud.ai.dashscope.chat.DashScopeChatOptions;
import org.springframework.ai.chat.client.ChatClient;
import org.springframework.ai.chat.model.ChatModel;
import org.springframework.ai.chat.prompt.ChatOptions;
import org.springframework.beans.factory.annotation.Qualifier;
import org.springframework.context.annotation.Bean;
import org.springframework.context.annotation.Configuration;/*** @Description ChatModel+ChatClient+多模型共存*/
@Configuration
public class SaaLLMConfig
{// 模型名称常量定义private final String DEEPSEEK_MODEL = "deepseek-v3";private final String QWEN_MODEL = "qwen-plus";@Bean(name = "deepseek")public ChatModel deepSeek(){return DashScopeChatModel.builder().dashScopeApi(DashScopeApi.builder().apiKey(System.getenv("DASHSCOPE_API_KEY")).build()).defaultOptions(DashScopeChatOptions.builder().withModel(DEEPSEEK_MODEL).build()).build();}@Bean(name = "qwen")public ChatModel qwen(){return DashScopeChatModel.builder().dashScopeApi(DashScopeApi.builder().apiKey(System.getenv("DASHSCOPE_API_KEY")).build()).defaultOptions(DashScopeChatOptions.builder().withModel(QWEN_MODEL).build()).build();}@Bean(name = "qwenChatClient")public ChatClient qwenChatClient(@Qualifier("qwen") ChatModel qwen){return ChatClient.builder(qwen).defaultOptions(ChatOptions.builder().model(QWEN_MODEL).build()).build();}@Bean(name = "deepseekChatClient")public ChatClient deepseekChatClient(@Qualifier("deepseek") ChatModel deepSeek){return ChatClient.builder(deepSeek).defaultOptions(ChatOptions.builder().model(DEEPSEEK_MODEL).build()).build();}}
1.1.6 编写记录类
新建record子包,并在其中新建记录类,StudentRecord,记录类替代了lombok
/*** @Description jdk14以后的新特性,记录类record = entity + lombok*/
public record StudentRecord(String id, String sname,String major,String email) { }
1.1.7 编写业务类
新建子包controller,并在其中新建业务类StructuredOutputController
import jakarta.annotation.Resource;
import org.springframework.ai.chat.client.ChatClient;
import org.springframework.web.bind.annotation.GetMapping;
import org.springframework.web.bind.annotation.RequestParam;
import org.springframework.web.bind.annotation.RestController;import java.util.function.Consumer;@RestController
public class StructuredOutputController
{@Resource(name = "qwenChatClient")private ChatClient qwenChatClient;/*** http://localhost:8007/structuredoutput/chat?sname=李四&email=lisi@163.com* @param sname* @return*/@GetMapping("/structuredoutput/chat")public StudentRecord chat(@RequestParam(name = "sname") String sname,@RequestParam(name = "email") String email) {return qwenChatClient.prompt().user(new Consumer<ChatClient.PromptUserSpec>(){@Overridepublic void accept(ChatClient.PromptUserSpec promptUserSpec){promptUserSpec.text("学号1001,我叫{sname},大学专业计算机科学与技术,邮箱{email}").param("sname",sname).param("email",email);}}).call().entity(StudentRecord.class);}/*** http://localhost:8007/structuredoutput/chat2?sname=孙伟&email=sunwei@163.com* @param sname* @return*/@GetMapping("/structuredoutput/chat2")public StudentRecord chat2(@RequestParam(name = "sname") String sname,@RequestParam(name = "email") String email) {String stringTemplate = """学号1002,我叫{sname},大学专业软件工程,邮箱{email}            """;return qwenChatClient.prompt().user(promptUserSpec -> promptUserSpec.text(stringTemplate).param("sname",sname).param("email",email)).call().entity(StudentRecord.class);}
}
1.1.8 测试
启动主启动类后,在浏览器中依次请求如下地址:
http://localhost:8007/structuredoutput/chat?sname=李四&email=lisi@163.com
http://localhost:8007/structuredoutput/chat2?sname=孙伟&email=sunwei@163.com


可以看到如图中的效果。
2. Chat Memory连续对话保存和持久化
Spring AI Alibaba中的聊天记忆提供了维护 AI 聊天应用程序的对话上下文和历史的机制。
因大模型本身不存储数据,需将历史对话信息一次性提供给它以实现连续对话,不然服务一重启就什么都没了,所以,必须持久化。
2.1 对话记忆
”大模型的对话记忆”这一概念,根植于人工智能与自然语言处理领域,特别是针对具有深度学习能力的大型语言模型而言,它指的是模型在与用户进行交互式对话过程中,能够追踪、理解并利用先前对话上下文的能力。 此机制使得大模型不仅能够响应即时的输入请求,还能基于之前的交流内容能够在对话中记住先前的对话内容,并根据这些信息进行后续的响应。这种记忆机制使得模型能够在对话中持续跟踪和理解用户的意图和上下文,从而实现更自然和连贯的对话。
在调用大模型的过程中,如果自己维护多轮的对话记忆,通常情况下调用代码如下:
import java.util.ArrayList;List<Message> messages = new ArrayList<>();//第一轮对话
messages.add(new SystemMessage("你是一个旅游规划师"));
messages.add(new UserMessage("我想去新疆"));
ChatResponse response = chatModel.call(new Prompt(messages));
String content = response.getResult().getOutput().getContent();messages.add(new AssistantMessage(content));//第二轮对话
messages.add(new UserMessage("能帮我推荐一些旅游景点吗?"));
response = chatModel.call(new Prompt(messages));
content = response.getResult().getOutput().getContent();messages.add(new AssistantMessage(content));//第三轮对话
messages.add(new UserMessage("那里这两天的天气如何?"));
response = chatModel.call(new Prompt(messages));
content = response.getResult().getOutput().getContent();System.out.printf("content: %s\n", content);
2.2 基于memory的对话记忆
spring-ai-alibaba支持基于chat memory的对话记忆,也就是不需要调用显示的记录每一轮的对话历史。下边是一个基于内存存储的对话记忆实现:
//初始化基于内存的对话记忆ChatMemory chatMemory = new InMemoryChatMemory();DashScopeChatModel chatModel = ...;ChatClient chatClient = ChatClient.builder(dashscopeChatModel).defaultAdvisors(new MessageChatMemoryAdvisor(chatMemory)).build();//对话记忆的唯一标识String conversantId = UUID.randomUUID().toString();ChatResponse response = chatClient.prompt().user("我想去新疆").advisors(spec -> spec.param(CHAT_MEMORY_CONVERSATION_ID_KEY, conversantId).param(CHAT_MEMORY_RETRIEVE_SIZE_KEY, 10)).call().chatResponse();String content = response.getResult().getOutput().getContent();Assertions.assertNotNull(content);logger.info("content: {}", content);response = chatClient.prompt().user("可以帮我推荐一些美食吗").advisors(spec -> spec.param(CHAT_MEMORY_CONVERSATION_ID_KEY, conversantId).param(CHAT_MEMORY_RETRIEVE_SIZE_KEY, 10)).call().chatResponse();content = response.getResult().getOutput().getContent();Assertions.assertNotNull(content);logger.info("content: {}", content);当然,开发者也可以自行实现ChatMemory基于类似于文件、Redis等方式进行上下文内容的存储和记录。
2.3 记忆类型
- 内存存储:用于开发和测试的简单内存存储。
- 持久化存储:用于生产环境的数据库支持存储。
- 分布式存储:用于可扩展应用程序的分布式存储。
- 自定义存储:用于特定需求的自定义存储。
2.3.2 聊天内存
大型语言模型(LLMs)是无状态的,这意味着它们不保留有关先前交互的信息。当您想要在多个交互中维护上下文或状态时,这可能是一个限制。为了解决这个问题,Spring AI 提供了聊天内存功能,允许您存储和检索与 LLM 的多个交互中的信息。
ChatMemory 抽象允许您实现各种类型的内存来支持不同的用例。消息的底层存储由 ChatMemoryRepository 处理,其唯一职责是存储和检索消息。由 ChatMemory 实现决定保留哪些消息以及何时删除它们。策略示例可能包括保留最后 N 条消息、保留特定时间段的消息或保留达到特定令牌限制的消息。
在选择内存类型之前,了解聊天内存和聊天历史之间的区别很重要:
- 聊天内存:大型语言模型保留并用于在整个对话中保持上下文感知的信息。
- 聊天历史:整个对话历史,包括用户和模型之间交换的所有消息。
ChatMemory 抽象旨在管理聊天内存。它允许您存储和检索与当前对话上下文相关的消息。但是,它不适合存储聊天历史。如果您需要维护所有交换消息的完整记录,您应该考虑使用不同的方法,例如依赖 Spring Data 来高效存储和检索完整的聊天历史。
ChatMemory 抽象允许您实现各种类型的内存以适应不同的用例。内存类型的选择会显著影响应用程序的性能和行为。
2.3.2.1 消息窗口聊天内存
MessageWindowChatMemory 维护一个最大指定大小的消息窗口。当消息数量超过最大值时,会删除较旧的消息,同时保留系统消息。默认窗口大小为 20 条消息。
MessageWindowChatMemory memory = MessageWindowChatMemory.builder().maxMessages(10).build();这是 Spring AI 用于自动配置 ChatMemory bean 的默认消息类型。
2.3.2.2 内存存储库
InMemoryChatMemoryRepository 使用 ConcurrentHashMap 在内存中存储消息。
默认情况下,如果没有配置其他存储库,Spring AI 会自动配置一个类型为 InMemoryChatMemoryRepository 的 ChatMemoryRepository bean,您可以直接在应用程序中使用它。
@Autowired
ChatMemoryRepository chatMemoryRepository;
如果您想手动创建 InMemoryChatMemoryRepository,可以这样做:
ChatMemoryRepository repository = new InMemoryChatMemoryRepository();2.3.2.3 JdbcChatMemoryRepository
JdbcChatMemoryRepository 是一个内置实现,使用 JDBC 在关系数据库中存储消息。它开箱即用地支持多个数据库,适合需要持久存储聊天内存的应用程序。
依赖配置
Maven:
<dependency><groupId>org.springframework.ai</groupId><artifactId>spring-ai-starter-model-chat-memory-repository-jdbc</artifactId>
</dependency>Gradle:
dependencies {implementation 'org.springframework.ai:spring-ai-starter-model-chat-memory-repository-jdbc'
}
使用方式
Spring AI 为 JdbcChatMemoryRepository 提供自动配置,您可以直接在应用程序中使用它:
@Autowired
JdbcChatMemoryRepository chatMemoryRepository;ChatMemory chatMemory = MessageWindowChatMemory.builder().chatMemoryRepository(chatMemoryRepository).maxMessages(10).build();
如果您想手动创建 JdbcChatMemoryRepository,可以通过提供 JdbcTemplate 实例和 JdbcChatMemoryRepositoryDialect 来实现:
ChatMemoryRepository chatMemoryRepository = JdbcChatMemoryRepository.builder().jdbcTemplate(jdbcTemplate).dialect(new PostgresChatMemoryDialect()).build();ChatMemory chatMemory = MessageWindowChatMemory.builder().chatMemoryRepository(chatMemoryRepository).maxMessages(10).build();2.3.2.4 支持的数据库和方言抽象
Spring AI 通过方言抽象支持多个关系数据库。以下数据库开箱即用地支持:
- PostgreSQL
- MySQL / MariaDB
- SQL Server
- HSQLDB
当使用 JdbcChatMemoryRepositoryDialect.from(DataSource) 时,可以从 JDBC URL 自动检测正确的方言。您可以通过实现 JdbcChatMemoryRepositoryDialect 接口来扩展对其他数据库的支持。
配置属性
| 属性 | 描述 | 默认值 |
|---|---|---|
| spring.ai.chat.memory.repository.jdbc.initialize-schema | 控制何时初始化架构。值: embedded(默认)、always、never。 | embedded |
| spring.ai.chat.memory.repository.jdbc.schema | 用于初始化的架构脚本的位置。支持 classpath: URL 和平台占位符。 | classpath:org /springframework/ai/chat/ memory/repository/jdbc/schema-@@platform@@.sql |
| spring.ai.chat.memory.repository.jdbc.platform | 如果在初始化脚本中使用了 @@platform@@ 占位符,则使用的平台。 | 自动检测 |
2.3.2 记忆存储的痛点:
- 需要选择合适的持久化媒介
- 消息对话窗口,聊天记录上限的设置
2.4 顾问(Advisors)
Spring AI ChatClient 的一个关键特性是 Advisor API。这是一个拦截器链设计模式,允许你通过注入检索数据(Retrieval Context)和对话历史(Chat Memory)来修改传入的 Prompt。
MessageChatMemoryAdvisor.此顾问使用提供的实现来管理对话内存。在每次交互中,它都会从内存中检索对话历史记录,并将其作为消息集合包含在提示中。ChatMemory
PromptChatMemoryAdvisor.此顾问使用提供的实现来管理对话内存。在每次交互时,它都会从内存中检索对话历史记录,并将其作为纯文本附加到系统提示中。ChatMemory
VectorStoreChatMemoryAdvisor.此顾问使用提供的实现来管理对话内存。在每次交互时,它都会从矢量存储中检索对话历史记录,并将其作为纯文本追加到系统消息中。VectorStore
例如,MessageWindowChatMemory如果要MessageChatMemoryAdvisor与一起使用,可以按如下方式配置:
ChatMemory chatMemory = MessageWindowChatMemory.builder().build();ChatClient chatClient = ChatClient.builder(chatModel).defaultAdvisors(MessageChatMemoryAdvisor.builder(chatMemory).build()).build();当执行对ChatClient的调用时,内存将由MessageChatMemoryAdvisor自动管理。将根据指定的对话ID从内存中检索对话历史记录:
String conversationId = "007";chatClient.prompt().user("Do I have license to code?").advisors(a -> a.param(ChatMemory.CONVERSATION_ID, conversationId)).call().content();2.5 编码实现
本文采用的是将客户和大模型的对话问答保存进Redis进行持久化记忆留存。读者须提前安装好redis环境。
2.5.1 新建Module
可以命名为Persistent
2.5.2 修改POM文件
在依赖配置节点修改为以下配置:
<dependencies><dependency><groupId>org.springframework.boot</groupId><artifactId>spring-boot-starter-web</artifactId></dependency><!--spring-ai-alibaba dashscope--><dependency><groupId>com.alibaba.cloud.ai</groupId><artifactId>spring-ai-alibaba-starter-dashscope</artifactId></dependency><!--spring-ai-alibaba memory-redis--><dependency><groupId>com.alibaba.cloud.ai</groupId><artifactId>spring-ai-alibaba-starter-memory-redis</artifactId></dependency><!--jedis--><dependency><groupId>redis.clients</groupId><artifactId>jedis</artifactId></dependency><!--lombok--><dependency><groupId>org.projectlombok</groupId><artifactId>lombok</artifactId><version>1.18.38</version></dependency><!--hutool--><dependency><groupId>cn.hutool</groupId><artifactId>hutool-all</artifactId><version>5.8.22</version></dependency><dependency><groupId>org.springframework.boot</groupId><artifactId>spring-boot-starter-test</artifactId><scope>test</scope></dependency></dependencies><build><plugins><plugin><groupId>org.springframework.boot</groupId><artifactId>spring-boot-maven-plugin</artifactId></plugin><plugin><groupId>org.apache.maven.plugins</groupId><artifactId>maven-compiler-plugin</artifactId><version>3.11.0</version><configuration><compilerArgs><arg>-parameters</arg></compilerArgs><source>21</source><target>21</target></configuration></plugin></plugins></build><repositories><repository><id>spring-milestones</id><name>Spring Milestones</name><url>https://repo.spring.io/milestone</url><snapshots><enabled>false</enabled></snapshots></repository></repositories>2.5.3 编写配置文件
在resources目录下新建application.properties配置文件,内容如下:
server.port=8008# 设置响应的字符编码
server.servlet.encoding.charset=utf-8
server.servlet.encoding.enabled=true
server.servlet.encoding.force=truespring.application.name=Persistent# ====SpringAIAlibaba Config=============
spring.ai.dashscope.api-key=${DASHSCOPE_API_KEY}# ==========redis config ===============
spring.data.redis.host=localhost
spring.data.redis.port=6379
spring.data.redis.database=1
spring.data.redis.password=123456
spring.data.redis.connect-timeout=3
spring.data.redis.timeout=2
此处笔者的redis密码设置为了123456,读者如果未进行设置,此处留空即可。
2.5.4 编写主启动类
新建主启动类,并编写如下内容:
import org.springframework.boot.SpringApplication;
import org.springframework.boot.autoconfigure.SpringBootApplication;/*** @Description 将客户和大模型的对话问答保存进Redis进行持久化记忆留存*/
@SpringBootApplication
public class PersistentApplication{public static void main(String[] args){SpringApplication.run(PersistentApplication.class,args);}
}
2.5.5 编写配置类
新建子包config,并在其中新建配置类SaaLLMConfig
import com.alibaba.cloud.ai.dashscope.api.DashScopeApi;
import com.alibaba.cloud.ai.dashscope.chat.DashScopeChatModel;
import com.alibaba.cloud.ai.dashscope.chat.DashScopeChatOptions;
import com.alibaba.cloud.ai.memory.redis.RedisChatMemoryRepository;
import org.springframework.ai.chat.client.ChatClient;
import org.springframework.ai.chat.client.advisor.MessageChatMemoryAdvisor;
import org.springframework.ai.chat.memory.MessageWindowChatMemory;
import org.springframework.ai.chat.model.ChatModel;
import org.springframework.ai.chat.prompt.ChatOptions;
import org.springframework.beans.factory.annotation.Qualifier;
import org.springframework.context.annotation.Bean;
import org.springframework.context.annotation.Configuration;/*** @Description ChatModel+ChatClient+多模型共存*/
@Configuration
public class SaaLLMConfig
{// 模型名称常量定义private final String DEEPSEEK_MODEL = "deepseek-v3";private final String QWEN_MODEL = "qwen-plus";@Bean(name = "deepseek")public ChatModel deepSeek(){return DashScopeChatModel.builder().dashScopeApi(DashScopeApi.builder().apiKey(System.getenv("DASHSCOPE_API_KEY")).build()).defaultOptions(DashScopeChatOptions.builder().withModel(DEEPSEEK_MODEL).build()).build();}@Bean(name = "qwen")public ChatModel qwen(){return DashScopeChatModel.builder().dashScopeApi(DashScopeApi.builder().apiKey(System.getenv("DASHSCOPE_API_KEY")).build()).defaultOptions(DashScopeChatOptions.builder().withModel(QWEN_MODEL).build()).build();}@Bean(name = "qwenChatClient")public ChatClient qwenChatClient(@Qualifier("qwen") ChatModel qwen,RedisChatMemoryRepository redisChatMemoryRepository){MessageWindowChatMemory windowChatMemory = MessageWindowChatMemory.builder().chatMemoryRepository(redisChatMemoryRepository).maxMessages(10).build();return ChatClient.builder(qwen).defaultOptions(ChatOptions.builder().model(QWEN_MODEL).build()).defaultAdvisors(MessageChatMemoryAdvisor.builder(windowChatMemory).build()).build();}/*** 基于deepseek的模型存储* @param deepSeek* @return*/@Bean(name = "deepseekChatClient")public ChatClient deepseekChatClient(@Qualifier("deepseek") ChatModel deepSeek, RedisChatMemoryRepository redisChatMemoryRepository){MessageWindowChatMemory windowChatMemory = MessageWindowChatMemory.builder().chatMemoryRepository(redisChatMemoryRepository).maxMessages(10).build();return ChatClient.builder(deepSeek).defaultOptions(ChatOptions.builder().model(DEEPSEEK_MODEL).build()).defaultAdvisors(MessageChatMemoryAdvisor.builder(windowChatMemory).build()).build();}
}
除了要配置大模型,我们此处还需要配置redis,新建配置类 RedisMemoryConfig
import com.alibaba.cloud.ai.memory.redis.RedisChatMemoryRepository;
import org.springframework.ai.chat.memory.ChatMemory;
import org.springframework.beans.factory.annotation.Value;
import org.springframework.context.annotation.Bean;
import org.springframework.context.annotation.Configuration;@Configuration
public class RedisMemoryConfig
{@Value("${spring.data.redis.host}")private String host;@Value("${spring.data.redis.port}")private int port;@Value("${spring.data.redis.password}") //如果redis未配置,可以不写该字段private String password;@Beanpublic RedisChatMemoryRepository redisChatMemoryRepository(){return RedisChatMemoryRepository.builder().host(host).port(port).password(password) //如果redis未配置,可以步配置该属性.build();}
}
2.5.6 编写业务类
新建子包controller,并在其中新建业务类 ChatMemory4RedisController
import jakarta.annotation.Resource;
import org.springframework.ai.chat.client.ChatClient;
import org.springframework.web.bind.annotation.GetMapping;
import static org.springframework.ai.chat.memory.ChatMemory.CONVERSATION_ID;
import org.springframework.web.bind.annotation.RestController;import java.util.function.Consumer;@RestController
public class ChatMemory4RedisController
{@Resource(name = "qwenChatClient")private ChatClient qwenChatClient;@Resource(name = "deepseekChatClient")private ChatClient deepseekChatClient;/*** @param msg* @param userId* @return* http://localhost:8008/chatmemory/chat?msg=2加5等于多少&userId=7*/@GetMapping("/chatmemory/chat")public String chat(String msg, String userId){//此处是原来函数原型的写法/*return qwenChatClient.prompt(msg).advisors(new Consumer<ChatClient.AdvisorSpec>(){@Overridepublic void accept(ChatClient.AdvisorSpec advisorSpec){advisorSpec.param(CONVERSATION_ID, userId);}}).call().content();*///这是lambda表达式的函数写法return qwenChatClient.prompt(msg).advisors(advisorSpec -> advisorSpec.param(CONVERSATION_ID, userId)).call().content();}/*** @param msg* @param userId* @return* http://localhost:8008/chatmemory/deepseek/chat?msg=2加6等于多少&userId=8*/@GetMapping("/chatmemory/deepseek/chat")public String deepseekChat(String msg, String userId){return deepseekChatClient.prompt(msg).advisors(advisorSpec -> advisorSpec.param(CONVERSATION_ID, userId)).call().content();}}
2.5.7 测试
启动主启动类后,在浏览器中依次请求如下地址:
http://localhost:8008/chatmemory/chat?msg=2加5等于多少&userId=7
http://localhost:8008/chatmemory/chat?msg=再加5等于多少&userId=7


http://localhost:8008/chatmemory/deepseek/chat?msg=2加6等于多少&userId=8
http://localhost:8008/chatmemory/deepseek/chat?msg=再加9等于多少&userId=8


也可以在redis数据库中查看到刚才的数据:
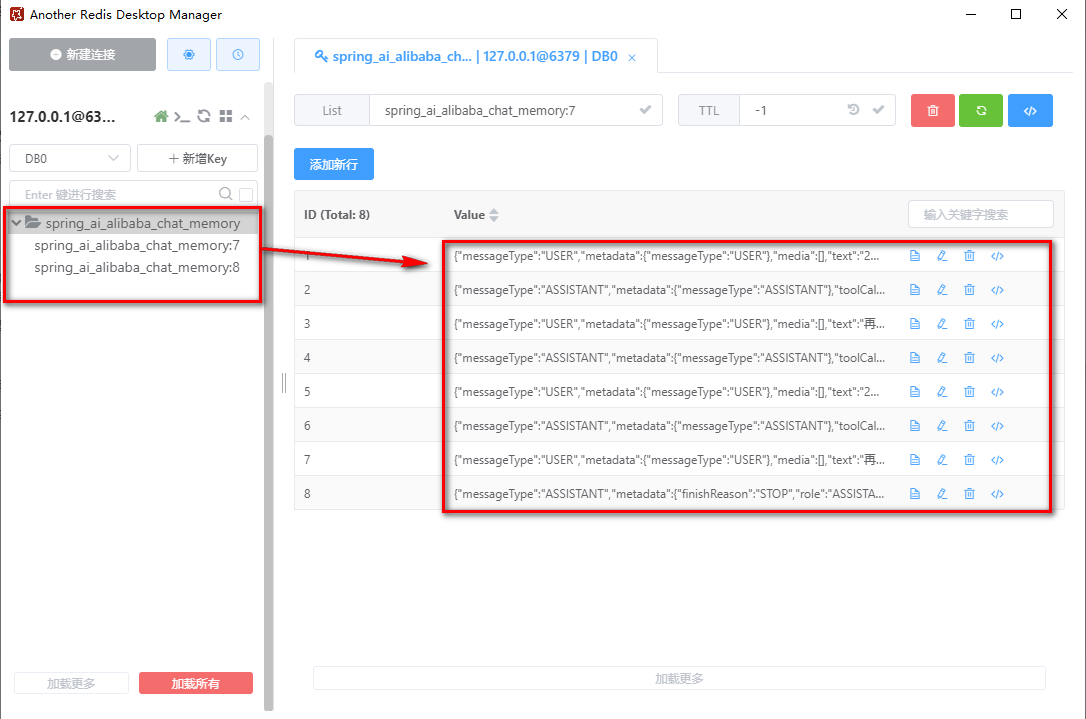
2.5.8 特别应当注意的是
此处有个Bug,就是即使在redis的配置文件中指定database,例如
spring.data.redis.database=1
但是实际上存储的位置还是在
spring.data.redis.database=0
也就是图中的索引为0的数据库中,这个问题我去Spring AI Alibaba找了一下,是他们框架中使用的使jedis默认配置,所以在配置文件中的配置压根不会被读取,我已经在项目issue下提了需求,开发团队已经给出了解决方案,新版本已新增了对于数据库的指定,增加了对配置文件以及链式函数属性设置的需求,该问题已经得到修复,待新版发布后可以针对该问题进行进一步测试。