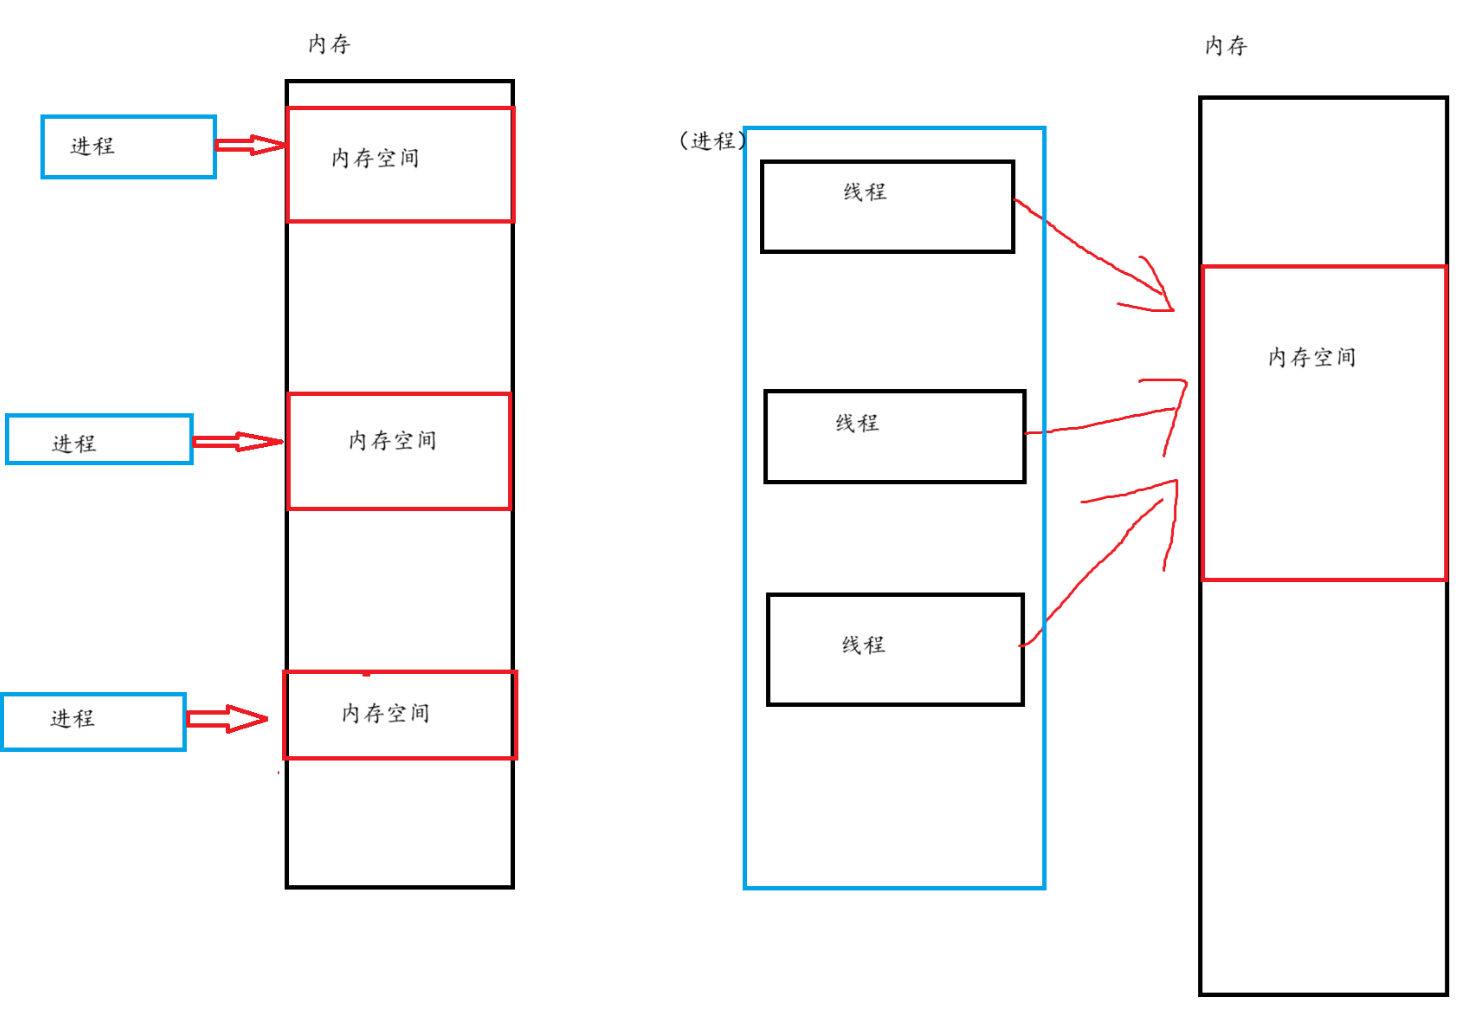
多线程的出现
- 在过去使用网络编程时,编写的服务器使用 多进程(CGI) 来回复网页的请求。而每一个进程的使用需要申请资源、释放资源(CPU、内存、硬盘等)。请求往往是接连不断的,一连接一个的请求就会导致频繁的创建、销毁进程,对操作系统的开销是比较大的。为了解决频繁创建、销毁的问题,多线程在进程的基础上进行了改进。
线程的工作方式

- 进程的创建申请的资源由线程共享,线程的调度基本与进程相同(资源不仅限于内存)
- 线程的PCB中也有 状态、优先级、记账信息、上下文等属性
- 一个进程可以有多个PCB(拥有多个线程)
- 线程之间可能会互相干扰,引起线程安全问题
- 第一个线程的开销资源程度是最大的,申请的资源不足时,新的线程创建也可能会伴随开销资源,不是一次性买卖。
- 线程不是越多越好,线程太多会导致调度占用过多。
多线程编程
1) 继承Thread
- 创建一个MyThread类继承Thread类,重写run方法作为此类的入口。在主类中实例化MyThread对象,通过对象t调用start方法开启多线程,将会死循环打印"HELLO THREAD"和"hello world",线程的随机调度为抢占式执行,不分先后。
class MyThread extends Thread{ @Overridepublic void run() { while (true){System.out.println("HELLO THREAD"); }}
}
public class ThreadDemo1 { public static void main(String[] args) { Thread t = new MyThread(); t.start(); while (true){System.out.println("hello world");}}
}
- 为了将结果可视化,通过Thread.sleep(Thread类里面的静态方法)将线程停顿1000ms。jvm会自动识别sleep方法将当前线程sleep,不会发生此线程干扰其他线程sleep情况。在每一行的打印之后加上
Thread.sleep(1000);出现异常之后try-ctach捕获异常
class MyThread2 extends Thread{ @Overridepublic void run() { while (true){System.out.println("HELLO THREAD");try {Thread.sleep(1000); } catch (InterruptedException e) {throw new RuntimeException(e);}}}
}
public class ThreadDemo2 { public static void main(String[] args) { Thread t = new MyThread2(); t.start(); while (true){System.out.println("hello world");try {Thread.sleep(1000); } catch (InterruptedException e) {throw new RuntimeException(e);}}}
}
打印结果像这样,每秒一组打印
HELLO THREAD
HELLO THREAD
-------------------
hello world
HELLO THREAD
-------------------
hello world
HELLO THREAD
-------------------
hello world
hello world
2) 接上接口Runnable
- Thread类本身实现了Runnable接口
- 继承Thread既将线程和任务绑定在一起。如果一个任务需要被多个线程使用,用Runnable接口进行解耦合将会更方便,多个线程可以共享同一个Runnable实例。
class MyThread3 implements Runnable { @Overridepublic void run() { while (true) {System.out.println("hello runnable");try {Thread.sleep(1000); } catch (InterruptedException e) {throw new RuntimeException(e);}}}
}public class ThreadDemo3 {public static void main(String[] args) { Runnable runnable = new MtThread3(); Thread t = new Thread(runnable); t.start(); while (true) {System.out.println("hello main");try {Thread.sleep(1000); } catch (InterruptedException e) {throw new RuntimeException(e);}}}
}
3) 使用匿名内部类继承Thread
- 匿名内部类可以重写外部类的方法,并且不需要创建内部类的名字
public class ThreadDemo4 {public static void main(String[] args) {Thread t = new Thread() { @Overridepublic void run() { while (true) {System.out.println("hello thread");try {Thread.sleep(1000); } catch (InterruptedException e) {throw new RuntimeException(e);}}}}; t.start(); while (true) {System.out.println("hello main");try {Thread.sleep(1000); } catch (InterruptedException e) {throw new RuntimeException(e);}}}
}
4) 使用匿名内部类接上接口Runnable
public class ThreadDemo5 {public static void main(String[] args) {Thread t = new Thread(new Runnable() { @Overridepublic void run() {while (true) {System.out.println("hello runnable");try {Thread.sleep(1000);} catch (InterruptedException e) {throw new RuntimeException(e);}}}}); t.start();while (true) {System.out.println("hello main");try {Thread.sleep(1000);} catch (InterruptedException e) {throw new RuntimeException(e);}}}
}
5) lambda表达式(最简便的方法)
- lambda表达式可以实例化一个只有一个抽象方法的接口
public class ThreadDemo6 {public static void main(String[] args) {Thread t = new Thread(() -> { while (true) {System.out.println("hello thread");try {Thread.sleep(1000);} catch (InterruptedException e) {e.printStackTrace();}}});t.start();while (true) {System.out.println("hello main");try {Thread.sleep(1000);} catch (InterruptedException e) {e.printStackTrace();}}}
}

