Vue3小兔鲜-(一)
Vue3小兔鲜-(二)
Vue3小兔鲜-(一)
- 认识Vue3
- 1. Vue3组合式API体验
- 2. Vue3更多的优势
- 使用create-vue搭建Vue3项目
- 1. 认识create-vue
- 2. 使用create-vue创建项目
- 熟悉项目和关键文件
- 组合式API - setup选项
- 1. setup选项的写法和执行时机
- 2. setup中写代码的特点
- 3. <script setup>语法糖
- 组合式API - reactive和ref函数
- 1. reactive
- 2. ref
- 3. reactive 对比 ref
- 组合式API - computed
- 组合式API - watch
- 1. 侦听单个数据
- 2. 侦听多个数据
- 3. immediate
- 4. deep
- 组合式API - 生命周期函数
- 1. 选项式对比组合式
- 2. 生命周期函数基本使用
- 3. 执行多次
- 组合式API - 父子通信
- 1. 父传子
- 2. 子传父
- 组合式API - 模版引用
- 1. 基本使用
- 2. defineExpose
- 组合式API - provide和inject
- 1. 作用和场景
- 2. 跨层传递普通数据
- 3. 跨层传递响应式数据
- 4. 跨层传递方法
- 综合案例
- 1. 项目地址
- 2. 项目说明
- 什么是pinia
- 创建空Vue项目并安装Pinia
- 1. 创建空Vue项目
- 2. 安装Pinia并注册
- 实现counter
- 实现getters
- 异步action
- storeToRefs保持响应式解构
- 创建项目并整理目录
- jsconfig.json配置别名路径
- elementPlus引入
- 1. 安装elementPlus和自动导入插件
- 2. 配置自动按需导入
- 3. 测试组件
- 定制elementPlus主题
- 1. 安装sass
- 2. 准备定制化的样式文件
- 3. 自动导入配置
- axios安装并简单封装
- 1. 安装axios
- 2. 基础配置
- 3. 封装请求函数并测试
- 路由整体设计
- 静态资源引入和Error Lens安装
- 1. 静态资源引入
- 2. Error Lens插件安装
- scss变量自动导入
- 组件结构快速搭建
- 字体图标渲染
- 一级导航渲染
- 吸顶导航交互实现
- 1. 准备组件静态结构
- 2. 渲染基础数据
- 3. 实现吸顶交互
- Pinia优化重复请求
- 静态结构搭建和分类实现
- 1. 整体结构创建
- 2. 分类实现
- banner轮播图实现
- 1. 熟悉组件
- 2. 获取数据渲染组件
- 面板组件封装
- 1. 纯静态结构
- 2. 完整代码
- 新鲜好物实现
- 1. 准备模版
- 2. 封装接口
- 3. 获取数据渲染模版
- 人气推荐实现
- 1. 封装接口
- 2. 获取数据渲染模版
- 懒加载指令实现
- 1. 封装全局指令
- 2. 注册全局指令
- Product产品列表实现
- 1. 基础数据渲染
- 2. 图片懒加载
- GoodsItem组件封装
- 1. 封装组件
- 2. 使用组件
- 静态结构搭建和路由配置
- 1. 准备分类组件
- 2. 配置路由
- 3. 配置导航区域链接
- 面包屑导航渲染
- 1. 认识组件准备模版
- 2. 封装接口
- 3. 渲染面包屑导航
- 分类Banner渲染
- 1. 适配接口
- 2. 迁移首页Banner逻辑
- 导航激活设置分类列表渲染
- 1. 导航激活状态设置
- 2. 分类数据模版
- 路由缓存问题解决
- 基于业务逻辑的函数拆分
- 整体业务认识和路由配置
- 1. 准备组件模版
- 2. 配置路由关系
- 3. 跳转配置
- 面包屑导航实现
- 1. 准备接口
- 2. 获取数据渲染模版
- 分类基础列表实现
- 1. 准备接口
- 2. 获取数据列表
- 列表筛选实现
- 无限加载实现
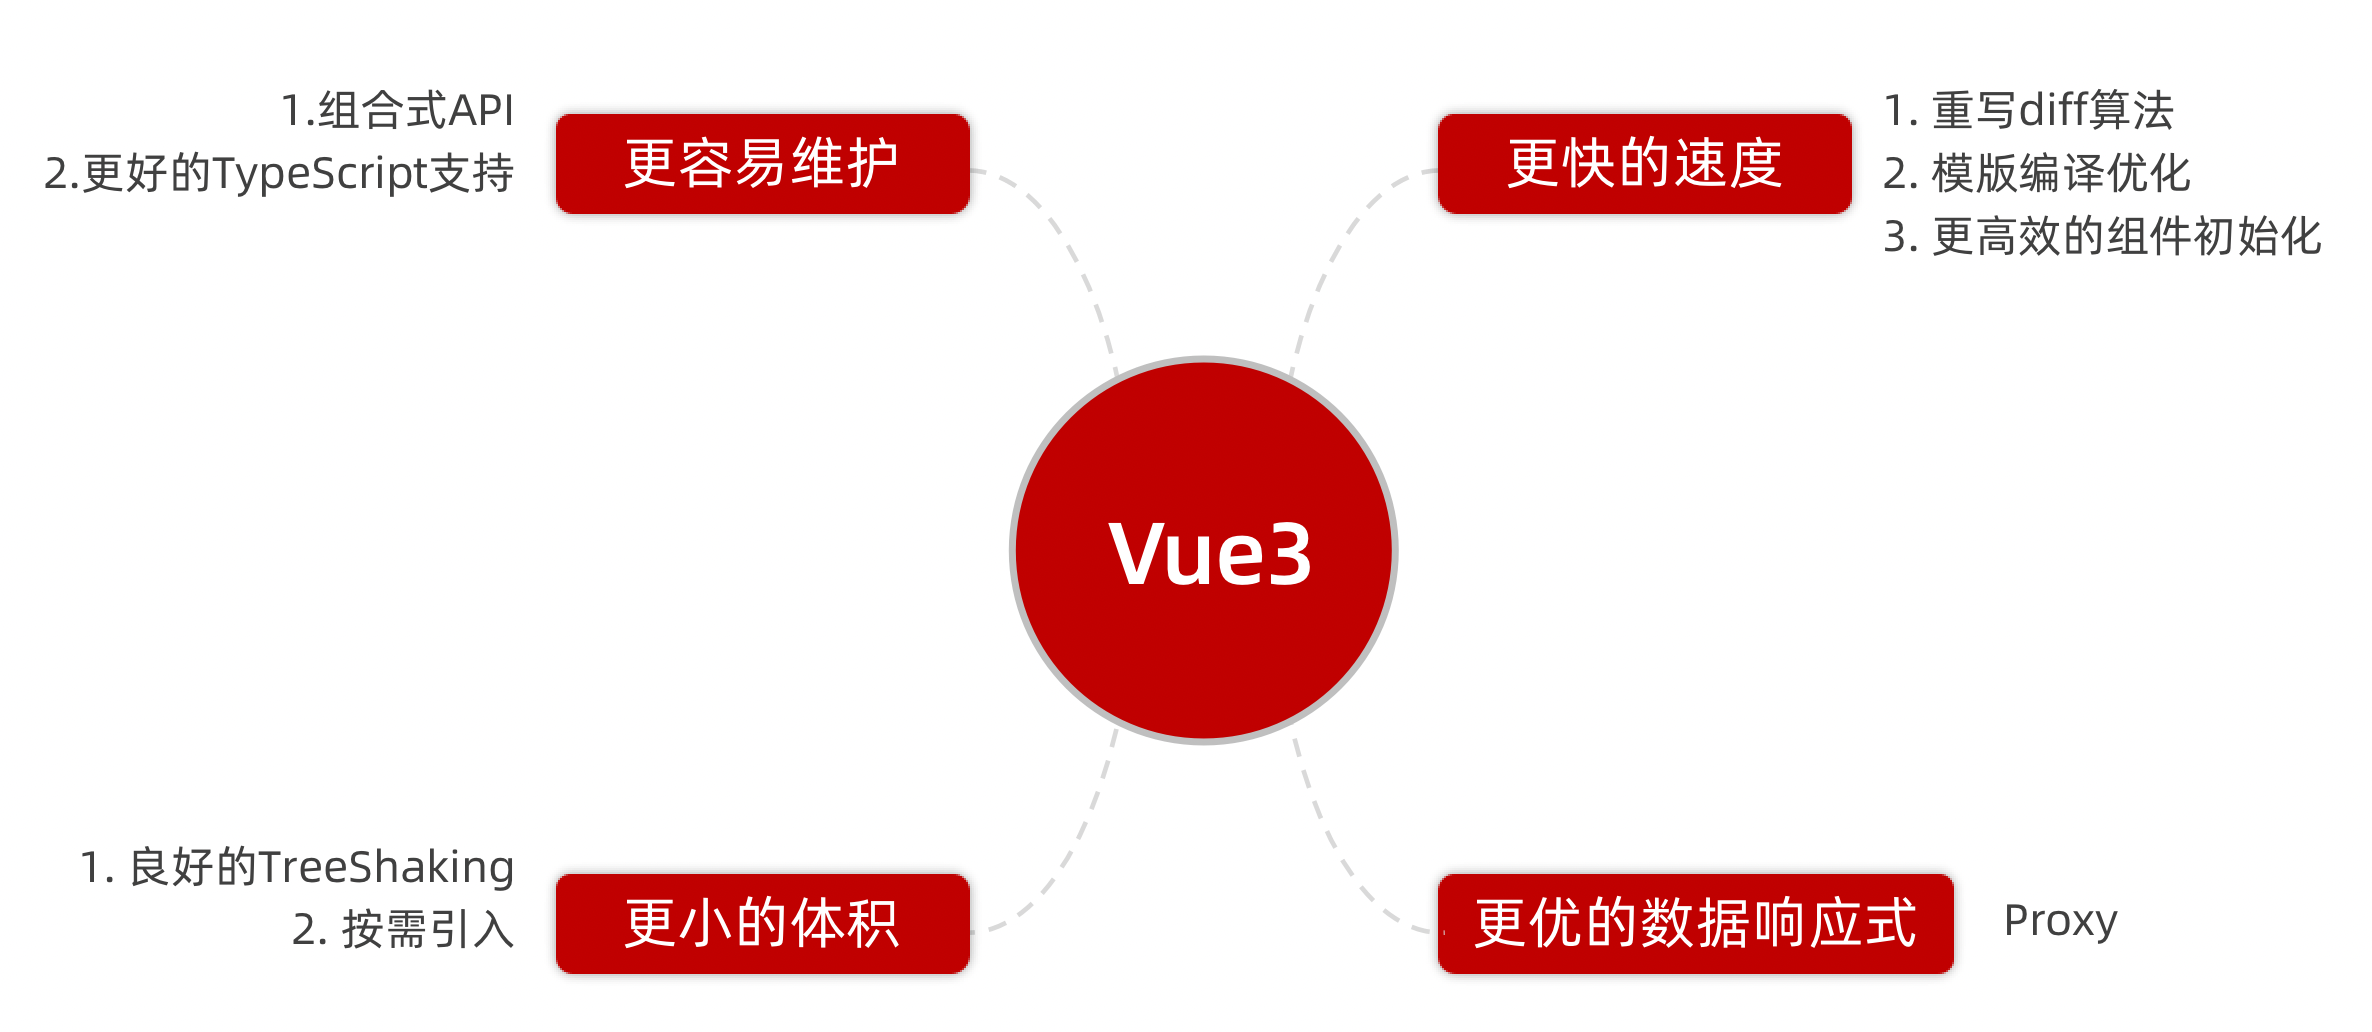
认识Vue3
1. Vue3组合式API体验
通过 Counter 案例 体验Vue3新引入的组合式API
<script>
export default {data(){return {count:0}},methods:{addCount(){this.count++}}
}
</script>
<script setup>
import { ref } from 'vue'
const count = ref(0)
const addCount = ()=> count.value++
</script>
特点:
- 代码量变少
- 分散式维护变成集中式维护
2. Vue3更多的优势
使用create-vue搭建Vue3项目
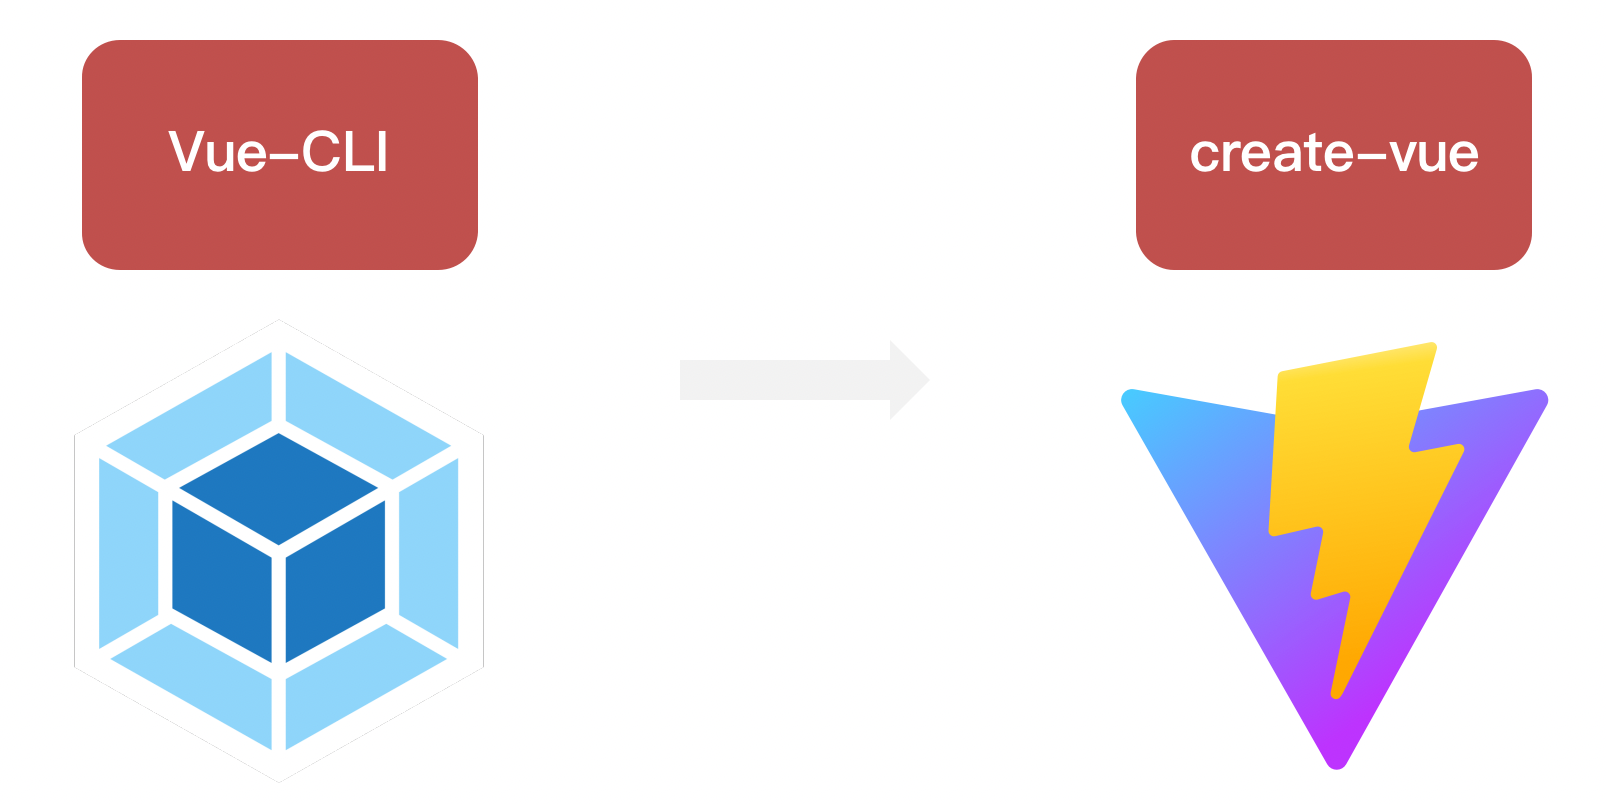
1. 认识create-vue
create-vue是Vue官方新的脚手架工具,底层切换到了 vite (下一代前端工具链),为开发提供极速响应
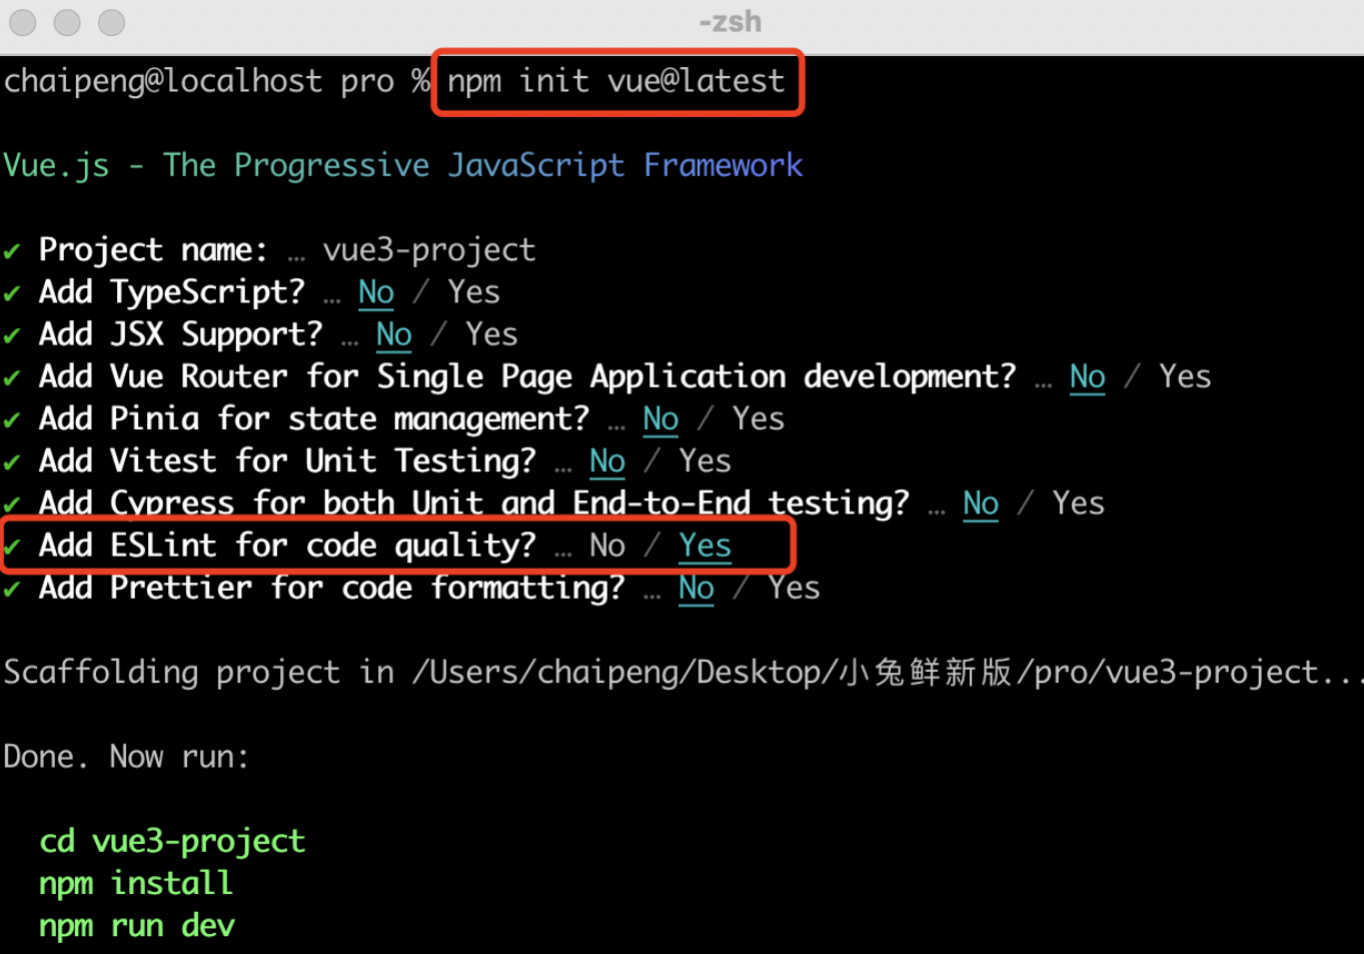
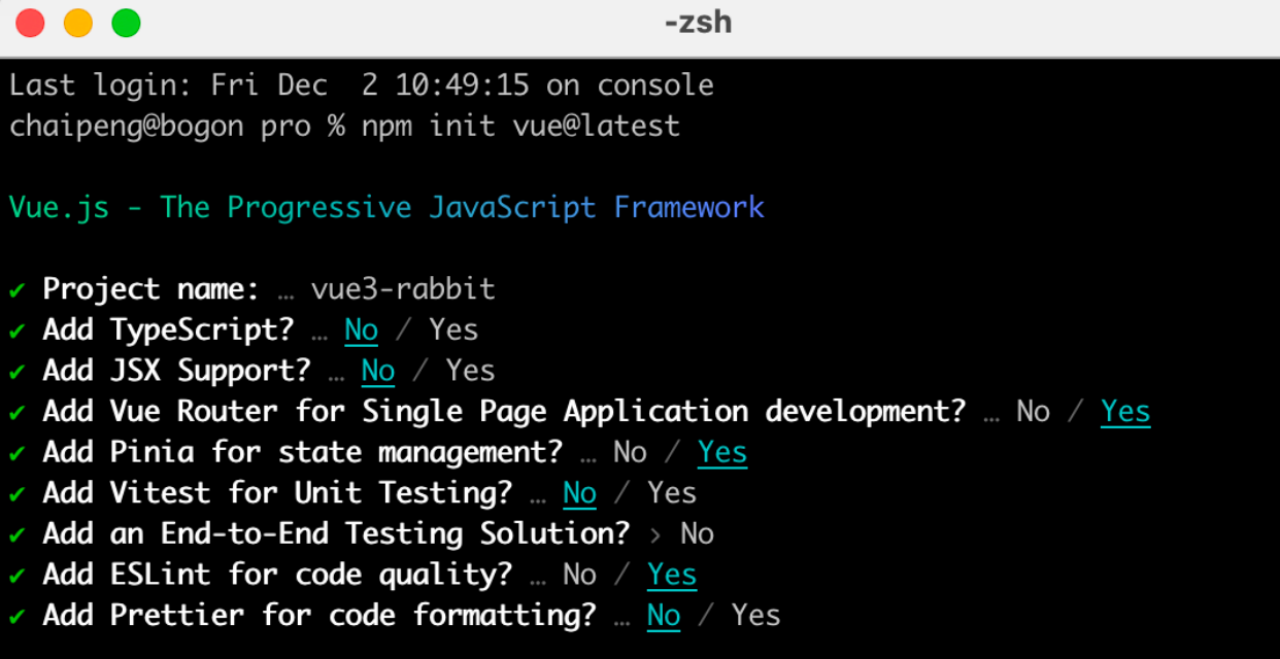
2. 使用create-vue创建项目
前置条件 - 已安装16.0或更高版本的Node.js
执行如下命令,这一指令将会安装并执行 create-vue
npm init vue@latest
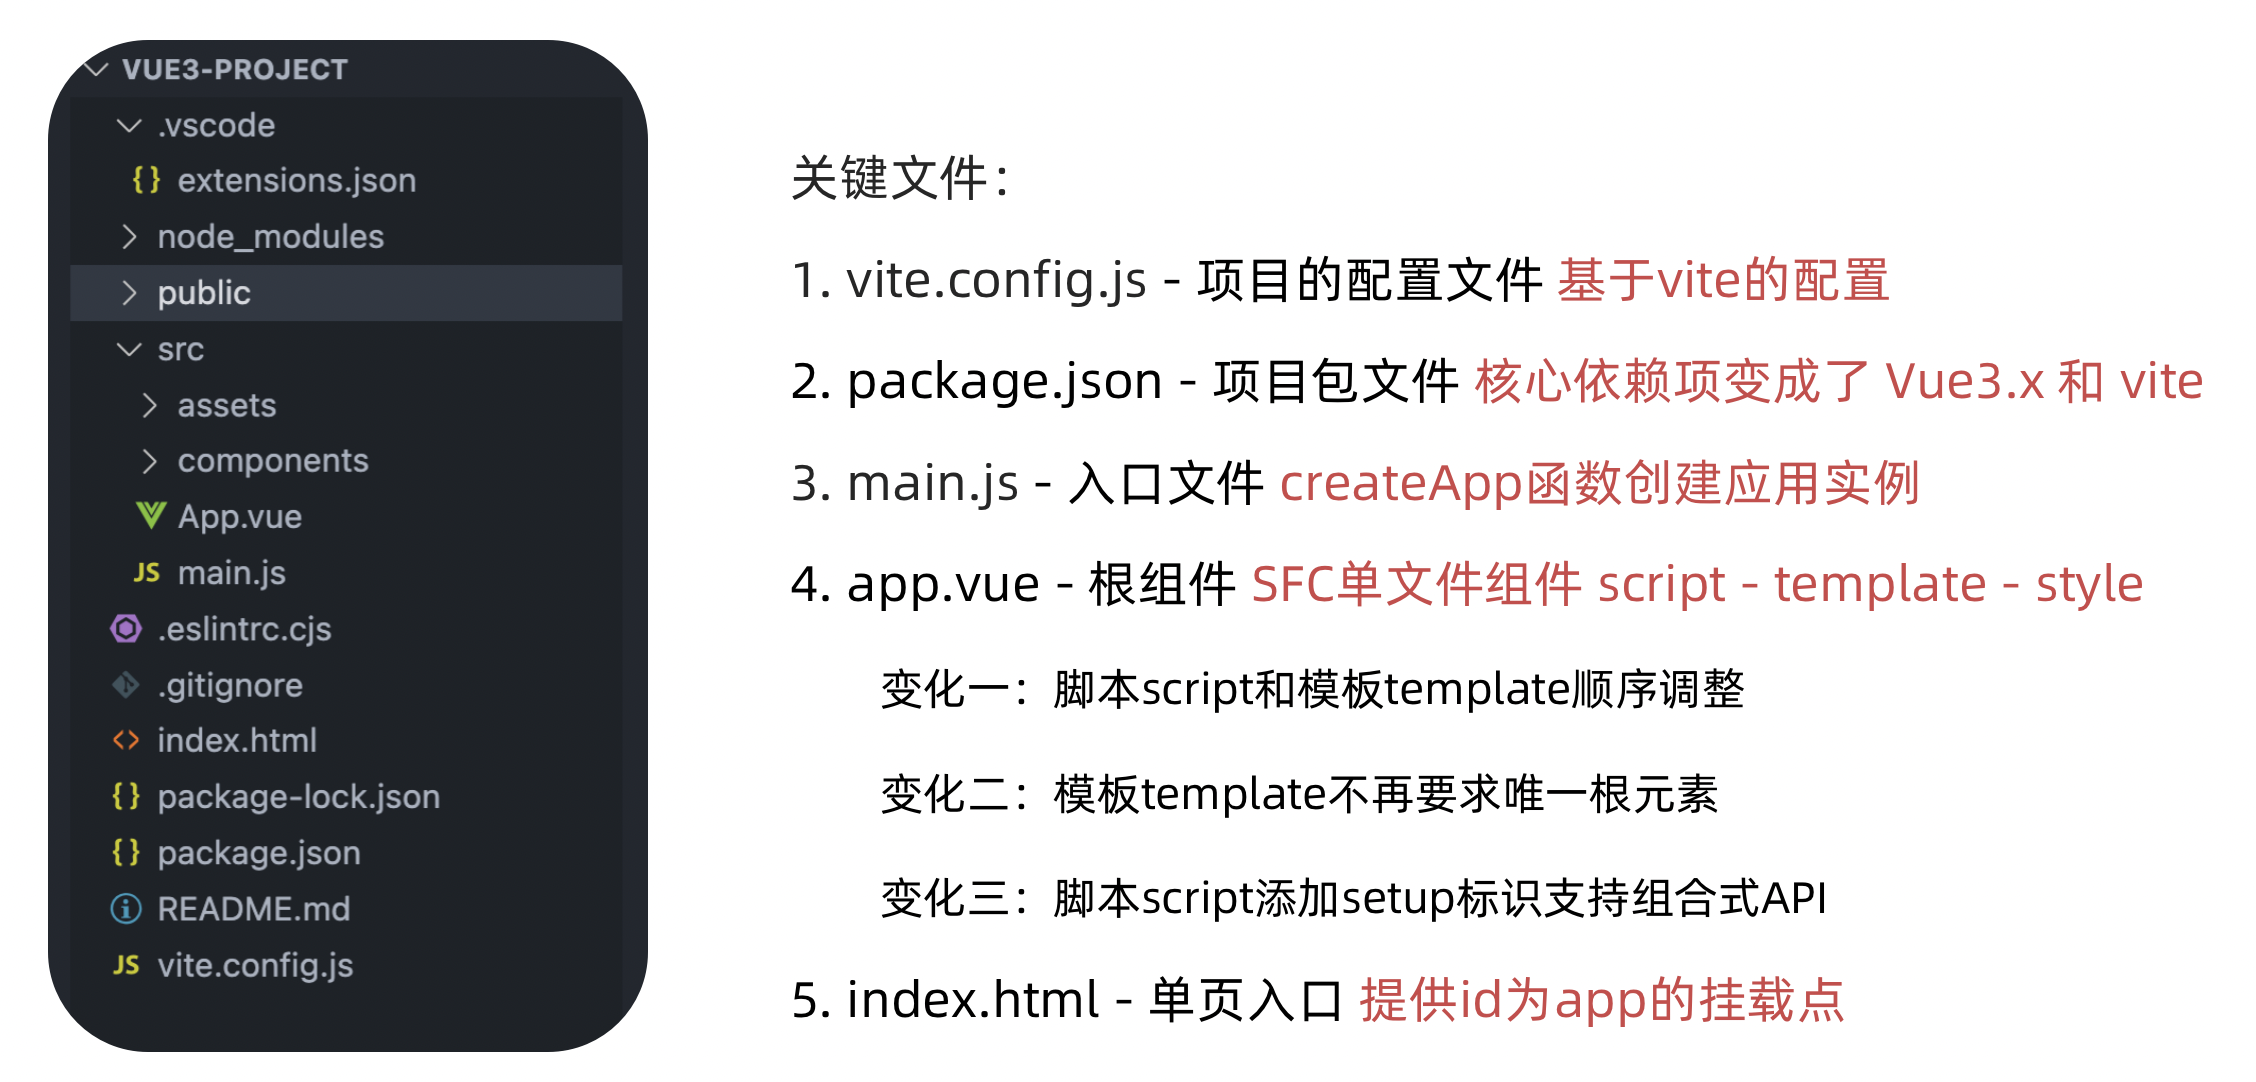
熟悉项目和关键文件
组合式API - setup选项
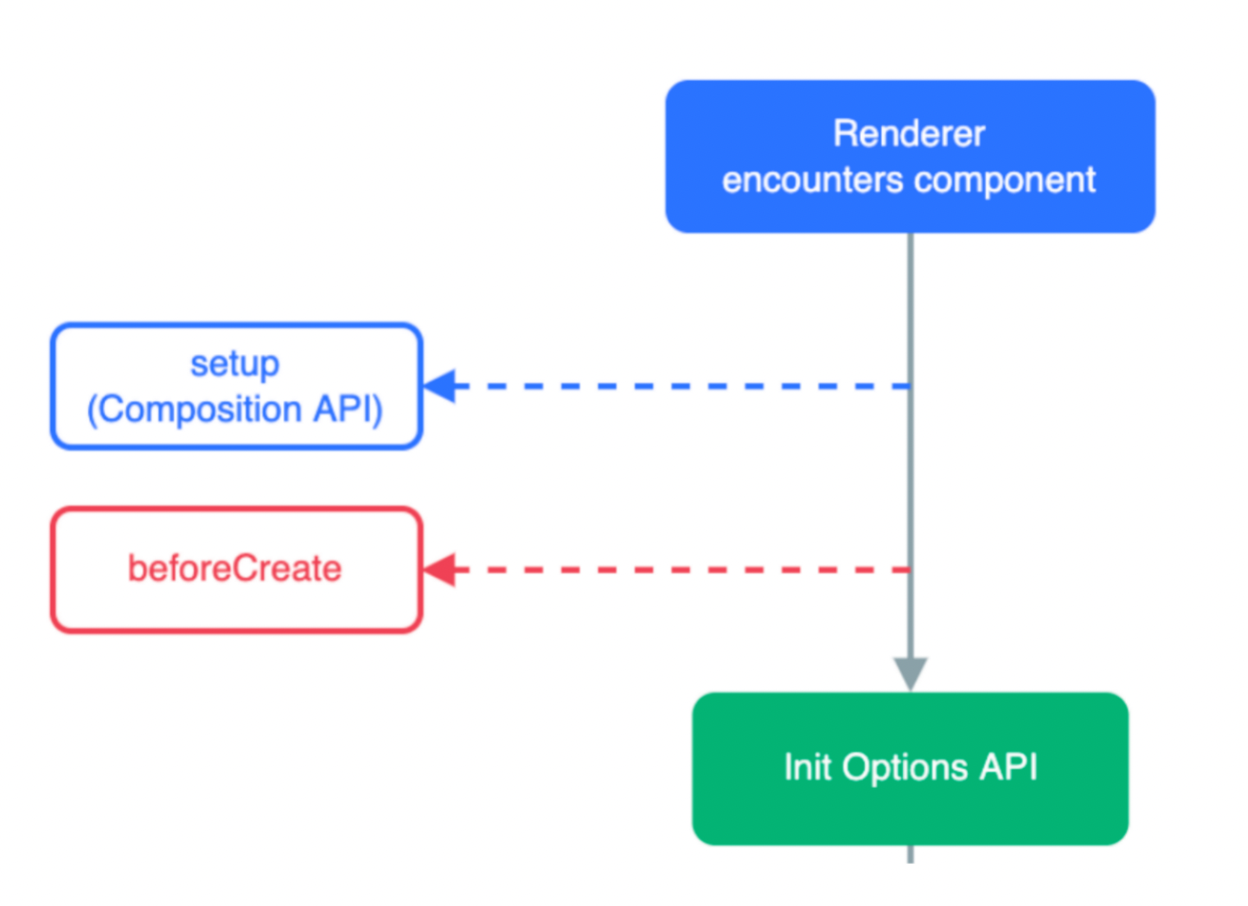
1. setup选项的写法和执行时机
写法
<script>export default {setup(){},beforeCreate(){}}
</script>
执行时机
在beforeCreate钩子之前执行
2. setup中写代码的特点
在setup函数中写的数据和方法需要在末尾以对象的方式return,才能给模版使用
<script>export default {setup(){const message = 'this is message'const logMessage = ()=>{console.log(message)}// 必须return才可以return {message,logMessage}}}
</script>
3.
script标签添加 setup标记,不需要再写导出语句,默认会添加导出语句
<script setup>const message = 'this is message'const logMessage = ()=>{console.log(message)}
</script>
组合式API - reactive和ref函数
1. reactive
接受对象类型数据的参数传入并返回一个响应式的对象
<script setup>// 导入import { reactive } from 'vue'// 执行函数 传入参数 变量接收const state = reactive({msg:'this is msg'})const setSate = ()=>{// 修改数据更新视图state.msg = 'this is new msg'}
</script><template>{{ state.msg }}<button @click="setState">change msg</button>
</template>
2. ref
接收简单类型或者对象类型的数据传入并返回一个响应式的对象
<script setup>// 导入import { ref } from 'vue'// 执行函数 传入参数 变量接收const count = ref(0)const setCount = ()=>{// 修改数据更新视图必须加上.valuecount.value++}
</script><template><button @click="setCount">{{count}}</button>
</template>
3. reactive 对比 ref
- 都是用来生成响应式数据
- 不同点
- reactive不能处理简单类型的数据
- ref参数类型支持更好,但是必须通过.value做访问修改
- ref函数内部的实现依赖于reactive函数
- 在实际工作中的推荐
- 推荐使用ref函数,减少记忆负担,小兔鲜项目都使用ref
组合式API - computed
计算属性基本思想和Vue2保持一致,组合式API下的计算属性只是修改了API写法
<script setup>
// 导入
import {ref, computed } from 'vue'
// 原始数据
const count = ref(0)
// 计算属性
const doubleCount = computed(()=>count.value * 2)// 原始数据
const list = ref([1,2,3,4,5,6,7,8])
// 计算属性list
const filterList = computed(item=>item > 2)
</script>
组合式API - watch
侦听一个或者多个数据的变化,数据变化时执行回调函数,俩个额外参数 immediate控制立刻执行,deep开启深度侦听
1. 侦听单个数据
<script setup>// 1. 导入watchimport { ref, watch } from 'vue'const count = ref(0)// 2. 调用watch 侦听变化watch(count, (newValue, oldValue)=>{console.log(`count发生了变化,老值为${oldValue},新值为${newValue}`)})
</script>
2. 侦听多个数据
侦听多个数据,第一个参数可以改写成数组的写法
<script setup>// 1. 导入watchimport { ref, watch } from 'vue'const count = ref(0)const name = ref('cp')// 2. 调用watch 侦听变化watch([count, name], ([newCount, newName],[oldCount,oldName])=>{console.log(`count或者name变化了,[newCount, newName],[oldCount,oldName])})
</script>
3. immediate
在侦听器创建时立即出发回调,响应式数据变化之后继续执行回调
<script setup>// 1. 导入watchimport { ref, watch } from 'vue'const count = ref(0)// 2. 调用watch 侦听变化watch(count, (newValue, oldValue)=>{console.log(`count发生了变化,老值为${oldValue},新值为${newValue}`)},{immediate: true})
</script>
4. deep
通过watch监听的ref对象默认是浅层侦听的,直接修改嵌套的对象属性不会触发回调执行,需要开启deep
<script setup>// 1. 导入watchimport { ref, watch } from 'vue'const state = ref({ count: 0 })// 2. 监听对象statewatch(state, ()=>{console.log('数据变化了')})const changeStateByCount = ()=>{// 直接修改不会引发回调执行state.value.count++}
</script><script setup>// 1. 导入watchimport { ref, watch } from 'vue'const state = ref({ count: 0 })// 2. 监听对象state 并开启deepwatch(state, ()=>{console.log('数据变化了')},{deep:true})const changeStateByCount = ()=>{// 此时修改可以触发回调state.value.count++}
</script>
组合式API - 生命周期函数
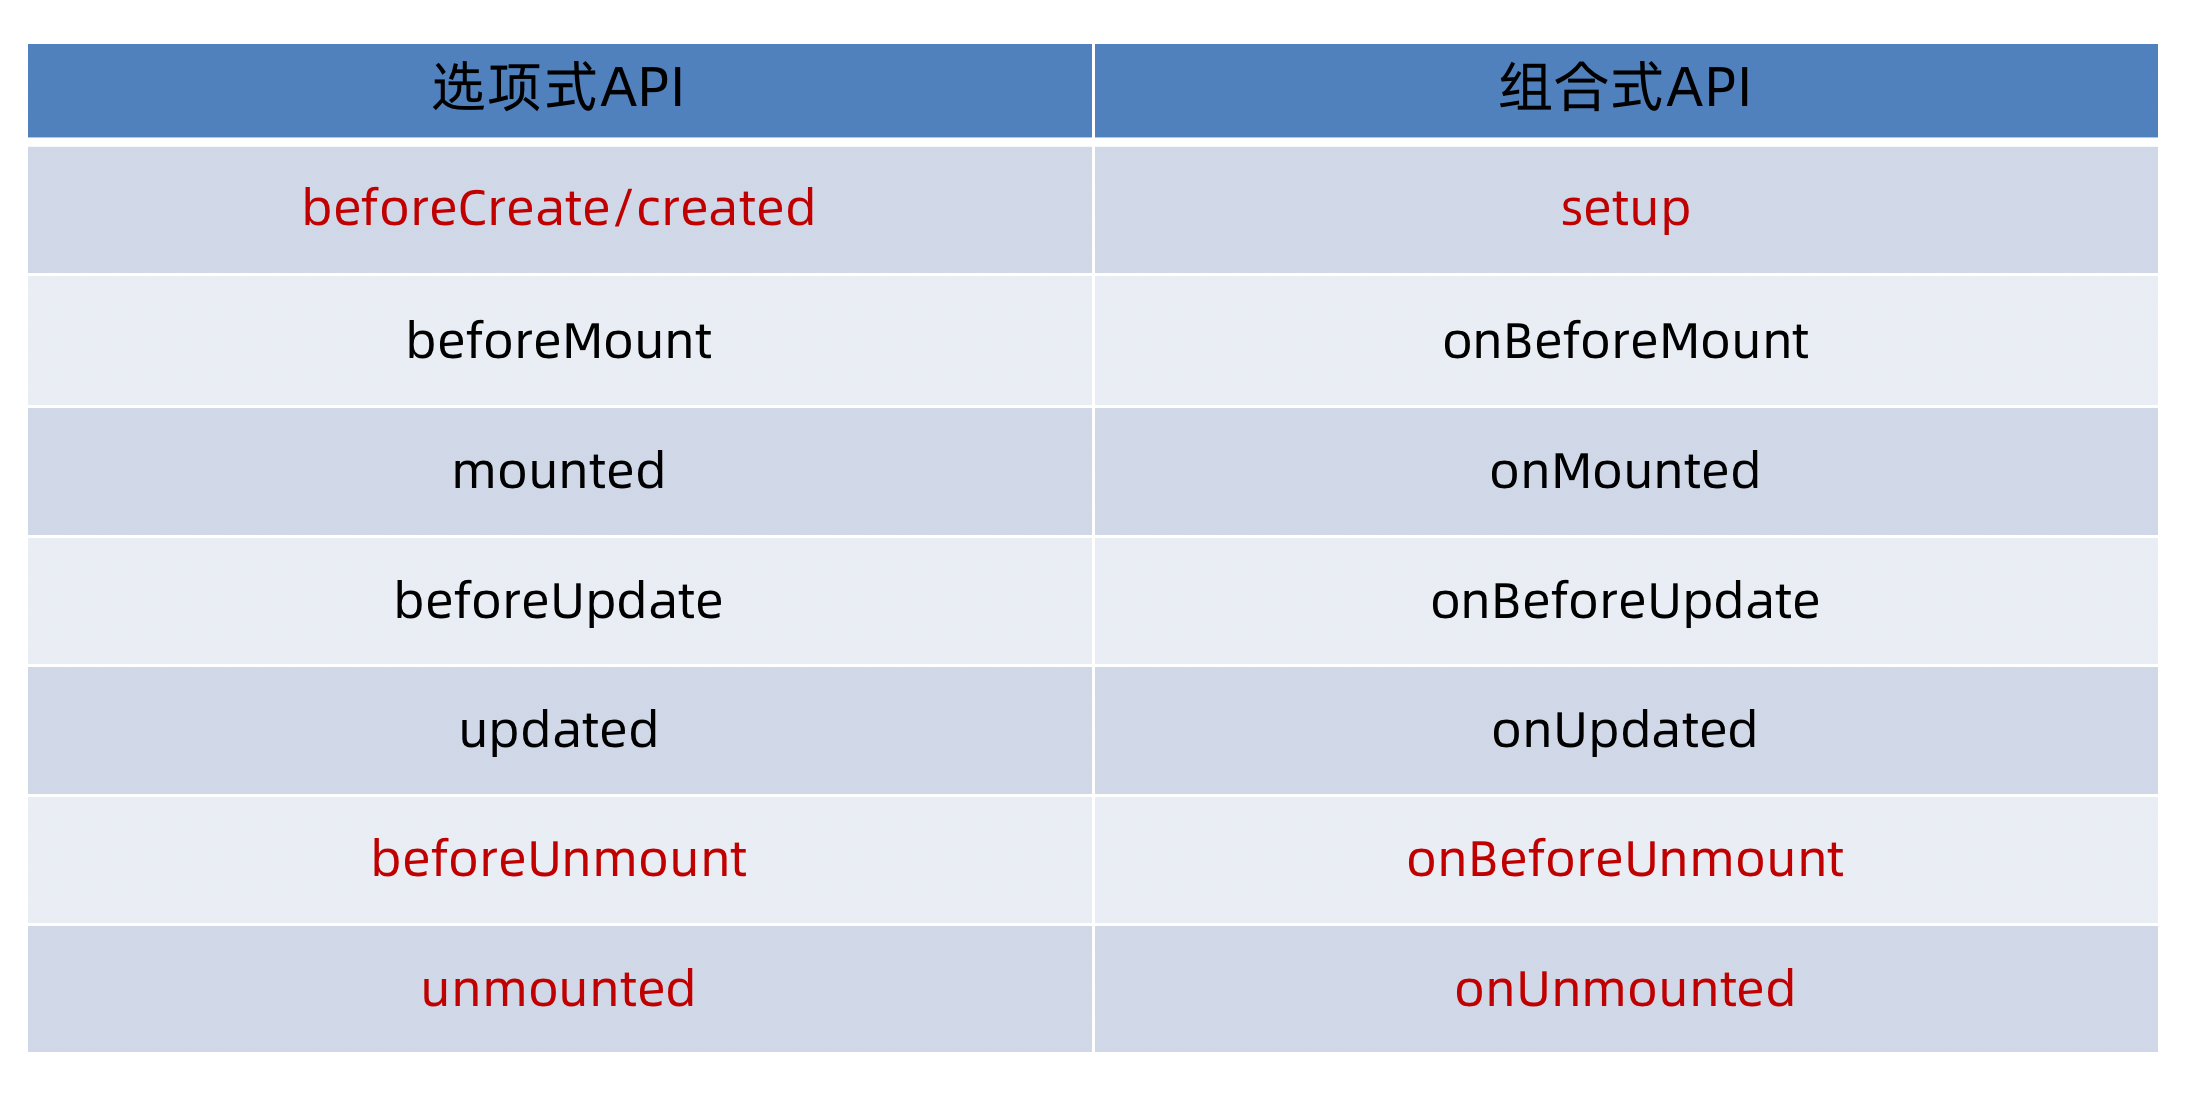
1. 选项式对比组合式
2. 生命周期函数基本使用
- 导入生命周期函数
- 执行生命周期函数,传入回调
<scirpt setup>
import { onMounted } from 'vue'
onMounted(()=>{// 自定义逻辑
})
</script>
3. 执行多次
生命周期函数执行多次的时候,会按照顺序依次执行
<scirpt setup>
import { onMounted } from 'vue'
onMounted(()=>{// 自定义逻辑
})onMounted(()=>{// 自定义逻辑
})
</script>
组合式API - 父子通信
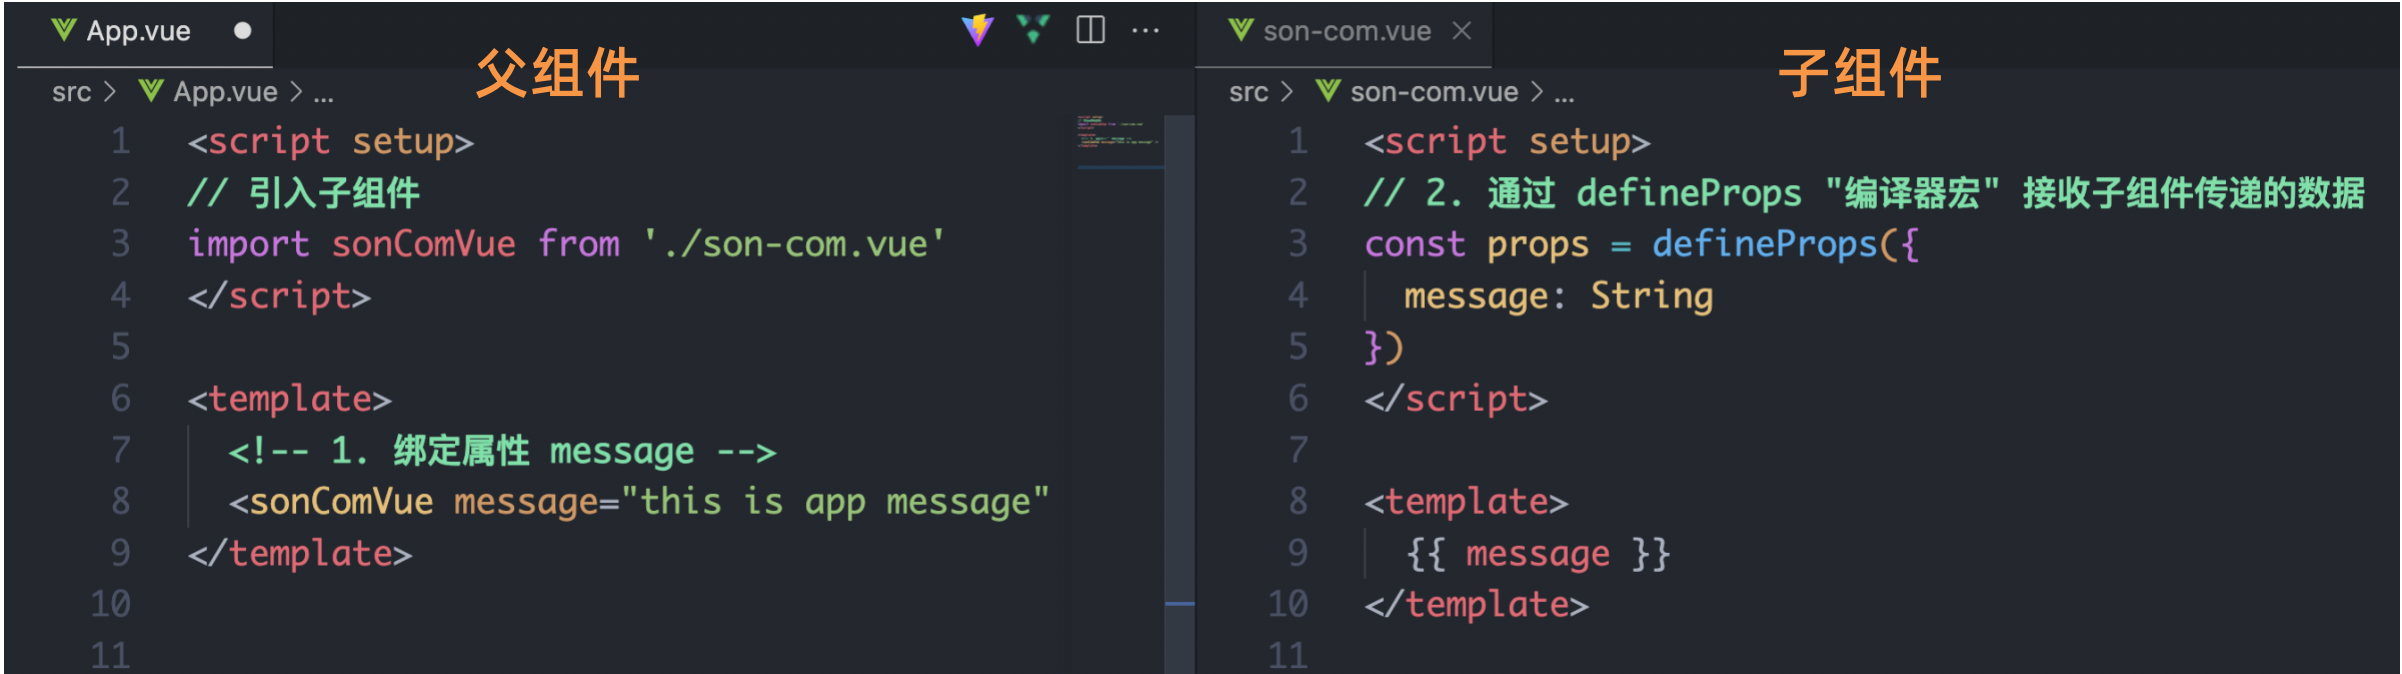
1. 父传子
基本思想
- 父组件中给子组件绑定属性
- 子组件内部通过props选项接收数据
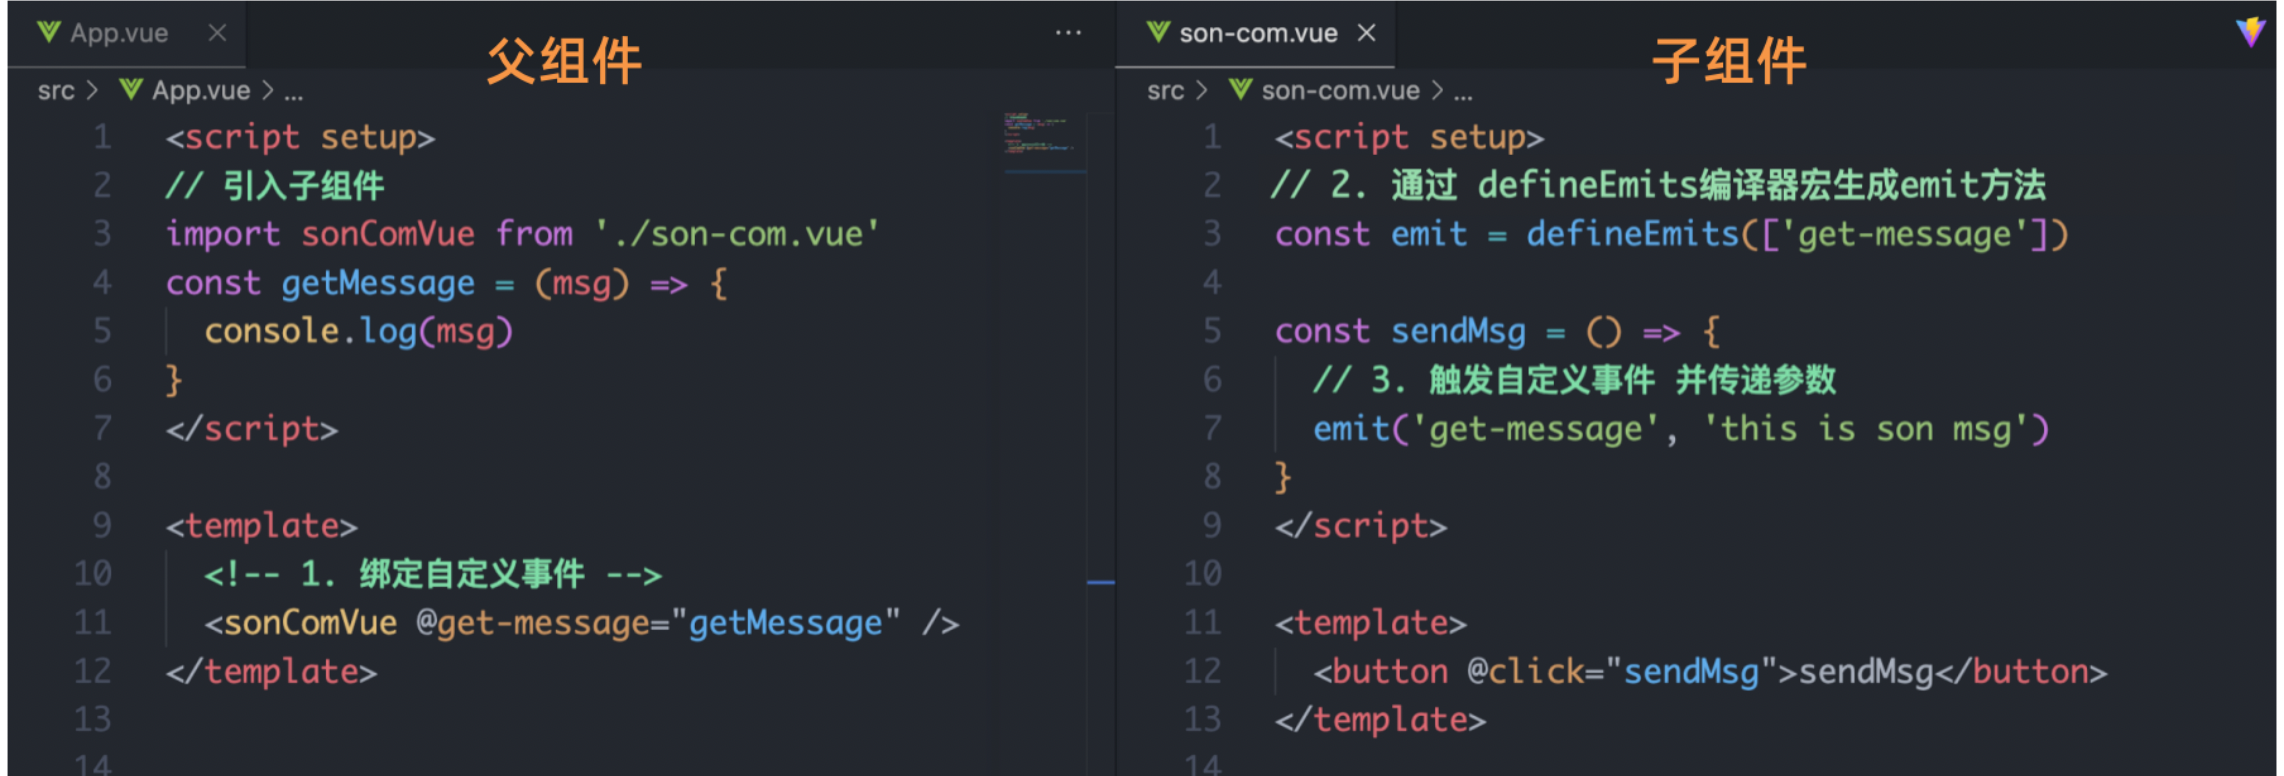
2. 子传父
基本思想
- 父组件中给子组件标签通过@绑定事件
- 子组件内部通过 emit 方法触发事件
组合式API - 模版引用
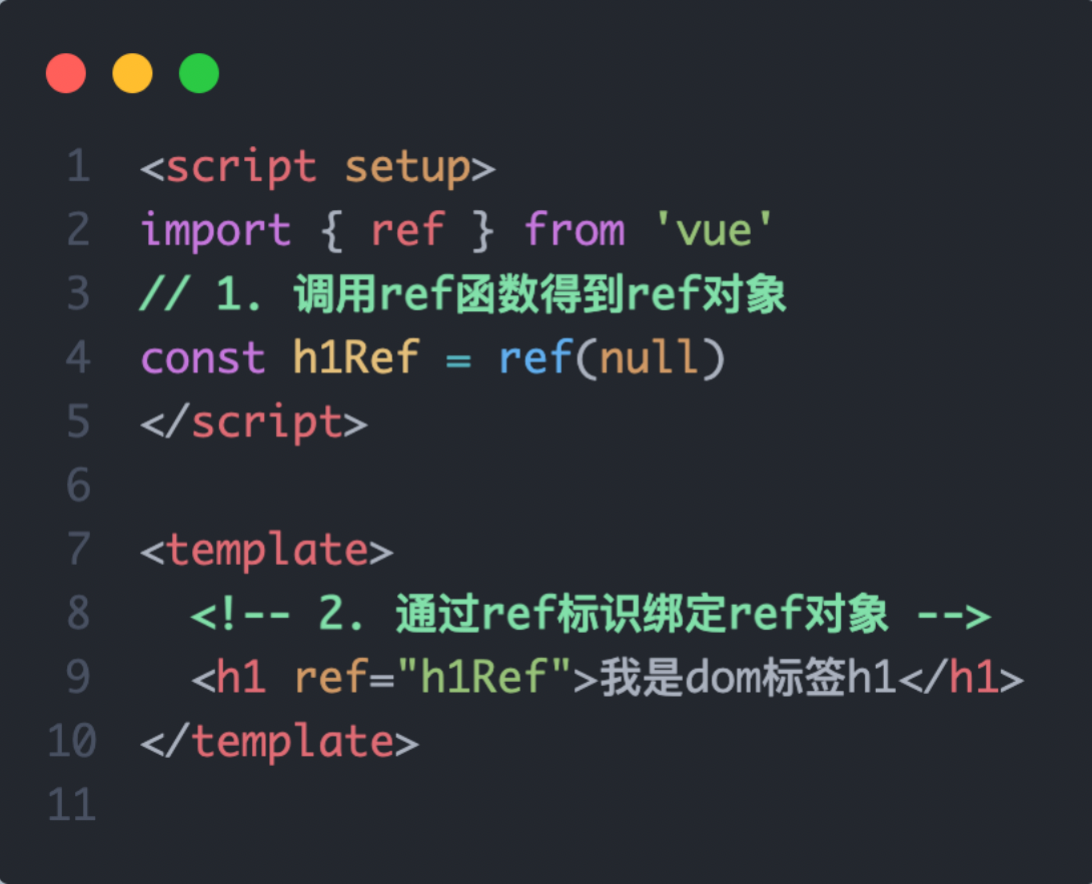
概念:通过 ref标识 获取真实的 dom对象或者组件实例对象
1. 基本使用
实现步骤:
- 调用ref函数生成一个ref对象
- 通过ref标识绑定ref对象到标签
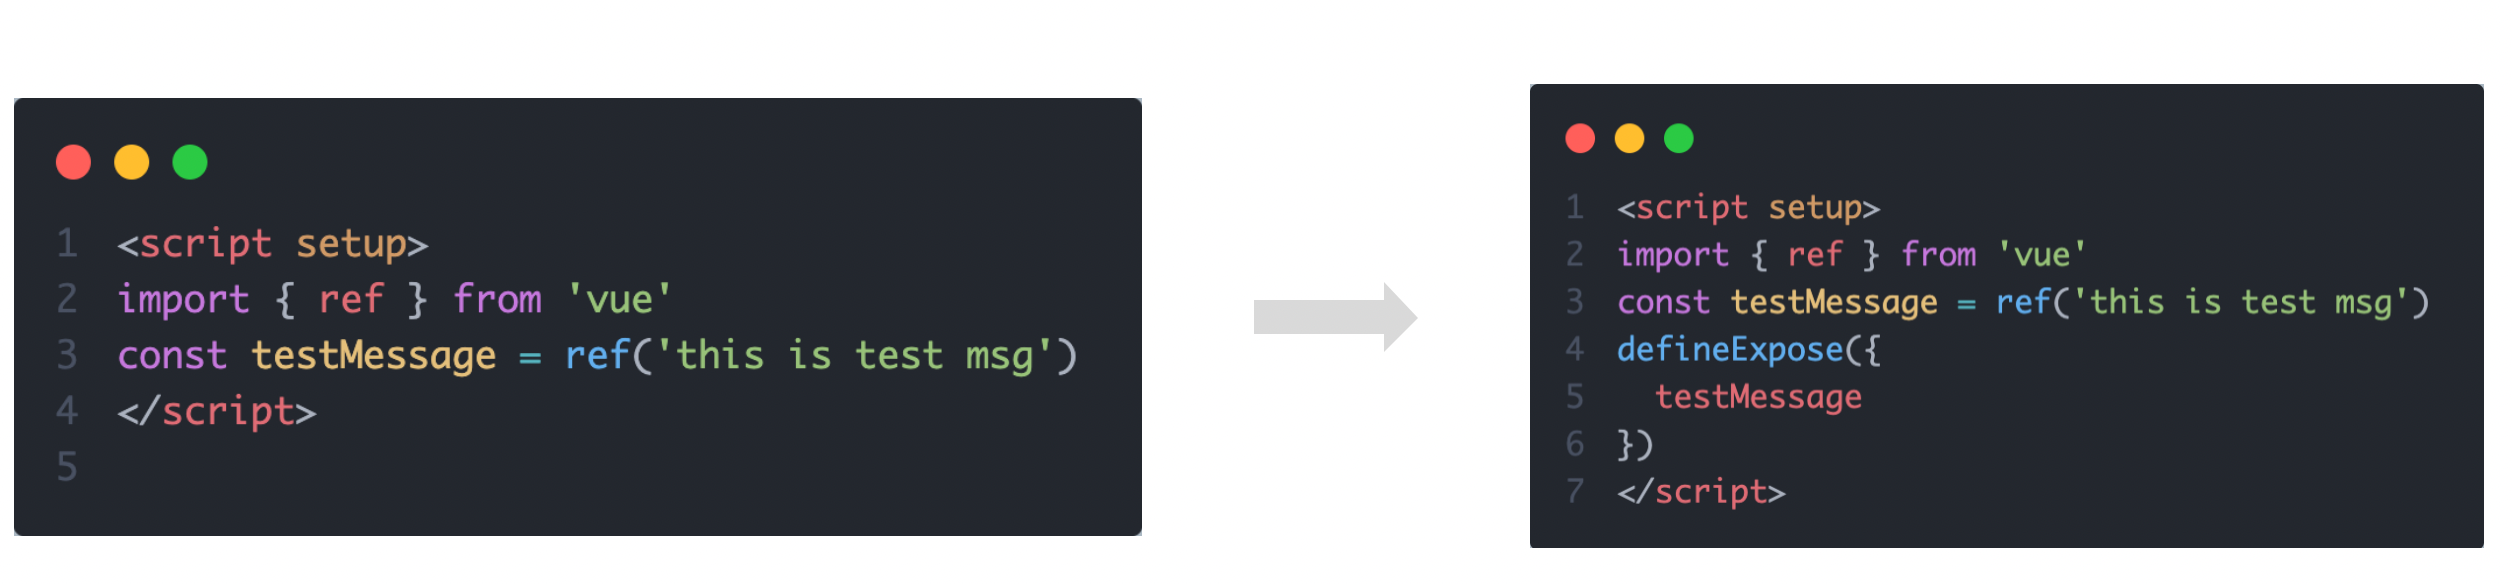
2. defineExpose
默认情况下在
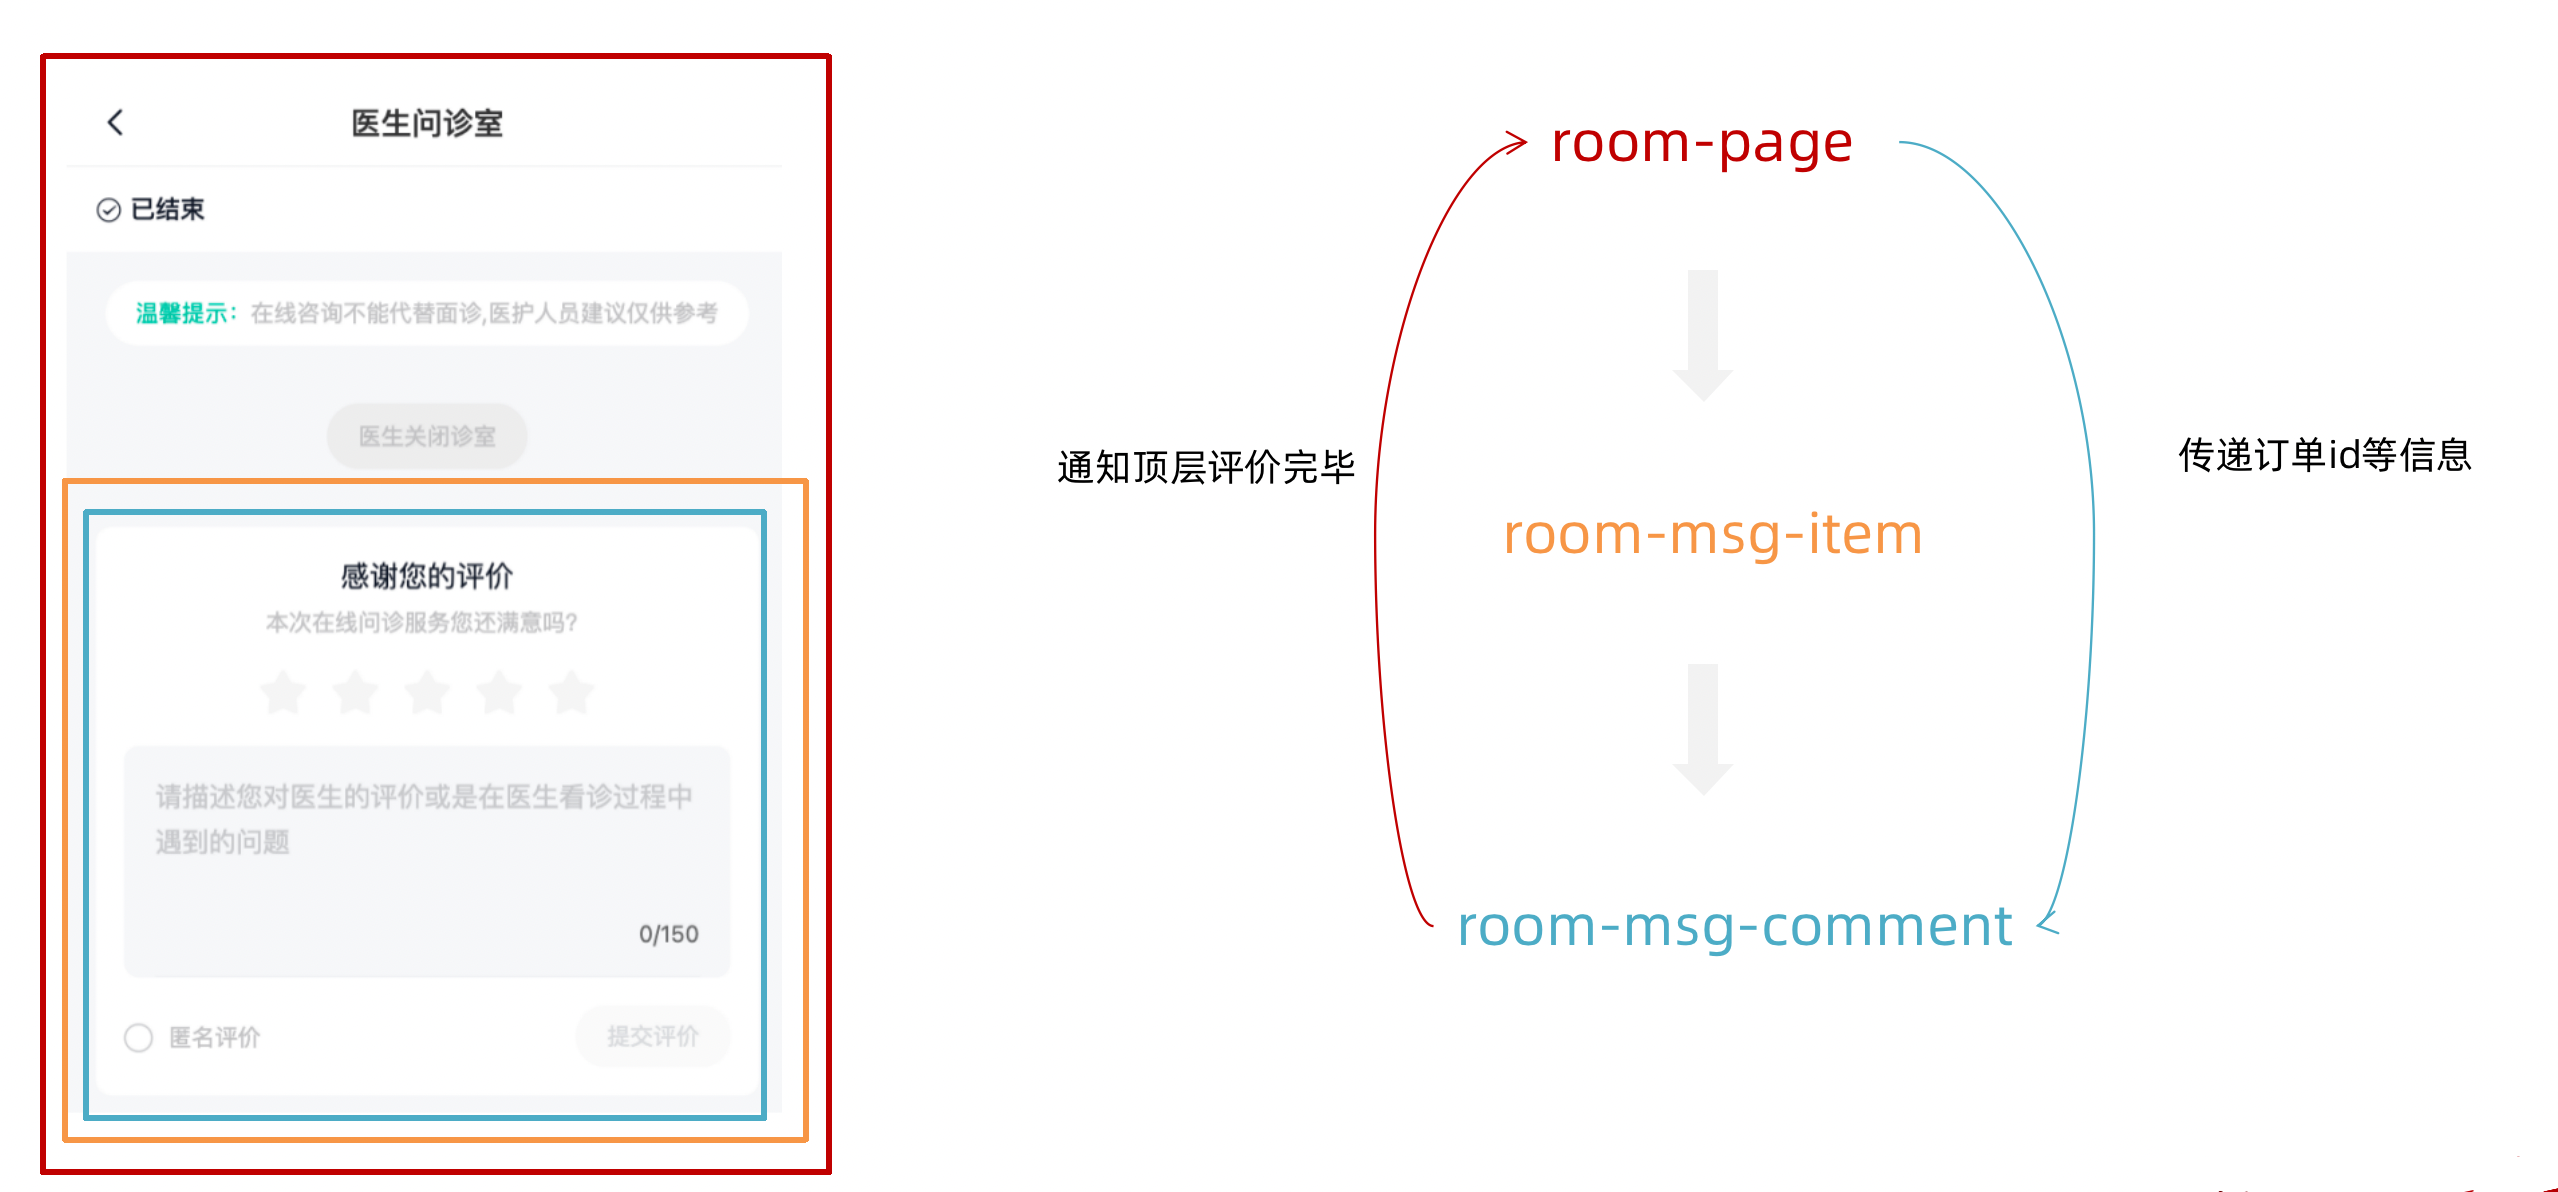
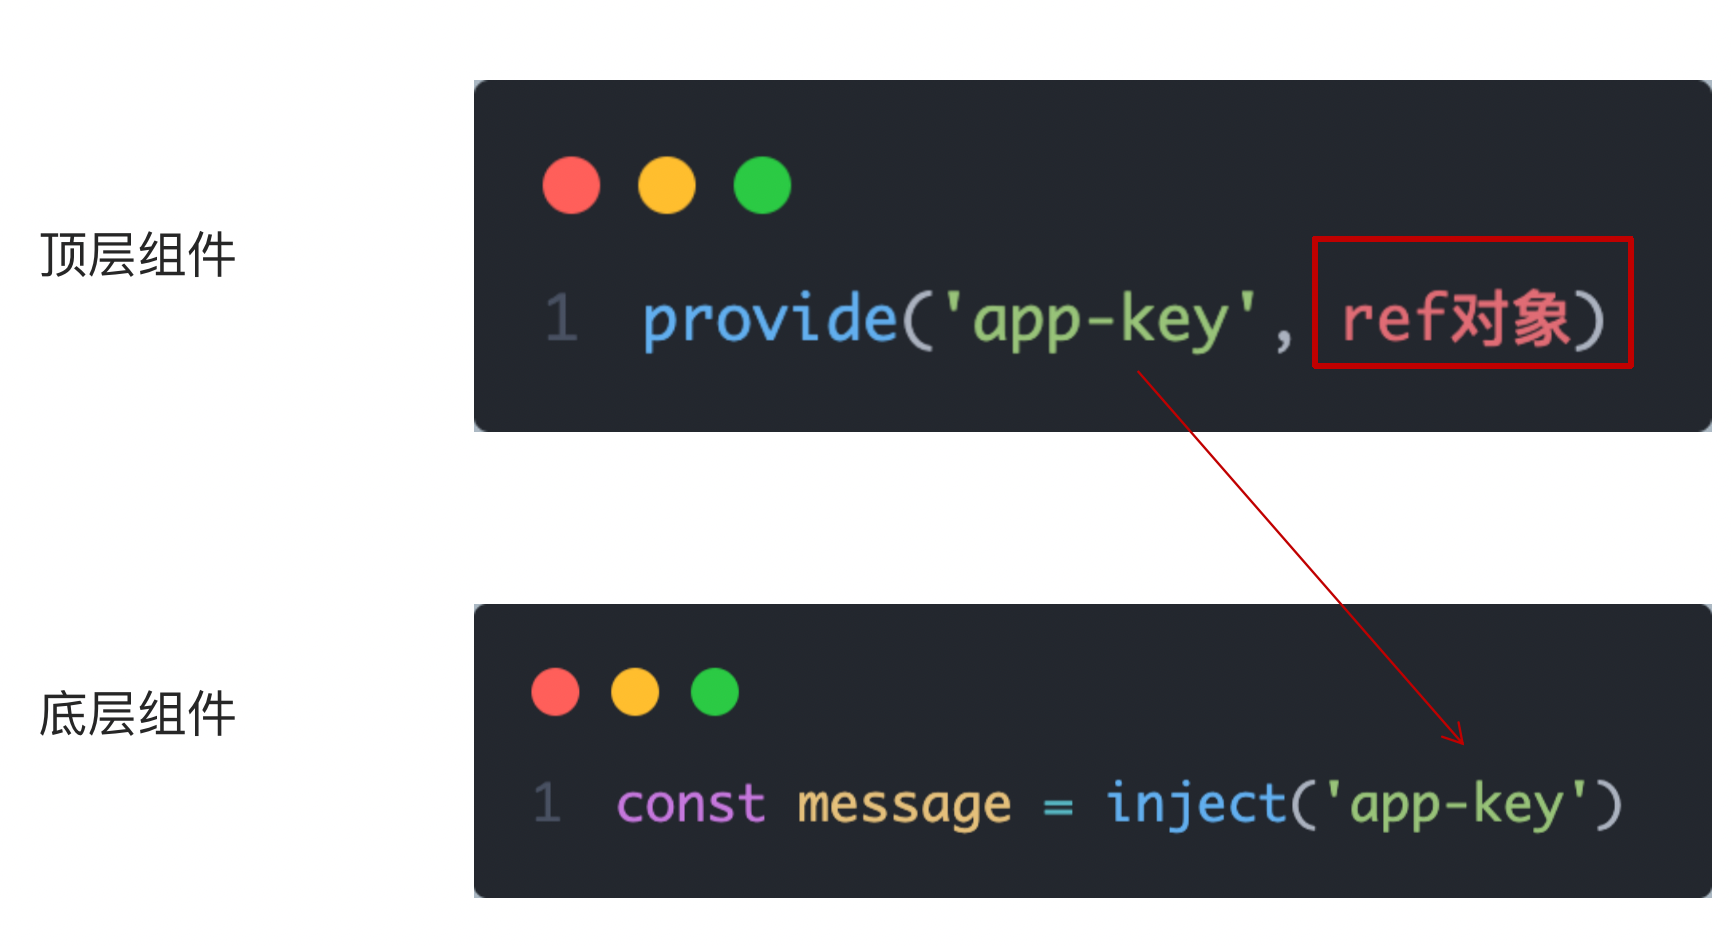
组合式API - provide和inject
1. 作用和场景
顶层组件向任意的底层组件传递数据和方法,实现跨层组件通信
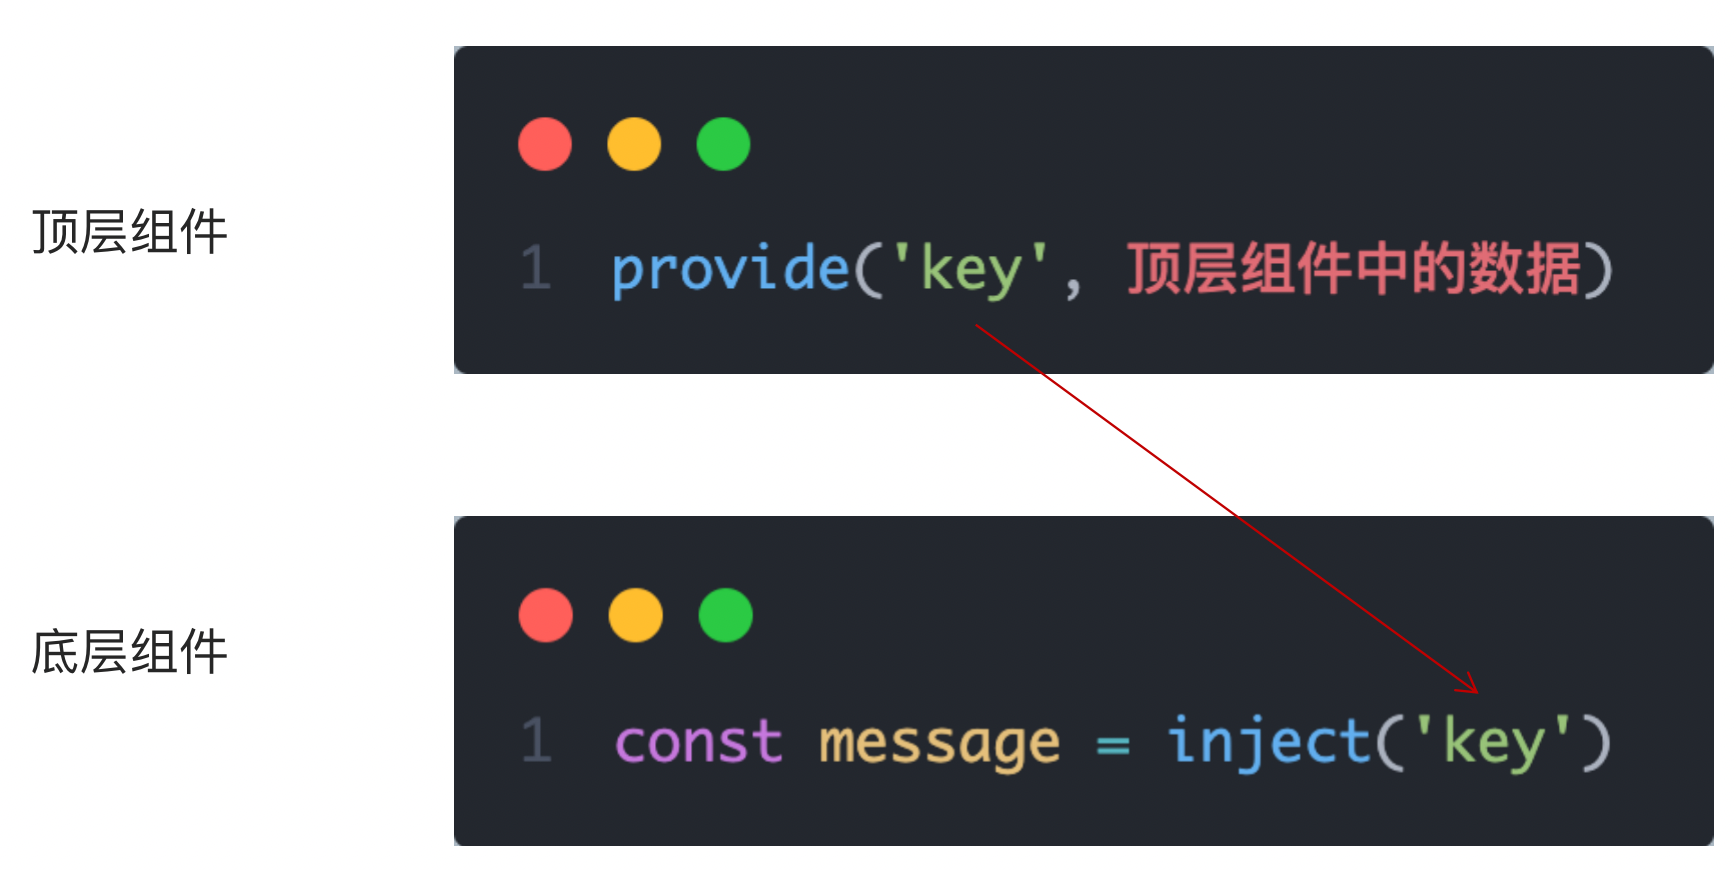
2. 跨层传递普通数据
实现步骤
- 顶层组件通过
provide函数提供数据- 底层组件通过
inject函数提供数据
3. 跨层传递响应式数据
在调用provide函数时,第二个参数设置为ref对象
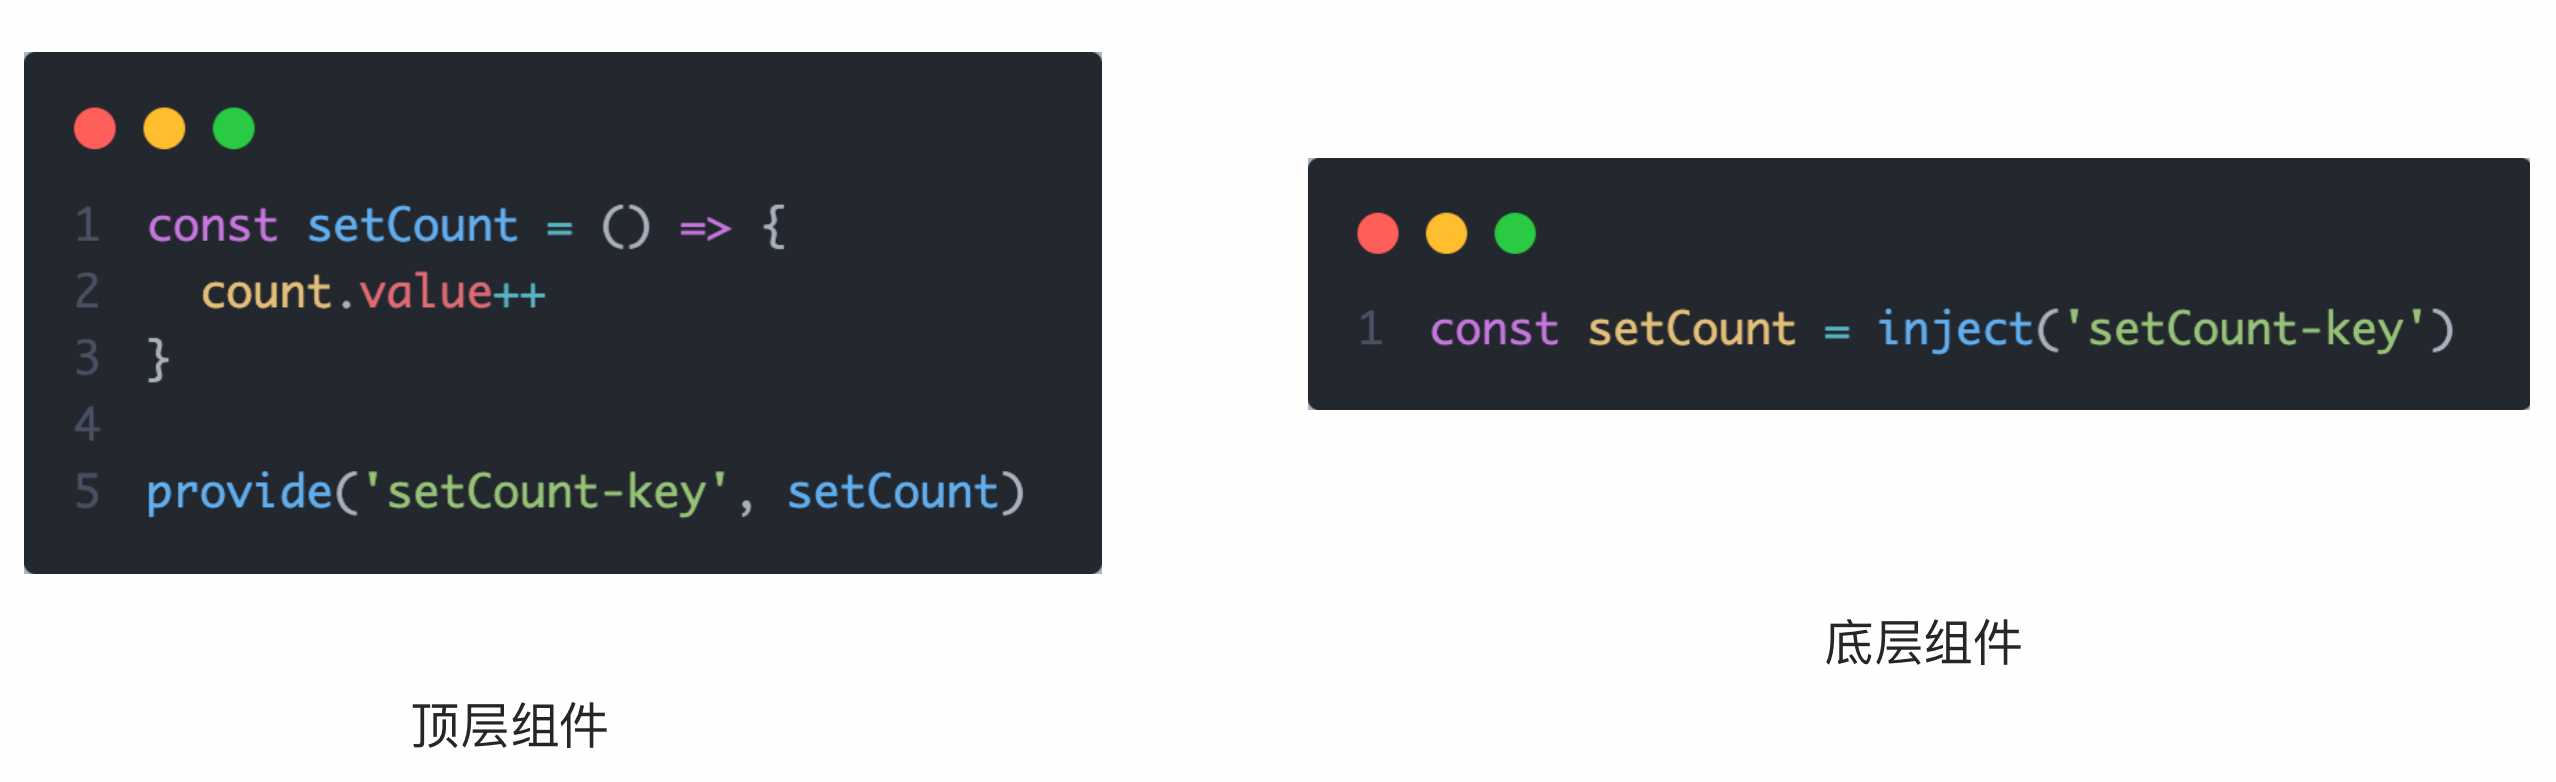
4. 跨层传递方法
顶层组件可以向底层组件传递方法,底层组件调用方法修改顶层组件的数据
综合案例
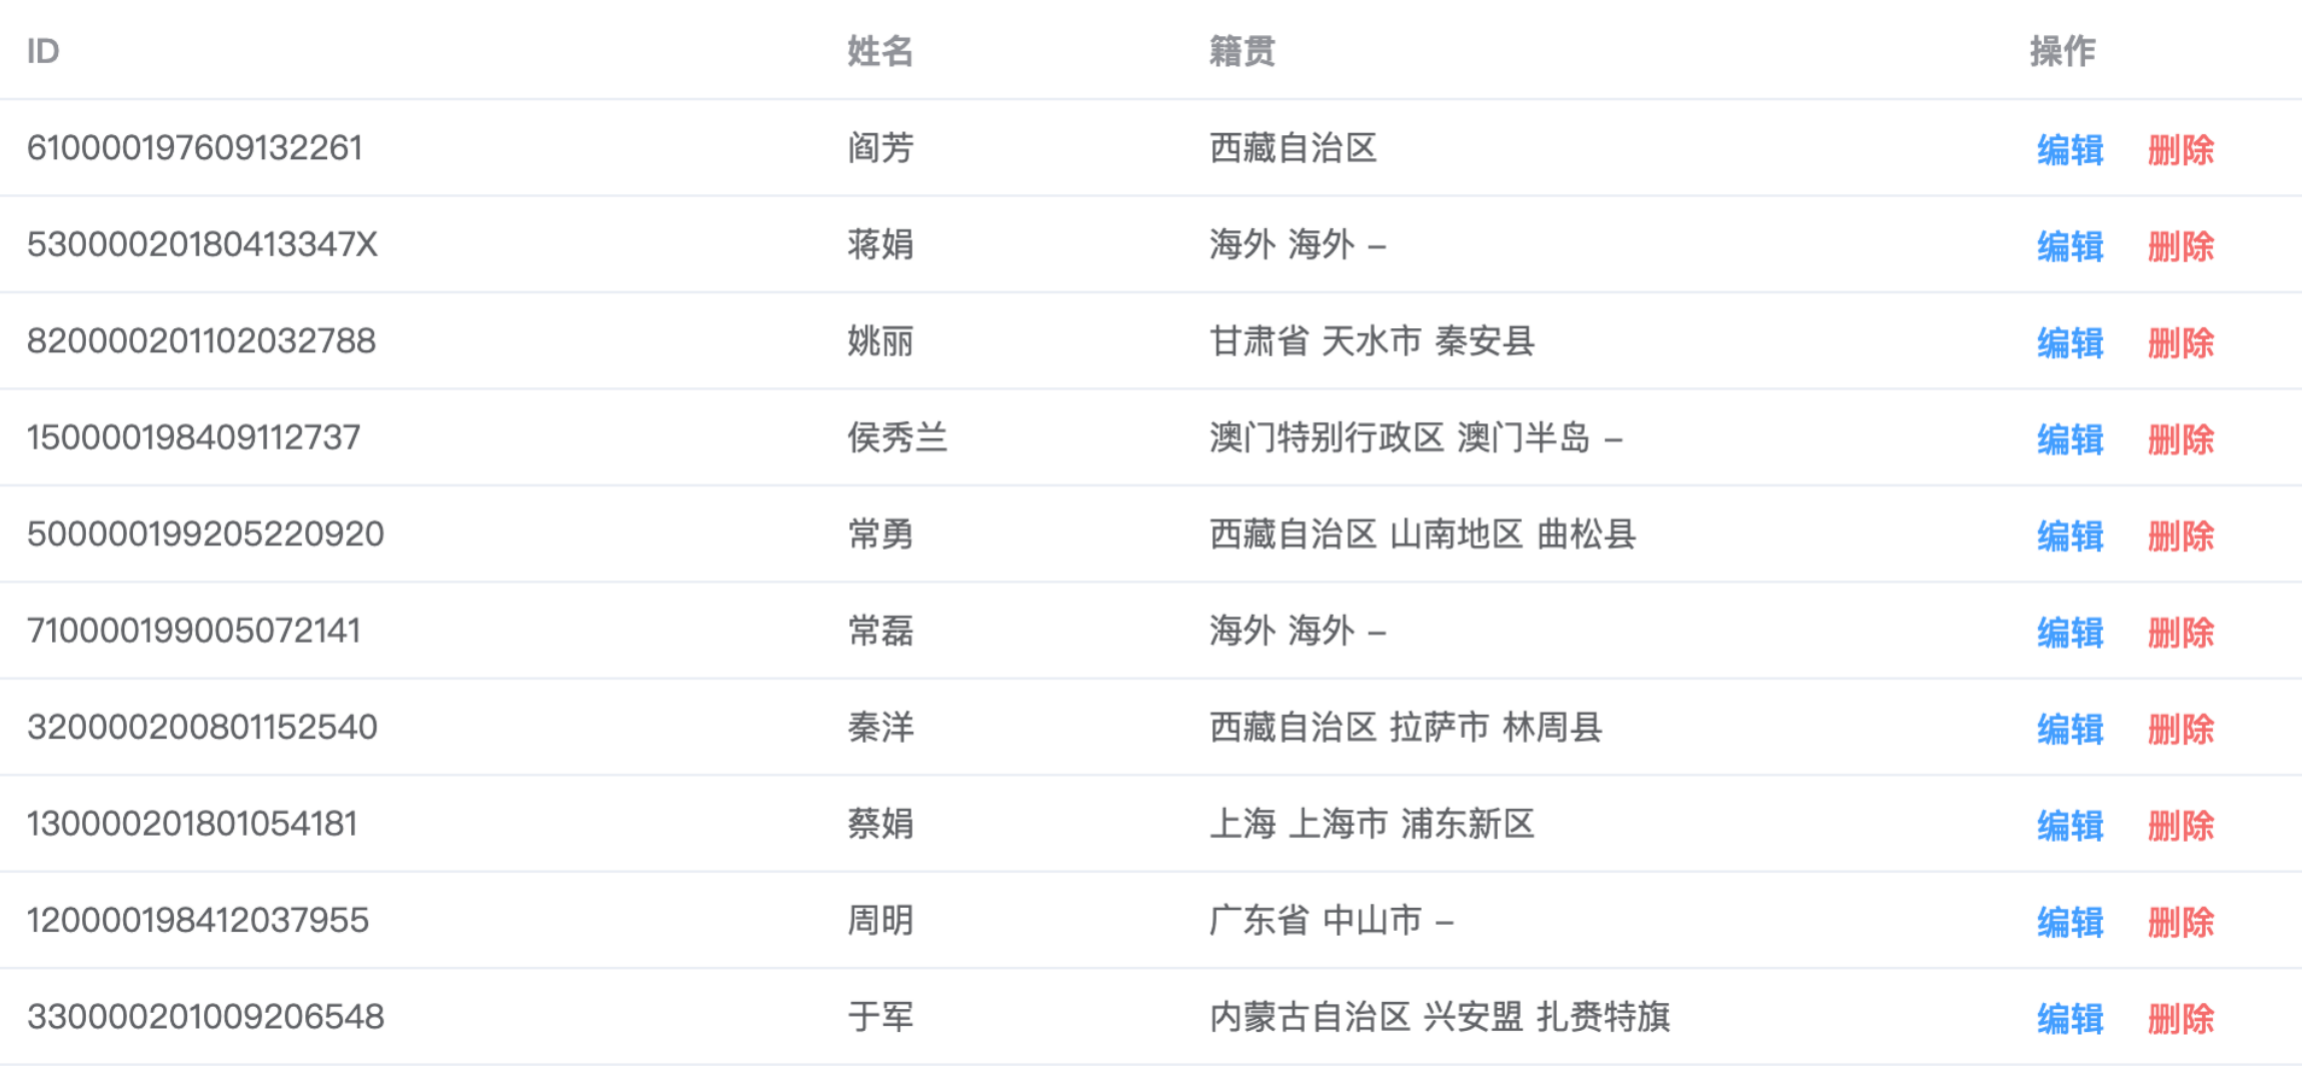
1. 项目地址
git clone http://git.itcast.cn/heimaqianduan/vue3-basic-project.git
2. 项目说明
- 模版已经配置好了案例必须的安装包
- 案例用到的接口在 README.MD文件 中
- 案例项目有俩个分支,main主分支为开发分支,complete分支为完成版分支供开发完参考
什么是pinia
Pinia 是 Vue 的专属状态管理库,可以实现跨组件或页面共享状态,是 vuex 状态管理工具的替代品,和 Vuex相比,具备以下优势
- 提供更加简单的API (去掉了 mutation )
- 提供符合组合式API风格的API (和 Vue3 新语法统一)
- 去掉了modules的概念,每一个store都是一个独立的模块
- 搭配 TypeScript 一起使用提供可靠的类型推断
创建空Vue项目并安装Pinia
1. 创建空Vue项目
npm init vue@latest
2. 安装Pinia并注册
npm i pinia
import { createPinia } from 'pinia'const app = createApp(App)
// 以插件的形式注册
app.use(createPinia())
app.use(router)
app.mount('#app')
实现counter
核心步骤:
- 定义store
- 组件使用store
1- 定义store
import { defineStore } from 'pinia'
import { ref } from 'vue'export const useCounterStore = defineStore('counter', ()=>{// 数据 (state)const count = ref(0)// 修改数据的方法 (action)const increment = ()=>{count.value++}// 以对象形式返回return {count,increment}
})
2- 组件使用store
<script setup>// 1. 导入use方法import { useCounterStore } from '@/stores/counter'// 2. 执行方法得到store store里有数据和方法const counterStore = useCounterStore()
</script><template><button @click="counterStore.increment">{{ counterStore.count }}</button>
</template>
实现getters
getters直接使用计算属性即可实现
// 数据(state)
const count = ref(0)
// getter (computed)
const doubleCount = computed(() => count.value * 2)
异步action
思想:action函数既支持同步也支持异步,和在组件中发送网络请求写法保持一致
步骤:
- store中定义action
- 组件中触发action
1- store中定义action
const API_URL = 'http://geek.itheima.net/v1_0/channels'export const useCounterStore = defineStore('counter', ()=>{// 数据const list = ref([])// 异步actionconst loadList = async ()=>{const res = await axios.get(API_URL)list.value = res.data.data.channels}return {list,loadList}
})
2- 组件中调用action
<script setup>import { useCounterStore } from '@/stores/counter'const counterStore = useCounterStore()// 调用异步actioncounterStore.loadList()
</script><template><ul><li v-for="item in counterStore.list" :key="item.id">{{ item.name }}</li></ul>
</template>
storeToRefs保持响应式解构
直接基于store进行解构赋值,响应式数据(state和getter)会丢失响应式特性,使用storeToRefs辅助保持响应式
<script setup>import { storeToRefs } from 'pinia'import { useCounterStore } from '@/stores/counter'const counterStore = useCounterStore()// 使用它storeToRefs包裹之后解构保持响应式const { count } = storeToRefs(counterStore)const { increment } = counterStore</script><template><button @click="increment">{{ count }}</button>
</template>
创建项目并整理目录
npm init vue@latest
jsconfig.json配置别名路径
配置别名路径可以在写代码时联想提示路径
{"compilerOptions" : {"baseUrl" : "./","paths" : {"@/*":["src/*"]}}
}
elementPlus引入
1. 安装elementPlus和自动导入插件
npm i elementPlus
npm install -D unplugin-vue-components unplugin-auto-import
2. 配置自动按需导入
// 引入插件
import AutoImport from 'unplugin-auto-import/vite'
import Components from 'unplugin-vue-components/vite'
import { ElementPlusResolver } from 'unplugin-vue-components/resolvers'export default defineConfig({plugins: [// 配置插件AutoImport({resolvers: [ElementPlusResolver()],}),Components({resolvers: [ElementPlusResolver()],}),]
})
3. 测试组件
<template><el-button type="primary">i am button</el-button>
</template>
定制elementPlus主题
1. 安装sass
基于vite的项目默认不支持css预处理器,需要开发者单独安装
npm i sass -D
2. 准备定制化的样式文件
/* 只需要重写你需要的即可 */
@forward 'element-plus/theme-chalk/src/common/var.scss' with ($colors: ('primary': (// 主色'base': #27ba9b,),'success': (// 成功色'base': #1dc779,),'warning': (// 警告色'base': #ffb302,),'danger': (// 危险色'base': #e26237,),'error': (// 错误色'base': #cf4444,),)
)
3. 自动导入配置
这里自动导入需要深入到elementPlus的组件中,按照官方的配置文档来
- 自动导入定制化样式文件进行样式覆盖
- 按需定制主题配置 (需要安装 unplugin-element-plus)
import { fileURLToPath, URL } from 'node:url'
import { defineConfig } from 'vite'
import vue from '@vitejs/plugin-vue'
import AutoImport from 'unplugin-auto-import/vite'
import Components from 'unplugin-vue-components/vite'
import { ElementPlusResolver } from 'unplugin-vue-components/resolvers'
// 导入对应包
import ElementPlus from 'unplugin-element-plus/vite'
export default defineConfig({plugins: [vue(),AutoImport({resolvers: [ElementPlusResolver()],}),Components({resolvers: [ElementPlusResolver()],}),// 按需定制主题配置ElementPlus({useSource: true,}),],resolve: {alias: {'@': fileURLToPath(new URL('./src', import.meta.url))}},css: {preprocessorOptions: {scss: {// 自动导入定制化样式文件进行样式覆盖additionalData: `@use "@/styles/element/index.scss" as *;`,}}}
})
axios安装并简单封装
1. 安装axios
npm i axios
2. 基础配置
官方文档地址:https://axios-http.com/zh/docs/intro
基础配置通常包括:
- 实例化 - baseURL + timeout
- 拦截器 - 携带token 401拦截等
import axios from 'axios'// 创建axios实例
const http = axios.create({baseURL: 'http://pcapi-xiaotuxian-front-devtest.itheima.net',timeout: 5000
})// axios请求拦截器
instance.interceptors.request.use(config => {return config
}, e => Promise.reject(e))// axios响应式拦截器
instance.interceptors.response.use(res => res.data, e => {return Promise.reject(e)
})export default http
3. 封装请求函数并测试
import http from '@/utils/http'export function getCategoryAPI () {return http({url: 'home/category/head'})
}
路由整体设计
路由设计原则:找页面的切换方式,如果是整体切换,则为一级路由,如果是在一级路由的内部进行的内容切换,则为二级路由
<template>我是登录页
</template>
<template>我是首页
</template>
<template>我是home
</template>
<template>我是分类
</template>
// createRouter:创建router实例对象
// createWebHistory:创建history模式的路由import { createRouter, createWebHistory } from 'vue-router'
import Login from '@/views/Login/index.vue'
import Layout from '@/views/Layout/index.vue'
import Home from '@/views/Home/index.vue'
import Category from '@/views/Category/index.vue'const router = createRouter({history: createWebHistory(import.meta.env.BASE_URL),// path和component对应关系的位置routes: [{path: '/',component: Layout,children: [{path: '',component: Home},{path: 'category',component: Category}]},{path: '/login',component: Login}]
})export default router
静态资源引入和Error Lens安装
1. 静态资源引入
- 图片资源 - 把 images 文件夹放到 assets 目录下
- 样式资源 - 把 common.scss 文件放到 styles 目录下
2. Error Lens插件安装
scss变量自动导入
$xtxColor: #27ba9b;
$helpColor: #e26237;
$sucColor: #1dc779;
$warnColor: #ffb302;
$priceColor: #cf4444;
css: {preprocessorOptions: {scss: {// 自动导入scss文件additionalData: `@use "@/styles/element/index.scss" as *;@use "@/styles/var.scss" as *;`,}}
}
组件结构快速搭建
<script setup></script><template><nav class="app-topnav"><div class="container"><ul><template v-if="true"><li><a href="javascript:;""><i class="iconfont icon-user"></i>周杰伦</a></li><li><el-popconfirm title="确认退出吗?" confirm-button-text="确认" cancel-button-text="取消"><template #reference><a href="javascript:;">退出登录</a></template></el-popconfirm></li><li><a href="javascript:;">我的订单</a></li><li><a href="javascript:;">会员中心</a></li></template><template v-else><li><a href="javascript:;">请先登录</a></li><li><a href="javascript:;">帮助中心</a></li><li><a href="javascript:;">关于我们</a></li></template></ul></div></nav>
</template><style scoped lang="scss">
.app-topnav {background: #333;ul {display: flex;height: 53px;justify-content: flex-end;align-items: center;li {a {padding: 0 15px;color: #cdcdcd;line-height: 1;display: inline-block;i {font-size: 14px;margin-right: 2px;}&:hover {color: $xtxColor;}}~li {a {border-left: 2px solid #666;}}}}
}
</style>
<script setup></script><template><header class='app-header'><div class="container"><h1 class="logo"><RouterLink to="/">小兔鲜</RouterLink></h1><ul class="app-header-nav"><li class="home"><RouterLink to="/">首页</RouterLink></li><li> <RouterLink to="/">居家</RouterLink> </li><li> <RouterLink to="/">美食</RouterLink> </li><li> <RouterLink to="/">服饰</RouterLink> </li></ul><div class="search"><i class="iconfont icon-search"></i><input type="text" placeholder="搜一搜"></div><!-- 头部购物车 --></div></header>
</template><style scoped lang='scss'>
.app-header {background: #fff;.container {display: flex;align-items: center;}.logo {width: 200px;a {display: block;height: 132px;width: 100%;text-indent: -9999px;background: url('@/assets/images/logo.png') no-repeat center 18px / contain;}}.app-header-nav {width: 820px;display: flex;padding-left: 40px;position: relative;z-index: 998;li {margin-right: 40px;width: 38px;text-align: center;a {font-size: 16px;line-height: 32px;height: 32px;display: inline-block;&:hover {color: $xtxColor;border-bottom: 1px solid $xtxColor;}}.active {color: $xtxColor;border-bottom: 1px solid $xtxColor;}}}.search {width: 170px;height: 32px;position: relative;border-bottom: 1px solid #e7e7e7;line-height: 32px;.icon-search {font-size: 18px;margin-left: 5px;}input {width: 140px;padding-left: 5px;color: #666;}}.cart {width: 50px;.curr {height: 32px;line-height: 32px;text-align: center;position: relative;display: block;.icon-cart {font-size: 22px;}em {font-style: normal;position: absolute;right: 0;top: 0;padding: 1px 6px;line-height: 1;background: $helpColor;color: #fff;font-size: 12px;border-radius: 10px;font-family: Arial;}}}
}
</style>
<template><footer class="app_footer"><!-- 联系我们 --><div class="contact"><div class="container"><dl><dt>客户服务</dt><dd><i class="iconfont icon-kefu"></i> 在线客服</dd><dd><i class="iconfont icon-question"></i> 问题反馈</dd></dl><dl><dt>关注我们</dt><dd><i class="iconfont icon-weixin"></i> 公众号</dd><dd><i class="iconfont icon-weibo"></i> 微博</dd></dl><dl><dt>下载APP</dt><dd class="qrcode"><img src="@/assets/images/qrcode.jpg" /></dd><dd class="download"><span>扫描二维码</span><span>立马下载APP</span><a href="javascript:;">下载页面</a></dd></dl><dl><dt>服务热线</dt><dd class="hotline">400-0000-000 <small>周一至周日 8:00-18:00</small></dd></dl></div></div><!-- 其它 --><div class="extra"><div class="container"><div class="slogan"><a href="javascript:;"><i class="iconfont icon-footer01"></i><span>价格亲民</span></a><a href="javascript:;"><i class="iconfont icon-footer02"></i><span>物流快捷</span></a><a href="javascript:;"><i class="iconfont icon-footer03"></i><span>品质新鲜</span></a></div><!-- 版权信息 --><div class="copyright"><p><a href="javascript:;">关于我们</a><a href="javascript:;">帮助中心</a><a href="javascript:;">售后服务</a><a href="javascript:;">配送与验收</a><a href="javascript:;">商务合作</a><a href="javascript:;">搜索推荐</a><a href="javascript:;">友情链接</a></p><p>CopyRight © 小兔鲜儿</p></div></div></div></footer>
</template><style scoped lang='scss'>
.app_footer {overflow: hidden;background-color: #f5f5f5;padding-top: 20px;.contact {background: #fff;.container {padding: 60px 0 40px 25px;display: flex;}dl {height: 190px;text-align: center;padding: 0 72px;border-right: 1px solid #f2f2f2;color: #999;&:first-child {padding-left: 0;}&:last-child {border-right: none;padding-right: 0;}}dt {line-height: 1;font-size: 18px;}dd {margin: 36px 12px 0 0;float: left;width: 92px;height: 92px;padding-top: 10px;border: 1px solid #ededed;.iconfont {font-size: 36px;display: block;color: #666;}&:hover {.iconfont {color: $xtxColor;}}&:last-child {margin-right: 0;}}.qrcode {width: 92px;height: 92px;padding: 7px;border: 1px solid #ededed;}.download {padding-top: 5px;font-size: 14px;width: auto;height: auto;border: none;span {display: block;}a {display: block;line-height: 1;padding: 10px 25px;margin-top: 5px;color: #fff;border-radius: 2px;background-color: $xtxColor;}}.hotline {padding-top: 20px;font-size: 22px;color: #666;width: auto;height: auto;border: none;small {display: block;font-size: 15px;color: #999;}}}.extra {background-color: #333;}.slogan {height: 178px;line-height: 58px;padding: 60px 100px;border-bottom: 1px solid #434343;display: flex;justify-content: space-between;a {height: 58px;line-height: 58px;color: #fff;font-size: 28px;i {font-size: 50px;vertical-align: middle;margin-right: 10px;font-weight: 100;}span {vertical-align: middle;text-shadow: 0 0 1px #333;}}}.copyright {height: 170px;padding-top: 40px;text-align: center;color: #999;font-size: 15px;p {line-height: 1;margin-bottom: 20px;}a {color: #999;line-height: 1;padding: 0 10px;border-right: 1px solid #999;&:last-child {border-right: none;}}}
}
</style>
<script setup>
import LayoutNav from './components/LayoutNav.vue'
import LayoutHeader from './components/LayoutHeader.vue'
import LayoutFooter from './components/LayoutFooter.vue'
</script><template><LayoutNav /><LayoutHeader /><RouterView /><LayoutFooter />
</template>
字体图标渲染
字体图标采用的是阿里的字体图标库,样式文件已经准备好,在
index.html文件中引入即可
<link rel="stylesheet" href="//at.alicdn.com/t/font_2143783_iq6z4ey5vu.css">
一级导航渲染

实现步骤
- 封装接口函数
- 调用接口函数
- v-for渲染模版
代码落地
import httpInstance from '@/utils/http'export function getCategoryAPI () {return httpInstance({url: '/home/category/head'})
}
<script setup>import { getCategoryAPI } from '@/apis/layout'import { onMounted, ref } from 'vue'const categoryList = ref([])const getCategory = async () => {const res = await getCategoryAPI()categoryList.value = res.result}onMounted(() => getCategory())</script><template><header class='app-header'><div class="container"><h1 class="logo"><RouterLink to="/">小兔鲜</RouterLink></h1><ul class="app-header-nav"><li class="home" v-for="item in categoryList" :key="item.id"><RouterLink to="/">{{ item.name }}</RouterLink></li></ul><div class="search"><i class="iconfont icon-search"></i><input type="text" placeholder="搜一搜"></div><!-- 头部购物车 --></div></header>
</template>
吸顶导航交互实现
1. 准备组件静态结构
<script setup></script><template><div class="app-header-sticky"><div class="container"><RouterLink class="logo" to="/" /><!-- 导航区域 --><ul class="app-header-nav "><li class="home"><RouterLink to="/">首页</RouterLink></li><li><RouterLink to="/">居家</RouterLink></li><li><RouterLink to="/">美食</RouterLink></li><li><RouterLink to="/">服饰</RouterLink></li><li><RouterLink to="/">母婴</RouterLink></li><li><RouterLink to="/">个护</RouterLink></li><li><RouterLink to="/">严选</RouterLink></li><li><RouterLink to="/">数码</RouterLink></li><li><RouterLink to="/">运动</RouterLink></li><li><RouterLink to="/">杂项</RouterLink></li></ul><div class="right"><RouterLink to="/">品牌</RouterLink><RouterLink to="/">专题</RouterLink></div></div></div>
</template><style scoped lang='scss'>
.app-header-sticky {width: 100%;height: 80px;position: fixed;left: 0;top: 0;z-index: 999;background-color: #fff;border-bottom: 1px solid #e4e4e4;// 此处为关键样式!!!// 状态一:往上平移自身高度 + 完全透明transform: translateY(-100%);opacity: 0;// 状态二:移除平移 + 完全不透明&.show {transition: all 0.3s linear;transform: none;opacity: 1;}.container {display: flex;align-items: center;}.logo {width: 200px;height: 80px;background: url("@/assets/images/logo.png") no-repeat right 2px;background-size: 160px auto;}.right {width: 220px;display: flex;text-align: center;padding-left: 40px;border-left: 2px solid $xtxColor;a {width: 38px;margin-right: 40px;font-size: 16px;line-height: 1;&:hover {color: $xtxColor;}}}
}.app-header-nav {width: 820px;display: flex;padding-left: 40px;position: relative;z-index: 998;li {margin-right: 40px;width: 38px;text-align: center;a {font-size: 16px;line-height: 32px;height: 32px;display: inline-block;&:hover {color: $xtxColor;border-bottom: 1px solid $xtxColor;}}.active {color: $xtxColor;border-bottom: 1px solid $xtxColor;}}
}
</style>
2. 渲染基础数据
3. 实现吸顶交互
核心逻辑:根据滚动距离判断当前show类名是否显示,大于78显示,小于78,不显示
<script setup>
import LayoutHeaderUl from './LayoutHeaderUl.vue'
// vueUse
import { useScroll } from '@vueuse/core'
const { y } = useScroll(window)
</script><template><div class="app-header-sticky" :class="{ show: y > 78 }"><!-- 省略部分代码 --></div>
</template>
Pinia优化重复请求
import { ref } from 'vue'
import { defineStore } from 'pinia'
import { getCategoryAPI } from '@/apis/layout'
export const useCategoryStore = defineStore('category', () => {// 导航列表的数据管理// state 导航列表数据const categoryList = ref([])// action 获取导航数据的方法const getCategory = async () => {const res = await getCategoryAPI()categoryList.value = res.result}return {categoryList,getCategory}
})
静态结构搭建和分类实现
1. 整体结构创建
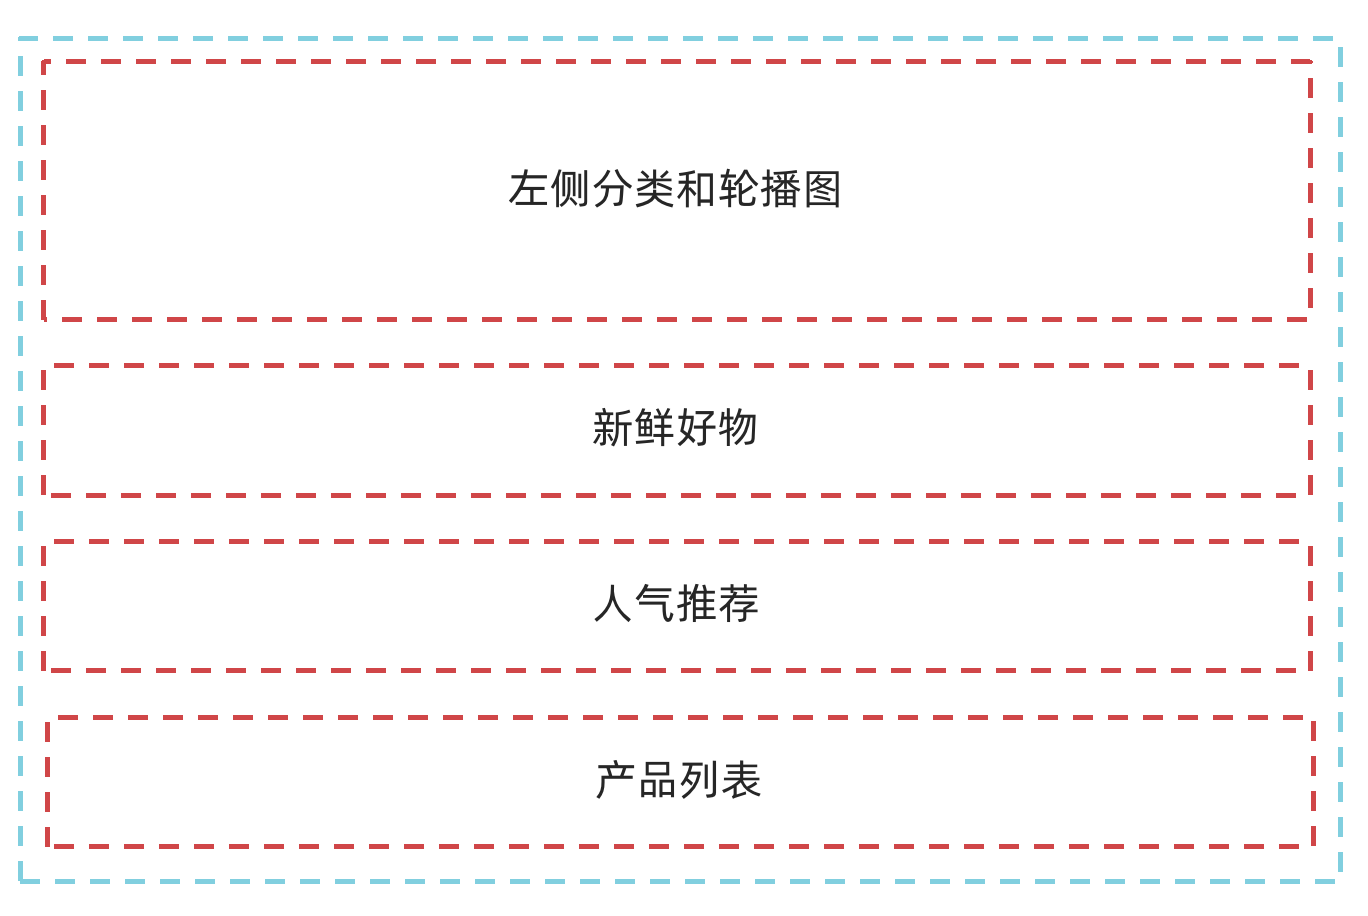
1- 按照结构新增五个组件,准备最简单的模版,分别在Home模块的入口组件中引入
- HomeCategory
- HomeBanner
- HomeNew
- HomeHot
- HomeProduct
<script setup>
</script><template><div> HomeCategory </div>
</template>
2- Home模块入口组件中引入并渲染
<script setup>
import HomeCategory from './components/HomeCategory.vue'
import HomeBanner from './components/HomeBanner.vue'
import HomeNew from './components/HomeNew.vue'
import HomeHot from './components/HomeHot.vue'
import homeProduct from './components/HomeProduct.vue'
</script><template><div class="container"><HomeCategory /><HomeBanner /></div><HomeNew /><HomeHot /><homeProduct />
</template>
2. 分类实现
1- 准备详细模版
<script setup></script><template><div class="home-category"><ul class="menu"><li v-for="item in 9" :key="item"><RouterLink to="/">居家</RouterLink><RouterLink v-for="i in 2" :key="i" to="/">南北干货</RouterLink><!-- 弹层layer位置 --><div class="layer"><h4>分类推荐 <small>根据您的购买或浏览记录推荐</small></h4><ul><li v-for="i in 5" :key="i"><RouterLink to="/"><img alt="" /><div class="info"><p class="name ellipsis-2">男士外套</p><p class="desc ellipsis">男士外套,冬季必选</p><p class="price"><i>¥</i>200.00</p></div></RouterLink></li></ul></div></li></ul></div>
</template><style scoped lang='scss'>
.home-category {width: 250px;height: 500px;background: rgba(0, 0, 0, 0.8);position: relative;z-index: 99;.menu {li {padding-left: 40px;height: 55px;line-height: 55px;&:hover {background: $xtxColor;}a {margin-right: 4px;color: #fff;&:first-child {font-size: 16px;}}.layer {width: 990px;height: 500px;background: rgba(255, 255, 255, 0.8);position: absolute;left: 250px;top: 0;display: none;padding: 0 15px;h4 {font-size: 20px;font-weight: normal;line-height: 80px;small {font-size: 16px;color: #666;}}ul {display: flex;flex-wrap: wrap;li {width: 310px;height: 120px;margin-right: 15px;margin-bottom: 15px;border: 1px solid #eee;border-radius: 4px;background: #fff;&:nth-child(3n) {margin-right: 0;}a {display: flex;width: 100%;height: 100%;align-items: center;padding: 10px;&:hover {background: #e3f9f4;}img {width: 95px;height: 95px;}.info {padding-left: 10px;line-height: 24px;overflow: hidden;.name {font-size: 16px;color: #666;}.desc {color: #999;}.price {font-size: 22px;color: $priceColor;i {font-size: 16px;}}}}}}}// 关键样式  hover状态下的layer盒子变成block&:hover {.layer {display: block;}}}}
}
</style>
2- 完成代码
<script setup>
import { useCategoryStore } from '@/stores/category'const categoryStore = useCategoryStore()</script><template><div class="home-category"><ul class="menu"><li v-for="item in categoryStore.categoryList" :key="item.id"><RouterLink to="/">{{ item.name }}</RouterLink><RouterLink v-for="i in item.children.slice(0, 2)" :key="i" to="/">{{ i.name }}</RouterLink><!-- 弹层layer位置 --><div class="layer"><h4>分类推荐 <small>根据您的购买或浏览记录推荐</small></h4><ul><li v-for="i in item.goods" :key="i.id"><RouterLink to="/"><img :src="i.picture" alt="" /><div class="info"><p class="name ellipsis-2">{{ i.name }}</p><p class="desc ellipsis">{{ i.desc }}</p><p class="price"><i>¥</i>{{ i.price }}</p></div></RouterLink></li></ul></div></li></ul></div>
</template>
banner轮播图实现
1. 熟悉组件
<script setup></script><template><div class="home-banner"><el-carousel height="500px"><el-carousel-item v-for="item in 4" :key="item"><img src="http://yjy-xiaotuxian-dev.oss-cn-beijing.aliyuncs.com/picture/2021-04-15/6d202d8e-bb47-4f92-9523-f32ab65754f4.jpg" alt=""></el-carousel-item></el-carousel></div>
</template><style scoped lang='scss'>
.home-banner {width: 1240px;height: 500px;position: absolute;left: 0;top: 0;z-index: 98;img {width: 100%;height: 500px;}
}
</style>
2. 获取数据渲染组件
1- 封装接口
/*** @description: 获取banner图* @param {*}* @return {*}*/
import  httpInstance  from '@/utils/http'
function getBannerAPI (){return request({url:'home/banner'})
}
2- 获取数据渲染模版
<script setup>
import { getBannerAPI } from '@/apis/home'
import { onMounted, ref } from 'vue'const bannerList = ref([])const getBanner = async () => {const res = await getBannerAPI()console.log(res)bannerList.value = res.result
}onMounted(() => getBanner())</script><template><div class="home-banner"><el-carousel height="500px"><el-carousel-item v-for="item in bannerList" :key="item.id"><img :src="item.imgUrl" alt=""></el-carousel-item></el-carousel></div>
</template>
面板组件封装
1. 纯静态结构
<script setup></script><template><div class="home-panel"><div class="container"><div class="head"><!-- 主标题和副标题 --><h3>新鲜好物<small>新鲜出炉 品质靠谱</small></h3></div><!-- 主体内容区域 --><div> 主体内容 </div></div></div>
</template><style scoped lang='scss'>
.home-panel {background-color: #fff;.head {padding: 40px 0;display: flex;align-items: flex-end;h3 {flex: 1;font-size: 32px;font-weight: normal;margin-left: 6px;height: 35px;line-height: 35px;small {font-size: 16px;color: #999;margin-left: 20px;}}}
}
</style>
2. 完整代码
<script setup>defineProps({title: {type: String,default: ''},subTitle: {type: String,default: ''}
})</script><template><div class="home-panel"><div class="container"><div class="head"><!-- 主标题和副标题 --><h3>{{ title }}<small>{{ subTitle }}</small></h3></div><!-- 主体内容区域 --><slot name="main" /></div></div>
</template><style scoped lang='scss'>
.home-panel {background-color: #fff;.head {padding: 40px 0;display: flex;align-items: flex-end;h3 {flex: 1;font-size: 32px;font-weight: normal;margin-left: 6px;height: 35px;line-height: 35px;small {font-size: 16px;color: #999;margin-left: 20px;}}}
}
</style>
新鲜好物实现
1. 准备模版
<script setup></script><template><div></div><!-- 下面是插槽主体内容模版<ul class="goods-list"><li v-for="item in newList" :key="item.id"><RouterLink to="/"><img :src="item.picture" alt="" /><p class="name">{{ item.name }}</p><p class="price">¥{{ item.price }}</p></RouterLink></li></ul>-->
</template><style scoped lang='scss'>
.goods-list {display: flex;justify-content: space-between;height: 406px;li {width: 306px;height: 406px;background: #f0f9f4;transition: all .5s;&:hover {transform: translate3d(0, -3px, 0);box-shadow: 0 3px 8px rgb(0 0 0 / 20%);}img {width: 306px;height: 306px;}p {font-size: 22px;padding-top: 12px;text-align: center;text-overflow: ellipsis;overflow: hidden;white-space: nowrap;}.price {color: $priceColor;}}
}
</style>
2. 封装接口
/*** @description: 获取新鲜好物* @param {*}* @return {*}*/
export const findNewAPI = () => {return httpInstance({url:'/home/new'})
}
3. 获取数据渲染模版
<script setup>
import HomePanel from './HomePanel.vue'
import { getNewAPI } from '@/apis/home'
import { ref } from 'vue'
const newList = ref([])
const getNewList = async () => {const res = await getNewAPI()newList.value = res.result
}getNewList()
</script><template><HomePanel title="新鲜好物" sub-title="新鲜出炉 品质靠谱"><template #main><ul class="goods-list"><li v-for="item in newList" :key="item.id"><RouterLink :to="`/detail/${item.id}`"><img :src="item.picture" alt="" /><p class="name">{{ item.name }}</p><p class="price">¥{{ item.price }}</p></RouterLink></li></ul></template></HomePanel>
</template>
人气推荐实现
1. 封装接口
/*** @description: 获取人气推荐* @param {*}* @return {*}*/
export const getHotAPI = () => {return  httpInstance('home/hot', 'get', {})
}
2. 获取数据渲染模版
<script setup>
import HomePanel from './HomePanel.vue'
import { getHotAPI } from '@/apis/home'
import { ref } from 'vue'
const hotList = ref([])
const getHotList = async () => {const res = await getHotAPI()hotList.value = res.result
}
getHotList()</script><template><HomePanel title="人气推荐" sub-title="人气爆款 不容错过"><ul class="goods-list"><li v-for="item in hotList" :key="item.id"><RouterLink to="/"><img v-img-lazy="item.picture" alt=""><p class="name">{{ item.title }}</p><p class="desc">{{ item.alt }}</p></RouterLink></li></ul></HomePanel>
</template><style scoped lang='scss'>
.goods-list {display: flex;justify-content: space-between;height: 426px;li {width: 306px;height: 406px;transition: all .5s;&:hover {transform: translate3d(0, -3px, 0);box-shadow: 0 3px 8px rgb(0 0 0 / 20%);}img {width: 306px;height: 306px;}p {font-size: 22px;padding-top: 12px;text-align: center;}.desc {color: #999;font-size: 18px;}}
}
</style>
懒加载指令实现
1. 封装全局指令
// 定义懒加载插件
import { useIntersectionObserver } from '@vueuse/core'export const lazyPlugin = {install (app) {// 懒加载指令逻辑app.directive('img-lazy', {mounted (el, binding) {// el: 指令绑定的那个元素 img// binding: binding.value  指令等于号后面绑定的表达式的值  图片urlconsole.log(el, binding.value)const { stop } = useIntersectionObserver(el,([{ isIntersecting }]) => {console.log(isIntersecting)if (isIntersecting) {// 进入视口区域el.src = binding.valuestop()}},)}})}
}
2. 注册全局指令
// 全局指令注册
import { directivePlugin } from '@/directives'
app.use(directivePlugin)
Product产品列表实现
1. 基础数据渲染
1- 准备静态模版
<script setup>
import HomePanel from './HomePanel.vue'</script><template><div class="home-product"><!-- <HomePanel :title="cate.name" v-for="cate in goodsProduct" :key="cate.id"><div class="box"><RouterLink class="cover" to="/"><img :src="cate.picture" /><strong class="label"><span>{{ cate.name }}馆</span><span>{{ cate.saleInfo }}</span></strong></RouterLink><ul class="goods-list"><li v-for="good in cate.goods" :key="good.id"><RouterLink to="/" class="goods-item"><img :src="good.picture" alt="" /><p class="name ellipsis">{{ good.name }}</p><p class="desc ellipsis">{{ good.desc }}</p><p class="price">¥{{ good.price }}</p></RouterLink></li></ul></div></HomePanel> --></div>
</template><style scoped lang='scss'>
.home-product {background: #fff;margin-top: 20px;.sub {margin-bottom: 2px;a {padding: 2px 12px;font-size: 16px;border-radius: 4px;&:hover {background: $xtxColor;color: #fff;}&:last-child {margin-right: 80px;}}}.box {display: flex;.cover {width: 240px;height: 610px;margin-right: 10px;position: relative;img {width: 100%;height: 100%;}.label {width: 188px;height: 66px;display: flex;font-size: 18px;color: #fff;line-height: 66px;font-weight: normal;position: absolute;left: 0;top: 50%;transform: translate3d(0, -50%, 0);span {text-align: center;&:first-child {width: 76px;background: rgba(0, 0, 0, 0.9);}&:last-child {flex: 1;background: rgba(0, 0, 0, 0.7);}}}}.goods-list {width: 990px;display: flex;flex-wrap: wrap;li {width: 240px;height: 300px;margin-right: 10px;margin-bottom: 10px;&:nth-last-child(-n + 4) {margin-bottom: 0;}&:nth-child(4n) {margin-right: 0;}}}.goods-item {display: block;width: 220px;padding: 20px 30px;text-align: center;transition: all .5s;&:hover {transform: translate3d(0, -3px, 0);box-shadow: 0 3px 8px rgb(0 0 0 / 20%);}img {width: 160px;height: 160px;}p {padding-top: 10px;}.name {font-size: 16px;}.desc {color: #999;height: 29px;}.price {color: $priceColor;font-size: 20px;}}}
}
</style>
2- 封装接口
/*** @description: 获取所有商品模块* @param {*}* @return {*}*/
export const getGoodsAPI = () => {return httpInstance({url: '/home/goods'})
}
3- 获取并渲染数据
<script setup>
import HomePanel from './HomePanel.vue'
import { getGoodsAPI } from '@/apis/home'
import { ref } from 'vue'
const goodsProduct = ref([])
const getGoods = async () => {const { result } = await getGoodsAPI()goodsProduct.value = result
}
onMounted( ()=> getGoods() )
</script><template><div class="home-product"><HomePanel :title="cate.name" v-for="cate in goodsProduct" :key="cate.id"><div class="box"><RouterLink class="cover" to="/"><img :src="cate.picture" /><strong class="label"><span>{{ cate.name }}馆</span><span>{{ cate.saleInfo }}</span></strong></RouterLink><ul class="goods-list"><li v-for="goods in cate.goods" :key="good.id"><RouterLink to="/" class="goods-item"><img :src="goods.picture" alt="" /><p class="name ellipsis">{{ goods.name }}</p><p class="desc ellipsis">{{ goods.desc }}</p><p class="price">¥{{ goods.price }}</p></RouterLink></li></ul></div></HomePanel></div>
</template>
2. 图片懒加载
<div class="home-product"><HomePanel :title="cate.name" v-for="cate in goodsProduct" :key="cate.id"><div class="box"><RouterLink class="cover" to="/"><!-- 指令替换 --><img v-img-lazy="cate.picture" /></RouterLink><ul class="goods-list"><li v-for="goods in cate.goods" :key="goods.id"><RouterLink to="/" class="goods-item"><!-- 指令替换 --><img v-img-lazy="goods.picture" alt="" /></RouterLink></li></ul></div></HomePanel>
</div>
GoodsItem组件封装
1. 封装组件
<script setup>
defineProps({goods: {type: Object,default: () => { }}
})
</script><template><RouterLink to="/" class="goods-item"><img :src="goods.picture" alt="" /><p class="name ellipsis">{{ goods.name }}</p><p class="desc ellipsis">{{ goods.desc }}</p><p class="price">¥{{ goods.price }}</p></RouterLink>
</template><style scoped lang="scss">
.goods-item {display: block;width: 220px;padding: 20px 30px;text-align: center;transition: all .5s;&:hover {transform: translate3d(0, -3px, 0);box-shadow: 0 3px 8px rgb(0 0 0 / 20%);}img {width: 160px;height: 160px;}p {padding-top: 10px;}.name {font-size: 16px;}.desc {color: #999;height: 29px;}.price {color: $priceColor;font-size: 20px;}
}
</style>
2. 使用组件
<ul class="goods-list"><li v-for="goods in cate.goods" :key="item.id"><GoodsItem :goods="goods" /></li>
</ul>
静态结构搭建和路由配置
1. 准备分类组件
<script setup></script><template><div class='top-category'>我是分类</div>
</template>
2. 配置路由
import { createRouter, createWebHashHistory } from 'vue-router'
import Layout from '@/views/Layout/index.vue'
import Home from '@/views/Home/index.vue'
import Category from '@/views/Category/index.vue'
const router = createRouter({history: createWebHashHistory(import.meta.env.BASE_URL),routes: [{path: '/',name: 'layout',component: Layout,children: [{path: '',name: 'home',component: Home},{path: 'category/:id',name: 'category',component: Category}]},{path: '/login',name: 'login',component: Login},]
})export default router
3. 配置导航区域链接
<li v-for="item in categoryStore.categoryList" :key="item.id"><RouterLink active-class="active" :to="`/category/${item.id}`">{{ item.name }}</RouterLink>
</li>
面包屑导航渲染
1. 认识组件准备模版
<script setup></script><template><div class="top-category"><div class="container m-top-20"><!-- 面包屑 --><div class="bread-container"><el-breadcrumb separator=">"><el-breadcrumb-item :to="{ path: '/' }">首页</el-breadcrumb-item><el-breadcrumb-item>居家</el-breadcrumb-item></el-breadcrumb></div></div></div>
</template><style scoped lang="scss">
.top-category {h3 {font-size: 28px;color: #666;font-weight: normal;text-align: center;line-height: 100px;}.sub-list {margin-top: 20px;background-color: #fff;ul {display: flex;padding: 0 32px;flex-wrap: wrap;li {width: 168px;height: 160px;a {text-align: center;display: block;font-size: 16px;img {width: 100px;height: 100px;}p {line-height: 40px;}&:hover {color: $xtxColor;}}}}}.ref-goods {background-color: #fff;margin-top: 20px;position: relative;.head {.xtx-more {position: absolute;top: 20px;right: 20px;}.tag {text-align: center;color: #999;font-size: 20px;position: relative;top: -20px;}}.body {display: flex;justify-content: space-around;padding: 0 40px 30px;}}.bread-container {padding: 25px 0;}
}
</style>
2. 封装接口
import request from '@/utils/request'/*** @description: 获取分类数据* @param {*} id 分类id * @return {*}*/
export const getTopCategoryAPI = (id) => {return request({url:'/category',params:{id}})
}
3. 渲染面包屑导航
<script setup>import { findTopCategoryAPI } from '@/apis/category'const categoryData = ref({})const route = useRoute()const getCategory = async (id) => {// 如何在setup中获取路由参数 useRoute() -> route 等价于this.$routeconst res = await findTopCategoryAPI(id)categoryData.value = res.result}getCategory(route.params.id)
</script><template><div class="bread-container"><el-breadcrumb separator=">"><el-breadcrumb-item :to="{ path: '/' }">首页</el-breadcrumb-item><el-breadcrumb-item>{{ categoryData.name }}</el-breadcrumb-item></el-breadcrumb></div>
</template>
分类Banner渲染
1. 适配接口
export function getBannerAPI (params = {}) {// 默认为1 商品为2const { distributionSite = '1' } = paramsreturn httpInstance({url: '/home/banner',params: {distributionSite}})
}
2. 迁移首页Banner逻辑
<script setup>
// 部分代码省略
import { getBannerAPI } from '@/apis/home'// 获取banner
const bannerList = ref([])const getBanner = async () => {const res = await getBannerAPI({distributionSite: '2'})console.log(res)bannerList.value = res.result
}onMounted(() => getBanner())</script><template><div class="top-category"><div class="container m-top-20"><!-- 面包屑 --><div class="bread-container"><el-breadcrumb separator=">"><el-breadcrumb-item :to="{ path: '/' }">首页</el-breadcrumb-item><el-breadcrumb-item>{{ categoryData.name }}</el-breadcrumb-item></el-breadcrumb></div><!-- 轮播图 --><div class="home-banner"><el-carousel height="500px"><el-carousel-item v-for="item in bannerList" :key="item.id"><img :src="item.imgUrl" alt=""></el-carousel-item></el-carousel></div></div></div>
</template><style scoped lang="scss">
// 部分代码省略
.home-banner {width: 1240px;height: 500px;margin: 0 auto;img {width: 100%;height: 500px;}
}
</style>
导航激活设置分类列表渲染
1. 导航激活状态设置
<RouterLink active-class="active" :to="`/category/${item.id}`">{{ item.name }}</RouterLink>
2. 分类数据模版
<div class="sub-list"><h3>全部分类</h3><ul><li v-for="i in categoryData.children" :key="i.id"><RouterLink to="/"><img :src="i.picture" /><p>{{ i.name }}</p></RouterLink></li></ul>
</div>
<div class="ref-goods" v-for="item in categoryData.children" :key="item.id"><div class="head"><h3>- {{ item.name }}-</h3></div><div class="body"><GoodsItem v-for="good in item.goods" :goods="good" :key="good.id" /></div>
</div>
路由缓存问题解决
缓存问题:当路由path一样,参数不同的时候会选择直接复用路由对应的组件
解决方案:
- 给 routerv-view 添加key属性,破坏缓存
- 使用 onBeforeRouteUpdate钩子函数,做精确更新
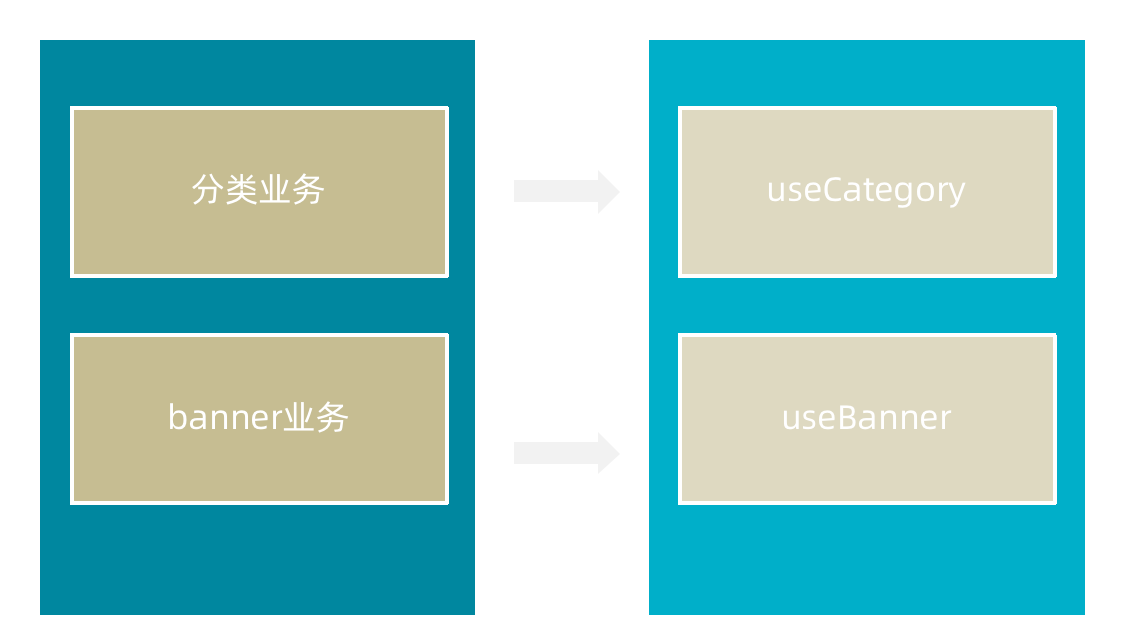
基于业务逻辑的函数拆分
基本思想:把组件内独立的业务逻辑通过
useXXX函数做封装处理,在组件中做组合使用
// 封装分类数据业务相关代码
import { onMounted, ref } from 'vue'
import { getCategoryAPI } from '@/apis/category'
import { useRoute } from 'vue-router'
import { onBeforeRouteUpdate } from 'vue-router'export function useCategory () {// 获取分类数据const categoryData = ref({})const route = useRoute()const getCategory = async (id = route.params.id) => {const res = await getCategoryAPI(id)categoryData.value = res.result}onMounted(() => getCategory())// 目标:路由参数变化的时候 可以把分类数据接口重新发送onBeforeRouteUpdate((to) => {// 存在问题:使用最新的路由参数请求最新的分类数据getCategory(to.params.id)})return {categoryData}
}
// 封装banner轮播图相关的业务代码
import { ref, onMounted } from 'vue'
import { getBannerAPI } from '@/apis/home'export function useBanner () {const bannerList = ref([])const getBanner = async () => {const res = await getBannerAPI({distributionSite: '2'})console.log(res)bannerList.value = res.result}onMounted(() => getBanner())return {bannerList}
}
<script setup>import GoodsItem from '../Home/components/GoodsItem.vue'
import { useBanner } from './composables/useBanner'
import { useCategory } from './composables/useCategory'
const { bannerList } = useBanner()
const { categoryData } = useCategory()</script>
整体业务认识和路由配置
1. 准备组件模版
<script setup></script><template><div class="container "><!-- 面包屑 --><div class="bread-container"><el-breadcrumb separator=">"><el-breadcrumb-item :to="{ path: '/' }">首页</el-breadcrumb-item><el-breadcrumb-item :to="{ path: '/' }">居家</el-breadcrumb-item><el-breadcrumb-item>居家生活用品</el-breadcrumb-item></el-breadcrumb></div><div class="sub-container"><el-tabs><el-tab-pane label="最新商品" name="publishTime"></el-tab-pane><el-tab-pane label="最高人气" name="orderNum"></el-tab-pane><el-tab-pane label="评论最多" name="evaluateNum"></el-tab-pane></el-tabs><div class="body"><!-- 商品列表--></div></div></div></template><style lang="scss" scoped>
.bread-container {padding: 25px 0;color: #666;
}.sub-container {padding: 20px 10px;background-color: #fff;.body {display: flex;flex-wrap: wrap;padding: 0 10px;}.goods-item {display: block;width: 220px;margin-right: 20px;padding: 20px 30px;text-align: center;img {width: 160px;height: 160px;}p {padding-top: 10px;}.name {font-size: 16px;}.desc {color: #999;height: 29px;}.price {color: $priceColor;font-size: 20px;}}.pagination-container {margin-top: 20px;display: flex;justify-content: center;}}
</style>
2. 配置路由关系
import { createRouter, createWebHashHistory } from 'vue-router'
import Layout from '@/views/Layout/index.vue'
import Home from '@/views/Home/index.vue'
import Category from '@/views/Category/index.vue'
import SubCategory from '@/views/SubCategory/index.vue'
const router = createRouter({history: createWebHashHistory(import.meta.env.BASE_URL),routes: [{path: '/',name: 'layout',component: Layout,children: [{path: '',name: 'home',component: Home},{path: 'category/:id',name: 'category',component: Category},{path: 'category/sub/:id',name: 'subCategory',component: SubCategory},]},{path: '/login',name: 'login',component: Login},]
})export default router
3. 跳转配置
<div class="sub-list"><h3>全部分类</h3><ul><li v-for="i in categoryData.children" :key="i.id"><RouterLink :to="`/category/sub/${i.id}`"><img :src="i.picture" /><p>{{ i.name }}</p></RouterLink></li></ul>
</div>
面包屑导航实现
1. 准备接口
/*** @description: 获取二级分类列表数据* @param {*} id 分类id * @return {*}*/export const getCategoryFilterAPI = (id) => {return request({url:'/category/sub/filter',params:{id}})
}
2. 获取数据渲染模版
<script setup>
import { getCategoryFilterAPI } from '@/apis/category'
// 获取面包屑导航数据
const filterData = ref({})
const getFilterData = async () => {const res = await getCategoryFilterAPI(route.params.id)filterData.value = res.result
}
getFilterData()
</script><template><div class="bread-container"><el-breadcrumb separator=">"><el-breadcrumb-item :to="{ path: '/' }">首页</el-breadcrumb-item><el-breadcrumb-item :to="{ path: `/category/${filterData.parentId}` }">{{ filterData.parentName }}</el-breadcrumb-item><el-breadcrumb-item>{{ filterData.name }}</el-breadcrumb-item></el-breadcrumb></div>
</template>
分类基础列表实现
1. 准备接口
/*** @description: 获取导航数据* @data { categoryId: 1005000 ,page: 1,pageSize: 20,sortField: 'publishTime' | 'orderNum' | 'evaluateNum'} * @return {*}*/
export const getSubCategoryAPI = (data) => {return request({url:'/category/goods/temporary',method:'POST',data})
}
2. 获取数据列表
<script setup>// 获取基础列表数据渲染
const goodList = ref([])
const reqData = ref({categoryId: route.params.id,page: 1,pageSize: 20,sortField: 'publishTime'
})const getGoodList = async () => {const res = await getSubCategoryAPI(reqData.value)console.log(res)goodList.value = res.result.items
}onMounted(() => getGoodList())</script>
列表筛选实现
思路:tab组件切换时修改reqData中的sortField字段,重新拉取接口列表
<script setup>
// tab切换回调
const tabChange = () => {console.log('tab切换了', reqData.value.sortField)reqData.value.page = 1getGoodList()
}
</script><template><el-tabs v-model="reqData.sortField" @tab-change="tabChange"><el-tab-pane label="最新商品" name="publishTime"></el-tab-pane><el-tab-pane label="最高人气" name="orderNum"></el-tab-pane><el-tab-pane label="评论最多" name="evaluateNum"></el-tab-pane></el-tabs>
</template>
无限加载实现
基础思路
- 触底条件满足之后 page++,拉取下一页数据
- 新老数据做数组拼接
- 判断是否已经全部加载完毕,停止监听
// 加载更多
const disabled = ref(false)
const load = async () => {console.log('加载更多数据咯')// 获取下一页的数据reqData.value.page++const res = await getSubCategoryAPI(reqData.value)goodList.value = [...goodList.value, ...res.result.items]// 加载完毕 停止监听if (res.result.items.length === 0) {disabled.value = true}
}