MySQL高可用方案MICmysqlCluster+mysqlRouter
01高可用方案介绍
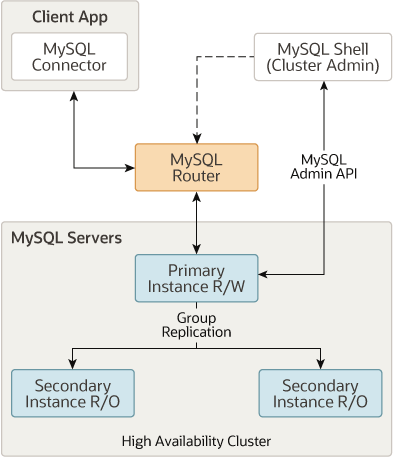
mysqlCluster+mysqlRouter这是一套由 MySQL 官方提供的、开箱即用的、完整的数据库高可用与扩展方案。结合了多个组件,以实现自动故障转移、读写分离和负载均衡。
MySQL Cluster 简介:
MySQL Cluster(也称为 NDB Cluster)是一个基于内存的分布式数据库系统,具备以下核心特性:
- Shared-nothing 架构:每个节点独立拥有自己的内存和磁盘,无单点瓶颈。
- 自动分片(Sharding):数据自动分布在多个数据节点(Data Nodes)上。
- 同步复制:数据在多个副本之间同步复制,确保高可用和强一致性。
- 节点角色:
- 管理节点(Management Node):负责配置和监控。
- 数据节点(Data Node):存储实际数据,支持多副本。
- SQL 节点(SQL Node):提供 MySQL Server 接口,供应用连接。
MySQL Cluster 本身已具备高可用能力(如节点故障自动切换、数据冗余等),但客户端直接连接 SQL 节点仍可能因某 SQL 节点宕机而中断连接。
MySQL Router 的作用
MySQL Router 是 MySQL 官方提供的轻量级中间件,用于透明地将客户端请求路由到后端 MySQL 实例(说白了就是nginx反向代理),主要功能包括:
- 连接路由:根据配置将读/写请求转发到合适的 MySQL 实例
- 故障转移(Failover):当主节点不可用时,自动切换到备用节点
- 负载均衡:支持多个只读实例间的读请求分发
- 透明性:应用无需感知后端拓扑变化
架构图如下:
02主机规划
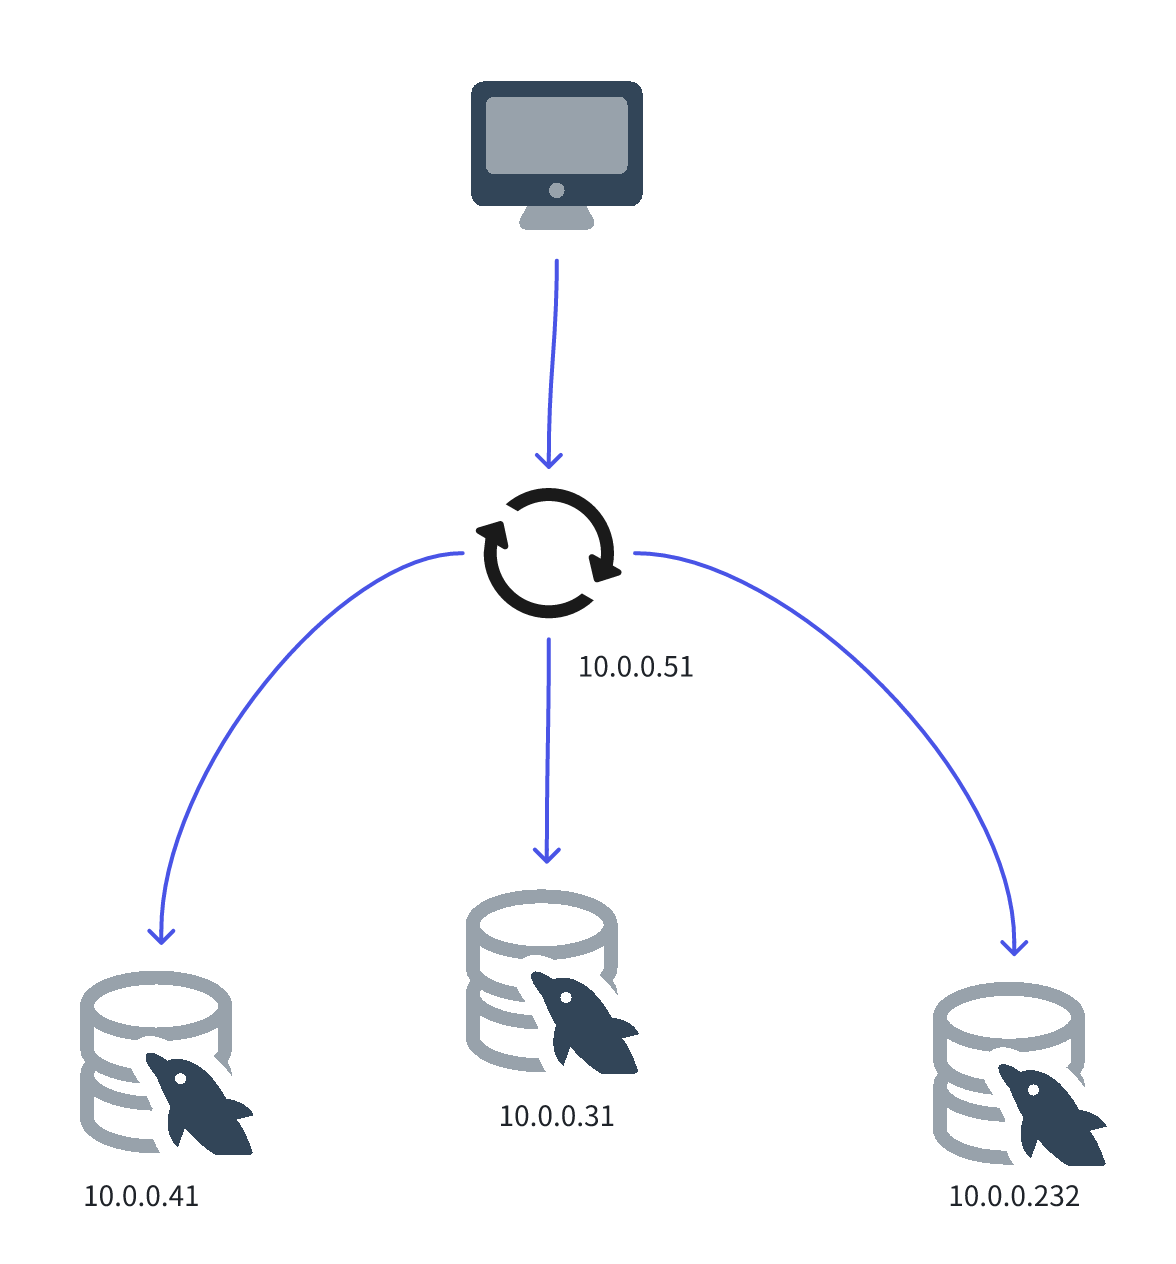
下面做一个简单的daemon演示一下,装备3个主机
| IP | hosts | 角色 |
|---|---|---|
| 10.0.0.31 | node1 | InnodbCluster PRIMARY |
| 10.0.0.41 | node2 | InnodbCluster SECONDARY |
| 10.0.0.232 | node3 | InnodbCluster SECONDARY |
| 10.0.0.51 | 无 | mysqlRouter |
也就是这样:
03 配置Innodb Cluster
温馨提示:
数据库安装过程和相关工具安装过程我简写了,本文适用于有数据管理、linux使用经验的人士使用。如何二进制安装mysql8.0.26请参考我的博客:
https://blog.csdn.net/qq_73797346/article/details/142687873?fromshare=blogdetail&sharetype=blogdetail&sharerId=142687873&sharerefer=PC&sharesource=qq_73797346&sharefrom=from_link
1.二进制安装mysql8.0.26,配置文件使用如下内容,每个节点只需要修改server_id
[mysqld]
skip-name-resolve
server_id=2
port=3306
user=mysql
# mysqlx=0  mysql-8.0有这个功能
basedir=/usr/local/mysql-8.0.26
datadir=/app/mysql-8.0.26/data
socket=/app/mysql-8.0.26/mysql.sock
character-set-server=utf8mb4
# 关闭区分表名大小写
# lower_case_table_names=1
max_allowed_packet=1024M
#init-file=/app/mysql-8.0.26/conf/init.sql# 日志相关配置
# binlog
sync_binlog=1
log_bin=/app/mysql-8.0.26/logs/binlog
max_binlog_size=1024M
expire-logs-days=30
# error log
log_error=/app/mysql-8.0.26/logs/error.log
# slow log
slow_query_log=1
slow_query_log_file=/app/mysql-8.0.26/logs/slow.log
long_query_time=1
log_queries_not_using_indexes=0# 事务相关配置
gtid_mode=on
enforce_gtid_consistency=on
transaction_isolation=READ-COMMITTED
binlog_transaction_dependency_tracking = WRITESET
transaction_write_set_extraction = XXHASH64# innodb相关设置
innodb_buffer_pool_size=2G
innodb_log_file_size=512M
innodb_file_per_table=1
innodb_flush_log_at_trx_commit=1# 主从同步相关设置relay_log=mysql-relay-bin
slave_parallel_type = LOGICAL_CLOCK
slave_preserve_commit_order = ON
slave_parallel_workers = 4
下载mysqlShell,用于管理msyqlCluster和mysqlRouter。在任意一个节点安装都可以。
下载地址:https://downloads.mysql.com/archives/shell/
直接下载:https://downloads.mysql.com/archives/get/p/43/file/mysql-shell-8.0.26-linux-glibc2.12-x86-64bit.tar.gz
下载解压后设置环境变量:/app/mysql-shell-8.0.26/bin
所有节点设置hsots解析
[root@db51 ~]# tail -3 /etc/hosts
10.0.0.31 node1
10.0.0.41 node2
10.0.0.232 node3
所有节点提前改好root密码
set session sql_log_bin=0;
create user root@'%' identified with mysql_native_password by 'aa';
grant all on *.* to root@'%' with grant option;
alter user root@'localhost' identified by 'aa';
set session sql_log_bin=1;
1.在node1输入mysqlsh。注意不要开启mysql的safe_update,否则不能创建集群
添加主机
dba.configureInstance('root:aa@10.0.0.31:3306', { clusterAdmin:'cluster_admin', clusterAdminPassword: 'aa' })
dba.configureInstance('root:aa@10.0.0.41:3306', { clusterAdmin:'cluster_admin', clusterAdminPassword: 'aa' })
dba.configureInstance('root:aa@10.0.0.232:3306', { clusterAdmin:'cluster_admin', clusterAdminPassword: 'aa' })
输出示例:
 MySQL  JS > dba.configureInstance('root:aa@10.0.0.31:3306', { clusterAdmin:'cluster_admin', clusterAdminPassword: 'aa' })
Configuring local MySQL instance listening at port 3306 for use in an InnoDB cluster...This instance reports its own address as node1:3306
Clients and other cluster members will communicate with it through this address by default. If this is not correct, the report_host MySQL system variable should be changed.
Assuming full account name 'cluster_admin'@'%' for cluster_adminapplierWorkerThreads will be set to the default value of 4.The instance 'node1:3306' is valid to be used in an InnoDB cluster.Cluster admin user 'cluster_admin'@'%' created.
The instance 'node1:3306' is already ready to be used in an InnoDB cluster.Successfully enabled parallel appliers
2.再添加主机完成后,开始创建集群
shell.connect('cluster_admin:aa@10.0.0.31:3306')
dba.createCluster('myCluster', { disableClone:false })
3.把节点加入集群,默认使用克隆的方式。如果mysql是通过systemd启动的,克隆之后的实例并不会自动启动,需要手动去拉起。
在node1的mysqlshell执行:
cluster=dba.getCluster('myCluster')
cluster.addInstance('cluster_admin:aa@10.0.0.41:3306')
node2启动失败,去node2的命令行执行 systemctl start mysqld-8.0.26.service
NOTE: node2:3306 is shutting down...* Waiting for server restart... timeout
WARNING: Clone process appears to have finished and tried to restart the MySQL server, but it has not yet started back up.
然后新检测节点状态,并继续添加流程
cluster.rescan()
再次查看node2成功加入,也可以使用 cluster.status() 查看节点列表
 MySQL  10.0.0.31:3306 ssl  JS > cluster.rescan()
Rescanning the cluster...Result of the rescanning operation for the 'myCluster' cluster:
{"name": "myCluster", "newTopologyMode": null, "newlyDiscoveredInstances": [{"host": "node2:3306", "member_id": "1c0124cb-acce-11f0-a107-000c292ef90e", "name": null, "version": "8.0.26"}], "unavailableInstances": [], "updatedInstances": []
}A new instance 'node2:3306' was discovered in the cluster.
Would you like to add it to the cluster metadata? [Y/n]: y
Adding instance to the cluster metadata...
The instance 'node2:3306' was successfully added to the cluster metadata
接下来继续添加node3
4.查看节点列表
cluster.status()
{"clusterName": "myCluster", "defaultReplicaSet": {"name": "default", "primary": "node1:3306", "ssl": "REQUIRED", "status": "OK", "statusText": "Cluster is ONLINE and can tolerate up to ONE failure.", "topology": {"node1:3306": {"address": "node1:3306", "memberRole": "PRIMARY", "mode": "R/W", "readReplicas": {}, "replicationLag": null, "role": "HA", "status": "ONLINE", "version": "8.0.26"}, "node2:3306": {"address": "node2:3306", "memberRole": "SECONDARY", "mode": "R/O", "readReplicas": {}, "replicationLag": null, "role": "HA", "status": "ONLINE", "version": "8.0.26"}, "node3:3306": {"address": "node3:3306", "memberRole": "SECONDARY", "mode": "R/O", "readReplicas": {}, "replicationLag": null, "role": "HA", "status": "ONLINE", "version": "8.0.26"}}, "topologyMode": "Single-Primary"}, "groupInformationSourceMember": "node1:3306"
}
04 配置mysqlRouter
下载地址:https://downloads.mysql.com/archives/router/
直接下载:https://downloads.mysql.com/archives/get/p/41/file/mysql-router-8.0.26-linux-glibc2.12-x86_64.tar.xz
下载解压后设置环境变量 /app/mysql-router-8.0.26/bin
1.基于刚刚创建的 Cluster 初始化 MySQL Router
mkdir -p /app/mysql-router-datamysqlrouter --bootstrap cluster_admin@10.0.0.31:3306 \--user=mysql \--directory /app/mysql-router-data \--conf-use-sockets --report-host='10.0.0.51'# Bootstrapping MySQL Router instance at '/app/mysql-router-data'...- Creating account(s) (only those that are needed, if any)
- Verifying account (using it to run SQL queries that would be run by Router)
- Storing account in keyring
- Adjusting permissions of generated files
- Creating configuration /app/mysql-router-data/mysqlrouter.conf# MySQL Router configured for the InnoDB Cluster 'myCluster'After this MySQL Router has been started with the generated configuration$ mysqlrouter -c /app/mysql-router-data/mysqlrouter.confthe cluster 'myCluster' can be reached by connecting to:## MySQL Classic protocol- Read/Write Connections: 10.0.0.51:6446, /app/mysql-router-data/mysql.sock
- Read/Only Connections:  10.0.0.51:6447, /app/mysql-router-data/mysqlro.sock## MySQL X protocol- Read/Write Connections: 10.0.0.51:6448, /app/mysql-router-data/mysqlx.sock
- Read/Only Connections:  10.0.0.51:6449, /app/mysql-router-data/mysqlxro.sock
6446:对应 Classic 协议的读写操作。
6447 :对应 Classic 协议的只读操作。
6448 :对应 X 协议的读写操作。
6449: 对应 X 协议的只读操作。
8443 :提供 REST API 的 HTTP 端口。
在mysqlshell中查看router
 MySQL  10.0.0.31:3306 ssl  JS > cluster.listRouters()
{"clusterName": "myCluster", "routers": {"10.0.0.51::": {"hostname": "10.0.0.51", "lastCheckIn": null, "roPort": 6447, "roXPort": 6449, "rwPort": 6446, "rwXPort": 6448, "version": "8.0.26"}}
}
2.启动Router
# 启动 MySQL Router
sh /data/myrouter/6446/start.sh# 除了脚本,也可通过 mysqlrouter 命令直接启动
mysqlrouter -c /app/mysql-router-data/mysqlrouter.conf --user=mysql &
05读写分离测试
3.在任意一个节点创建用户 create user app@'%' identified with mysql_native_password by 'aa'; 测试脚本
#!/usr/bin/env python3
import pymysql
import time
import syshostname = '10.0.0.51'
username = 'app'
password = 'aa'
database = 'information_schema'def check_mysql(host, port, user, passwd, db):try:conn = pymysql.connect(host=host,port=port,user=user,password=passwd,database=db,connect_timeout=3)cursor = conn.cursor()cursor.execute("SELECT @@hostname;")result = cursor.fetchone()print(f"[{time.strftime('%Y-%m-%d %H:%M:%S')}] 已连接 {host}:{port} -> 当前节点: {result[0]}")cursor.close()conn.close()return Trueexcept pymysql.Error as e:print(f"[{time.strftime('%Y-%m-%d %H:%M:%S')}] 连接 {host}:{port} 失败: {e}")return Falseif len(sys.argv) < 2:print("❌ 用法: python check_router.py [rw|ro]")sys.exit(1)mode = sys.argv[1].lower()
if mode == 'rw':port = 6446
elif mode == 'ro':port = 6447
else:print("❌ 参数错误,应为 rw 或 ro")sys.exit(1)print(f"✅ 开始测试 {mode.upper()} 模式 ({hostname}:{port}) ...")
while True:check_mysql(hostname, port, username, password, database)time.sleep(2)

4.如果报错遇到
"check_mysql.py" 50L, 1259B written
[root@node3 ~]# python3 check_mysql.py ro
✅ 开始测试 RO 模式 (10.0.0.51:6447) ...
[2025-10-19 19:49:19] 连接 10.0.0.51:6447 失败: (2003, "Can't connect to remote MySQL server for client connected to '0.0.0.0:6447'")
[2025-10-19 19:49:21] 连接 10.0.0.51:6447 失败: (2003, "Can't connect to remote MySQL server for client connected to '0.0.0.0:6447'")
[2025-10-19 19:49:23] 连接 10.0.0.51:6447 失败: (2003, "Can't connect to remote MySQL server for client connected to '0.0.0.0:6447'")
[2025-10-19 19:49:25] 连接 10.0.0.51:6447 失败: (2003, "Can't connect to remote MySQL server for client connected to '0.0.0.0:6447'")
^CTraceback (most recent call last):File "/root/check_mysql.py", line 49, in <module>time.sleep(2)
KeyboardInterrupt[root@node3 ~]# telnet 10.0.0.51 64447
Trying 10.0.0.51...
telnet: Unable to connect to remote host: Connection refused
[root@node3 ~]# telnet 10.0.0.51 6447
Trying 10.0.0.51...
Connected to 10.0.0.51.
Escape character is '^]'.
NCan't connect to remote MySQL server for client connected to '0.0.0.0:6447'Connection closed by foreign host.tail /app/mysql-router-data/log/mysqlrouter.log
2025-10-19 19:53:48 metadata_cache ERROR [7f16acf33700] Failed to connect to metadata server
2025-10-19 19:53:48 metadata_cache ERROR [7f16acf33700] Failed fetching metadata from any of the 3 metadata servers.
2025-10-19 19:53:48 metadata_cache WARNING [7f16acf33700] Failed connecting with Metadata Server node1:3306: Unknown MySQL server host 'node1' (2) (2005)
2025-10-19 19:53:48 metadata_cache ERROR [7f16acf33700] Failed to connect to metadata server
2025-10-19 19:53:48 metadata_cache WARNING [7f16acf33700] Failed connecting with Metadata Server node2:3306: Unknown MySQL server host 'node2' (2) (2005)
2025-10-19 19:53:48 metadata_cache ERROR [7f16acf33700] Failed to connect to metadata server
2025-10-19 19:53:48 metadata_cache WARNING [7f16acf33700] Failed connecting with Metadata Server node3:3306: Unknown MySQL server host 'node3' (2) (2005)
那是因为数据库节点都设置了其他节点hosts解析,而router节点没有,添加进去就好了
[root@db51 ~]# hostname -I
10.0.0.51 172.17.0.1
[root@db51 ~]# tail -3 /etc/hosts
10.0.0.31 node1
10.0.0.41 node2
10.0.0.232 node3
或者提前指定使用ip+端口号建立集群,my.cnf
[mysqld]
# node1 改为自己的 IP
report_host=10.0.0.31
report_port=3306