人工智能时代医疗大健康微服务编程:架构与实践(代码部分)
摘要
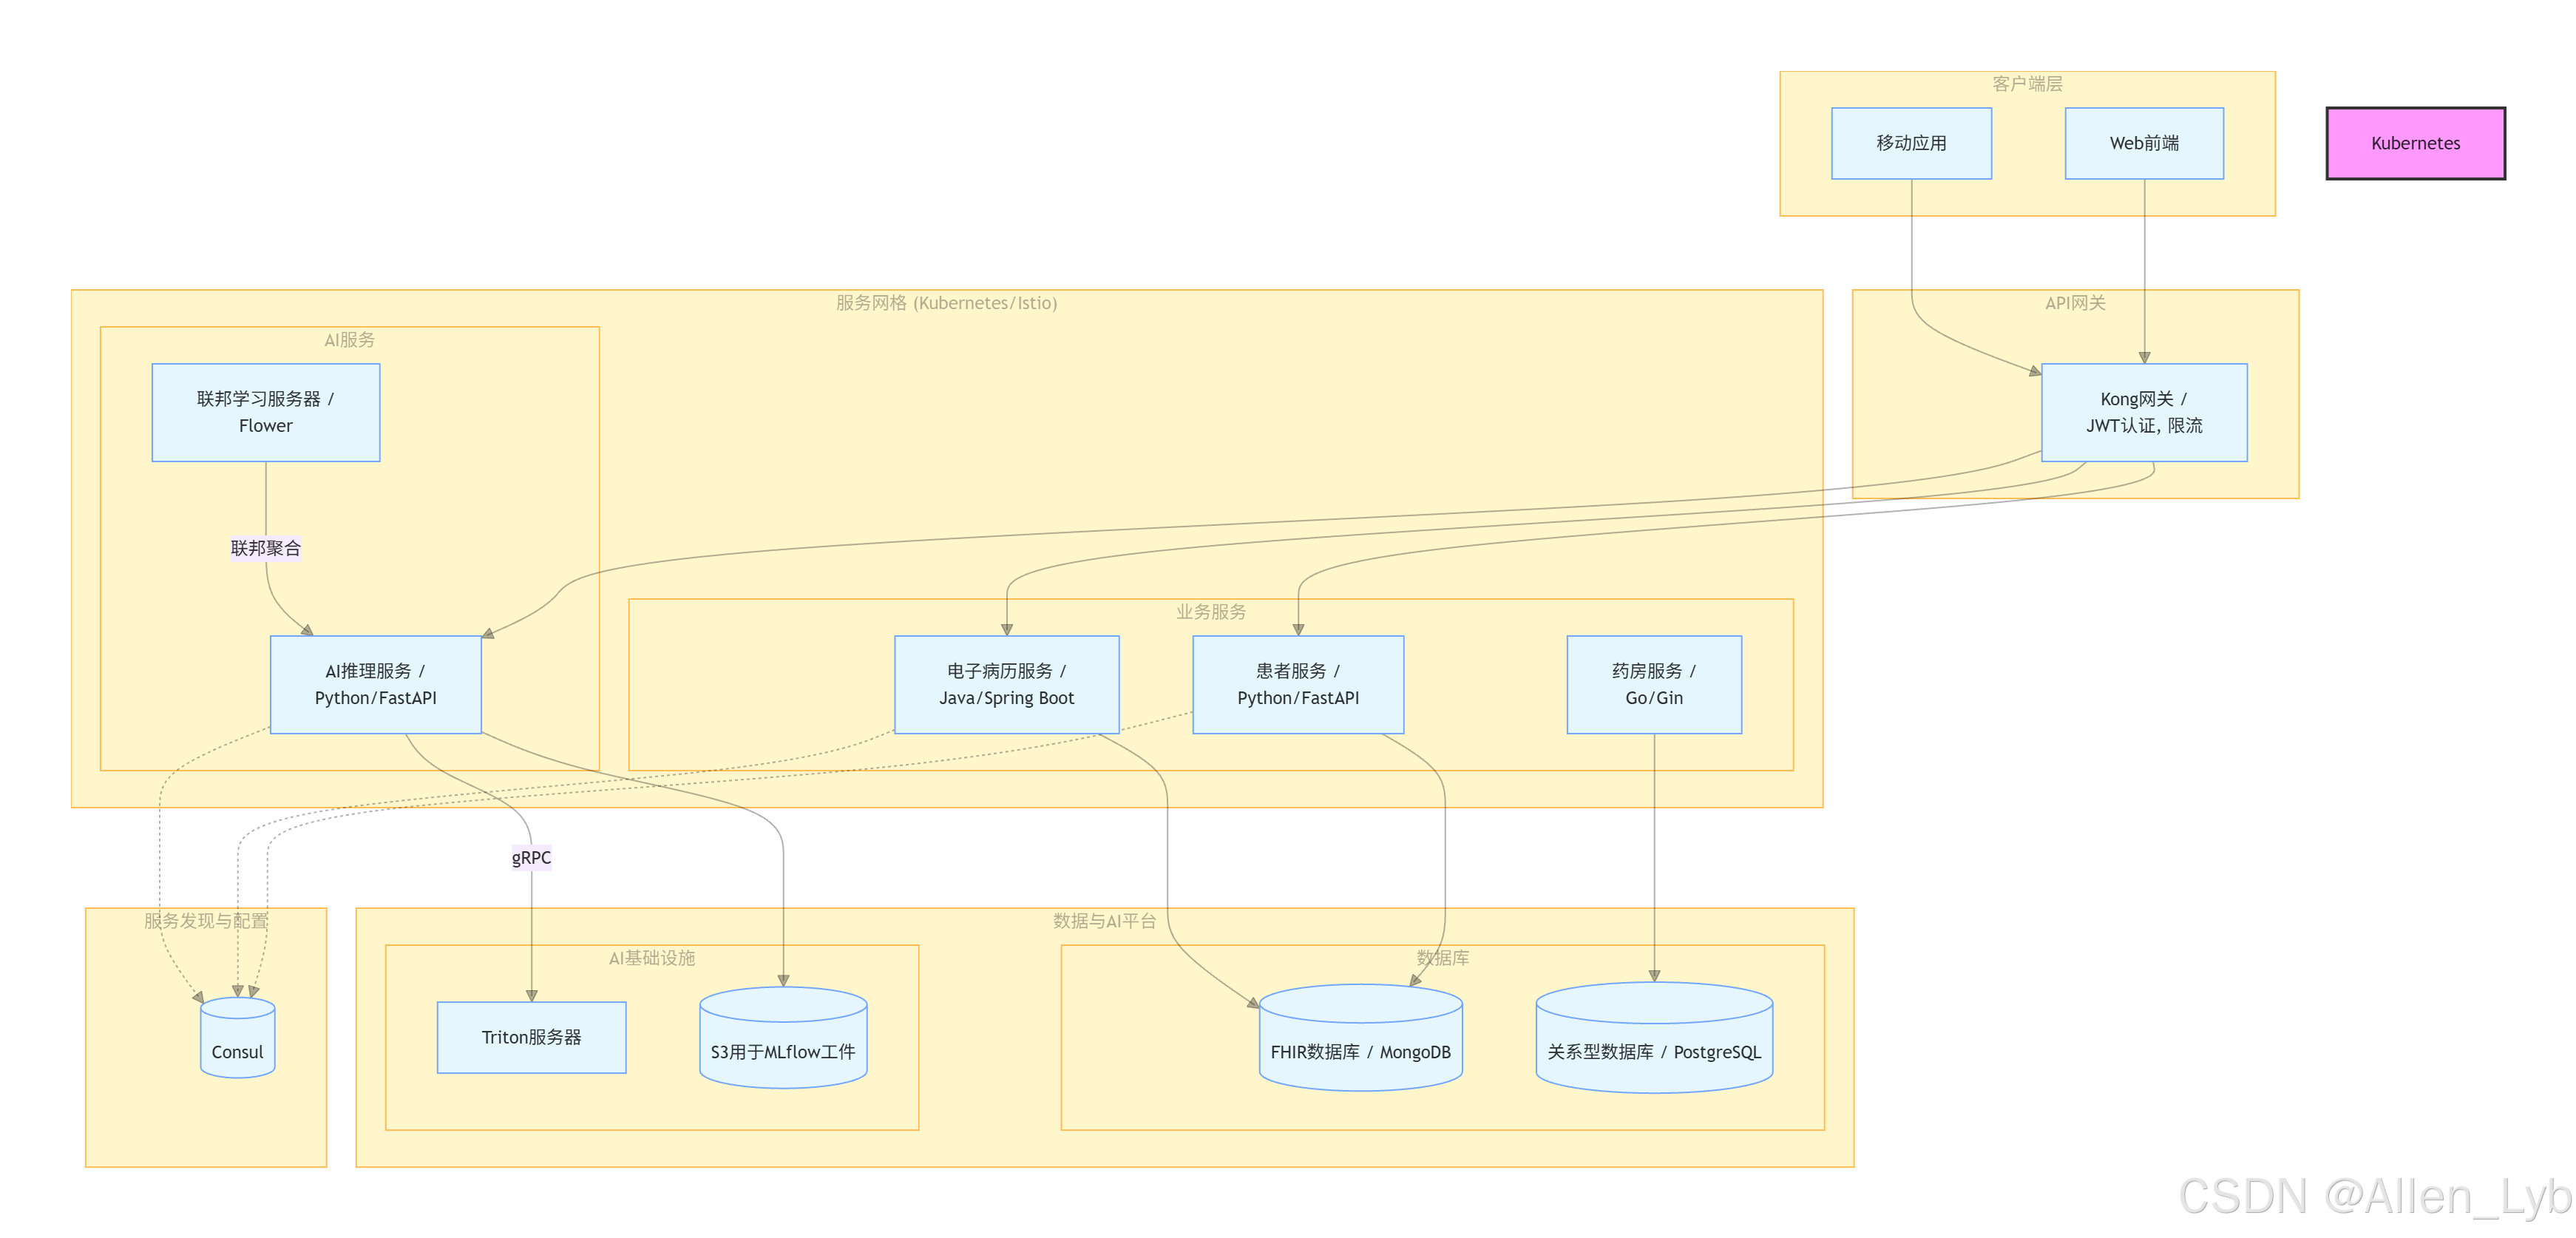
本文聚焦于AI与医疗大健康微服务融合的可编程实现。我们将通过代码、配置、架构图和命令行指令,系统化地展示从基础服务构建、AI能力集成、到安全合规部署的全过程。核心内容将围绕一个假设的“智慧医疗平台”项目展开,提供可直接参考与调整的实现范例,章节与原文章对应。
第一章:核心微服务构建
传统引言将被一个可运行的“Hello, World”级微服务所取代,这是我们整个平台的基石。
1.1 患者注册微服务
一个最基础的业务微服务,负责处理患者信息的录入与验证。
技术栈: Python + FastAPI + Pydantic + HL7 FHIR
项目结构:
/patient-service
├── app/
│   ├── __init__.py
│   ├── main.py          # FastAPI 应用入口
│   ├── models.py        # Pydantic 数据模型 (FHIR Schema)
│   └── database.py      # 数据库连接与操作
├── requirements.txt
└── Dockerfile
app/models.py - 定义数据模型
from pydantic import BaseModel, EmailStr
from datetime import date# 使用 Pydantic 来定义和验证基于 FHIR R4 Patient 资源的模型
class HumanName(BaseModel):use: strfamily: strgiven: list[str]class Patient(BaseModel):resource_type: str = "Patient"id: str | None = Noneactive: bool = Truename: list[HumanName]gender: str # male, female, other, unknownbirth_date: dateemail: EmailStrclass Config:schema_extra = {"example": {"resource_type": "Patient","name": [{"use": "official", "family": "Zhang", "given": ["San"]}],"gender": "male","birth_date": "1990-01-01","email": "zhangsan@example.com"}}
app/main.py - API 端点实现
from fastapi import FastAPI, HTTPException, Depends
from . import models
from .database import get_db_sessionapp = FastAPI(title="Patient Registration Service",version="1.0.0",description="Manages patient data compliant with HL7 FHIR standard."
)@app.post("/patients/", response_model=models.Patient, status_code=201)
async def create_patient(patient: models.Patient, db=Depends(get_db_session)):"""Create a new patient record.- **Validation**: Pydantic automatically validates input against the FHIR-like model.- **Database**: A hypothetical `db` session is used to persist the data."""# 在实际应用中,这里会调用数据库操作# created_patient = db.patients.insert_one(patient.dict())# patient.id = str(created_patient.inserted_id)print(f"Persisting patient: {patient.name[0].family}")# 模拟数据库返回的IDpatient.id = "patient-12345"return patient@app.get("/patients/{patient_id}", response_model=models.Patient)
async def read_patient(patient_id: str, db=Depends(get_db_session)):# 从数据库获取患者信息# patient_data = db.patients.find_one({"_id": ObjectId(patient_id)})# if not patient_data:#     raise HTTPException(status_code=404, detail="Patient not found")# return patient_data# 模拟返回if patient_id == "patient-12345":return models.Patient(id="patient-12345",name=[{"use": "official", "family": "Zhang", "given": ["San"]}],gender="male",birth_date="1990-01-01",email="zhangsan@example.com")raise HTTPException(status_code=404, detail="Patient not found")
Dockerfile - 容器化
FROM python:3.10-slimWORKDIR /appCOPY requirements.txt .
RUN pip install --no-cache-dir -r requirements.txtCOPY ./app /app# 暴露端口
EXPOSE 8000# 启动命令
CMD ["uvicorn", "app.main:app", "--host", "0.0.0.0", "--port", "8000"]
第二章:服务治理与通信
将“现状”中提到的挑战,转化为具体的治理组件代码。
2.1 服务发现与配置中心
技术栈: Consul + Spring Cloud (for Java services) or pyconsul (for Python)
Consul 服务注册配置:
启动Consul Agent:
consul agent -dev -ui -client=0.0.0.0
Python服务注册到Consul (app/main.py中添加):
import consul
import socket# ... 在FastAPI应用启动时 ...
consul_client = consul.Consul(host='consul', port=8500)def register_service():service_name = "patient-service"service_id = f"{service_name}-{socket.gethostname()}"consul_client.agent.service.register(name=service_name,service_id=service_id,address=socket.gethostbyname(socket.gethostname()),port=8000,check=consul.Check.http(f"http://{socket.gethostbyname(socket.gethostname())}:8000/health", interval="10s"))print(f"Service {service_id} registered.")# 在app startup事件中调用
@app.on_event("startup")
async def startup_event():register_service()
2.2 API 网关与安全认证
技术栈: Kong 或 Spring Cloud Gateway
Kong 配置示例 - 为患者服务添加路由和JWT认证:
# 1. 添加服务
curl -X POST http://localhost:8001/services \--data name=patient-service \--data url='http://patient-service:8000'# 2. 添加路由
curl -X POST http://localhost:8001/services/patient-service/routes \--data 'paths[]=/api/v1/patients'# 3. 启用JWT插件
curl -X POST http://localhost:8001/services/patient-service/plugins \--data name=jwt# 4. 创建Consumer
curl -X POST http://localhost:8001/consumers \--data username=medical-frontend-app# 5. 为Consumer生成JWT凭证
curl -X POST http://localhost:8001/consumers/medical-frontend-app/jwt
前端请求示例:
现在,所有到 /api/v1/patients 的请求都必须携带有效的JWT。
// 假设已从认证服务获取token