AutoSAR实战教程--英飞凌MCAL/ETH Driver移植LwIP以太网协议栈(Tc3XX系列)
 | 近日天气转凉,偶感风寒,百感交集,遂赋诗一首: 年长头发稀,未老人先贫。 满目山河恨,落花下津门。
注:当下裁员、降薪、和美帝那点事,故曰:满目山河恨,借鉴杜少陵"感时花溅泪,恨别鸟惊心"。 |
工作背景
其实这个方法曾福大佬已经写过了,他是基于NXP芯片的MCAL做的,我在他的博客下面把关键代码也贴上了。大家想看的话可以点击LWIP基于MCAL ETH Driver。之所以我今天写这个文章是看他写的,我仍然有疑惑,所以在巨人的肩膀上,我把这个事再说透一些。
我的Base工程是英飞凌提供的基于iLLD实现的LwIP工程。
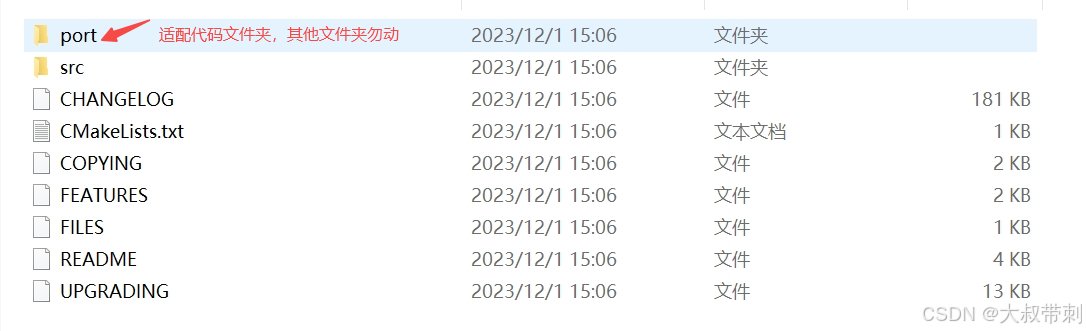
port文件夹下文件其实不多,
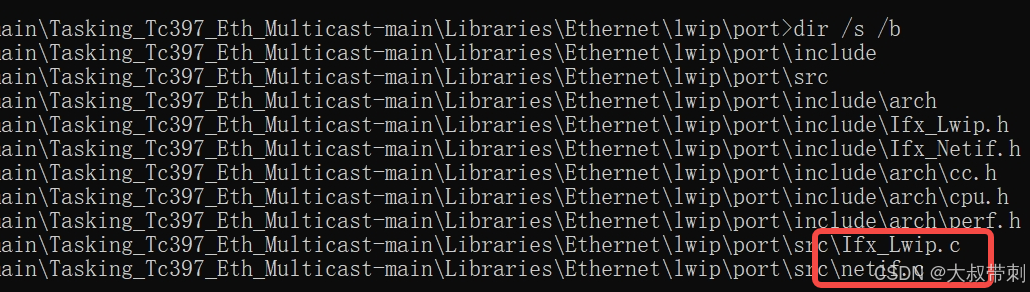
所以我重点是要看这两个.c文件,里面对外暴露的接口。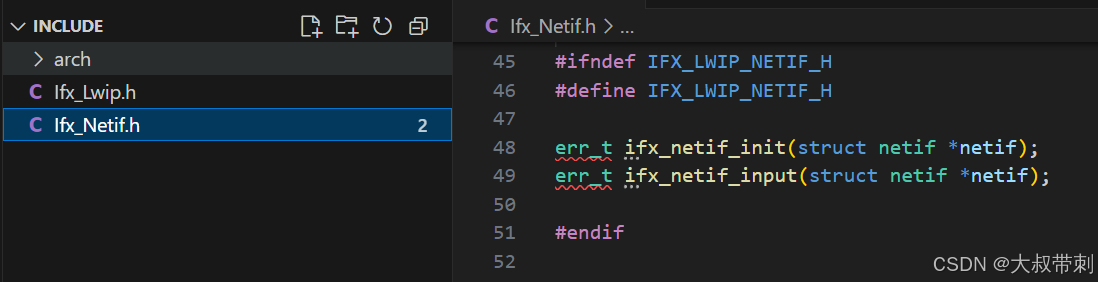 这里面只有2个暴露的接口,聪明的你会发现怎么缺少了发送接口呢?肿么肥事?
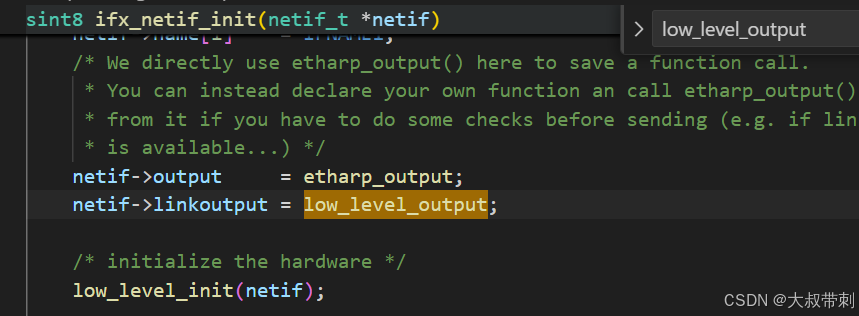 实际上low_level_output在ifx_netif_init中被绑定了,所以low_level_output就没有再对外暴露的必要。总结下来,我们要实现的最重要的3个函数就是
err_t ifx_netif_init(struct netif *netif);
err_t ifx_netif_input(struct netif *netif);
static sint8 low_level_output(netif_t *netif, pbuf_t *p)
先做到心中有数,好了,继续我们的工作。
第一步:编译通过
叔考研期间快把谭浩强老爷子的C语言课本摸秃噜皮了,至今仍能记住的一句话是:自顶向下,逐步细化,模块化设计,结构化编码。所以我们做事情要有先后顺序,轻重缓急。
由于iLLD和MCAL代码差别很大,我的Base工程里面基于iLLD实现的很多函数,在MCAL环境下都不能用,所以,我要先适配接口,做法就是把各个函数功能屏蔽了,只留个空壳,一些非常必须的数据类型复制粘贴之外,尽量不引入其他额外的东西。
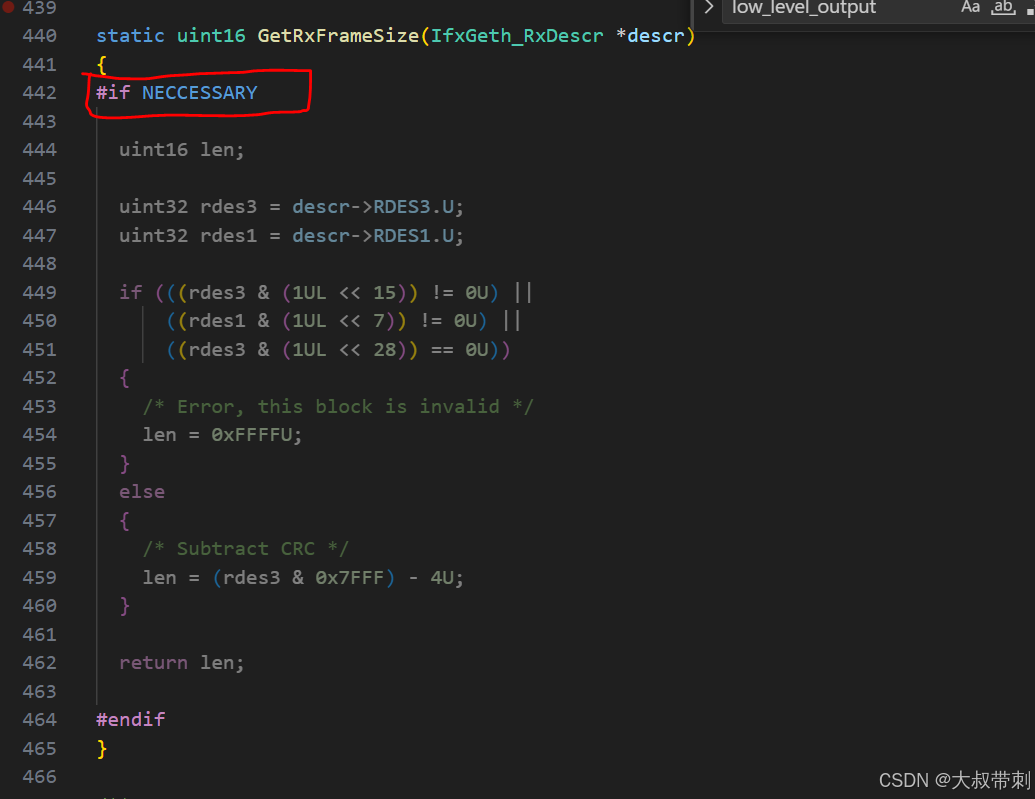
比如这样,用一个宏把函数内容屏蔽了,这样后期我用它,就解开这个宏,不用就留着供我参考。
第二步:接口适配
| MCAL接口 | iLLD接口 |
|---|---|
| EthIf_RxIndication | Ifx_Lwip_pollReceiveFlags |
| 隶属于ifx_netif_input | |
| 隶属于隶属于low_level_input | |
| IrqEthernet_Init | ifx_netif_init |
| Eth_Init | |
| EthTrcv_Init | |
| Eth_Transmit | low_level_output |
| Eth_ProvideTxBuffer |
初始化函数
对于init部分,这个不用我多说,都是初始化,也很容易看懂,你可以直接追加MCAL提供的Init接口,也可以把IrqEthernet_Init/Eth_Init/EthTrcv_Init放在ifx_netif_init里面。
这里注意一点,我们看:
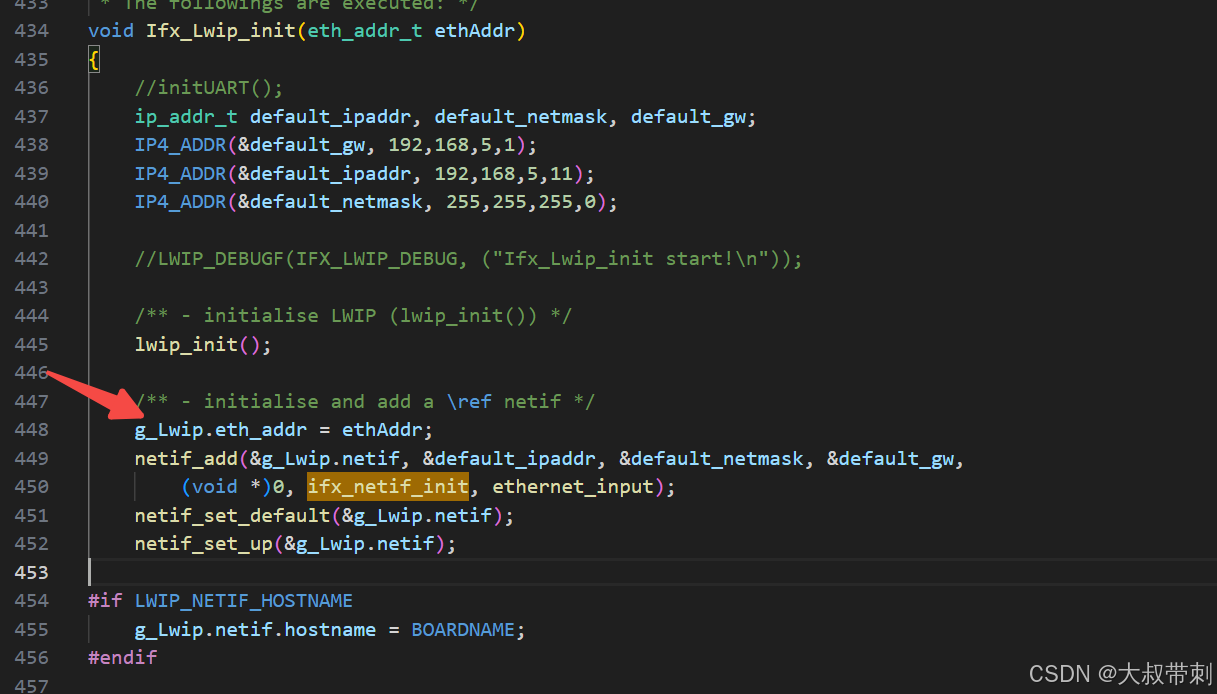
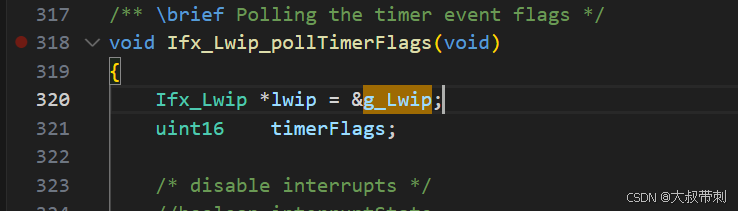
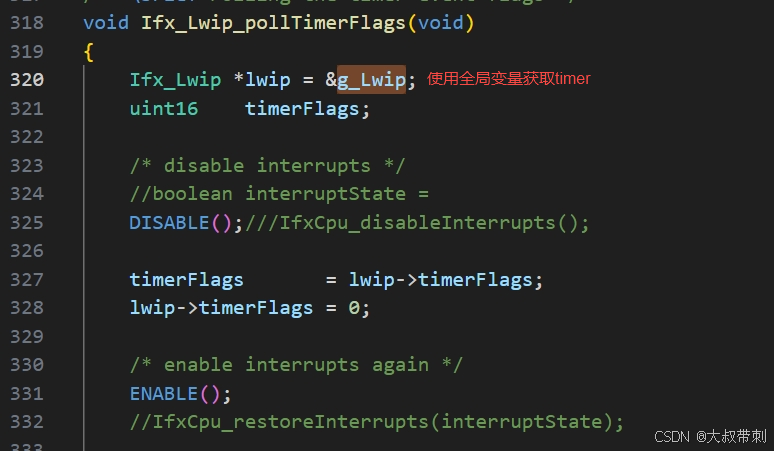
这个g_Lwip是个全局变量,也就是对Lwip各项配置属性做个一个结构体,所以这一块我们还是要保留的。后面有很多函数都是以g_Lwip作为参数,比如:
接收函数
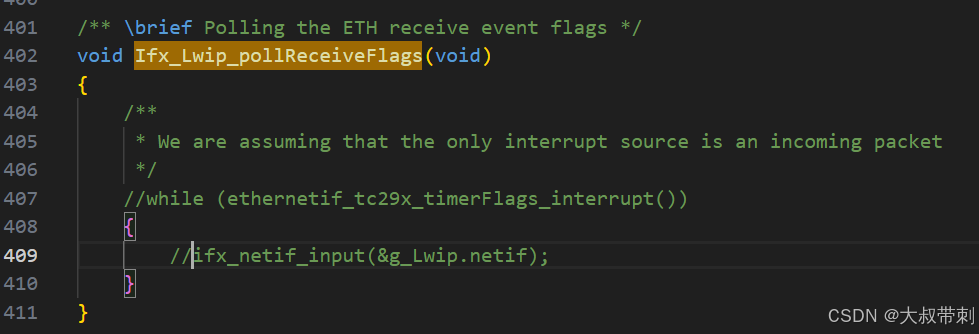
这个iLLD函数周期性的去polling接收数据,它跟MCAL中的EthIf_RxIndication被接收中断触发,功能几乎是一样的。但是!
我们看Ifx_Lwip_pollReceiveFlags它下面的函数ifx_netif_input的参数&g_Lwip.netif,这是个什么玩意?对比下接口差异
MCAL接口
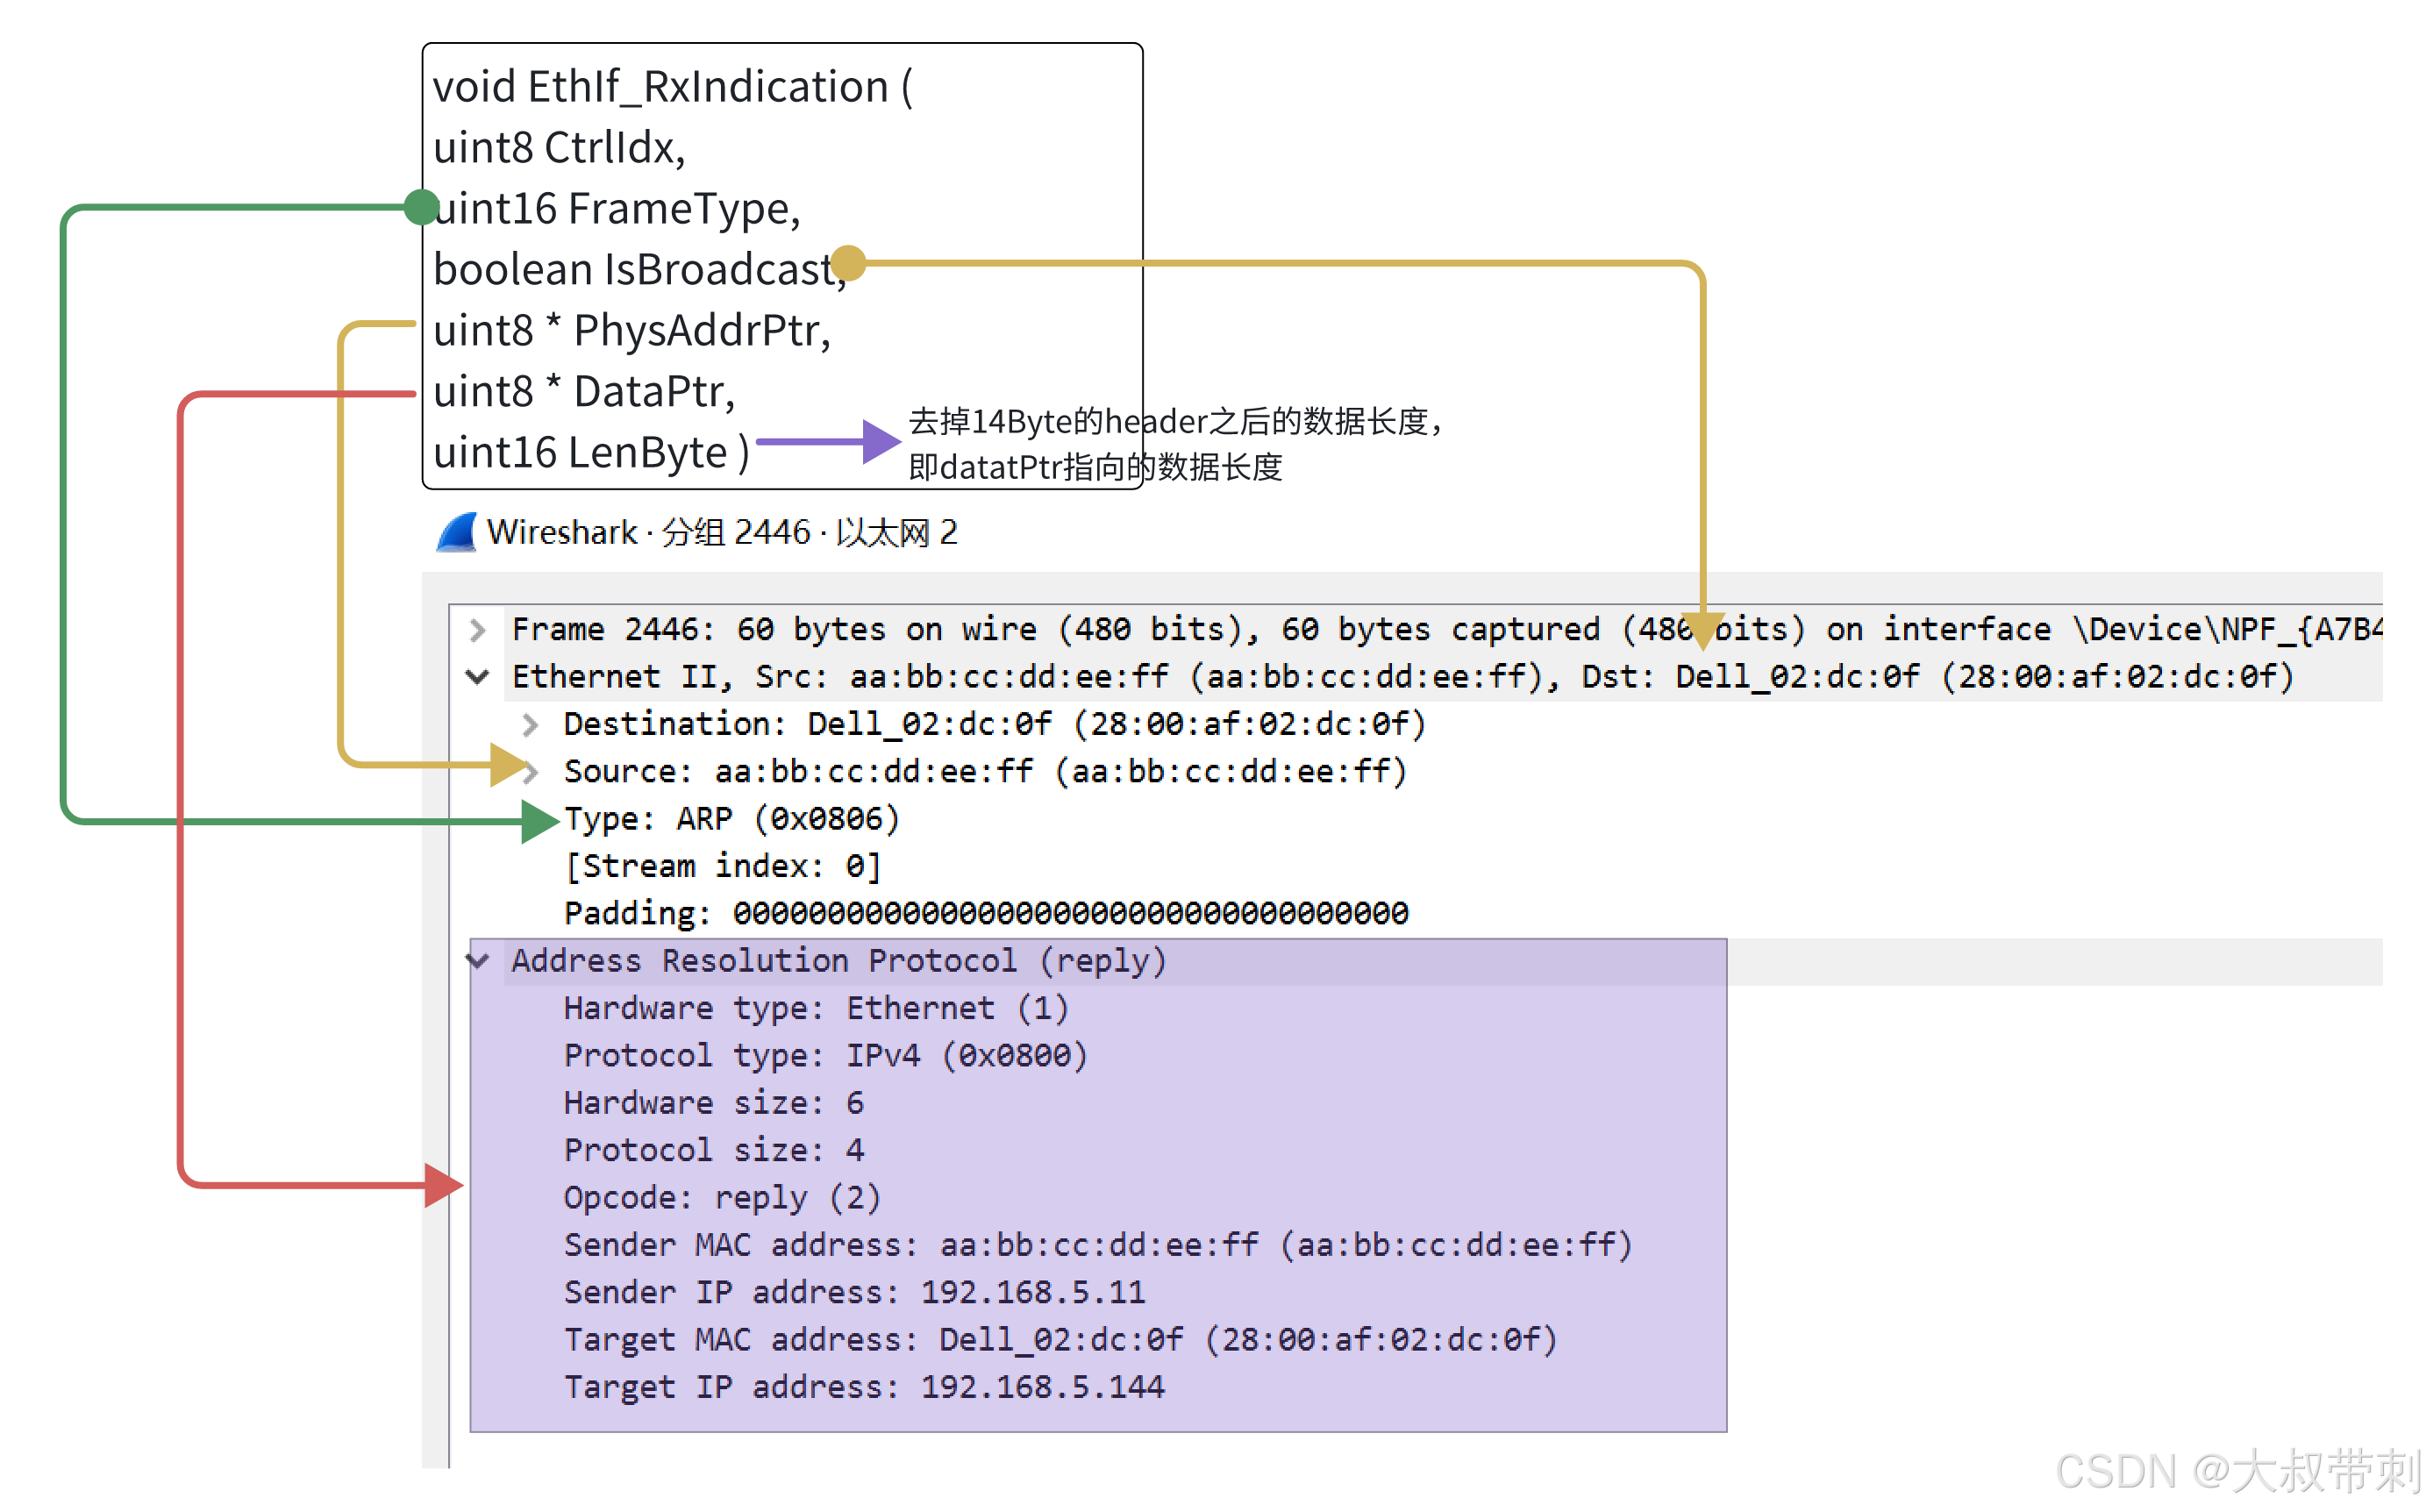
iLLD接口
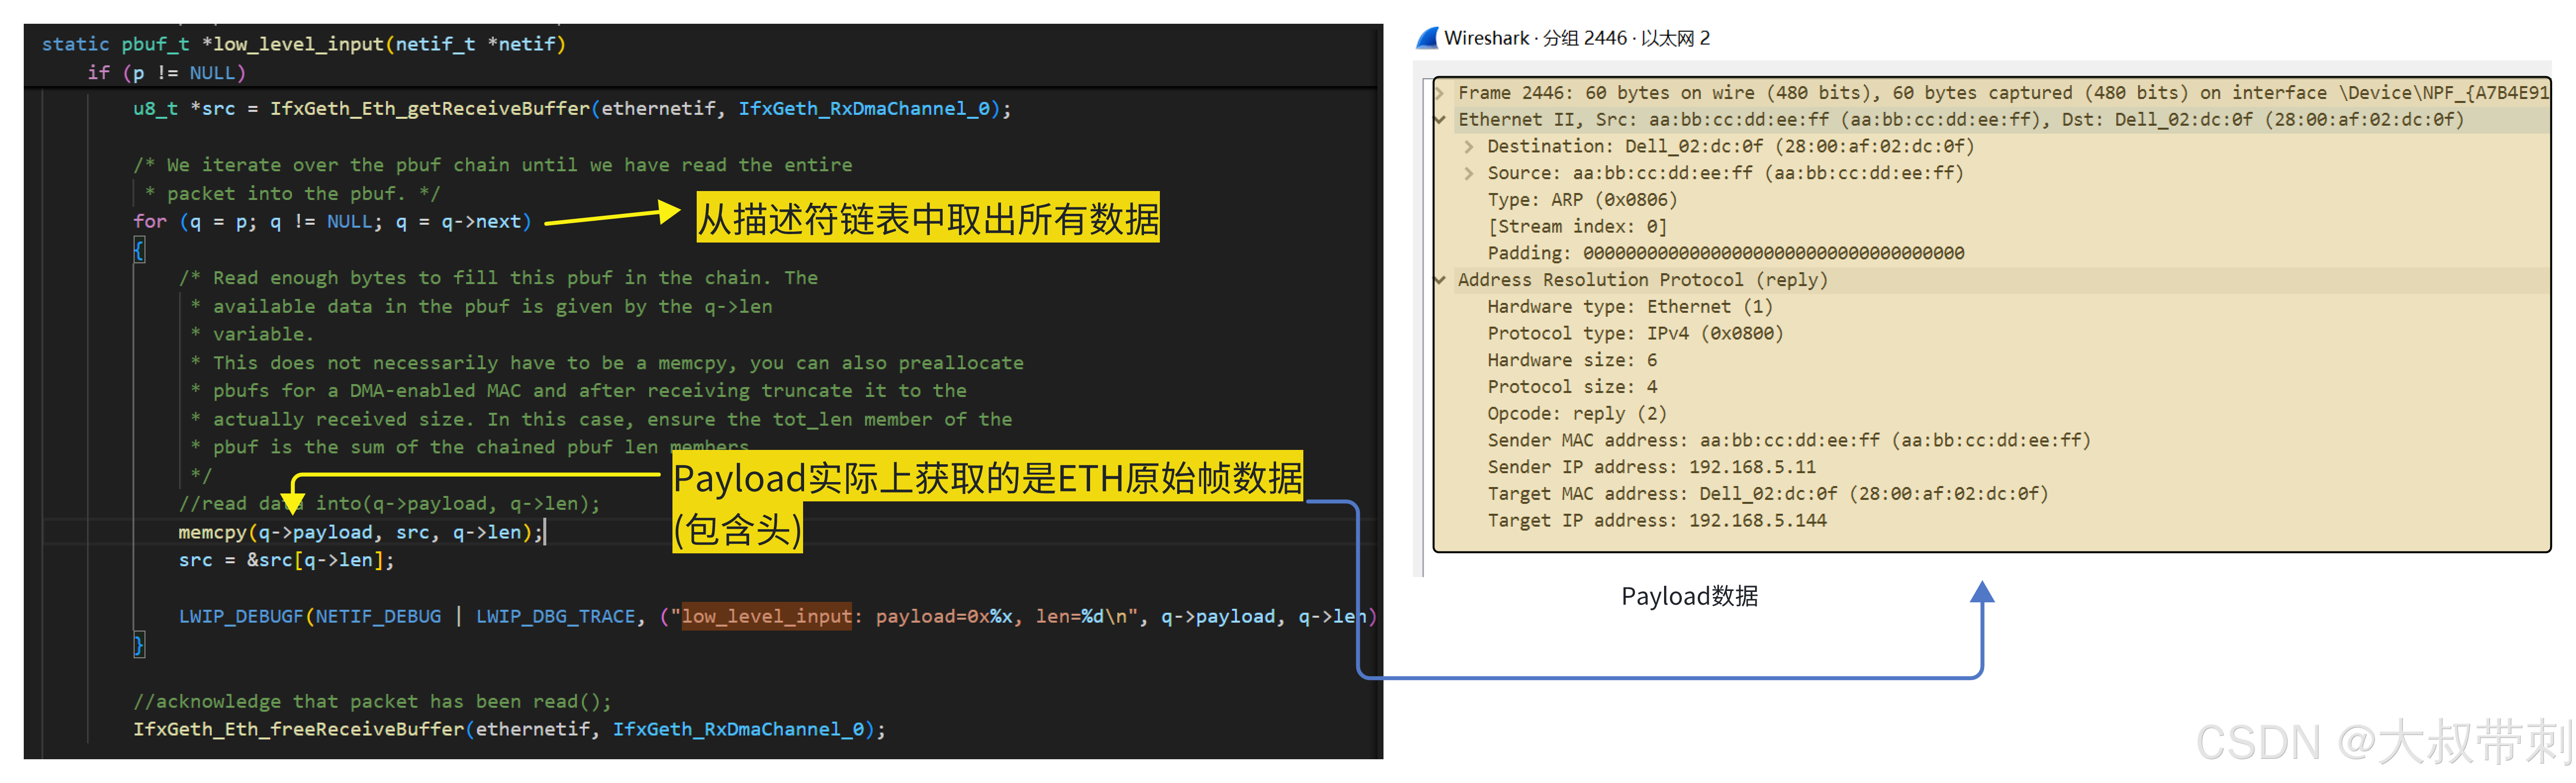
我们对比这两种接口就会发现:
1. iLLD中的payload是通过遍历链表中获取的数据。
2. iLLD接口中获取的是原始帧,包含头。
3. MCAL接口在EthIf_RxIndication接口之前已经完成了链表遍历,并且把ETH头信息去掉了。
所以我们在适配这两个接口的时候要把EthIf_RxIndication中的DataPtr数据+头信息,给还原回一个完整的ETH原始数据,并且不用再做遍历描述符链表的操作了(MCAL代码已经做了),这样才能给ifx_netif_input用。
EthIf_RxIndication适配
//This MCAL API Replace the Ifx_Lwip_pollReceiveFlags
void EthIf_RxIndication ( uint8 CtrlIdx, uint16 FrameType,boolean IsBroadcast, uint8 * PhysAddrPtr,uint8 * DataPtr, uint16 LenByte )
{//---->ifx_netif_input//Trans CtrlIdx, FrameType, IsBroadcast, PhysAddrPtr, DataPtr, LenByte --> pbuf_t#if ETH_PAD_SIZEuint8 offset_ETH_PAD_SIZE = 0;//ETH_PAD_SIZE;#elseuint8 offset_ETH_PAD_SIZE = 0;#endifif(IsBroadcast){rawEthFrame[0+offset_ETH_PAD_SIZE] = 0xFF;//rawEthFrame[1+offset_ETH_PAD_SIZE] = 0xFF;//rawEthFrame[2+offset_ETH_PAD_SIZE] = 0xFF;//rawEthFrame[3+offset_ETH_PAD_SIZE] = 0xFF;//rawEthFrame[4+offset_ETH_PAD_SIZE] = 0xFF;//rawEthFrame[5+offset_ETH_PAD_SIZE] = 0xFF;//}else{rawEthFrame[0+offset_ETH_PAD_SIZE] = ethAddr.addr[0];//rawEthFrame[1+offset_ETH_PAD_SIZE] = ethAddr.addr[1];//rawEthFrame[2+offset_ETH_PAD_SIZE] = ethAddr.addr[2];//rawEthFrame[3+offset_ETH_PAD_SIZE] = ethAddr.addr[3];//rawEthFrame[4+offset_ETH_PAD_SIZE] = ethAddr.addr[4];//rawEthFrame[5+offset_ETH_PAD_SIZE] = ethAddr.addr[5];//}rawEthFrame[6+offset_ETH_PAD_SIZE] = PhysAddrPtr[0];rawEthFrame[7+offset_ETH_PAD_SIZE] = PhysAddrPtr[1];rawEthFrame[8+offset_ETH_PAD_SIZE] = PhysAddrPtr[2];rawEthFrame[9+offset_ETH_PAD_SIZE] = PhysAddrPtr[3];rawEthFrame[10+offset_ETH_PAD_SIZE] = PhysAddrPtr[4];rawEthFrame[11+offset_ETH_PAD_SIZE] = PhysAddrPtr[5];rawEthFrame[12+offset_ETH_PAD_SIZE] = FrameType >> 8;//Frame TyperawEthFrame[13+offset_ETH_PAD_SIZE] = FrameType & 0xFF;//Frame Type(void)ifx_netif_input(CtrlIdx, FrameType, rawEthFrame, DataPtr, LenByte);
}
low_level_input适配
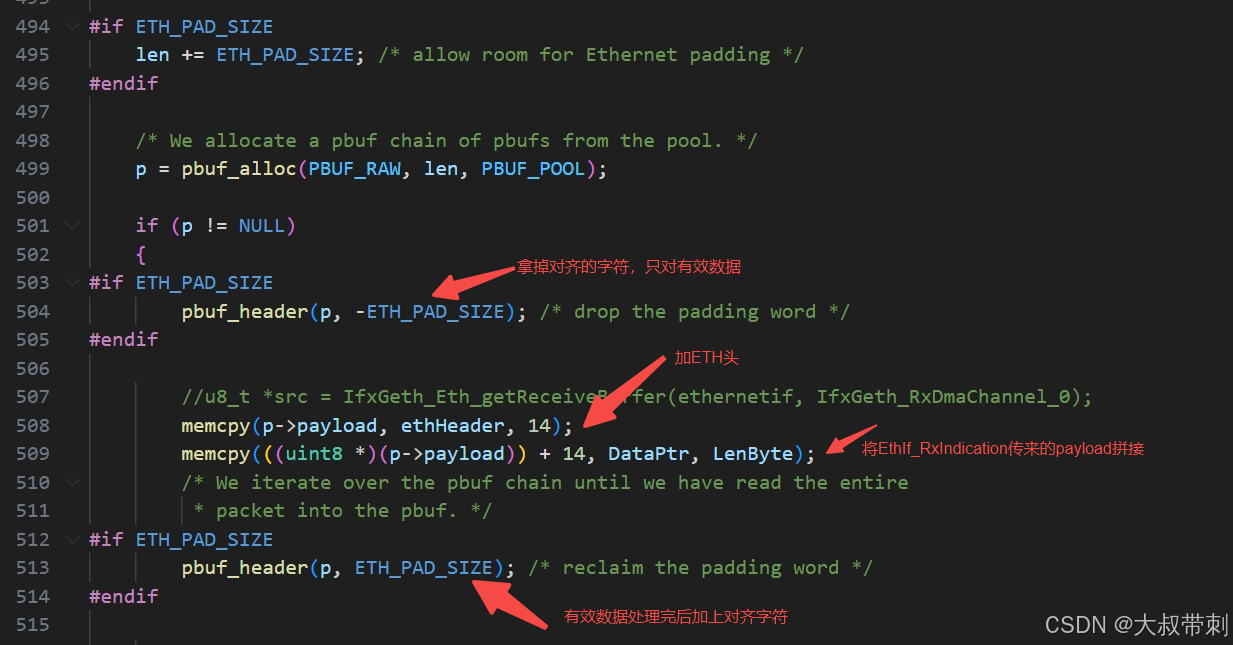
static pbuf_t *low_level_input(uint8 CtrlIdx, uint8 * ethHeader,uint8 * DataPtr, uint16 LenByte)
{//IfxGeth_Eth *ethernetif = netif->state;pbuf_t *p;u16_t   len;len = LenByte + 14;
#if ETH_PAD_SIZElen += ETH_PAD_SIZE; /* allow room for Ethernet padding */
#endif/* We allocate a pbuf chain of pbufs from the pool. */p = pbuf_alloc(PBUF_RAW, len, PBUF_POOL);if (p != NULL){
#if ETH_PAD_SIZEpbuf_header(p, -ETH_PAD_SIZE); /* drop the padding word */
#endif//u8_t *src = IfxGeth_Eth_getReceiveBuffer(ethernetif, IfxGeth_RxDmaChannel_0);memcpy(p->payload, ethHeader, 14);//把头信息还原出来memcpy(((uint8 *)(p->payload)) + 14, DataPtr, LenByte);/* We iterate over the pbuf chain until we have read the entire* packet into the pbuf. */
#if ETH_PAD_SIZEpbuf_header(p, ETH_PAD_SIZE); /* reclaim the padding word */
#endifLINK_STATS_INC(link.recv);}else{//TODO: drop packet();LINK_STATS_INC(link.memerr);LINK_STATS_INC(link.drop);}return p;
}
这里再注意一点,我把low_level_input的参数改了,以便接收EthIf_RxIndication传来的数据。
static pbuf_t *low_level_input(uint8 CtrlIdx, uint8 * ethHeader,uint8 * DataPtr, uint16 LenByte)这里再注意一点,也是很容易出错的地方,low_level_input中有为了数据对齐做的pad,这里一定要注意,去掉pad字符进行填充,填充完再加上pad字符!!!
发送函数
用MCAL接口Eth_Transmit+Eth_ProvideTxBuffer去实现low_level_output,还是比较简单的。
static sint8 low_level_output(netif_t *netif, pbuf_t *p)
{err_enum_t  res = ERR_USE;BufReq_ReturnType buffRes;Std_ReturnType    transRes;uint32 TmpBuffIdx;uint16 Tmp_Txlenghth1;uint8  *txBuf;uint16 frameType;boolean ifTxConfim = 1;uint8  ethHeader[16];uint8  desMac[16];#if ETH_PAD_SIZEpbuf_header(p, -ETH_PAD_SIZE); /* drop the padding word */
#endifmemcpy(ethHeader, p->payload, 16);desMac[0] = ethHeader[0];desMac[1] = ethHeader[1];desMac[2] = ethHeader[2];desMac[3] = ethHeader[3];desMac[4] = ethHeader[4];desMac[5] = ethHeader[5];Tmp_Txlenghth1 = p->len - 14;frameType = (ethHeader[12] << 8) + ethHeader[13];if(p->tot_len < 2){return ERR_USE;}if(p->if_idx == 0xFF){return ERR_USE;}//Eth_ProvideTxBuffer(0, &TmpBuffIdx, &TmpBuffPtr, &Tmp_Txlenghth1);buffRes = Eth_ProvideTxBuffer(0, &TmpBuffIdx, &txBuf, &Tmp_Txlenghth1);if(BUFREQ_OK == buffRes){memcpy(txBuf, ((uint8 *)p->payload) + 14, p->len-14);//Eth_Transmit(0, TmpBuffIdx, 0x0806u, TxConfirmation, Tmp_Txlenghth1, &MacDestBrodaddress[0]);transRes = Eth_Transmit(0, TmpBuffIdx, frameType, ifTxConfim, p->len - 14, desMac);//EthIf_TxConfirmation( uint8 CtrlIdx, uint32 BufIdx )if(E_OK == transRes){//EthIf_TxConfirmation(0, );}else{return ERR_USE;}}else{return ERR_USE;}#if ETH_PAD_SIZEpbuf_header(p, ETH_PAD_SIZE); /* reclaim the padding word */
#endifLINK_STATS_INC(link.xmit);return ERR_OK;
时间戳接口
1. 使用中断,STM中断服务函数去做时间戳。
2.不用中断的话,即使不配置STM也可以用Mcal_DelayGetTick()来获取STM内的计数。
但是叔这回就是倔了!就非得用STM中断来做!
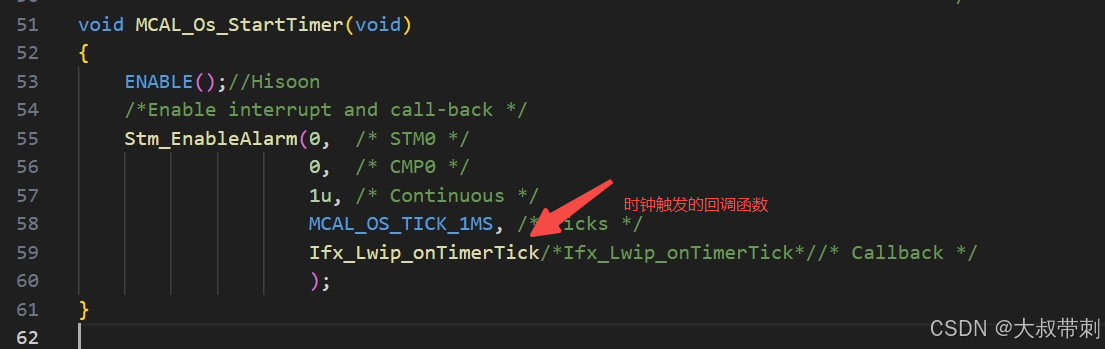 Ifx_Lwip_onTimerTick函数的逻辑几乎不用改变,它会改变timer的值,然后该timer再被Ifx_Lwip_pollTimerFlags周期性调用更新。

好了接下来该看成果了:
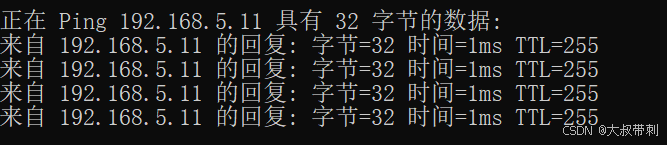
OK!收工!