用FastAPI封装Qwen云端API,本机Postman测试,再用Django做前端界面调用
用FastAPI封装Qwen云端API,本机Postman测试,再用Django做前端界面调用
- 云服务器平台:autodl 无卡模式开机 0.1元 / 时
- 🚀 快速部署(10分钟完成)
- 步骤1: 上传文件到服务器(3分钟)
- requirements.txt
- qwen_api_fastapi.py:需要填写自己的 Qwen api key
- 步骤2: 安装依赖(2分钟)
- 步骤3: 测试运行(1分钟)
- 解决 8000 端口被占用
- 📝 Postman测试:因为浏览器只能发送 GET 请求,不能输入问题
- 测试: 简单文本生成
- 1️⃣ 设置请求基本信息
- 2️⃣ 配置请求体(**Body** 标签 → **raw** → **JSON** )
- 3️⃣ 发送请求
- 4️⃣ 查看响应
- 💡 更多测试示例
- 测试: 多参数生成
- 测试: 多轮对话
云服务器平台:autodl 无卡模式开机 0.1元 / 时
# Qwen API 代理服务部署指南使用Qwen云端API,无需本地部署大模型,轻量快速!## 📋 部署准备### 1. 确认环境
- Linux云服务器(已配置好Python环境)
- Python 3.8+
- 已有Qwen API Key: `sk-025a68f2`### 2. 创建项目目录
```bash
mkdir ~/qwen-api && cd ~/qwen-api
🚀 快速部署(10分钟完成)
步骤1: 上传文件到服务器(3分钟)
将以下文件上传到 ~/qwen-api 目录:
qwen_api_fastapi.py(FastAPI版本,推荐)qwen_api_flask.py(Flask版本,可选)requirements.txt
使用scp上传:
# 在本地执行
scp qwen_api_fastapi.py requirements.txt user@your-server-ip:~/qwen-api/
或者直接在服务器上创建:
# 在服务器上执行
cd ~/qwen-api
nano qwen_api_fastapi.py  # 粘贴代码
nano requirements.txt      # 粘贴依赖
requirements.txt
# Qwen API代理服务依赖
# 使用云端API,无需torch等大型库# FastAPI方案
fastapi==0.109.0
uvicorn[standard]==0.27.0
pydantic==2.5.0# Flask方案
Flask==3.0.0
flask-cors==4.0.0# OpenAI客户端(用于调用Qwen API)
openai>=1.0.0# 生产环境服务器
gunicorn==21.2.0# 其他工具
python-multipart==0.0.6
requests==2.31.0
qwen_api_fastapi.py:需要填写自己的 Qwen api key
"""
Qwen API 代理服务 - FastAPI版本
使用Qwen云端API,无需本地加载模型
"""from fastapi import FastAPI, HTTPException, status
from fastapi.middleware.cors import CORSMiddleware
from pydantic import BaseModel, Field, field_validator
import openai
import logging
import time
from typing import Optional, Dictlogging.basicConfig(level=logging.INFO)
logger = logging.getLogger(__name__)# 配置Qwen API
QWEN_API_KEY = "sk-025a6...."
QWEN_BASE_URL = "https://dashscope.aliyuncs.com/compatible-mode/v1"  # Qwen API兼容OpenAI格式# 创建OpenAI客户端(用于调用Qwen API)
client = openai.OpenAI(api_key=QWEN_API_KEY,base_url=QWEN_BASE_URL
)# 创建FastAPI应用
app = FastAPI(title="Qwen API 代理服务",description="通过Qwen云端API提供文本生成服务",version="1.0.0"
)# CORS配置
app.add_middleware(CORSMiddleware,allow_origins=["*"],  # 生产环境应指定具体域名allow_credentials=True,allow_methods=["*"],allow_headers=["*"],
)# 请求模型
class ChatRequest(BaseModel):prompt: str = Field(..., min_length=1, max_length=4000, description="输入提示文本")max_tokens: int = Field(default=512, ge=10, le=2000, description="最大生成token数")temperature: float = Field(default=0.7, ge=0.0, le=2.0, description="采样温度")top_p: float = Field(default=0.9, ge=0.0, le=1.0, description="核采样参数")system_prompt: str = Field(default="You are a helpful assistant.",description="系统提示")model: str = Field(default="qwen-turbo",description="使用的模型名称")@field_validator('prompt')@classmethoddef validate_prompt(cls, v):v = ' '.join(v.split())if len(v.strip()) < 1:raise ValueError('提示文本不能为空')return v# 响应模型
class ChatResponse(BaseModel):generated_text: strprompt: strmodel: strprocessing_time: floatparameters: Dictusage: Optional[Dict] = None# 根路径
@app.get("/")
async def root():return {"message": "Qwen API 代理服务","version": "1.0.0","docs": "/docs","health": "/health","endpoints": {"generate": "POST /generate","chat": "POST /chat"}}# 健康检查
@app.get("/health")
async def health_check():"""健康检查端点"""try:# 测试API连接response = client.chat.completions.create(model="qwen-turbo",messages=[{"role": "user", "content": "hi"}],max_tokens=5)return {"status": "healthy","api_connected": True,"api_key_valid": True}except Exception as e:logger.error(f"健康检查失败: {str(e)}")return {"status": "unhealthy","api_connected": False,"error": str(e)}# 文本生成接口
@app.post("/api/generate", response_model=ChatResponse)
async def generate_text(request: ChatRequest):"""主要的文本生成接口"""try:start_time = time.time()logger.info(f"处理请求: {request.prompt[:50]}...")# 调用Qwen APIresponse = client.chat.completions.create(model=request.model,messages=[{"role": "system", "content": request.system_prompt},{"role": "user", "content": request.prompt}],max_tokens=request.max_tokens,temperature=request.temperature,top_p=request.top_p)# 提取生成的文本generated_text = response.choices[0].message.contentprocessing_time = time.time() - start_timelogger.info(f"生成完成,耗时 {processing_time:.3f}秒")return ChatResponse(generated_text=generated_text,prompt=request.prompt,model=request.model,processing_time=processing_time,parameters={"max_tokens": request.max_tokens,"temperature": request.temperature,"top_p": request.top_p},usage={"prompt_tokens": response.usage.prompt_tokens,"completion_tokens": response.usage.completion_tokens,"total_tokens": response.usage.total_tokens} if response.usage else None)except openai.APIError as e:logger.error(f"Qwen API错误: {str(e)}")raise HTTPException(status_code=status.HTTP_502_BAD_GATEWAY,detail=f"Qwen API调用失败: {str(e)}")except Exception as e:logger.error(f"生成错误: {str(e)}")raise HTTPException(status_code=status.HTTP_500_INTERNAL_SERVER_ERROR,detail=f"文本生成失败: {str(e)}")# 聊天接口(支持多轮对话)
class ChatMessagesRequest(BaseModel):messages: list = Field(..., description="消息列表")max_tokens: int = Field(default=512, ge=10, le=2000)temperature: float = Field(default=0.7, ge=0.0, le=2.0)top_p: float = Field(default=0.9, ge=0.0, le=1.0)model: str = Field(default="qwen-turbo")@app.post("/api/chat")
async def chat(request: ChatMessagesRequest):"""支持多轮对话的聊天接口"""try:start_time = time.time()# 调用Qwen APIresponse = client.chat.completions.create(model=request.model,messages=request.messages,max_tokens=request.max_tokens,temperature=request.temperature,top_p=request.top_p)processing_time = time.time() - start_timereturn {"success": True,"message": response.choices[0].message.content,"role": response.choices[0].message.role,"model": request.model,"processing_time": processing_time,"usage": {"prompt_tokens": response.usage.prompt_tokens,"completion_tokens": response.usage.completion_tokens,"total_tokens": response.usage.total_tokens} if response.usage else None}except Exception as e:logger.error(f"聊天错误: {str(e)}")raise HTTPException(status_code=status.HTTP_500_INTERNAL_SERVER_ERROR,detail=f"聊天失败: {str(e)}")# 模型列表接口
@app.get("/models")
async def list_models():"""列出可用的Qwen模型"""return {"models": [{"id": "qwen-turbo","name": "Qwen Turbo","description": "快速响应,适合日常对话"},{"id": "qwen-plus","name": "Qwen Plus","description": "平衡性能和质量"},{"id": "qwen-max","name": "Qwen Max","description": "最高质量,适合复杂任务"},{"id": "qwen-long","name": "Qwen Long","description": "支持长文本处理"}]}if __name__ == "__main__":import uvicornuvicorn.run("qwen_api_fastapi:app",host="0.0.0.0",port=8000,workers=1,log_level="info")
步骤2: 安装依赖(2分钟)
cd ~/qwen-api# 创建虚拟环境(推荐)
python3 -m venv venv
source venv/bin/activate# 安装依赖
pip install --upgrade pip
pip install -r requirements.txt
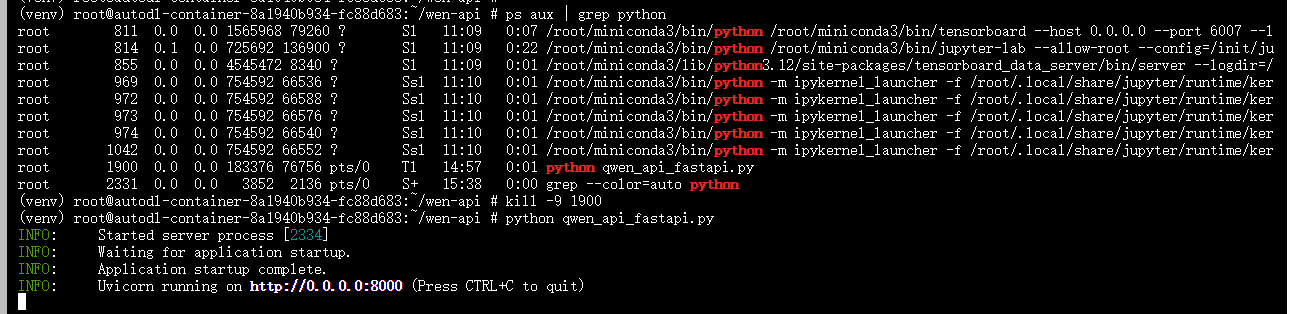
步骤3: 测试运行(1分钟)
测试FastAPI版本:
python qwen_api_fastapi.py
在【另一个终端】测试:
# 健康检查
curl http://localhost:8000/health# 测试生成
curl -X POST http://localhost:8000/api/generate \-H "Content-Type: application/json" \-d '{"prompt": "你好,请介绍一下自己","max_tokens": 100}'
看到正常响应说明服务运行成功!按Ctrl+C停止。
解决 8000 端口被占用
# 查看所有Python进程
ps aux | grep python# 找到相关的FastAPI进程,记下PID后关闭
kill -9 PID号
📝 Postman测试:因为浏览器只能发送 GET 请求,不能输入问题
测试: 简单文本生成
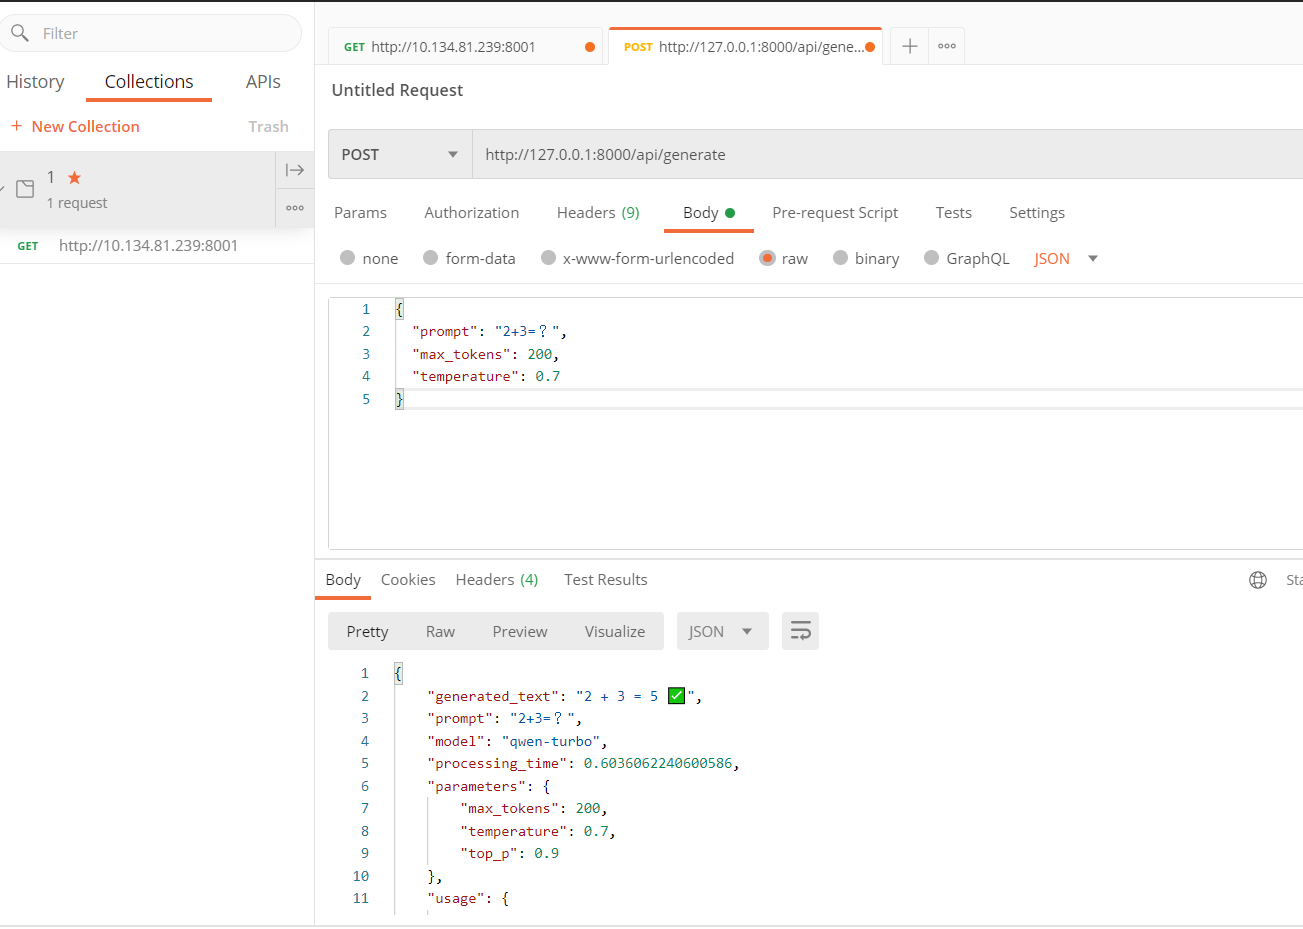
很好!你已经打开了Postman。现在我来教你如何测试:
1️⃣ 设置请求基本信息
- ✅ 方法已选:POST
- ✅ URL已填:
http://127.0.0.1:8000/api/generate
2️⃣ 配置请求体(Body 标签 → raw → JSON )
- 点击 “Body” 标签(在Params旁边)
- 选择 “raw” 选项
- 在右侧下拉菜单选择 “JSON”
- 在下方文本框输入:
{"prompt": "介绍一下人工智能的发展历史","max_tokens": 200,"temperature": 0.7
}
3️⃣ 发送请求
点击蓝色的 “Send” 按钮
4️⃣ 查看响应
在下方 Response 区域会显示返回结果,包括:
generated_text: 生成的文本processing_time: 处理时间usage: token使用情况
💡 更多测试示例
简单测试:
{"prompt": "你好"
}
带更多参数:
{"prompt": "写一首关于春天的诗","max_tokens": 300,"temperature": 0.9,"model": "qwen-turbo","system_prompt": "你是一位诗人"
}
测试: 多参数生成
{"prompt": "写一首关于春天的诗","max_tokens": 200,                                   // 最大生成长度,作用:限制AI回复的最大长度,范围:10-2000(最新的qwen3,好像有128K)"temperature": 0.9,                                  // 温度/创造性,作用:控制回答的随机性和创造性,范围:0.0 - 2.0"top_p": 0.95,                                       // 核采样,作用:控制词汇选择的多样性,越小越保守,范围:0.0 - 1.0"system_prompt": "你是一位诗人,擅长创作优美的诗歌",      // 系统提示/角色设定 --- 作用:告诉AI它的身份和行为方式"model": "qwen-plus"
}
测试: 多轮对话
- URL:
http://your-server-ip:8000/api/chat - Body:
{"messages": [                  // messages:消息列表(对话历史),作用:让AI记住上下文,实现连续对话{"role": "system", "content": "你是数学老师"},{"role": "user", "content": "什么是质数?"},{"role": "assistant", "content": "质数是只能被1和自己整除的数"},{"role": "user", "content": "17是质数吗?"}  // AI能理解"质数"指之前讨论的
],  // system → 系统设定(只在开头),user → 用户的话,assistant → AI的回复"max_tokens": 150
}