Vue2 与 Vue3 父子组件参数传递全解析:从实例到原理
在 Vue 开发中,组件间通信是核心知识点之一,而父子组件间的参数传递更是日常开发中最常遇到的场景。本文将详细对比 Vue2 和 Vue3 中父子组件参数传递的实现方式,通过具体实例分析两者的异同点,并解读背后的设计理念变化。
一、父传子:数据从父组件流向子组件
父组件向子组件传递数据是最基础的组件通信场景,通常用于将初始化数据、配置项等传递给子组件。
Vue2 实现方式
Vue2 中父传子通过props实现,子组件需要在props选项中声明接收的属性:
<!-- 父组件 Parent.vue -->
<template><div><Child :message="parentMsg" :user-info="user" :is-visible="showChild"/></div>
</template><script>
import Child from './Child.vue'export default {components: { Child },data() {return {parentMsg: 'Hello from parent',user: { name: 'Vue2', age: 6 },showChild: true}}
}
</script><!-- 子组件 Child.vue -->
<template><div><p>{{ message }}</p><p>{{ userInfo.name }} - {{ userInfo.age }}</p><p v-if="isVisible">Visible</p></div>
</template><script>
export default {// 声明接收的propsprops: {message: String,userInfo: {type: Object,required: true},isVisible: {type: Boolean,default: false}}
}
</script>
Vue2 的 props 验证支持类型检查、必填项验证、默认值等特性,通过对象形式可以进行更细致的配置。
Vue3 实现方式
Vue3 中父传子同样使用props,但在组合式 API 中通过defineProps宏来声明:
<!-- 父组件 Parent.vue -->
<template><div><Child :message="parentMsg" :user-info="user" :is-visible="showChild"/></div>
</template><script setup>
import Child from './Child.vue'
import { ref, reactive } from 'vue'const parentMsg = ref('Hello from parent')
const user = reactive({ name: 'Vue3', age: 3 })
const showChild = ref(true)
</script><!-- 子组件 Child.vue -->
<template><div><p>{{ message }}</p><p>{{ userInfo.name }} - {{ userInfo.age }}</p><p v-if="isVisible">Visible</p></div>
</template><script setup>
// 声明接收的props
const props = defineProps({message: String,userInfo: {type: Object,required: true},isVisible: {type: Boolean,default: false}
})// 在脚本中使用
console.log(props.message)
</script>
Vue3 在script setup中使用defineProps宏,无需导入即可直接使用。此外,Vue3 还支持基于 TypeScript 的 props 类型声明:
// 基于TS的props声明
const props = defineProps<{message?: stringuserInfo: {name: stringage: number}isVisible: boolean
}>()
父传子对比分析
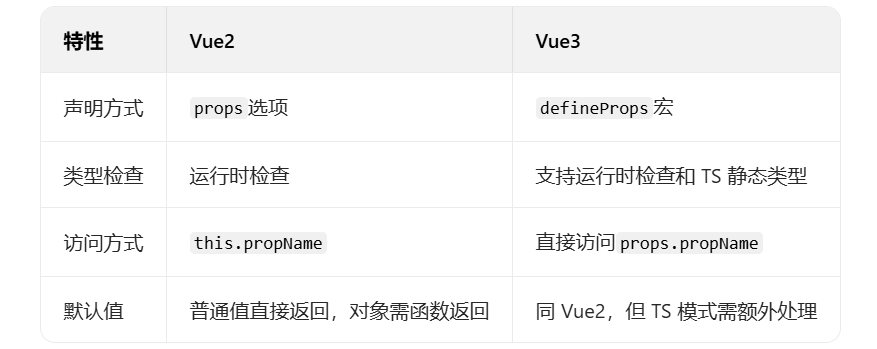
Vue3 的改进主要体现在类型支持和使用便捷性上,defineProps宏配合 TypeScript 可以提供更好的开发体验和类型安全。
二、子传父:数据从子组件流向父组件
子组件向父组件传递数据通常用于将用户操作、组件内部状态变化等通知给父组件。
Vue2 实现方式
Vue2 中子传父通过$emit方法触发自定义事件实现:
<!-- 子组件 Child.vue -->
<template><div><button @click="handleClick">点击传递数据</button><input v-model="inputValue" @input="handleInput" /></div>
</template><script>
export default {data() {return {inputValue: ''}},methods: {handleClick() {// 触发自定义事件并传递数据this.$emit('button-click', '来自子组件的点击')},handleInput() {this.$emit('input-change', this.inputValue)}},// 可选:声明触发的事件emits: ['button-click', 'input-change']
}
</script><!-- 父组件 Parent.vue -->
<template><div><Child @button-click="handleButtonClick" @input-change="handleInputChange"/></div>
</template><script>
import Child from './Child.vue'export default {components: { Child },methods: {handleButtonClick(data) {console.log('收到子组件数据:', data)},handleInputChange(value) {console.log('输入框值:', value)}}
}
</script>
Vue2.2.0 + 新增了emits选项,用于声明组件触发的事件,提高代码可读性和 IDE 支持。
Vue3 实现方式
Vue3 中子传父同样使用事件触发机制,但在组合式 API 中通过defineEmits宏来声明:
<!-- 子组件 Child.vue -->
<template><div><button @click="handleClick">点击传递数据</button><input v-model="inputValue" @input="handleInput" /></div>
</template><script setup>
import { ref } from 'vue'const inputValue = ref('')// 声明触发的事件
const emit = defineEmits(['button-click', 'input-change'])
// 或使用TS类型声明
// const emit = defineEmits<{
//   (e: 'button-click', data: string): void
//   (e: 'input-change', value: string): void
// }>()const handleClick = () => {emit('button-click', '来自子组件的点击')
}const handleInput = () => {emit('input-change', inputValue.value)
}
</script><!-- 父组件 Parent.vue -->
<template><div><Child @button-click="handleButtonClick" @input-change="handleInputChange"/></div>
</template><script setup>
import Child from './Child.vue'const handleButtonClick = (data) => {console.log('收到子组件数据:', data)
}const handleInputChange = (value) => {console.log('输入框值:', value)
}
</script>
子传父对比分析
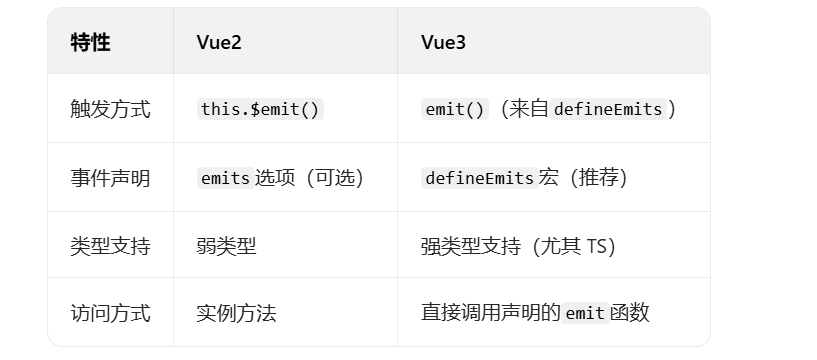
Vue3 的defineEmits提供了更明确的事件类型定义,特别是结合 TypeScript 时,可以获得完整的类型检查和自动补全,减少运行时错误。
三、双向绑定:父子组件数据同步
双向绑定是一种特殊的通信模式,允许父子组件共享同一状态并保持同步。
Vue2 实现方式
Vue2 中通过.sync修饰符或v-model实现双向绑定:
<!-- .sync 修饰符方式 -->
<!-- 父组件 -->
<Child :visible.sync="isVisible" /><!-- 子组件 -->
this.$emit('update:visible', false)<!-- v-model 方式 -->
<!-- 父组件 -->
<Child v-model="message" /><!-- 子组件 -->
export default {props: ['value'],methods: {updateValue(newVal) {this.$emit('input', newVal)}}
}
Vue2 中一个组件只能有一个v-model,如果需要多个双向绑定属性,需使用.sync修饰符。
Vue3 实现方式
Vue3 对双向绑定进行了统一和增强,使用v-model配合参数的方式:
<!-- 父组件 -->
<template><Child v-model:visible="isVisible"v-model:message="msg"/>
</template><script setup>
import { ref } from 'vue'
import Child from './Child.vue'const isVisible = ref(true)
const msg = ref('Hello')
</script><!-- 子组件 -->
<template><div><button @click="close">关闭</button><input v-model="localMsg" @input="updateMsg" /></div>
</template><script setup>
import { ref, toRef } from 'vue'const props = defineProps(['visible', 'message'])
const emit = defineEmits(['update:visible', 'update:message'])const localMsg = toRef(props, 'message')const close = () => {emit('update:visible', false)
}const updateMsg = () => {emit('update:message', localMsg.value)
}
</script>
Vue3 中v-model可以接受一个参数,从而实现多属性的双向绑定,取代了 Vue2 中的.sync修饰符,使 API 更加统一。
四、父子组件访问:直接操作实例
在某些特殊场景下,可能需要直接访问父子组件的实例或 DOM 元素。
Vue2 实现方式
Vue2 中通过$parent和$children访问父子组件实例,通过ref获取 DOM 或组件引用:
<!-- 父组件访问子组件 -->
<template><Child ref="childRef" />
</template><script>
export default {mounted() {// 访问子组件方法this.$refs.childRef.childMethod()// 访问父组件console.log(this.$parent)}
}
</script><!-- 子组件访问父组件 -->
<script>
export default {mounted() {// 访问父组件数据console.log(this.$parent.parentData)}
}
</script>
Vue3 实现方式
Vue3 中取消了$children,推荐使用ref配合defineExpose来暴露子组件的属性和方法:
<!-- 父组件 -->
<template><Child ref="childRef" />
</template><script setup>
import { ref, onMounted } from 'vue'
import Child from './Child.vue'const childRef = ref(null)onMounted(() => {// 访问子组件暴露的方法childRef.value.childMethod()
})
</script><!-- 子组件 -->
<script setup>
import { ref } from 'vue'const count = ref(0)const childMethod = () => {count.value++
}// 显式暴露属性和方法
defineExpose({childMethod,count
})
</script>
五、总结与最佳实践
对比 Vue2 和 Vue3 的父子组件通信方式,可以发现以下变化趋势:
- API 简化:Vue3 通过
defineProps和defineEmits宏简化了代码,减少了模板代码量 - 类型强化:Vue3 对 TypeScript 的原生支持使组件通信更加类型安全
- 明确性提升:
defineExpose要求显式暴露组件 API,使组件接口更加清晰 - 双向绑定统一:Vue3 的
v-model参数语法统一了双向绑定的实现方式
最佳实践建议:
- 优先使用
props和emit进行父子通信,保持单向数据流 - 避免过度使用
$parent或直接访问组件实例,降低耦合度 - 复杂场景下可以考虑使用
provide/inject或状态管理库 - 使用 TypeScript 提升类型安全性和开发体验
- 组件通信应遵循 "单一职责" 原则,每个组件只关注自身功能
Vue3 在保持 Vue2 核心思想的基础上,通过 API 的优化和类型系统的增强,使父子组件通信更加直观、安全和高效。理解这些变化不仅有助于我们更好地使用 Vue3,也能加深对组件化思想的理解。