Linux:12.线程同步与互斥
线程同步与互斥
一.线程互斥
1. 进程线程间的互斥相关背景概念
- 共享资源
- 临界资源:多线程执行流被保护的共享的资源就叫做临界资源
- 临界区:每个线程内部,访问临界资源的代码,就叫做临界区
- 互斥:任何时刻,互斥保证有且只有一个执行流进入临界区,访问临界资源,通常对临界资源起保护作用
- **原子性(后面讨论如何实现):不会被任何调度机制打断的操作,该操作只有两态,要么完成,要么未完成; 当前我们认为一条汇编,就是原子的! **
- 切换的时间点(陷入内核):1.时间片;2.阻塞是lO;3.sleep;等
选择新的时间点:从内核态,返回用户态的时候,进行检查! - 对临界资源进行保护:本质起始就是用锁,来对临界区代码进行保护.
2. 互斥量mutex
(互斥锁/互斥量是一个概念)
- 大部分情况,线程使用的数据都是局部变量,变量的地址空间在线程栈空间内,这种情况,变量归属单个线程,其他线程无法获得这种变量。
- 但有时候,很多变量都需要在线程间共享,这样的变量称为共享变量,可以通过数据的共享,完成线程之间的交互。
- 多个线程并发的操作共享变量,会带来一些问题。
// 操作共享变量会有问题的售票系统代码
#include <stdio.h>
#include <stdlib.h>
#include <string.h>
#include <unistd.h>
#include <pthread.h>int ticket = 100;
void *route(void *arg)
{char *id = (char*)arg;while ( 1 ) {if ( ticket > 0 ) {usleep(1000);printf("%s sells ticket:%d\n", id, ticket);ticket--;} else {break;}}
}
int main( void )
{pthread_t t1, t2, t3, t4;pthread_create(&t1, NULL, route, (void*)"thread 1");pthread_create(&t2, NULL, route, (void*)"thread 2");pthread_create(&t3, NULL, route, (void*)"thread 3");pthread_create(&t4, NULL, route, (void*)"thread 4");pthread_join(t1, NULL);pthread_join(t2, NULL);pthread_join(t3, NULL);pthread_join(t4, NULL);
}一次执行结果:thread 4 sells ticket:100...thread 4 sells ticket:1thread 2 sells ticket:0thread 1 sells ticket:-1thread 3 sells ticket:-2
为什么可能无法获得争取结果?
- if 语句判断条件为真以后,代码可以并发的切换到其他线程
- usleep 这个模拟漫长业务的过程,在这个漫长的业务过程中,可能有很多个线程会进入该代码段
- –ticket 操作本身就不是一个原子操作
取出ticket--部分的汇编代码
objdump -d a.out > test.objdump
152 40064b: 8b 05 e3 04 20 00 mov 0x2004e3(%rip),%eax #600b34 <ticket>
153 400651: 83 e8 01 sub $0x1,%eax
154 400654: 89 05 da 04 20 00 mov %eax,0x2004da(%rip) #600b34 <ticket>
– 操作并不是原子操作,而是对应三条汇编指令:
- load :将共享变量ticket从内存加载到寄存器中
- update : 更新寄存器里面的值,执行-1操作
- store :将新值,从寄存器写回共享变量ticket的内存地址
要解决以上问题,需要做到三点:
- 代码必须要有互斥行为:当代码进入临界区执行时,不允许其他线程进入该临界区。
- 如果多个线程同时要求执行临界区的代码,并且临界区没有线程在执行,那么只能允许一个线程进入该临界区。
- 如果线程不在临界区中执行,那么该线程不能阻止其他线程进入临界区。
要做到这三点,本质上就是需要一把锁。Linux上提供的这把锁叫互斥量。
- 注:
加锁之后,在临界区内部,也允许线程切换;切换了也不怎么样,所有线程必须等我跑完
因为我当前线程,并没有释放锁,我是持有锁被切换的,即便我不在其他线程也得等我回来执行完代码,释放锁,其他
线程才能展开锁的竞争,进入临界区.

(1).互斥量的接口
- (都是库函数,需要#include<pthread.h>)
①.初始化互斥量
初始化互斥量有两种方法:
- 方法1,静态分配:

- 方法2,动态分配:
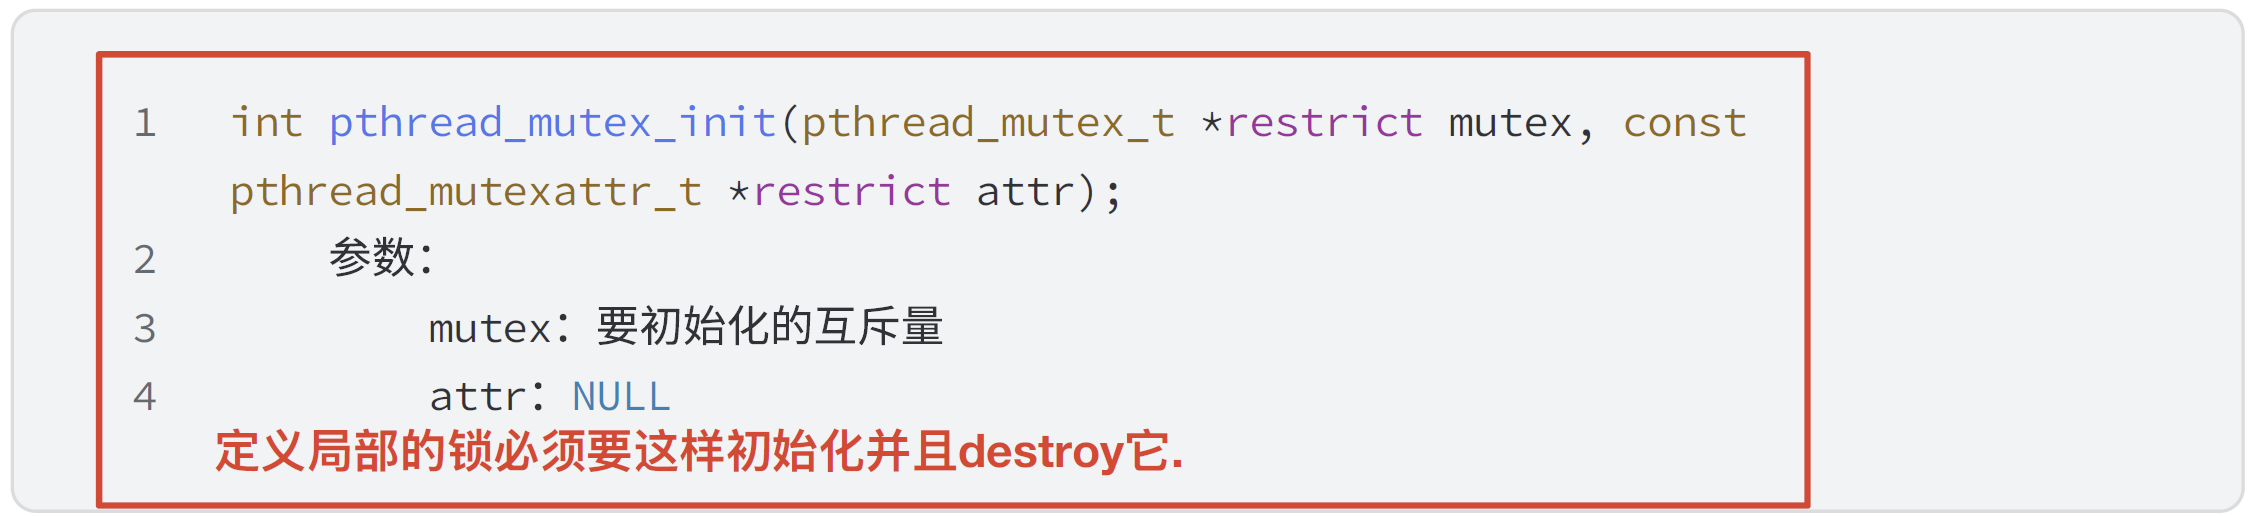
②.销毁互斥量
销毁互斥量需要注意:
-
使用
PTHREAD_ MUTEX_ INITIALIZER初始化的互斥量不需要销毁 -
不要销毁一个已经加锁的互斥量
-
已经销毁的互斥量,要确保后面不会有线程再尝试加锁
int pthread_mutex_destroy(pthread_mutex_t *mutex);
③.互斥量加锁和解锁
竞争申请锁,多线程都得先看到锁,锁本身就是临界资源;所以申请锁的过程,必须是原子!
申请锁结果
成功:继续向后运行,访问临界区代码,访问临界资源;
失败:阻塞挂起申请执行流
int pthread_mutex_lock(pthread_mutex_t *mutex);
int pthread_mutex_unlock(pthread_mutex_t *mutex);
返回值:成功返回0,失败返回错误号
还有一个pthread_mutex_trylock接口是申请锁非阻塞版本(我们不考虑).
锁提供的能力的本质:执行临界区代码由并行转换成为串行;在我执行期间不会被打扰,也是一种变相的原子性的表现.
调用 pthread_ lock 时,可能会遇到以下情况:
- 互斥量处于未锁状态,该函数会将互斥量锁定,同时返回成功
- 发起函数调用时,其他线程已经锁定互斥量,或者存在其他线程同时申请互斥量,但没有竞争到互斥量,那么pthread_ lock调用会陷入阻塞(执行流被挂起),等待互斥量解锁。
加锁:尽量加锁的范围粒度要比较细,尽可能的不要包含太多的非临界区代码
(2).例子
改进上面的售票系统:
#include <stdio.h>
#include <stdlib.h>
#include <string.h>
#include <unistd.h>
#include <pthread.h>
#include <sched.h>
int ticket = 100;
pthread_mutex_t mutex;
void *route(void *arg)
{char *id = (char*)arg;while ( 1 ) {pthread_mutex_lock(&mutex);if ( ticket > 0 ) {usleep(1000);printf("%s sells ticket:%d\n", id, ticket);ticket--;pthread_mutex_unlock(&mutex);} else {pthread_mutex_unlock(&mutex);break;}}return nullptr;
}
int main( void )
{pthread_t t1, t2, t3, t4;pthread_mutex_init(&mutex, NULL);pthread_create(&t1, NULL, route, (void*)"thread 1");pthread_create(&t2, NULL, route, (void*)"thread 2");pthread_create(&t3, NULL, route, (void*)"thread 3");pthread_create(&t4, NULL, route, (void*)"thread 4");pthread_join(t1, NULL);pthread_join(t2, NULL);pthread_join(t3, NULL);pthread_join(t4, NULL);pthread_mutex_destroy(&mutex);
}
3. 互斥量实现原理探究
-
经过上面的例子,大家已经意识到单纯的i++ 或者++i 都不是原子的,有可能会有数据一致性问题
-
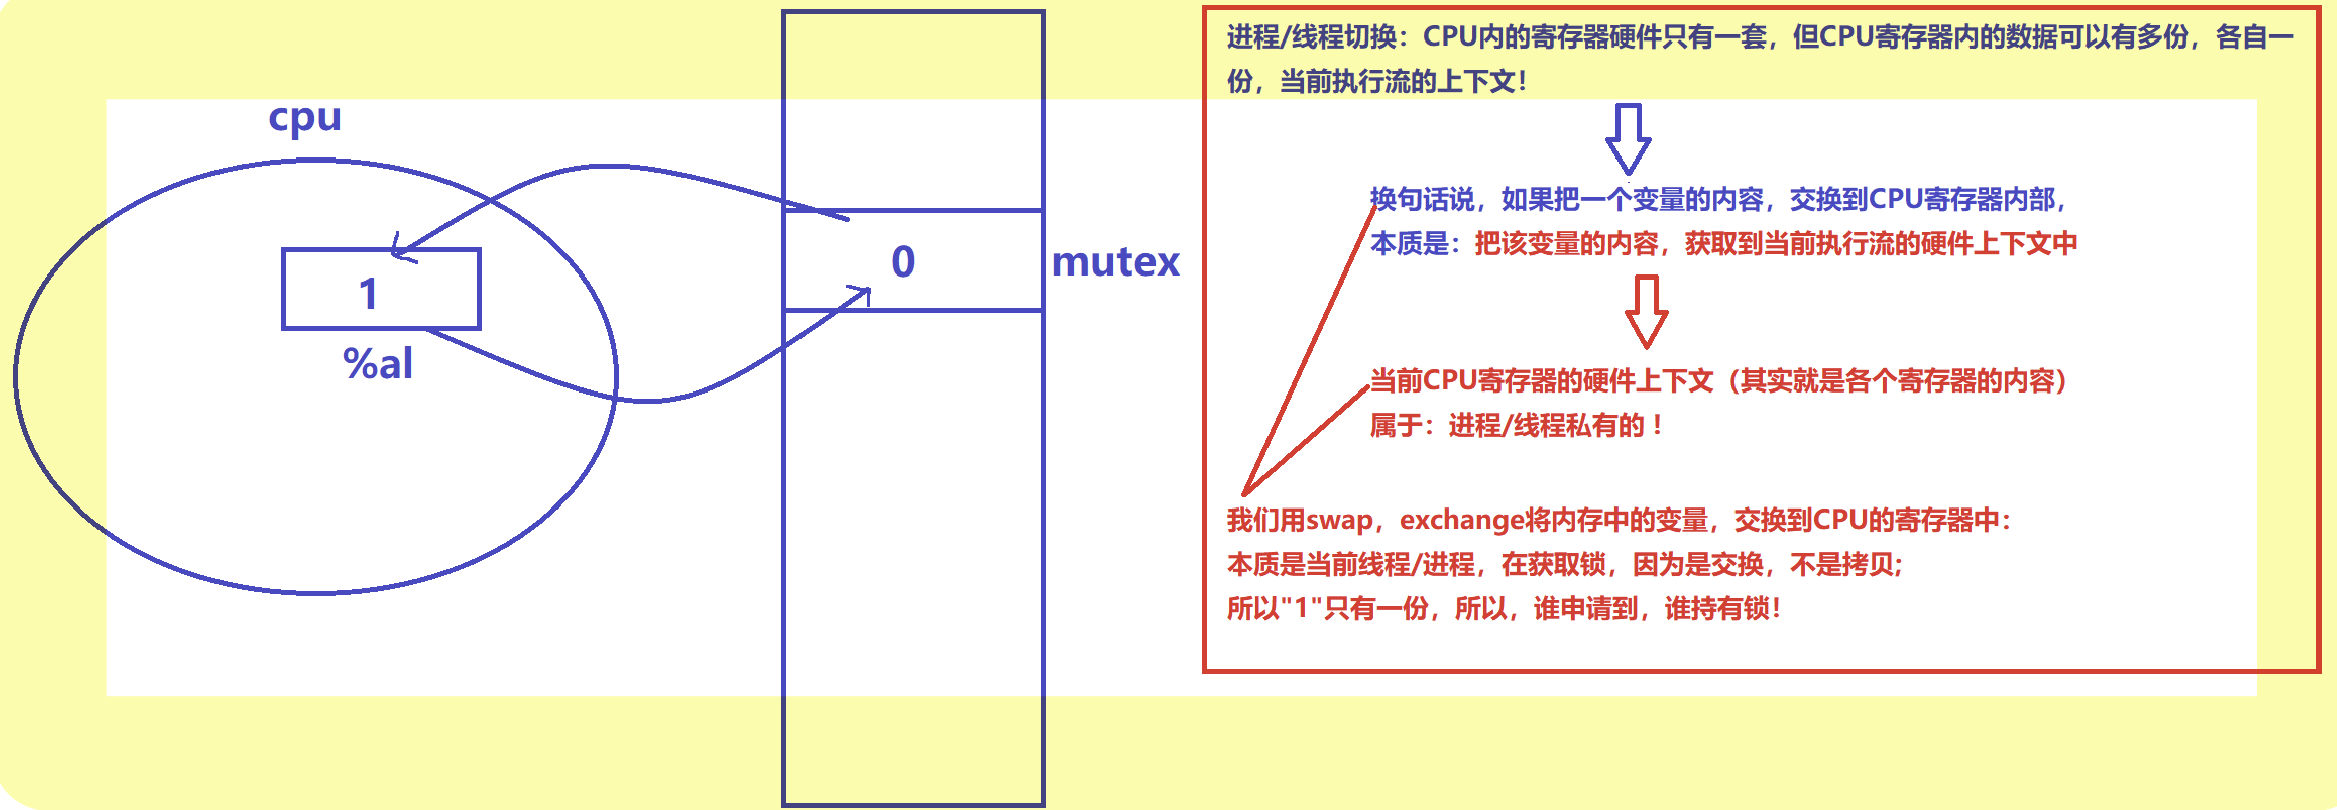
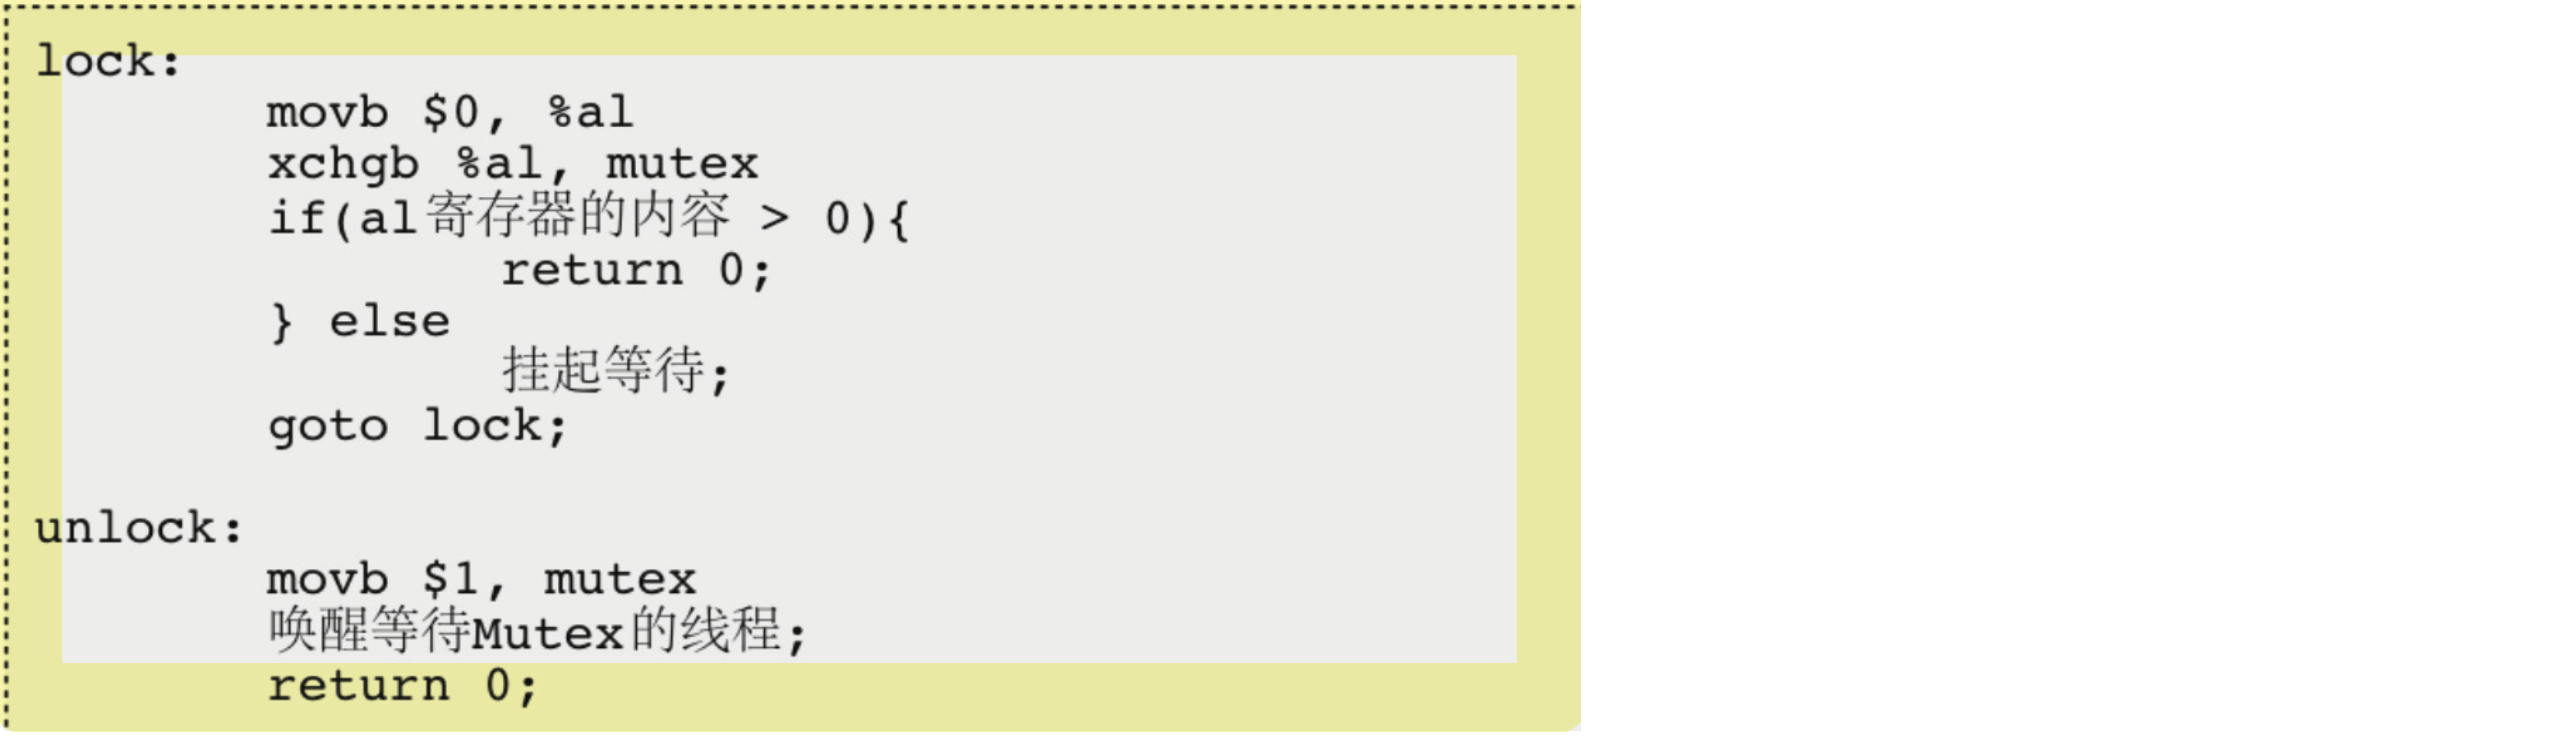
为了实现互斥锁操作,大多数体系结构都提供了swap或exchange指令,该指令的作用是把寄存器和内存单元的数据相交换,由于只有一条指令,保证了原子性,即使是多处理器平台,访问内存的 总线周期也有先后,一个处理器上的交换指令执行时另一个处理器的交换指令只能等待总线周期。 现在我们把lock和unlock的伪代码改一下
-
锁的原理:
1.硬件级实现:关闭时钟中断
2.软件级实现:swap/exchange(如下)
4. 互斥量的封装
Mutex.hpp
#pragma once
#include <pthread.h>
#include <iostream>
#include <cstring>namespace MutexModule
{class Mutex{public:Mutex(){pthread_mutex_init(&_mutex, nullptr);}~Mutex(){pthread_mutex_destroy(&_mutex);}void Lock(){int n = pthread_mutex_lock(&_mutex);if(n != 0){std::cerr << "lock error:" << strerror(n) << std::endl;}}void Unlock(){int n = pthread_mutex_unlock(&_mutex);if(n != 0){std::cerr << "unlock error:" << strerror(n) << std::endl;}}pthread_mutex_t* get(){return &_mutex;}private:pthread_mutex_t _mutex;};class LockGuard{public:LockGuard(Mutex& mutex):_mutex(mutex){_mutex.Lock();}~LockGuard(){_mutex.Unlock();}private:Mutex& _mutex;};
}
RAII风格的互斥锁, C++11也有,比如:
std::mutex mtx;
std::lock_guardstd::mutex guard(mtx);
// 抢票的代码就可以更新成为
#include <stdio.h>
#include <stdlib.h>
#include <string.h>
#include <unistd.h>
#include <pthread.h>
#include "Mutex.hpp"
using namespace LockModule;
int ticket = 1000;
Mutex mutex;
void *route(void *arg)
{char *id = (char *)arg;while (1){LockGuard lockguard(mutex); // 使用RAII风格的锁if (ticket > 0){usleep(1000);printf("%s sells ticket:%d\n", id, ticket);ticket--;}else{break;}}return nullptr;
}
int main(void)
{pthread_t t1, t2, t3, t4;pthread_create(&t1, NULL, route, (void*)"thread 1");pthread_create(&t2, NULL, route, (void*)"thread 2");pthread_create(&t3, NULL, route, (void*)"thread 3");pthread_create(&t4, NULL, route, (void*)"thread 4");pthread_join(t1, NULL);pthread_join(t2, NULL);pthread_join(t3, NULL);pthread_join(t4, NULL);
}
二.线程同步
由于一个进程高频申请释放锁,导致其他线程得不到锁,叫作饥饿问题!
1. 条件变量
- 当一个线程互斥地访问某个变量时,它可能发现在其它线程改变状态之前,它什么也做不了。
- 铃铛+队列=条件变量
- 例如一个线程访问队列时,发现队列为空,它只能等待,只到其它线程将一个节点添加到队列中。这种情况就需要用到条件变量。
2. 同步概念与竞态条件
- 同步:在保证数据安全的前提下,让线程能够按照某种特定的顺序访问临界资源,从而有效避免饥饿问题,叫做同步
- 竞态条件:因为时序问题,而导致程序异常,我们称之为竞态条件。在线程场景下,这种问题也不难理解
3. 条件变量函数
(1).初始化
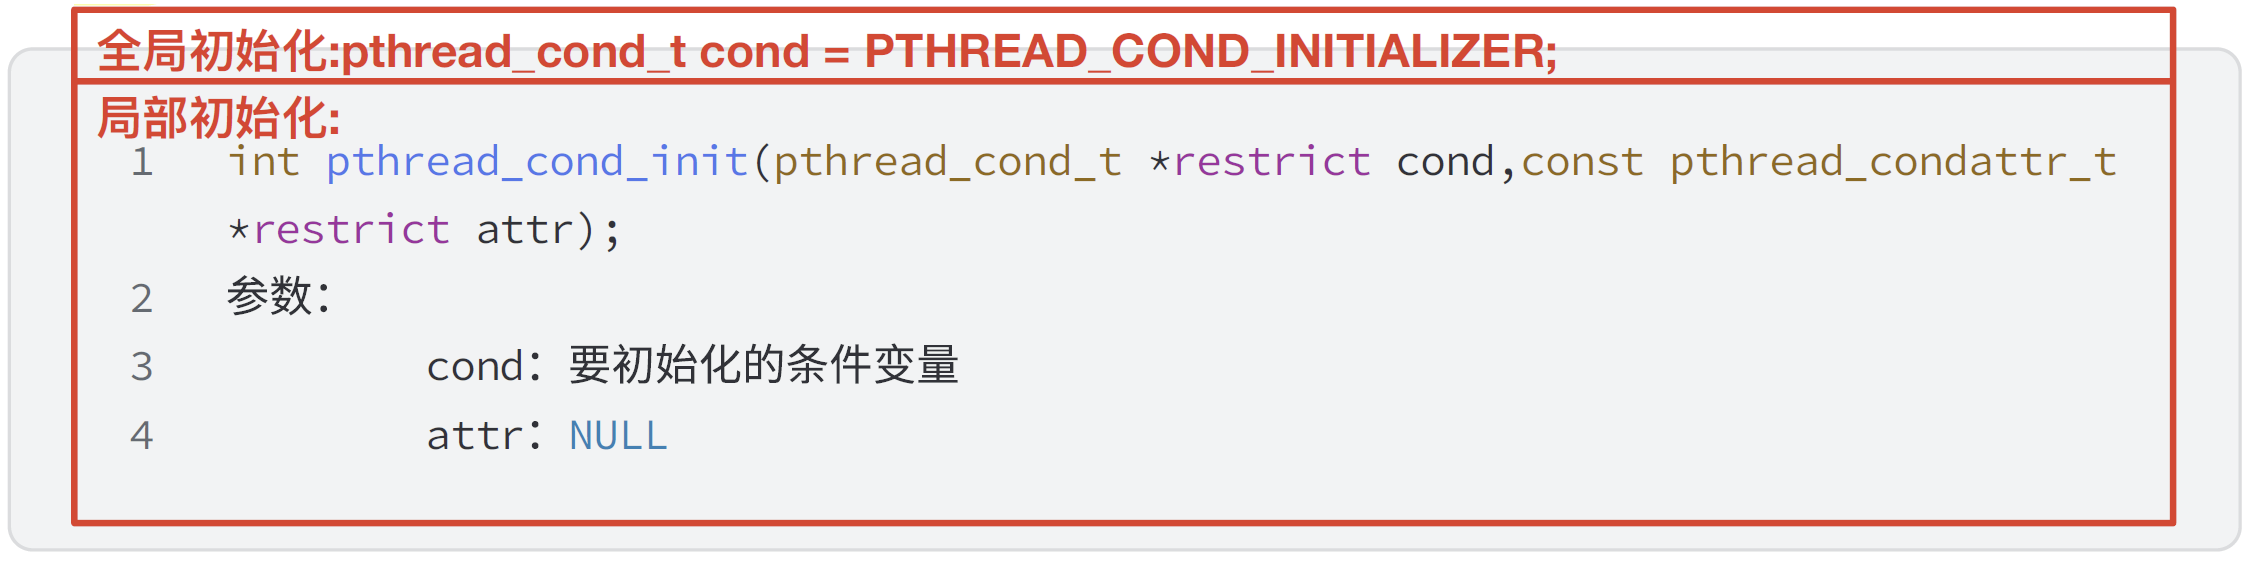
(2).销毁
int pthread_cond_destroy(pthread_cond_t *cond)
(3).等待条件满足
int pthread_cond_wait(pthread_cond_t *restrict cond,pthread_mutex_t *restrictmutex);
参数:
cond:要在这个条件变量上等待
mutex:互斥量,后面详细解释
(4).唤醒等待
int pthread_cond_broadcast(pthread_cond_t *cond);	//唤醒在指定条件变量下等待的所有的线程
int pthread_cond_signal(pthread_cond_t *cond);		//唤醒在该条件变量下等待的一个线程
简单案例:
- 我们先使用PTHREAD_COND/MUTEX_INITIALIZER进行测试,对其他细节暂不追究
- 然后将接口更改成为使用 pthread_cond_init/pthread_cond_destroy 的方式,方便后续进行封装
#include <iostream>
#include <string.h>
#include <unistd.h>
#include <pthread.h>
pthread_cond_t cond = PTHREAD_COND_INITIALIZER;
pthread_mutex_t mutex = PTHREAD_MUTEX_INITIALIZER;
void *active( void *arg )
{std::string name = static_cast<const char*>(arg);while (true){pthread_mutex_lock(&mutex);pthread_cond_wait(&cond, &mutex);std::cout << name << " 活动..." << std::endl;pthread_mutex_unlock(&mutex);}
}
int main( void )
{pthread_t t1, t2;pthread_create(&t1, NULL, active, (void*)"thread-1");pthread_create(&t2, NULL, active, (void*)"thread-2");sleep(3); // 可有可无,这里确保两个线程已经在运行while(true){// 对比测试// pthread_cond_signal(&cond); // 唤醒一个线程pthread_cond_broadcast(&cond); // 唤醒所有线程sleep(1);}pthread_join(t1, NULL);pthread_join(t2, NULL);
}
$ ./cond
thread-1 活动...
thread-2 活动...
thread-1 活动...
thread-1 活动...
thread-2 活动...
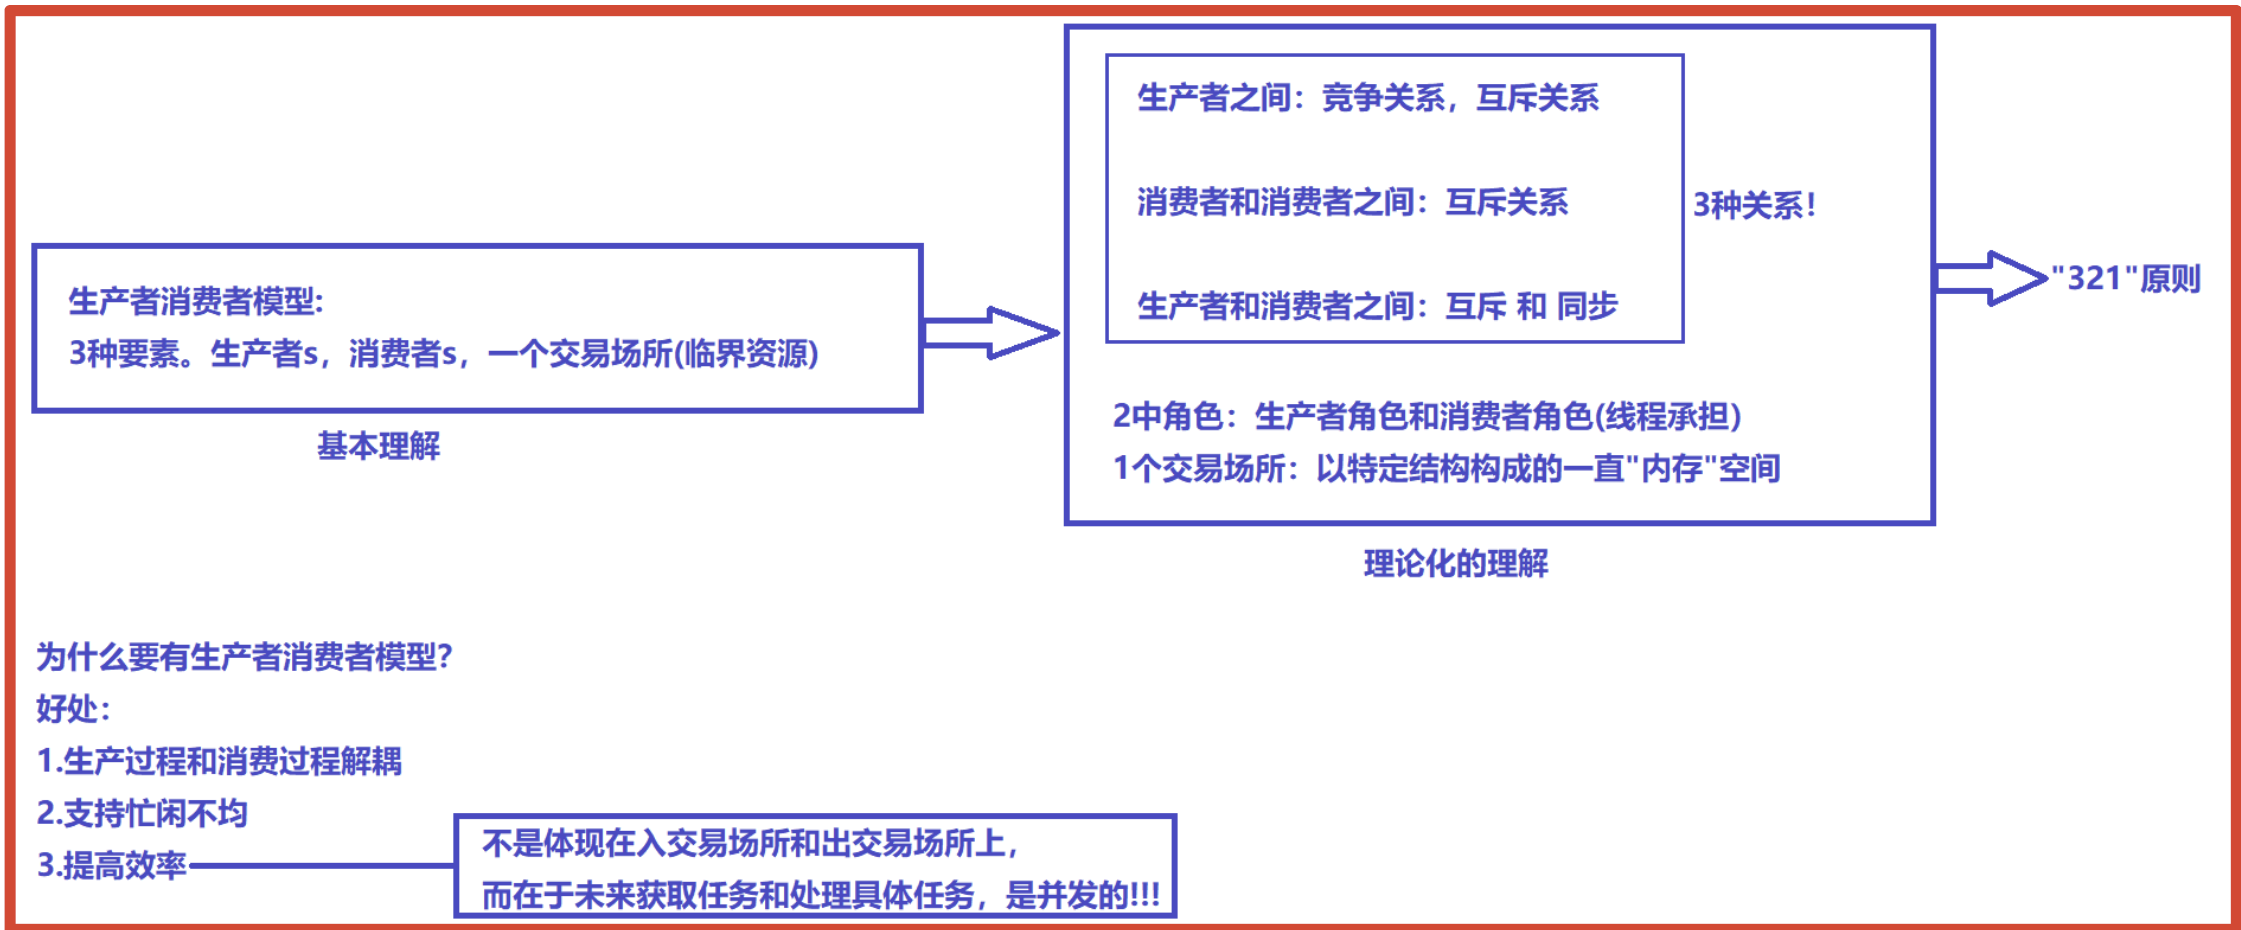
4. 生产者消费者模型
- 321原则(便于记忆)
(1).为何要使用生产者消费者模型
生产者消费者模式就是通过一个容器来解决生产者和消费者的强耦合问题。生产者和消费者彼此之间不直接通讯,而通过阻塞队列来进行通讯,所以生产者生产完数据之后不用等待消费者处理,直接扔给阻塞队列,消费者不找生产者要数据,而是直接从阻塞队列里取,阻塞队列就相当于一个缓冲区,平衡了生产者和消费者的处理能力。这个阻塞队列就是用来给生产者和消费者解耦的。
(2).生产者消费者模型优点
- 解耦
- 支持并发
- 支持忙闲不均
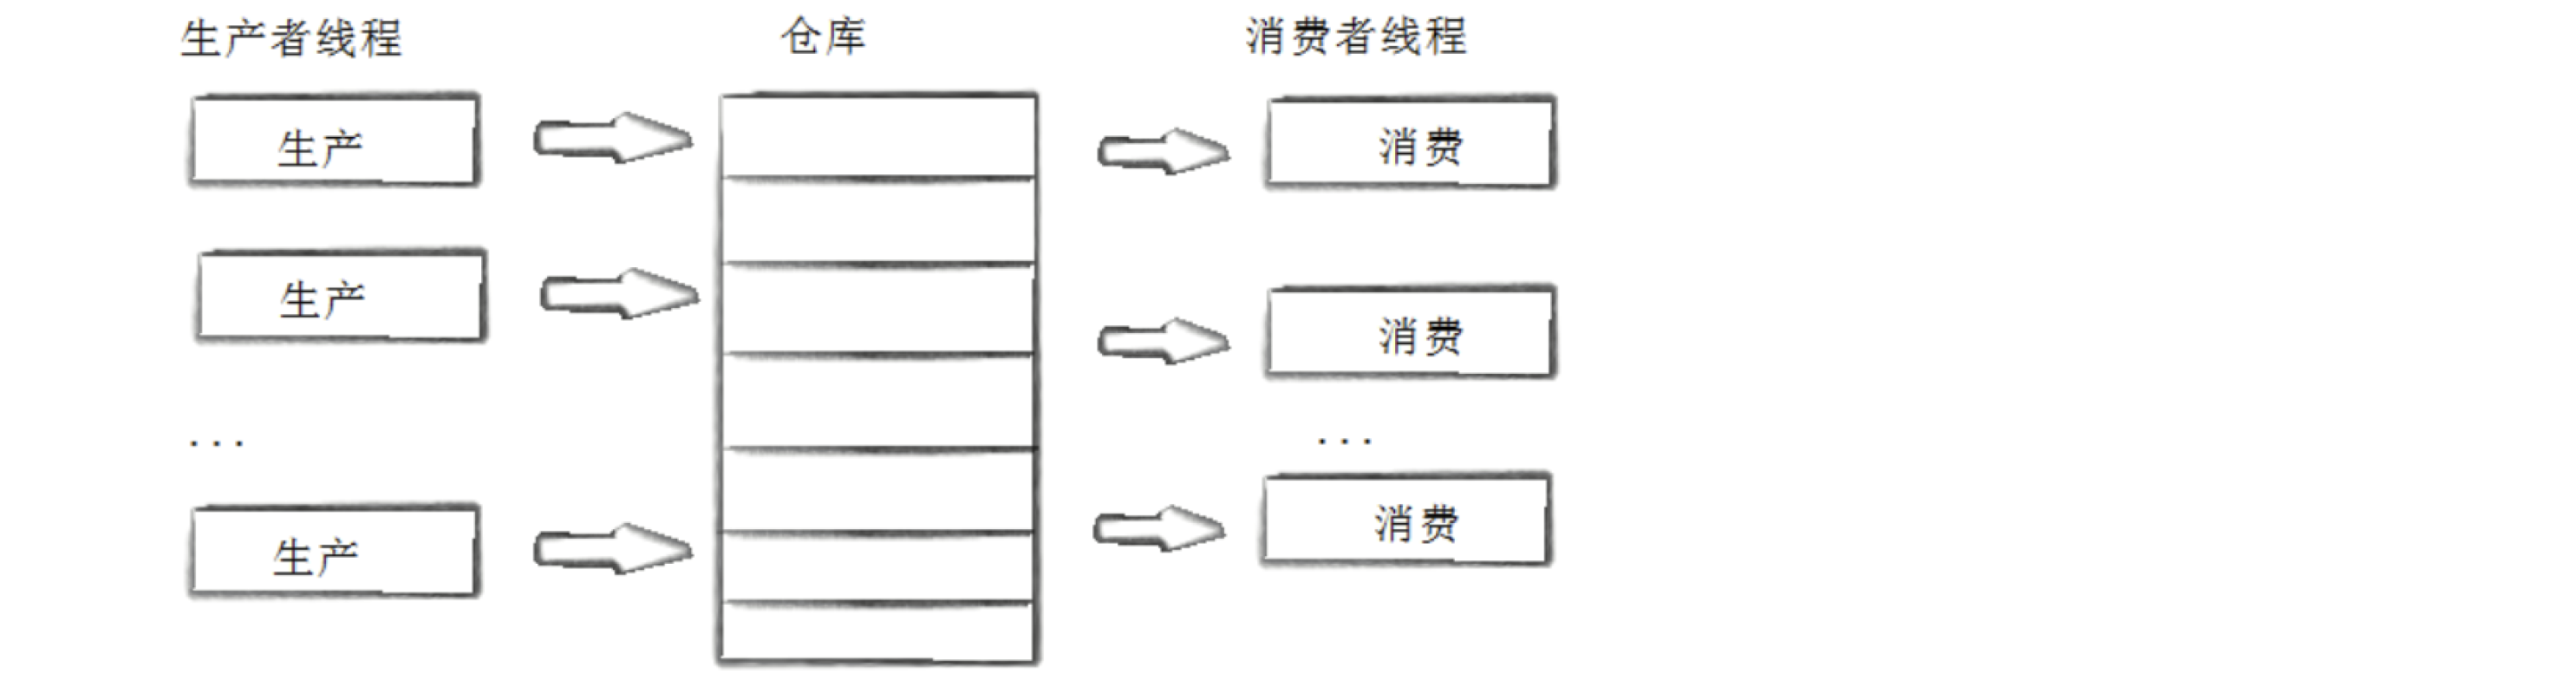
5. 基于BlockingQueue的生产者消费者模型
(1).BlockingQueue
在多线程编程中阻塞队列(Blocking Queue)是一种常用于实现生产者和消费者模型的数据结构。其与普通的队列区别在于,当队列为空时,从队列获取元素的操作将会被阻塞,直到队列中被放入了元素;当队列满时,往队列里存放元素的操作也会被阻塞,直到有元素被从队列中取出(以上的操作都是基于不同的线程来说的,线程在对阻塞队列进程操作时会被阻塞)

(2).C++ queue模拟阻塞队列的生产消费模型
代码:
- 为了便于同学们理解,我们以单生产者,单消费者,来进行讲解。
- 刚开始写,我们采用原始接口。
- 我们先写单生产,单消费。然后改成多生产,多消费(这里代码其实不变)。
BlockQueue.hpp
//阻塞队列实现
#pragma once
#include <iostream>
#include <string>
#include <queue>
#include <pthread.h>const int defaultcap = 5;template<typename T>
class BlockQueue
{
private:bool IsFull()  { return _q.size() >= _cap;}bool IsEmpty() { return _q.empty(); }public:BlockQueue(int cap = defaultcap) :_cap(cap),_csleep_num(0),_psleep_num(0){pthread_mutex_init(&_mutex,nullptr);pthread_cond_init(&_full_cond,nullptr);pthread_cond_init(&_empty_cond,nullptr);}void Equeue(const T& in){pthread_mutex_lock(&_mutex);// 生产者调用while(IsFull()){// 等待// 重点1.pthread_cond_wait调用成功,挂起当前线程之前,要先自动释放锁!// 重点2.当线程被唤醒的时候,默认就在临界区内唤醒!成功返回,需要当前进程,重新申请_mutex锁!// 重点3.如果我被唤醒,但是申请锁失败了,我就会在锁上阻塞等待!_psleep_num++;// 问题1: pthread_cond_wait是函数吗?有没有可能失败?pthread_cond_wait立即返回了// 问题2:pthread_cond_wait可能会因为,条件其实不满足,叫作pthread_cond_wait被伪唤醒// 解决办法:判断用while不用if!pthread_cond_wait(&_full_cond, &_mutex);_psleep_num--;}//100%确定:队列有空间_q.push(in);if(_csleep_num>0){pthread_cond_signal(&_empty_cond);std::cout << "唤醒消费者..." << std::endl;}pthread_mutex_unlock(&_mutex); // TODO}T Pop(){//消费者调用pthread_mutex_lock(&_mutex);if(IsEmpty()){//等待_csleep_num++;pthread_cond_wait(&_empty_cond, &_mutex);_csleep_num--;}T data = _q.front();_q.pop();if(_psleep_num>0){pthread_cond_signal(&_full_cond);std::cout << "唤醒生产者..." << std::endl;}pthread_mutex_unlock(&_mutex);return data;}~BlockQueue() {pthread_mutex_destroy(&_mutex);pthread_cond_destroy(&_full_cond);pthread_cond_destroy(&_empty_cond);}
private:std::queue<T> _q; //临界资源int _cap; //容量大小pthread_mutex_t _mutex;pthread_cond_t _full_cond;pthread_cond_t _empty_cond;int _csleep_num; //消费者休眠个数int _psleep_num; //生产者休眠个数
};
注意:这里采用模版,队列中不仅仅可以放置内置类型,比如int, 对象也可以作为任务来参与生产消费的过程哦.
#pragma once
#include <iostream>
#include <string>
#include <functional>
// 任务类型1
// class Task
// {
// public:
// Task() {}
// Task(int a, int b) : _a(a), _b(b), _result(0)
// {
// }
// void Excute()
// {
// _result = _a + _b;
// }
// std::string ResultToString()
// {
// return std::to_string(_a) + "+" + std::to_string(_b) + "=" +
std::to_string(_result);
// }
// std::string DebugToString()
// {
// return std::to_string(_a) + "+" + std::to_string(_b) + "=?";
// }
// private:
// int _a;
// int _b;
// int _result;
// };
// 任务类型2
using Task = std::function<void()>;
6. 为什么pthread_cond_wait 需要互斥量?
- 条件等待是线程间同步的一种手段,如果只有一个线程,条件不满足,一直等下去都不会满足,所以必须要有一个线程通过某些操作,改变共享变量,使原先不满足的条件变得满足,并且友好的通知等待在条件变量上的线程。
- 条件不会无缘无故的突然变得满足了,必然会牵扯到共享数据的变化。所以一定要用互斥锁来保护。没有互斥锁就无法安全的获取和修改共享数据。

- 按照上面的说法,我们设计出如下的代码:先上锁,发现条件不满足,解锁,然后等待在条件变量上不就行了,如下代码:
// 错误的设计
pthread_mutex_lock(&mutex);
while (condition_is_false) {
pthread_mutex_unlock(&mutex);
//解锁之后,等待之前,条件可能已经满足,信号已经发出,但是该信号可能被错过
pthread_cond_wait(&cond, &mutex);
pthread_mutex_lock(&mutex);
}
pthread_mutex_unlock(&mutex);
- 由于解锁和等待不是原子操作。调用解锁之后, pthread_cond_wait 之前,如果已经有其他线程获取到互斥量,摒弃条件满足,发送了信号,那么pthread_cond_wait 将错过这个信号,可能会导致线程永远阻塞在这个pthread_cond_wait 。所以解锁和等待必须是一个原子操作。
- int pthread_cond_wait(pthread_cond_ t *cond,pthread_mutex_ t *mutex); 进入该函数后,会去看条件量等于0不?等于,就把互斥量变成1,直到cond_ wait返回,把条件量改成1,把互斥量恢复成原样。
7. 条件变量使用规范
- 等待条件代码
pthread_mutex_lock(&mutex);
while (条件为假) //if不行pthread_cond_wait(cond, mutex);
修改条件
pthread_mutex_unlock(&mutex);
- 给条件发送信号代码
pthread_mutex_lock(&mutex);
设置条件为真
pthread_cond_signal(cond);
pthread_mutex_unlock(&mutex);
8. 条件变量的封装
- 基于上面的基本认识,我们已经知道条件变量如何使用,虽然细节需要后面再来进行解释,但这里可以做一下基本的封装,以备后用.
Cond.hpp
#pragma once#include <iostream>
#include <pthread.h>
#include "Mutex.hpp"using namespace MutexModule;namespace CondModule
{class Cond{public:    Cond(){pthread_cond_init(&_cond, nullptr);}void Wait(Mutex& mutex){int n = pthread_cond_wait(&_cond, mutex.get());(void)n;}void Signal(){// 唤醒在条件变量下等待的一个线程int n = pthread_cond_signal(&_cond);(void)n;}void Broadcast(){// 唤醒所有在条件变量下等待的线程int n = pthread_cond_broadcast(&_cond);(void)n;}~Cond(){pthread_cond_destroy(&_cond);}private:pthread_cond_t _cond;};
}
为了让条件变量更具有通用性,建议封装的时候,不要在Cond类内部引用对应的封装互斥量,要不然后面组合的时候,会因为代码耦合的问题难以初始化,因为一般而言Mutex和Cond基本是一起创建的。
三.POSIX信号量
信号量:本质是一个计数器,是对特定资源的预订机制!
所有的线程,都得先看到sem(计数器+锁可以实现),sem–,Sem++;信号量本质也是临界资源
P:–:原子的
V:++:原子的
多线程使用资源,有两种场景:
1.将目标资源整体使用月(mutex+2元信号量)
2.将目标资源按照不同的"块"分批使用(信号量)
POSIX信号量和SystemV信号量作用相同,都是用于同步操作,达到无冲突的访问共享资源目的。但POSIX可以用于线程间同步。
1. 初始化信号量
#include <semaphore.h>
int sem_init(sem_t *sem, int pshared, unsigned int value);
参数:
pshared:0表示线程间共享,非零表示进程间共享
value:信号量初始值
返回值:0:成功;非0:错误码
2. 销毁信号量
int sem_destroy(sem_t *sem);
3. 等待信号量
功能:等待信号量,会将信号量的值减1
int sem_wait(sem_t *sem); //P()
4. 发布信号量
功能:发布信号量,表示资源使用完毕,可以归还资源了。将信号量值加1。
int sem_post(sem_t *sem);//V()
生产者-消费者的例子是基于queue的,其空间可以动态分配,现在基于固定大小的环形队列重写这个程序(POSIX信号量):
信号量的另一个本质:
信号量把对临界资源是否存在?就绪?等的条件,以原子性的形式,呈现在访问临界资源之前就判断了!
如果资源可以拆分,你可以考虑sem
如果资源是整体使用的,你就使用mutex
5. 模拟实现sem(信号量)
#include <iostream>
#include <semaphore.h>
#include <pthread.h>namespace SemModule
{const int defaultvalue = 1;class Sem{public:Sem(unsigned int sem_value = defaultvalue){sem_init(&_sem, 0, sem_value);}void P(){int n = sem_wait(&_sem); //原子的(void)n;}void V(){int n = sem_post(&_sem); //原子的(void)n;}~Sem(){sem_destroy(&_sem);}private:sem_t _sem;};
}
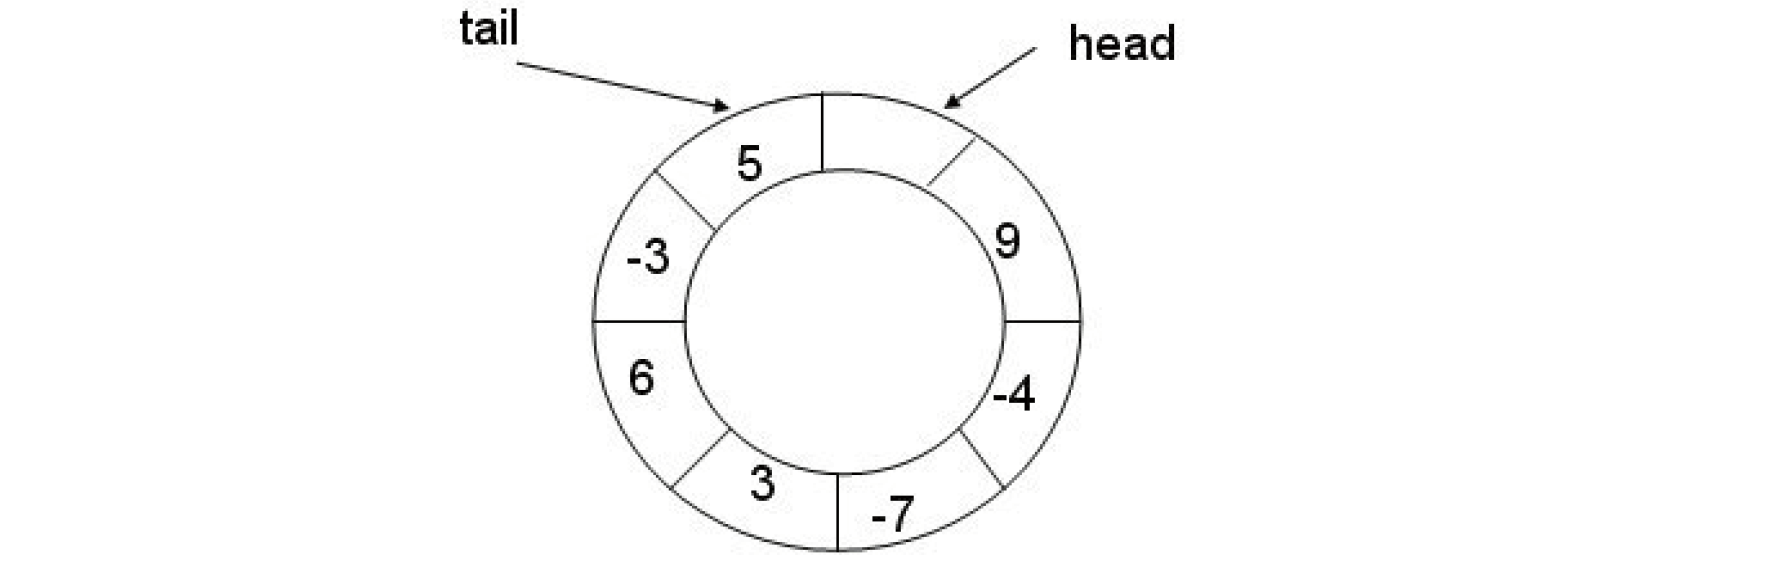
6. 基于环形队列的生产消费模型
- 环形队列采用数组模拟,用模运算来模拟环状特性
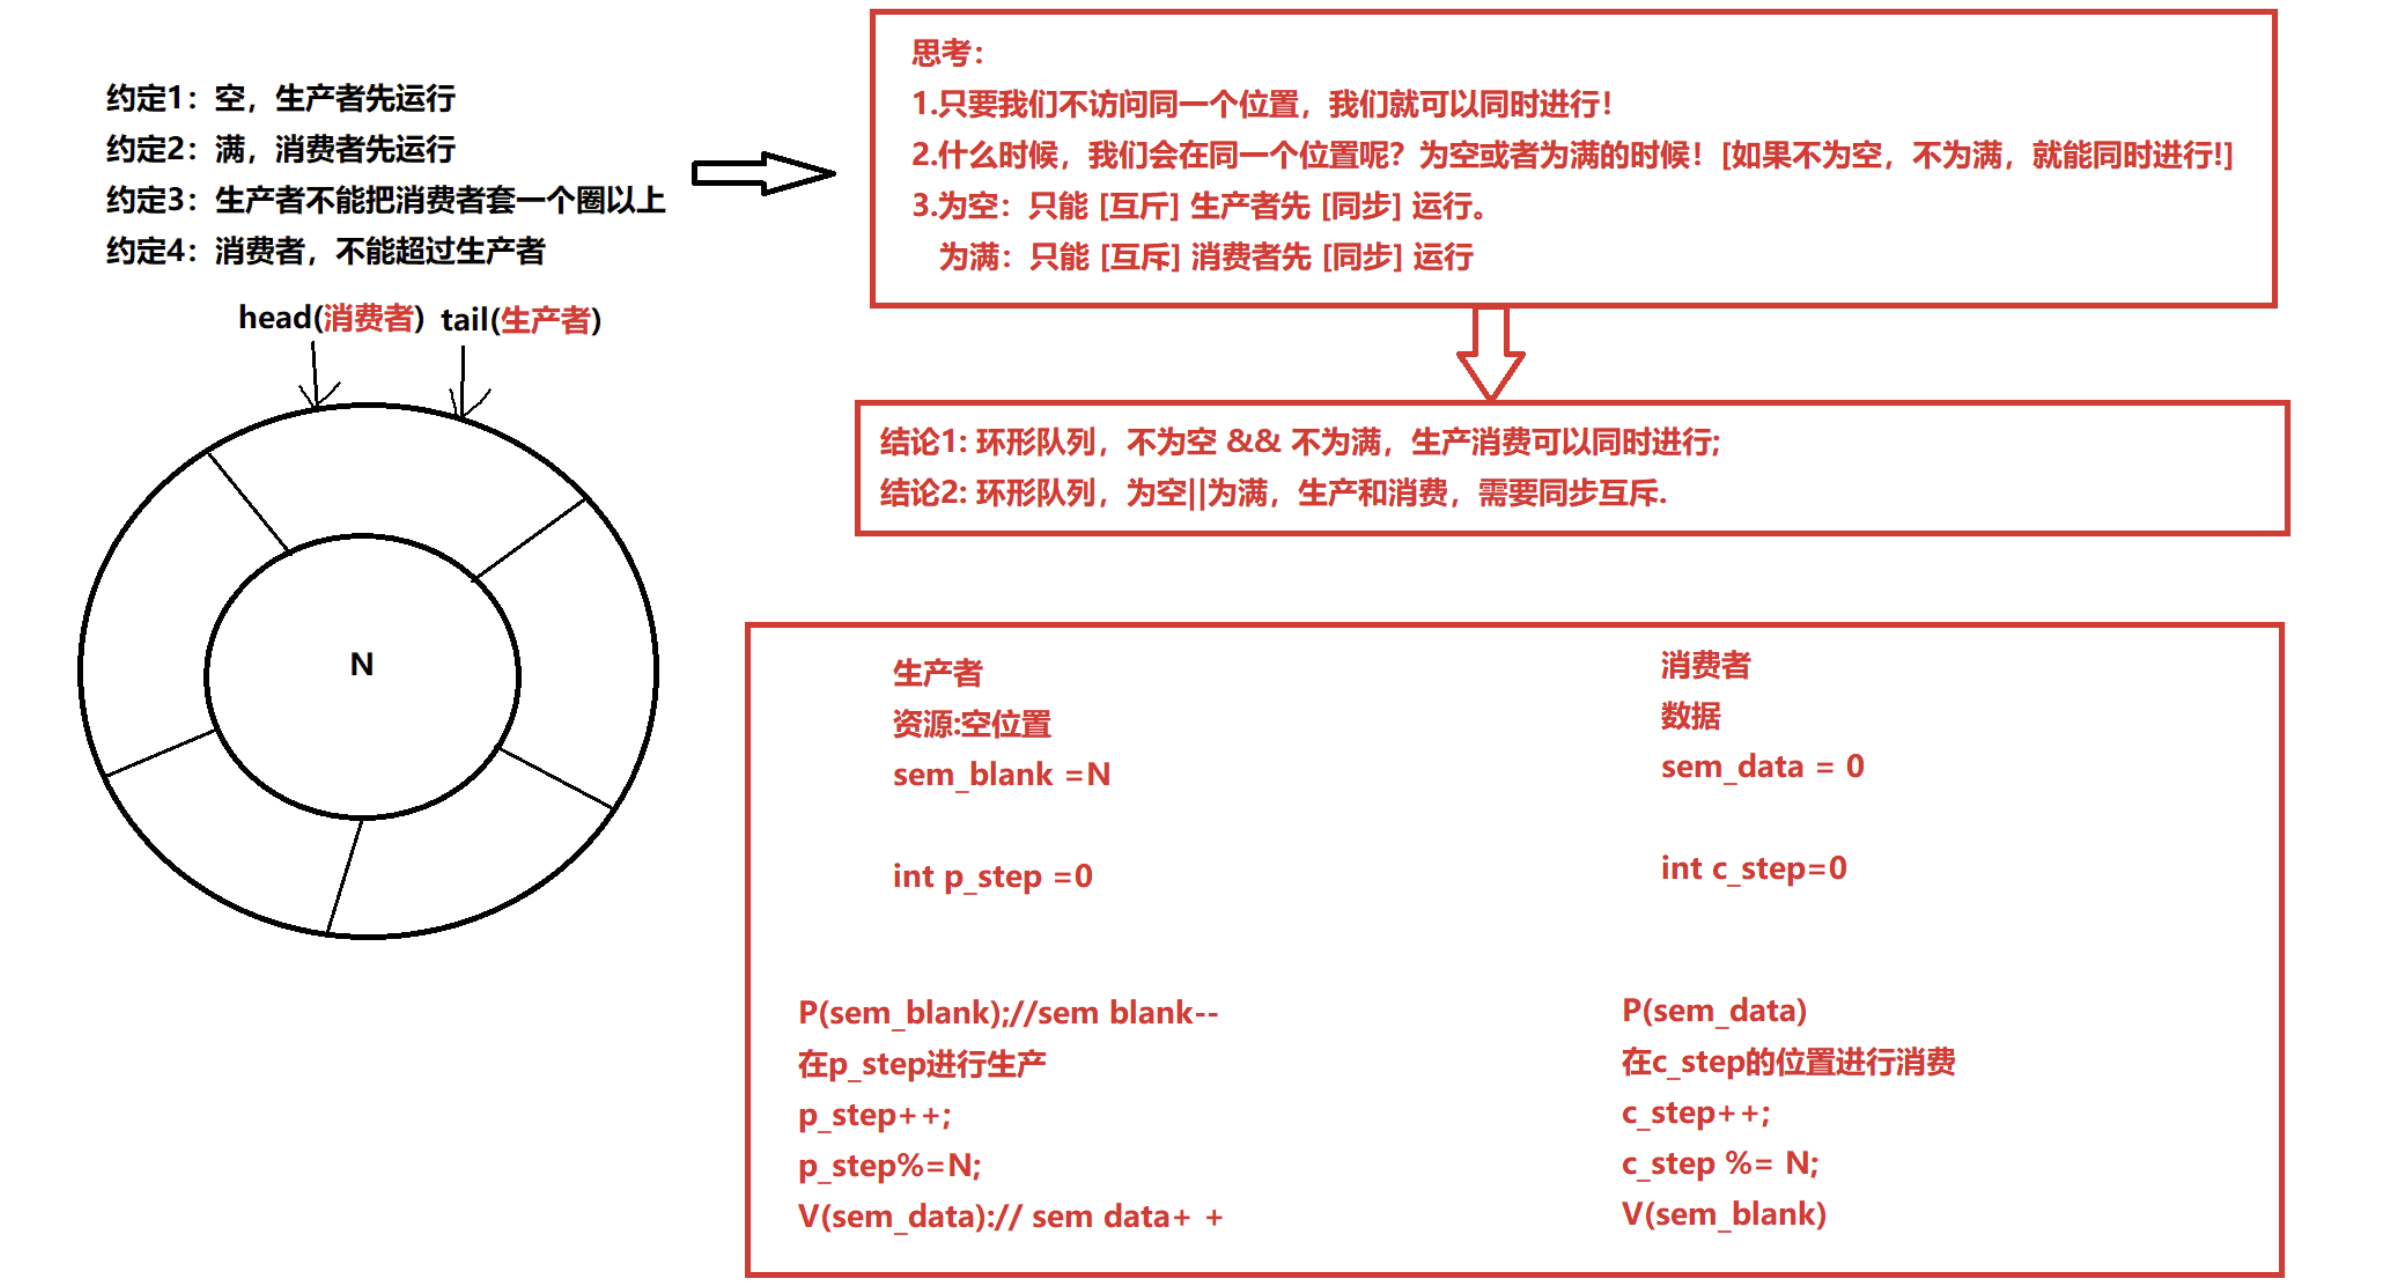

- 环形结构起始状态和结束状态都是一样的,不好判断为空或者为满,所以可以通过加计数器或者标记位来判断满或者空。另外也可以预留一个空的位置,作为满的状态.
- 但是我们现在有信号量这个计数器,就很简单的进行多线程间的同步过程。
7. 模拟实现环形队列的生产消费者模型
Mutex.hpp
#pragma once
#include <pthread.h>
#include <iostream>
#include <cstring>namespace MutexModule
{class Mutex{public:Mutex(){pthread_mutex_init(&_mutex, nullptr);}~Mutex(){pthread_mutex_destroy(&_mutex);}void Lock(){int n = pthread_mutex_lock(&_mutex);if(n != 0){std::cerr << "lock error:" << strerror(n) << std::endl;}}void Unlock(){int n = pthread_mutex_unlock(&_mutex);if(n != 0){std::cerr << "unlock error:" << strerror(n) << std::endl;}}pthread_mutex_t* get(){return &_mutex;}private:pthread_mutex_t _mutex;};class LockGuard{public:LockGuard(Mutex& mutex):_mutex(mutex){_mutex.Lock();}~LockGuard(){_mutex.Unlock();}private:Mutex& _mutex;};
}
Sem.hpp
#include <iostream>
#include <semaphore.h>
#include <pthread.h>namespace SemModule
{const int defaultvalue = 1;class Sem{public:Sem(unsigned int sem_value = defaultvalue){sem_init(&_sem, 0, sem_value);}void P(){int n = sem_wait(&_sem); //原子的(void)n;}void V(){int n = sem_post(&_sem); //原子的(void)n;}~Sem(){sem_destroy(&_sem);}private:sem_t _sem;};
}
RingQueue.hpp
#pragma once
#include <iostream>
#include <vector>
#include "Sem.hpp"
#include "Mutex.hpp"static const int gcap = 5;using namespace SemModule;
using namespace MutexModule;template<typename T>
class RingQueue
{
public:RingQueue(int cap = gcap):_cap(cap),_rq(cap) //构造方法一种,_blank_sem(cap),_p_step(0),_data_sem(0),_c_step(0){}void Equeue(const T& in){// 生产者// _pmutex.Lock();// 1.申请(空位置)信号量_blank_sem.P();{LockGuard lockguard(_pmutex); // 先瓜分信号量在竞争锁效率比较高。(如电影院,买票和排队一样)// 2.生产_rq[_p_step] = in;// 3.更新下标++_p_step;// 4.维持环形特性_p_step %= _cap;}// 5.通知消费者_data_sem.V();}void Pop(T* out){// 消费者// 1.申请(数据)信号量_data_sem.P();{ LockGuard lockguard(_cmutex); // 先瓜分信号量在竞争锁效率比较高。(如电影院,买票和排队一样)// 2.消费*out = _rq[_c_step];// 3.更新下标++_c_step;// 4.维持环形特性_c_step %= _cap;}// 5.通知生产者_blank_sem.V();}~RingQueue(){}
private:std::vector<T> _rq;int _cap;// 生产者Sem _blank_sem; //空位置int _p_step;// 消费者Sem _data_sem; //数据int _c_step;//维护多生产,多消费,2把锁Mutex _cmutex;Mutex _pmutex;
};
Main.cc
#include <iostream>
#include <unistd.h>
#include "RingQueue.hpp"void* consumer(void* args)
{RingQueue<int> *rq = reinterpret_cast<RingQueue<int> *>(args);while (true){sleep(3);// 1.消费任务int t = 0;rq->Pop(&t);//2.处理任务// t();std::cout << "消费了一个数据: " << t << std::endl;}
}int data = 1;void* productor(void* args)
{RingQueue<int> *rq = reinterpret_cast<RingQueue<int> *>(args);while (true){sleep(1);//1.获得任务std::cout << "生产了一个任务: " << data << std::endl;//2.生成任务rq->Equeue(data++);}
}int main() {//申请阻塞队列RingQueue<int> *rq = new RingQueue<int>();//构建生产者和消费者pthread_t c[2], p[3];pthread_create(c, nullptr, consumer, rq);pthread_create(c+1, nullptr, consumer, rq);pthread_create(p, nullptr, productor, rq);pthread_create(p+1, nullptr, productor, rq);pthread_create(p+2, nullptr, productor, rq);pthread_join(c[0],nullptr);pthread_join(c[1],nullptr);pthread_join(p[0],nullptr);pthread_join(p[1],nullptr);pthread_join(p[2],nullptr);return 0;
}
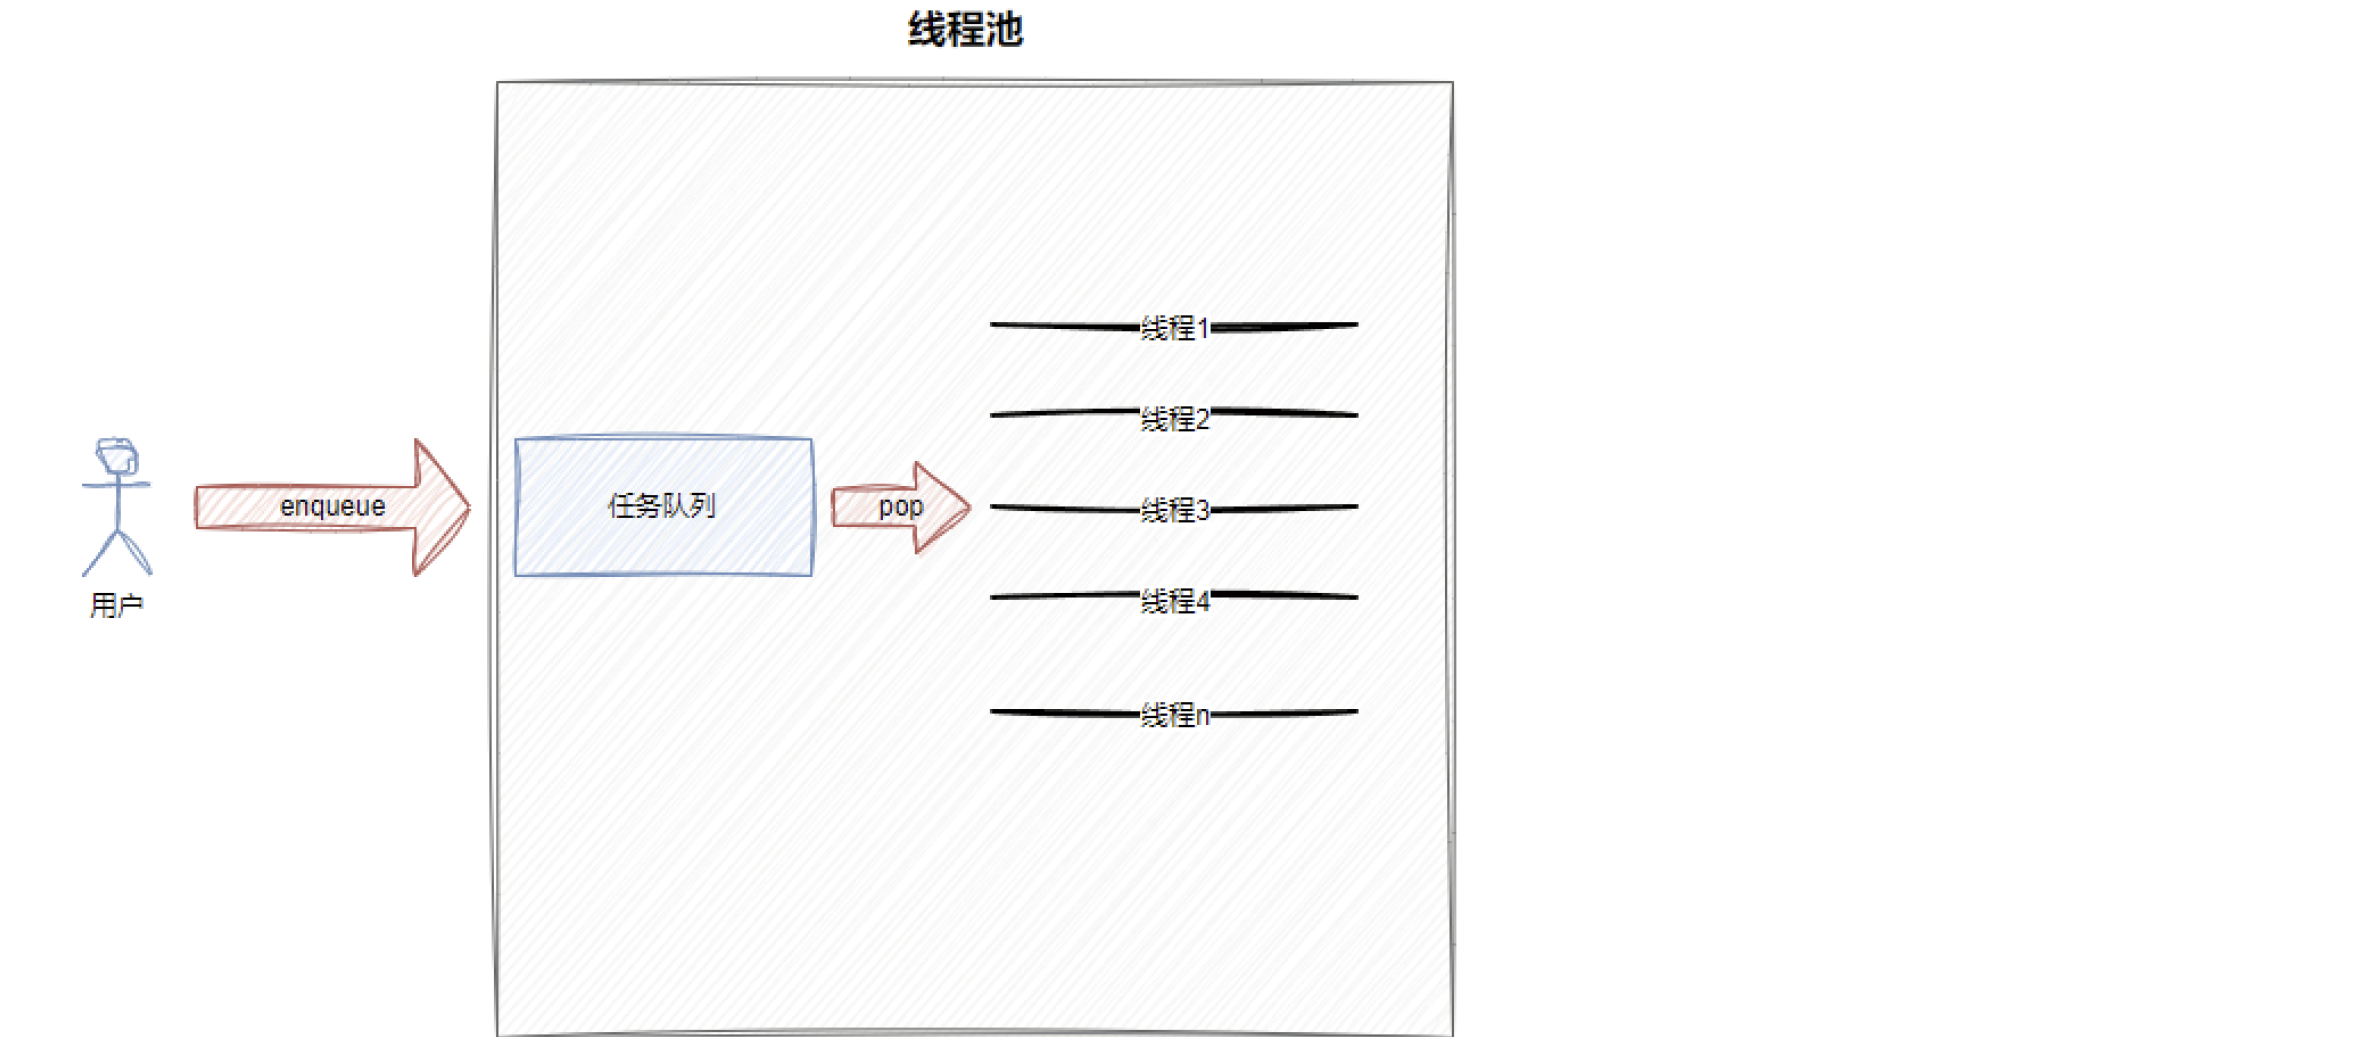
四.线程池
下面开始,我们结合我们之前所做的所有封装,进行一个线程池的设计。在写之前,我们要做如下准备
- 准备线程的封装
- 准备锁和条件变量的封装
- 引入日志,对线程进行封装
1. 日志与策略模式
什么是设计模式
IT行业这么火, 涌入的人很多. 俗话说林子大了啥鸟都有. 大佬和菜鸡们两极分化的越来越严重. 为了让菜鸡们不太拖大佬的后腿, 于是大佬们针对一些经典的常见的场景, 给定了一些对应的解决方案, 这个就是设计模式
日志认识
计算机中的日志是记录系统和软件运行中发生事件的文件,主要作用是监控运行状态、记录异常信息,帮助快速定位问题并支持程序员进行问题修复。它是系统维护、故障排查和安全管理的重要工具。
日志格式以下几个指标是必须得有的
- 时间戳
- 日志等级
- 日志内容
以下几个指标是可选的
- 文件名行号
- 进程,线程相关id信息等
日志有现成的解决方案,如:spdlog、glog、Boost.Log、Log4cxx等等,我们依旧采用自定义日志的方式。
这里我们采用设计模式-策略模式来进行日志的设计。
我们想要的日志格式如下:
[可读性很好的时间] [日志等级] [进程pid] [打印对应日志的文件名][行号] - 消息内容,支持可变参数
[2024-08-04 12:27:03] [DEBUG] [202938] [main.cc] [16] - hello world
[2024-08-04 12:27:03] [DEBUG] [202938] [main.cc] [17] - hello world
[2024-08-04 12:27:03] [DEBUG] [202938] [main.cc] [18] - hello world
[2024-08-04 12:27:03] [DEBUG] [202938] [main.cc] [20] - hello world
[2024-08-04 12:27:03] [DEBUG] [202938] [main.cc] [21] - hello world
[2024-08-04 12:27:03] [WARNING] [202938] [main.cc] [23] - hello world
2. 补充函数
(1).localtime_r(库函数)
localtime_r的作用是 C/C++中获取本地时间(即当前时区时间)的一种**线程安全(reentrant)**版本函数。
①.函数原型
#include <time.h>struct tm *localtime_r(const time_t *timep, struct tm *result);
②.参数与返回值说明
| 参数 | 类型 | 说明 |
|---|---|---|
timep | const time_t* | 输入的时间戳(通常来自 time(nullptr)) |
result | struct tm* | 输出参数,调用者提供的结构体,用来存放转换后的时间信息 |
| 返回值 | struct tm* | 与 result 相同的指针(即方便链式调用) |
struct tm {int tm_sec;    /* Seconds (0-60) */int tm_min;    /* Minutes (0-59) */int tm_hour;   /* Hours (0-23) */int tm_mday;   /* Day of the month (1-31) */int tm_mon;    /* Month (0-11) */int tm_year;   /* Year - 1900 */int tm_wday;   /* Day of the week (0-6, Sunday = 0) */int tm_yday;   /* Day in the year (0-365, 1 Jan = 0) */int tm_isdst;  /* Daylight saving time */
};
(2).C++流式格式控制器
| 控制器 | 含义 |
|---|---|
std::setfill(c) | 设置填充字符 |
std::setw(n) | 设置字段宽度(只对下一个输出项生效) |
std::left / std::right | 左对齐 / 右对齐 |
std::setprecision(n) | 设置浮点数精度 |
std::fixed | 固定小数位输出 |
std::hex / std::oct / std::dec | 控制整数进制 |
std::boolalpha / std::noboolalpha | bool 输出 true/false |
std::showpos / std::noshowpos | 显示正号 / 不显示 |
例:
#include <iomanip>
#include <sstream>
#include <ctime>std::string GetTimeStamp()
{time_t curr = time(nullptr);struct tm curr_tm;localtime_r(&curr, &curr_tm);std::stringstream ss;// 设置统一的对齐和填充规则ss << std::setfill('0')<< std::setw(4) << curr_tm.tm_year + 1900 << "-"<< std::setw(2) << curr_tm.tm_mon + 1 << "-"<< std::setw(2) << curr_tm.tm_mday << " "<< std::setw(2) << curr_tm.tm_hour << ":"<< std::setw(2) << curr_tm.tm_min << ":"<< std::setw(2) << curr_tm.tm_sec;return ss.str();
}//运行结果:
//2025-10-10 13:24:07
3. 模拟实现日志
Log.hpp
#ifndef __LOG_HPP__
#define __LOG_HPP__#include <iostream>
#include <string>
#include <filesystem>
#include <fstream>
#include <sstream>
#include <memory>
#include <unistd.h>
#include <ctime>
#include "Mutex.hpp"namespace LogModule
{using namespace MutexModule;const std::string gsep = "\r\n";// 策略模式(利用的C++多态特性)//1.刷新策略 a:显示器打印 b:向指定文件写入// 刷新策略基类class LogStrategy{public:~LogStrategy() = default;virtual void SyncLog(const std::string& message) = 0; // =0表示纯虚函数};// (1).显示器打印日志的策略(子类)class ConsoleLogStrategy : public LogStrategy{public:ConsoleLogStrategy(){}~ConsoleLogStrategy(){}void SyncLog(const std::string& message) override{LockGuard lockguard(_mutex);std::cout << message << gsep;}private:Mutex _mutex;};// (2).文件打印日志的策略(子类)const std::string defaultpath = "./log";const std::string defaultfile = "my.log";class FileLogStrategy : public LogStrategy{public:FileLogStrategy(const std::string& path = defaultpath, const std::string& file = defaultfile):_path(path),_file(file){LockGuard lockguard(_mutex);if (std::filesystem::exists(_path)) // 判断目录是否存在{return;}//防止由权限不够等情况,创建路径失败try{std::filesystem::create_directories(_path); //创建路径}catch(const std::filesystem::filesystem_error& e){std::cerr << e.what() << '\n';}}~FileLogStrategy(){}void SyncLog(const std::string& message) override{LockGuard lockguard(_mutex);std::string filename = _path + ((_path.back()=='/')?"":"/") + _file;std::ofstream out(filename,std::ios::app); // 追加写入方式打开if(!out.is_open()){return;}out << message<<gsep;out.close();}private:std::string _path; //日志文件所在路径std::string _file; //日志文件本身Mutex _mutex;};//形成一条完整的日志&&根据上面策略,选择不同的刷新方式//1.形成日志等级enum class LogLevel{DEBUG,INFO,WARNING,ERROR,FATAL};std::string Level2Str(LogLevel level){switch(level){case LogLevel::DEBUG:return "DEBUG";case LogLevel::INFO:return "INFO";case LogLevel::WARNING:return "WARNING";case LogLevel::ERROR:return "ERROR";case LogLevel::FATAL:return "FATAL";default:return "UNKNOWN";}}std::string GetTimeStamp(){time_t curr = time(nullptr);struct tm curr_tm;localtime_r(&curr, &curr_tm);// 法一:stringstreamstd::stringstream ss;ss << std::setfill('0')<< std::setw(4) << curr_tm.tm_year + 1900 << "-"<< std::setw(2) << curr_tm.tm_mon + 1 << "-"<< std::setw(2) << curr_tm.tm_mday << " "<< std::setw(2) << curr_tm.tm_hour << ":"<< std::setw(2) << curr_tm.tm_min << ":"<< std::setw(2) << curr_tm.tm_sec;// ss << curr_tm.tm_year + 1900 << "-" << curr_tm.tm_mon + 1 << "-" << curr_tm.tm_mday << " "//    << curr_tm.tm_hour << ":" << curr_tm.tm_min << ":" << curr_tm.tm_sec;return ss.str();//法二:// char timebuffer[128];// snprintf(timebuffer, sizeof(timebuffer),"%4d-%02d-%02d %02d:%02d:%02d",//     curr_tm.tm_year+1900,//     curr_tm.tm_mon+1,//     curr_tm.tm_mday,//     curr_tm.tm_hour,//     curr_tm.tm_min,//     curr_tm.tm_sec// );// return timebuffer;}//class Logger作用:1.形成日志 2.根据不同的策略,完成刷新class Logger{public:Logger(){EnableConsoleLogStrategy();}~Logger(){}void EnableFileLogStrategy(const std::string& path = defaultpath, const std::string& file = defaultfile){_fflush_strategy = std::make_unique<FileLogStrategy>(path, file);}void EnableConsoleLogStrategy(){_fflush_strategy = std::make_unique<ConsoleLogStrategy>();}//内部类:表示的是未来的一条日志class LogMessage{public:LogMessage(LogLevel& level, std::string& src_name,int line_number,Logger& logger):_curr_time(GetTimeStamp()),_leve(level),_pid(getpid()),_src_name(src_name),_line_number(line_number),_logger(logger){//先把日志的左半部分合并起来std::stringstream ss;ss << "[" << _curr_time << "] "<< "[" << Level2Str(_leve) << "] "<< "[" << _pid << "] "<< "[" << _src_name << "] "<< "[" << _line_number << "] "<< "- ";_loginfo = ss.str();}// LogMessage()<<"hello word"<<"XXXX"<<3.14<<12345template<typename T>LogMessage& operator <<(const T& info){//再把日志的右半部分合并起来std::stringstream ss;ss << info;//左半部分和右半部分合并起来_loginfo += ss.str();return *this;}~LogMessage(){if(_logger._fflush_strategy){_logger._fflush_strategy->SyncLog(_loginfo);}}private:std::string _curr_time;LogLevel _leve;pid_t _pid;std::string _src_name;int _line_number;std::string _loginfo; //合并之后,一条完整的信息Logger &_logger;};//这里故意写成返回临时对象LogMessage operator()(LogLevel level, std::string name,int line){return LogMessage(level, name, line, *this);}private:std::unique_ptr<LogStrategy> _fflush_strategy;};//全局日志对象Logger logger;//使用宏,简化用户操作,获取文件名和行号#define LOG(level) logger(level, __FILE__, __LINE__)#define Enable_Console_Log_Strategy() logger.EnableConsoleLogStrategy()#define Enable_File_Log_Strategy(...) logger.EnableFileLogStrategy(__VA_ARGS__) //可变参数宏
}#endif
Main.cc
#include"Log.hpp"
#include <memory>
using namespace LogModule;
int main()
{Enable_Console_Log_Strategy();// Enable_File_Log_Strategy();LOG(LogLevel::DEBUG) << "hello world"<<3.14;return 0;
}
3. 线程池设计
线程池:
一种线程使用模式。线程过多会带来调度开销,进而影响缓存局部性和整体性能。而线程池维护着多个线程,等待着监督管理者分配可并发执行的任务。这避免了在处理短时间任务时创建与销毁线程的代价。线程池不仅能够保证内核的充分利用,还能防止过分调度。可用线程数量应该取决于可用的并发处理器、处理器内核、内存、网络sockets等的数量。
线程池的应用场景:
- 需要大量的线程来完成任务,且完成任务的时间比较短。 比如WEB服务器完成网页请求这样的任务,使用线程池技术是非常合适的。因为单个任务小,而任务数量巨大,你可以想象一个热门网站的点击次数。 但对于长时间的任务,比如一个Telnet连接请求,线程池的优点就不明显了。因为Telnet会话时间比线程的创建时间大多了。
- 对性能要求苛刻的应用,比如要求服务器迅速响应客户请求。
- 接受突发性的大量请求,但不至于使服务器因此产生大量线程的应用。突发性大量客户请求,在没有线程池情况下,将产生大量线程,虽然理论上大部分操作系统线程数目最大值不是问题,短时间内产生大量线程可能使内存到达极限,出现错误.
线程池的种类
a. 创建固定数量线程池,循环从任务队列中获取任务对象,获取到任务对象后,执行任务对象中的任务接口
b. 浮动线程池,其他同上
此处,我们选择固定线程个数的线程池。
4. 线程池模拟实现–版本1
(1).Thread.hpp
#ifndef _THREAD_H_
#define _THREAD_H_#include <iostream>
#include <functional>
#include <string>
#include <cstdio>
#include <cstring>
#include <pthread.h>
#include "Mutex.hpp"
#include "Log.hpp"namespace ThreadModlue
{using namespace MutexModule;using namespace LogModule;static uint32_t number = 1;//静态常量的无符号32位整型变量(需要加锁)class Thread{using func_t = std::function<void()>; // 暂时这样写就够了private:void EnableDetach(){_isdetach = true;}void EnableRunning(){_isrunning = true;}static void* Routine(void* args){Thread *self = static_cast<Thread*>(args);self->EnableRunning();if(self->_isdetach)self->Detach();pthread_setname_np(self->_tid,self->_name.c_str());self->_func(); // 回调处理return nullptr;}public:Thread(func_t func):_tid(0),_isdetach(false),_isrunning(false),res(nullptr),_func(func){LockGuard guard(_number);_name = "thread-" + std::to_string(number++);}void Detach(){if(_isdetach)return;if(_isrunning)pthread_detach(_tid);EnableDetach();}std::string Name(){return _name;}bool Start(){if(_isrunning) return false;int n = pthread_create(&_tid, nullptr, Routine, this);if(n != 0){return false;}else{return true;}}bool Stop(){if(_isrunning){int n = pthread_cancel(_tid);if(n != 0){return false;}else{_isrunning = false;return true;}}return false;}void Join(){if(_isdetach){return;}int n = pthread_join(_tid, &res);if (n != 0){LOG(LogLevel::DEBUG) << "Join线程失败";}else{LOG(LogLevel::DEBUG) << "Join线程成功";}}~Thread(){}private:pthread_t _tid;std::string _name;bool _isdetach;bool _isrunning;void *res;func_t _func;Mutex _number;};
}#endif
(2).Mutex.hpp
#pragma once
#include <pthread.h>
#include <iostream>
#include <cstring>namespace MutexModule
{class Mutex{public:Mutex(){pthread_mutex_init(&_mutex, nullptr);}~Mutex(){pthread_mutex_destroy(&_mutex);}void Lock(){int n = pthread_mutex_lock(&_mutex);if(n != 0){std::cerr << "lock error:" << strerror(n) << std::endl;}}void Unlock(){int n = pthread_mutex_unlock(&_mutex);if(n != 0){std::cerr << "unlock error:" << strerror(n) << std::endl;}}pthread_mutex_t* get(){return &_mutex;}private:pthread_mutex_t _mutex;};class LockGuard{public:LockGuard(Mutex& mutex):_mutex(mutex){_mutex.Lock();}~LockGuard(){_mutex.Unlock();}private:Mutex& _mutex;};
}
(3).Cond.hpp
#pragma once#include <iostream>
#include <pthread.h>
#include "Mutex.hpp"using namespace MutexModule;namespace CondModule
{class Cond{public:    Cond(){pthread_cond_init(&_cond, nullptr);}void Wait(Mutex& mutex){int n = pthread_cond_wait(&_cond, mutex.get());(void)n;}void Signal(){// 唤醒在条件变量下等待的一个线程int n = pthread_cond_signal(&_cond);(void)n;}void Broadcast(){// 唤醒所有在条件变量下等待的线程int n = pthread_cond_broadcast(&_cond);(void)n;}~Cond(){pthread_cond_destroy(&_cond);}private:pthread_cond_t _cond;};
}
(4).Log.hpp
#ifndef __LOG_HPP__
#define __LOG_HPP__#include <iostream>
#include <string>
#include <filesystem>
#include <fstream>
#include <sstream>
#include <memory>
#include <unistd.h>
#include <ctime>
#include "Mutex.hpp"namespace LogModule
{using namespace MutexModule;const std::string gsep = "\r\n";// 策略模式(利用的C++多态特性)//1.刷新策略 a:显示器打印 b:向指定文件写入// 刷新策略基类class LogStrategy{public:~LogStrategy() = default;virtual void SyncLog(const std::string& message) = 0; // =0表示纯虚函数};// (1).显示器打印日志的策略(子类)class ConsoleLogStrategy : public LogStrategy{public:ConsoleLogStrategy(){}~ConsoleLogStrategy(){}void SyncLog(const std::string& message) override{LockGuard lockguard(_mutex);std::cout << message << gsep;}private:Mutex _mutex;};// (2).文件打印日志的策略(子类)const std::string defaultpath = "./log";const std::string defaultfile = "my.log";class FileLogStrategy : public LogStrategy{public:FileLogStrategy(const std::string& path = defaultpath, const std::string& file = defaultfile):_path(path),_file(file){LockGuard lockguard(_mutex);if (std::filesystem::exists(_path)) // 判断目录是否存在{return;}//防止由权限不够等情况,创建路径失败try{std::filesystem::create_directories(_path); //创建路径}catch(const std::filesystem::filesystem_error& e){std::cerr << e.what() << '\n';}}~FileLogStrategy(){}void SyncLog(const std::string& message) override{LockGuard lockguard(_mutex);std::string filename = _path + ((_path.back()=='/')?"":"/") + _file;std::ofstream out(filename,std::ios::app); // 追加写入方式打开if(!out.is_open()){return;}out << message<<gsep;out.close();}private:std::string _path; //日志文件所在路径std::string _file; //日志文件本身Mutex _mutex;};//形成一条完整的日志&&根据上面策略,选择不同的刷新方式//1.形成日志等级enum class LogLevel{DEBUG,INFO,WARNING,ERROR,FATAL};std::string Level2Str(LogLevel level){switch(level){case LogLevel::DEBUG:return "DEBUG";case LogLevel::INFO:return "INFO";case LogLevel::WARNING:return "WARNING";case LogLevel::ERROR:return "ERROR";case LogLevel::FATAL:return "FATAL";default:return "UNKNOWN";}}std::string GetTimeStamp(){time_t curr = time(nullptr);struct tm curr_tm;localtime_r(&curr, &curr_tm);// 法一:stringstreamstd::stringstream ss;ss << std::setfill('0')<< std::setw(4) << curr_tm.tm_year + 1900 << "-"<< std::setw(2) << curr_tm.tm_mon + 1 << "-"<< std::setw(2) << curr_tm.tm_mday << " "<< std::setw(2) << curr_tm.tm_hour << ":"<< std::setw(2) << curr_tm.tm_min << ":"<< std::setw(2) << curr_tm.tm_sec;// ss << curr_tm.tm_year + 1900 << "-" << curr_tm.tm_mon + 1 << "-" << curr_tm.tm_mday << " "//    << curr_tm.tm_hour << ":" << curr_tm.tm_min << ":" << curr_tm.tm_sec;return ss.str();//法二:// char timebuffer[128];// snprintf(timebuffer, sizeof(timebuffer),"%4d-%02d-%02d %02d:%02d:%02d",//     curr_tm.tm_year+1900,//     curr_tm.tm_mon+1,//     curr_tm.tm_mday,//     curr_tm.tm_hour,//     curr_tm.tm_min,//     curr_tm.tm_sec// );// return timebuffer;}//class Logger作用:1.形成日志 2.根据不同的策略,完成刷新class Logger{public:Logger(){EnableConsoleLogStrategy();}~Logger(){}void EnableFileLogStrategy(const std::string& path = defaultpath, const std::string& file = defaultfile){_fflush_strategy = std::make_unique<FileLogStrategy>(path, file);}void EnableConsoleLogStrategy(){_fflush_strategy = std::make_unique<ConsoleLogStrategy>();}//内部类:表示的是未来的一条日志class LogMessage{public:LogMessage(LogLevel& level, std::string& src_name,int line_number,Logger& logger):_curr_time(GetTimeStamp()),_leve(level),_pid(getpid()),_src_name(src_name),_line_number(line_number),_logger(logger){//先把日志的左半部分合并起来std::stringstream ss;ss << "[" << _curr_time << "] "<< "[" << Level2Str(_leve) << "] "<< "[" << _pid << "] "<< "[" << _src_name << "] "<< "[" << _line_number << "] "<< "- ";_loginfo = ss.str();}// LogMessage()<<"hello word"<<"XXXX"<<3.14<<12345template<typename T>LogMessage& operator <<(const T& info){//再把日志的右半部分合并起来std::stringstream ss;ss << info;//左半部分和右半部分合并起来_loginfo += ss.str();return *this;}~LogMessage(){if(_logger._fflush_strategy){_logger._fflush_strategy->SyncLog(_loginfo);}}private:std::string _curr_time;LogLevel _leve;pid_t _pid;std::string _src_name;int _line_number;std::string _loginfo; //合并之后,一条完整的信息Logger &_logger;};//这里故意写成返回临时对象LogMessage operator()(LogLevel level, std::string name,int line){return LogMessage(level, name, line, *this);}private:std::unique_ptr<LogStrategy> _fflush_strategy;};//全局日志对象Logger logger;//使用宏,简化用户操作,获取文件名和行号#define LOG(level) logger(level, __FILE__, __LINE__)#define Enable_Console_Log_Strategy() logger.EnableConsoleLogStrategy()#define Enable_File_Log_Strategy(...) logger.EnableFileLogStrategy(__VA_ARGS__) //可变参数宏
}#endif
(5).ThreadPool.hpp
#pragma once
#include <iostream>
#include <string>
#include <vector>
#include <queue>
#include "Log.hpp"
#include "Thread.hpp"
#include "Cond.hpp"
#include "Mutex.hpp"namespace ThreadPoolModule
{using namespace LogModule;using namespace ThreadModlue;using namespace CondModule;using namespace MutexModule;const static int gnum = 5;template<typename T>class ThreadPool{private:void WakeUpAllThread(){LockGuard lockguard(_mutex);if(_sleepernum > 0)_cond.Broadcast();LOG(LogLevel::INFO) << "唤醒所有休眠的线程";}void WakeUpOne(){_cond.Signal();LOG(LogLevel::INFO) << "唤醒一个休眠的线程";}public:ThreadPool(int num = gnum):_num(num),_isrunning(false),_sleepernum(0){for (int i = 0; i <num; i++){_threads.emplace_back([this](){HandlerTask();});}}void Start(){if(_isrunning) return;_isrunning = true;for (auto &thread : _threads){thread.Start();LOG(LogLevel::INFO) << "start creat new thread success" << thread.Name();}}void Stop(){if (!_isrunning)return;_isrunning = false;//唤醒所有休眠线程WakeUpAllThread();}void Join(){for (auto &thread : _threads){thread.Join();}}void HandlerTask(){char name[128];pthread_getname_np(pthread_self(), name, sizeof(name));while (true){T t;{LockGuard lockguard(_mutex);// 1. a.队列为空;b.线程池没有退出//(本质:当还没取完任务时Stop,Stop后取完所有任务后为队列为空后,防止线程继续wait,这时如果wait就没有人唤醒它了,让线程退出)while (_taskq.empty() && _isrunning){_sleepernum++;_cond.Wait(_mutex);_sleepernum--;}// 2. 内部的线程被唤醒//(本质:当取完任务时Stop,任务队列为空,Stop后将所有线程唤醒它了,让线程退出)if(!_isrunning && _taskq.empty()){LOG(LogLevel::INFO) << name << "退出了,线程池退出&&任务队列为空";break;}//一定有任务t = _taskq.front();_taskq.pop();}t(); // 处理任务,不需要在临界区内部处理;从_taskq中获取任务,任务已经是私有的了.}}bool Enqueue(const T& in){if(_isrunning){LockGuard lockguard(_mutex);_taskq.push(in);if(_threads.size() - _sleepernum == 0)WakeUpOne();return true;}return false;}~ThreadPool(){}private:std::vector<Thread> _threads;int _num; // 线程池中,线程的个数std::queue<T> _taskq;Cond _cond;Mutex _mutex;bool _isrunning;int _sleepernum;};
}
(6).Task.hpp
#pragma once
#include <functional>
#include <iostream>
#include <unistd.h>
#include "Log.hpp"using namespace LogModule;//任务形式2
//我们定义了一个任务类型,返回值void,参数为空
using task_t = std::function<void()>;void Download()
{LOG(LogLevel::DEBUG) << "我是一个下载任务...";
}//任务形式1
class Task
{
public:Task() {}Task(int x,int y):_x(x),_y(y){}void Execute(){_result = _x + _y;}int X() { return _x; }int Y() { return _y; }int Result(){return _result;}~Task() {}
private:int _x;int _y;int _result;
};
(7).Main.cc
#include "Log.hpp"
#include "Thread.hpp"
#include "ThreadPool.hpp"
#include "Task.hpp"
#include <memory>using namespace LogModule;
using namespace ThreadPoolModule;int main(){Enable_Console_Log_Strategy();// Enable_File_Log_Strategy();ThreadPool<task_t>* tp =  new ThreadPool<task_t>;tp->Start();int count = 10;while (count){tp->Enqueue(Download);sleep(1);count--;}sleep(3);tp->Stop();tp->Join();// sleep(2);// LOG(LogLevel::DEBUG) << "回收";// sleep(5);return 0;
}
(8).Makefile
threadpool:Main.ccg++ -o $@ $^ -std=c++17
.PHONY:clean
clean:rm -f threadpool
(9).运行结果:

五.线程安全的单例模式
1. 什么是单例模式
一个类只能创建一个实例对象
2. 单例模式的特点
某些类, 只应该具有一个对象(实例), 就称之为单例.
例如一个男人只能有一个媳妇.
在很多服务器开发场景中, 经常需要让服务器加载很多的数据 (上百G) 到内存中. 此时往往要用一个单例的类来管理这些数据.
3. 饿汉实现方式和懒汉实现方式
[洗碗的例子]
吃完饭, 立刻洗碗, 这种就是饿汉方式. 因为下一顿吃的时候可以立刻拿着碗就能吃饭.
吃完饭, 先把碗放下, 然后下一顿饭用到这个碗了再洗碗, 就是懒汉方式.
懒汉方式最核心的思想是 “延时加载”. 从而能够优化服务器的启动速度.
4. 饿汉方式实现单例模式
template <typename T>
class Singleton {static T data;
public:static T* GetInstance() {return &data;}
};
只要通过 Singleton 这个包装类来使用 T 对象, 则一个进程中只有一个 T 对象的实例.
5. 懒汉方式实现单例模式
template <typename T>
class Singleton {static T* inst;
public:static T* GetInstance() {if (inst == NULL) {inst = new T();}return inst;}
};
存在一个严重的问题, 线程不安全.
第一次调用 GetInstance 的时候, 如果两个线程同时调用, 可能会创建出两份 T 对象的实例.
但是后续再次调用, 就没有问题了.
6. 懒汉方式实现单例模式(线程安全版本)
// 懒汉模式, 线程安全
template <typename T>
class Singleton {volatile static T* inst; // 需要设置 volatile 关键字, 否则可能被编译器优化.static std::mutex lock;
public:static T* GetInstance() {if (inst == NULL) { // 双重判定空指针, 降低锁冲突的概率, 提高性能.lock.lock(); // 使用互斥锁, 保证多线程情况下也只调用一次 new.if (inst == NULL) {inst = new T();}lock.unlock();}return inst;}
};
7. 补充语法
=delete
C++11 引入的函数控制说明符,用来显式禁用某个函数。
- 基本语法
函数声明 = delete;
作用:告诉编译器不允许使用该函数,任何调用都会在编译时报错。
- 例:
class A
{
public:A() = default;              // 显式要求编译器生成默认构造函数A(const A&) = delete;       // 禁止拷贝构造A& operator=(const A&) = delete; // 禁止拷贝赋值
};
8. 单例式线程池
线程池模拟实现–版本2(仅threadpool.hop和main.cc改变)
(1).Thread.hpp
#ifndef _THREAD_H_
#define _THREAD_H_#include <iostream>
#include <functional>
#include <string>
#include <cstdio>
#include <cstring>
#include <pthread.h>
#include "Mutex.hpp"
#include "Log.hpp"namespace ThreadModlue
{using namespace MutexModule;using namespace LogModule;static uint32_t number = 1;//静态常量的无符号32位整型变量(需要加锁)class Thread{using func_t = std::function<void()>; // 暂时这样写就够了private:void EnableDetach(){_isdetach = true;}void EnableRunning(){_isrunning = true;}static void* Routine(void* args){Thread *self = static_cast<Thread*>(args);self->EnableRunning();if(self->_isdetach)self->Detach();pthread_setname_np(self->_tid,self->_name.c_str());self->_func(); // 回调处理return nullptr;}public:Thread(func_t func):_tid(0),_isdetach(false),_isrunning(false),res(nullptr),_func(func){LockGuard guard(_number);_name = "thread-" + std::to_string(number++);}void Detach(){if(_isdetach)return;if(_isrunning)pthread_detach(_tid);EnableDetach();}std::string Name(){return _name;}bool Start(){if(_isrunning) return false;int n = pthread_create(&_tid, nullptr, Routine, this);if(n != 0){return false;}else{return true;}}bool Stop(){if(_isrunning){int n = pthread_cancel(_tid);if(n != 0){return false;}else{_isrunning = false;return true;}}return false;}void Join(){if(_isdetach){return;}int n = pthread_join(_tid, &res);if (n != 0){LOG(LogLevel::DEBUG) << "Join线程失败";}else{LOG(LogLevel::DEBUG) << "Join线程成功";}}~Thread(){}private:pthread_t _tid;std::string _name;bool _isdetach;bool _isrunning;void *res;func_t _func;Mutex _number;};
}#endif
(2).Mutex.hpp
#pragma once
#include <pthread.h>
#include <iostream>
#include <cstring>namespace MutexModule
{class Mutex{public:Mutex(){pthread_mutex_init(&_mutex, nullptr);}~Mutex(){pthread_mutex_destroy(&_mutex);}void Lock(){int n = pthread_mutex_lock(&_mutex);if(n != 0){std::cerr << "lock error:" << strerror(n) << std::endl;}}void Unlock(){int n = pthread_mutex_unlock(&_mutex);if(n != 0){std::cerr << "unlock error:" << strerror(n) << std::endl;}}pthread_mutex_t* get(){return &_mutex;}private:pthread_mutex_t _mutex;};class LockGuard{public:LockGuard(Mutex& mutex):_mutex(mutex){_mutex.Lock();}~LockGuard(){_mutex.Unlock();}private:Mutex& _mutex;};
}
(3).Cond.hpp
#pragma once#include <iostream>
#include <pthread.h>
#include "Mutex.hpp"using namespace MutexModule;namespace CondModule
{class Cond{public:    Cond(){pthread_cond_init(&_cond, nullptr);}void Wait(Mutex& mutex){int n = pthread_cond_wait(&_cond, mutex.get());(void)n;}void Signal(){// 唤醒在条件变量下等待的一个线程int n = pthread_cond_signal(&_cond);(void)n;}void Broadcast(){// 唤醒所有在条件变量下等待的线程int n = pthread_cond_broadcast(&_cond);(void)n;}~Cond(){pthread_cond_destroy(&_cond);}private:pthread_cond_t _cond;};
}
(4).Log.hpp
#ifndef __LOG_HPP__
#define __LOG_HPP__#include <iostream>
#include <string>
#include <filesystem>
#include <fstream>
#include <sstream>
#include <memory>
#include <unistd.h>
#include <ctime>
#include "Mutex.hpp"namespace LogModule
{using namespace MutexModule;const std::string gsep = "\r\n";// 策略模式(利用的C++多态特性)//1.刷新策略 a:显示器打印 b:向指定文件写入// 刷新策略基类class LogStrategy{public:~LogStrategy() = default;virtual void SyncLog(const std::string& message) = 0; // =0表示纯虚函数};// (1).显示器打印日志的策略(子类)class ConsoleLogStrategy : public LogStrategy{public:ConsoleLogStrategy(){}~ConsoleLogStrategy(){}void SyncLog(const std::string& message) override{LockGuard lockguard(_mutex);std::cout << message << gsep;}private:Mutex _mutex;};// (2).文件打印日志的策略(子类)const std::string defaultpath = "./log";const std::string defaultfile = "my.log";class FileLogStrategy : public LogStrategy{public:FileLogStrategy(const std::string& path = defaultpath, const std::string& file = defaultfile):_path(path),_file(file){LockGuard lockguard(_mutex);if (std::filesystem::exists(_path)) // 判断目录是否存在{return;}//防止由权限不够等情况,创建路径失败try{std::filesystem::create_directories(_path); //创建路径}catch(const std::filesystem::filesystem_error& e){std::cerr << e.what() << '\n';}}~FileLogStrategy(){}void SyncLog(const std::string& message) override{LockGuard lockguard(_mutex);std::string filename = _path + ((_path.back()=='/')?"":"/") + _file;std::ofstream out(filename,std::ios::app); // 追加写入方式打开if(!out.is_open()){return;}out << message<<gsep;out.close();}private:std::string _path; //日志文件所在路径std::string _file; //日志文件本身Mutex _mutex;};//形成一条完整的日志&&根据上面策略,选择不同的刷新方式//1.形成日志等级enum class LogLevel{DEBUG,INFO,WARNING,ERROR,FATAL};std::string Level2Str(LogLevel level){switch(level){case LogLevel::DEBUG:return "DEBUG";case LogLevel::INFO:return "INFO";case LogLevel::WARNING:return "WARNING";case LogLevel::ERROR:return "ERROR";case LogLevel::FATAL:return "FATAL";default:return "UNKNOWN";}}std::string GetTimeStamp(){time_t curr = time(nullptr);struct tm curr_tm;localtime_r(&curr, &curr_tm);// 法一:stringstreamstd::stringstream ss;ss << std::setfill('0')<< std::setw(4) << curr_tm.tm_year + 1900 << "-"<< std::setw(2) << curr_tm.tm_mon + 1 << "-"<< std::setw(2) << curr_tm.tm_mday << " "<< std::setw(2) << curr_tm.tm_hour << ":"<< std::setw(2) << curr_tm.tm_min << ":"<< std::setw(2) << curr_tm.tm_sec;// ss << curr_tm.tm_year + 1900 << "-" << curr_tm.tm_mon + 1 << "-" << curr_tm.tm_mday << " "//    << curr_tm.tm_hour << ":" << curr_tm.tm_min << ":" << curr_tm.tm_sec;return ss.str();//法二:// char timebuffer[128];// snprintf(timebuffer, sizeof(timebuffer),"%4d-%02d-%02d %02d:%02d:%02d",//     curr_tm.tm_year+1900,//     curr_tm.tm_mon+1,//     curr_tm.tm_mday,//     curr_tm.tm_hour,//     curr_tm.tm_min,//     curr_tm.tm_sec// );// return timebuffer;}//class Logger作用:1.形成日志 2.根据不同的策略,完成刷新class Logger{public:Logger(){EnableConsoleLogStrategy();}~Logger(){}void EnableFileLogStrategy(const std::string& path = defaultpath, const std::string& file = defaultfile){_fflush_strategy = std::make_unique<FileLogStrategy>(path, file);}void EnableConsoleLogStrategy(){_fflush_strategy = std::make_unique<ConsoleLogStrategy>();}//内部类:表示的是未来的一条日志class LogMessage{public:LogMessage(LogLevel& level, std::string& src_name,int line_number,Logger& logger):_curr_time(GetTimeStamp()),_leve(level),_pid(getpid()),_src_name(src_name),_line_number(line_number),_logger(logger){//先把日志的左半部分合并起来std::stringstream ss;ss << "[" << _curr_time << "] "<< "[" << Level2Str(_leve) << "] "<< "[" << _pid << "] "<< "[" << _src_name << "] "<< "[" << _line_number << "] "<< "- ";_loginfo = ss.str();}// LogMessage()<<"hello word"<<"XXXX"<<3.14<<12345template<typename T>LogMessage& operator <<(const T& info){//再把日志的右半部分合并起来std::stringstream ss;ss << info;//左半部分和右半部分合并起来_loginfo += ss.str();return *this;}~LogMessage(){if(_logger._fflush_strategy){_logger._fflush_strategy->SyncLog(_loginfo);}}private:std::string _curr_time;LogLevel _leve;pid_t _pid;std::string _src_name;int _line_number;std::string _loginfo; //合并之后,一条完整的信息Logger &_logger;};//这里故意写成返回临时对象LogMessage operator()(LogLevel level, std::string name,int line){return LogMessage(level, name, line, *this);}private:std::unique_ptr<LogStrategy> _fflush_strategy;};//全局日志对象Logger logger;//使用宏,简化用户操作,获取文件名和行号#define LOG(level) logger(level, __FILE__, __LINE__)#define Enable_Console_Log_Strategy() logger.EnableConsoleLogStrategy()#define Enable_File_Log_Strategy(...) logger.EnableFileLogStrategy(__VA_ARGS__) //可变参数宏
}#endif
(5).ThreadPool.hpp
#pragma once
#include <iostream>
#include <string>
#include <vector>
#include <queue>
#include "Log.hpp"
#include "Thread.hpp"
#include "Cond.hpp"
#include "Mutex.hpp"// .hpp header onlynamespace ThreadPoolModule
{using namespace LogModule;using namespace ThreadModlue;using namespace CondModule;using namespace MutexModule;const static int gnum = 5;template<typename T>class ThreadPool{private:void WakeUpAllThread(){LockGuard lockguard(_mutex);if(_sleepernum > 0)_cond.Broadcast();LOG(LogLevel::INFO) << "唤醒所有休眠的线程";}void WakeUpOne(){_cond.Signal();LOG(LogLevel::INFO) << "唤醒一个休眠的线程";}ThreadPool(int num = gnum):_num(num),_isrunning(false),_sleepernum(0){for (int i = 0; i <num; i++){_threads.emplace_back([this](){HandlerTask();});}}void Start(){if(_isrunning) return;_isrunning = true;for (auto &thread : _threads){thread.Start();LOG(LogLevel::INFO) << "start creat new thread success" << thread.Name();}}ThreadPool(const ThreadPool<T> &) = delete;ThreadPool<T> &operator=(const ThreadPool<T> &) = delete;public:static ThreadPool<T>* GetInstance(int num = gnum){if(inc==nullptr){LockGuard lockguard (_lock);{LOG(LogLevel::DEBUG) << "获取单例";if(inc==nullptr){LOG(LogLevel::DEBUG) << "首次使用单例,创建之...";inc = new ThreadPool<T>(num);inc->Start();}}}return inc;}void Stop(){if (!_isrunning)return;_isrunning = false;//唤醒所有休眠线程WakeUpAllThread();}void Join(){for (auto &thread : _threads){thread.Join();}}void HandlerTask(){char name[128];pthread_getname_np(pthread_self(), name, sizeof(name));while (true){T t;{LockGuard lockguard(_mutex);// 1. a.队列为空;b.线程池没有退出//(本质:当还没取完任务时Stop,Stop后取完所有任务后为队列为空后,防止线程继续wait,这时如果wait就没有人唤醒它了,让线程退出)while (_taskq.empty() && _isrunning){_sleepernum++;_cond.Wait(_mutex);_sleepernum--;}// 2. 内部的线程被唤醒//(本质:当取完任务时Stop,任务队列为空,Stop后将所有线程唤醒它了,让线程退出)if(!_isrunning && _taskq.empty()){LOG(LogLevel::INFO) << name << "退出了,线程池退出&&任务队列为空";break;}//一定有任务t = _taskq.front();_taskq.pop();}t(); // 处理任务,不需要在临界区内部处理;从_taskq中获取任务,任务已经是私有的了.}}bool Enqueue(const T& in){if(_isrunning){LockGuard lockguard(_mutex);_taskq.push(in);if(_threads.size() - _sleepernum == 0)WakeUpOne();return true;}return false;}~ThreadPool(){}private:std::vector<Thread> _threads;int _num; // 线程池中,线程的个数std::queue<T> _taskq;Cond _cond;Mutex _mutex;bool _isrunning;int _sleepernum;static ThreadPool<T> *inc;  //单例指针static Mutex _lock;  //获取单例用锁};template <typename T>ThreadPool<T> *ThreadPool<T>::inc = nullptr;template <typename T>Mutex ThreadPool<T>::_lock;
}
(6).Task.hpp
#pragma once
#include <functional>
#include <iostream>
#include <unistd.h>
#include "Log.hpp"using namespace LogModule;//任务形式2
//我们定义了一个任务类型,返回值void,参数为空
using task_t = std::function<void()>;void Download()
{LOG(LogLevel::DEBUG) << "我是一个下载任务...";
}//任务形式1
class Task
{
public:Task() {}Task(int x,int y):_x(x),_y(y){}void Execute(){_result = _x + _y;}int X() { return _x; }int Y() { return _y; }int Result(){return _result;}~Task() {}
private:int _x;int _y;int _result;
};
(7).Main.cc
#include "Log.hpp"
#include "Thread.hpp"
#include "ThreadPool.hpp"
#include "Task.hpp"
#include <memory>using namespace LogModule;
using namespace ThreadPoolModule;int main()
{Enable_Console_Log_Strategy();// Enable_File_Log_Strategy();int count = 10;while (count){ThreadPool<task_t>::GetInstance()->Enqueue(Download);sleep(1);count--;}sleep(3);ThreadPool<task_t>::GetInstance()->Stop();ThreadPool<task_t>::GetInstance()->Join();// sleep(2);// LOG(LogLevel::DEBUG) << "回收";// sleep(5);return 0;
}
(8).Makefile
threadpool:Main.ccg++ -o $@ $^ -std=c++17
.PHONY:clean
clean:rm -f threadpool
(9).运行结果:

六.线程安全和重入问题
概念
线程安全:就是多个线程在访问共享资源时,能够正确地执行,不会相互干扰或破坏彼此的执行结果。一般而言,多个线程并发同一段只有局部变量的代码时,不会出现不同的结果。但是对全局变量或者静态变量进行操作,并且没有锁保护的情况下,容易出现该问题。
重入:同一个函数被不同的执行流调用,当前一个流程还没有执行完,就有其他的执行流再次进入,我们称之为重入。一个函数在重入的情况下,运行结果不会出现任何不同或者任何问题,则该函数被称为可重入函数,否则,是不可重入函数。
学到现在,其实我们已经能理解重入其实可以分为两种情况
- 多线程重入函数
- 信号导致一个执行流重复进入函数(概率较低)

结论
不要被上面绕口令式的话语唬住,你只要仔细观察,其实对应概念说的都是一回事。
可重入与线程安全联系
- 函数是可重入的,那就是线程安全的(其实知道这一句话就够了) 意思是线程调用可重入函数一定是线程安全的
- 函数是不可重入的,那就不能由多个线程使用,有可能引发线程安全问题
- 如果一个函数中有全局变量,那么这个函数既不是线程安全也不是可重入的。
可重入与线程安全区别
可重入函数是线程安全函数的一种
线程安全不一定是可重入的,而可重入函数则一定是线程安全的。
如果将对临界资源的访问加上锁,则这个函数是线程安全的,但如果这个重入函数若锁还未释放则会产生死锁,因此是不可重入的。(比如一个函数加锁了,调用的过程中收到的信号,信号设置了自定义捕捉,在自定义捕捉里又调用了该函数,就会造成死锁。)
注意:
- 如果不考虑 信号导致一个执行流重复进入函数 这种重入情况,线程安全和重入在安全角度不做区分
- 但是线程安全侧重说明线程访问公共资源的安全情况,表现的是并发线程的特点
- 可重入描述的是一个函数是否能被重复进入,表示的是函数的特点
七.常见锁概念
1. 死锁
- 死锁是指在一组进程中的各个进程均占有不会释放的资源,但因互相申请被其他进程所占用不会释放的资源而处于的一种永久等待状态。
- 单线程也会有死锁问题,上面刚才那个信号的例子,或者同一把锁连申请两次都会死锁。
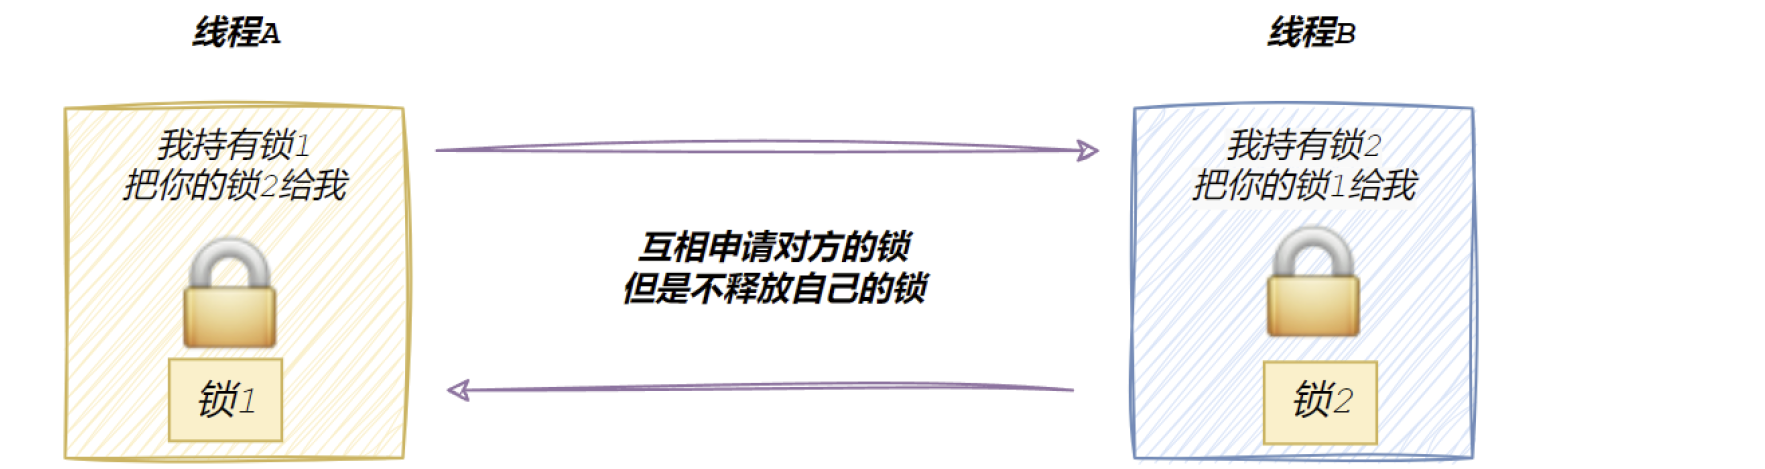
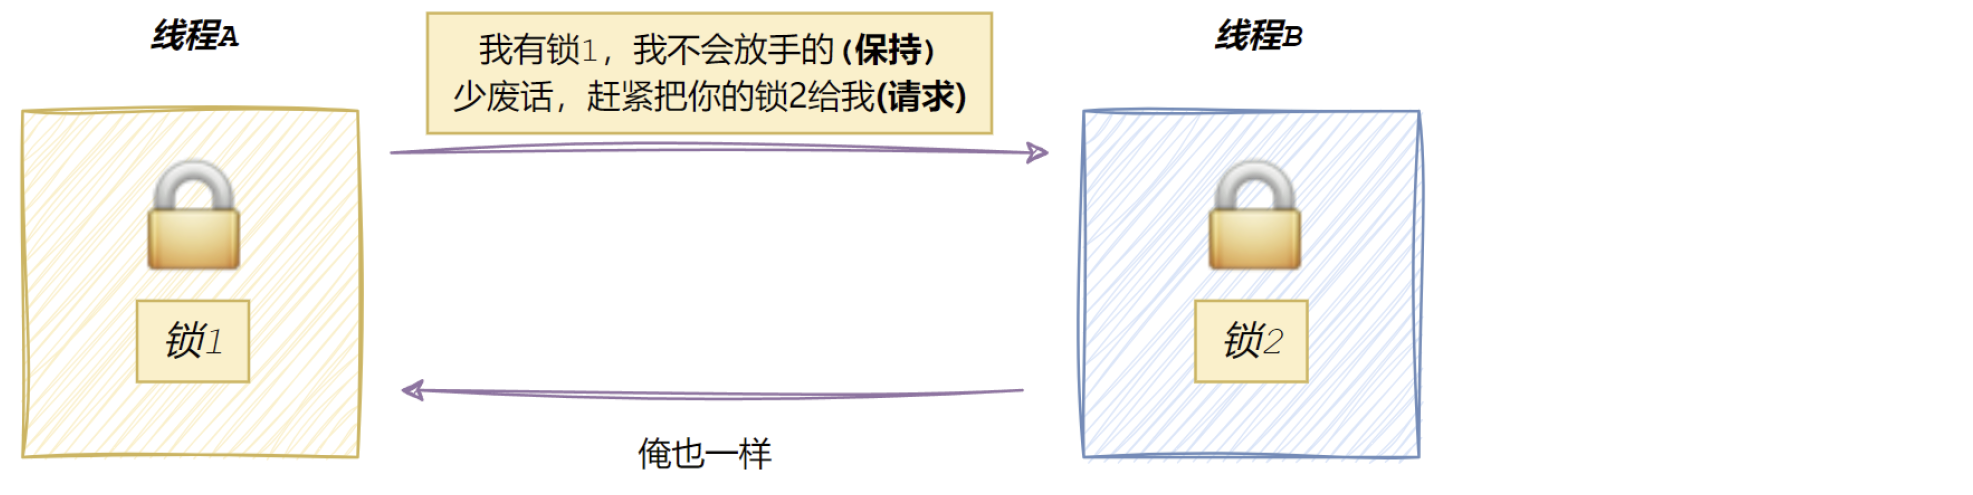
- 为了方便表述,假设现在线程A,线程B必须同时持有锁1和锁2,才能进行后续资源的访问
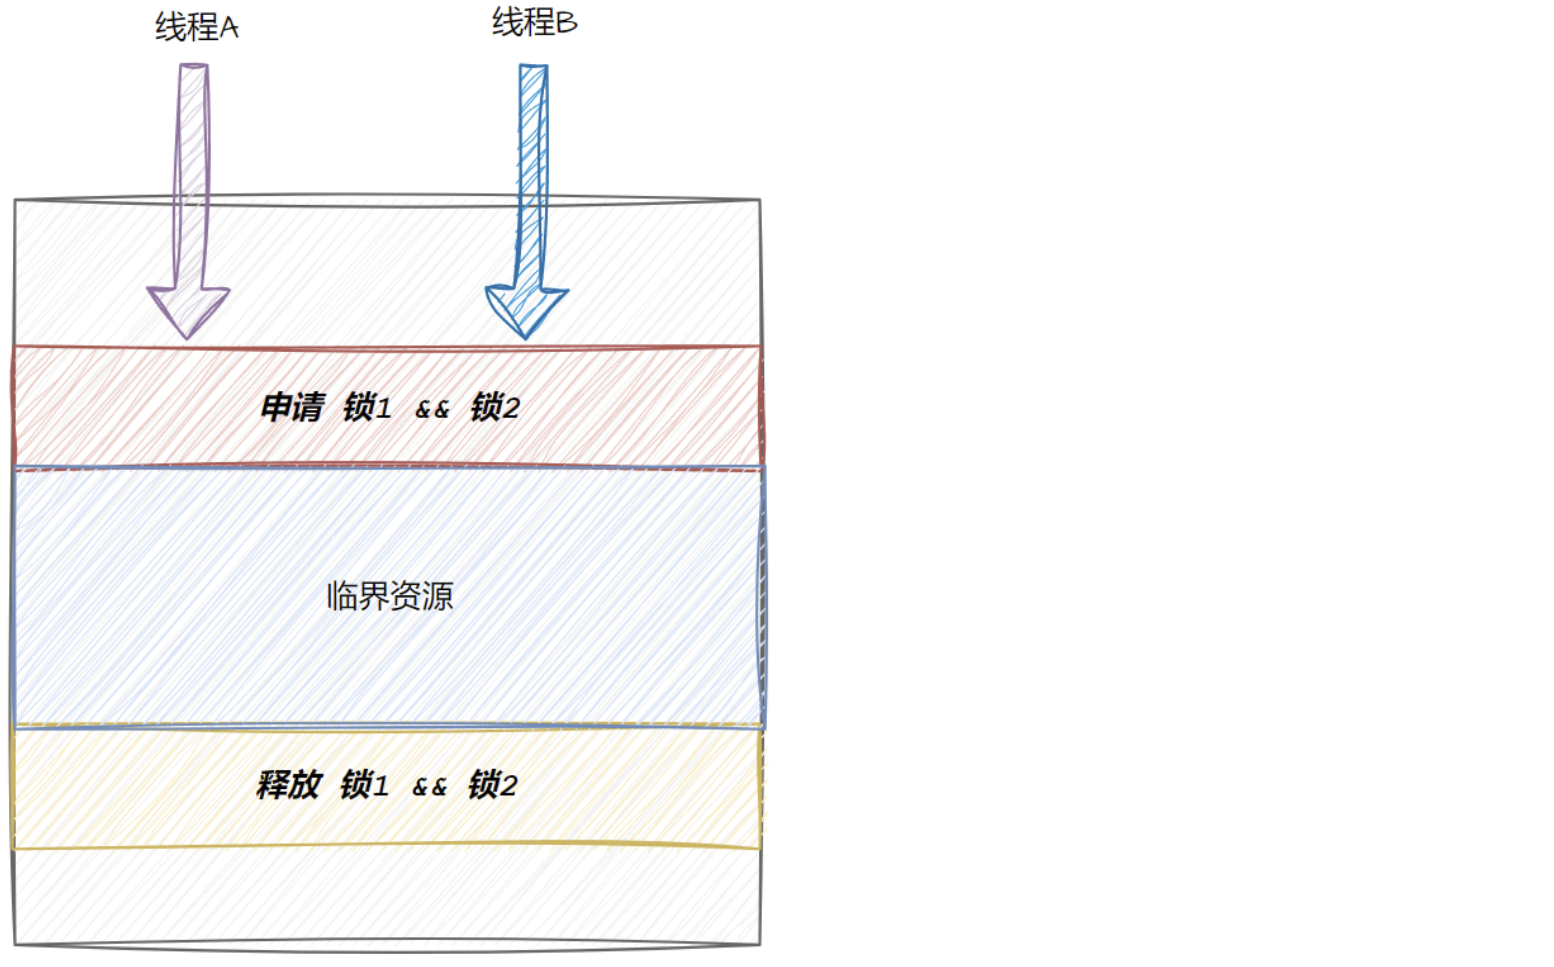
申请一把锁是原子的,但是申请两把锁就不一定了
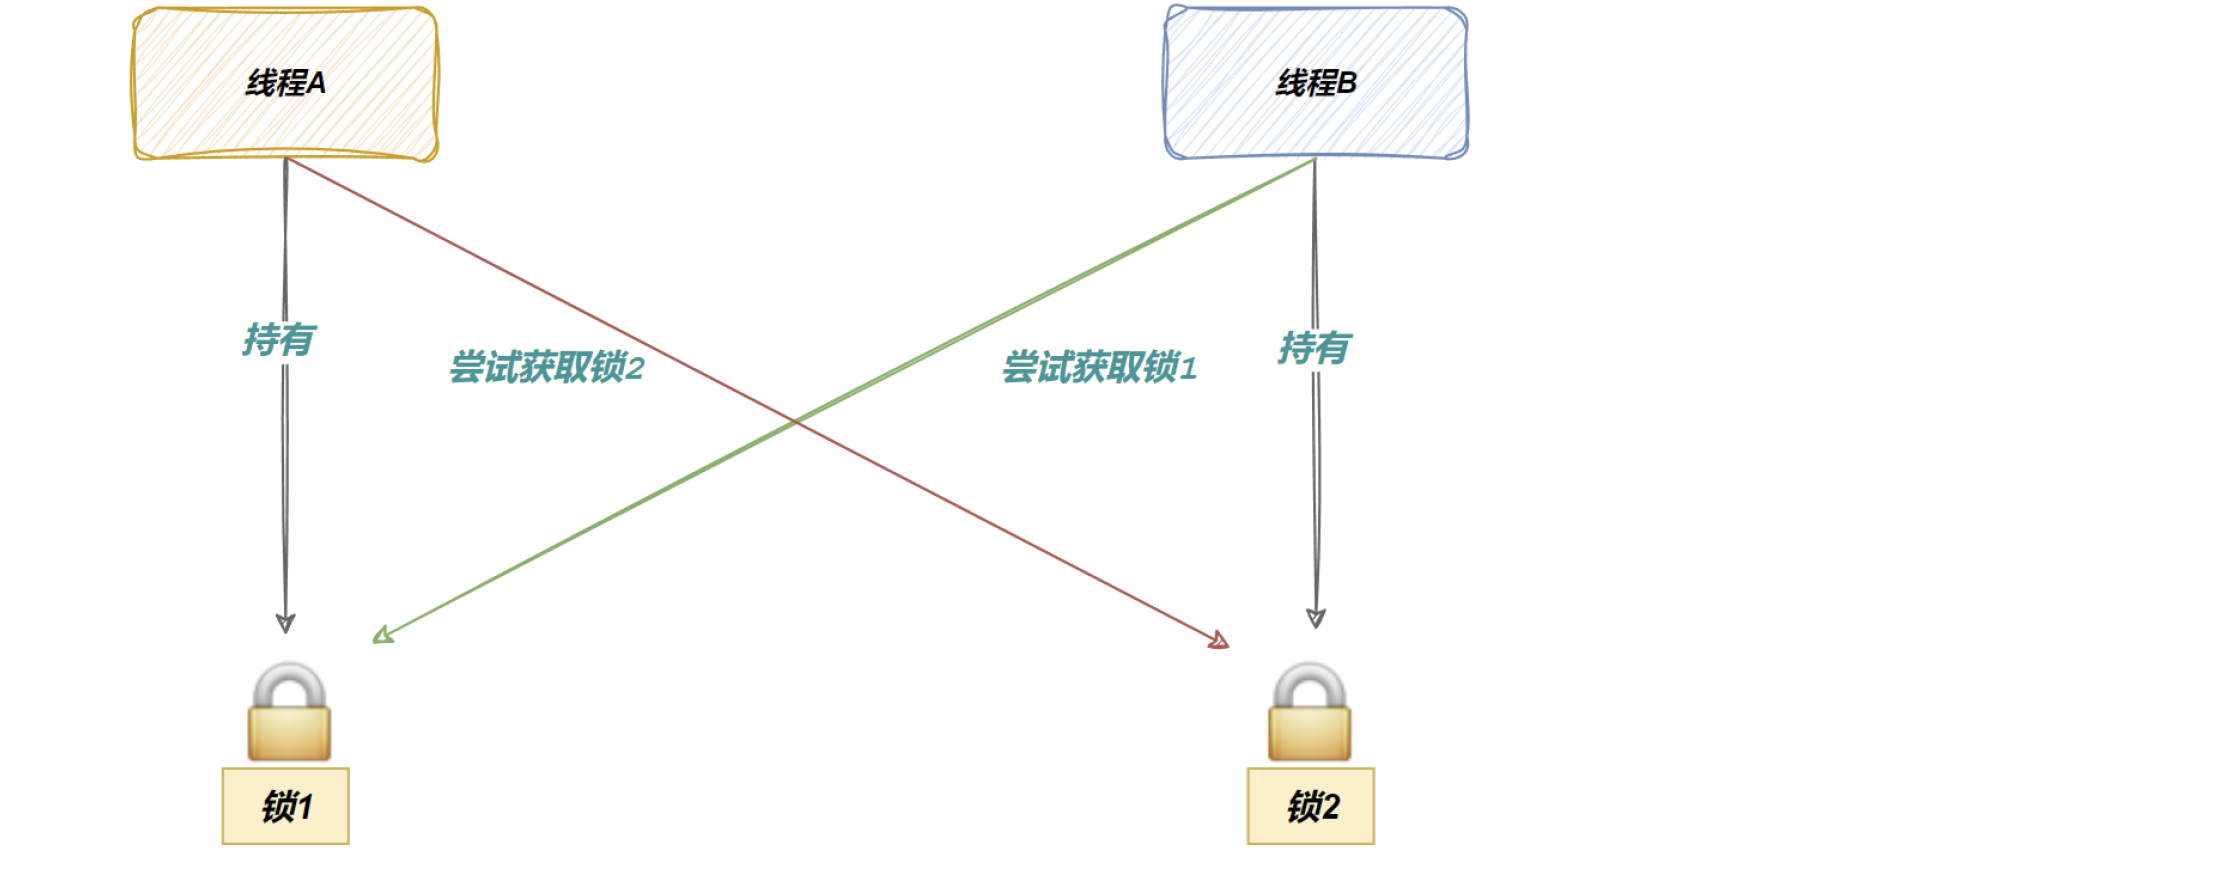
造成的结果是
2. 死锁四个必要条件
- 互斥条件:一个资源每次只能被一个执行流使用
- 好理解,不做解释
- 请求与保持条件:一个执行流因请求资源而阻塞时,对已获得的资源保持不放
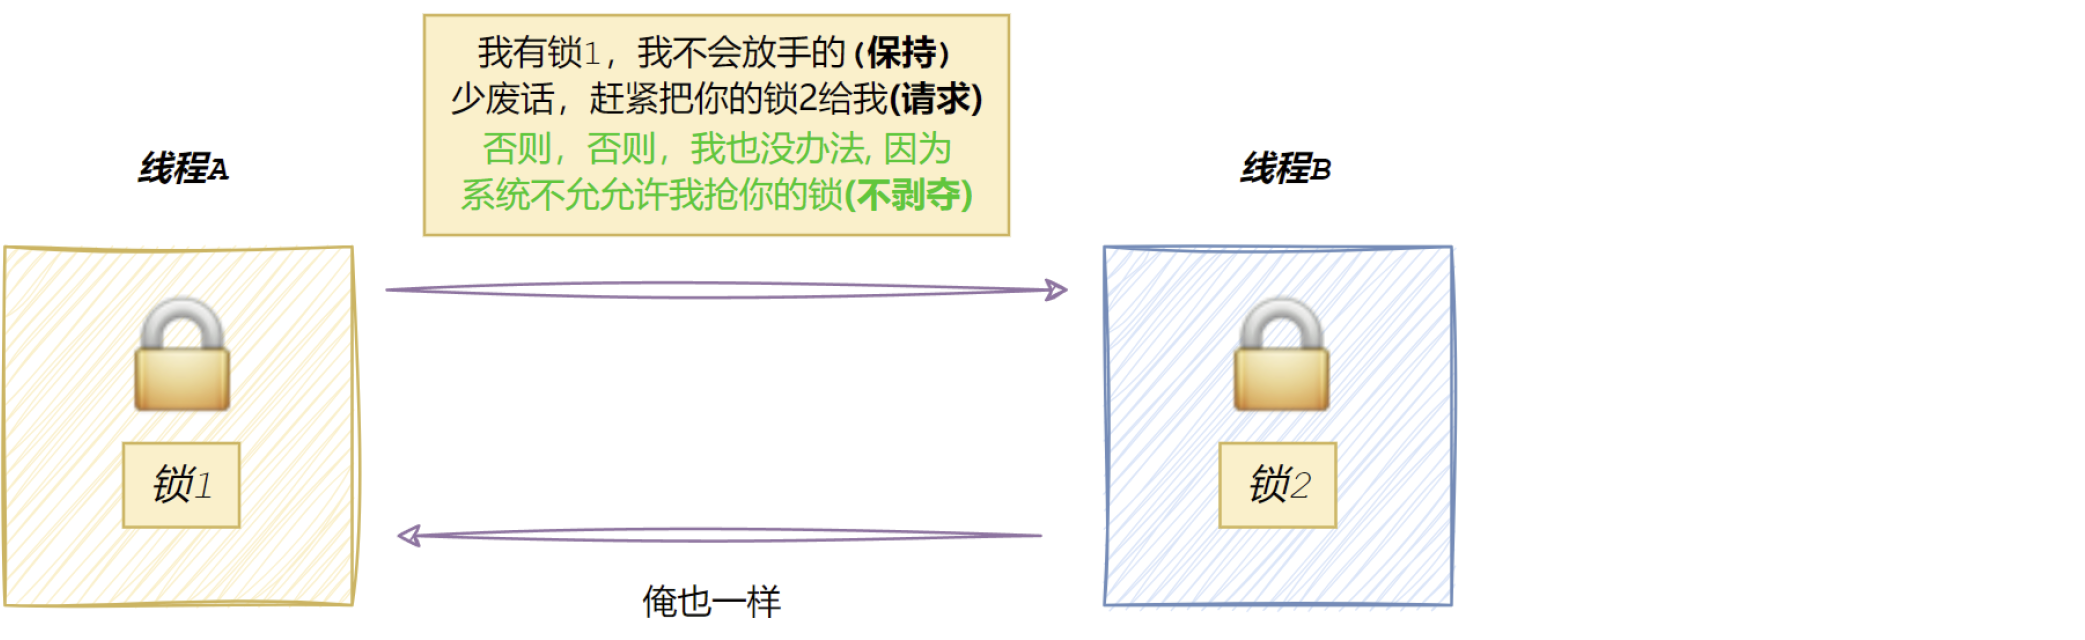
- 不剥夺条件:一个执行流已获得的资源,在末使用完之前,不能强行剥夺
- 循环等待条件:若干执行流之间形成一种头尾相接的循环等待资源的关系

3. 避免死锁
- 破坏死锁的四个必要条件
- 破坏循环等待条件问题:资源一次性分配, 使用超时机制、加锁顺序一致
#include <iostream>
#include <mutex>
#include <thread>
#include <vector>
#include <unistd.h>
// 定义两个共享资源(整数变量)和两个互斥锁
int shared_resource1 = 0;
int shared_resource2 = 0;
std::mutex mtx1, mtx2;
// 一个函数,同时访问两个共享资源
void access_shared_resources()
{// std::unique_lock<std::mutex> lock1(mtx1, std::defer_lock);// std::unique_lock<std::mutex> lock2(mtx2, std::defer_lock);// // 使用 std::lock 同时锁定两个互斥锁// std::lock(lock1, lock2);// 现在两个互斥锁都已锁定,可以安全地访问共享资源int cnt = 10000;while (cnt){++shared_resource1;++shared_resource2;cnt--;}// 当离开 access_shared_resources 的作用域时,lock1 和 lock2 的析构函数会被自动调用// 这会导致它们各自的互斥量被自动解锁
}
// 模拟多线程同时访问共享资源的场景
void simulate_concurrent_access()
{std::vector<std::thread> threads;// 创建多个线程来模拟并发访问for (int i = 0; i < 10; ++i){threads.emplace_back(access_shared_resources);}// 等待所有线程完成for (auto &thread : threads){thread.join();}// 输出共享资源的最终状态std::cout << "Shared Resource 1: " << shared_resource1 << std::endl;std::cout << "Shared Resource 2: " << shared_resource2 << std::endl;
}
int main()
{simulate_concurrent_access();return 0;
}
$ ./a.out // 不一次申请
Shared Resource 1: 94416
Shared Resource 2: 94536
$ ./a.out // 一次申请
Shared Resource 1: 100000
Shared Resource 2: 100000
- 避免锁未释放的场景
4. 避免死锁算法(了解)
-
死锁检测算法(了解)
-
银行家算法(了解)
八.STL,智能指针和线程安全
1. STL中的容器是否是线程安全的?
不是.
原因是, STL 的设计初衷是将性能挖掘到极致, 而一旦涉及到加锁保证线程安全, 会对性能造成巨大的影响.
而且对于不同的容器, 加锁方式的不同, 性能可能也不同(例如hash表的锁表和锁桶).
因此 STL 默认不是线程安全. 如果需要在多线程环境下使用, 往往需要调用者自行保证线程安全.
2. 智能指针是否是线程安全的?
对于 unique_ptr, 由于只是在当前代码块范围内生效, 因此不涉及线程安全问题.
对于 shared_ptr, 多个对象需要共用一个引用计数变量, 所以会存在线程安全问题. 但是标准库实现的时候考虑到了这个问题, 基于原子操作(CAS)的方式保证 shared_ptr 能够高效, 原子的操作引用计数.
九.其他常见的各种锁(不做介绍,听说过即可)
- 悲观锁:在每次取数据时,总是担心数据会被其他线程修改,所以会在取数据前先加锁(读锁,写锁,行锁等),当其他线程想要访问数据时,被阻塞挂起。
- 乐观锁:每次取数据时候,总是乐观的认为数据不会被其他线程修改,因此不上锁。但是在更新数据前,会判断其他数据在更新前有没有对数据进行修改。主要采用两种方式:版本号机制和CAS操作。
- CAS操作:当需要更新数据时,判断当前内存值和之前取得的值是否相等。如果相等则用新值更新。若不等则失败,失败则重试,一般是一个自旋的过程,即不断重试。
- 自旋锁,读写锁