本地用docling实现pdf转markdown操作笔记
docling原理悉知
Docling 是一个开源的 python 文档处理库,由 IBM 开发,用于将 PDF、DOCX、PPTX、XLSX、图像、HTML 等文档转换为结构化的 Markdown 或 JSON 格式,为构建 AI 驱动的 RAG/QA 应用提供了高效、便捷的解决方案。
其使用的技术可以总结为:
1.布局分析模型 首先,Docling使用一个布局分析模型,这是一个对象检测器,用于预测给定页面图像上各种元素的边界框和类别。
2.表格结构识别模型:其次,Docling使用TableFormer 表格结构识别模型模型。它可以根据输入图像预测给定表格的逻辑行和列结构。推理依赖于PyTorch。
3.OCR文字识别:Docling还提供了可选的OCR支持,例如用于扫描件PDF 。默认情况下,Docling使用EasyOCR 引擎,该引擎以高分辨率(216 dpi)页面图像进行OCR,以捕获小字体细节。
4.处理管道:Docling实现了一个线性处理管道,按顺序对每个文档执行操作。每个文档首先由PDF后端解析,以检索程序化文本标记和渲染每页的位图图像。然后,标准模型管道独立应用于文档中的每一页,以提取特征和内容,如布局和表格结构。最后,所有页面的结果汇总并通过后处理阶段传递,以增强元数据、检测文档语言、推断阅读顺序并最终组装一个可序列化为JSON或Markdown 的类型化文档对象。
Docling处理阶段:
1.预处理阶段:图像增强、倾斜校正、分辨率调整。
2.内容提取阶段:OCR识别(大模型)、布局分析(大模型)、元素关联。
1.布局模型:文档元素检测:识别文档中的文本块、表格、图像、标题等元素。
2.元素分类:将检测到的元素分类为不同的类型。
3.阅读顺序确定:确定文档元素的逻辑阅读顺序。
4.结构化输出:为后续处理步骤提供结构化的文档表示。
3.结构增强阶段:公式转换、表格结构化、引用解析。
本地化部署
步骤1:创建虚拟环境
#创建虚拟环境
conda create -n doclingenv python=3.11 -y
#激活虚拟环境
conda activate doclingenv
步骤2:安装相关依赖
# 安装docling
pip install docling
在下载的时候观察到会自动下载cpu版本的torch。运行下述代码检测是否安装了支持gpu版本的torch:
import torch# 检查CUDA是否可用
print("CUDA是否可用:", torch.cuda.is_available())if torch.cuda.is_available():# 查看可用GPU数量print("可用GPU数量:", torch.cuda.device_count())# 查看当前使用的GPU索引print("当前GPU索引:", torch.cuda.current_device())# 查看GPU名称print("GPU名称:", torch.cuda.get_device_name(torch.cuda.current_device()))
else:print("未检测到可用的GPU,PyTorch将使用CPU进行计算")
发现,应该在安装docling库时自动下载了支持gpu版本的torch,这为后续使用gpu加速来计算提供了便利。
步骤3:运行下述代码
from docling.document_converter import DocumentConvertersource = "test.pdf"
output = "01.md"converter = DocumentConverter()
result = converter.convert(source)with open(output, "w", encoding = "utf-8") as f:f.write(result.document.export_to_markdown())print("docling已完成解析!")
报错:
#网络无法访问 Hugging Face,导致 docling 初始化时无法自动下载必需的布局模型。
阅读下述链接可以发现
Docling学习笔记(含本地部署教程)_docling本地部署-CSDN博客
想要用本地下载好的模型,必须学习docling的源码然后传递参数。好在上述博客已经对源码进行了深度学习,我们只需按照步骤来操作如何定义使用自己的模型。
步骤4:下载模型
首先,安装库:
pip install modelscope下载模型:ms-agent/docling-models。这里边包括了布局检测和表格模型。
布局检测模型:给 PDF 页面 “分区”—— 把页面图像中的内容按 “布局类型” 分开,比如识别出哪里是标题(Title)、哪里是表格(Table)、哪里是公式(Formula)、哪里是脚注(Footnote)等,共 11 种布局组件(完整列表见表格第一列)。技术基础:基于 RT-DETR 模型(一种高效的目标检测模型)实现,能快速且准确地定位不同内容区域。
TableFormer(表格结构识别模型):专门处理 “表格” 的结构化提取—— 当 Layout Model 识别出 “这是一个表格” 后,TableFormer 会进一步分析表格的行、列、单元格(比如哪几行是表头、单元格是否跨行跨列),最终把 PDF 中的 “图片表格” 转成可编辑的 “结构化表格”(对应你看到的 Markdown 表格)。工作流程:依赖 Layout Model 的输出(先找到表格在哪里),再聚焦表格区域做精细化分析。
下载easyocr模型
下载模型脚本:
import os
from modelscope import snapshot_download# 定义主目录:当前目录下的 docling_model
main_dir = os.path.join(os.getcwd(), "docling_model")# 为两个模型分别创建独立的子目录
docling_subdir = os.path.join(main_dir, "docling-models")  # docling模型子目录
easyocr_subdir = os.path.join(main_dir, "easyocr-models")  # easyocr模型子目录# 创建目录(如果不存在)
os.makedirs(docling_subdir, exist_ok=True)
os.makedirs(easyocr_subdir, exist_ok=True)# 下载docling模型(保存到专属子目录)
docling_model_dir = snapshot_download(model_id='ms-agent/docling-models',local_dir=docling_subdir
)
print(f'docling模型下载完成,路径: {docling_model_dir}')# 下载easyocr模型(保存到专属子目录)
easyocr_model_dir = snapshot_download(model_id='Ceceliachenen/easyocr',local_dir=easyocr_subdir
)
print(f'easyocr模型下载完成,路径: {easyocr_model_dir}')
步骤5,用下载的模型来实现转md。
运行下述脚本:
import os  # 导入os模块处理路径
from docling.datamodel.base_models import InputFormat, ImageRefMode  # 补充ImageRefMode导入
from docling.datamodel.pipeline_options import PdfPipelineOptions, EasyOcrOptions
from docling.document_converter import (PdfFormatOption, DocumentConverter, ImageFormatOption, PowerpointFormatOption, WordFormatOption, ExcelFormatOption, HTMLFormatOption
)# -------------------------- 1. 配置OCR模型(EasyOCR)--------------------------
# 用os.path.join拼接路径,自动适配Linux/Windows
easyocr_model_storage_directory = os.path.join("docling_model", "easyocr-models")
easyocr_options = EasyOcrOptions()
easyocr_options.lang = ['ch_sim', 'en']  # 中文+英文识别
easyocr_options.model_storage_directory = easyocr_model_storage_directory# -------------------------- 2. 配置PDF核心模型(docling)--------------------------
# 拼接docling模型路径,确保Linux下解析为 docling_model/docling-models
pdf_artifacts_path = os.path.join("docling_model", "docling-models")# 验证路径是否存在(避免路径不存在导致的错误)
if not os.path.exists(pdf_artifacts_path):raise FileNotFoundError(f"docling模型路径不存在:{pdf_artifacts_path}\n请确认模型已下载到该路径")# 初始化PDF管道配置
pipeline_options = PdfPipelineOptions(artifacts_path=pdf_artifacts_path)
pipeline_options.do_ocr = True  # 启用OCR(处理扫描件)
pipeline_options.do_table_structure = True  # 启用表格结构提取
pipeline_options.ocr_options = easyocr_options  # 关联OCR配置# -------------------------- 3. 初始化文档转换器--------------------------
converter = DocumentConverter(format_options={InputFormat.PDF: PdfFormatOption(pipeline_options=pipeline_options),InputFormat.IMAGE: ImageFormatOption(pipeline_options=pipeline_options),InputFormat.PPTX: PowerpointFormatOption(pipeline_options=pipeline_options),InputFormat.DOCX: WordFormatOption(pipeline_options=pipeline_options),InputFormat.XLSX: ExcelFormatOption(pipeline_options=pipeline_options),InputFormat.HTML: HTMLFormatOption(pipeline_options=pipeline_options)}
)# -------------------------- 4. 执行转换并保存--------------------------
source = "test.pdf"  # 输入PDF路径(确保该文件存在)
output = "01.md"     # 输出Markdown路径# 验证输入PDF是否存在
if not os.path.exists(source):raise FileNotFoundError(f"输入PDF不存在:{source}")# 执行转换
result = converter.convert(source)# 保存Markdown(使用ImageRefMode.EMBEDDED嵌入图片)
with open(output, "w", encoding="utf-8") as f:f.write(result.document.export_to_markdown(image_mode=ImageRefMode.EMBEDDED))print(f"docling已完成解析!Markdown文件保存至:{os.path.abspath(output)}")报错:ImageRefMode 的实际导入路径与 docling 版本不匹配。
ImageRefMode 是一个枚举类型,用于控制图片在导出的 Markdown 文档中的呈现方式。它有三个选项:
PLACEHOLDER - 占位符模式:只在文档中保留图片的位置,不实际嵌入或引用图片;
EMBEDDED - 嵌入模式:将图片以 base64 编码的形式直接嵌入到 Markdown 文档中;
REFERENCED - 引用模式:将图片保存为外部 PNG 文件,并在 Markdown 中通过链接引用这些图片。
修改代码如下
from docling_core.types.doc import ImageRefMode
#增加图片处理配置
# 启用图片生成功能,使文档中的图片能够被提取和处理
pipeline_options.generate_picture_images = True
# 设置图片缩放比例为2.0,提高导出图片的质量
pipeline_options.images_scale = 2.0
import os  # 导入os模块处理路径
from docling.datamodel.base_models import InputFormat  # 补充ImageRefMode导入
from docling.datamodel.pipeline_options import PdfPipelineOptions, EasyOcrOptions
from docling.document_converter import (PdfFormatOption, DocumentConverter, ImageFormatOption, PowerpointFormatOption, WordFormatOption, ExcelFormatOption, HTMLFormatOption
)
# 导入ImageRefMode枚举类,用于控制图片在Markdown中的呈现方式
from docling_core.types.doc import ImageRefMode
# -------------------------- 1. 配置OCR模型(EasyOCR)--------------------------
# 用os.path.join拼接路径,自动适配Linux/Windows
easyocr_model_storage_directory = os.path.join("docling_model", "easyocr-models")
easyocr_options = EasyOcrOptions()
easyocr_options.lang = ['ch_sim', 'en']  # 中文+英文识别
easyocr_options.model_storage_directory = easyocr_model_storage_directory# -------------------------- 2. 配置PDF核心模型(docling)--------------------------
# 拼接docling模型路径,确保Linux下解析为 docling_model/docling-models
pdf_artifacts_path = os.path.join("docling_model", "docling-models")# 验证路径是否存在(避免路径不存在导致的错误)
if not os.path.exists(pdf_artifacts_path):raise FileNotFoundError(f"docling模型路径不存在:{pdf_artifacts_path}\n请确认模型已下载到该路径")# 初始化PDF管道配置
pipeline_options = PdfPipelineOptions(artifacts_path=pdf_artifacts_path)
pipeline_options.do_ocr = True  # 启用OCR(处理扫描件)
pipeline_options.do_table_structure = True  # 启用表格结构提取
pipeline_options.ocr_options = easyocr_options  # 关联OCR配置
#增加图片处理配置
# 启用图片生成功能,使文档中的图片能够被提取和处理
pipeline_options.generate_picture_images = True
# 设置图片缩放比例为2.0,提高导出图片的质量
pipeline_options.images_scale = 2.0
# -------------------------- 3. 初始化文档转换器--------------------------
converter = DocumentConverter(format_options={InputFormat.PDF: PdfFormatOption(pipeline_options=pipeline_options),InputFormat.IMAGE: ImageFormatOption(pipeline_options=pipeline_options),InputFormat.PPTX: PowerpointFormatOption(pipeline_options=pipeline_options),InputFormat.DOCX: WordFormatOption(pipeline_options=pipeline_options),InputFormat.XLSX: ExcelFormatOption(pipeline_options=pipeline_options),InputFormat.HTML: HTMLFormatOption(pipeline_options=pipeline_options)}
)# -------------------------- 4. 执行转换并保存--------------------------
source = "test.pdf"  # 输入PDF路径(确保该文件存在)
output = "01.md"     # 输出Markdown路径# 验证输入PDF是否存在
if not os.path.exists(source):raise FileNotFoundError(f"输入PDF不存在:{source}")# 执行转换
result = converter.convert(source)# 保存Markdown(使用ImageRefMode.EMBEDDED嵌入图片)
with open(output, "w", encoding="utf-8") as f:f.write(result.document.export_to_markdown(image_mode=ImageRefMode.EMBEDDED))print(f"docling已完成解析!Markdown文件保存至:{os.path.abspath(output)}")报错:easyocr 库未安装。
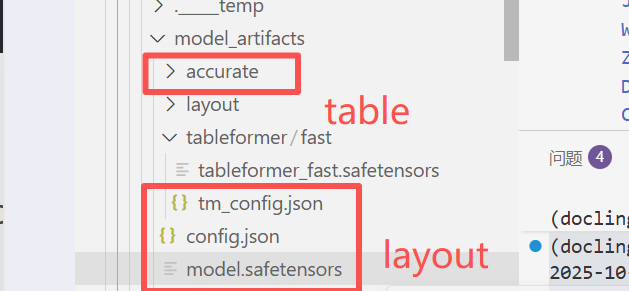
pip install easyocr报错:FileNotFoundError: Missing safe tensors file: docling_model/docling-models/model_artifacts/model.safetensors.
解决办法:
layout模型的权重需要放到model_artifacts下。
table模型的权重需要放到model_artifacts/accurate下。
到这里,docling已经可以成功将pdf转换成markdown。
效果优化
1.用gpu加速的参数设置。
import os
import torch  # 用于验证GPU环境
from docling.datamodel.base_models import InputFormat
from docling.datamodel.pipeline_options import (PdfPipelineOptions, EasyOcrOptions,AcceleratorOptions,  # 导入GPU加速器配置类AcceleratorDevice    # 导入设备类型(CUDA/CPU)
)
from docling.document_converter import (PdfFormatOption, DocumentConverter, ImageFormatOption, PowerpointFormatOption, WordFormatOption, ExcelFormatOption, HTMLFormatOption
)
from docling_core.types.doc import ImageRefMode# 第一步:先验证GPU环境(避免配置后无效)
def check_gpu_env():if not torch.cuda.is_available():raise RuntimeError("未检测到可用GPU环境!请先安装GPU版本的PyTorch,安装命令参考:\n""pip3 install torch torchvision torchaudio --index-url https://download.pytorch.org/whl/cu118")print(f"✅ 检测到GPU环境:{torch.cuda.get_device_name(0)}(CUDA版本:{torch.version.cuda})")# 验证GPU环境(若失败直接报错)
check_gpu_env()# -------------------------- 1. 配置OCR模型(EasyOCR,启用GPU)--------------------------
easyocr_model_storage_directory = os.path.join("docling_model", "easyocr-models")
easyocr_options = EasyOcrOptions()
easyocr_options.lang = ['ch_sim', 'en']  # 中英双语识别
easyocr_options.model_storage_directory = easyocr_model_storage_directory
easyocr_options.use_gpu = True  # 关键:启用EasyOCR的GPU加速
easyocr_options.force_full_page_ocr = True  # 整页OCR(提升识别完整性)# -------------------------- 2. 配置PDF核心模型(docling,添加GPU加速)--------------------------
pdf_artifacts_path = os.path.join("docling_model", "docling-models", "model_artifacts")# 验证模型路径存在
if not os.path.exists(pdf_artifacts_path):raise FileNotFoundError(f"docling模型路径不存在:{pdf_artifacts_path}\n请确认模型已下载到该路径")# 初始化PDF管道配置(核心:添加AcceleratorOptions)
pipeline_options = PdfPipelineOptions(artifacts_path=pdf_artifacts_path)
pipeline_options.do_ocr = True  # 启用OCR(处理扫描件)
pipeline_options.do_table_structure = True  # 启用表格结构提取
pipeline_options.ocr_options = easyocr_options  # 关联OCR的GPU配置# 关键:配置GPU加速器(指定使用CUDA)
pipeline_options.accelerator_options = AcceleratorOptions(device=AcceleratorDevice.CUDA,  # 使用NVIDIA GPU(核心配置)num_threads=4  # 并行线程数(建议设为CPU核心数的1/2,避免CPU瓶颈)
)# 图片处理配置(不影响GPU加速,保持原功能)
pipeline_options.generate_picture_images = True
pipeline_options.images_scale = 2.0  # 图片缩放比例(1.0-3.0为宜,值越大越清晰但耗时更长)# -------------------------- 3. 初始化文档转换器--------------------------
converter = DocumentConverter(format_options={InputFormat.PDF: PdfFormatOption(pipeline_options=pipeline_options),InputFormat.IMAGE: ImageFormatOption(pipeline_options=pipeline_options),InputFormat.PPTX: PowerpointFormatOption(pipeline_options=pipeline_options),InputFormat.DOCX: WordFormatOption(pipeline_options=pipeline_options),InputFormat.XLSX: ExcelFormatOption(pipeline_options=pipeline_options),InputFormat.HTML: HTMLFormatOption(pipeline_options=pipeline_options)}
)# -------------------------- 4. 执行转换(带GPU加速)并保存--------------------------
source = "test.pdf"  # 输入PDF路径
output = "01.md"     # 输出Markdown路径# 验证输入PDF存在
if not os.path.exists(source):raise FileNotFoundError(f"输入PDF不存在:{source}")# 执行转换(记录GPU加速耗时)
import time
start_time = time.time()
print(f"🔄 开始转换PDF(GPU加速):{source}")
try:result = converter.convert(source)conversion_time = time.time() - start_timeprint(f"✅ PDF转换完成,耗时:{conversion_time:.2f}秒(GPU加速)")
except Exception as e:raise RuntimeError(f"转换失败:{e}") from e# 保存Markdown(嵌入图片)
with open(output, "w", encoding="utf-8") as f:f.write(result.document.export_to_markdown(image_mode=ImageRefMode.EMBEDDED))print(f"📄 Markdown文件已保存至:{os.path.abspath(output)}")
2.将图片提取出来放到一个文件夹内,然后以本地路径嵌入markdown文档。
为了后续能够处理图片,这里我不采用Base64编
import os
import time
import torch
from pathlib import Path# Docling 相关导入
from docling.datamodel.base_models import InputFormat
from docling.datamodel.pipeline_options import (PdfPipelineOptions, EasyOcrOptions, AcceleratorOptions, AcceleratorDevice
)
from docling.document_converter import (DocumentConverter, PdfFormatOption,ImageFormatOption, PowerpointFormatOption,WordFormatOption, ExcelFormatOption, HTMLFormatOption
)
from docling_core.types.doc import ImageRefMode# -------------------------- 1. GPU 环境验证 --------------------------
def check_gpu_env():"""检查并验证GPU环境是否可用。"""if not torch.cuda.is_available():raise RuntimeError("未检测到可用GPU环境!请安装GPU版PyTorch:\n""pip3 install torch torchvision torchaudio --index-url https://download.pytorch.org/whl/cu118")print(f"✅ 检测到GPU环境:{torch.cuda.get_device_name(0)}(CUDA版本:{torch.version.cuda})")check_gpu_env()# -------------------------- 2. OCR 和 PDF 管道配置 --------------------------
# 配置EasyOCR选项
easyocr_model_storage_directory = os.path.join("docling_model", "easyocr-models")
easyocr_options = EasyOcrOptions()
easyocr_options.lang = ['ch_sim', 'en']  # 支持中文简体和英文
easyocr_options.model_storage_directory = easyocr_model_storage_directory
easyocr_options.use_gpu = True
easyocr_options.force_full_page_ocr = True# 配置Docling模型路径
pdf_artifacts_path = os.path.join("docling_model", "docling-models", "model_artifacts")
if not os.path.exists(pdf_artifacts_path):raise FileNotFoundError(f"Docling模型路径不存在:{pdf_artifacts_path}\n"f"请执行命令下载:docling-download-models --output-dir {pdf_artifacts_path}")# 配置PDF处理管道
pipeline_options = PdfPipelineOptions(artifacts_path=pdf_artifacts_path,images_scale=2.0,  # 提高图片导出质量generate_picture_images=True,do_ocr=True,do_table_structure=True,ocr_options=easyocr_options,accelerator_options=AcceleratorOptions(device=AcceleratorDevice.CUDA,num_threads=4),# --- 关键配置:强制生成页面图片 ---# 这能确保即使PDF中的图片无法被单独提取,每一页也会被保存为一张图片generate_page_images=True,keep_images_raw=False,
)# -------------------------- 3. 初始化转换器 --------------------------
converter = DocumentConverter(format_options={InputFormat.PDF: PdfFormatOption(pipeline_options=pipeline_options),InputFormat.IMAGE: ImageFormatOption(pipeline_options=pipeline_options),InputFormat.PPTX: PowerpointFormatOption(pipeline_options=pipeline_options),InputFormat.DOCX: WordFormatOption(pipeline_options=pipeline_options),InputFormat.XLSX: ExcelFormatOption(pipeline_options=pipeline_options),InputFormat.HTML: HTMLFormatOption(pipeline_options=pipeline_options)}
)# -------------------------- 4. 定义输入/输出路径 --------------------------
source_pdf = "test.pdf"
output_md = "01.md"
# 定义图片保存的目录名
image_assets_dir_name = "figures"# 检查输入文件是否存在
if not os.path.exists(source_pdf):raise FileNotFoundError(f"输入PDF不存在:{source_pdf}")# -------------------------- 5. 执行转换 --------------------------
start_time = time.time()
print(f"🔄 开始转换PDF(GPU加速):{source_pdf}")
try:conv_res = converter.convert(source_pdf)print(f"✅ PDF转换完成,耗时:{time.time() - start_time:.2f}秒")
except Exception as e:raise RuntimeError(f"转换失败:{e}") from e# -------------------------- 6. 保存为Markdown(最终修正版) --------------------------
print(f"🔄 开始保存Markdown和图片...")
try:# 将目录名转换为 Path 对象image_assets_path = Path(image_assets_dir_name)# 调用save_as_markdown方法conv_res.document.save_as_markdown(filename=output_md,image_mode=ImageRefMode.REFERENCED,artifacts_dir=image_assets_path  # 传递 Path 对象)print(f"✅ Markdown已生成:{os.path.abspath(output_md)}")# --- 修正:检查我们实际指定的图片目录 ---if image_assets_path.exists():print(f"🖼️  图片已保存至:{image_assets_path.resolve()}")# (可选) 列出保存的图片文件以供确认image_files = [f.name for f in image_assets_path.iterdir() if f.is_file()]if image_files:print(f"   包含的图片文件: {', '.join(image_files)}")else:print("   目录已创建,但为空。")else:# 如果这个目录真的不存在,那才是一个真正的问题print("⚠️  错误:指定的图片目录未生成!")except Exception as e:raise RuntimeError(f"保存Markdown失败:{e}") from eprint("\n🎉 所有任务已完成!")
码嵌入图片,而是保存为本地绝对路径。
这里报了很久的错,原因在于,项目自定义需要的参数不清晰,因此需要查看源码。。。。一直忙其他工作,没时间看源码。看了一下就清楚多了:
找到:save_as_markdown函数的源码:/home/agent/anaconda3/envs/doclingenv/lib/python3.11/site-packages/docling_core/types/doc/document.py
def save_as_markdown(self,filename: Union[str, Path],              # 1. Markdown 文件的路径artifacts_dir: Optional[Path] = None,     # 2. 图片存放的目录# ... 其他参数 ...image_mode: ImageRefMode = ImageRefMode.PLACEHOLDER, # 3. 图片引用模式# ...
):
最终成功运行代码:
import os
import time
import torch
from pathlib import Path# Docling 相关导入
from docling.datamodel.base_models import InputFormat
from docling.datamodel.pipeline_options import (PdfPipelineOptions, EasyOcrOptions, AcceleratorOptions, AcceleratorDevice
)
from docling.document_converter import (DocumentConverter, PdfFormatOption,ImageFormatOption, PowerpointFormatOption,WordFormatOption, ExcelFormatOption, HTMLFormatOption
)
from docling_core.types.doc import ImageRefMode# -------------------------- 1. GPU 环境验证 --------------------------
def check_gpu_env():"""检查并验证GPU环境是否可用。"""if not torch.cuda.is_available():raise RuntimeError("未检测到可用GPU环境!请安装GPU版PyTorch:\n""pip3 install torch torchvision torchaudio --index-url https://download.pytorch.org/whl/cu118")print(f"✅ 检测到GPU环境:{torch.cuda.get_device_name(0)}(CUDA版本:{torch.version.cuda})")check_gpu_env()# -------------------------- 2. OCR 和 PDF 管道配置 --------------------------
# 配置EasyOCR选项
easyocr_model_storage_directory = os.path.join("docling_model", "easyocr-models")
easyocr_options = EasyOcrOptions()
easyocr_options.lang = ['ch_sim', 'en']  # 支持中文简体和英文
easyocr_options.model_storage_directory = easyocr_model_storage_directory
easyocr_options.use_gpu = True
easyocr_options.force_full_page_ocr = True# 配置Docling模型路径
pdf_artifacts_path = os.path.join("docling_model", "docling-models", "model_artifacts")
if not os.path.exists(pdf_artifacts_path):raise FileNotFoundError(f"Docling模型路径不存在:{pdf_artifacts_path}\n"f"请执行命令下载:docling-download-models --output-dir {pdf_artifacts_path}")# 配置PDF处理管道
pipeline_options = PdfPipelineOptions(artifacts_path=pdf_artifacts_path,images_scale=2.0,  # 提高图片导出质量generate_picture_images=True,do_ocr=True,do_table_structure=True,ocr_options=easyocr_options,accelerator_options=AcceleratorOptions(device=AcceleratorDevice.CUDA,num_threads=4),# --- 关键配置:强制生成页面图片 ---# 这能确保即使PDF中的图片无法被单独提取,每一页也会被保存为一张图片generate_page_images=True,keep_images_raw=False,
)# -------------------------- 3. 初始化转换器 --------------------------
converter = DocumentConverter(format_options={InputFormat.PDF: PdfFormatOption(pipeline_options=pipeline_options),InputFormat.IMAGE: ImageFormatOption(pipeline_options=pipeline_options),InputFormat.PPTX: PowerpointFormatOption(pipeline_options=pipeline_options),InputFormat.DOCX: WordFormatOption(pipeline_options=pipeline_options),InputFormat.XLSX: ExcelFormatOption(pipeline_options=pipeline_options),InputFormat.HTML: HTMLFormatOption(pipeline_options=pipeline_options)}
)# -------------------------- 4. 定义输入/输出路径 --------------------------
source_pdf = "test.pdf"
output_md = "01.md"
# 定义图片保存的目录名
image_assets_dir_name = "figures"# 检查输入文件是否存在
if not os.path.exists(source_pdf):raise FileNotFoundError(f"输入PDF不存在:{source_pdf}")# -------------------------- 5. 执行转换 --------------------------
start_time = time.time()
print(f"🔄 开始转换PDF(GPU加速):{source_pdf}")
try:conv_res = converter.convert(source_pdf)print(f"✅ PDF转换完成,耗时:{time.time() - start_time:.2f}秒")
except Exception as e:raise RuntimeError(f"转换失败:{e}") from e# -------------------------- 6. 保存为Markdown(最终修正版) --------------------------
print(f"🔄 开始保存Markdown和图片...")
try:# 将目录名转换为 Path 对象image_assets_path = Path(image_assets_dir_name)# 调用save_as_markdown方法conv_res.document.save_as_markdown(filename=output_md,image_mode=ImageRefMode.REFERENCED,artifacts_dir=image_assets_path  # 传递 Path 对象)print(f"✅ Markdown已生成:{os.path.abspath(output_md)}")# --- 修正:检查我们实际指定的图片目录 ---if image_assets_path.exists():print(f"🖼️  图片已保存至:{image_assets_path.resolve()}")# (可选) 列出保存的图片文件以供确认image_files = [f.name for f in image_assets_path.iterdir() if f.is_file()]if image_files:print(f"   包含的图片文件: {', '.join(image_files)}")else:print("   目录已创建,但为空。")else:# 如果这个目录真的不存在,那才是一个真正的问题print("⚠️  错误:指定的图片目录未生成!")except Exception as e:raise RuntimeError(f"保存Markdown失败:{e}") from eprint("\n🎉 所有任务已完成!")
优化图片名称后的最新代码:
import os
import time
import torch
import re
import shutil
from pathlib import Path
from collections import defaultdict# Docling 相关导入
from docling.datamodel.base_models import InputFormat
from docling.datamodel.pipeline_options import (PdfPipelineOptions, EasyOcrOptions, AcceleratorOptions, AcceleratorDevice
)
from docling.document_converter import (DocumentConverter, PdfFormatOption,ImageFormatOption, PowerpointFormatOption,WordFormatOption, ExcelFormatOption, HTMLFormatOption
)
from docling_core.types.doc import ImageRefMode, PictureItem# -------------------------- 1. GPU 环境验证 --------------------------
def check_gpu_env():"""检查并验证GPU环境是否可用。"""if not torch.cuda.is_available():raise RuntimeError("未检测到可用GPU环境!请安装GPU版PyTorch:\n""pip3 install torch torchvision torchaudio --index-url https://download.pytorch.org/whl/cu118")print(f"✅ 检测到GPU环境:{torch.cuda.get_device_name(0)}(CUDA版本:{torch.version.cuda})")check_gpu_env()# -------------------------- 2. OCR 和 PDF 管道配置 --------------------------
# 配置EasyOCR选项
easyocr_model_storage_directory = os.path.join("docling_model", "easyocr-models")
easyocr_options = EasyOcrOptions()
easyocr_options.lang = ['ch_sim', 'en']  # 支持中文简体和英文
easyocr_options.model_storage_directory = easyocr_model_storage_directory
easyocr_options.use_gpu = True
easyocr_options.force_full_page_ocr = True# 配置Docling模型路径
pdf_artifacts_path = os.path.join("docling_model", "docling-models", "model_artifacts")
if not os.path.exists(pdf_artifacts_path):raise FileNotFoundError(f"Docling模型路径不存在:{pdf_artifacts_path}\n"f"请执行命令下载:docling-download-models --output-dir {pdf_artifacts_path}")# 配置PDF处理管道
pipeline_options = PdfPipelineOptions(artifacts_path=pdf_artifacts_path,images_scale=2.0,  # 提高图片导出质量generate_picture_images=True,do_ocr=True,do_table_structure=True,ocr_options=easyocr_options,accelerator_options=AcceleratorOptions(device=AcceleratorDevice.CUDA,num_threads=4),# --- 关键配置:强制生成页面图片 ---# 这能确保即使PDF中的图片无法被单独提取,每一页也会被保存为一张图片generate_page_images=True,keep_images_raw=False,
)# -------------------------- 3. 初始化转换器 --------------------------
converter = DocumentConverter(format_options={InputFormat.PDF: PdfFormatOption(pipeline_options=pipeline_options),InputFormat.IMAGE: ImageFormatOption(pipeline_options=pipeline_options),InputFormat.PPTX: PowerpointFormatOption(pipeline_options=pipeline_options),InputFormat.DOCX: WordFormatOption(pipeline_options=pipeline_options),InputFormat.XLSX: ExcelFormatOption(pipeline_options=pipeline_options),InputFormat.HTML: HTMLFormatOption(pipeline_options=pipeline_options)}
)# -------------------------- 4. 定义输入/输出路径 --------------------------
source_pdf = "test.pdf"
output_md = "01.md"
# 定义图片保存的目录名
image_assets_dir_name = "figures"# 检查输入文件是否存在
if not os.path.exists(source_pdf):raise FileNotFoundError(f"输入PDF不存在:{source_pdf}")# -------------------------- 5. 执行转换 --------------------------
start_time = time.time()
print(f"🔄 开始转换PDF(GPU加速):{source_pdf}")
try:conv_res = converter.convert(source_pdf)print(f"✅ PDF转换完成,耗时:{time.time() - start_time:.2f}秒")
except Exception as e:raise RuntimeError(f"转换失败:{e}") from e# -------------------------- 6. 保存为Markdown(初步保存) --------------------------
print(f"🔄 初步保存Markdown和图片...")
try:image_assets_path = Path(image_assets_dir_name)conv_res.document.save_as_markdown(filename=output_md,image_mode=ImageRefMode.REFERENCED,artifacts_dir=image_assets_path)print(f"✅ Markdown已初步生成:{os.path.abspath(output_md)}")
except Exception as e:raise RuntimeError(f"保存Markdown失败:{e}") from e# -------------------------- 7. 新增:按页码和序号重命名图片 (修正版) --------------------------
def rename_images_by_page_and_order(md_path: Path, images_dir: Path, doc_result):"""按照 '页码_序号' 的规则重命名图片,并更新Markdown文件。"""if not images_dir.exists():print("⚠️  图片目录不存在,跳过重命名。")returnprint("🔄 开始按 '页码_序号' 重命名图片...")# 1. 从文档结构中获取所有图片的页码信息pictures_by_page = defaultdict(list)for element, level in doc_result.document.iterate_items():if isinstance(element, PictureItem) and element.prov:page_no = element.prov[0].page_nopictures_by_page[page_no].append(element)# 2. 获取磁盘上的图片文件并排序image_files = sorted([p for p in images_dir.iterdir() if p.is_file()], key=lambda x: x.name)if not image_files:print("   - 图片目录为空,无需重命名。")return# 3. 创建一个映射:旧文件名 -> 新文件名rename_map = {}picture_index = 0# 按页码顺序处理for page_no in sorted(pictures_by_page.keys()):page_pictures = pictures_by_page[page_no]for i, _ in enumerate(page_pictures):if picture_index >= len(image_files):print(f"   - 警告:文档中的图片数量多于文件数量,停止重命名。")breakold_file = image_files[picture_index]old_filename = old_file.name# 生成新文件名,例如: page_03_01.pngnew_filename = f"page_{page_no:02d}_{i + 1:02d}{old_file.suffix}"new_file_path = images_dir / new_filename# --- 修正:只有在需要重命名时才操作 ---if old_file != new_file_path:shutil.move(old_file, new_file_path)rename_map[old_filename] = new_filenameprint(f"   - '{old_filename}' -> '{new_filename}'")picture_index += 1# --- 修正:只有在 rename_map 不为空时才更新 Markdown ---if rename_map:print("   - 更新Markdown文件中的图片链接...")with open(md_path, 'r', encoding='utf-8') as f:md_content = f.read()for old_name, new_name in rename_map.items():md_content = re.sub(rf'(\]\({re.escape(image_assets_dir_name)}/){re.escape(old_name)}(\))', rf'\1{new_name}\2', md_content)with open(md_path, 'w', encoding='utf-8') as f:f.write(md_content)else:print("   - 没有图片需要重命名,跳过Markdown文件更新。")print("✅ 图片重命名和链接更新完成。")# -------------------------- 8. 调用重命名函数 --------------------------
try:rename_images_by_page_and_order(md_path=Path(output_md), images_dir=image_assets_path, doc_result=conv_res)
except Exception as e:print(f"⚠️  重命名过程中发生错误,但原始文件已生成: {e}")print("\n🎉 所有任务已完成!")
3.尝试处理页眉页脚
检测和排除页眉/页脚是 Docling 处理的关键功能之一,这些元素(默认情况下)从 markdown 和 html 导出中排除,既然解析PDF没有过滤,那么最有可能的一种情况就是布局模型没有识别出页眉和页脚。
4.可以使用docling发布的不同的layout模型。
https://www.modelscope.cn/organization/ds4sd
5.想调用其他的大模型api可以参考下述链接:
🚀支持视觉大模型的开源PDF解析+OCR工具!Docling本地配置从入门到精通保姆级教程!支持LM Studio+InternVL3-9B与Gemini2.5 Pro轻松识别解析模糊PDF扫描文件 - AI超元域的博客