BEM命名规范
目录
什么是BEM规范
Block 块
Element 元素
Modifier 修饰符
State 状态
为什么要用BEM
怎么使用BEM
尾言
什么是BEM规范
BEM全称:“Block Element Modifier”,意思是:“块、元素、修饰符”,意思是任意CSS命名都可以按照上述三类进行命名。
但是除了上述块、元素、修饰符以外,其实还有一类“State”表示“状态”,所以我更愿意叫“BEMS”而不是“BEM”
Block 块
- 命名符:无
- 命名格式:block-name
- 作用:独立的功能模块或可复用的单元
- 示例场景:按钮(btn)、卡片(card)
Element 元素
- 命名符:“__”(双下划线)
- 命名格式:block-name__element
- 作用:块的组成部分(块的下级),不可以单独出现
- 示例场景:按钮文字(btn__text)、卡片标题(card__title)
Modifier 修饰符
- 命名符:“--”(双短横线)
- 命名格式:block-name--modifier
- 作用:块 / 元素的外观 / 行为,不改变核心功能
- 示例场景:按钮尺寸(btn--large)、卡片标题颜色(card__title--warning)
State 状态
- 命名符:“is”、“has”、“-”(短横线)
- 命名格式:is-state / has-property
- 作用:通用状态类,允许跨块复用
- 示例场景:禁用状态(is-disabled)、含有未读属性(has-unread)
为什么要用BEM
使用BEM无非就是两点:
- BEM命名更加工整,他人阅读代码更加方便,一目了然
- 在某些情况下(如vue组件封装),可以防止作用域冲突
对于第一点就不再多说,着重说明第二点,我们假设有“App.vue”和“child.vue”两个vue文件,其中App.vue是父组件,child.vue是子组件,具体代码如下:
App.vue:
<script setup>
import child from './views/child.vue';
</script><template><div class="container"><div class="title"><span>这是父组件区域</span></div><div class="content"><child /></div></div>
</template><style scoped>
.container {width: 100%;height: 100%;color: red;background-color: blueviolet;
}
.container .title {font-size: 20px;font-weight: bold;color: black;
}
</style>child.vue:
<script setup></script><template>
<div class="container"><div class="title">这是子组件区域</div>
</div>
</template><style scoped>
.container {background-color: white;color: green;
}
.container .title {color: orange;
}
</style>效果:

此时子组件的container明明是白色的背景为什么还会是紫色的呢?
我们打开F12开发者工具发现:
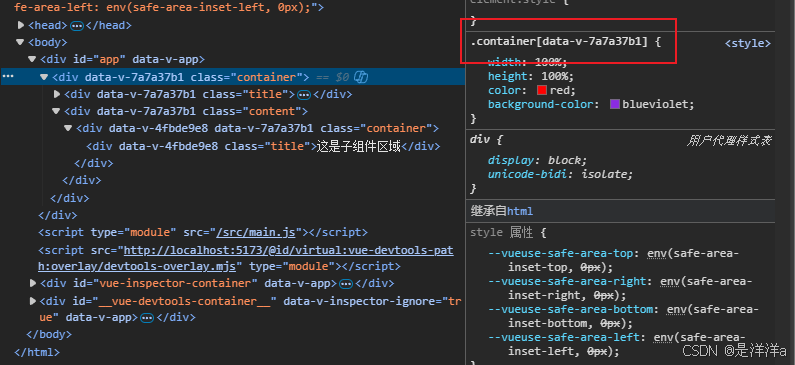
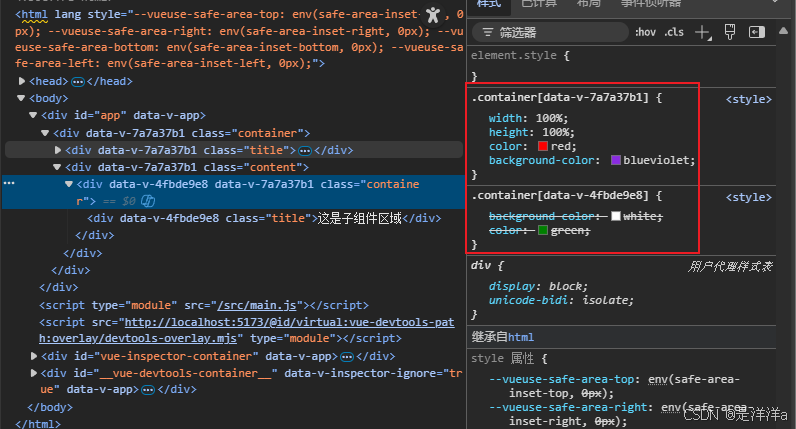
子组件的container居然被父组件的container顶掉了,官方给出的结论是:
- 子组件的根元素会继承父组件的所有样式
为此,使用BEM命名可以有效的避免子组件的CSS与父组件的CSS重名
怎么使用BEM
原理说的再多,不如实践来一遍,接下来我们将尽量模拟一个“真实”的父子组件,并通过BEM命名CSS
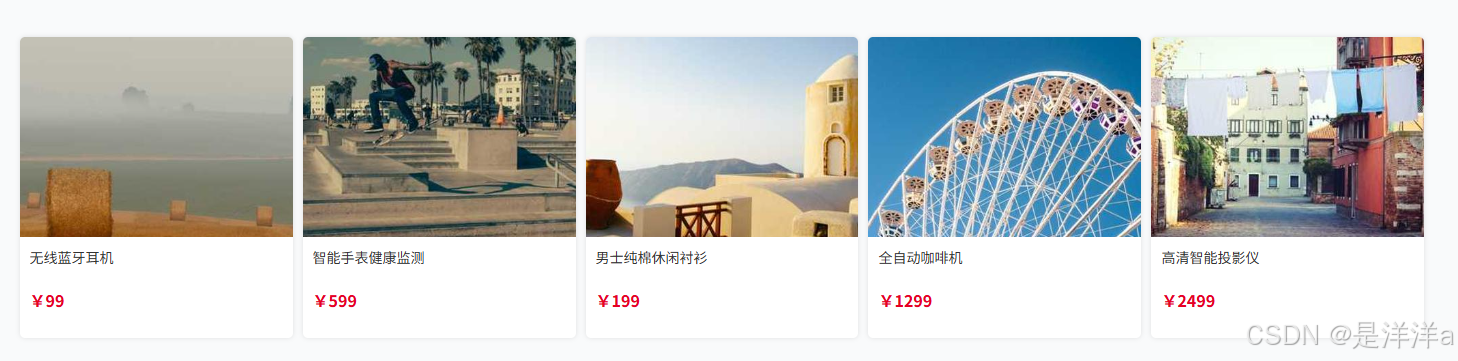
模拟场景介绍:
- 一个购物商城商品列表页,有诸多商品(卡片)
- 父组件名:App.vue,子组件名:Child.vue
- 父组件提供一个容器用来承载子组件,使用v-for批量渲染子组件
- 子组件是一个卡片
App.vue:
<script setup>
import { ref } from 'vue';
import Child from './views/Child.vue';const data = ref([{title: "无线蓝牙耳机",price: 99,imgUrl: "https://picsum.photos/400/400?random=10",},{title: "智能手表健康监测",price: 599,imgUrl: "https://picsum.photos/400/400?random=9",},{title: "男士纯棉休闲衬衫",price: 199,imgUrl: "https://picsum.photos/400/400?random=8",},{title: "全自动咖啡机",price: 1299,imgUrl: "https://picsum.photos/400/400?random=7",},{title: "高清智能投影仪",price: 2499,imgUrl: "https://picsum.photos/400/400?random=6",}
]);
</script><template>
<div class="container"><div class="container__content"><Child v-for="(item, index) in data" :key="index" :title="item.title" :price="item.price" :imgUrl="item.imgUrl"/></div>
</div>
</template><style scoped>
.container {display: flex;justify-content: center;align-items: center;width: 100%;height: 100vh;background-color: rgb(249 250 251);
}
.container .container__content {display: flex;flex-wrap: wrap;justify-content: space-between;align-items: center;gap: 10px;width: 80%;
}
</style>
Child.vue:
<script setup>
const props = defineProps({imgUrl: String,title: String,price: Number
})
</script><template>
<div class="product"><div class="product__img"><img :src=imgUrl alt="产品图"></div><div class="product__info"><span class="product__info--title">{{ title }}</span><p class="product__info--price">¥{{ price }}</p></div>
</div>
</template><style scoped>
.product {display: flex;flex-direction: column;gap: 10px;width: calc((100% - 40px) / 5);border-radius: 5px;background-color: white;box-shadow: 0 0 5px rgba(0, 0, 0, 0.1);overflow: hidden;box-sizing: border-box;
}
.product__img {width: 100%;height: 200px;
}
.product__img img {width: 100%;height: 100%;object-fit: cover;
}
.product__info {display: flex;flex-direction: column;gap: 5px;padding: 0 10px 10px 10px;
}
.product__info--title {font-size: 14px;color: #333;white-space: nowrap;overflow: hidden;text-overflow: ellipsis;
}
.product__info--price {font-size: 16px;color: #e60023;font-weight: bold;
}
</style>效果:
尾言
使用BEM进行CSS命名是一种非常严谨的方式,我个人也推荐大家尽量早点学习,否则后面一旦需要用到再改变,一时间还真适应不过来
更多CSS文章可以参考我的专栏:
CSS_是洋洋a的博客-CSDN博客