三种方式管理Spring核心 IOC/DI 控制反转和依赖注入
三种方式管理Spring核心 IOC/DI 控制反转和依赖注入
- 一、核心概念:IoC 与 DI
- 1.1 传统应用程序存在的问题
- 1.2 控制反转(Inversion of Control, IoC)
- 1.3 依赖注入(Dependency Injection, DI)
- 二、基于XML管理Bean组件
- XML方式管理组件Bean
- 2.1 在 `xml` 文件中定义 Bean组件。
- 2.2 获取容器中的组件对象
- 重点:获取组件时遇到的异常情况:
- 2.3 XML Bean组件属性赋值-setter
- 基本数据类型-赋值
- 引用类型(引用其他bean)-赋值
- 内部Bean定义-赋值
- 2.4 xml方式:将第三方类引入到IOC容器
- 引入外部配置参数(*.properties)
- 2.5 高级特性:FactoryBean
- FactoryBean的使用步骤
- 特别注意:只有通过Bean `&id`和class类型,才能获取FactoryBean对象本身
- 为FactoryBean创建的Bean赋值
- 2.6 高级特性:bean 作用域
- 2.7 高级特性:生命周期
- 生命周期流程
- 初始化与销毁示例
- 特殊情况:注意
- XML方式
- 接口方式
- 注解方式
- XML、接口、注解执行顺序
- Bean周期扩展接口
- BeanFactoryPostProcessor
- BeanPostProcessor
- 三、基于XML+注解方式管理Bean组件
- 基本组合配置
- **XML辅助扫描**
- XML辅助扫描——注解不生效
- XML辅助扫描——仅生效
- 注解
- 将自定义Bean加入IOC容器
- 非引用类型赋值:@Value
- 配置文件赋值与默认值:@Value
- 引用类型赋值:@Autowired
- 接口存在多个实现类的情况
- 四、基于配置类管理组件Bean
- 配置类注解
- 基础配置类
- 配置类读取配置文件(注入非引用类型)
- 方式一:全局变量导入配置类
- 方式二:形式参数导入配置类【推荐】
- 配置类注入引用类型
- 方式一:@Bean注解注入到IOC容器
- 方式二:使用@Component和@Autowired注入依赖
- 配置类单例、多例
- 单例
- 多例
- 其他:为什么SpringBoot项目不需要配置@ComponentScan也可以使用注解?
- 导入其他不在主路径的包
- 排除某个类或者接口。
- @Import
- 示例代码
- @Conditional
- 示例代码
- 基本代码:
- 多数据源配置
- 衍生注解
- 五、扩展
- 使用注解如@Controller等,并没有在类中显式编写构造器为什么不报错?
- 通过反射获取构造器
- xml中`<bean>标签`什么时候提示需要构造器
- 面试题:什么是FactoryBean?什么是BeanFactory?
- 核心容器设计的接口和实现类有哪些?
一、核心概念:IoC 与 DI
首先,要理解 Spring 核心容器,必须先理解它要解决的问题以及其背后的思想:IoC 和 DI。
1.1 传统应用程序存在的问题
在传统的应用程序开发中,对象负责管理和创建其依赖的对象。
举个例子:
假设有一个 BookService,它需要调用 BookRepository 来获取数据。
// 数据访问层
public class BookRepository {public Book findBookById(Long id) {// ... 从数据库查询逻辑return new Book(id, "《Spring 实战》");}
}// 业务逻辑层
public class BookService {// BookService 自己创建它所依赖的 BookRepository 实例private BookRepository bookRepository = new BookRepository();public Book getBookDetails(Long bookId) {return bookRepository.findBookById(bookId);}
}// 主程序
public class MyApp {public static void main(String[] args) {BookService bookService = new BookService();Book book = bookService.getBookDetails(1L);System.out.println(book.getTitle());}
}
存在的问题:
- 紧耦合:
BookService和BookRepository紧密耦合在一起。如果我想把BookRepository换成MockBookRepository(用于测试)或者JpaBookRepository,我必须修改BookService的源代码。 - 难以测试: 在测试
BookService时,无法轻松地为其注入一个模拟的BookRepository,因为它内部已经写死了具体的实现。 - 责任混乱: 对象不仅要完成自己的业务逻辑,还要负责依赖对象的生命周期。
1.2 控制反转(Inversion of Control, IoC)
IoC 是一种设计原则(思想),其核心是“将控制权反转”。
- 谁的控制权? 创建和管理对象的控制权。
- 反转给谁? 从应用程序代码反转给一个外部容器(在 Spring 中就是 IoC 容器)。
在上面的例子中,控制流是:
MyApp -> BookService -> 创建 -> BookRepository
应用 IoC 原则后,控制流变为:
IoC 容器 -> 创建 -> BookRepository -> 注入 -> BookService -> 被 MyApp 使用
简单来说:IoC 就是由一个统一的容器来帮你“new”对象,而不是你自己去“new”。 这实现了对象创建与使用的分离。
1.3 依赖注入(Dependency Injection, DI)
DI 是实现 IoC 最主要、最典型的技术手段。
它的理念是:对象不自己查找或创建它依赖的其他对象,而是由容器在运行时自动将依赖“注入”给它。
继续上面的例子,使用 DI 后的代码:
public class BookService {// BookService 不再自己创建 BookRepository,只是声明它需要一个依赖private BookRepository bookRepository;// 方式一:通过构造器注入依赖(推荐)public BookService(BookRepository bookRepository) {this.bookRepository = bookRepository;}// ... 或者方式二:通过Setter方法注入// public void setBookRepository(BookRepository bookRepository) {//    this.bookRepository = bookRepository;// }public Book getBookDetails(Long bookId) {return bookRepository.findBookById(bookId);}
}
现在,BookService 变得“纯粹”了,它只关心自己的业务逻辑,不关心 BookRepository 是从哪来的。它只是通过构造函数(或Setter方法)告诉外界:“要使用我,你必须给我一个 BookRepository”。
二、基于XML管理Bean组件
Spring 核心容器就是实现 IoC 和 DI 的“外部容器”。它负责实例化、配置和组装应用程序中的对象(这些对象在 Spring 中被称为 Bean),并管理它们的生命周期。
容器通过读取配置元数据(Configuration Metadata) 来获取指令,知道要创建哪些 Bean 以及它们之间的依赖关系。
配置元数据的三种方式
- XML配置方式,spring 1.0版本,自己的类和第三方包都使用xml管理,缺点:xml配置繁琐,属性赋值时必须有
setter方法。 - xml+注解配置方式,spring 2.5版本,自己的类使用注解管理,第三方包需要使用xml管理。
- 配置类方式,自己类和第三方包,都是用注解的形式进行管理。
XML方式管理组件Bean
特点: 三层架构代码调用,注入时必须得有setter方法。并且需要在XML中通过Bean标签的property标签,通过ref属性引入对象。
2.1 在 xml 文件中定义 Bean组件。
- pom文件中导入
spring-context包。
<properties><spring.version>6.2.11</spring.version><junit.version>5.12.2</junit.version></properties><!-- 在pom.xml中直接声明了同一个依赖的两个版本 --><dependencies><dependency><groupId>org.springframework</groupId><artifactId>spring-context</artifactId><version>${spring.version}</version></dependency><dependency><groupId>org.junit.jupiter</groupId><artifactId>junit-jupiter-api</artifactId><version>${junit.version}</version><scope>test</scope></dependency></dependencies>
- 在
resource目录下,创建xml配置文件。

<?xml version="1.0" encoding="UTF-8"?>
<beans xmlns="http://www.springframework.org/schema/beans"xmlns:xsi="http://www.w3.org/2001/XMLSchema-instance"xsi:schemaLocation="http://www.springframework.org/schema/beans http://www.springframework.org/schema/beans/spring-beans.xsd"></beans>
- 创建User类。
public class User {private String name;private String password;// 若想添加到容器中,必须有一个无参构造器public User() {}public String getName() {return name;}//必须配置set方法,属性设置,ioc容器是通过set方法调用,进行属性赋值public void setName(String name) {this.name = name;}public String getPassword() {return password;}public void setPassword(String password) {this.password = password;}
}
- 引入
bean标签。
在spring中每个bean都被认为是一个组件。
<bean>标签的class属性需要指定类的全限定名(即包含包名的类名),并且Spring会通过调用该类的无参构造函数来创建Bean实例。- 如果类中没有无参构造函数[^1],那么Spring在实例化时会抛出异常。
id 属性:为bean组件对象的标记。一般为类名称首字母小写。注意:类必须具有无参构造函数,才能通过XMLBean标签的形式添加到容器中。切记!切记!切记!
<?xml version="1.0" encoding="UTF-8"?>
<beans xmlns="http://www.springframework.org/schema/beans"xmlns:xsi="http://www.w3.org/2001/XMLSchema-instance"xsi:schemaLocation="http://www.springframework.org/schema/beans http://www.springframework.org/schema/beans/spring-beans.xsd"><!-- bean 组件信息--><bean id="user" class="com.maven.bean.User" /></beans>
5. 创建容器,读取配置文件。
方式一:
import org.junit.jupiter.api.Test;
import org.springframework.context.ApplicationContext;
import org.springframework.context.support.ClassPathXmlApplicationContext;
import java.util.Arrays;public class SpringTest {@Testpublic void testSpring() {ApplicationContext context = new ClassPathXmlApplicationContext("spring.xml");String[] beanDefinitionNames = context.getBeanDefinitionNames();System.out.println(Arrays.toString(beanDefinitionNames));}
}
方式二:
@Testpublic void testSpring4() {ClassPathXmlApplicationContext context = new ClassPathXmlApplicationContext();context.setConfigLocation("classpath:spring.xml");// 容器底层源码context.refresh();User bean = context.getBean(User.class);System.out.println(bean);}
结果输出为:
- bean 对象成功注入到容器中。
[user]
注意事项:spring.xml配置文件中的Bean
- 在xml配置文件中,Bean对象只能是实现类!
- 不能是接口、父类。
- 例如:我们有一个
UserServiceImpl类,他实现了一个IUserService接口,在XML配置文件中,我们只能写UserServiceImpl实现类,而不是接口,否则抛出异常。 <bean id="user1" class="com.maven.controller.UserServiceImpl" />
- 通过容器创建
Bean时,可以是接口、父类。
2.2 获取容器中的组件对象
常用的获取容器的方式:
- 根据BeanId获取
- 根据BeanId和类型获取
- 根据类型获取,【推荐方式】
/*** 获取组件对象的方法:* getBean("BeanId") 方案1:根据组件Id获取,类型需要强制转换。* getBean("BeanId", Class clazz) 方案2:根据组件Id和类型获取,要求结果直接转为对应的指定类型。* getBean(Class clazz) 方案3:根据类型获取,并且直接返回对应的类型。*/// 方案一:根据BeanId获取User user = (User)context.getBean("user");System.out.println(user);// 方案二:根据BeanId和类型获取User user2 = context.getBean("user", User.class);System.out.println(user2);// 方案三:根据类型获取User user1 = context.getBean(User.class);System.out.println(user1);
重点:获取组件时遇到的异常情况:
- 若
BeanId不存在,使用context.getBean("user")获取组件时,会报异常
示例如下:
@Test
public void testSpring3() {ApplicationContext context = new ClassPathXmlApplicationContext("spring.xml");// 方案一:根据BeanId获取User user = (User)context.getBean("user1111");System.out.println(user);
}
异常信息:
// 没有名为“user1111”的 bean 可用
org.springframework.beans.factory.NoSuchBeanDefinitionException: No bean named 'user1111' available
- 根据类型
context.getBean(User.class);获取组件时,若同一类型定义多个BeanId时,会抛出异常。
示例如下:
<?xml version="1.0" encoding="UTF-8"?>
<beans xmlns="http://www.springframework.org/schema/beans"xmlns:xsi="http://www.w3.org/2001/XMLSchema-instance"xsi:schemaLocation="http://www.springframework.org/schema/beans http://www.springframework.org/schema/beans/spring-beans.xsd"><!-- bean 组件信息--><bean id="user" class="com.maven.bean.User" /><!-- 复制一行,beanId进行区分--><bean id="user1" class="com.maven.bean.User" /></beans>
代码:
@Testpublic void testSpring2() {ApplicationContext context = new ClassPathXmlApplicationContext("spring.xml");// 方案三:根据类型获取User user1 = context.getBean(User.class);System.out.println(user1);}
异常信息:
// 预期只有一个匹配的 bean,但找到了两个:user、user1
org.springframework.beans.factory.NoUniqueBeanDefinitionException: No qualifying bean of type 'com.maven.bean.User' available: expected single matching bean but found 2: user,user1
2.3 XML Bean组件属性赋值-setter
<property>标签:
- name:指定要注入的属性名称。这个名称通常与Bean类中的setter方法对应的属性名一致(例如,属性名为name,则setter方法为setName)。【因此必须有setter方法】
- value:用于注入基本数据类型及其包装类、String等类型的值。可以直接指定字面值。
- ref:用于引用其他Bean的ID,将其他Bean注入到当前Bean的属性中。通常用于注入依赖对象。
核心:
-
我们使用
property标签进行依赖注入时,name属性指定的是属性的名称,但Spring实际上是通过调用setter方法来实现的。 -
具体来说,
name属性并不直接对应类的字段名,而是对应setter方法名去掉"set"并首字母小写(遵循JavaBean规范)。 -
实际上Spring会根据
name值来寻找对应的setter方法,即通过反射调用setXxx()方法。 -
例如:
- 如果
name="userName",那么Spring会尝试调用setUserName(String userName)方法。 - 如果
name="age",那么Spring会尝试调用setAge(int age)方法。
- 如果
基本数据类型-赋值
重点:类属性,必须具有setXxx方法。
User类:
public class User {private String name;private String password;// 若想添加到容器中,必须有一个无参构造器public User() {}public String getName() {return name;}//必须配置set方法,属性设置,ioc容器是通过set方法调用,进行属性赋值public void setName(String name) {this.name = name;}public String getPassword() {return password;}public void setPassword(String password) {this.password = password;}
}
- 通过xml方式为类对象User赋值。
<!-- bean 组件信息--><bean id="user" class="com.maven.bean.User"><!-- property属性name属性 对应 User类的name属性value属性 对应 为User类中的name属性赋值value属性为非引用类型赋值--><!-- property 属性的ref属性,是为引用类型赋值 --><property name="name" value="123"/><property name="password" value="456"/></bean>
- 获取容器中的组件User
@Testpublic void testSpring4() {ClassPathXmlApplicationContext context = new ClassPathXmlApplicationContext();context.setConfigLocation("classpath:spring.xml");// 容器底层源码context.refresh();User bean = context.getBean(User.class);System.out.println(bean);}
- 结果为:
User(name=123, password=456)
引用类型(引用其他bean)-赋值
- 创建
UserService、UserController类文件。
UserService 类
package com.maven.service;
import com.maven.bean.User;public class UserService {public User getUser() {User user = new User();user.setName("小明");user.setPassword("123456");return user;}
}
UserController类
public class UserController {private UserService userService;public void setUserService(UserService userService) {this.userService = userService;}public UserService getUserService() {return userService;}
}
- 修改
spring.xml配置文件,添加两个组件Bean。
<?xml version="1.0" encoding="UTF-8"?>
<beans xmlns="http://www.springframework.org/schema/beans"xmlns:xsi="http://www.w3.org/2001/XMLSchema-instance"xsi:schemaLocation="http://www.springframework.org/schema/beans http://www.springframework.org/schema/beans/spring-beans.xsd"><!-- bean 组件信息--><bean id="user" class="com.maven.bean.User"><property name="name" value="123"/><property name="password" value="456"/></bean><bean id="userService" class="com.maven.service.UserService"/><bean id="userController" class="com.maven.controller.UserController"><!--通过ref进行赋值--><property name="userService" ref="userService" /></bean></beans>
内部Bean定义-赋值
只能通过引用对象间接获取,甚至无法在容器中获取。
内部Bean在xml中的定义:- 被放在
<property>属性中的Bean。不需要定义ID属性,因为ID属性主要用于获取外部Bean的,内部Bean只能通过简介调用。 - 常规写法为
外部Bean。
- 被放在
<bean id="userController" class="com.maven.controller.UserController"><!--通过ref进行赋值--><property name="userService" ><bean class="com.maven.service.UserService"/></property></bean>
- 通过代码,尝试获取内部bean,
userService组件。
    @Testpublic void testSpring6() {ApplicationContext context = new ClassPathXmlApplicationContext("spring.xml");UserService bean = context.getBean(UserService.class);System.out.println(bean);}
}
// 报错:获取不到UserSercie组件
org.springframework.beans.factory.NoSuchBeanDefinitionException:
No qualifying bean of type 'com.maven.service.UserService' available
- 正确方式:间接获取外部Bean
@Testpublic void testSpring6() {ApplicationContext context = new ClassPathXmlApplicationContext("spring.xml");// 1. 先获取UserController组件beanUserController bean = context.getBean("userController", UserController.class);// 2. 间接获取UserService组件UserService userService = bean.getUserService();User user = userService.getUser();System.out.println("user = " + user);}
- 输出结果:
user = User(name=小明, password=123456)
2.4 xml方式:将第三方类引入到IOC容器
- pom文件中引入第三方jar包。
<properties><mysql.version>8.0.28</mysql.version><druid.version>1.2.27</druid.version></properties><dependencies><!-- https://mvnrepository.com/artifact/mysql/mysql-connector-java --><dependency><groupId>mysql</groupId><artifactId>mysql-connector-java</artifactId><version>${mysql.version}</version></dependency><!-- https://mvnrepository.com/artifact/com.alibaba/druid --><dependency><groupId>com.alibaba</groupId><artifactId>druid</artifactId><version>${druid.version}</version></dependency></dependencies>
- XML中添加组件。
- 常规方式:用于对比通过配置文件获取配置信息。
druidDataSource:类文件来源于导入的第三方jar包。
<bean id="druidDataSource" class="com.alibaba.druid.pool.DruidDataSource"><property name="driverClassName" value="com.mysql.cj.jdbc.Driver"/><!--如果是本地库,可以省略localhost--><property name="url" value="jdbc:mysql:///ry"/><property name="name" value="root"/><property name="password" value="root"/></bean>
引入外部配置参数(*.properties)
- 创建配置文件
jdbc.properties。
jdbc.driver=com.mysql.cj.jdbc.Driver
jdbc.url=jdbc:mysql:///ry
jdbc.username=root
jdbc.password=root
- 引入
context约束,指定配置文件。
- 指定要读取的配置文件(
jdbc.properties)的参数信息进行赋值。
<context:property-placeholder location="jdbc.properties" />
- 重新引入第三方jar包。
- 通过
${}引入jdbc.properties配置文件的参数信息。
<bean id="druidDataSource" class="com.alibaba.druid.pool.DruidDataSource"><property name="driverClassName" value="${jdbc.driver}" /><property name="url" value="${jdbc.url}" /><property name="name" value="${jdbc.username}" /><property name="password" value="${jdbc.password}" /></bean>
- 从容器中获取
druidDataSource组件。
@Testpublic void testSpring7() throws SQLException {ApplicationContext context = new ClassPathXmlApplicationContext("spring.xml");// 从容器中获取组件DruidDataSource dataSource = context.getBean(DruidDataSource.class);DruidPooledConnection connection = dataSource.getConnection();System.out.println("connection = " + connection);connection.close();}
- 结果:
connection = com.alibaba.druid.pool.DruidStatementConnection@5827af16
2.5 高级特性:FactoryBean
核心:FactoryBean 是 Spring 框架中的一个接口,它是一个创造其他**复杂对象(没有无参构造函数)**的特殊Bean。
详细解释: 它是一个Bean,它本身被Spring容器所管理,定义在配置文件中,有自己的生命周期。它是一个工厂,它的主要职责不是提供自身的实例,而是通过其 getObject()方法创建并返回另一个对象。
FactoryBean接口的代码:
public interface FactoryBean<T> {String OBJECT_TYPE_ATTRIBUTE = "factoryBeanObjectType";@NullableT getObject() throws Exception;@NullableClass<?> getObjectType();default boolean isSingleton() {return true;}
}
该接口有三个核心方法需要实现:
T getObject():核心方法,返回由这个工厂创建的Bean实例。返回值会被存储到IOC容器中。
Class<?> getObjectType():返回这个工厂所创建的对象的类型。
boolean isSingleton():指示这个工厂创建的对象是否是单例。单例则为True,反之则为False。
FactoryBean使用场景:
- 核心:将
第三方框架引入到Spring IOC容器中。Spring框架相当于留了一个后门FactoryBean,方便引入第三方框架的。【spring引入第三方框架,本质上就是造FactoryBean。】 - 复杂对象的实例化(组件化)。
FactoryBean的使用步骤
- 创建一个复杂对象。
- xml方式管理
Bean,必须具有无参构造函数,我们这个对象不加无参构造函数。直接通过Bean标签引入这个对象会报错。
public class Animal {private String name;private int age;// 没有无参构造函数public Animal(String name, int age) {this.name = name;this.age = age;}public String getName() {return name;}public void setName(String name) {this.name = name;}public int getAge() {return age;}public void setAge(int age) {this.age = age;}@Overridepublic String toString() {return "Animal{" +"name='" + name + '\'' +", age=" + age +'}';}
}
- 创建一个类
AnimalFactoryBean实现FactoryBean接口,并指定类型FactoryBean<Animal>。
import com.maven.bean.Animal;
import org.springframework.beans.factory.FactoryBean;public class AnimalFactoryBean implements FactoryBean<Animal> {// 返回的对象会自动加入到IOC容器中。@Overridepublic Animal getObject() throws Exception {return new Animal("小猫",18);}// 返回对象的类型@Overridepublic Class<?> getObjectType() {return Animal.class;}// 可以不重写,默认创建的对象是单例,只创建一个对象。return ture。@Overridepublic boolean isSingleton() {return FactoryBean.super.isSingleton();}
}
- 创建完成FactoryBean工厂后,还需要将
AnimalFactoryBean工厂引入到IOC容器中。
- 根据Spring xml的
规定,我们通过<bean>标签引入AnimalFactoryBean工厂组件Bean(AnimalFactoryBean是我们创建的工厂bean,并实现了FactoryBean接口)。<bean>标签的id属性,在此刻不能代表AnimalFactoryBean这个Bean自身,而代表的是他getObject()方法内部创建的Bean组件,也就是Animal组件。- 也就是说我们执行代码context.getBean(“
animalFactoryBean”),通过Bean id获取容器中的组件时,得到的不是AnimalFactoryBean工厂本身,而是最终的Animal组件。- 若我们想通过
Bean id的形式,获取工厂组件本身,则需要在id前添加&号。 - 即:context.getBean(“
&animalFactoryBean”); - 根据这一特性:XML中引入
FactoryBean工厂类组件时,Bean ID应该写为创建Bean的ID,此处应为:animal。 - 详细代码,看步骤4的方法二代码。
- 若我们想通过
<?xml version="1.0" encoding="UTF-8"?>
<beans xmlns="http://www.springframework.org/schema/beans"xmlns:xsi="http://www.w3.org/2001/XMLSchema-instance"xsi:schemaLocation="http://www.springframework.org/schema/beans http://www.springframework.org/schema/beans/spring-beans.xsd"><!--class 类必须具有无参构造函数 --><!--爆红的原因是:没有写无参构造函数-->
<!--    <bean id="animal" class="com.maven.bean.Animal" />--><bean class="com.maven.factorybean.AnimalFactoryBean" id="animalFactoryBean" /><!--正确写法:id应对应创建的对象--><!--<bean class="com.maven.factorybean.AnimalFactoryBean" id="animal" />--></beans>
- 测试,从容器中获取
Animal组件对象Bean。
方式一:通过class获取工厂组件,调用getObject方法获取Bean
@Testpublic void testSpring9() throws Exception {ApplicationContext context = new ClassPathXmlApplicationContext("spring-01.xml");// 通过class获取工厂组件AnimalFactoryBean animalFactoryBean = context.getBean(AnimalFactoryBean.class);// 调用接口方法实现getObject(),返回创建的复杂组件(没有无参构造器)Animal animal = animalFactoryBean.getObject();System.out.println("animal = " + animal);}
方式二:通过Bean id获取工厂组件,需要在在id前加上&符
@Testpublic void testSpring11() throws Exception {ApplicationContext context = new ClassPathXmlApplicationContext("spring-01.xml");AnimalFactoryBean bean = (AnimalFactoryBean)context.getBean("&animalFactoryBean");System.out.println("bean = " + bean);Animal animal = bean.getObject();System.out.println("animal = " + animal);}
方式三:直接获取Bean组件,工厂创建Bean时会自动放入IOC容器中
不需要先获取工厂组件,直接获取对应Bean组件即可。
@Testpublic void testSpring10(){ApplicationContext context = new ClassPathXmlApplicationContext("spring-01.xml");// 直接从容器中拿到工厂创建好的组件bean,// 默认FactoryBean工厂会将创造好的组件Bean,放到ioc容器中Animal animal = context.getBean(Animal.class);System.out.println("animal = " + animal);}
- 结果为:
animal = Animal{name='小猫', age=18}
特别注意:只有通过Bean &id和class类型,才能获取FactoryBean对象本身
示例如下:
    @Testpublic void testSpring13() throws Exception {ApplicationContext context = new ClassPathXmlApplicationContext("spring-01.xml");// bean &id:获取工厂本身Object bean = context.getBean("&animalFactoryBean");// class类型:获取工厂本身AnimalFactoryBean bean1 = context.getBean(AnimalFactoryBean.class);// 相等,结果为trueSystem.out.println(bean == bean1);// true}
}
为FactoryBean创建的Bean赋值
搭建桥梁,而在工厂类中创建一个属性,就可以为被创建的Bean赋值。
问题:若我们想为AnimalFactoryBean工厂,创建的组件Animal赋值,应该怎么做呢?
1.我们无法直接对AnimalBean对象赋值,但是我们可以对工厂AnimalFactoryBeanBean属性赋值。
2.再通过赋值的形式,为Animal赋值即可。
操作步骤:
- 在
AnimalFactoryBean工厂类中新增两个属性字段,并设置setter方法。
public class AnimalFactoryBean implements FactoryBean<Animal> {// 新增属性private String factoryName;private Integer factoryAge;public void setFactoryName(String factoryName) {this.factoryName = factoryName;}public void setFactoryAge(Integer factoryAge) {this.factoryAge = factoryAge;}// 返回的对象会加入到IOC容器中。@Overridepublic Animal getObject() throws Exception {return new Animal("小猫",18);}// 返回对象的类型@Overridepublic Class<?> getObjectType() {return Animal.class;}// 可以不重写,默认创建的对象是单例,只创建一个对象。return ture。@Overridepublic boolean isSingleton() {return FactoryBean.super.isSingleton();}
}
- 新增
animal.properties配置文件。
animal.name=小狗
animal.age=18
- xml中引入
context标签新增配置文件,并使用property标签,为工厂类中的属性赋值。
<?xml version="1.0" encoding="UTF-8"?>
<beans xmlns="http://www.springframework.org/schema/beans"xmlns:xsi="http://www.w3.org/2001/XMLSchema-instance"xmlns:context="http://www.springframework.org/schema/context"xsi:schemaLocation="http://www.springframework.org/schema/beans http://www.springframework.org/schema/beans/spring-beans.xsd http://www.springframework.org/schema/context https://www.springframework.org/schema/context/spring-context.xsd"><!--引入配置文件--><context:property-placeholder location="classpath:animal.properties" /><bean class="com.maven.factorybean.AnimalFactoryBean" id="animalFactoryBean"><!--为工厂类,属性进行赋值--><property name="factoryName" value="${animal.name}" /><property name="factoryAge" value="${animal.age}" /></bean>
</beans>
- 修改
AnimalFactoryBean工厂类中的getObject()创建Bean组件方法。
public class AnimalFactoryBean implements FactoryBean<Animal> {private String factoryName;private Integer factoryAge;public void setFactoryName(String factoryName) {this.factoryName = factoryName;}public void setFactoryAge(Integer factoryAge) {this.factoryAge = factoryAge;}// 返回的对象会加入到IOC容器中。@Overridepublic Animal getObject() throws Exception {// 引入工厂类属性,为Animal进行赋值操作。return new Animal(factoryName, factoryAge);}// 返回对象的类型@Overridepublic Class<?> getObjectType() {return Animal.class;}// 可以不重写,默认创建的对象是单例,只创建一个对象。return ture。@Overridepublic boolean isSingleton() {return FactoryBean.super.isSingleton();}
}
- 测试:从容器中获取
animalBean组件。
@Testpublic void testSpring14() throws Exception {ApplicationContext context = new ClassPathXmlApplicationContext("spring-01.xml");Animal bean = context.getBean(Animal.class);System.out.println("bean = " + bean);// 成功输出// bean = Animal{name='小狗', age=18}}
2.6 高级特性:bean 作用域
在使用Spring框架时,可以通过配置来定义Bean的作用域。作用域决定了Bean实例的生命周期和可见范围。
在Spring中,Bean的作用域是在Bean定义时指定的,可以通过XML配置、注解或Java配置的方式设置。
在XML配置中,我们可以使用scope属性来指定Bean的作用域,例如:
<!--bean 作用域默认为单例singleton--><bean class="com.maven.bean.User" id="user" scope="singleton" /><!--bean 将作用域定义为多例--><bean class="com.maven.bean.User" id="user" scope="prototype" />
单例singleton:单例对象,默认在IOC容器初始化的时候完成创建(除非设置懒加载),并且全局只有一个实例。每次getBean()返回同一个实例。
多例prototype:多例对象,不会在IOC容器初始化的时候创建,每次getBean()时都会创建一个新的实例。
线程安全的分析
首先,我们需要明白并发和多线程对单例和多例的影响。
在Web应用中,Tomcat为每个请求分配一个线程,这些线程会调用我们Bean的方法。如果Bean是单例,那么所有线程共享同一个Bean实例;如果Bean是多例,每个线程会使用不同的Bean实例。
从线程安全的角度来看:
-
局部变量是线程安全的,因为每个线程有自己的栈空间。
-
实例变量(非静态)的线程安全性取决于Bean的作用域:
-
单例Bean的实例变量被所有线程共享,因此不是线程安全的。
-
多例Bean每个请求都会获得一个新的实例,实例变量不共享,因此多例Bean的实例变量是线程安全的(但要注意,如果多例Bean中使用了静态变量,那么静态变量仍然是共享的,会有线程安全问题)。
-
-
静态变量是类级别的,无论单例还是多例,所有实例共享,因此不是线程安全的。
但是,并不是所有有状态的对象都必须使用多例。如果单例Bean没有状态(即没有实例变量,或者实例变量只读),那么单例也是线程安全的。
@Component
@Scope("singleton")  // 或 "prototype"
public class ExampleService {private int instanceVar = 0;        // 实例变量(也叫非静态变量) - 堆内存private static int staticVar = 0;   // 静态变量(避免使用) - 方法区public void process() {int localVar = 0;               // 局部变量 - 线程栈 - 线程安全localVar++;                     // 线程安全instanceVar++;                  // 可能线程不安全staticVar++;                    // 线程不安全}
}
所以,如果Bean中包含可变的实例变量,并且希望避免线程安全问题,可以考虑使用多例。但是,如果Bean无状态(没有可变的实例变量),使用单例即可,因为单例性能更好(创建一次,重复使用)。
注意:多例不能解决静态变量的线程安全问题,静态变量需要通过同步机制(如加锁)来保证线程安全。
另外,使用多例时,Spring不会管理多例Bean的完整生命周期,即不会调用多例Bean的销毁方法,需要自己负责清理。
总结:
- 单例Bean:适用于无状态Bean,性能好。
- 多例Bean:适用于有状态Bean,且状态不能共享,需要避免实例变量的线程安全问题。
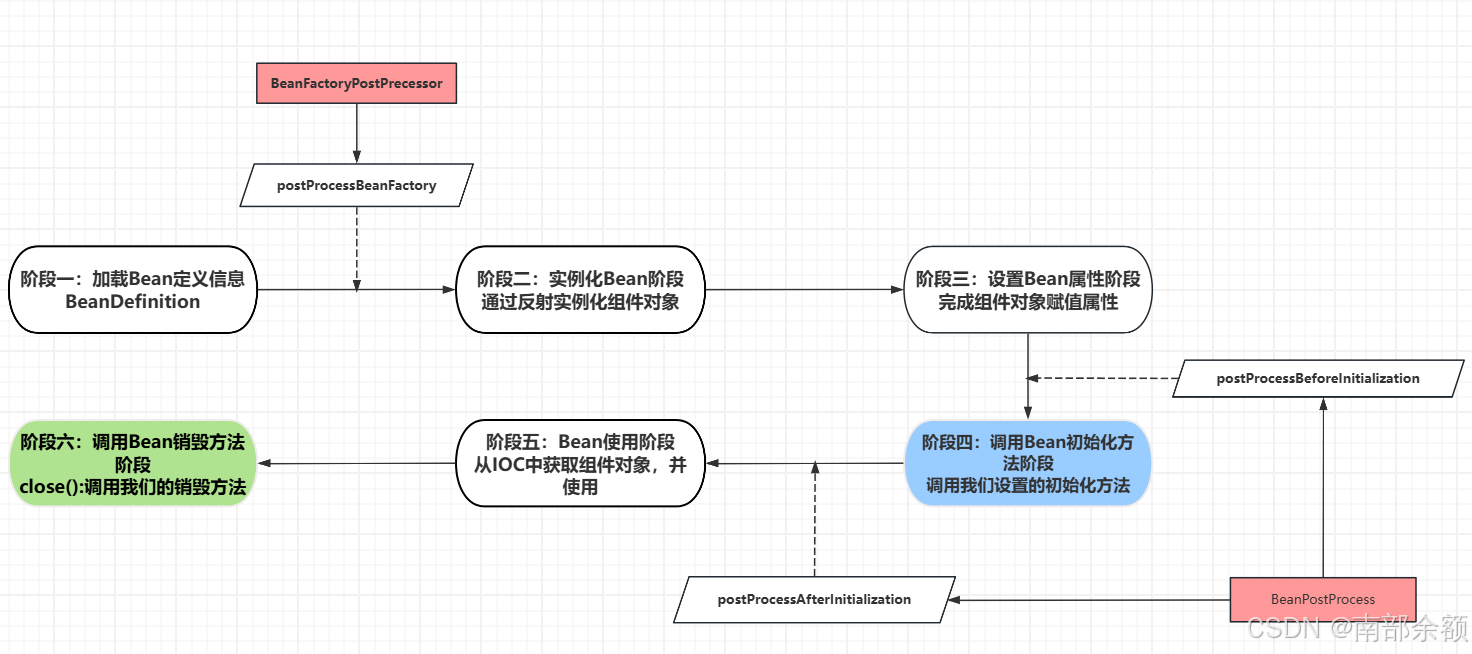
2.7 高级特性:生命周期
- 简单预览:
- 复杂预览
生命周期流程
- 阶段一:加载Bean定义:
- Spring容器读取XML文件或其他配置文件,解析配置信息。
- 将解析后的配置信息转为Spring内部数据结构(BeanDefinition对象).
- 存储
BeanDefinition对象,待进行组件实例化。
- 阶段二:实例化Bean组件:
- 根据
BeanDefinition中的信息,实例化Bean对象。 - 如果有依赖其他Bean的情况,先实例化被依赖的Bean。
- 此步骤单纯实例化Bean和依赖的Bean组件,不会进行属性赋值。
- 实例Bean组件,是通过反射进行调用的,构造函数的执行也在这个阶段完成。
- 根据
- 阶段三:设置Bean属性:
- Spring容器将根据
BeanDefinition中的配置,通过setter方法或字段直接注入属性值。 - Spring容器属性和实例化过程是分离的,所以在配置的时候,组件声明和引用不分先后顺序。
- Spring容器将根据
- 阶段四:调用Bean的初始化方法:
- 如果Bean实现了
InitializingBean接口,Spring将调用其afterPropertiesSet()方法。 - 如果在XML配置中定义了
init-method,则执行该方法。 - 如果Bean使用了
@PostConstruct注解,则执行被注解的方法。 - 此阶段调用自定义初始化方法,可以进行相关的初始化工作,类似:
Servlet的init方法。
- 如果Bean实现了
- 阶段五:Bean可以使用:
- 此时Bean已经初始化完成,可以被其他Bean引用或者容器直接使用。
- 阶段六:调用Bean的销毁方法阶段(仅适用于单例Bean):
- 如果Bean实现了
DisposableBean接口,Spring将调用其destroy()方法 - 如果在XML配置中定义了
destroy-method,则执行该方法。 - 如果Bean使用了
@PreDestroy注解,则在销毁之前执行被注解的方法。 - 此阶段调用自定义销毁方法,可以进行相关的资源释放工作,类似:
Servlet的destroy方法。
- 如果Bean实现了
初始化与销毁示例
特殊情况:注意
-
只有当容器正常关闭时,才会执行销毁方法,否则不会执行后续销毁方法。
-
非正常关闭容器的情况,是基于jvm直接kill掉当前运行的程序。
-
示例代码:Bean组件实现了初始化和销毁接口。
public class Garden implements InitializingBean, DisposableBean {@Overridepublic void destroy() throws Exception {System.out.println("接口:接口的销毁方法");}@Overridepublic void afterPropertiesSet() throws Exception {System.out.println("接口:接口的初始化方法");}
}
- 容器获取bean,出发初始化和销毁
@Testpublic void testSpring15() throws Exception {// 单例会在创建容器时,实例化对象。这一步:相当于走完了生命周期的【1,2,3,4】步骤。ClassPathXmlApplicationContext context = new ClassPathXmlApplicationContext("spring-03.xml");System.out.println("容器初始化【1、2、3、4】---------------------");// 【第5步】,获取容器,并使用容器Garden bean = context.getBean(Garden.class);System.out.println("bean = " + bean);System.out.println("使用容器【5】++++++++++++++++++++++++++++++");// 【第6步】,Bean的销毁}
- 最终执行结果:销毁方法没有执行,说明容器没有正常的关闭
接口:接口的初始化方法
容器初始化【1、2、3、4】---------------------
bean = com.maven.bean.Garden@6bffbc6d
使用容器【5】++++++++++++++++++++++++++++++
- 使用
close()方法,正常关闭容器,才会执行Bean的销毁方法。
@Testpublic void testSpring15() throws Exception {// 单例会在创建容器时,实例化对象。这一步:相当于走完了生命周期的【1,2,3,4】步骤。ClassPathXmlApplicationContext context = new ClassPathXmlApplicationContext("spring-03.xml");System.out.println("容器初始化【1、2、3、4】---------------------");// 【第5步】,获取容器,并使用容器Garden bean = context.getBean(Garden.class);System.out.println("bean = " + bean);System.out.println("使用容器【5】++++++++++++++++++++++++++++++");// 【第6步】,Bean的销毁context.close();}
接口:接口的初始化方法
容器初始化【1、2、3、4】---------------------
bean = com.maven.bean.Garden@6bffbc6d
使用容器【5】++++++++++++++++++++++++++++++
接口:接口的销毁方法
XML方式
- 创建一个类,创建两个方法。
public class Garden {public void xml_init() {System.out.println("XML配置:调用init_method()方法,进行初始化");}public void xml_destroy() {System.out.println("XML配置:调用destroy()方法,进行销毁");}
}
- 在XML配置文件中配置Bean并设置初始化和销毁方法
init-method:初始化方法,spring创建容器加载Bean时,会调用init-method指定的方法,进行初始化。destroy-method:销毁方法,容器正常关闭时,会调用destroy-method指定的方法,销毁Bean。
<?xml version="1.0" encoding="UTF-8"?>
<beans xmlns="http://www.springframework.org/schema/beans"xmlns:xsi="http://www.w3.org/2001/XMLSchema-instance"xmlns:context="http://www.springframework.org/schema/context"xsi:schemaLocation="http://www.springframework.org/schema/beans http://www.springframework.org/schema/beans/spring-beans.xsd http://www.springframework.org/schema/context https://www.springframework.org/schema/context/spring-context.xsd"><bean class="com.maven.bean.Garden" id="garden" init-method="xml_init" destroy-method="xml_destroy"/>
</beans>
- 测试代码:
@Testpublic void testSpring15() throws Exception {// 单例会在创建容器时,实例化对象。这一步:相当于走完了生命周期的【1,2,3,4】步骤。ClassPathXmlApplicationContext context = new ClassPathXmlApplicationContext("spring-03.xml");System.out.println("容器初始化【1、2、3、4】---------------------");// 【第5步】,获取容器,并使用容器Garden bean = context.getBean(Garden.class);System.out.println("bean = " + bean);System.out.println("使用容器【5】++++++++++++++++++++++++++++++");// 【第6步】,Bean的销毁context.close();}
XML配置:调用init_method()方法,进行初始化
容器初始化【1、2、3、4】---------------------
bean = com.maven.bean.Garden@8c3619e
使用容器【5】++++++++++++++++++++++++++++++
XML配置:调用destroy()方法,进行销毁
接口方式
类需要实现两个接口文件InitializingBean和DisposableBean,重写初始化afterPropertiesSet方法和销毁destroy方法。
- 将类文件,在xml文件中进行配置。
<?xml version="1.0" encoding="UTF-8"?>
<beans xmlns="http://www.springframework.org/schema/beans"xmlns:xsi="http://www.w3.org/2001/XMLSchema-instance"
xsi:schemaLocation="http://www.springframework.org/schema/beans http://www.springframework.org/schema/beans/spring-beans.xsd"><bean class="com.maven.bean.Garden" id="garden" /></beans>
- 实现两个接口,并重写方法。
public class Garden implements InitializingBean, DisposableBean {@Overridepublic void afterPropertiesSet() throws Exception {System.out.println("接口:接口的初始化方法");}@Overridepublic void destroy() throws Exception {System.out.println("接口:接口的销毁方法");}
}
- 测试代码同上↑
- 测试执行结果
接口:接口的初始化方法
容器初始化【1、2、3、4】---------------------
bean = com.maven.bean.Garden@6bffbc6d
使用容器【5】++++++++++++++++++++++++++++++
接口:接口的销毁方法
注解方式
- 需要引入contex进行包扫描。
<?xml version="1.0" encoding="UTF-8"?>
<beans xmlns="http://www.springframework.org/schema/beans"xmlns:xsi="http://www.w3.org/2001/XMLSchema-instance"xmlns:context="http://www.springframework.org/schema/context"xsi:schemaLocation="http://www.springframework.org/schema/beans http://www.springframework.org/schema/beans/spring-beans.xsd http://www.springframework.org/schema/context https://www.springframework.org/schema/context/spring-context.xsd"><!-- 开启注解扫描 --><context:component-scan base-package="com.maven.bean"/><bean class="com.maven.bean.Garden" id="garden" /></beans>
- 在类中方法上添加注解。
public class Garden {@PostConstructpublic void annotation_init() {System.out.println("注解:初始化方法");}@PreDestroypublic void annotation_destroy() {System.out.println("注解:销毁方法");}
}
- 测试代码同上↑;
- 执行结果:
注解:初始化方法
容器初始化【1、2、3、4】---------------------
bean = com.maven.bean.Garden@2766ca9d
使用容器【5】++++++++++++++++++++++++++++++
注解:销毁方法
XML、接口、注解执行顺序
- xml中配置注解扫描和以xml的方式指定初始化和销毁方法。
<?xml version="1.0" encoding="UTF-8"?>
<beans xmlns="http://www.springframework.org/schema/beans"xmlns:xsi="http://www.w3.org/2001/XMLSchema-instance"xmlns:context="http://www.springframework.org/schema/context"xsi:schemaLocation="http://www.springframework.org/schema/beans http://www.springframework.org/schema/beans/spring-beans.xsd http://www.springframework.org/schema/context https://www.springframework.org/schema/context/spring-context.xsd"><!-- 开启注解扫描 --><context:component-scan base-package="com.maven.bean"/><bean class="com.maven.bean.Garden" id="garden" init-method="xml_init" destroy-method="xml_destroy"/></beans>
- 类文件实现接口,添加注解方法和xml方法。
public class Garden implements InitializingBean, DisposableBean {public void xml_init() {System.out.println("XML配置:调用init_method()方法,进行初始化");}public void xml_destroy() {System.out.println("XML配置:调用destroy()方法,进行销毁");}@Overridepublic void destroy() throws Exception {System.out.println("接口:接口的销毁方法");}@Overridepublic void afterPropertiesSet() throws Exception {System.out.println("接口:接口的初始化方法");}@PostConstructpublic void annotation_init() {System.out.println("注解:初始化方法");}@PreDestroypublic void annotation_destroy() {System.out.println("注解:销毁方法");}
}
- 测试代码执行
@Testpublic void testSpring15() throws Exception {// 单例会在创建容器时,实例化对象。这一步:相当于走完了生命周期的【1,2,3,4】步骤。ClassPathXmlApplicationContext context = new ClassPathXmlApplicationContext("spring-03.xml");System.out.println("容器初始化【1、2、3、4】---------------------");// 【第5步】,获取容器,并使用容器Garden bean = context.getBean(Garden.class);System.out.println("bean = " + bean);System.out.println("使用容器【5】++++++++++++++++++++++++++++++");// 【第6步】,Bean的销毁// 容器的关闭,调用close,目的是让容器中的Bean正常销毁。context.close();}
- 执行顺序
- 初始化方法:注解先执行,其次是接口,最后是XML配置。
- 销毁方法:注解先执行,其次是接口,最后是XML配置。
注解:初始化方法
接口:接口的初始化方法
XML配置:调用init_method()方法,进行初始化
容器初始化【1、2、3、4】---------------------
bean = com.maven.bean.Garden@29a0cdb
使用容器【5】++++++++++++++++++++++++++++++
注解:销毁方法
接口:接口的销毁方法
XML配置:调用destroy()方法,进行销毁
Bean周期扩展接口
接口:
- 接口一:
BeanFactoryPostProcessor - 接口二:
BeanPostProcessor
BeanFactoryPostProcessor
- 这个接口发生在阶段一和阶段二之间。
- 他操控的是
BeanDefinitionBean信息,这个时候还没有创建Bean。 - 例如:我们在xml中写
${key}之所以能够取配置文件中的信息,就是Spring框架实现了BeanFactoryPostProcessor接口,在实现类中完成类属性 的修改。
接口代码示例:
- 为House类的date日期类型属性赋值,调用
BeanFactoryPostProcessor接口的postProcessBeanFactory方法。
- 定义一个类。
package com.maven.bean;import java.util.Date;public class House {private String room;private Integer number;private Date date;public String getRoom() {return room;}public void setRoom(String room) {this.room = room;}public Integer getNumber() {return number;}public void setNumber(Integer number) {this.number = number;}public Date getDate() {return date;}public void setDate(Date date) {this.date = date;}@Overridepublic String toString() {return "House{" +"room='" + room + '\'' +", number=" + number +", date=" + date +'}';}
}
- 创建一个实现类,实现接口。
public class HouseBeanFactoryPostProcessor implements BeanFactoryPostProcessor {@Overridepublic void postProcessBeanFactory(ConfigurableListableBeanFactory beanFactory) throws BeansException {// 我们在此处要获取Bean信息,为House类属性字段date赋值,因此我们应该调用getBeanDefinition()方法获取BeanDefinition信息BeanDefinition houseDefinition = beanFactory.getBeanDefinition("house");// 父类实现了Iterable接口,Java的for-each循环会自动调用iterator()方法MutablePropertyValues propertyValues = houseDefinition.getPropertyValues();for (PropertyValue propertyValue : propertyValues) {System.out.println("propertyValue = " + propertyValue);}propertyValues.addPropertyValue("date", new Date());}
}
- 在xml中对实现类进行注册。
<?xml version="1.0" encoding="UTF-8"?>
<beans xmlns="http://www.springframework.org/schema/beans"xmlns:xsi="http://www.w3.org/2001/XMLSchema-instance"xsi:schemaLocation="http://www.springframework.org/schema/beans http://www.springframework.org/schema/beans/spring-beans.xsd"><!--注册bean,我们要为bean中的date属性赋值--><bean id="house" class="com.maven.bean.House" ><property name="room" value="bedroom" /><property name="number" value="3" /></bean><!-- 注册 --><bean class="com.maven.beanFactoryPostProcessor.HouseBeanFactoryPostProcessor" />
</beans>
- 在测试代码中,获取Bean信息。
@Testpublic void testSpring16() throws Exception {ClassPathXmlApplicationContext context = new ClassPathXmlApplicationContext("spring-04.xml");House bean = context.getBean(House.class);System.out.println("bean = " + bean);}
- 结果输出。成功为Date类型的date字段赋值。
propertyValue = bean property 'room'
propertyValue = bean property 'number'
bean = House{room='bedroom', number=3, date=Wed Oct 01 21:05:14 CST 2025}
BeanPostProcessor
- 这个接口发成在**第三步与第四步(前置处理before)以及第四步与第五步(后置处理after)**之间,有两处地方。
- 前置处理器,会在于Bean的初始化方法,之前执行。
- 一般推荐使用后置处理器,等待Bean的初始化方法执行完成后,再执行其他逻辑。
- 提供了两个方法,
postProcessBeforeInitialization()和postProcessAfterInitialization(),允许在Bean初始化前进行自定义操作。 - 作用:可以对组件对象进行扩展和修改(AOP切面)。
- 例如:AOP方式可以动态给业务对象的所有方法添加事务,添加日志。
接口代码示例:
- 定义一个类。
package com.maven.bean;import java.util.Date;public class House {private String room;private Integer number;private Date date;public String getRoom() {return room;}public void setRoom(String room) {this.room = room;}public Integer getNumber() {return number;}public void setNumber(Integer number) {this.number = number;}public Date getDate() {return date;}public void setDate(Date date) {this.date = date;}@Overridepublic String toString() {return "House{" +"room='" + room + '\'' +", number=" + number +", date=" + date +'}';}
}
- 创建一个实现类,实现接口
BeanPostProcessor接口。
- 将House
属性room修改为:书房。 - 将House属性
number修改为:100。
public class HouseBeanPostProcessor implements BeanPostProcessor {// 3-4阶段之间,3是属性赋值,4是初始化方法@Overridepublic Object postProcessBeforeInitialization(Object bean, String beanName) throws BeansException {if (bean instanceof House) {((House) bean).setNumber(100);}System.out.println("postProcessBeforeInitialization 修改属性为100 = " + bean);return bean;}// 4-5阶段之间,4是初始化方法,5是使用bean组件@Overridepublic Object postProcessAfterInitialization(Object bean, String beanName) throws BeansException {if (bean instanceof House) {((House) bean).setRoom("书房");}System.out.println("postProcessAfterInitialization 修改属性为书房 = " + bean);return bean;}
}
- 在xml中进行注册到容器中。
<?xml version="1.0" encoding="UTF-8"?>
<beans xmlns="http://www.springframework.org/schema/beans"xmlns:xsi="http://www.w3.org/2001/XMLSchema-instance"xsi:schemaLocation="http://www.springframework.org/schema/beans http://www.springframework.org/schema/beans/spring-beans.xsd"><!--注册bean,我们要为bean中的date属性赋值--><bean id="house" class="com.maven.bean.House" ><property name="room" value="bedroom" /><property name="number" value="3" /></bean><!-- 注册 --><bean class="com.maven.beanPostProcessor.HouseBeanPostProcessor" />
</beans>
- 从容其中获取House组件对象。
@Testpublic void testSpring17() throws Exception {ClassPathXmlApplicationContext context = new ClassPathXmlApplicationContext("spring-04.xml");// 正常获取House组件// xml中定义,room属性为:bedroom,number属性为:3;House bean = context.getBean(House.class);System.out.println("从IOC容器中获取bean = " + bean);}
- 结果示例如下:
postProcessBeforeInitialization 修改属性为100 = House{room='bedroom', number=100, date=Wed Oct 01 21:36:51 CST 2025}
postProcessAfterInitialization 修改属性为书房 = House{room='书房', number=100, date=Wed Oct 01 21:36:51 CST 2025}
从IOC容器中获取bean = House{room='书房', number=100, date=Wed Oct 01 21:36:51 CST 2025}
三、基于XML+注解方式管理Bean组件
- Spring 2.5版本升级改进纯xml方式管理Bean组件标签,现在使用注解+XML组合方式管理IOC容器。
- XML扫描注解所在的包,减少XML中
<Bean>标签注册Bean组件的数量。 - 注解将当前类进行标记,容器启动时,XML扫描注解所在包,通过反射的方式获取判断类是否存在注解,存在则注册到IOC容器中。
基本组合配置
步骤如下:
- 配置xml文件,添加注解扫描包。
<context:component-scan base-package="com.maven" />
- 创建类文件,并使用注解
@Component。
@Component
public class User {
}
- 测试XML+注解形式。
@Testpublic void test2() {ApplicationContext context = new ClassPathXmlApplicationContext("spring.xml");User bean = context.getBean(User.class);System.out.println("bean = " + bean);}
- 结果输出
bean = com.maven.bean.User@6f3c660a
XML辅助扫描
<?xml version="1.0" encoding="UTF-8"?>
<beans xmlns="http://www.springframework.org/schema/beans"xmlns:xsi="http://www.w3.org/2001/XMLSchema-instance"xmlns:context="http://www.springframework.org/schema/context"xsi:schemaLocation="http://www.springframework.org/schema/beans http://www.springframework.org/schema/beans/spring-beans.xsd http://www.springframework.org/schema/context https://www.springframework.org/schema/context/spring-context.xsd"><!-- 扫描注解所在的包,尽量精准,路径下的子包默认生效--><context:component-scan base-package="com.maven" /></beans>
XML辅助扫描——注解不生效
- 排除注解,使@Controller注解在com.maven路径下不生效。
<?xml version="1.0" encoding="UTF-8"?>
<beans xmlns:xsi="http://www.w3.org/2001/XMLSchema-instance"xmlns:context="http://www.springframework.org/schema/context"xmlns="http://www.springframework.org/schema/beans"xsi:schemaLocation="http://www.springframework.org/schema/beans http://www.springframework.org/schema/beans/spring-beans.xsd http://www.springframework.org/schema/context https://www.springframework.org/schema/context/spring-context.xsd"><!-- 扫描注解所在的包,尽量精准,路径下的子包默认生效--><context:component-scan base-package="com.maven"><!--排除:注解,使@Controller注解在com.maven路径下不生效。--><context:exclude-filter type="annotation" expression="org.springframework.stereotype.Controller"/></context:component-scan></beans>
XML辅助扫描——仅生效
- 仅配置的注解生效
<?xml version="1.0" encoding="UTF-8"?>
<beans xmlns:xsi="http://www.w3.org/2001/XMLSchema-instance"xmlns:context="http://www.springframework.org/schema/context"xmlns="http://www.springframework.org/schema/beans"xsi:schemaLocation="http://www.springframework.org/schema/beans http://www.springframework.org/schema/beans/spring-beans.xsd http://www.springframework.org/schema/context https://www.springframework.org/schema/context/spring-context.xsd"><!--仅配置的注解生效--><!--1. 默认是路径下所有的注解都生效,现在使用属性use-default-filters将其关闭--><context:component-scan base-package="com.maven" use-default-filters="false"><!--仅生效的注解:只有@Controller注解在com.maven路径下生效。--><context:include-filter type="annotation" expression="org.springframework.stereotype.Controller"/></context:component-scan>
</beans>
注解
三层架构注解:@Controller、@Service、Repository
非三层架构注解:@Component
将自定义Bean加入IOC容器
- 导入xml配置文件的注解扫描。
<?xml version="1.0" encoding="UTF-8"?>
<beans xmlns="http://www.springframework.org/schema/beans"xmlns:xsi="http://www.w3.org/2001/XMLSchema-instance"xmlns:context="http://www.springframework.org/schema/context"xsi:schemaLocation="http://www.springframework.org/schema/beans http://www.springframework.org/schema/beans/spring-beans.xsd http://www.springframework.org/schema/context https://www.springframework.org/schema/context/spring-context.xsd"><!--配置注解扫描--><context:component-scan base-package="com.maven.bean" />
</beans>
- 自定义组件。
@Controller
public class UserController {
}@Service
public class UserService {
}@Repository
public class UserMapper {
}
Component注解可以为Bean标签起一个别名。
@Component(value = "Animal")
@Data
public class User {private String userName;private String password;}
- 测试,从容器中获取自定义组件名称。
@Testpublic void test() {ApplicationContext context = new ClassPathXmlApplicationContext("spring.xml");String[] beanDefinitionNames = context.getBeanDefinitionNames();for (String beanDefinitionName : beanDefinitionNames) {System.out.println(beanDefinitionName);}}
- 结果输出。我们使用
@Component将User改为了Animal。
Animal
userController
userMapper
userService
org.springframework.context.annotation.internalConfigurationAnnotationProcessor
org.springframework.context.annotation.internalAutowiredAnnotationProcessor
org.springframework.context.event.internalEventListenerProcessor
org.springframework.context.event.internalEventListenerFactory
非引用类型赋值:@Value
@Value的使用场景:引入外部的配置参数(properties或者微服务场景的云配置)
- 在配置文件中,配置注解扫描。
<?xml version="1.0" encoding="UTF-8"?>
<beans xmlns="http://www.springframework.org/schema/beans"xmlns:xsi="http://www.w3.org/2001/XMLSchema-instance"xmlns:context="http://www.springframework.org/schema/context"xsi:schemaLocation="http://www.springframework.org/schema/beans http://www.springframework.org/schema/beans/spring-beans.xsd http://www.springframework.org/schema/context https://www.springframework.org/schema/context/spring-context.xsd"><!--配置注解扫描--><context:component-scan base-package="com.maven.bean" />
</beans>
- 在自定义组件中,使用
@Value注解,进行直接赋值。
// 修改Bean组件Id为:Animal
@Component
@Data
public class User {// 使用value注解直接赋值@Value("root")private String userName;// 直接赋值@Value("123456")private String password;}
- 测试,从容器中获取组件信息,验证赋值。
@Testpublic void test3() {ApplicationContext context = new ClassPathXmlApplicationContext("spring-01.xml");User user = context.getBean(User.class);System.out.println("user = " + user);}
- 运行结果。
user = User(userName=root, password=123456)
配置文件赋值与默认值:@Value
- 默认值:若我们在自定义类中,读取配置文件的属性,若配置文件中的属性被删除了代码运行会报错,因此可以设置一个默认值选项,以防止保持。
- 默认值通过冒号
:分割。 @Value(${mysql.password:123456})
- 创建一个jdbc.properties配置文件。
mysql.username=root
mysql.password=7654321
- xml中先配置注解扫描,后加载配置文件。
<?xml version="1.0" encoding="UTF-8"?>
<beans xmlns="http://www.springframework.org/schema/beans"xmlns:xsi="http://www.w3.org/2001/XMLSchema-instance"xmlns:context="http://www.springframework.org/schema/context"xsi:schemaLocation="http://www.springframework.org/schema/beans http://www.springframework.org/schema/beans/spring-beans.xsd http://www.springframework.org/schema/context https://www.springframework.org/schema/context/spring-context.xsd"><!--配置注解扫描--><context:component-scan base-package="com.maven.bean" /><!--注册配置文件--><context:property-placeholder location="jdbc.properties" />
</beans>
- 自定义组件bean,使用组件。
// 修改Bean组件Id为:Animal
@Component(value = "Animal")
@Data
public class User {// 从配置文件中获取值@Value("${mysql.username}")private String userName;// 直接赋值@Value("${mysql.password}")private String password;
}
- 测试,从IOC容器中获取组件。
@Testpublic void test3() {ApplicationContext context = new ClassPathXmlApplicationContext("spring-01.xml");// 根据类型,获取bean组件User user = context.getBean(User.class);System.out.println("user = " + user);// 根据bean组件id,获取Bean组件Object bean = context.getBean("Animal");System.out.println("bean = " + bean);}
- 验证,输出运行结果。
user = User(userName=root, password=123456)
bean = User(userName=root, password=123456)
引用类型赋值:@Autowired
基本概念:
@Autowired:注解用于为引用类型赋值,而@Value注解为非引用类型赋值。- 在xml中
ref为引用类型赋值,通常要求属性字段具有setter方法,而@Autowired注解不需要setter方法。 @Autowired注解使用范围,可以是构造函数、方法、全局变量(最常用、最方便)上。- 如果我们使用
@Autowired注入的依赖Bean组件,没有在 Spring 容器中定义,会抛出NoSuchBeanDefinitionException异常。若不想抛出异常,则可以修改@Autowired注解的属性boolean required() default true;,修改为False。@Autowired(required = false)。 - 若
UserService接口存在多个实现类,如:UserServiceImpl、UserServiceNew、UserServiceImpl2等类。
示例代码:
- xml中开启注解扫描。
<?xml version="1.0" encoding="UTF-8"?>
<beans xmlns="http://www.springframework.org/schema/beans"xmlns:xsi="http://www.w3.org/2001/XMLSchema-instance"xmlns:context="http://www.springframework.org/schema/context"xsi:schemaLocation="http://www.springframework.org/schema/beans http://www.springframework.org/schema/beans/spring-beans.xsd http://www.springframework.org/schema/context https://www.springframework.org/schema/context/spring-context.xsd"><!--配置注解扫描--><context:component-scan base-package="com.maven" />
</beans>
- 自定义两个Bean组件,使A组件中的某个属性字段为B类型。
- UserCotroller
@Controller
public class UserController {//如果要注入的依赖没有在 Spring 容器中定义,会抛出 NoSuchBeanDefinitionException 异常@Autowired(required = false)private UserService userService;public User getUser() {return userService.getUser();}
}
- UserService接口
public interface UserService {public User getUser();
}
- UserServiceImpl实现类
@Service
public class UserService {public User getUser() {User user = new User();user.setUserName("小明");user.setPassword("123456");return user;}
}
- 测试,从容器中获取组件。
@Testpublic void test4() {ApplicationContext context = new ClassPathXmlApplicationContext("spring-01.xml");// 1. 从IOC容器中获取UserController组件UserController userController = context.getBean(UserController.class);// 2. 调用组件方法User user = userController.getUser();// 3. 验证结果System.out.println("user = " + user);}
- 验证,输出运行结果。与
UserService中的getUser方法结果一致。
user = User(userName=小明, password=123456)
接口存在多个实现类的情况
- 被@Autowired注解修饰后,属性名称:userService类似于Xml配置文件的(
<Bean id="userService">)BeanId。 - 若UserService接口存在多个实现类时,使用@Autowired注解会报错,它找不到具体是那个实现类。
- 可以使用
@Qualifier注解,指定要使用的实现类
示例代码:
- 接口:
public interface UserService {public User getUser();
}
- 实现类有:
UserServiceImpl、UserServiceNews两个,@Autowired不知道注入那个实现类。
@Service
public class UserServiceImpl implements UserService {@Overridepublic User getUser() {return null;}
}
@Service
public class UserServiceNews implements UserService {@Overridepublic User getUser() {return null;}
}
- 使用
@Autowired和@Qualifier指定要注入的具体实现类。
@Controller
public class UserController {// 被@Autowired注解修饰后,属性名称:userService类似于Xml配置文件的(<Bean id="userService">)BeanId@Qualifier("userServiceNews")@Autowiredprivate UserService userService;public User getUser() {return userService.getUser();}
}
四、基于配置类管理组件Bean
配置类注解
- 核心注解:
@Configuration核心注解。 - 配置注解扫描:
@ComponentScan配置注解扫描,并将路径下带有**特定注解(@Component注解和其子注解)**的类注册到IOC容器中。示例:@ComponentScan(value = {"com.maven"})。- 用于替代XML配置文件中的
<context:component-scan base-package="com.maven" />标签。
- 用于替代XML配置文件中的
- 引入配置文件:
@PropertySource指定配置文件,示例:@PropertySource(value = {"classpath:metadata.properties"})。切记一定要加classpath:否则找不到配置文件。- 用于替代XML配置文件中的
<context:property-placeholder location="jdbc.properties" />标签。
- 用于替代XML配置文件中的
- 返回值加入到IOC容器:
@Bean注解用在方法上面,作用是将方法中的返回值加入到IOC容器中。特别注意@Bean注解是用来代替Xml中的<Bean>标签的,<bean id="">标签BeanId为@Bean注解的方法名称。<bean class="com.maven.bean.User" id="user" />
@ComponentScan(value = {"com.maven"}):配置类可以不在这个路径扫描内。但是推荐在路径扫描路径下。
基础配置类
我们从XML+注解管理组件Bean单元中知道,一般需要在XML中配置:
- 注解扫描:
<context:component-scan base-package="com.maven" /> - 引入配置文件:
<context:property-placeholder location="jdbc.properties" /> - 导入Bean实例:
<bean class="com.maven.bean.User" id="user" />
三个步骤,因此在配置类中也需要如下步骤:
- pom文件导入驱动和第三方包。
<properties><mysql.version>8.0.28</mysql.version><druid.version>1.2.27</druid.version></properties><dependencies><dependency><groupId>mysql</groupId><artifactId>mysql-connector-java</artifactId><version>${mysql.version}</version></dependency><!-- https://mvnrepository.com/artifact/com.alibaba/druid --><dependency><groupId>com.alibaba</groupId><artifactId>druid</artifactId><version>${druid.version}</version></dependency></dependencies>
- 创建配置类。
@Configuration
// 配置包扫描
@ComponentScan(value = {"com.maven"})
public class DataSourceConfiguration {@Beanpublic DataSource dataSource() {DruidDataSource dataSource = new DruidDataSource();dataSource.setDriverClassName("com.mysql.cj.jdbc.Driver");dataSource.setUrl("jdbc:mysql://localhost:3306/test");dataSource.setUsername("test");dataSource.setPassword("123456");return dataSource;}
}
- 测试,从容器中获取Bean组件。
@Testpublic void testSpringIOC3() throws SQLException {// 非常重要:指定配置类,需要的是@ComponentScan注解扫描的包路径AnnotationConfigApplicationContext context = new AnnotationConfigApplicationContext(DataSourceConfiguration.class);// 通过BeanId获取Bean组件Object bean = context.getBean("dataSource");System.out.println("bean = " + bean);// 通过类型获取Bean组件DataSource dataSource = context.getBean(DataSource.class);// 创建链接,链接不到数据库会报错Connection connection = dataSource.getConnection();System.out.println("connection = " + connection);// 关闭链接connection.close();}
- 结果返回。成功返回DataSource类和数据库链接。
bean = {CreateTime:"2025-10-03 20:32:10",ActiveCount:0,PoolingCount:0,CreateCount:0,DestroyCount:0,CloseCount:0,ConnectCount:0,Connections:[]
}
10月 03, 2025 8:32:10 下午 com.alibaba.druid.support.logging.JakartaCommonsLoggingImpl info
信息: {dataSource-1} inited
connection = com.alibaba.druid.pool.DruidStatementConnection@3c0fae6c
配置类读取配置文件(注入非引用类型)
读取配置文件的方式与XML+注解管理Bean组件的方式一直,都是依靠@Value注解。
方式一:全局变量导入配置类
- 创建配置文件。
jdbc.driver=com.mysql.cj.jdbc.Driver
jdbc.url=jdbc:mysql://localhost:3306/test
jdbc.username=test
jdbc.password=123456
- 配置类使用注解
@PropertySource(value={"classpath:XXX.properties"})导入配置文件。
@Configuration
// 配置包扫描
@ComponentScan(value = {"com.maven"})
// 导入配置文件
@PropertySource(value = {"classpath:jdbc.properties"})
public class DataSourceConfiguration {
}
- 创建全局变量并使用
@Value注解导入配置文件中的配置信息。
@Configuration
// 配置包扫描
@ComponentScan(value = {"com.maven"})
// 导入配置文件
@PropertySource(value = {"classpath:jdbc.properties"})
public class DataSourceConfiguration {@Value("${jdbc.driver}")private String driverClassName;@Value("${jdbc.url}")private String url;@Value("${jdbc.username}")private String username;@Value("${jdbc.password}")private String password;}
- 修改
@Bean方法替换参数。
package com.maven.configuration;import com.alibaba.druid.pool.DruidDataSource;
import org.springframework.beans.factory.annotation.Value;
import org.springframework.context.annotation.Bean;
import org.springframework.context.annotation.ComponentScan;
import org.springframework.context.annotation.Configuration;
import org.springframework.context.annotation.PropertySource;import javax.sql.DataSource;@Configuration
// 配置包扫描
@ComponentScan(value = {"com.maven"})
// 导入配置文件
@PropertySource(value = {"classpath:jdbc.properties"})
public class DataSourceConfiguration {@Value("${jdbc.driver}")private String driverClassName;@Value("${jdbc.url}")private String url;@Value("${jdbc.username}")private String username;@Value("${jdbc.password}")private String password;// @Bean注解,会将返回值注入到IOC容器中// 方法名:dataSource,会作为Bean的Id。@Beanpublic DataSource dataSource() {DruidDataSource dataSource = new DruidDataSource();// 替换为全局参数,从配置文件中取值dataSource.setDriverClassName(driverClassName);dataSource.setUrl(url);dataSource.setUsername(username);dataSource.setPassword(password);return dataSource;}
}
- 测试,从容器中获取Bean组件信息。
@Testpublic void test_04() throws SQLException {// 指定:配置类AnnotationConfigApplicationContext context = new AnnotationConfigApplicationContext(DataSourceConfiguration.class);// 通过BeanId,获取组件DataSource dataSource = (DataSource) context.getBean("dataSource");// 获取数据库链接Connection connection = dataSource.getConnection();System.out.println("connection = " + connection);// 关闭数据库链接connection.close();// 关闭容器,只有关闭容器后才能执行Bean的后置方法context.close();}
- 结果成功返回。
10月 03, 2025 8:49:43 下午 com.alibaba.druid.support.logging.JakartaCommonsLoggingImpl info
信息: {dataSource-1} inited
connection = com.alibaba.druid.pool.DruidStatementConnection@2a39fe6a
方式二:形式参数导入配置类【推荐】
- 被
注解@Bean修饰的方法,形式参数都是从容器中获取的。若不加@Value注解会报红
- 第一步与方法一第一步一致。
- 第二步与方法一第二步一致。
- 不再创建全局变量,而是通过形式参数赋值
@Bean方法。
@Configuration
// 配置包扫描
@ComponentScan(value = {"com.maven"})
// 导入配置文件
@PropertySource(value = {"classpath:jdbc.properties"})
public class DataSourceConfiguration {// @Bean注解,会将返回值注入到IOC容器中// 方法名:dataSource,会作为Bean的Id。// 被注解@Bean修饰的方法,形式参数都是从容器中获取的。若不加@Value注解会报红@Beanpublic DataSource dataSource(@Value("${jdbc.driver}")String driverClassName,@Value("${jdbc.url}")String url,@Value("${jdbc.username}")String username,@Value("${jdbc.password}")String password) {DruidDataSource dataSource = new DruidDataSource();dataSource.setDriverClassName(driverClassName);dataSource.setUrl(url);dataSource.setUsername(username);dataSource.setPassword(password);return dataSource;}}- 测试,从容器中获取Bean组件信息。
@Testpublic void test_05() throws SQLException {// 使用注解contextAnnotationConfigApplicationContext context = new AnnotationConfigApplicationContext();// 注册配置类context.register(DataSourceConfiguration.class);// 加载Beancontext.refresh();// 通过BeanId从容器获取Bean组件信息DataSource dataSource = (DataSource) context.getBean("dataSource");System.out.println("dataSource = " + dataSource);// 建立链接Connection connection = dataSource.getConnection();System.out.println("connection = " + connection);// 关闭数据库connection.close();// 关闭容器,正常关闭容器才能正常执行销毁方法context.close();}
配置类注入引用类型
- 配置类作用是引用第三方jar包到Spring框架中,一般情况下使用
@Autowired注解(全局变量)即可完成对引用类型的注入,但是在配置类中部分场景只能通过形式参数的方式进行注入。 - 配置类通过形参的方式读取配置文件的信息,配置文件中的类型一般都是非引用类型。
- 若像注入引用类型,则需要先将被引用类型注入到容器中,然后通过形式参数的方式注入到相应的Bean组件中。
@Bean注解修饰的方法,形式参数都是从容器中获取的,因此也需要将B类型注入到容器中。- 我们自定义的
Bean组件,使用@Component注解注册到容器中即可。获取应用类型的组件,使用@Autowired注解获取。
方式一:@Bean注解注入到IOC容器
- 存在两个引用类型,A类型在类中引用了B类型,作为某属性变量。
- B类型:
public class B {
}
- A类型:
public class A {private B b;
}
- 因为A引用B类型,因此在配置类中需要分别将A和B通过@Bean注入到容器中。
// 配置类核心注解
@Configuration
// 包扫描
@ComponentScan(value = {"com.maven"})
// 不需要配置文件,因此不需要@PropertySource()
public class FormalParameterConfiguration {@Beanpublic B b(){return new B();}// @Bean注解修饰的方法,形式参数都是从容器中获取的,因此也需要将B类型注入到容器中。// 切记切记。@Beanpublic A a(B b){A a = new A();a.setB(b);return a;}
}
- 测试,从容其中获取A标签。
@Testpublic void test_06(){AnnotationConfigApplicationContext context = new AnnotationConfigApplicationContext(FormalParameterConfiguration.class);String[] beanDefinitionNames = context.getBeanDefinitionNames();for (String beanDefinitionName : beanDefinitionNames) {System.out.println("beanDefinitionName = " + beanDefinitionName);}System.out.println(" ===================== ");// 使用beanId从IOC容器中获取Object bean = context.getBean("a");System.out.println("bean = " + bean);}
- 结果输出。
beanDefinitionName = formalParameterConfiguration
beanDefinitionName = b
beanDefinitionName = a=====================
bean = A(b=com.maven.bean.B@20b12f8a)
方式二:使用@Component和@Autowired注入依赖
- 使用
@Component注解将我们自定义的类型注入到IOC容器中。
@Component
public class C {private String type;}
- 使用
@Autowired注解,将C注入到组件D中。
@Component
@Data
public class D {@Autowiredprivate C c;
}
- 测试,从容器中获取D组件,测试注入情况。
@Testpublic void test_07(){// 配置类使用FormalParameterConfiguration.classAnnotationConfigApplicationContext context = new AnnotationConfigApplicationContext(FormalParameterConfiguration.class);// 获取容器中的组件名称String[] beanDefinitionNames = context.getBeanDefinitionNames();for (String beanDefinitionName : beanDefinitionNames) {System.out.println("beanDefinitionName = " + beanDefinitionName);}System.out.println(" ===================== ");// 使用beanId从IOC容器中获取Object bean = context.getBean("d");System.out.println("bean = " + bean);}
- 结果返回。
beanDefinitionName = formalParameterConfiguration
beanDefinitionName = c
beanDefinitionName = d
beanDefinitionName = b
beanDefinitionName = a=====================
bean = D(c=com.maven.bean.C@23d1e5d0)
配置类单例、多例
@Scope()注解:既可以放在类上,也可以放在方法上。方法上特指:被@Bean修饰的方法。
@Bean注解创建的类,默认是单例模式。@Component注解创建的类,默认是单例模式。- 若想更改单例或者多例,则使用
@Scope()注解。
单例
@Configuration
public class AnimalConfiguration {@Bean// 单例@Scope(ConfigurableBeanFactory.SCOPE_SINGLETON)public Dog animal() {return new Dog();}
}
多例
@Component
// 改为多例
@Scope(value = ConfigurableBeanFactory.SCOPE_PROTOTYPE)
public class Animal {
}
其他:为什么SpringBoot项目不需要配置@ComponentScan也可以使用注解?
- 启动类
@SpringBootApplication
public class MavenWebApplication {public static void main(String[] args) {SpringApplication.run(MavenWebApplication.class, args);}}
原因:
- SpringBoot启动类
@SpringBootApplication注解实际上是一个组合注解,它包含了@ComponentScan,默认扫描启动类所在的包及其子包。 - 因此不需要显式配置
@ComponentScan注解。只有当Bean组件不在主包及其子包中时,或者排除某个子包路径。
@SpringBootApplication注解:
@Target({ElementType.TYPE})
@Retention(RetentionPolicy.RUNTIME)
@Documented
@Inherited
@SpringBootConfiguration
@EnableAutoConfiguration
// 包含@ComponentScan注解:默认扫描启动类所在的包及其子包
@ComponentScan(excludeFilters = {@Filter(type = FilterType.CUSTOM,classes = {TypeExcludeFilter.class}
), @Filter(type = FilterType.CUSTOM,classes = {AutoConfigurationExcludeFilter.class}
)}
)
public @interface SpringBootApplication {
}
导入其他不在主路径的包
- 注意事项:在启动类上使用
@Component注解添加新路径时,默认会将原来的路径覆盖,因此也需要添加原来的默认路径。
项目结构:
- com.maven.web路径:是项目启动类所在的路径,默认扫描注解路径。像
Animal组件和UserController组件,默认都会被加入到IOC容器中的。 - com.maven.exclude路径:正常情况下,被已经被排除在扫描路径中了,因此需要通过
@ComponentScan注解,配置路径扫描。
├─src
│  ├─main
│  │  ├─java
│  │  │  └─com
│  │  │      └─maven
│  │  │          ├─exclude
│  │  │          │  ├─bean
│  │  │          │  │      People.java
│  │  │          │  │
│  │  │          │  └─configuration
│  │  │          │          PeopleConfiguration.java
│  │  │          │
│  │  │          └─web	// 启动类所在路径是项目的默认扫描路径
│  │  │              │  MavenWebApplication.java
│  │  │              │
│  │  │              ├─bean
│  │  │              │      Animal.java
│  │  │              │
│  │  │              └─controller
│  │  │                      UserController.java
- 默认路径下的类:
@Component
public class Animal {
}@Controller
public class UserController {}
- exclude路径下的类:
@Data
public class People {private String name;private int age;
}@Configuration
public class PeopleConfiguration {@Beanpublic People people(){People people = new People();people.setName("教师");people.setAge(18);return people;}
}
- 添加扫描路径:添加注解扫描路径
"com.maven.web","com.maven.exclude"
@SpringBootApplication
// 注意,在启动类上使用@Component注解添加新路径时,默认会将原来的路径覆盖,因此也需要添加原来的默认路径
@ComponentScan(value = {"com.maven.web", "com.maven.exclude"})
public class MavenWebApplication {public static void main(String[] args) {ConfigurableApplicationContext context = SpringApplication.run(MavenWebApplication.class, args);String[] beanDefinitionNames = context.getBeanDefinitionNames();for (String beanDefinitionName : beanDefinitionNames) {System.out.println("beanDefinitionName = " + beanDefinitionName);}}
}
- 输出IOC组件名称:
eanDefinitionName = animal
beanDefinitionName = userController
beanDefinitionName = peopleConfiguration
beanDefinitionName = people... ...
排除某个类或者接口。
ASSIGNABLE_TYPE:是一种过滤类型,用于根据类型来排除或包含组件。具体来说,它允许你指定一个或多个类型(类或接口),然后Spring会排除(或包含)这些类型以及它们的子类(或实现类)。
- 在排除的语境下,使用ASSIGNABLE_TYPE会排除指定的类以及所有继承自该类的子类或实现该接口的实现类。
@ComponentScan(excludeFilters = @ComponentScan.Filter(type = FilterType.ASSIGNABLE_TYPE,classes = {Animal.class}))
示例代码:
@SpringBootApplication
@ComponentScan(excludeFilters = @ComponentScan.Filter(type = FilterType.ASSIGNABLE_TYPE,classes = {Animal.class}))
public class MavenWebApplication {public static void main(String[] args) {ConfigurableApplicationContext context = SpringApplication.run(MavenWebApplication.class, args);String[] beanDefinitionNames = context.getBeanDefinitionNames();for (String beanDefinitionName : beanDefinitionNames) {System.out.println("beanDefinitionName = " + beanDefinitionName);}}
}
@Import
使用@Import注解的理由:我认为最重要的一点是明确配置的加载顺序。
@Configuration
@Import({DatabaseConfig.class, TransactionConfig.class})  // 推荐这样做
public class AppConfig {// 理由:// 1. 明确声明依赖关系// 2. 确保配置加载顺序// 3. 不依赖组件扫描的隐式行为// 4. 代码可读性更好
}
示例代码
// 数据库配置类
@Configuration
public class DatabaseConfig {@Beanpublic DataSource dataSource() {return new HikariDataSource();}@Beanpublic JdbcTemplate jdbcTemplate(DataSource dataSource) {return new JdbcTemplate(dataSource);}
}// 事务配置类
@Configuration
public class TransactionConfig {@Beanpublic PlatformTransactionManager transactionManager(DataSource dataSource) {return new DataSourceTransactionManager(dataSource);}
}// 主配置类,导入其他配置类
@Configuration
@Import({DatabaseConfig.class, TransactionConfig.class})  // 导入多个配置类
public class AppConfig {// 主配置类的其他Bean定义...
}
@Conditional
@Conditional注解:用于标记配置类、@Bean 方法或组件,根据指定的 Condition实现类来决定是否创建Bean。
- 一般使用
@Conditional注解时,需要去实现Condition接口。 Condition接口是一个函数式接口,用于定义条件判断逻辑,通过 matches() 方法返回 true 或 false 来决定是否满足条件。
使用场景:
-
环境相关的条件装配,不同环境(dev/test/prod)使用不同的 Bean,根据操作系统类型选择实现,根据配置文件属性决定是否启用功能
-
类路径依赖的条件装配,当某个类在类路径中存在时才创建 Bean,当某个 JAR 包存在时才启用特定功能。
-
Bean 依赖的条件装配,当某个 Bean 不存在时才创建当前 Bean避免 Bean 冲突和重复定义。
-
属性配置的条件装配
示例代码
基本代码:
根据系统是windows还是Mac,注册相应的Bean组件。
- 接口实现类:
public class MacConditional implements Condition {public boolean matches(ConditionContext context, AnnotatedTypeMetadata metadata) {Environment environment = context.getEnvironment();String os = environment.getProperty("OS");if (os != null && os.contains("MAC")){return true;}return false;}
}
public class WindowsConditional implements Condition {@Overridepublic boolean matches(ConditionContext context, AnnotatedTypeMetadata metadata) {Environment environment = context.getEnvironment();String os = environment.getProperty("OS");if (os != null && os.contains("Windows")){return true;}return false;}
}
- 使用
@Conditional注解,管理Bean的注册。
@Configuration
public class ComputerTypeConfig {@Conditional(MacConditional.class)@Beanpublic ComputerType computerMacType() {ComputerType computerType = new ComputerType();computerType.setName("MAC");return computerType;}@Conditional(WindowsConditional.class)@Beanpublic ComputerType computerWindowsType() {ComputerType computerType = new ComputerType();computerType.setName("WINDOWS");return computerType;}
}
多数据源配置
@Primary注解:当存在多个同类型的bean时,如果不想使用@Qualifier注解,则将primary放到类上,则默认作为同类型的主方法。默认导入该方法bean。
@Configuration
public class DataSourceConfiguration {@Bean// 从配置文件中,读取配置@ConditionalOnProperty(prefix = "spring.datasource", name = "primary.enabled")// Primary 注解:当存在多个bean时,如果不想使用Qualifier注解,则将primary放到类上,则默认作为同类型的主方法。默认导入该方法bean。@Primarypublic DataSource primaryDataSource() {// 主数据源配置return DataSourceBuilder.create().build();}@Bean@ConditionalOnProperty(prefix = "spring.datasource", name = "secondary.enabled")public DataSource secondaryDataSource() {// 备用数据源配置return DataSourceBuilder.create().build();}
}
衍生注解
@Configuration
public class ComputerTypeConfig {/*** 使用自定义条件注解:当满足 MacConditional 条件时创建此 Bean* MacConditional 是自定义条件类,通常基于特定逻辑判断是否创建 Bean*/@Conditional(MacConditional.class)@Beanpublic ComputerType computerMacType() {ComputerType computerType = new ComputerType();computerType.setName("MAC");return computerType;}/*** 使用自定义条件注解:当满足 WindowsConditional 条件时创建此 Bean* WindowsConditional 是自定义条件类,通常基于特定逻辑判断是否创建 Bean*/@Conditional(WindowsConditional.class)@Beanpublic ComputerType computerWindowsType() {ComputerType computerType = new ComputerType();computerType.setName("WINDOWS");return computerType;}/*** @ConditionalOnMissingBean:当容器中不存在指定类型的 Bean 时创建此 Bean* 这里检查 String.class 类型的 Bean 是否存在,如果不存在则创建此 ComputerType* @Primary:当存在多个同类型 Bean 时,此 Bean 作为首选(默认注入)* 注意:String.class 是示例,实际应用中应该检查更有意义的 Bean 类型*/@ConditionalOnMissingBean(String.class)@Bean@Primarypublic ComputerType miss(){ComputerType computerType = new ComputerType();computerType.setName("MISS");return computerType;}/*** @ConditionalOnMissingClass:当类路径中不存在指定的类时创建此 Bean* 需要指定完整的类路径,当 com.ssg.ioc.bean.Chicken 类不存在时创建此 Bean* 注意:该类不需要是 Spring Bean,只需要在类路径中检查*/@ConditionalOnMissingClass({"com.ssg.ioc.bean.Chicken"})@Beanpublic ComputerType missString(){ComputerType computerType = new ComputerType();computerType.setName("MISS Class");return computerType;}/*** @ConditionalOnBean:当容器中存在指定类型的 Bean 时创建此 Bean* 这里检查 DogConfig 类型的 Bean 是否存在,如果存在则创建此 ComputerType* 通常用于依赖其他配置类或 Bean 的场景*/@ConditionalOnBean(DogConfig.class)@Beanpublic ComputerType computerConditional(){ComputerType computerType = new ComputerType();computerType.setName("CONDITIONAL");return computerType;}/*** @ConditionalOnClass:当类路径中存在指定的类时创建此 Bean* 这里检查 Person.class 是否存在,存在则创建此 Bean* 注意:Person 类不需要是 Spring Bean,只需要在类路径中存在即可*/@ConditionalOnClass(Person.class)@Beanpublic ComputerType computerConditionalOne(){ComputerType computerType = new ComputerType();computerType.setName("CONDITIONAL ONE");return computerType;}/*** @ConditionalOnClass:当类路径中存在 PersonConfig 类时创建此 Bean* 与上一个方法类似,但检查的是配置类 PersonConfig* 常用于检查某个配置类是否存在来决定是否启用功能*/@ConditionalOnClass(PersonConfig.class)@Beanpublic ComputerType computerConditionalTwo(){ComputerType computerType = new ComputerType();computerType.setName("CONDITIONAL TWO");return computerType;}/*** @ConditionalOnClass:测试 ConditionalOnClass 注解的行为* 这个注解只需要类存在于类路径中就会生效,不需要把这个类注入到容器中* 这里检查 Chicken 类是否在类路径中,存在则创建此 Bean* @return ComputerType bean对象*/@ConditionalOnClass(Chicken.class)@Beanpublic ComputerType computerConditionalThree(){ComputerType computerType = new ComputerType();computerType.setName("CONDITIONAL THREE CHICKEN");return computerType;}/*** @ConditionalOnBooleanProperties:自定义复合条件注解,检查多个布尔属性* 配置文件中需要设置:conditional.check.boolean=true* - 前缀:conditional.check* - 名称:boolean* - 期望值:havingValue = true(默认为true)* 当配置文件中存在该配置且值为 true 时,注入此 Bean 到容器* 注意:@ConditionalOnBooleanProperties 不是 Spring 标准注解,可能是自定义注解*/@ConditionalOnBooleanProperties(@ConditionalOnBooleanProperty(prefix = "conditional.check", name = "boolean",havingValue = true))@Beanpublic ComputerType computerConditionalFour(){ComputerType computerType = new ComputerType();computerType.setName("CONDITIONAL FOUR Properties");return computerType;}/*** @ConditionalOnProperty:基于配置文件属性的条件注解* 检查 spring.application.name 属性值是否为 "SSG_IOC"* - prefix:配置前缀* - name:属性名* - havingValue:期望的属性值* 当应用名称为 SSG_IOC 时创建此 Bean*/@ConditionalOnProperty(prefix = "spring.application", name = "name", havingValue = "SSG_IOC")@Beanpublic ComputerType computerConditionalFive(){ComputerType computerType = new ComputerType();computerType.setName("CONDITIONAL FIVE Property 单属性检查");return computerType;}/*** @ConditionalOnProperties:自定义复合条件注解,同时检查多个属性* 需要同时满足两个条件:* 1. spring.application.name = "SSG_IOC"* 2. conditional.check.boolean = "true"* 只有两个条件都满足时才会创建此 Bean* 注意:@ConditionalOnProperties 不是 Spring 标准注解,可能是自定义注解*/@ConditionalOnProperties({@ConditionalOnProperty(prefix = "spring.application", name = "name", havingValue = "SSG_IOC"),@ConditionalOnProperty(prefix = "conditional.check", name = "boolean",havingValue = "true")})@Beanpublic ComputerType computerConditionalSix(){ComputerType computerType = new ComputerType();computerType.setName("CONDITIONAL Six Properties 多属性聚合");return computerType;}
}
五、扩展
使用注解如@Controller等,并没有在类中显式编写构造器为什么不报错?
-
我们经常在Spring Boot中使用注解如@Controller、@Service等,并没有在类中显式编写构造器,但Spring仍然能够创建Bean实例。这是因为Java编译器会为没有显式构造器的类自动生成一个默认的无参构造器。所以,Spring实际上是通过这个默认的无参构造器来创建Bean实例的。
-
如果类中有带参数的构造器,那么编译器
不会生成默认的无参构造器,此时Spring尝试通过无参构造器创建Bean就会失败。在这种情况下,我们需要提供无参构造器,或者使用带参数的构造器并通过@Autowired注解来告诉Spring使用这个构造器进行依赖注入。 -
使用@Controller注解时没有写无参构造器为什么不报错?
通过反射获取构造器
package com.maven.web.controller;import org.springframework.stereotype.Controller;@Controller
public class UserController {}
通过反射验证:
package com.maven.web;import com.maven.web.controller.UserController;
import org.junit.jupiter.api.Test;
import org.springframework.boot.test.context.SpringBootTest;import java.lang.reflect.Constructor;@SpringBootTest
class MavenWebApplicationTests {@Testvoid contextLoads() {Class<?> clazz = UserController.class;// 获取所有构造函数Constructor<?>[] constructors = clazz.getConstructors();for (Constructor<?> constructor : constructors) {System.out.println("构造函数: " + constructor);System.out.println("参数个数: " + constructor.getParameterCount());}// 输出:构造函数: public com.example.UserController()// 参数个数: 0}
}
总结
- Java 编译器会自动为没有显式构造函数的类生成默认无参构造函数
- Spring 在创建 Bean 时,通过反射发现并使用这个默认构造函数
- 您不需要显式编写,是因为 Java 语言已经为您处理了
关键点:
- Spring 仍然是通过构造函数来创建 Bean 实例的
- 只是这个构造函数是 Java 编译器自动生成的
- 当您需要依赖注入或自定义初始化时,仍然需要显式编写构造函数
xml中<bean>标签什么时候提示需要构造器
-
如果我们既不写无参数构造器,也不写有参构造器,
spring.xml中的Bean标签,不会爆红,从ioc容器获取Bean不会报错。因为java默认会为我们添加一个无参构造器,如上所属。 -
只有当我们写了有参构造器,但是无参构造器并没有写,xml中的
Bean标签才会爆红。从容器中获取Bean会报错。
面试题:什么是FactoryBean?什么是BeanFactory?
核心容器设计的接口和实现类有哪些?
- 组件管理的具体实现:spring framework框架中核心容器(IOC容器)
- 组件类——>配置文件——>实例化容器加载配置文件(refresh())
也可以理解为下面这段代码:
@Testpublic void testSpring4() {// 组件类ClassPathXmlApplicationContext context = new ClassPathXmlApplicationContext();// 加载配置文件context.setConfigLocation("classpath:spring.xml");// 实例化容器加载配置文件context.refresh();User bean = context.getBean(User.class);System.out.println(bean);}
接口和实现类:
- BeanFactory
- ApplicationContext
- ClassPathXmlApplicationContext
- FileSystemXmlApplicationContext
- AnnotationConfigApplicationContext
- WebApplicationContext