门户网站怎么开发百度搜索站长平台
目录
引言
DeferredImportSelector接口
DeferredImportSelector的作用
parse方法——parse方法,也就是解析注解类的方法。
process方法——看DeferredImportSelectorHandlerr如何处理
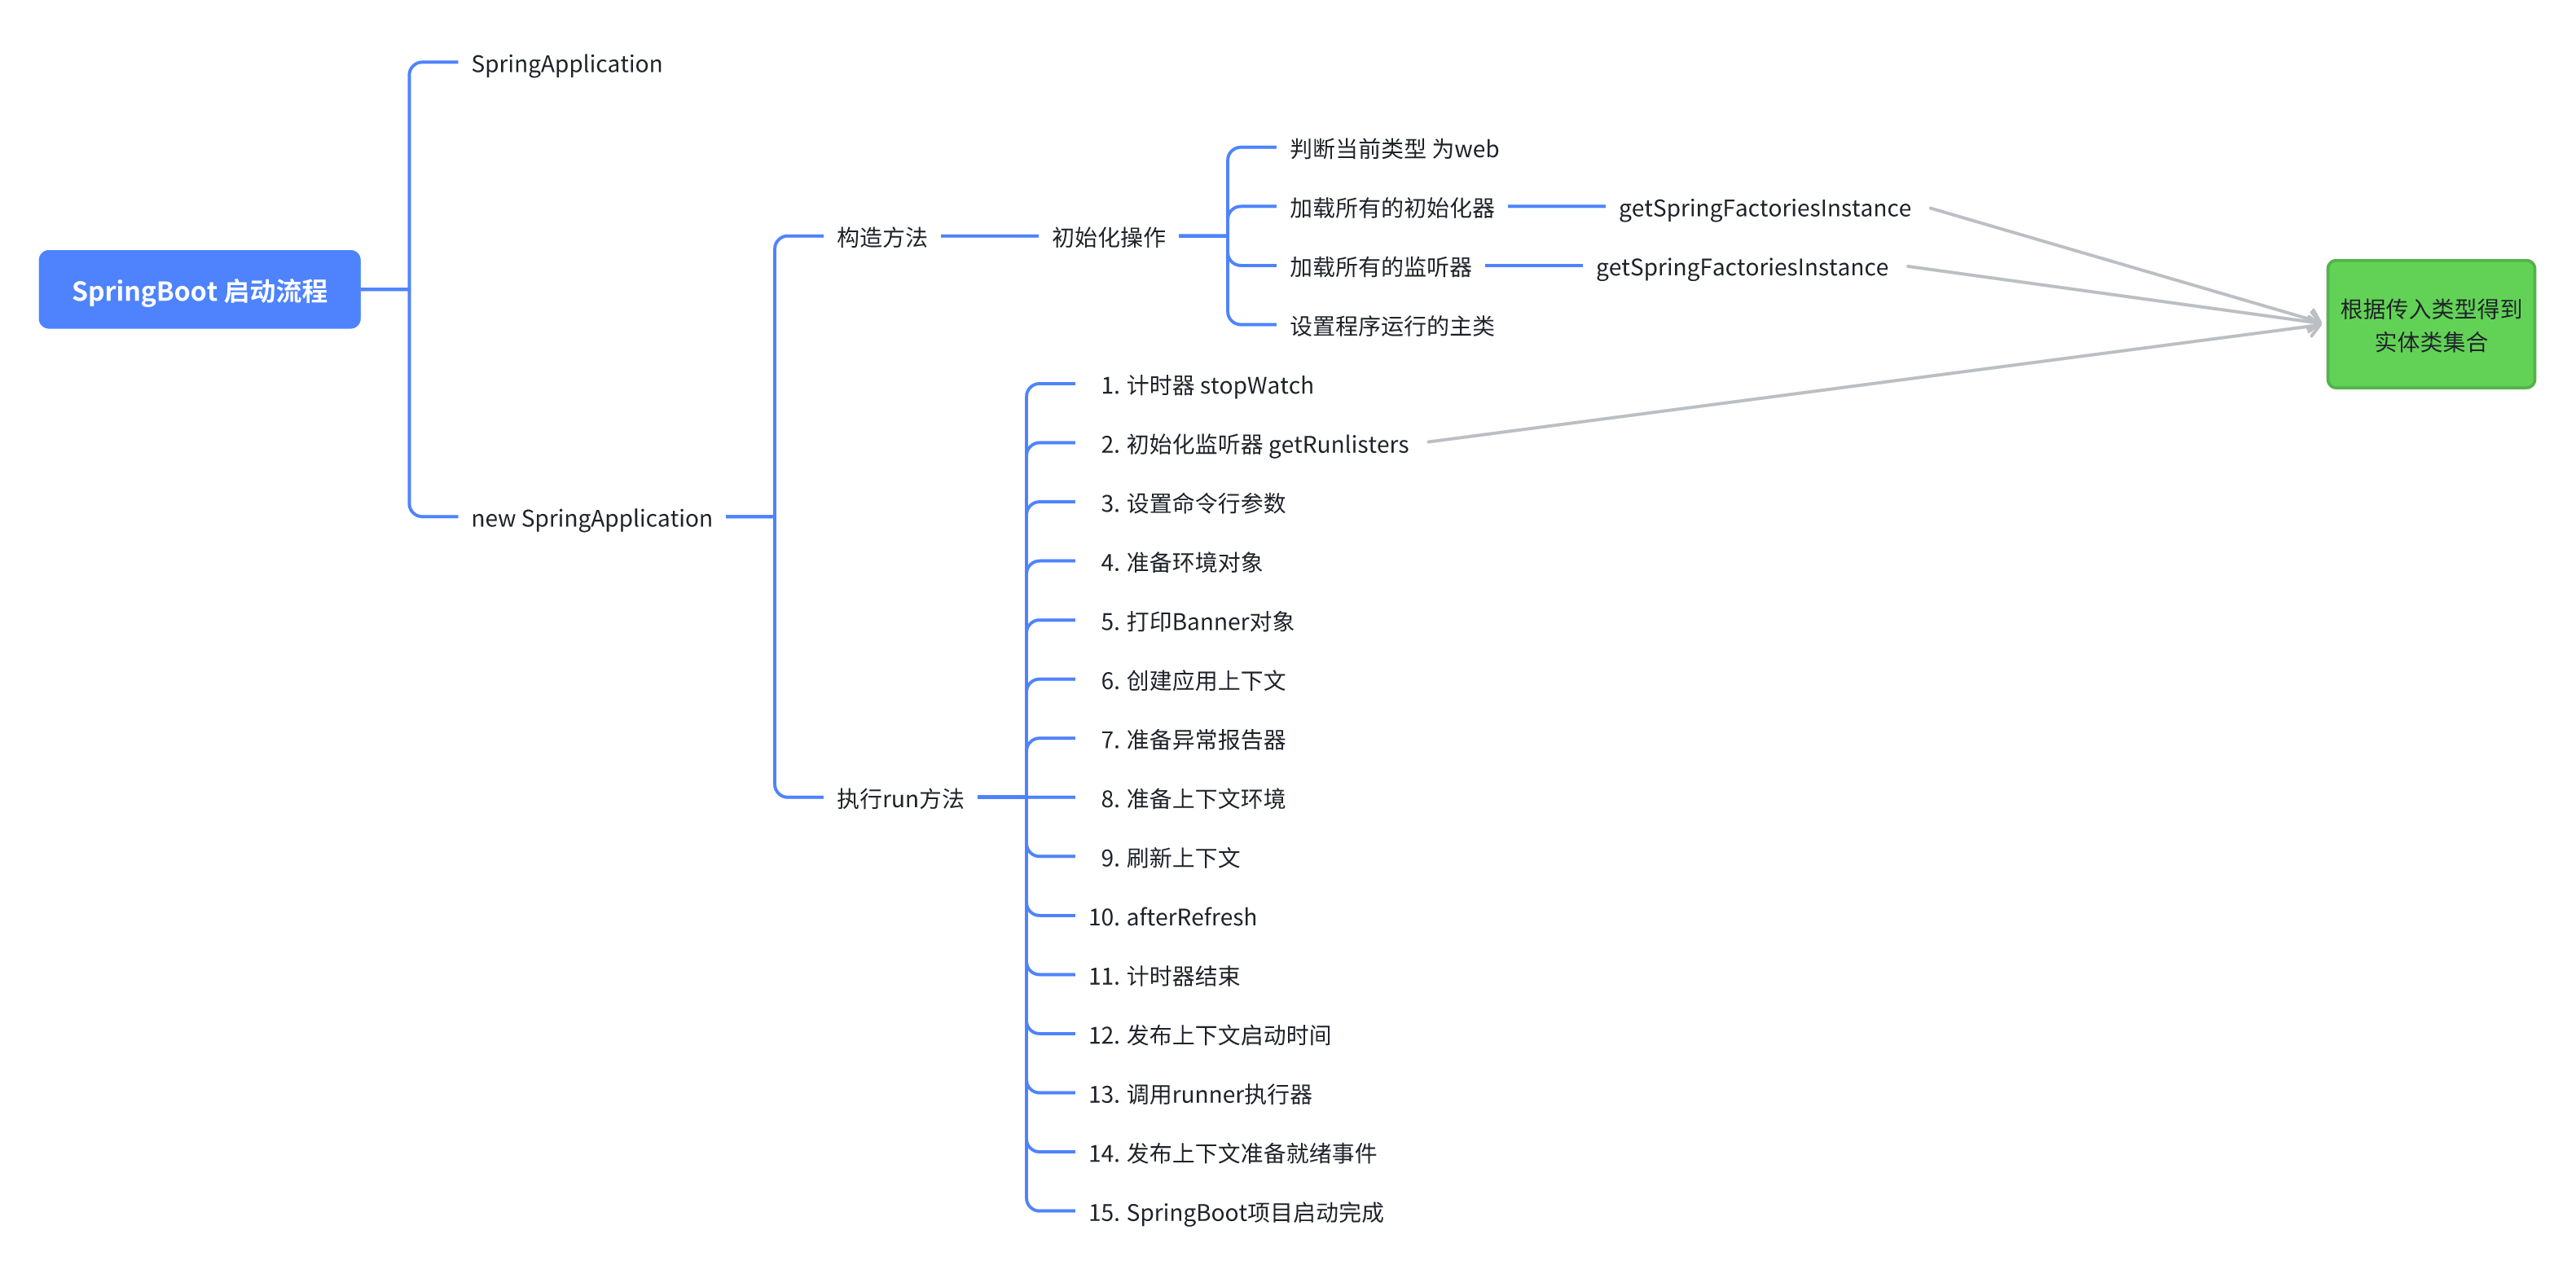
SpringBoot 源码主线的探索
SpringBoot 启动入口
SpringApplication构造器
run方法
SpringBoot监听器
SpringBoot如何自定义监听器?
SpringBoot中的事件类型
自定义事件?
SpringBoot中属性文件加载的原理
ConfigFileApplicationListener
引言
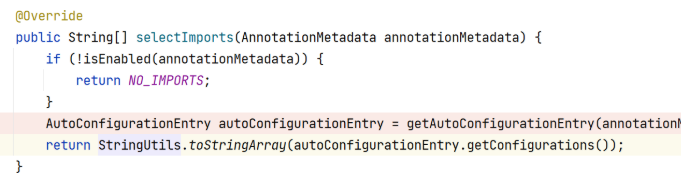
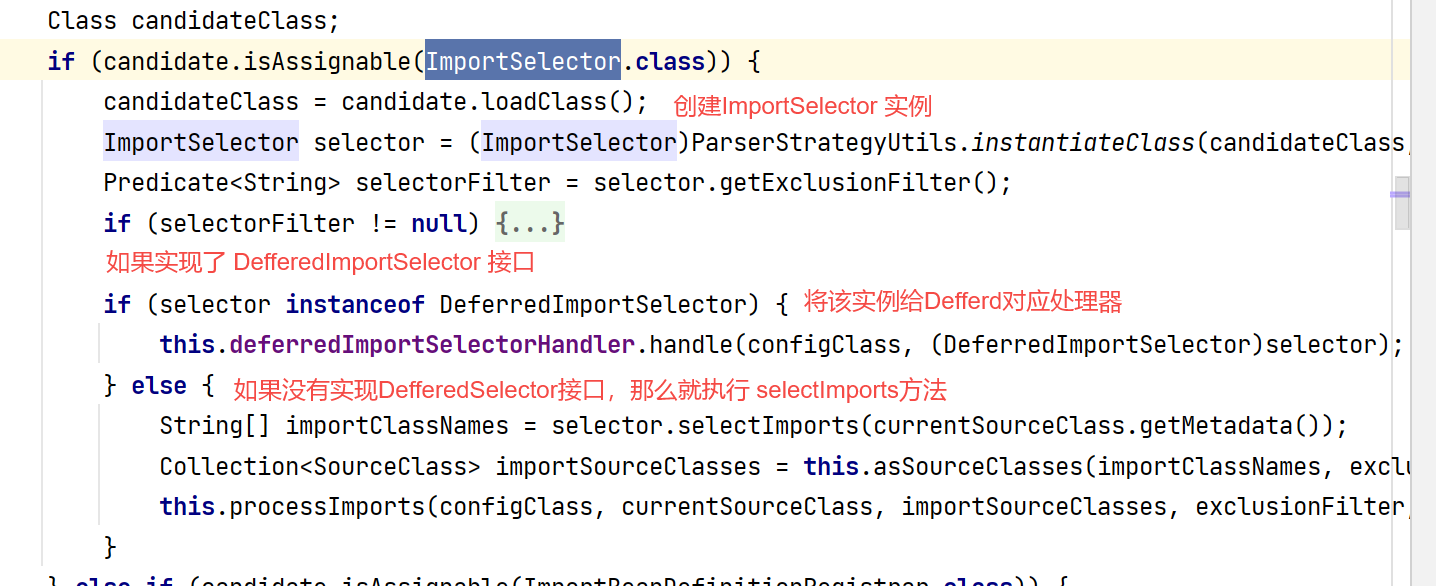
在分析SpringBoot自动装配原理的时候,我们分析了@EnableAutoConfiguration注解上通过 @Import注解导入了一个 ImportSelector接口的实现类 AutoConfigurationImportSelector。按照之前对 @Import 注解的理解,应该会执行重写的 selectImports 方法。但调试的时候,没有走 selectImports方法。 通过Debug模式,端点定位我们能够发现进入到了getAutoConfigurationEntry方法中。但是没有进入selectImports方法。

这是什么原因呢?他不是实现了ImportSelector接口吗?怎么和我们之前理解的不一样呢?这就需要我们再来细说下@Import注解了。
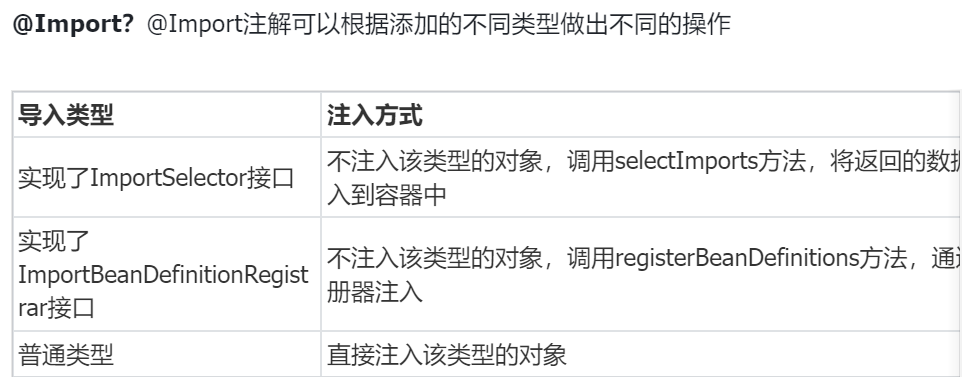
@Import?@Import注解可以根据添加的不同类型做出不同的操作
| 导入类型 | 注入方式 |
| 实现了ImportSelector接口 | 不注入该类型的对象,调用selectImports方法,将返回的数据注入到容器中 |
| 实现了ImportBeanDefinitionRegistrar接口 | 不注入该类型的对象,调用registerBeanDefinitions方法,通过注册器注入 |
| 普通类型 | 直接注入该类型的对象 |
而在自动装配中导入的AutoConfigurationImportSelector这个类型有点特殊。
如图所示:
那这个DeferredImportSelector这个接口的作用是什么呢?字面含义是延迟导入的意思。具体怎么实现的后面再说,我们先来说下他的作用。
DeferredImportSelector接口
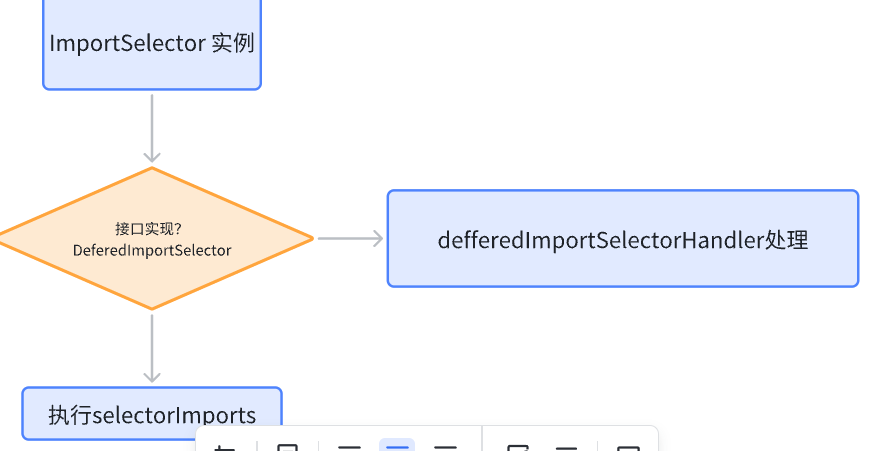
DeferredImportSelector接口本身也有ImportSelector接口的功能,如果我们仅仅是实现了DeferredImportSelector接口,重写了selectImports方法,那么selectImports方法还是会被执行的,来看代码。
public class MyDeferredImportSelector implements DeferredImportSelector {@Overridepublic String[] selectImports(AnnotationMetadata importingClassMetadata) {System.out.println("selectImports方法执行了---->");return new String[0];}
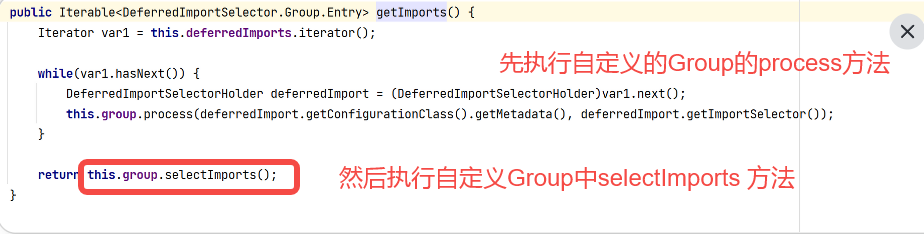
}但是如果我们重写了DeferredImportSelector中的Group接口,并重写了getImportGroup,那么容器在启动的时候就不会执行selectImports方法了,而是执行getImportGroup方法。进而执行Group中重写的方法。
public class MyDeferredImportSelector implements DeferredImportSelector {@Overridepublic String[] selectImports(AnnotationMetadata importingClassMetadata) {System.out.println("selectImports方法执行了---->");return new String[0];}@Overridepublic Class<? extends Group> getImportGroup() {System.out.println("getImportGroup");return MyDeferredImportSelectorGroup.class;}public static class MyDeferredImportSelectorGroup implements Group{private final List<Entry> imports = new ArrayList<>();@Overridepublic void process(AnnotationMetadata metadata, DeferredImportSelector selector) {System.out.println("MyDeferredImportSelectorGroup.Group");}@Overridepublic Iterable<Entry> selectImports() {System.out.println("Group中的:selectImports方法");return imports;}}
}
通过上面的效果解释了为什么在SpringBoot自动装配的时候没有走selectImports方法。那么DeferredImportSelector接口的作用是什么呢?为什么要这么设计呢?
DeferredImportSelector的作用
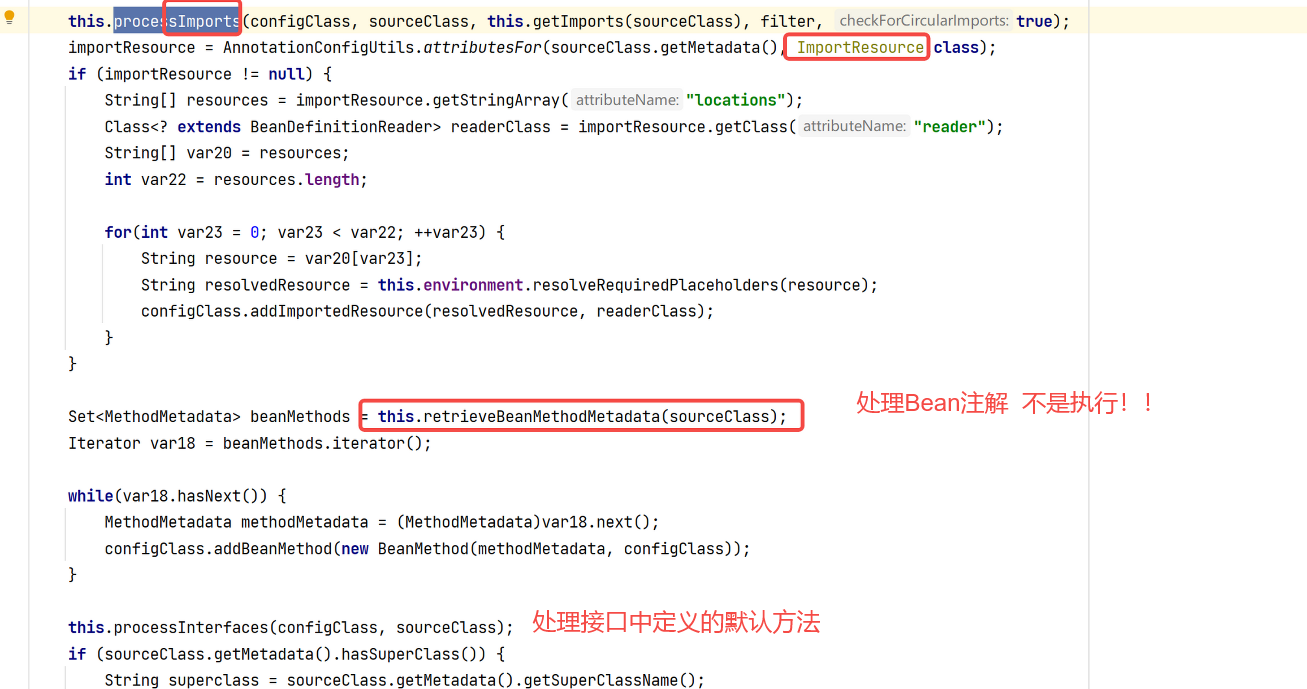
通过前面的类图结构我们知道DeferredImportSelector是ImportSelector接口的一个扩展。ImportSelector实例的selectImports方法的执行时机,是在@Configguration注解中的其他逻辑被处理之前,所谓的其他逻辑,包括对@ImportResource、@Bean这些注解的处理。(注意,这里只是对@Bean修饰的方法的处理,并不是立即调用@Bean修饰的方法,这个区别很重要!)
DeferredImportSelector实例的selectImports方法的执行时机,是在@Configguration注解中的其他逻辑被处理完毕之后,所谓的其他逻辑,包括对@ImportResource、@Bean这些注解的处理。
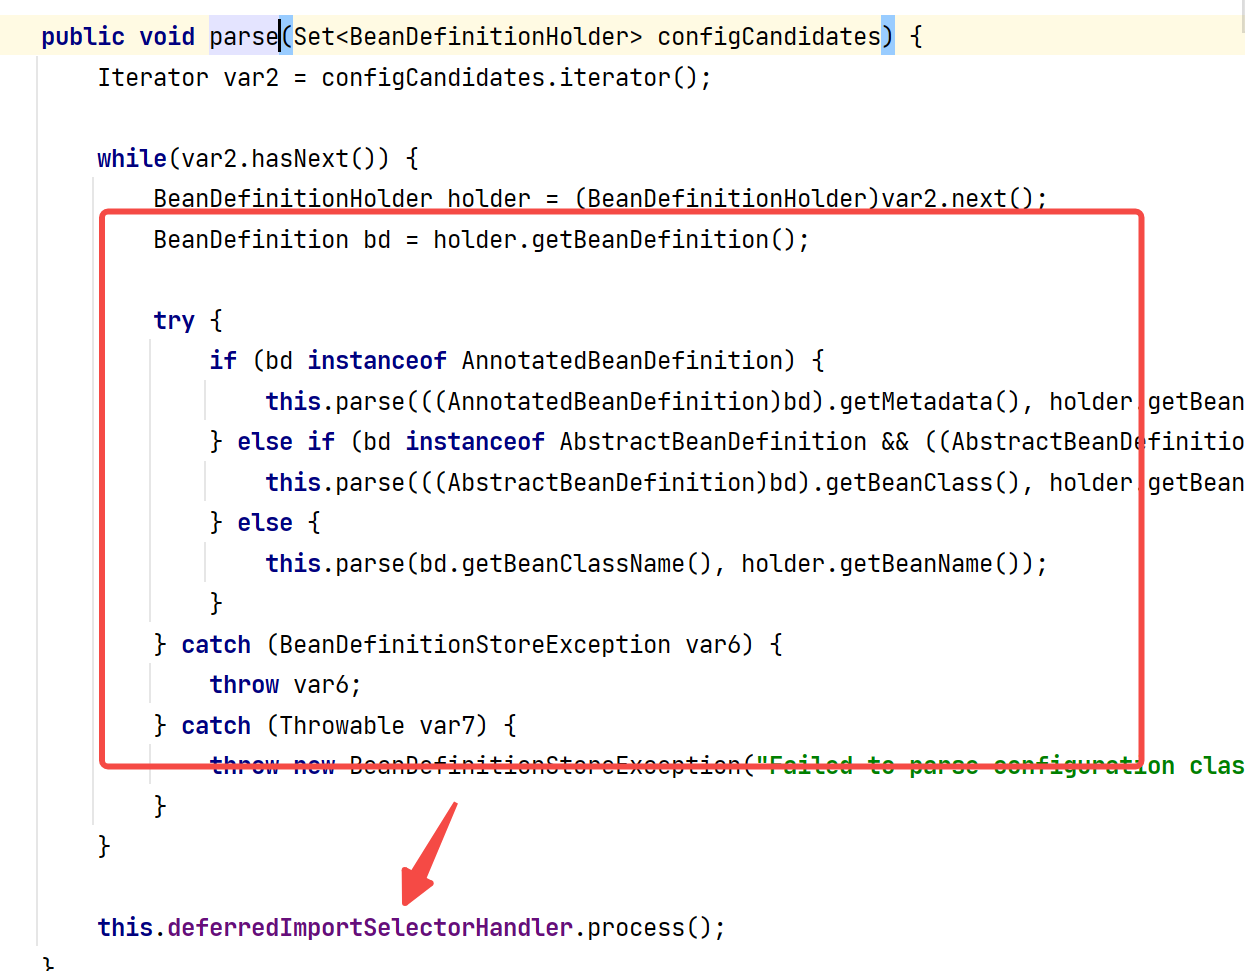
上面的结论我们可以直接在源码中看到对应的答案。首先定位到ConfigurationClassParser中的parse方法。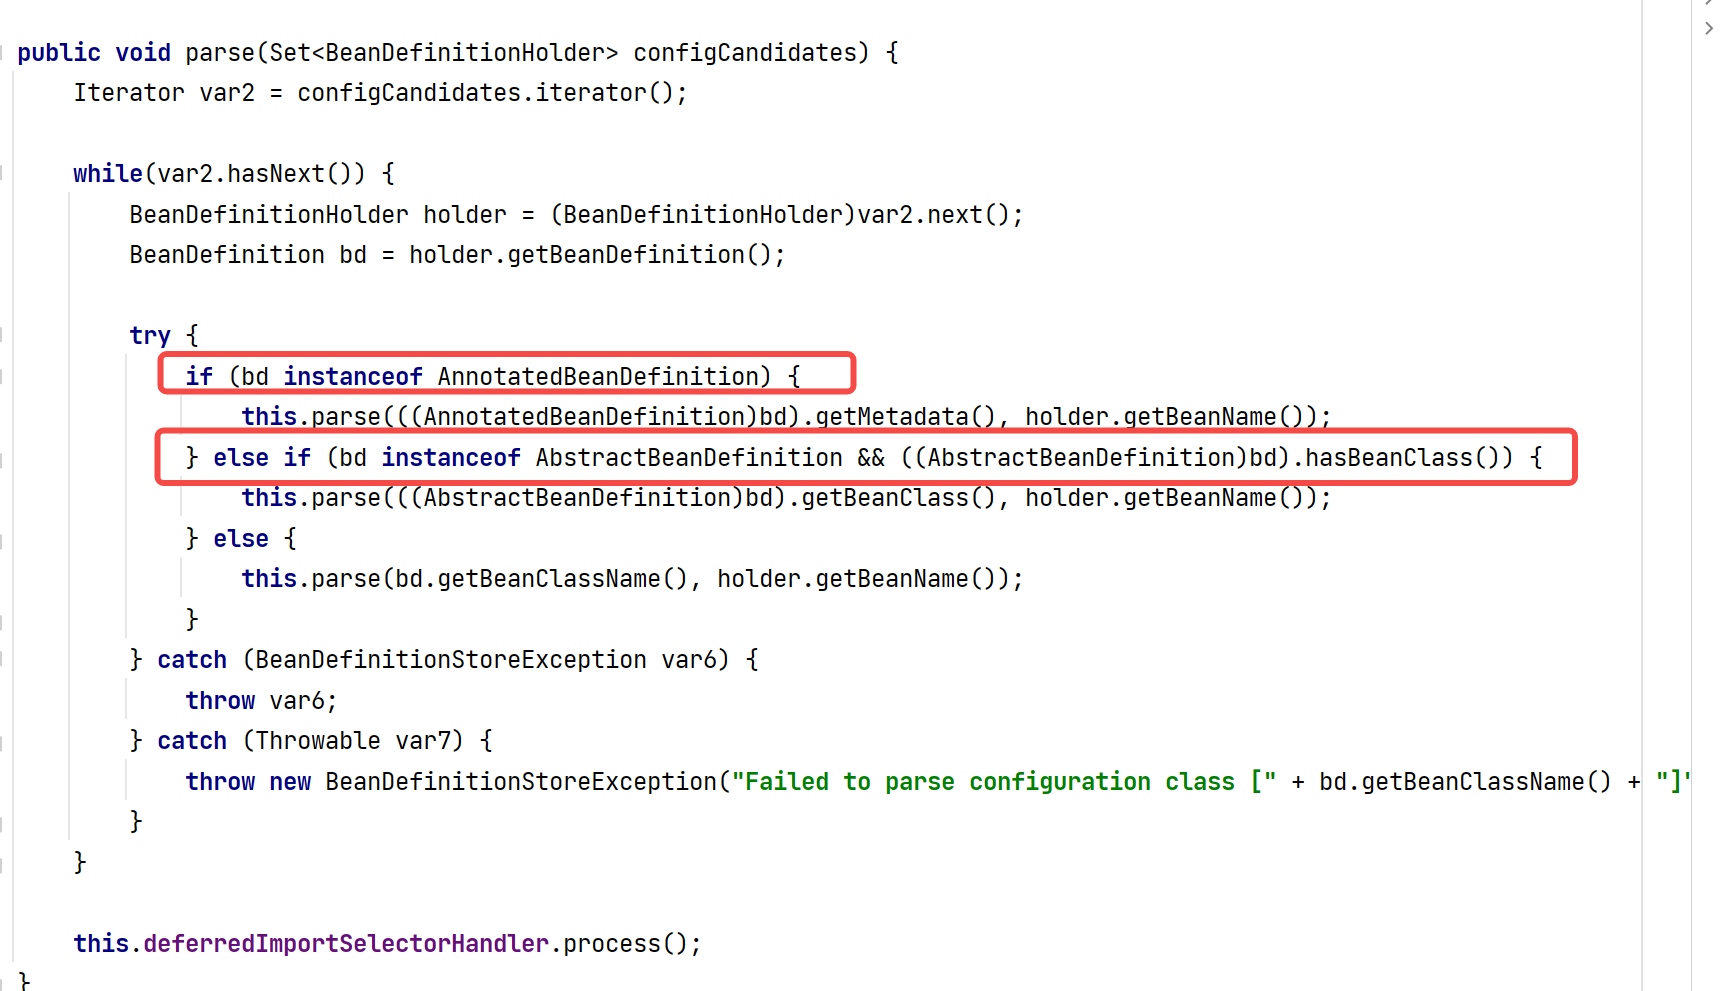
parse方法——parse方法,也就是解析注解类的方法。
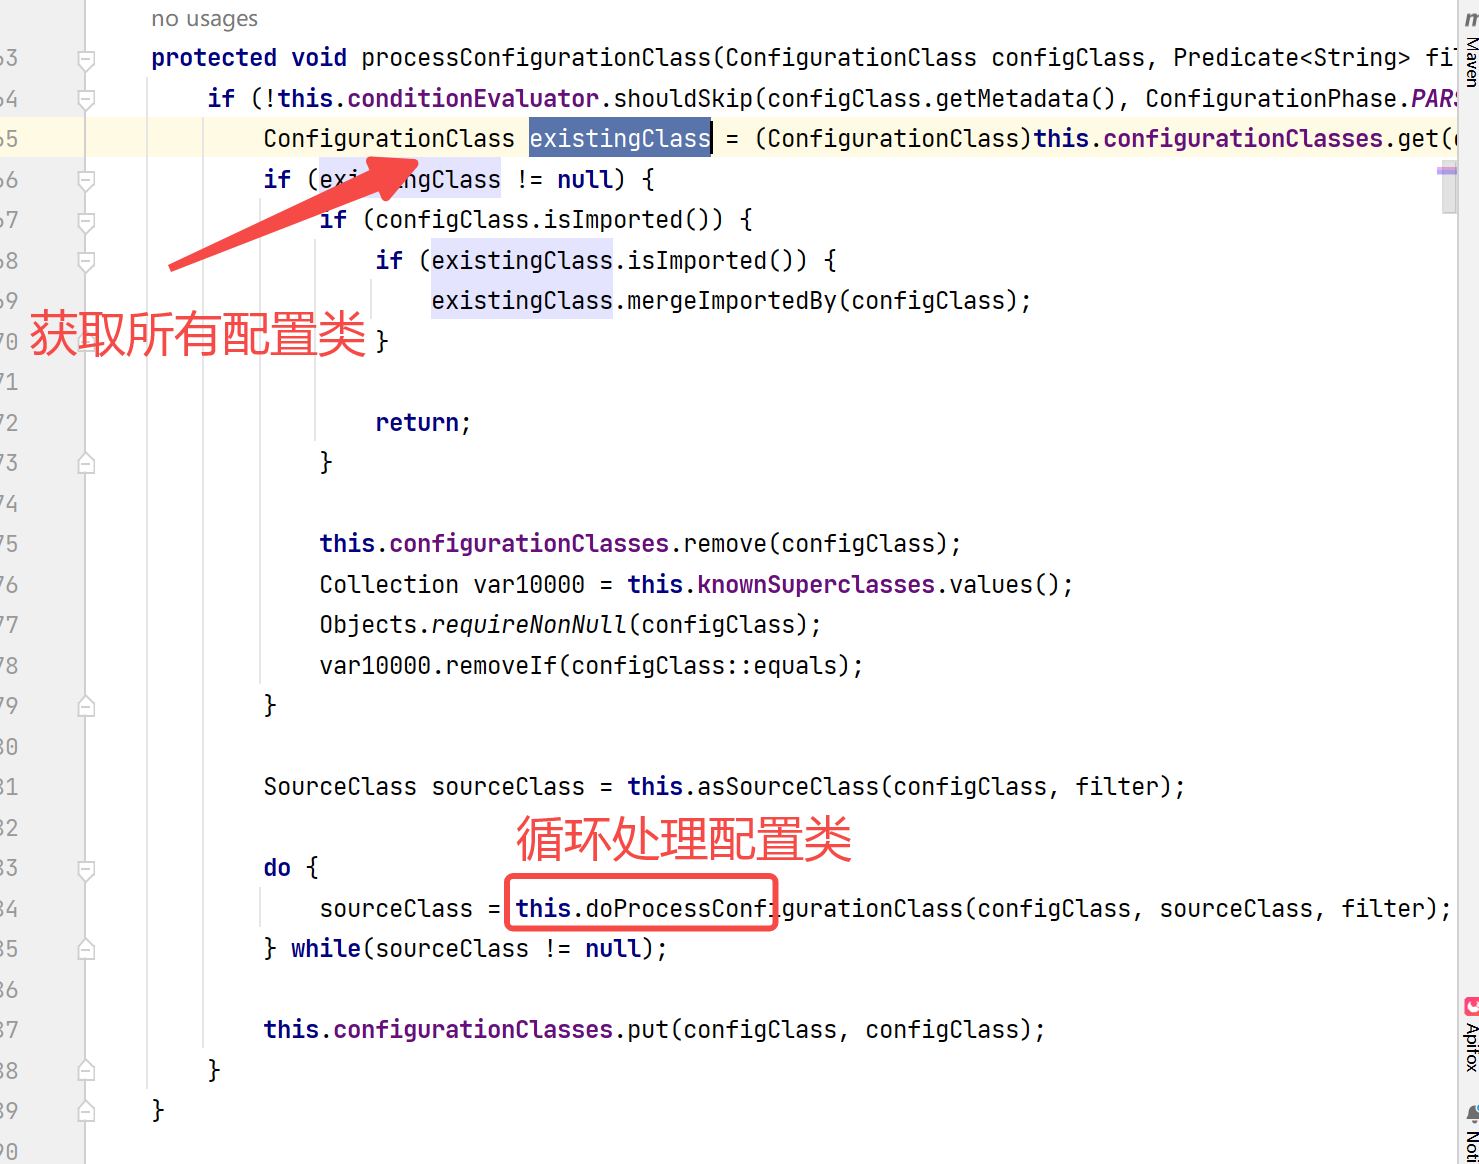
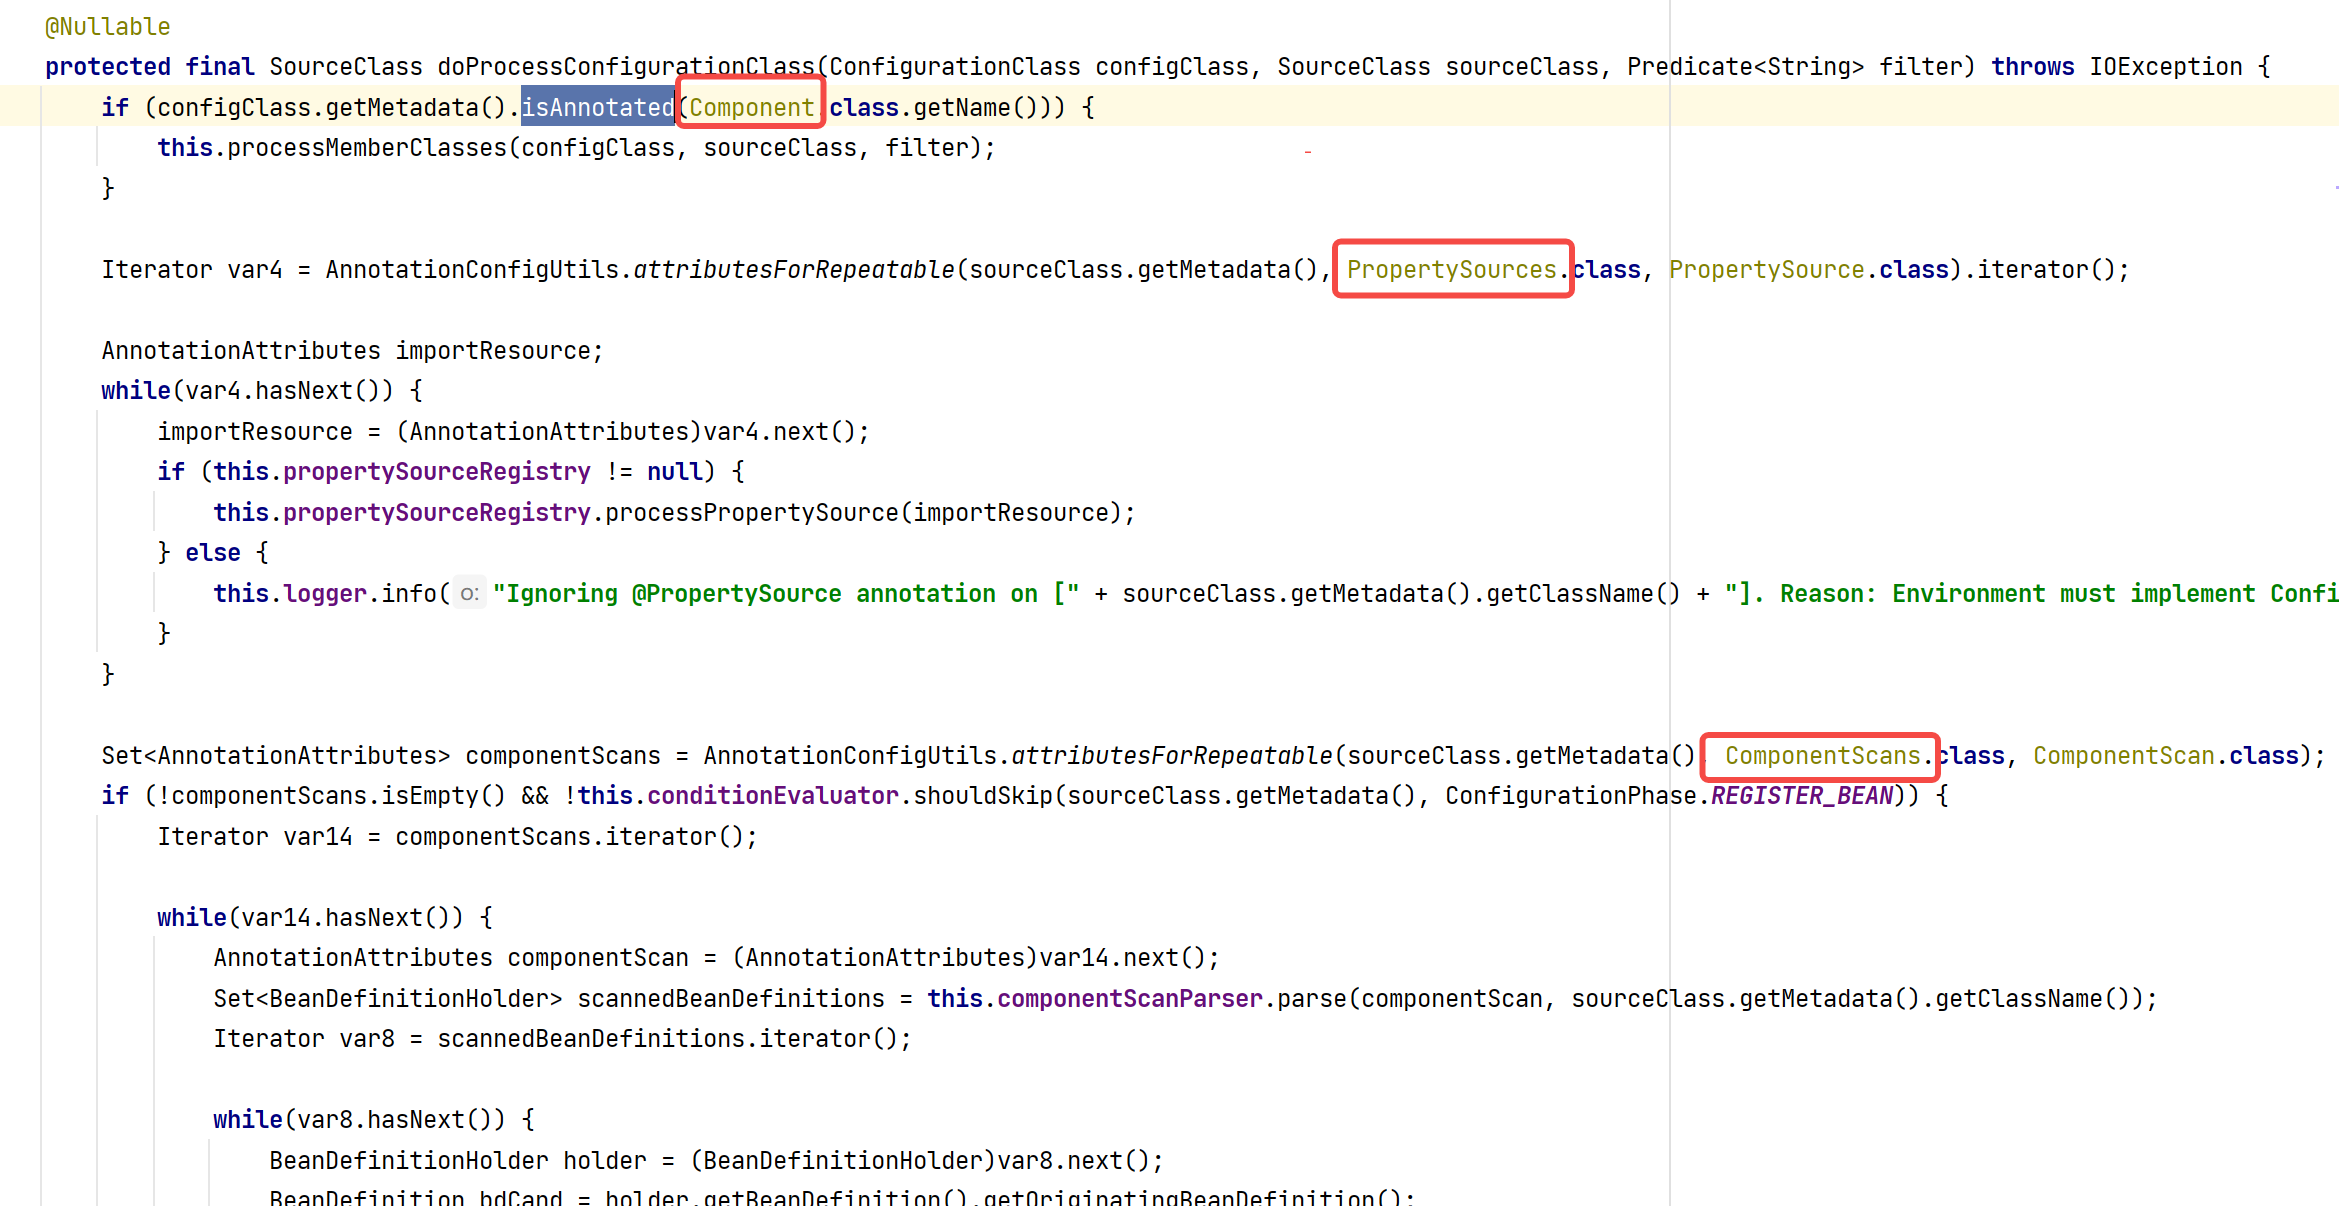
看到调用的是processConfigurationClass,翻译过来就比较好理解了,处理配置类
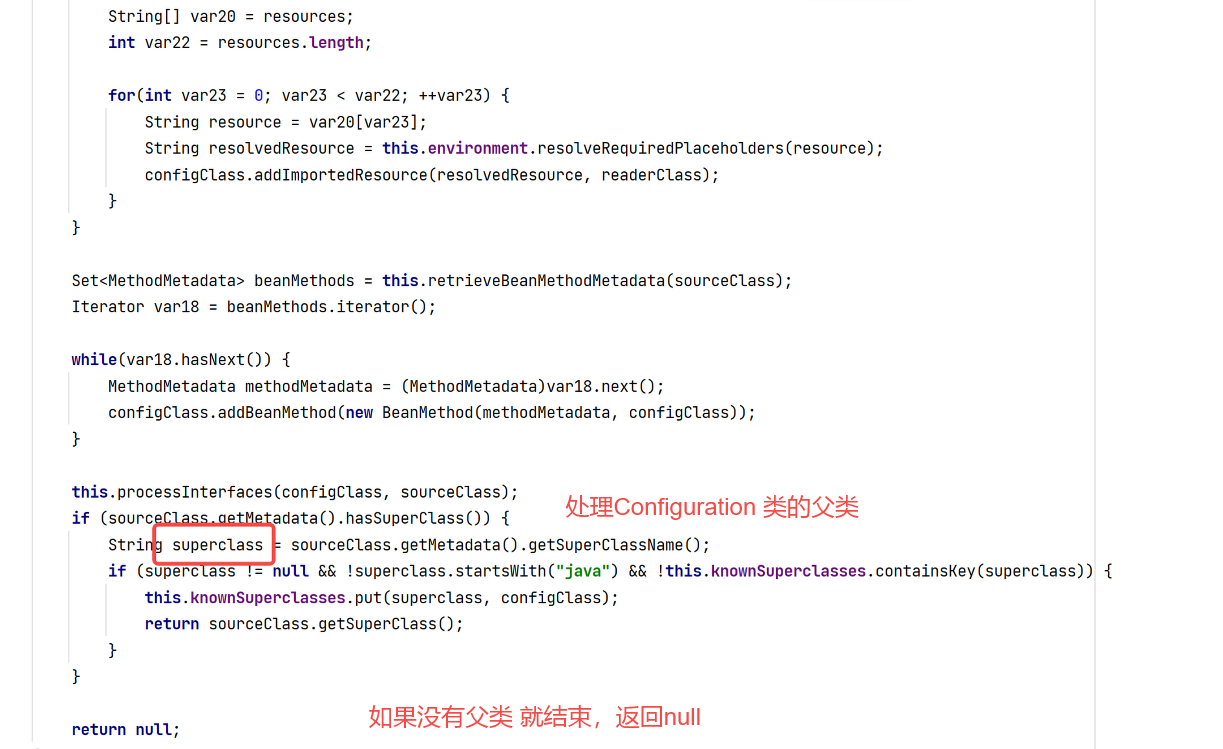
整个流程还是很清楚的。
然后我们需要回到上面的处理@Import注解的方法中。在这个方法中我们可以看到@Import注解的实现逻辑。
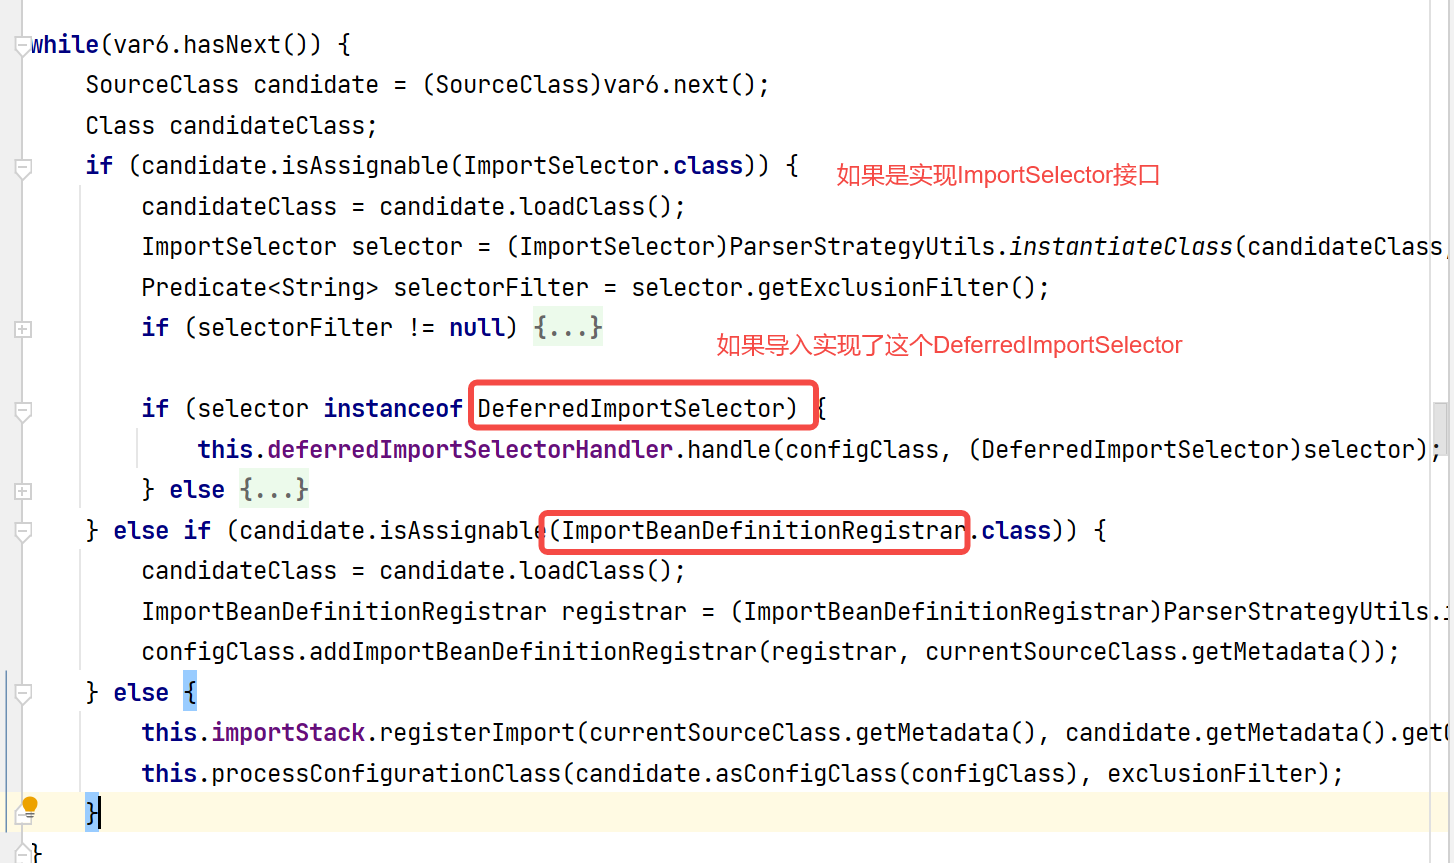
然后来看下导入的类型是ImportSelector接口的逻辑。
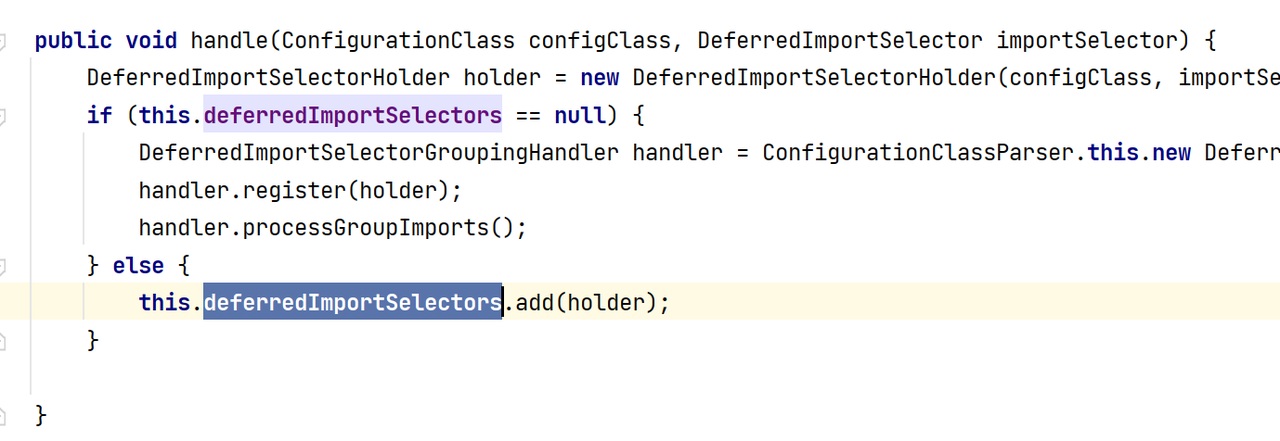
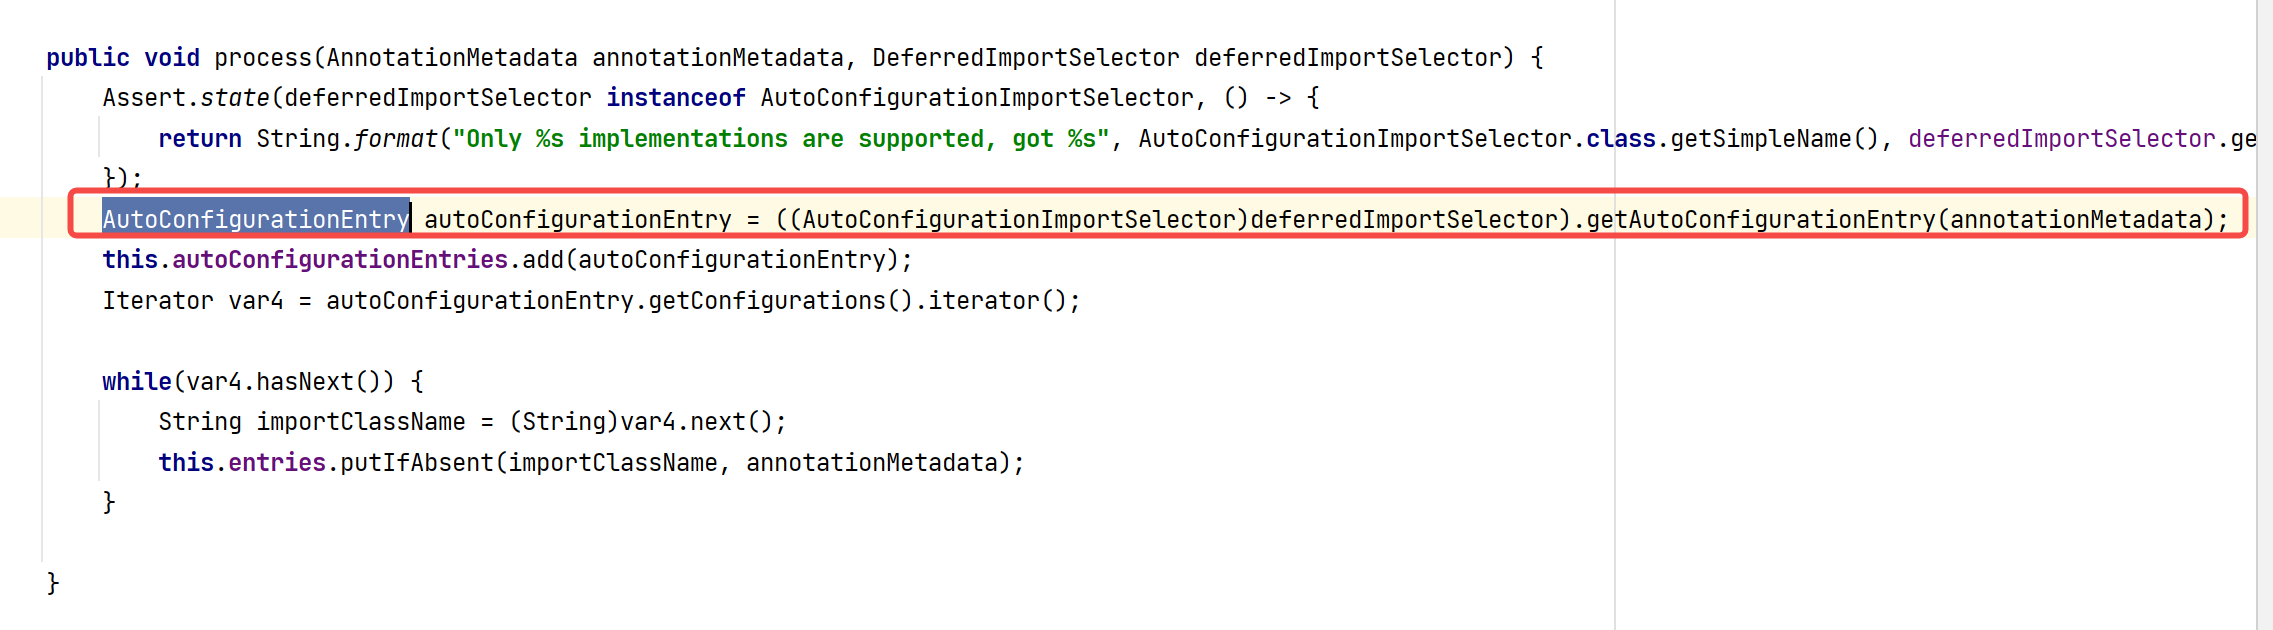
process方法——看DeferredImportSelectorHandlerr如何处理
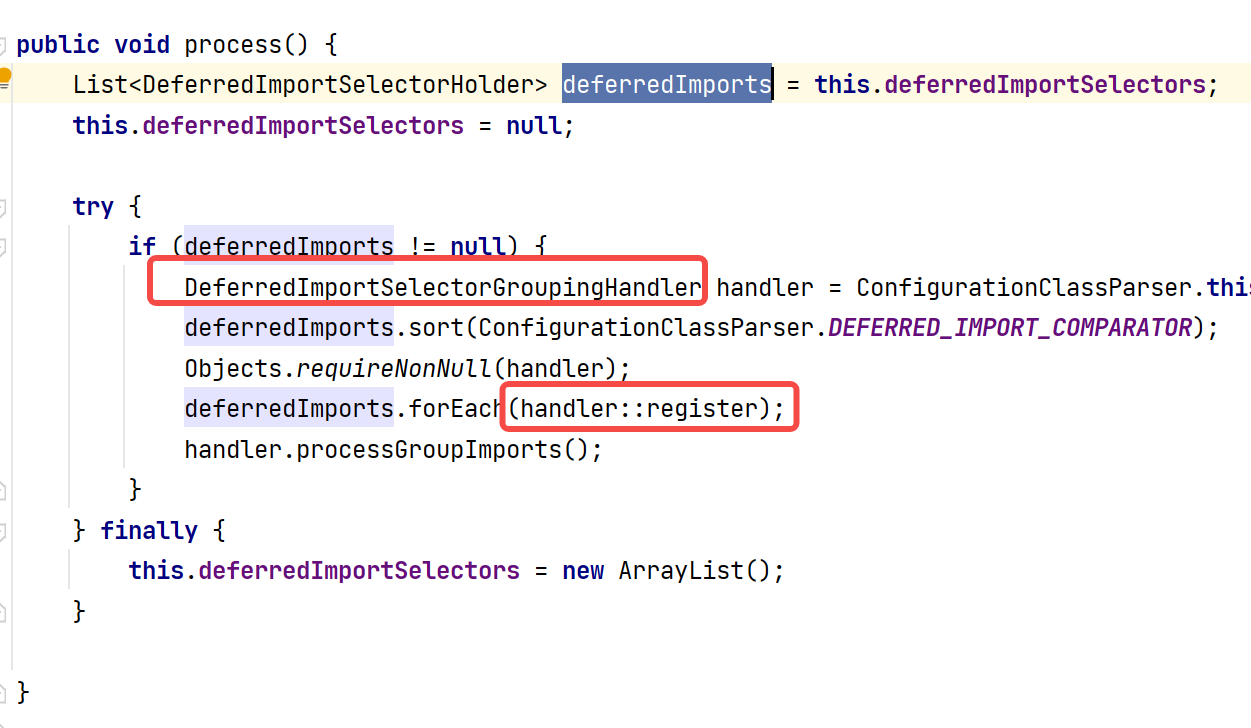
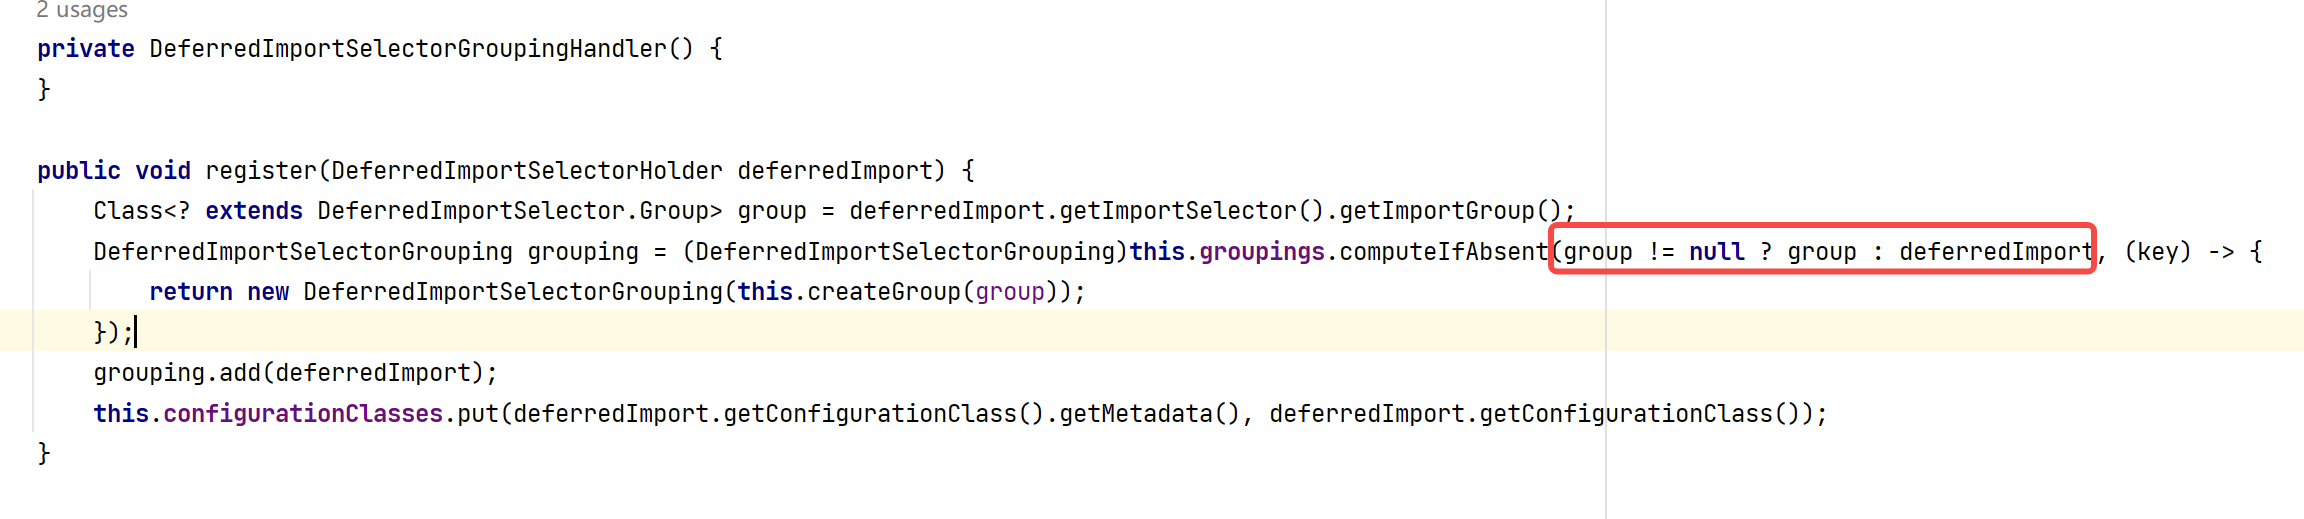
获取我们重写的importGroup方法的返回值,如果Group为空说明没有重写Group接口,就使用原来的ImportSelect对象否则就是自定义Group对象。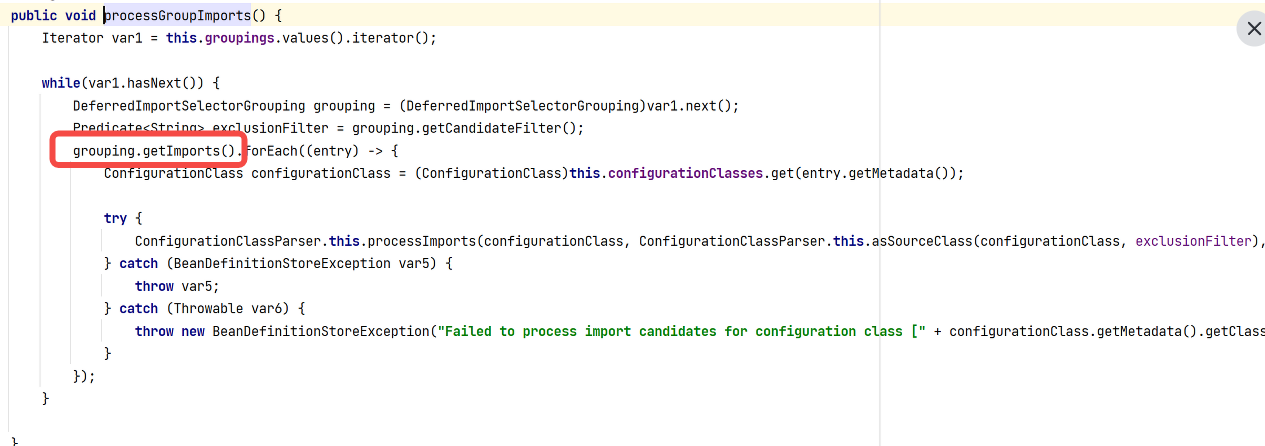
到此,明白了自动装配为什么没有走 AutoConfigurationImportSelector中的 selectImports 方法。
同时也清楚了ImportSelector与DeferredImportSelector的区别,就是selectImports方法执行时机有差别,这个差别期间,Spring容器对此Configguration类做了些其他的逻辑:包括对@ImportResource、@Bean这些注解的处理。
SpringBoot 源码主线的探索
SpringBoot 启动入口
当我们启动了SpringBoot项目的时候,入口程序就是main方法,而在main方法中执行了一个run方法。
@SpringBootApplication
public class StartApp {public static void main(String[] args) {SpringApplication.run(StartApp.class);}
}
那显然,我们关注的重点就是run方法喽。
public static ConfigurableApplicationContext run(Class<?> primarySource, String... args) {
// 调用重载的run方法,将传递的Class对象封装为了一个数组return run(new Class<?>[] { primarySource }, args);
}
public static ConfigurableApplicationContext run(Class<?>[] primarySources, String[] args) {
// 创建了一个SpringApplication对象,并调用其run方法
// 1.先看下构造方法中的逻辑
// 2.然后再看run方法的逻辑
return new SpringApplication(primarySources).run(args);
}
在该方法中创建了一个SpringApplication对象。同时调用了SpringApplication对象的run方法。这里的逻辑有分支,先看下SpringApplication的构造方法中的逻辑
SpringApplication构造器
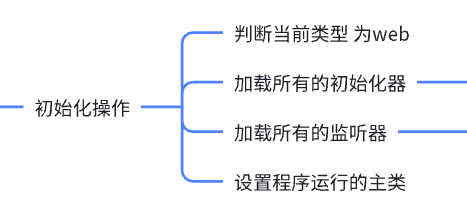
在本方法中完成了几个核心操作
-
推断当前项目的类型
-
加载配置在spring.factories文件中的ApplicationContextInitializer中的类型并实例化后存储在了initializers中。
-
完成监听器的初始化操作,并将实例化的监听器对象存储在了listeners成员变量中
-
通过StackTrace反推main方法所在的Class对象
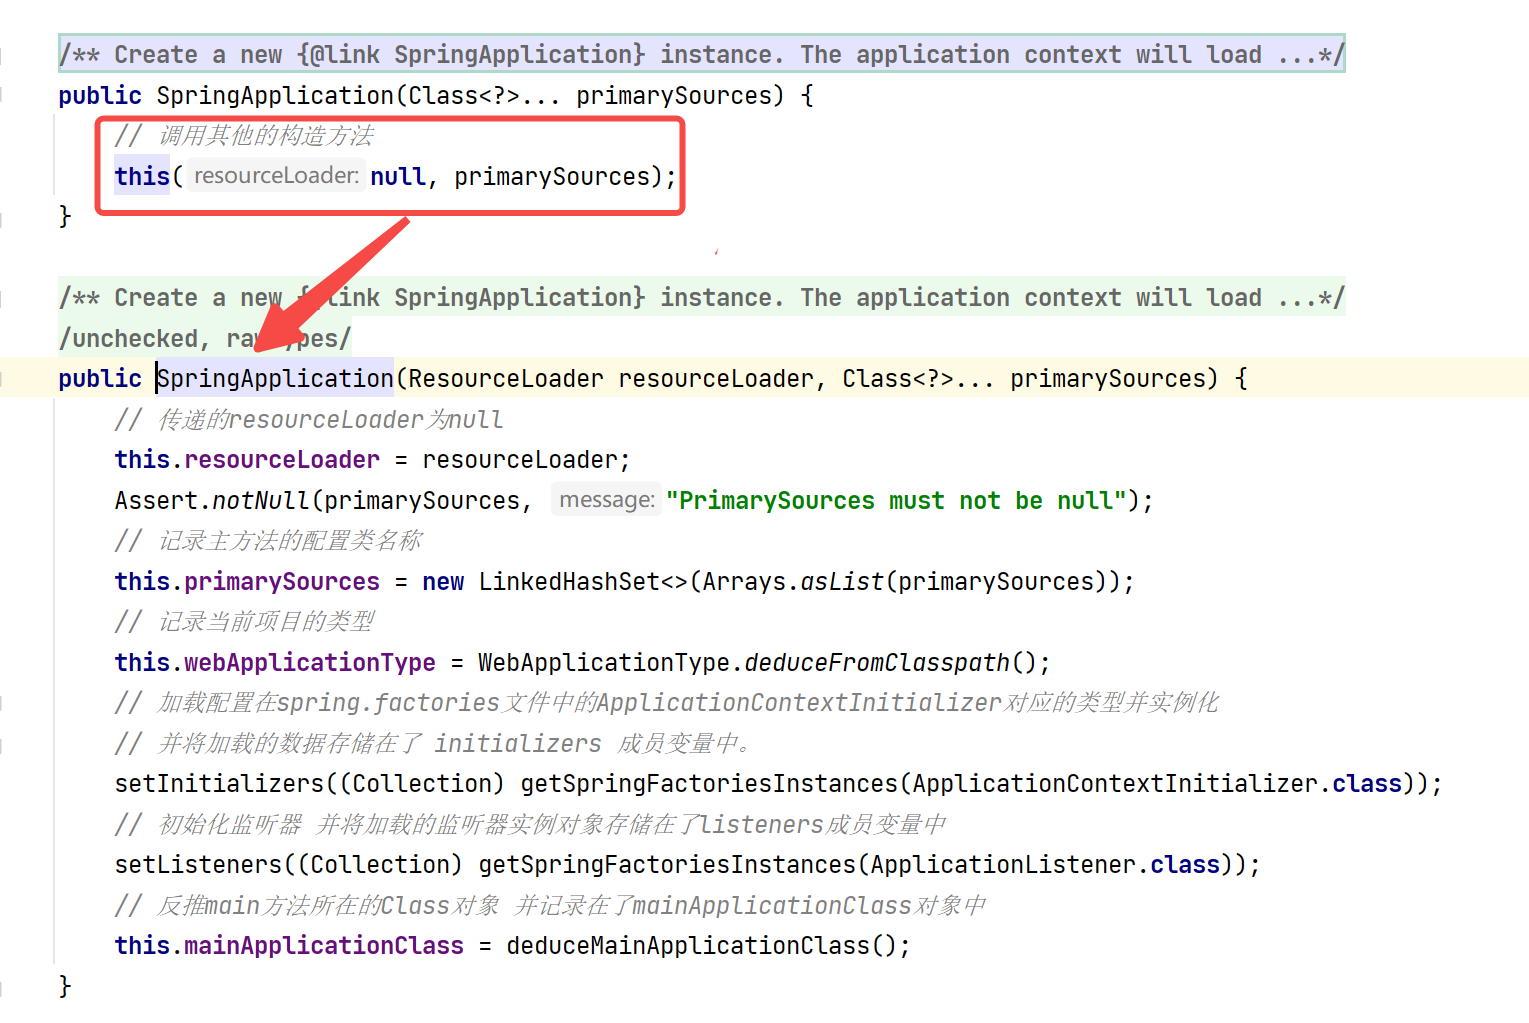
public SpringApplication(ResourceLoader resourceLoader, Class<?>... primarySources) {// 传递的resourceLoader为nullthis.resourceLoader = resourceLoader;Assert.notNull(primarySources, "PrimarySources must not be null");// 记录主方法的配置类名称this.primarySources = new LinkedHashSet<>(Arrays.asList(primarySources));// 记录当前项目的类型this.webApplicationType = WebApplicationType.deduceFromClasspath();// 加载配置在spring.factories文件中的ApplicationContextInitializer对应的类型并实例化// 并将加载的数据存储在了 initializers 成员变量中。setInitializers((Collection) getSpringFactoriesInstances(ApplicationContextInitializer.class));// 初始化监听器 并将加载的监听器实例对象存储在了listeners成员变量中setListeners((Collection) getSpringFactoriesInstances(ApplicationListener.class));// 反推main方法所在的Class对象 并记录在了mainApplicationClass对象中this.mainApplicationClass = deduceMainApplicationClass();
}
run方法
-
创建了一个任务执行的观察器,统计启动的时间
-
声明ConfigurableApplicationContext对象
-
声明集合容器来存储SpringBootExceptionReporter即启动错误的回调接口
-
设置java.awt.headless的系统属性
-
获取我们之间初始化的监听器(EventPublishingRunListener),并触发starting事件
-
创建ApplicationArguments这是一个应用程序的参数持有类
-
创建ConfigurableEnvironment这时一个配置环境的对象
-
配置需要忽略的BeanInfo信息
-
配置Banner信息对象
-
创建对象的上下文对象
-
加载配置的启动异常的回调异常处理器
-
刷新应用上下文,本质就是完成Spring容器的初始化操作
-
启动结束记录启动耗时
-
完成对应的事件广播
-
返回应用上下文对象。
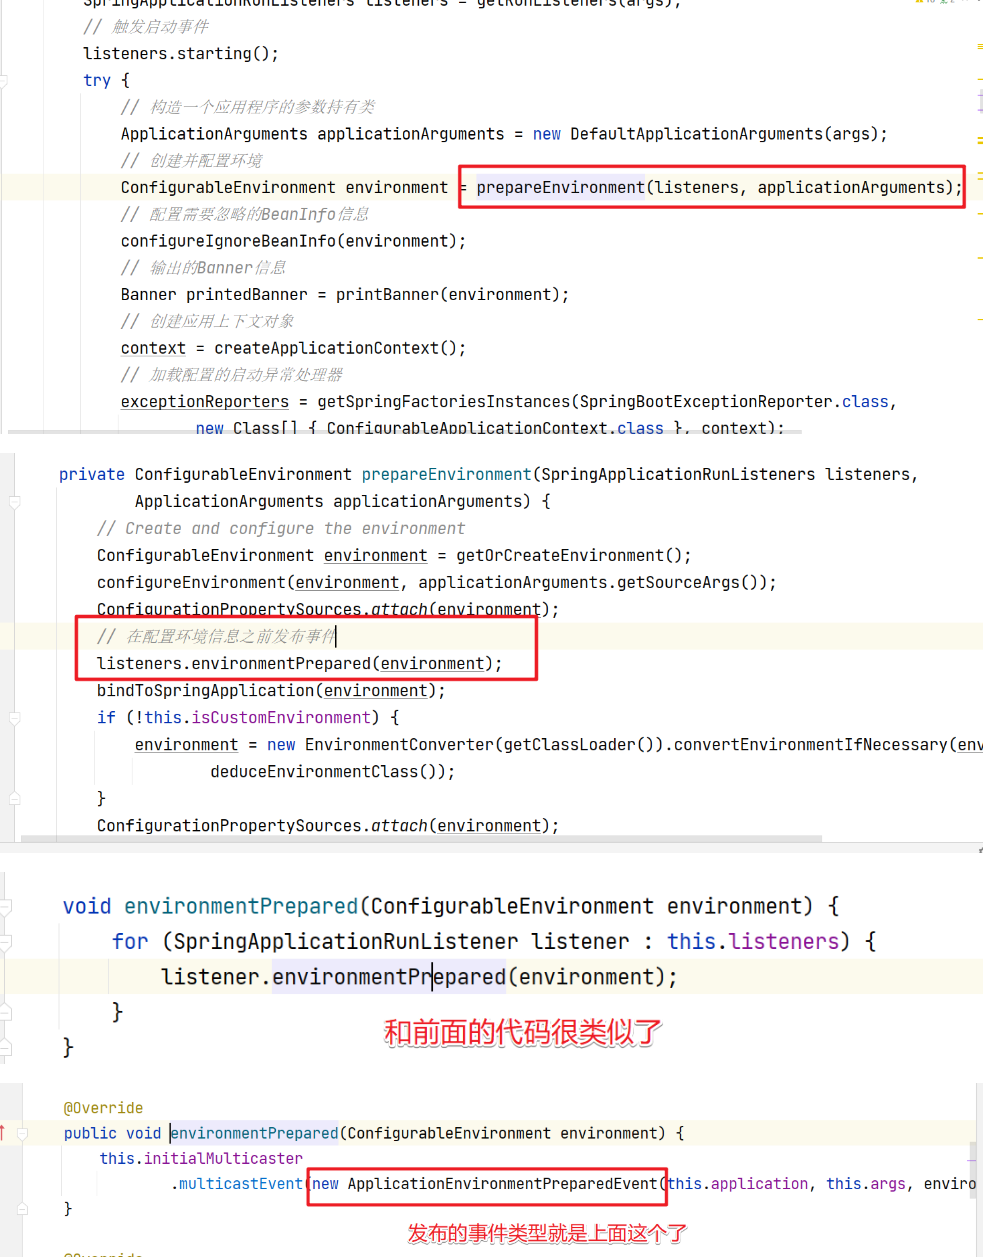
public ConfigurableApplicationContext run(String... args) {// 创建一个任务执行观察器StopWatch stopWatch = new StopWatch();// 开始执行记录执行时间stopWatch.start();// 声明 ConfigurableApplicationContext 对象ConfigurableApplicationContext context = null;// 声明集合容器用来存储 SpringBootExceptionReporter 启动错误的回调接口Collection<SpringBootExceptionReporter> exceptionReporters = new ArrayList<>();// 设置了一个名为java.awt.headless的系统属性// 其实是想设置该应用程序,即使没有检测到显示器,也允许其启动.//对于服务器来说,是不需要显示器的,所以要这样设置.configureHeadlessProperty();// 获取 SpringApplicationRunListener 加载的是 EventPublishingRunListener// 获取启动时到监听器SpringApplicationRunListeners listeners = getRunListeners(args);// 触发启动事件listeners.starting();try {// 构造一个应用程序的参数持有类ApplicationArguments applicationArguments = new DefaultApplicationArguments(args);// 创建并配置环境ConfigurableEnvironment environment = prepareEnvironment(listeners, applicationArguments);// 配置需要忽略的BeanInfo信息configureIgnoreBeanInfo(environment);// 输出的Banner信息Banner printedBanner = printBanner(environment);// 创建应用上下文对象context = createApplicationContext();// 加载配置的启动异常处理器exceptionReporters = getSpringFactoriesInstances(SpringBootExceptionReporter.class,new Class[] { ConfigurableApplicationContext.class }, context);// 刷新前操作prepareContext(context, environment, listeners, applicationArguments, printedBanner);// 刷新应用上下文 完成Spring容器的初始化refreshContext(context);// 刷新后操作afterRefresh(context, applicationArguments);// 结束记录启动时间stopWatch.stop();if (this.logStartupInfo) {new StartupInfoLogger(this.mainApplicationClass).logStarted(getApplicationLog(), stopWatch);}// 事件广播 启动完成了listeners.started(context);callRunners(context, applicationArguments);}catch (Throwable ex) {// 事件广播启动出错了handleRunFailure(context, ex, exceptionReporters, listeners);throw new IllegalStateException(ex);}try {// 监听器运行中listeners.running(context);}catch (Throwable ex) {handleRunFailure(context, ex, exceptionReporters, null);throw new IllegalStateException(ex);}// 返回上下文对象--> Spring容器对象return context;
}
首先,我们先看下SpringApplication的构造方法中是如何完成
上述步骤的。
@SuppressWarnings({ "unchecked", "rawtypes" })
public SpringApplication(ResourceLoader resourceLoader, Class<?>... primarySources) {// 传递的resourceLoader为nullthis.resourceLoader = resourceLoader;Assert.notNull(primarySources, "PrimarySources must not be null");// 记录主方法的配置类名称this.primarySources = new LinkedHashSet<>(Arrays.asList(primarySources));// 记录当前项目的类型this.webApplicationType = WebApplicationType.deduceFromClasspath();// 加载配置在spring.factories文件中的ApplicationContextInitializer对应的类型并实例化// 并将加载的数据存储在了 initializers 成员变量中。setInitializers((Collection) getSpringFactoriesInstances(ApplicationContextInitializer.class));// 初始化监听器 并将加载的监听器实例对象存储在了listeners成员变量中setListeners((Collection) getSpringFactoriesInstances(ApplicationListener.class));// 反推main方法所在的Class对象 并记录在了mainApplicationClass对象中this.mainApplicationClass = deduceMainApplicationClass();
}首先,webApplcaitionType:
根据ClassPath反推。
this.webApplicationType = WebApplicationType.deduceFromClasspath();// 具体
// 根据class推导出web项目类型、Servlet项目或者Reactive项目。
static WebApplicationType deduceFromClasspath() {if (ClassUtils.isPresent(WEBFLUX_INDICATOR_CLASS, null)&& !ClassUtils.isPresent(WEBMVC_INDICATOR_CLASS, null)&& !ClassUtils.isPresent(JERSEY_INDICATOR_CLASS, null)) {return WebApplicationType.REACTIVE;}for (String className : SERVLET_INDICATOR_CLASSES) {if (!ClassUtils.isPresent(className, null)) {return WebApplicationType.NONE;}}return WebApplicationType.SERVLET;
}// ClassUtils 什么角色?
public static boolean isPresent(String className, @Nullable ClassLoader classLoader) {try {forName(className, classLoader);return true;} catch (IllegalAccessError var3) {throw new IllegalStateException("Readability mismatch in inheritance hierarchy of class [" + className + "]: " + var3.getMessage(), var3);} catch (Throwable var4) {return false;}
}// 上面的常量信息如下
private static final String[] SERVLET_INDICATOR_CLASSES = { "javax.servlet.Servlet","org.springframework.web.context.ConfigurableWebApplicationContext" };private static final String WEBMVC_INDICATOR_CLASS = "org.springframework.web.servlet.DispatcherServlet";private static final String WEBFLUX_INDICATOR_CLASS = "org.springframework.web.reactive.DispatcherHandler";private static final String JERSEY_INDICATOR_CLASS = "org.glassfish.jersey.servlet.ServletContainer";private static final String SERVLET_APPLICATION_CONTEXT_CLASS = "org.springframework.web.context.WebApplicationContext";private static final String REACTIVE_APPLICATION_CONTEXT_CLASS = "org.springframework.boot.web.reactive.context.ReactiveWebApplicationContext";
根据class推导出web项目类型、Servlet项目或者Reactive项目。
setInitializers
// 加载配置在spring.factories文件中的ApplicationContextInitializer对应的类型并实例化
// 并将加载的数据存储在了 initializers 成员变量中。
setInitializers((Collection) getSpringFactoriesInstances(ApplicationContextInitializer.class));
首先所有的初始化器都实现了 ApplicationContextInitializer接口,也就是根据这个类型来加载相关的实现类。
public interface ApplicationContextInitializer<C extends ConfigurableApplicationContext> {void initialize(C var1);
}
然后加载的关键方法是 getSpringFactoriesInstances()方法。该方法会加载 spring.factories文件中的key为 org.springframework.context.ApplicationContextInitializer 的值。
// Spring-boot
# Application Context Initializers
org.springframework.context.ApplicationContextInitializer=\
org.springframework.boot.context.ConfigurationWarningsApplicationContextInitializer,\
org.springframework.boot.context.ContextIdApplicationContextInitializer,\
org.springframework.boot.context.config.DelegatingApplicationContextInitializer,\
org.springframework.boot.rsocket.context.RSocketPortInfoApplicationContextInitializer,\
org.springframework.boot.web.context.ServerPortInfoApplicationContextInitializer// Spring-boot-autoconfigure项目
# Initializers
org.springframework.context.ApplicationContextInitializer=\
org.springframework.boot.autoconfigure.SharedMetadataReaderFactoryContextInitializer,\
org.springframework.boot.autoconfigure.logging.ConditionEvaluationReportLoggingListener
具体的加载方法为 getSpringFacotiesInstance()方法
/*** 初始化Initializer.* SpringFactoriesLoader.loadFactoryNames(type, classLoader)。*    根据对应的类型加载 spring.factories 文件中的配置信息。* @param type 类型* @param parameterTypes 参数类型* @param args 参数* @param <T> 泛型* @return  返回实例*/
private <T> Collection<T> getSpringFactoriesInstances(Class<T> type, Class<?>[] parameterTypes, Object... args) {// 获取当前上下文类加载器ClassLoader classLoader = getClassLoader();// 获取到的扩展类名存入set集合中防止重复Set<String> names = new LinkedHashSet<>(SpringFactoriesLoader.loadFactoryNames(type, classLoader));// 创建扩展点实例List<T> instances = createSpringFactoriesInstances(type, parameterTypes, classLoader, args, names);AnnotationAwareOrderComparator.sort(instances);return instances;
}
先进入 SpringFactoriesLoader.loadFactoryNames(type, classLoader)中具体查看加载文件的过程
public static List<String> loadFactoryNames(Class<?> factoryType, @Nullable ClassLoader classLoader) {String factoryTypeName = factoryType.getName();return (List)loadSpringFactories(classLoader).getOrDefault(factoryTypeName, Collections.emptyList());
}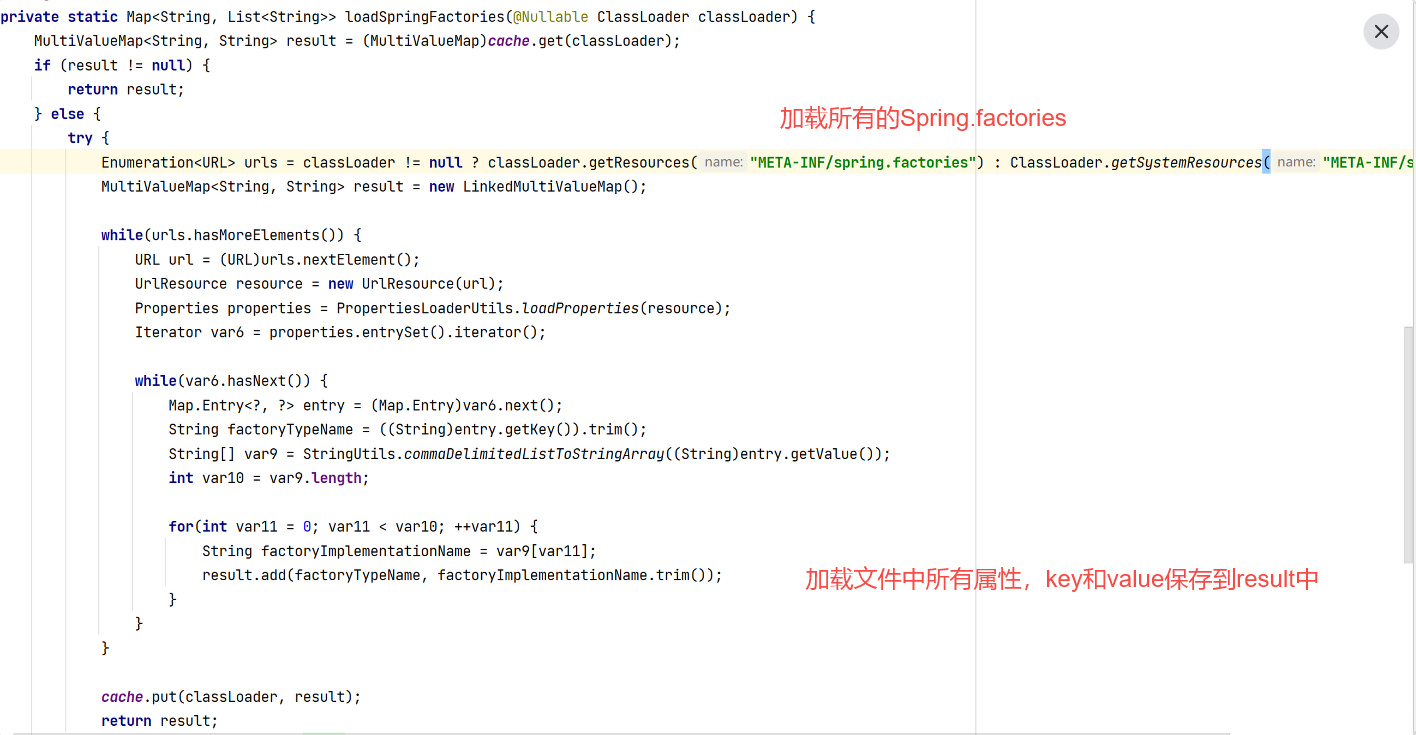
通过 loadSpringFactories 方法我们看到把 spring.factories文件中的所有信息都加载到了内存中了,但是我们现在只需要加载ApplicationContextInitializer类型的数据。这时我们再通过 getOrDefault()方法来查看。

private <T> List<T> createSpringFactoriesInstances(Class<T> type, Class<?>[] parameterTypes,ClassLoader classLoader, Object[] args, Set<String> names) {// 创建实例的集合容器List<T> instances = new ArrayList<>(names.size());for (String name : names) {try {// 通过反射将扩展点实例实例化Class<?> instanceClass = ClassUtils.forName(name, classLoader);Assert.isAssignable(type, instanceClass);Constructor<?> constructor = instanceClass.getDeclaredConstructor(parameterTypes);T instance = (T) BeanUtils.instantiateClass(constructor, args);instances.add(instance);}catch (Throwable ex) {throw new IllegalArgumentException("Cannot instantiate " + type + " : " + name, ex);}}return instances;
}
setListeners
清楚了 setInitializers()方法的作用后,再看 setListeners()方法就非常简单了,都是调用了 getSpringFactoriesInstances方法,只是传入的类型不同。也就是要获取的 META-INF/spring.factories文件中定义的不同信息罢了。即加载定义在 META-INF/spring.factories文件中声明的所有的监听器,并将获取后的监听器存储在了 SpringApplication的 listeners属性中。
mainApplicationClass
duduceMainApplicaitonClass()方法是如何反推导出main方法所在的Class对象的?
StackTrace其实就是记录了程序方法执行的链路。那么相关的调用链路我们都可以获取到,剩下的就只需要获取每链路判断执行的方法名称是否是 main就可以了。
/*** StackTrace.*我们在学习函数调用时,都知道每个函数都拥有自己的栈空间。*一个函数被调用时,就创建一个新的栈空间。那么通过函数的嵌套调用最后就形成了一个函数调用堆栈。* @return类对象*/
private Class<?> deduceMainApplicationClass() {try {// 获取当前run方法执行的堆栈信息StackTraceElement[] stackTrace = new RuntimeException().getStackTrace();// 遍历堆栈信息for (StackTraceElement stackTraceElement : stackTrace) {// 如果调用的是main方法说明就找到了if ("main".equals(stackTraceElement.getMethodName())) {return Class.forName(stackTraceElement.getClassName());}}}catch (ClassNotFoundException ex) {// Swallow and continue}return null;
}
SpringBoot监听器
监听器的设计会使用到Java设计模式中的观察者模式,所以在搞清楚SpringBoot中的监听器的设计之前需要把观察者模式先弄清楚。
观察者模式又称为发布/订阅(Publish/Subscribe)模式,在对象之间定义了一对多的依赖,这样一来,当一个对象改变状态,依赖它的对象会收到通知并自动更新。
在java.util包中包含有基本的Observer接口和Observable抽象类,功能上和Subject接口和Observer接口类似。不过在使用上方便多了,因为许多功能比如说注册,删除,通知观察者的那些功能已经内置好了。
SpringBoot启动这涉及到的监听器这块是如何实现的?
我们知道在SpringApplication的构造方法中会加载所有声明在spring.factories中的监听器。其实就是加载的spring.factories文件中的key为ApplicationListener的value
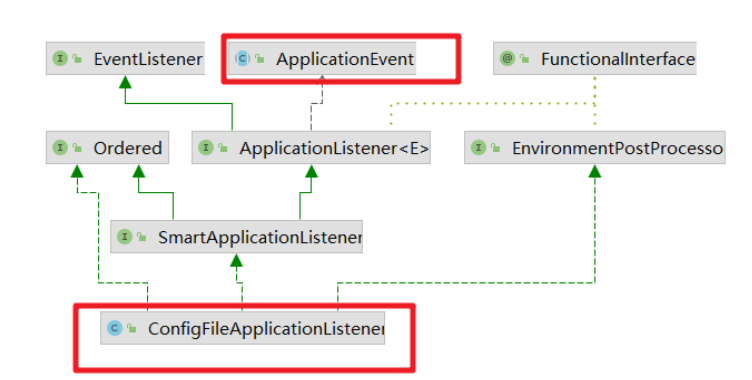
通过对这些内置监听器的源码查看我们发现这些监听器都实现了 ApplicationEvent接口。也就是都会监听 ApplicationEvent发布的相关的事件。ApplicationContext事件机制是观察者设计模式的实现,通过ApplicationEvent类和ApplicationListener接口,可以实现ApplicationContext事件处理。
在SpringApplication.run()方法中是如何发布对应的事件的?
首先会通过getRunListeners方法来获取我们在spring.factories中定义的SpringApplicationRunListener类型的实例。也就是EventPublishingRunListener。
加载这个类型的时候会同步的完成实例化。
private SpringApplicationRunListeners getRunListeners(String[] args) {Class<?>[] types = new Class<?>[] { SpringApplication.class, String[].class };return new SpringApplicationRunListeners(logger,// getSpringFactoriesInstances 读取spring.factories 文件中key 为 SpringApplicationRunListener 类型的getSpringFactoriesInstances(SpringApplicationRunListener.class, types, this, args));
}
//实例化操作就会执行EventPublishingRunListener。
到这其实我们就已经清楚了EventPublishingRunListener和我们前面加载的11个监听器的关系了。然后在看事件发布的方法。
void starting() {// 发布器 EventPulishingRunListenerfor (SpringApplicationRunListener listener : this.listeners) {listener.starting();}
}// 深入 EventPulishingRunListener中的
@Override
public void starting() {// System.out.println("EventPublishingRunListener ----》starting ");this.initialMulticaster.multicastEvent(new ApplicationStartingEvent(this.application, this.args));
}// 再探!
public void multicastEvent(ApplicationEvent event, @Nullable ResolvableType eventType) {ResolvableType type = eventType != null ? eventType : this.resolveDefaultEventType(event);Executor executor = this.getTaskExecutor();Iterator var5 = this.getApplicationListeners(event, type).iterator();while(var5.hasNext()) {ApplicationListener<?> listener = (ApplicationListener)var5.next();if (executor != null) {executor.execute(() -> {this.invokeListener(listener, event);});} else {// 触发会进入ConfigFileApplicationListener对象的onApplicationEvent方法中this.invokeListener(listener, event);}}}
通过代码我们可以发现当前的事件是ApplicationStartingEvent事件,都不满足,所以ConfigFileApplicationListener在SpringBoot项目开始启动的时候就不会做任何的操作。而当我们在配置环境信息的时候,会发布对应的事件来触发。
再触发ConfigFileApplicationListener监听器的时候就会触发如下方法了
其实到这,后面的事件发布与监听器的处理逻辑就差不多是一致了。对SpringBoot中的监听器部分分析差不多了。像SpringBoot的属性文件中的信息什么时候加载的就是在这些内置的监听器中完成的。
SpringBoot如何自定义监听器?
首先来回顾下SpringBoot中给我们提供的默认的监听器,这些都定义在spring.factories文件中。
| 监听器 | 监听事件 | 说明 |
| ClearCachesApplicationListener | ContextRefreshedEvent | 当触发ContextRefreshedEvent事件会清空应用的缓存 |
| ParentContextCloserApplicationListener | ParentContextAvailableEvent | 触发ParentContextAvailableEvent事件会完成父容器关闭的监听器 |
| CloudFoundryVcapEnvironmentPostProcessor | ApplicationPreparedEvent | 判断环境中是否存在VCAP_APPLICATION或者VCAP_SERVICES。如果有就添加Cloud Foundry的配置;没有就不执行任何操作。 |
| FileEncodingApplicationListener | ApplicationEnvironmentPreparedEvent | 文件编码的监听器 |
| AnsiOutputApplicationListener | ApplicationEnvironmentPreparedEvent | 根据 spring.output.ansi.enabled参数配置 AnsiOutput |
| ConfigFileApplicationListener | ApplicationEnvironmentPreparedEvent <br>ApplicationPreparedEvent | 完成相关属性文件的加载,application.properties application.yml 前面源码内容详细讲解过 |
| DelegatingApplicationListener | ApplicationEnvironmentPreparedEvent | 监听到事件后转发给环境变量 context.listener.classes指定的那些事件监听器 |
| ClasspathLoggingApplicationListener | ApplicationEnvironmentPreparedEvent <br>ApplicationFailedEvent | 一个SmartApplicationListener,对环境就绪事件ApplicationEnvironmentPreparedEvent/应用失败事件ApplicationFailedEvent做出响应,往日志DEBUG级别输出TCCL(thread context class loader)的classpath。 |
| LoggingApplicationListener | ApplicationStartingEvent <br>ApplicationEnvironmentPreparedEvent <br>ApplicationPreparedEvent <br>ContextClosedEvent <br>ApplicationFailedEvent | 配置 LoggingSystem。使用 logging.config环境变量指定的配置或者缺省配置 |
| LiquibaseServiceLocatorApplicationListener | ApplicationStartingEvent | 使用一个可以和Spring Boot可执行jar包配合工作的版本替换liquibase ServiceLocator |
| BackgroundPreinitializer | ApplicationStartingEvent <br>ApplicationReadyEvent <br>ApplicationFailedEvent |
SpringBoot中的事件类型
然后我们来看下对应的事件类型,SpringBoot中的所有的事件都是继承于 ApplicationEvent这个抽象类,在SpringBoot启动的时候会发布如下的相关事件,而这些事件其实都实现了 SpringApplicationContext接口。
| 事件 | 说明 |
| ApplicationStartingEvent | 容器启动的事件 |
| ApplicationEnvironmentPreparedEvent | 应用处理环境变量相关的事件 |
| ApplicationContextInitializedEvent | 容器初始化的事件 |
| ApplicationPreparedEvent | 应用准备的事件 |
| ApplicationFailedEvent | 应用启动出错的事件 |
| ApplicationStartedEvent | 应用Started状态事件 |
| ApplicationReadyEvent | 应用准备就绪的事件 |
也就是这些事件都是属于SpringBoot启动过程中涉及到的相关的事件。当然在启动过程中还会发布其他的相关事件...
自定义事件?
监听所有事件
/*** 自定义的监听器* 1.必须实现 ApplicationListener接口* 监听器监听的事件类型 泛型中如果制定的是 ApplicationEvent 表示监听所有的事件* 2.需要把自定义的监听器添加到spring.factories文件中* 这样当我们启动服务的时候就可以看到相关事件发布的时候,我们的监听器被触发了。*/
public class MySpringApplicationListenerimplements ApplicationListener<ApplicationEvent> {@Overridepublic void onApplicationEvent(ApplicationEvent event) {System.out.println("自定义监听器--->" + event);}
}
监听特定事件
public class MySpringApplicationStartingListener implements ApplicationListener<ApplicationStartingEvent> {@Overridepublic void onApplicationEvent(ApplicationStartingEvent event) {System.out.println("MySpringApplicationStartingListener--------->" + event);}
}
自定义事件
那如果我们想要通过自定义的监听器来监听自定义的事件呢?首先创建自定义的事件类,非常简单,只需要继承ApplicationEvent即可。然后在自定义的监听器中监听自定义的事件。同样需要在spring.factories中注册!
/*** 自定义监听器*    监听自定义的事件*/
public class MyCustomerEventListener implements ApplicationListener<MyEvent> {@Overridepublic void onApplicationEvent(MyEvent event) {System.out.println("MyCustomerEventListener ---》自定义事件触发" + event);// 触发对应的事件后 业务处理new Thread(()->{// 业务....}).start();}
}/*** 自定义的事件类型 --- 标志* 不局限于服务的启动,而是在特定的场景下面触发*/
public class MyEvent extends ApplicationEvent {/*** Create a new {@code ApplicationEvent}.** @param source the object on which the event initially occurred or with*               which the event is associated (never {@code null})*/public MyEvent(Object source) {super(source);}
}// 注册
org.springframework.context.ApplicationListener=\
com.dura.listener.MySpringApplicationListener,\
com.dura.listener.MySpringApplicationStartingListener,\
com.dura.listener.MyCustomerEventListener
SpringBoot中属性文件加载的原理
创建SpringBoot项目的时候会在对应的application.properties或者application.yml文件中添加对应的属性信息,我们的问题是这些属性文件是什么时候被加载的?如果要实现自定义的属性文件怎么来实现呢?
结合我们前面分析的SpringBoot中的监听事件机制,我们首先看下SpringApplication.run()方法,在该方法中会针对SpringBoot项目启动的不同的阶段来发布对应的事件。
处理属性文件加载解析的监听器是 ConfigFileApplicationListener ,这个监听器监听的事件有两个。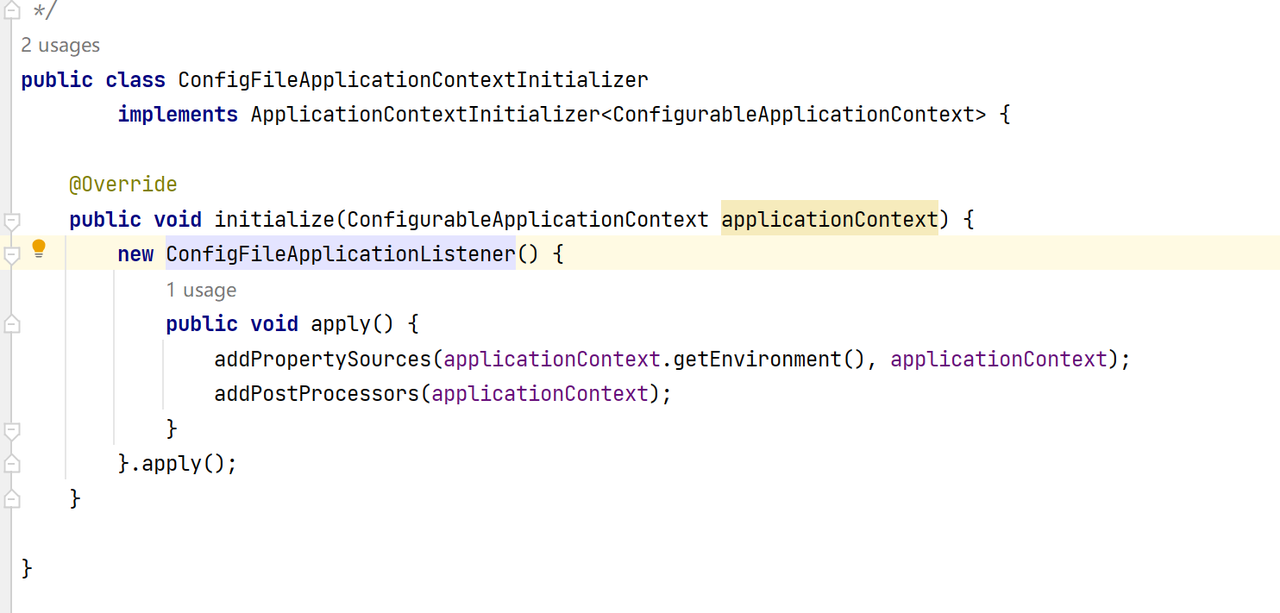
ConfigFileApplicationListener
具体的如何来处理配置文件的加载解析的?
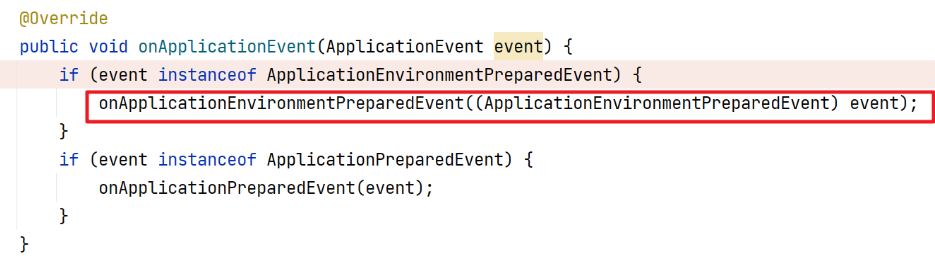
/*** 默认的是监听所有的事件.* @param event 事件*/
@Override
public void onApplicationEvent(ApplicationEvent event) {// 如果是 ApplicationEnvironmentPreparedEvent则处理if (event instanceof ApplicationEnvironmentPreparedEvent) {onApplicationEnvironmentPreparedEvent((ApplicationEnvironmentPreparedEvent) event);}// 如果是 ApplicationPreparedEvent 则处理if (event instanceof ApplicationPreparedEvent) {onApplicationPreparedEvent(event);}
}
根据逻辑我们直接进入onApplicationEnvironmentPreparedEvent()方法中。
private void onApplicationEnvironmentPreparedEvent(ApplicationEnvironmentPreparedEvent event) {// 加载系统提供的环境配置的后置处理器List<EnvironmentPostProcessor> postProcessors = loadPostProcessors();// 添加自身即 ConfigFileApplicationListener 为后置处理器postProcessors.add(this);// 原来有4个 现在加了一个需要重新排序AnnotationAwareOrderComparator.sort(postProcessors);for (EnvironmentPostProcessor postProcessor : postProcessors) {// 系统提供那4个不是重点,重点是 ConfigFileApplicationListener 中的这个方法处理postProcessor.postProcessEnvironment(event.getEnvironment(), event.getSpringApplication());}
}//   直接进入ConfigFileApplicationListener.postProcessEnvironment()方法。
@Override
public void postProcessEnvironment(ConfigurableEnvironment environment, SpringApplication application) {// 单个方法直接进入addPropertySources(environment, application.getResourceLoader());
}protected void addPropertySources(ConfigurableEnvironment environment, ResourceLoader resourceLoader) {// 处理我们在属性文件中配置的 ${random.value} ${random.long} ${random.uuid}RandomValuePropertySource.addToEnvironment(environment);// 创建Loader对象同时会完成属性加载器的加载 同时调用load方法  boge_javanew Loader(environment, resourceLoader).load();
}
new Loader(environment, resourceLoader)
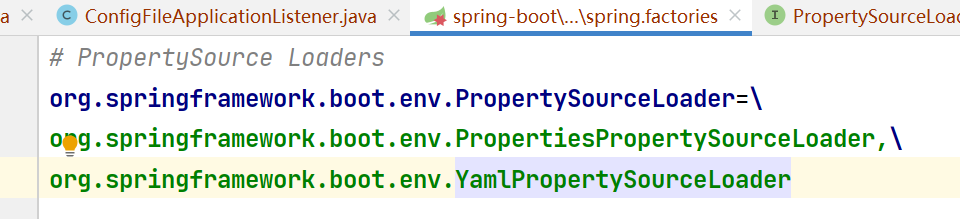
Loader(ConfigurableEnvironment environment, ResourceLoader resourceLoader) {// environment对象的赋值this.environment = environment;// 占位符的处理器this.placeholdersResolver = new PropertySourcesPlaceholdersResolver(this.environment);// 资源的加载器this.resourceLoader = (resourceLoader != null) ? resourceLoader : new DefaultResourceLoader();// 重点: 获取spring.factories 中配置的 属性加载器 用来加载解析properties文件或者yml文件this.propertySourceLoaders = SpringFactoriesLoader.loadFactories(PropertySourceLoader.class,getClass().getClassLoader());
}
通过源码我们可以发现在其中获取到了属性文件的加载器、从spring.factories文件中获取,对应的类型是 PropertySourceLoader类型。
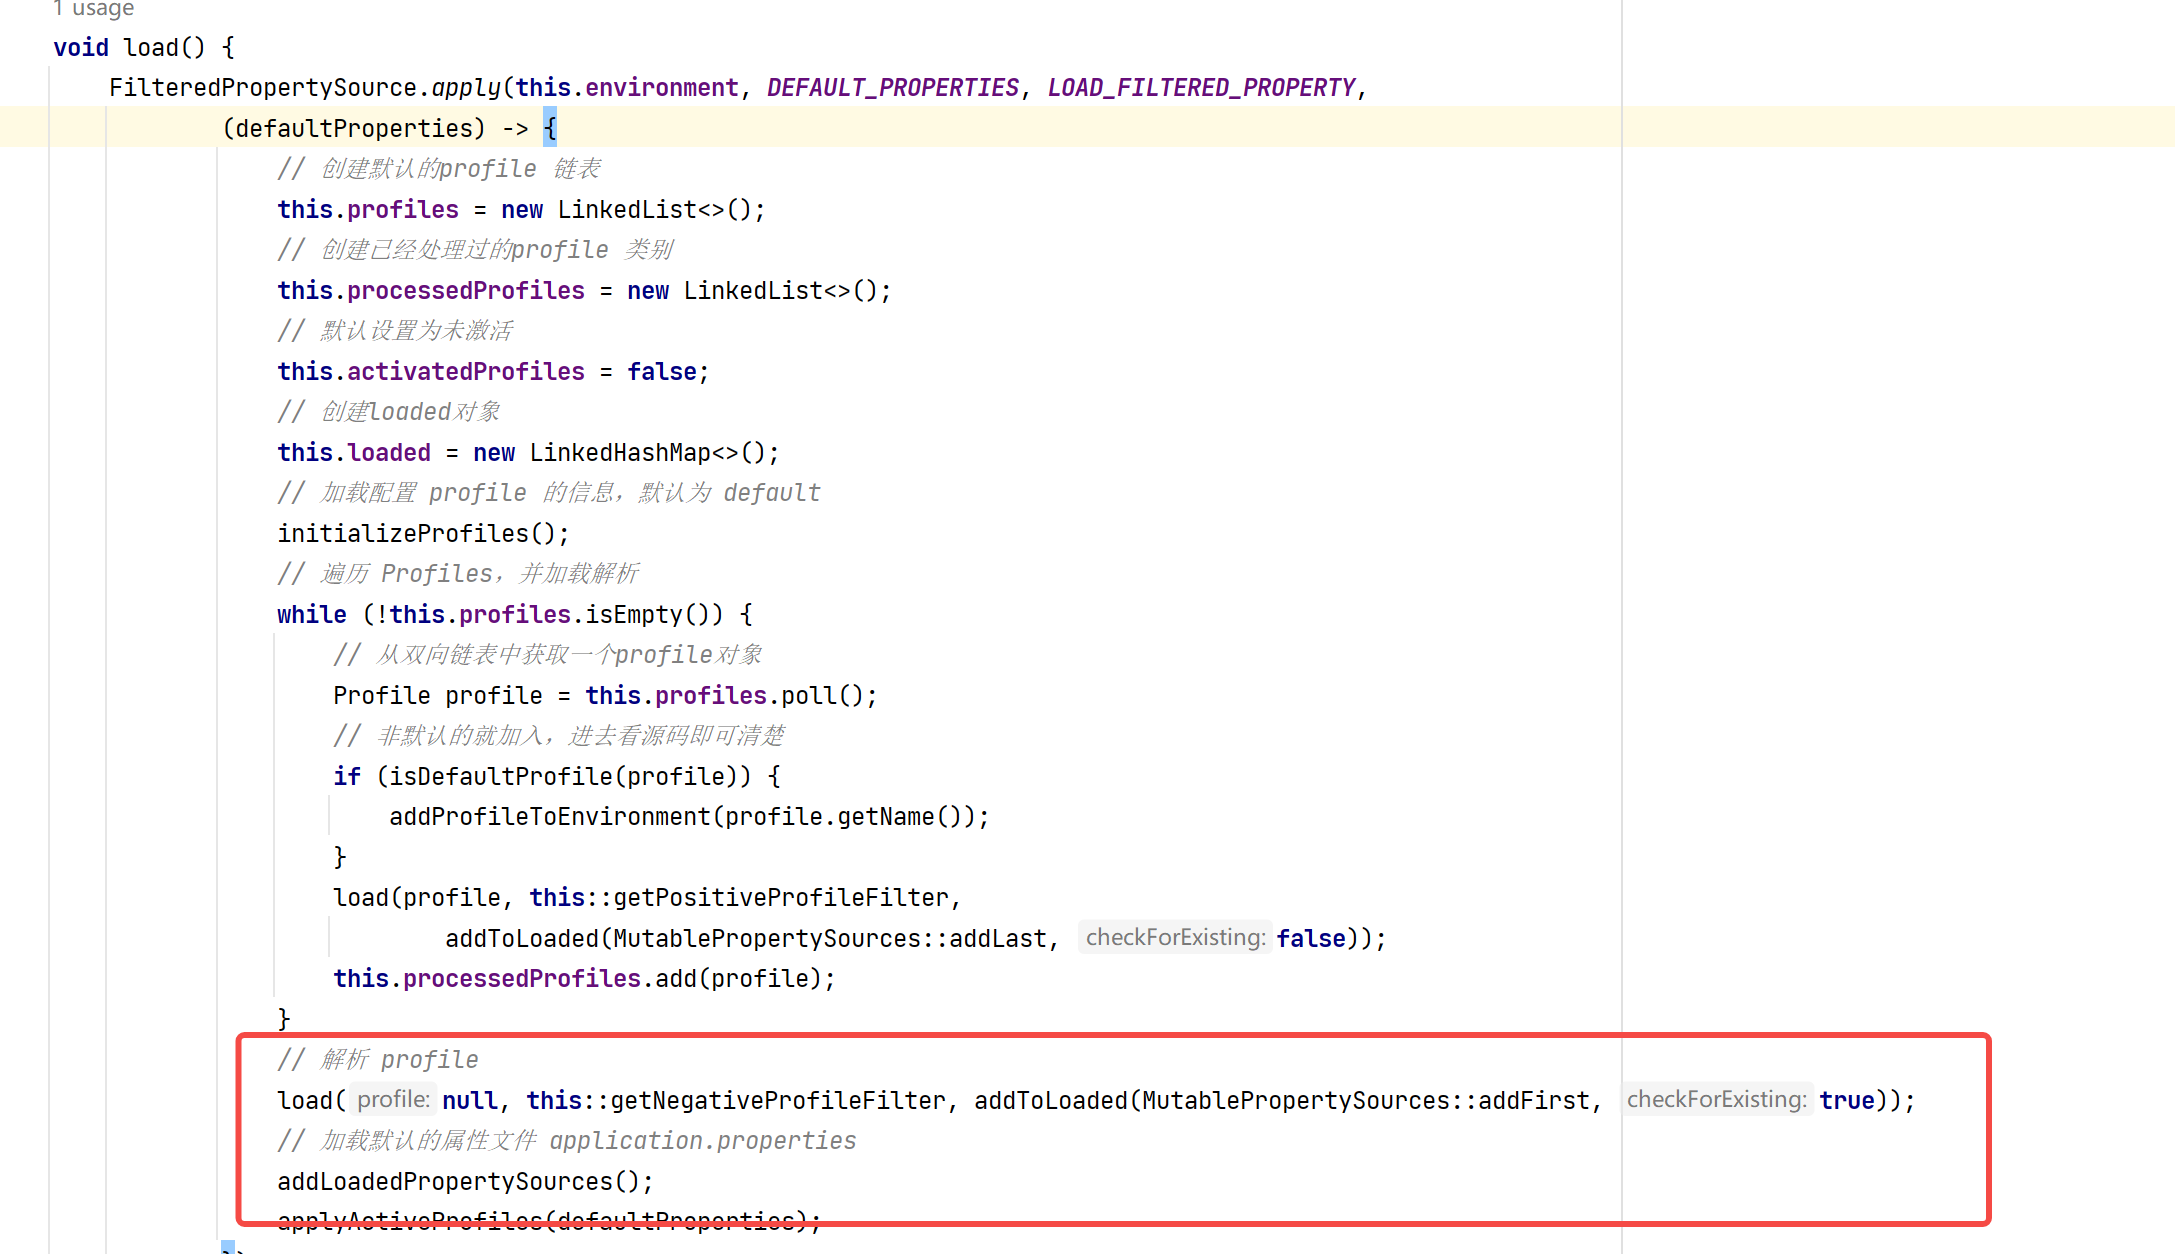
void load() {FilteredPropertySource.apply(this.environment, DEFAULT_PROPERTIES, LOAD_FILTERED_PROPERTY,(defaultProperties) -> {// 创建默认的profile 链表this.profiles = new LinkedList<>();// 创建已经处理过的profile 类别this.processedProfiles = new LinkedList<>();// 默认设置为未激活this.activatedProfiles = false;// 创建loaded对象this.loaded = new LinkedHashMap<>();// 加载配置 profile 的信息,默认为 defaultinitializeProfiles();// 遍历 Profiles,并加载解析while (!this.profiles.isEmpty()) {// 从双向链表中获取一个profile对象Profile profile = this.profiles.poll();// 非默认的就加入,进去看源码即可清楚if (isDefaultProfile(profile)) {addProfileToEnvironment(profile.getName());}load(profile, this::getPositiveProfileFilter,addToLoaded(MutablePropertySources::addLast, false));this.processedProfiles.add(profile);}// 解析 profileload(null, this::getNegativeProfileFilter, addToLoaded(MutablePropertySources::addFirst, true));// 加载默认的属性文件 application.propertiesaddLoadedPropertySources();applyActiveProfiles(defaultProperties);});
}
然后我们进入具体的apply()方法中来查看。
static void apply(ConfigurableEnvironment environment, String propertySourceName, Set<String> filteredProperties,Consumer<PropertySource<?>> operation) {// 获取当前环境下的所有的资源加载器MutablePropertySources propertySources = environment.getPropertySources();// 根据propertySourceName从众多的加载器中获取对应的加载器 默认的没有 defaultPropertiesPropertySource<?> original = propertySources.get(propertySourceName);if (original == null) {operation.accept(null);return;}propertySources.replace(propertySourceName, new FilteredPropertySource(original, filteredProperties));try {operation.accept(original);}finally {propertySources.replace(propertySourceName, original);}
}
中间的代码都有注释,主要是处理profile的内容。
private void load(Profile profile, DocumentFilterFactory filterFactory, DocumentConsumer consumer) {// 获得默认的扫描路径,如果没有特殊指定 ,// 就采用常量 DEFAULT_ SEARCH_ LOCATIONS中定义的4个路 径 。// 而getSearchNames 方 法获得的就是 application 这个默认的配置文件名。// 然后,逐一遍历加载目录路径及其指定文件名的文件。// file:./config/ file:./ classpath:/config/ classpath:/ 默认的四个路径getSearchLocations().forEach((location) -> {boolean isFolder = location.endsWith("/");// 去对应的路径下获取属性文件 默认的文件名称为 applicationSet<String> names = isFolder ? getSearchNames() : NO_SEARCH_NAMES;names.forEach((name) -> load(location, name, profile, filterFactory, consumer));});
}
进入load方法,会通过前面的两个加载器来分别加载application.properties和application.yml的文件。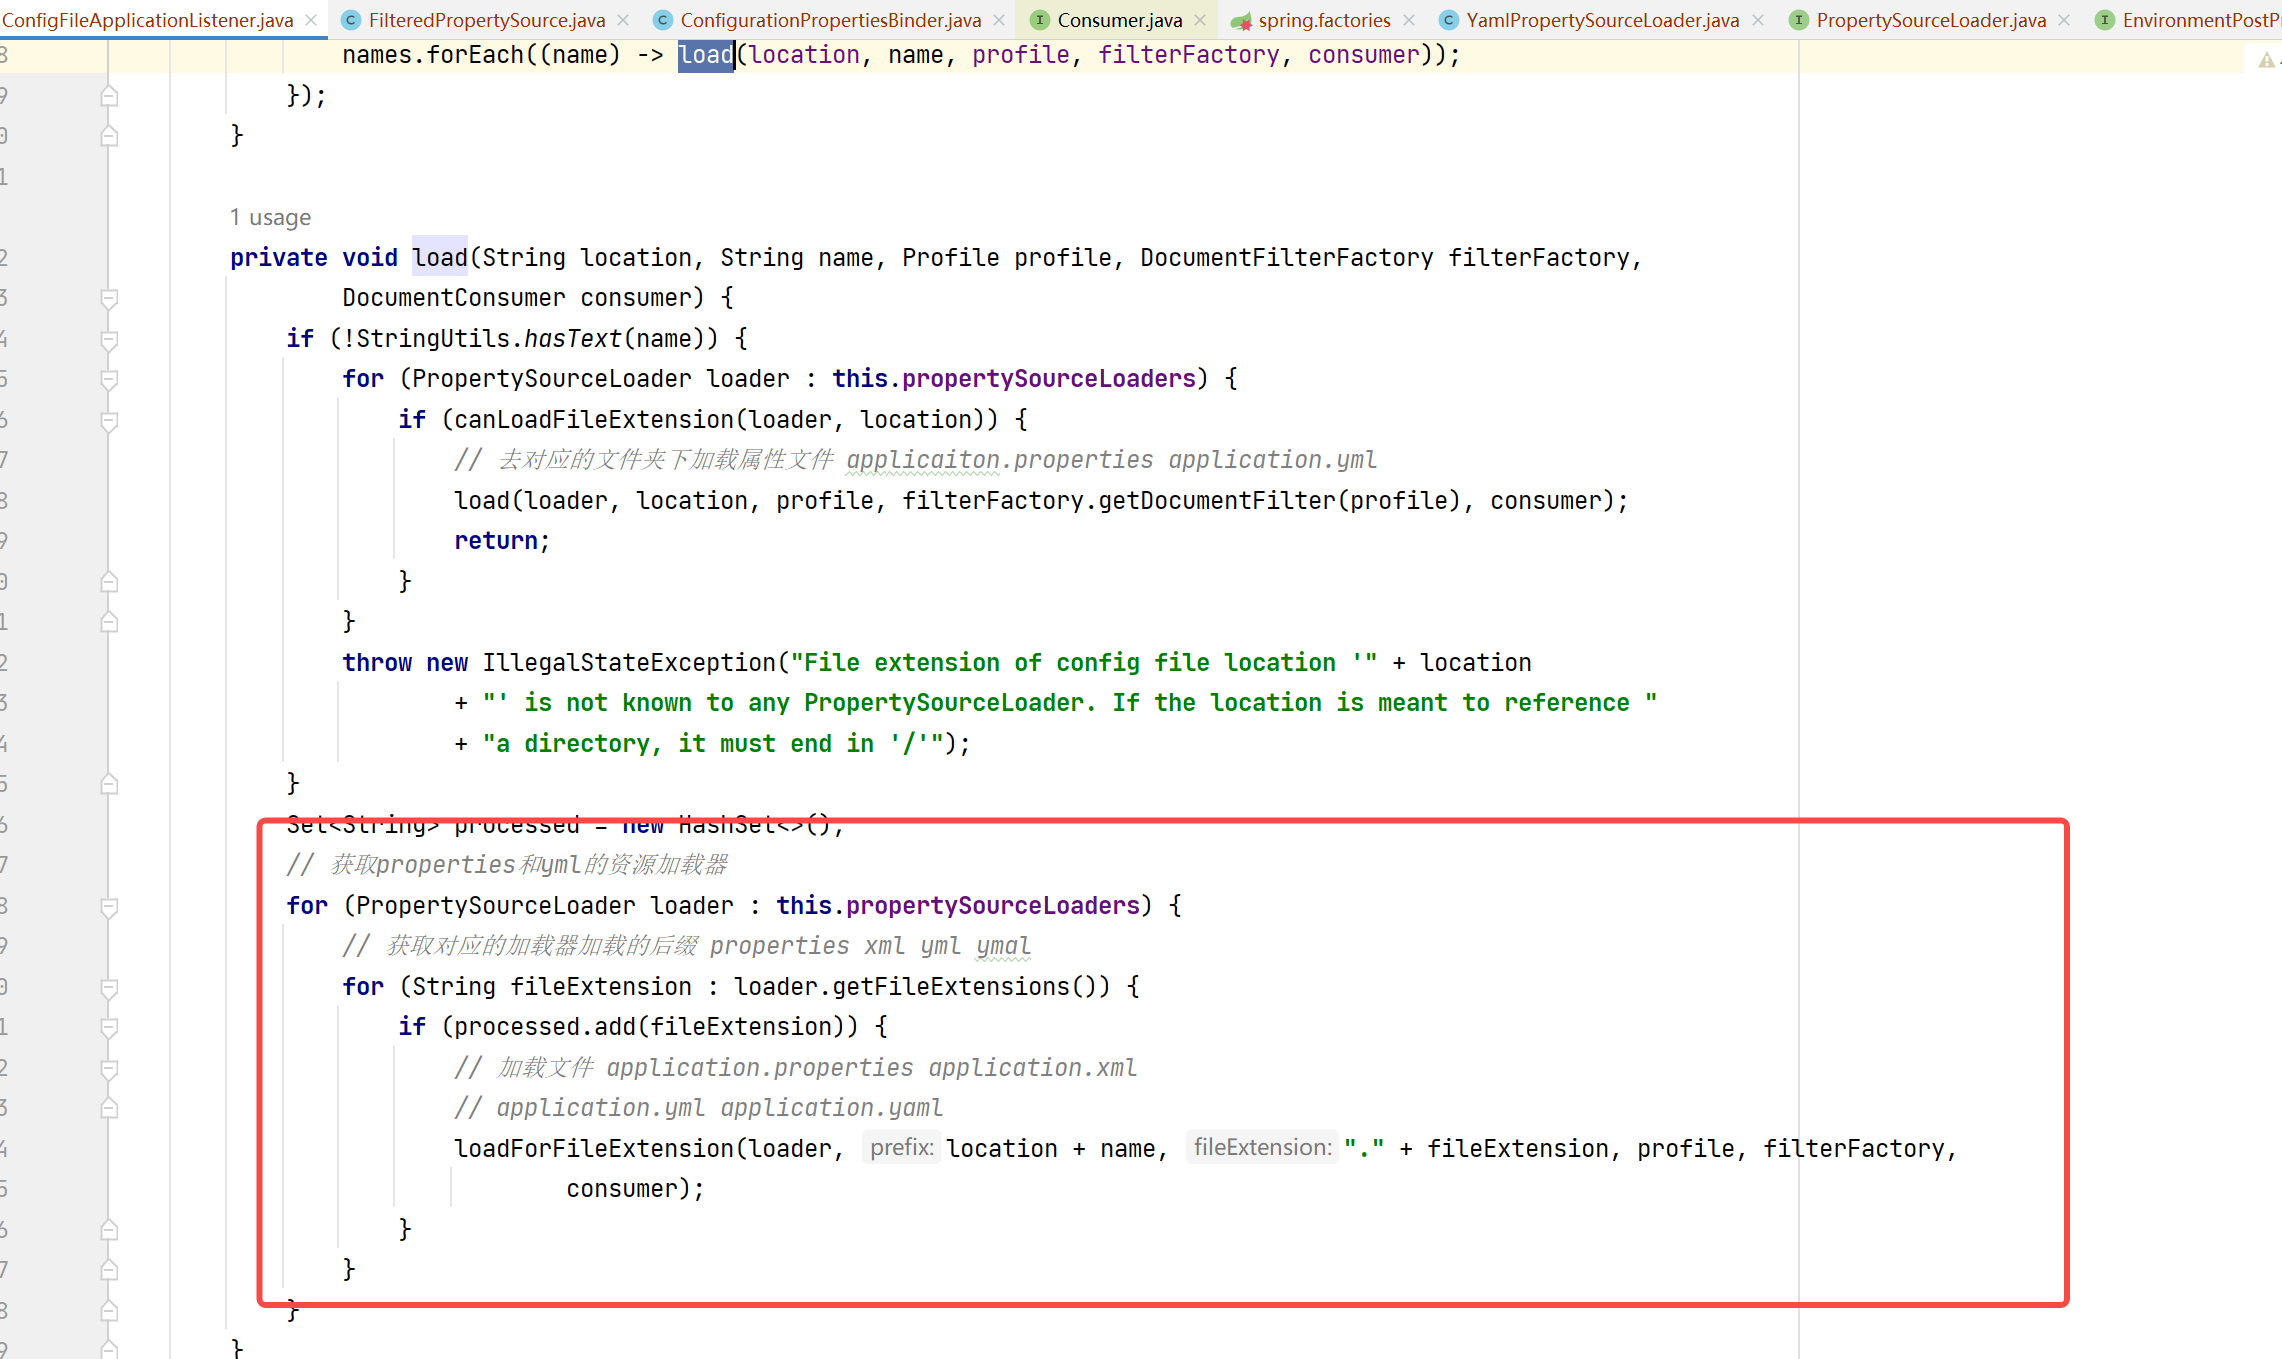
进入loadForFileExtension()方法,对profile和普通配置分别加载
private void loadForFileExtension(PropertySourceLoader loader, String prefix, String fileExtension,Profile profile, DocumentFilterFactory filterFactory, DocumentConsumer consumer) {DocumentFilter defaultFilter = filterFactory.getDocumentFilter(null);DocumentFilter profileFilter = filterFactory.getDocumentFilter(profile);if (profile != null) {// 如果有profile的情况比如 dev --> application-dev.propertiesString profileSpecificFile = prefix + "-" + profile + fileExtension;load(loader, profileSpecificFile, profile, defaultFilter, consumer);load(loader, profileSpecificFile, profile, profileFilter, consumer);// Try profile specific sections in files we've already processedfor (Profile processedProfile : this.processedProfiles) {if (processedProfile != null) {String previouslyLoaded = prefix + "-" + processedProfile + fileExtension;load(loader, previouslyLoaded, profile, profileFilter, consumer);}}}// 加载正常的情况的属性文件 application.propertiesload(loader, prefix + fileExtension, profile, profileFilter, consumer);
}
继续进入load方法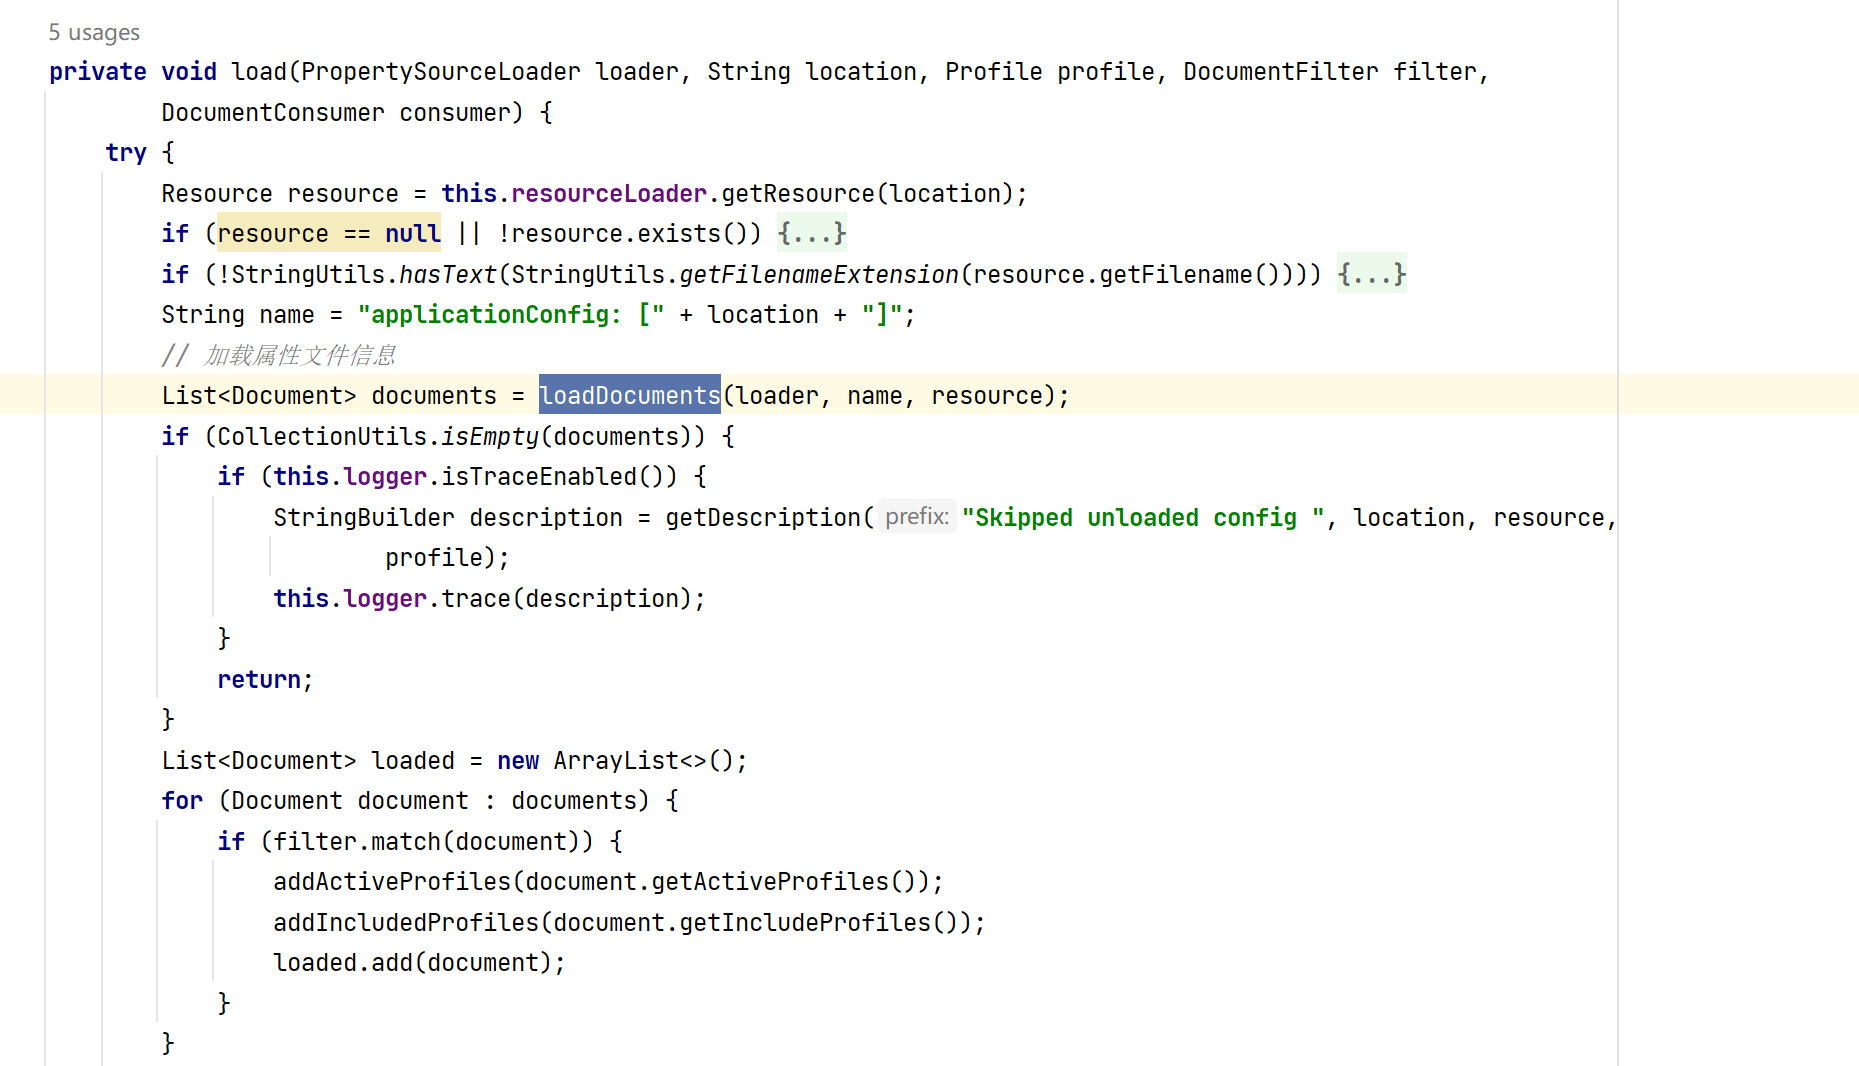
开始加载我们存在的application.properties文件。
properties加载
在找到了要加载的文件的名称和路径后,我们来看下资源加载器是如何来加载具体的文件信息的。进入loadDocuments方法中,我们会发现会先从缓存中查找,如果缓存中没有则会通过对应的资源加载器来加载了。此处是PropertiesPropertySourceLoader来加载的。进入loadProperties方法,之后进入load()方法看到的就是具体的加载解析properties文件中的内容了。
private List<Document> loadDocuments(PropertySourceLoader loader, String name, Resource resource)throws IOException {// 文档缓存的主键对象DocumentsCacheKey cacheKey = new DocumentsCacheKey(loader, resource);// 获取缓存的数据List<Document> documents = this.loadDocumentsCache.get(cacheKey);if (documents == null) {// 加载属性文件信息 缓存中没有就直接加载// 此处是PropertiesPropertySourceLoader来加载的。List<PropertySource<?>> loaded = loader.load(name, resource);documents = asDocuments(loaded);this.loadDocumentsCache.put(cacheKey, documents);}return documents;
}// PropertiesPropertySourceLoader 进入loadProperties方法
public List<PropertySource<?>> load(String name, Resource resource) throws IOException {// 获取属性文件中的信息Map<String, ?> properties = loadProperties(resource);if (properties.isEmpty()) {return Collections.emptyList();}return Collections.singletonList(new OriginTrackedMapPropertySource(name, Collections.unmodifiableMap(properties), true));
}