MiniCPM-V 4.5 视觉模型使用指南
!注意,本文提到的模型性能具有时效性,请以最新模型为准。
一、MiniCPM-V 4.5 介绍
MiniCPM-V 4.5 是MiniCPM-V系列中最新且功能最强大的模型。该模型基于Qwen3-8B和SigLIP2-400M构建,总共有8B参数。与之前的MiniCPM-V和MiniCPM-o模型相比,它展现出显著的性能提升,并引入了新的实用功能。MiniCPM-V 4.5的主要特点包括:
-
🔥 最先进的视觉-语言能力。 MiniCPM-V 4.5在OpenCompass上的平均得分为77.0,这是一个对8个流行基准测试的综合评估。仅用8B参数,它就超越了广泛使用的专有模型如GPT-4o-latest、Gemini-2.0 Pro以及强大的开源模型如Qwen2.5-VL 72B 的视觉-语言能力,使其成为30B参数以下性能最好的MLLM。
-
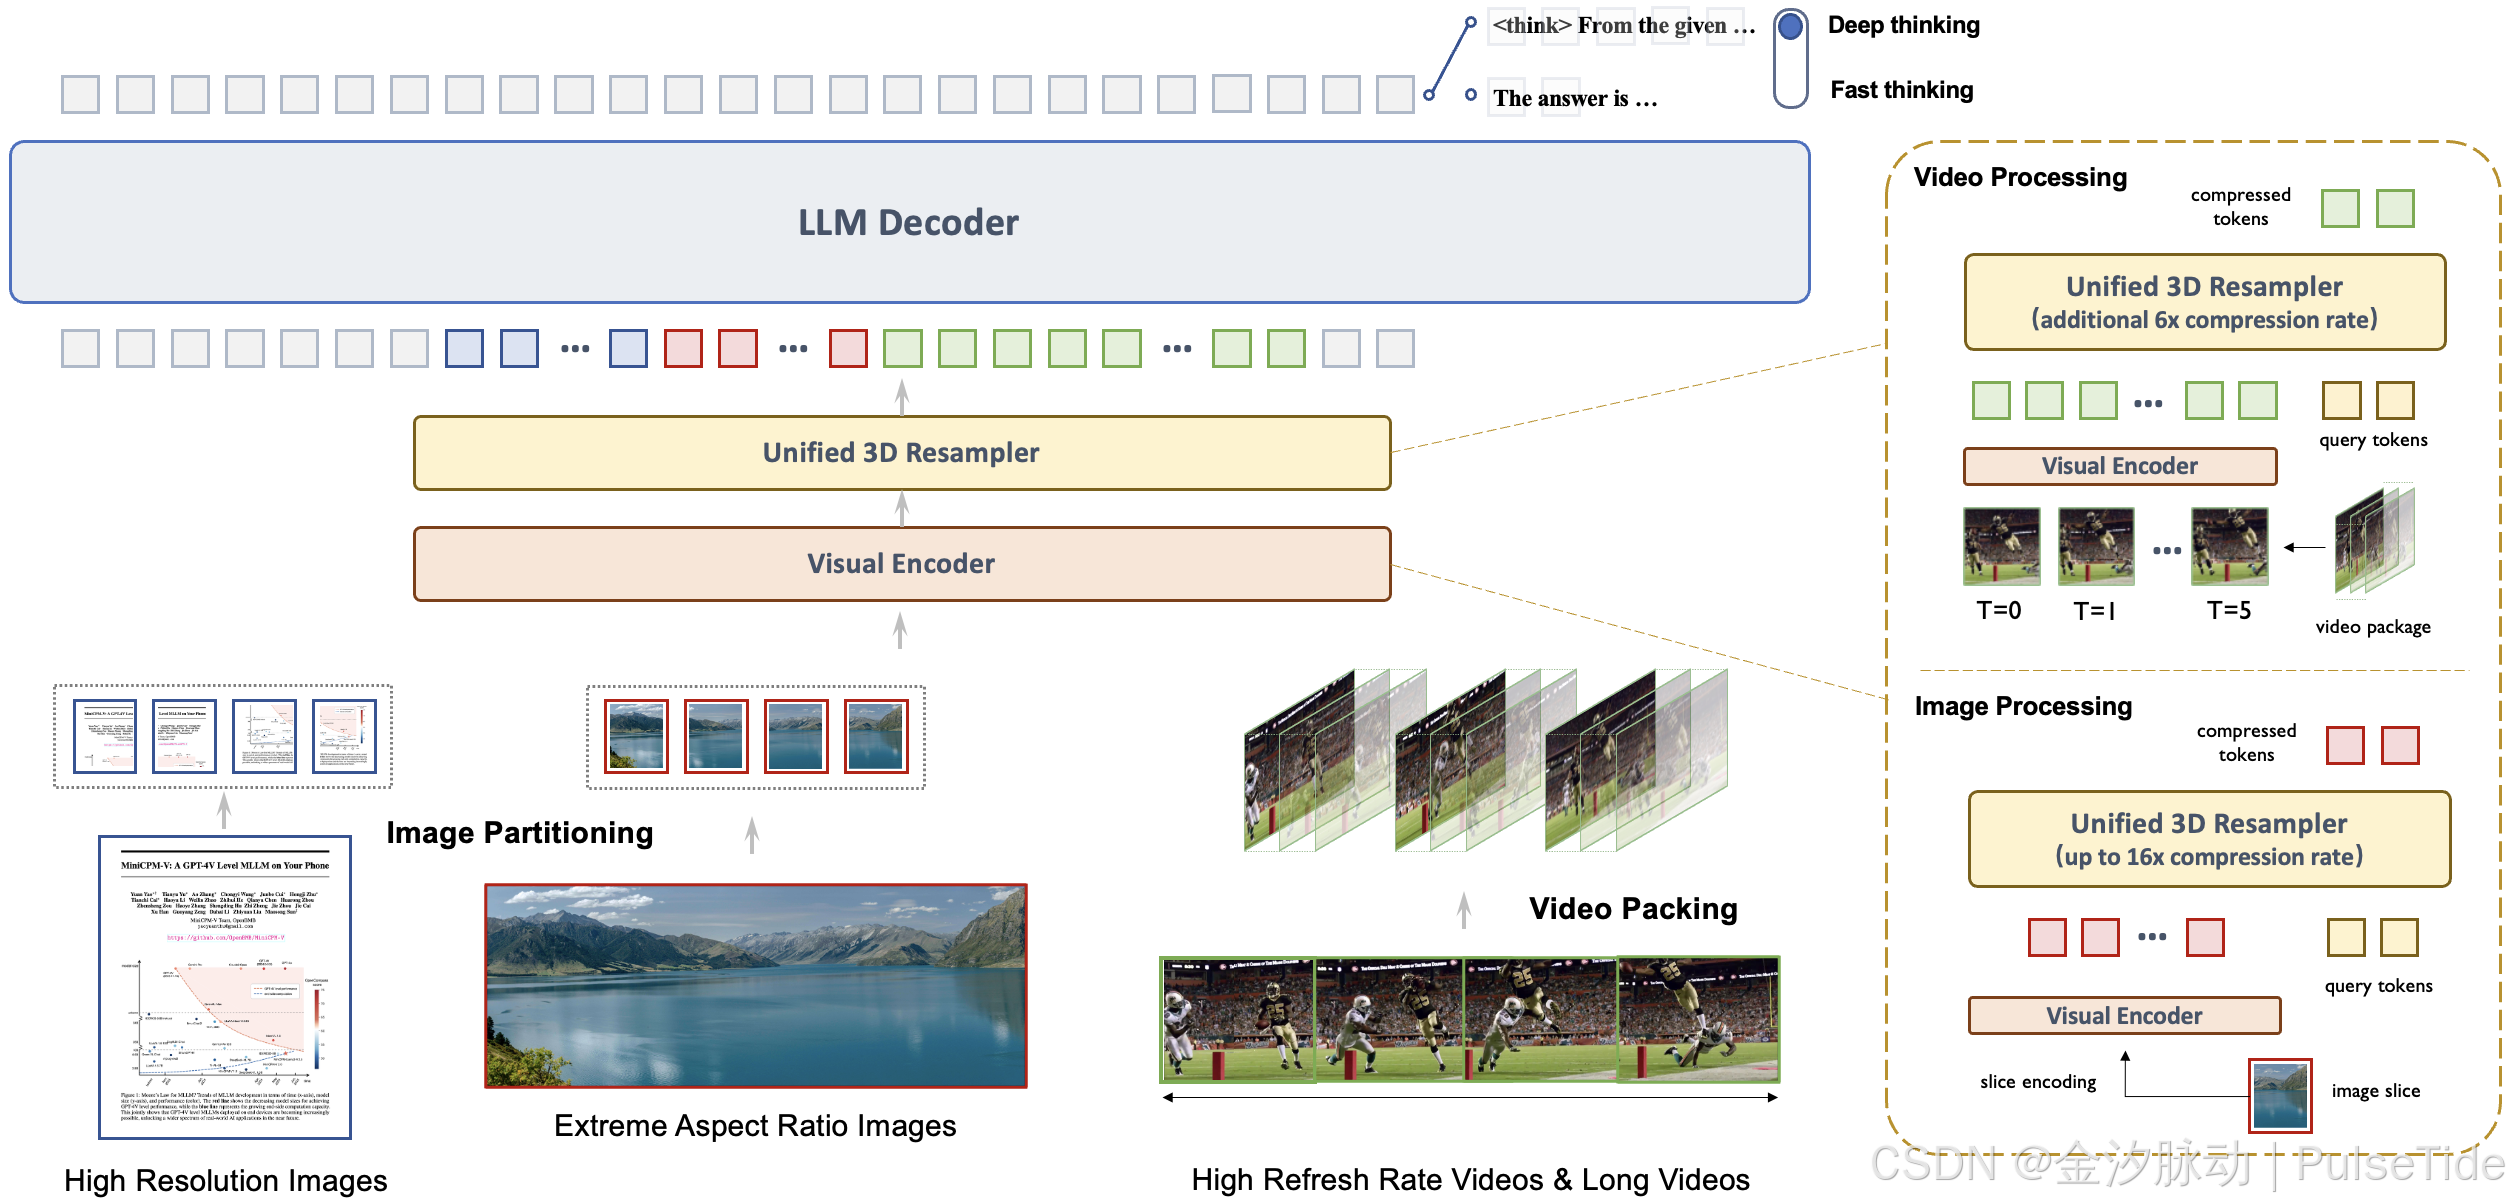
🎬 高效的高帧率和长视频理解。 通过一个新的统一的图像和视频3D重采样器,MiniCPM-V 4.5现在可以实现96倍的视频令牌压缩率,其中6个448x448视频帧可以联合压缩为64个视频令牌(通常大多数MLLM需要1,536个令牌)。这意味着模型可以在不增加LLM推理成本的情况下感知更多的视频帧。这带来了在Video-MME、LVBench、MLVU、MotionBench、FavorBench等基准测试中的最先进的高FPS(高达10FPS)视频理解和长时间视频理解能力。
-
⚙️ 可控的混合快速/深度思考。 MiniCPM-V 4.5支持高效频繁使用时的竞争性表现的快速思考,以及解决更复杂问题的深度思考。为了覆盖不同用户场景下的效率和性能权衡,这种快速/深度思考模式可以以高度可控的方式切换。
-
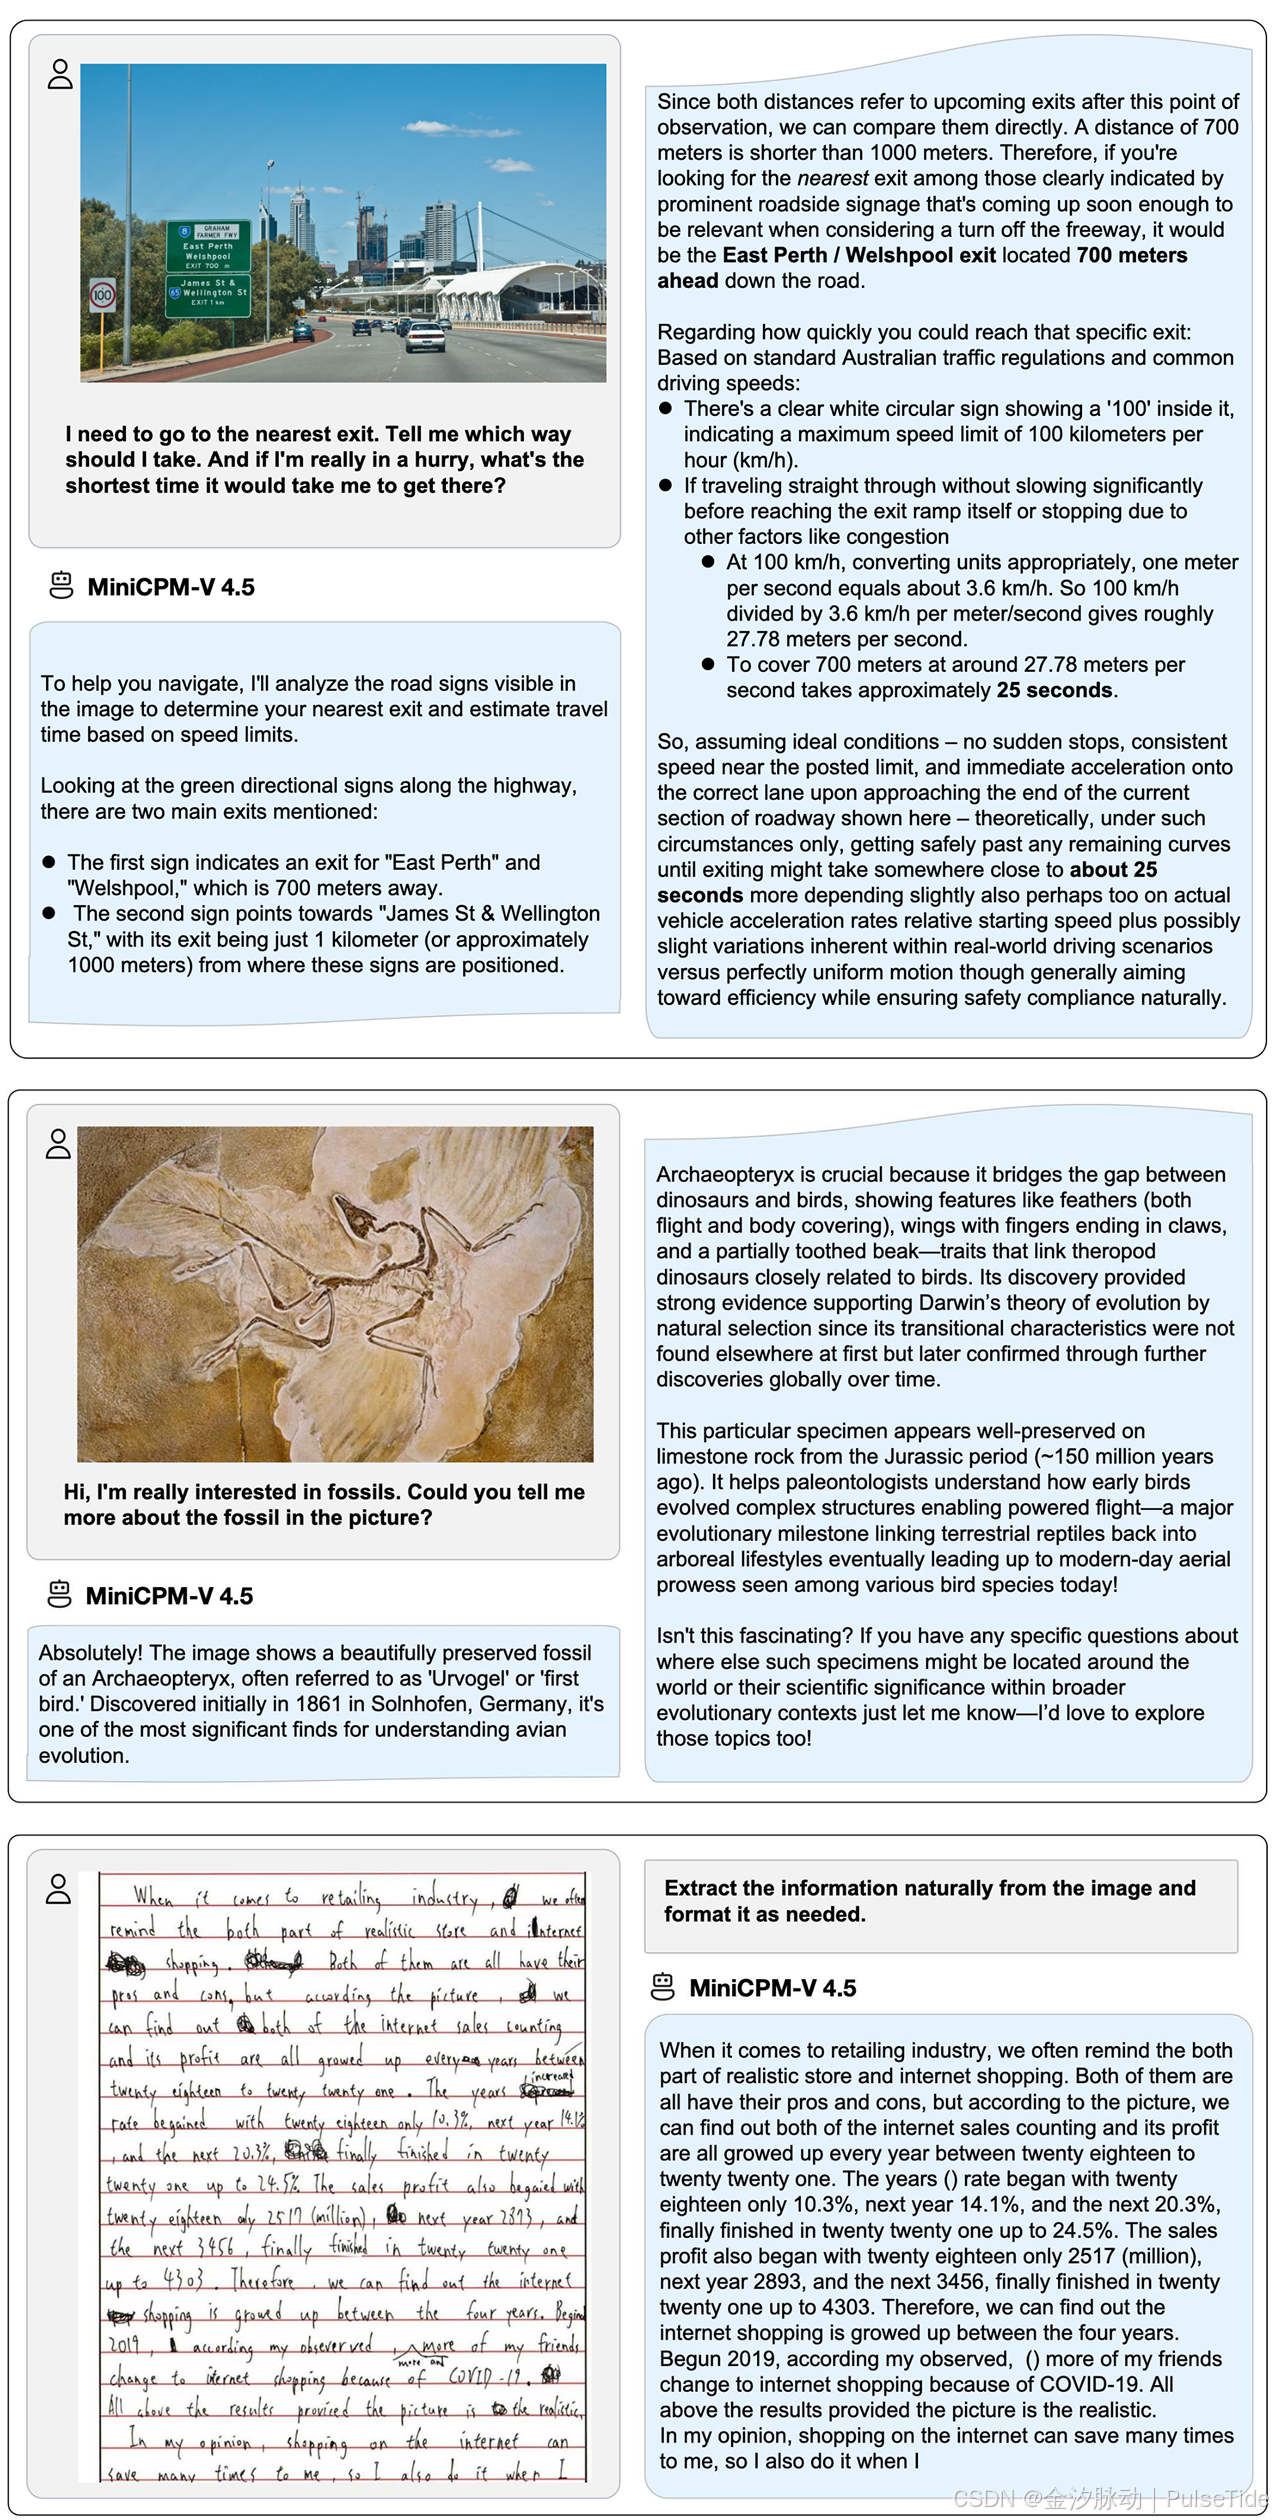
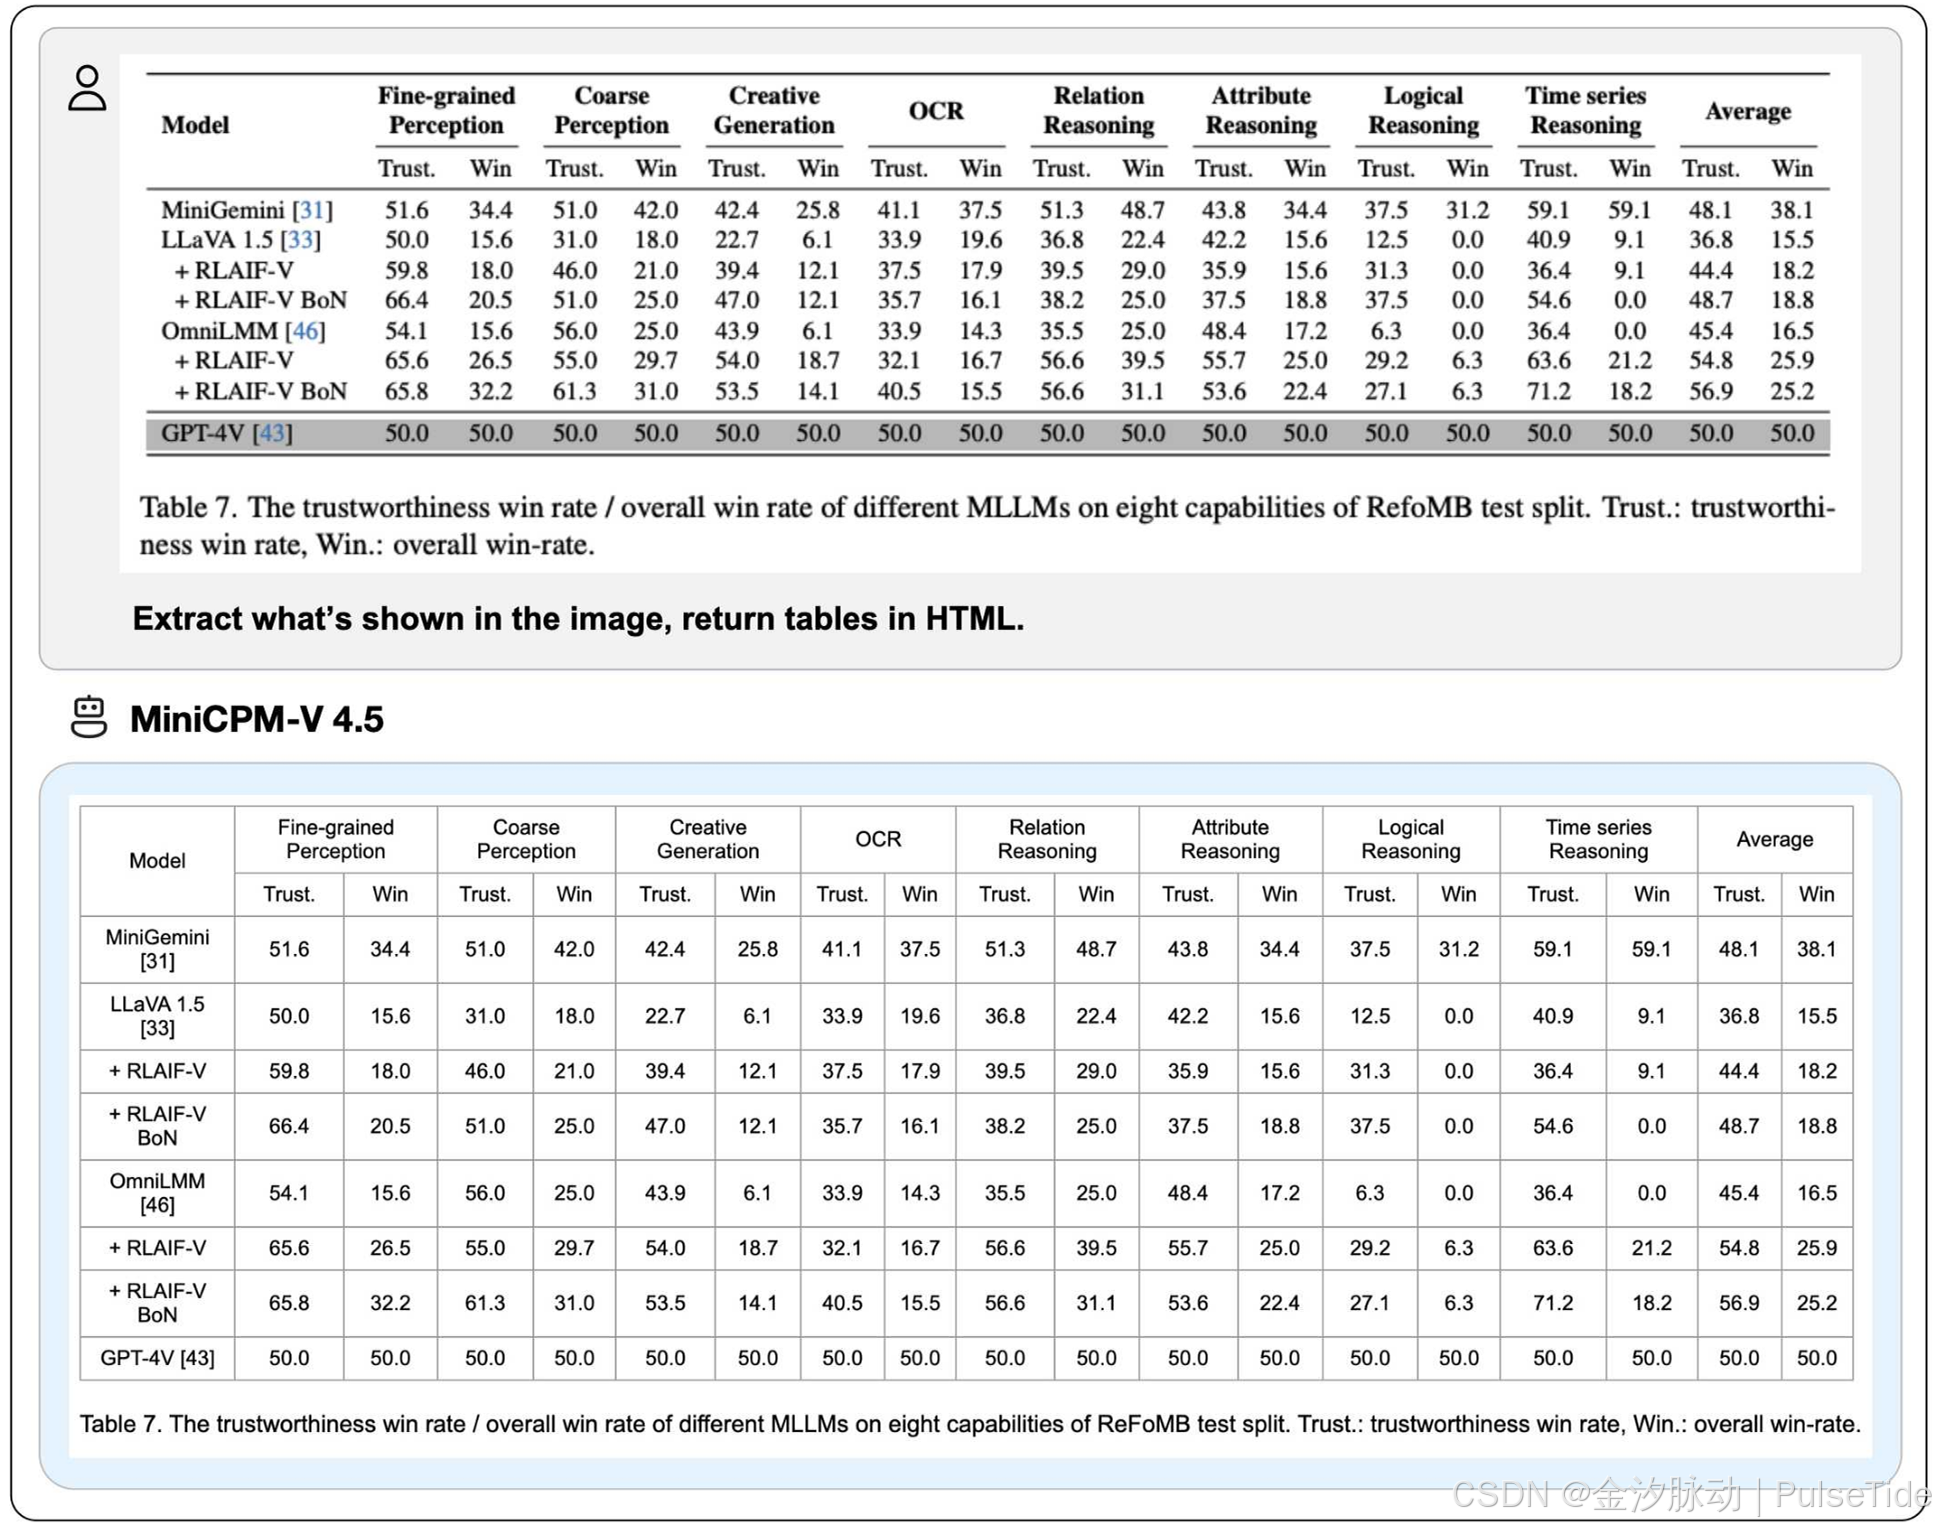
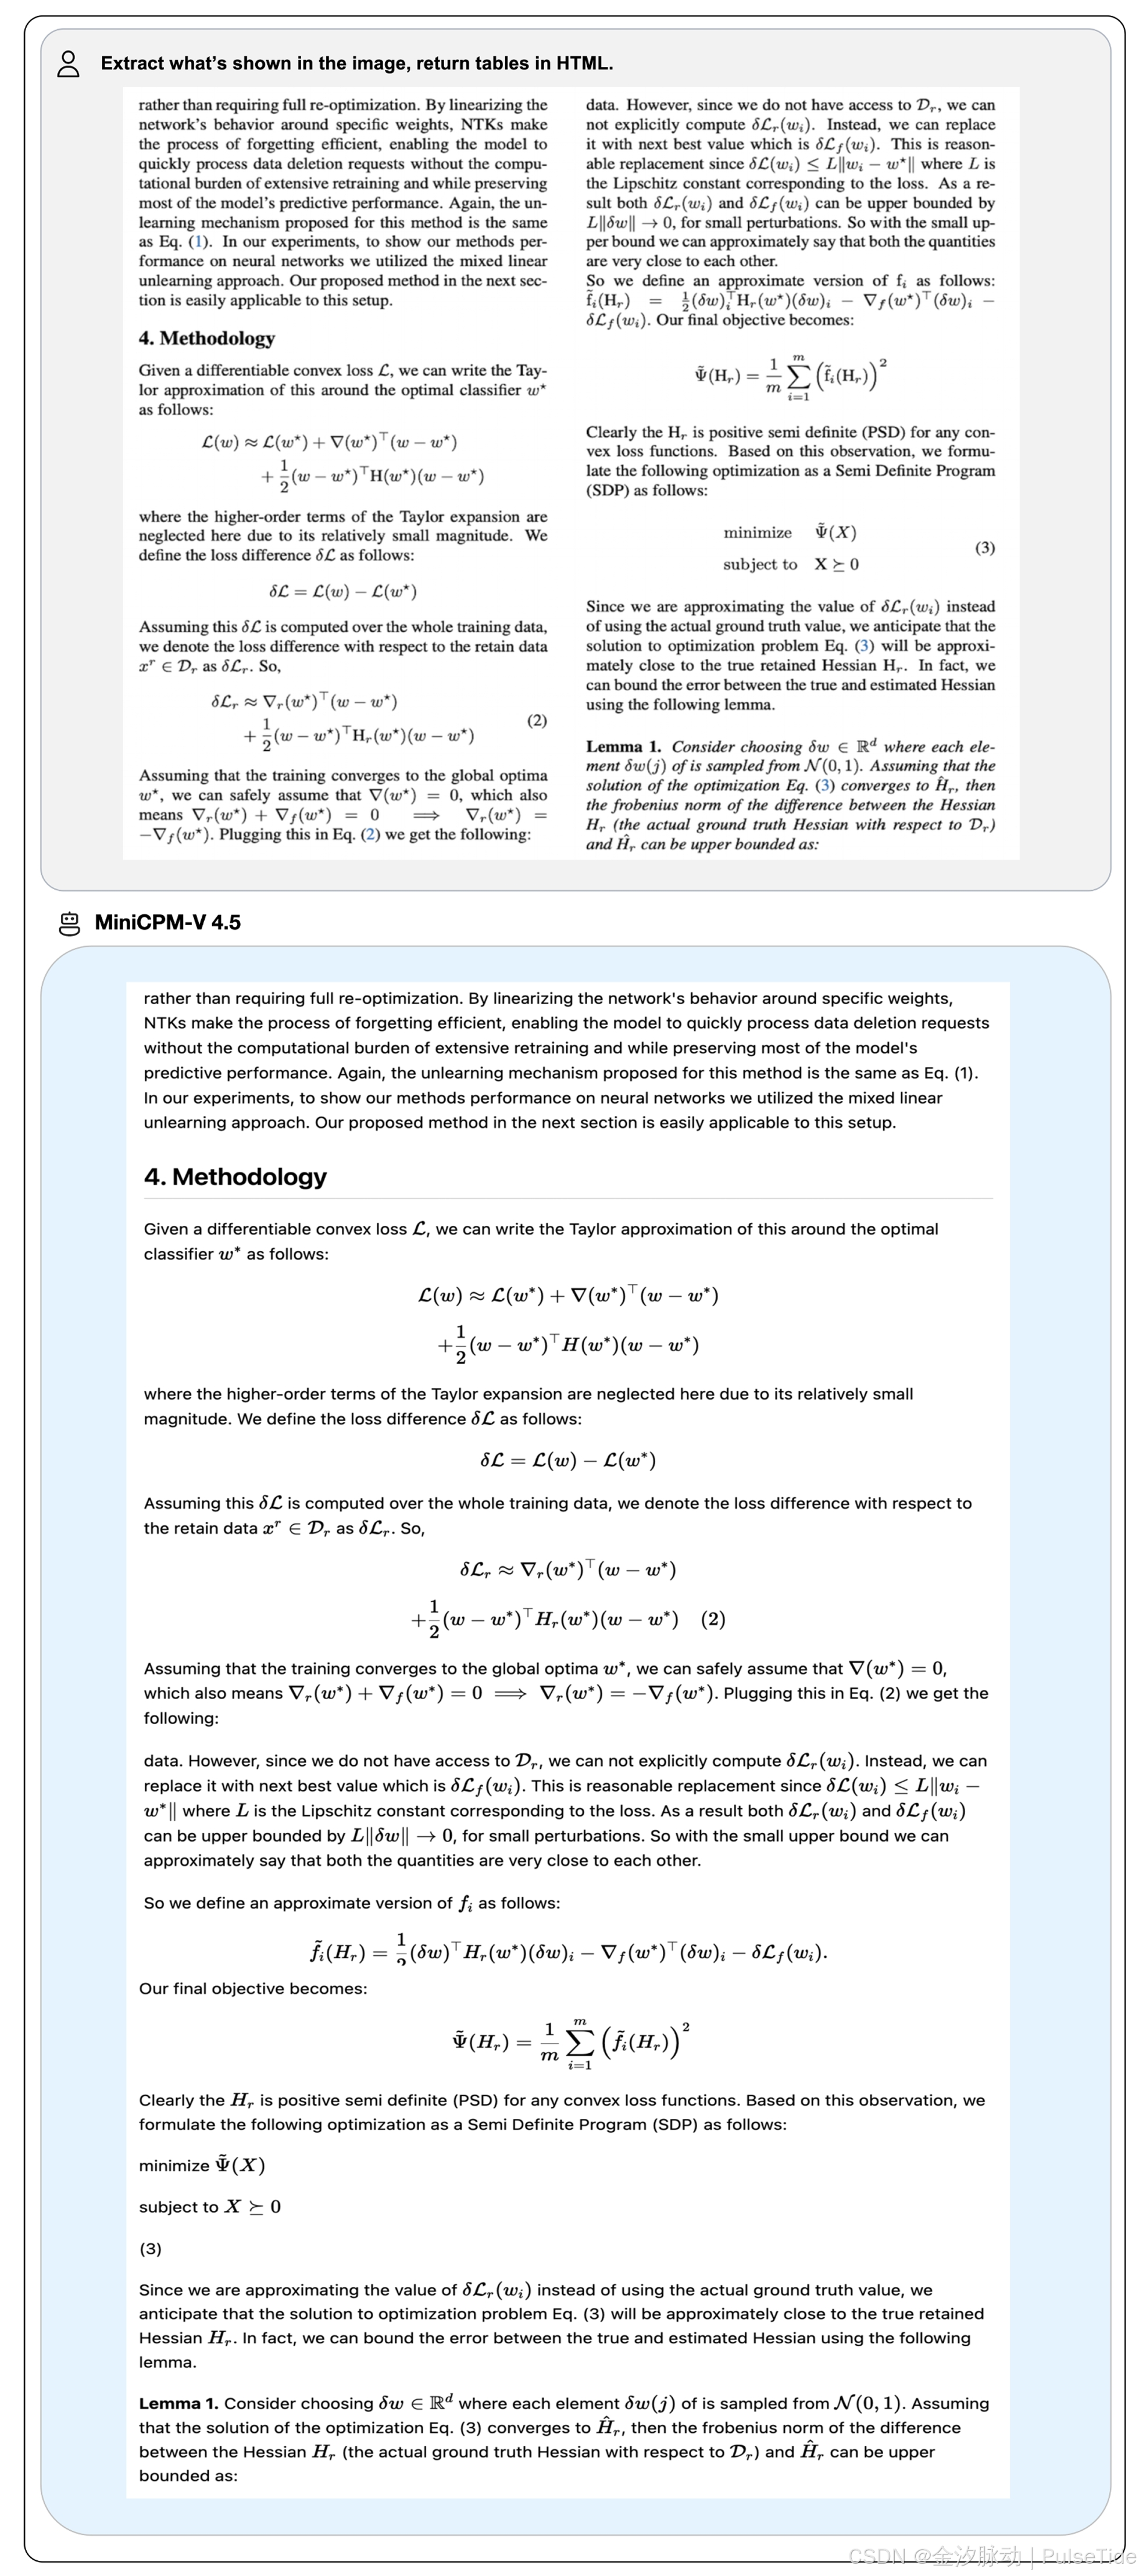
💪 强大的OCR、文档解析及其他功能。 基于LLaVA-UHD架构,MiniCPM-V 4.5可以处理任何宽高比且高达180万像素(例如:1344x1344)的高分辨率图像,使用的视觉令牌数量仅为大多数MLLM的四分之一。该模型在OCR Bench上取得了领先的表现,超越了诸如GPT-4o-latest和Gemini 2.5等专有模型。它还在OmniDocBench上实现了通用MLLM中PDF文档解析能力的最先进表现。基于最新的RLAIF-V 和 VisCPM 技术,它具有值得信赖的行为,在MMHal-Bench上优于GPT-4o-latest,并支持超过30种语言的多语言能力。
二、关键技术
-
架构:统一的3D重采样器用于高密度视频压缩。 MiniCPM-V 4.5 引入了一个3D重采样器,克服了视频理解中的性能与效率之间的权衡。通过将最多6个连续的视频帧分组并联合压缩为仅64个token(与MiniCPM-V系列中单个图像使用的token数量相同),MiniCPM-V 4.5 实现了96倍的视频token压缩率。这使得模型可以在不增加额外LLM计算成本的情况下处理更多的视频帧,从而实现高FPS视频和长视频的理解。该架构支持对图像、多图像输入和视频的统一编码,确保能力和平滑的知识迁移。
-
预训练:OCR和文档知识的统一学习。 现有的多语言大模型通过孤立的训练方法从文档中学习OCR能力和知识。我们观察到这两种训练方法之间本质的区别在于图像中文本的可见性。通过以不同噪声水平动态破坏文档中的文本区域,并要求模型重构这些文本,模型学会了根据情况自适应地正确切换于准确文本识别(当文本可见时)和基于多模态上下文的知识推理(当文本严重遮挡时)。这种方法消除了在从文档中学习知识时对容易出错的文档解析器的依赖,并防止了由于过度增强的OCR数据导致的幻觉,最终以最小的工程开销实现了顶级的OCR和多模态知识表现。
-
后训练:结合多模态强化学习的混合快速/深度思考模式。 MiniCPM-V 4.5 提供了两种可切换的模式来平衡推理体验:日常使用中的快速思考模式以及处理复杂任务时的深度思考模式。利用一种新的混合强化学习方法,模型同时优化这两种模式,在显著提升快速模式性能的同时不牺牲深度模式的能力。结合RLPR和RLAIF-V,它能够从广泛的多模态数据中泛化出稳健的推理技能,同时有效减少幻觉。
三、效果示例
四、开发环境
modelscope python 3.11 GPU 环境,开发环境搭建参考:ModelScope 开发环境配置指南,或者直接阅读官方文档。
五、图片对话示例
若需启用思考模式,请在聊天函数中提供参数 enable_thinking=True。
1、单图输入示例
import torch
from PIL import Image
from modelscope import AutoModel, AutoTokenizertorch.manual_seed(100)model = AutoModel.from_pretrained('OpenBMB/MiniCPM-V-4_5-int4', trust_remote_code=True, # or openbmb/MiniCPM-o-2_6attn_implementation='sdpa', torch_dtype=torch.bfloat16) # sdpa or flash_attention_2, no eager
model = model.eval().cuda()
tokenizer = AutoTokenizer.from_pretrained('OpenBMB/MiniCPM-V-4_5-int4', trust_remote_code=True) # or openbmb/MiniCPM-o-2_6image = Image.open('./example.jpeg').convert('RGB')enable_thinking=False # If `enable_thinking=True`, the thinking mode is enabled.
stream=True # If `stream=True`, the answer is string# First round chat
question = "简单描述该图片。"
msgs = [{'role': 'user', 'content': [image, question]}]answer = model.chat(msgs=msgs,tokenizer=tokenizer,enable_thinking=enable_thinking,stream=True
)generated_text = ""
for new_text in answer:generated_text += new_textprint(new_text, flush=True, end='')
测试图片:

首次运行报错 No package metadata was found for bitsandbytes:
importlib.metadata.PackageNotFoundError: No package metadata was found for bitsandbytes
解决方案:安装 bitsandbytes
pip install bitsandbytes
运行效果:
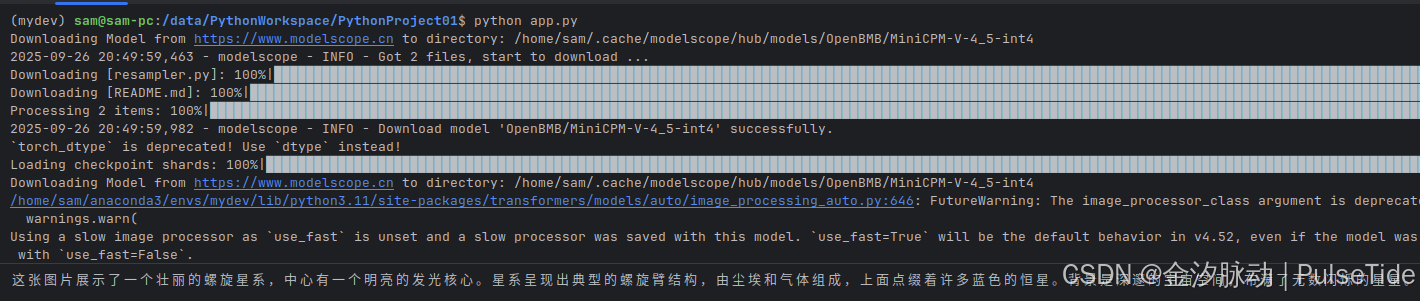
这张图片展示了一个壮丽的螺旋星系,中心有一个明亮的发光核心。星系呈现出典型的螺旋臂结构,由尘埃和气体组成,上面点缀着许多蓝色的恒星。背景是深邃的宇宙空间,布满了无数闪烁的星星。
2、多图输入示例
import torch
from PIL import Image
from modelscope import AutoModel, AutoTokenizermodel = AutoModel.from_pretrained('OpenBMB/MiniCPM-V-4_5-int4', trust_remote_code=True,attn_implementation='sdpa', torch_dtype=torch.bfloat16) # sdpa or flash_attention_2
model = model.eval().cuda()
tokenizer = AutoTokenizer.from_pretrained('OpenBMB/MiniCPM-V-4_5-int4', trust_remote_code=True)image1 = Image.open('s1.jpg').convert('RGB')
image2 = Image.open('s2.jpg').convert('RGB')
question = '比较图片1和图片2,简单描述两者之间的相同与不同点。'msgs = [{'role': 'user', 'content': [image1, image2, question]}]answer = model.chat(msgs=msgs,tokenizer=tokenizer
)
print(answer)
测试图片:


运行效果:
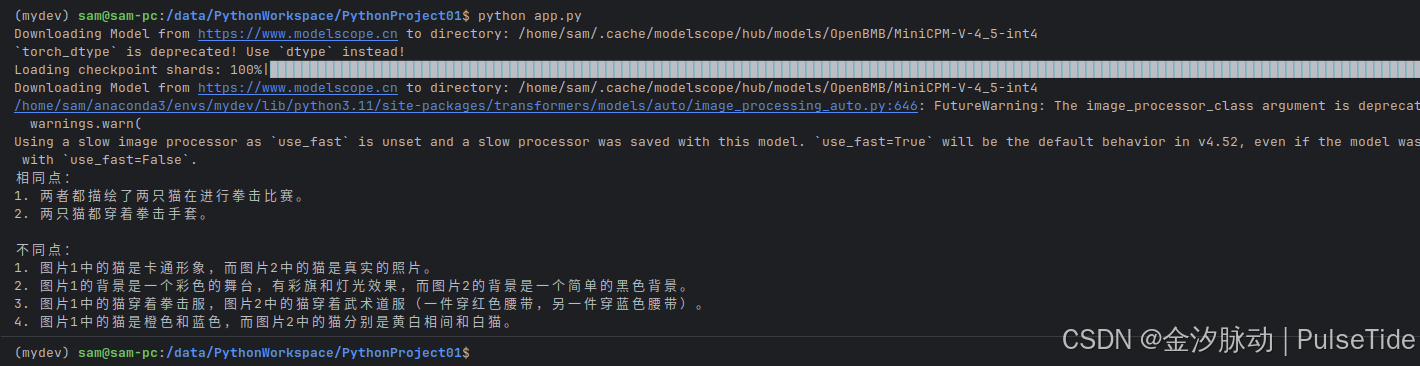
相同点:
1. 两者都描绘了两只猫在进行拳击比赛。
2. 两只猫都穿着拳击手套。不同点:
1. 图片1中的猫是卡通形象,而图片2中的猫是真实的照片。
2. 图片1的背景是一个彩色的舞台,有彩旗和灯光效果,而图片2的背景是一个简单的黑色背景。
3. 图片1中的猫穿着拳击服,图片2中的猫穿着武术道服(一件穿红色腰带,另一件穿蓝色腰带)。
4. 图片1中的猫是橙色和蓝色,而图片2中的猫分别是黄白相间和白猫。
3、少样本学习示例
import torch
from PIL import Image
from modelscope import AutoModel, AutoTokenizermodel = AutoModel.from_pretrained('OpenBMB/MiniCPM-V-4_5-int4', trust_remote_code=True,attn_implementation='sdpa', torch_dtype=torch.bfloat16)
model = model.eval().cuda()
tokenizer = AutoTokenizer.from_pretrained('OpenBMB/MiniCPM-V-4_5-int4', trust_remote_code=True)question = "production date"
image1 = Image.open('example1.jpg').convert('RGB')
answer1 = "2023.08.04"
image2 = Image.open('example2.jpg').convert('RGB')
answer2 = "2007.04.24"
image_test = Image.open('test.jpg').convert('RGB')msgs = [{'role': 'user', 'content': [image1, question]}, {'role': 'assistant', 'content': [answer1]},{'role': 'user', 'content': [image2, question]}, {'role': 'assistant', 'content': [answer2]},{'role': 'user', 'content': [image_test, question]}
]answer = model.chat(msgs=msgs,tokenizer=tokenizer
)
print(answer)
测试图片:分别为 example1.jpg、example2.jpg、test.jpg


测试效果:

文件夹名字:Download,创建时间:2025年8月31日 12:24:32,修改时间:2025年8月31日 14:21:53
四、视频对话示例
# 安装依赖
pip install decord

## The 3d-resampler compresses multiple frames into 64 tokens by introducing temporal_ids.
# To achieve this, you need to organize your video data into two corresponding sequences:
#   frames: List[Image]
#   temporal_ids: List[List[Int]].import torch
from PIL import Image
from modelscope import AutoModel, AutoTokenizer
from decord import VideoReader, cpu    # pip install decord
from scipy.spatial import cKDTree
import numpy as np
import mathmodel = AutoModel.from_pretrained('OpenBMB/MiniCPM-V-4_5-int4', trust_remote_code=True,  # or openbmb/MiniCPM-o-2_6attn_implementation='sdpa', torch_dtype=torch.bfloat16) # sdpa or flash_attention_2, no eager
model = model.eval().cuda()
tokenizer = AutoTokenizer.from_pretrained('OpenBMB/MiniCPM-V-4_5-int4', trust_remote_code=True)  # or openbmb/MiniCPM-o-2_6MAX_NUM_FRAMES=180 # Indicates the maximum number of frames received after the videos are packed. The actual maximum number of valid frames is MAX_NUM_FRAMES * MAX_NUM_PACKING.
MAX_NUM_PACKING=3  # indicates the maximum packing number of video frames. valid range: 1-6
TIME_SCALE = 0.1 def map_to_nearest_scale(values, scale):tree = cKDTree(np.asarray(scale)[:, None])_, indices = tree.query(np.asarray(values)[:, None])return np.asarray(scale)[indices]def group_array(arr, size):return [arr[i:i+size] for i in range(0, len(arr), size)]def encode_video(video_path, choose_fps=3, force_packing=None):def uniform_sample(l, n):gap = len(l) / nidxs = [int(i * gap + gap / 2) for i in range(n)]return [l[i] for i in idxs]vr = VideoReader(video_path, ctx=cpu(0))fps = vr.get_avg_fps()video_duration = len(vr) / fpsif choose_fps * int(video_duration) <= MAX_NUM_FRAMES:packing_nums = 1choose_frames = round(min(choose_fps, round(fps)) * min(MAX_NUM_FRAMES, video_duration))else:packing_nums = math.ceil(video_duration * choose_fps / MAX_NUM_FRAMES)if packing_nums <= MAX_NUM_PACKING:choose_frames = round(video_duration * choose_fps)else:choose_frames = round(MAX_NUM_FRAMES * MAX_NUM_PACKING)packing_nums = MAX_NUM_PACKINGframe_idx = [i for i in range(0, len(vr))]      frame_idx =  np.array(uniform_sample(frame_idx, choose_frames))if force_packing:packing_nums = min(force_packing, MAX_NUM_PACKING)print(video_path, ' duration:', video_duration)print(f'get video frames={len(frame_idx)}, packing_nums={packing_nums}')frames = vr.get_batch(frame_idx).asnumpy()frame_idx_ts = frame_idx / fpsscale = np.arange(0, video_duration, TIME_SCALE)frame_ts_id = map_to_nearest_scale(frame_idx_ts, scale) / TIME_SCALEframe_ts_id = frame_ts_id.astype(np.int32)assert len(frames) == len(frame_ts_id)frames = [Image.fromarray(v.astype('uint8')).convert('RGB') for v in frames]frame_ts_id_group = group_array(frame_ts_id, packing_nums)return frames, frame_ts_id_groupvideo_path="video_test.mp4"
fps = 5 # fps for video
force_packing = None # You can set force_packing to ensure that 3D packing is forcibly enabled; otherwise, encode_video will dynamically set the packing quantity based on the duration.
frames, frame_ts_id_group = encode_video(video_path, fps, force_packing=force_packing)question = "简单描述视频内容。"
msgs = [{'role': 'user', 'content': frames + [question]},
]answer = model.chat(msgs=msgs,tokenizer=tokenizer,use_image_id=False,max_slice_nums=1,temporal_ids=frame_ts_id_group
)
print(answer)
测试视频:
通义万相2.1-文生视频-1.3B-480P效果演示
测试效果:

视频展示了浩瀚的宇宙空间,其中一颗明亮的恒星位于画面中央,周围是散发着蓝光的星云。在星云中可以看到许多星星点缀其间。随着视频的发展,一些暗红色的小点逐渐显现出来,这些小点呈现出模糊的轮廓,并且缓慢地移动着。
五、AWQ 量化模型(N卡50系列)
使用 OpenBMB/MiniCPM-V-4_5-AWQ 量化会运行报错:
Important Notice:
- AutoAWQ is officially deprecated and will no longer be maintained.
- The last tested configuration used Torch 2.6.0 and Transformers 4.51.3.
- If future versions of Transformers break AutoAWQ compatibility, please report the issue to the Transformers project.Alternative:
- AutoAWQ has been adopted by the vLLM Project: https://github.com/vllm-project/llm-compressorFor further inquiries, feel free to reach out:
- X: https://x.com/casper_hansen_
- LinkedIn: https://www.linkedin.com/in/casper-hansen-804005170/warnings.warn(_FINAL_DEV_MESSAGE, category=DeprecationWarning, stacklevel=1)
Traceback (most recent call last):File "/data/PythonWorkspace/PythonProject01/app.py", line 41, in <module>model = AutoModel.from_pretrained('OpenBMB/MiniCPM-V-4_5-AWQ', trust_remote_code=True, # or openbmb/MiniCPM-o-2_6^^^^^^^^^^^^^^^^^^^^^^^^^^^^^^^^^^^^^^^^^^^^^^^^^^^^^^^^^^^^^^^^^^^^^^^^^^^^^^^^^^^^^^^^^^^^^^^^^^^^^^^^^File "/home/sam/anaconda3/envs/mydev/lib/python3.11/site-packages/modelscope/utils/hf_util/patcher.py", line 283, in from_pretrainedmodule_obj = module_class.from_pretrained(^^^^^^^^^^^^^^^^^^^^^^^^^^^^^File "/home/sam/anaconda3/envs/mydev/lib/python3.11/site-packages/transformers/models/auto/auto_factory.py", line 597, in from_pretrainedreturn model_class.from_pretrained(^^^^^^^^^^^^^^^^^^^^^^^^^^^^File "/home/sam/anaconda3/envs/mydev/lib/python3.11/site-packages/transformers/modeling_utils.py", line 288, in _wrapperreturn func(*args, **kwargs)^^^^^^^^^^^^^^^^^^^^^File "/home/sam/anaconda3/envs/mydev/lib/python3.11/site-packages/transformers/modeling_utils.py", line 5130, in from_pretrainedhf_quantizer.preprocess_model(File "/home/sam/anaconda3/envs/mydev/lib/python3.11/site-packages/transformers/quantizers/base.py", line 238, in preprocess_modelreturn self._process_model_before_weight_loading(model, **kwargs)^^^^^^^^^^^^^^^^^^^^^^^^^^^^^^^^^^^^^^^^^^^^^^^^^^^^^^^^^^File "/home/sam/anaconda3/envs/mydev/lib/python3.11/site-packages/transformers/quantizers/quantizer_awq.py", line 119, in _process_model_before_weight_loadingmodel, has_been_replaced = replace_with_awq_linear(^^^^^^^^^^^^^^^^^^^^^^^^File "/home/sam/anaconda3/envs/mydev/lib/python3.11/site-packages/transformers/integrations/awq.py", line 187, in replace_with_awq_linear_, has_been_replaced = replace_with_awq_linear(^^^^^^^^^^^^^^^^^^^^^^^^File "/home/sam/anaconda3/envs/mydev/lib/python3.11/site-packages/transformers/integrations/awq.py", line 187, in replace_with_awq_linear_, has_been_replaced = replace_with_awq_linear(^^^^^^^^^^^^^^^^^^^^^^^^File "/home/sam/anaconda3/envs/mydev/lib/python3.11/site-packages/transformers/integrations/awq.py", line 187, in replace_with_awq_linear_, has_been_replaced = replace_with_awq_linear(^^^^^^^^^^^^^^^^^^^^^^^^[Previous line repeated 2 more times]File "/home/sam/anaconda3/envs/mydev/lib/python3.11/site-packages/transformers/integrations/awq.py", line 174, in replace_with_awq_linearmodel._modules[name] = target_cls(^^^^^^^^^^^File "/home/sam/anaconda3/envs/mydev/lib/python3.11/site-packages/awq/modules/linear/gemm.py", line 132, in __init__assert self.in_features % self.group_size == 0^^^^^^^^^^^^^^^^^^^^^^^^^^^^^^^^^^^^^^^
AssertionError
主要原因:AutoAWQ has been adopted by the vLLM Project: https://github.com/vllm-project/llm-compressor,当前版本的 pytorch 与 modelscope 不兼容 AutoAWQ。
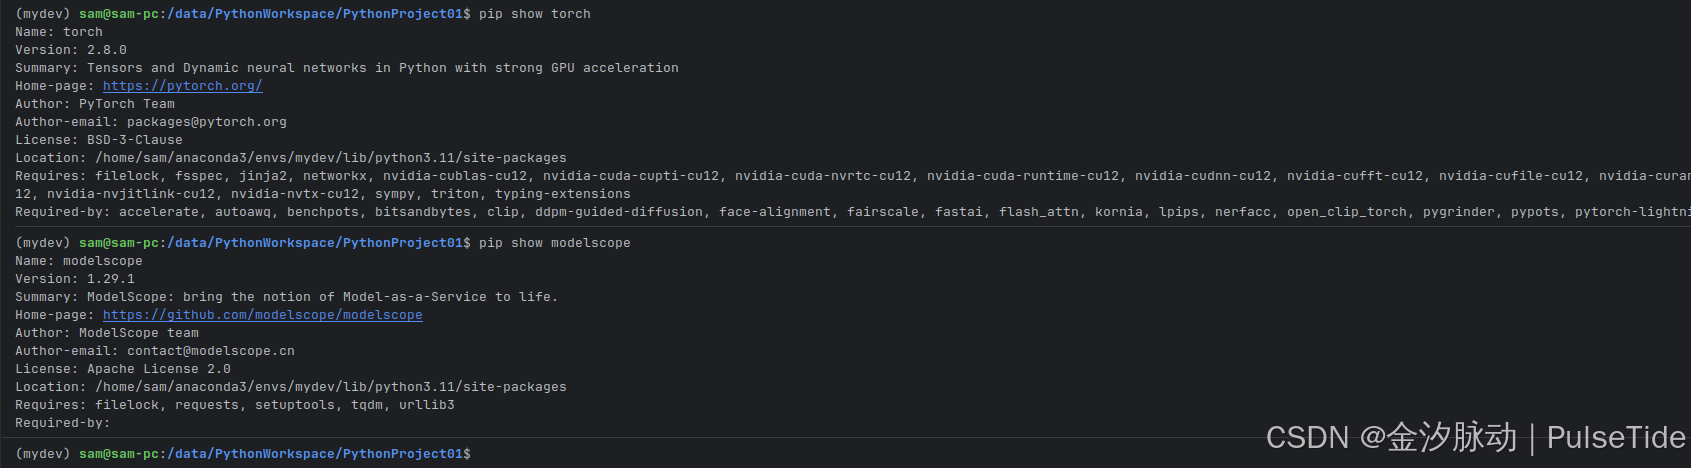
(mydev) sam@sam-pc:/data/PythonWorkspace/PythonProject01$ pip show torch
Name: torch
Version: 2.8.0
Summary: Tensors and Dynamic neural networks in Python with strong GPU acceleration
Home-page: https://pytorch.org/
Author: PyTorch Team
Author-email: packages@pytorch.org
License: BSD-3-Clause
Location: /home/sam/anaconda3/envs/mydev/lib/python3.11/site-packages
Requires: filelock, fsspec, jinja2, networkx, nvidia-cublas-cu12, nvidia-cuda-cupti-cu12, nvidia-cuda-nvrtc-cu12, nvidia-cuda-runtime-cu12, nvidia-cudnn-cu12, nvidia-cufft-cu12, nvidia-cufile-cu12, nvidia-curand-cu12, nvidia-cusolver-cu12, nvidia-cusparse-cu12, nvidia-cusparselt-cu12, nvidia-nccl-cu12, nvidia-nvjitlink-cu12, nvidia-nvtx-cu12, sympy, triton, typing-extensions
Required-by: accelerate, autoawq, benchpots, bitsandbytes, clip, ddpm-guided-diffusion, face-alignment, fairscale, fastai, flash_attn, kornia, lpips, nerfacc, open_clip_torch, pygrinder, pypots, pytorch-lightning, smplx, thop, timm, torchaudio, torchmetrics, torchvision
(mydev) sam@sam-pc:/data/PythonWorkspace/PythonProject01$ pip show modelscope
Name: modelscope
Version: 1.29.1
Summary: ModelScope: bring the notion of Model-as-a-Service to life.
Home-page: https://github.com/modelscope/modelscope
Author: ModelScope team
Author-email: contact@modelscope.cn
License: Apache License 2.0
Location: /home/sam/anaconda3/envs/mydev/lib/python3.11/site-packages
Requires: filelock, requests, setuptools, tqdm, urllib3
Required-by:
此时解决方案有两种:
- pytorch 降版本到 2.6.0
- 使用 vllm 库加载模型
到目前(25-9-29)为止,对于 N 卡 50 系列无解,因为 pytorch 降版本后无法识别到显卡,而 vllm 官方尚未支持 MiniCPM-V4.5。
参考文档
- https://www.modelscope.cn/models/OpenBMB/MiniCPM-V-4_5-int4