Spring Cloud Nacos 入门案例:从 0 到 1 实现服务注册与调用
Spring Cloud Nacos 入门案例:从 0 到 1 实现服务注册与调用(初学者指南)
作为 Spring Cloud 初学者,第一天接触 Nacos 时,核心是理解 “服务如何注册到 Nacos” 和 “服务如何通过 Nacos 调用其他服务”。本文将基于Nacos简单案例,从基础概念、项目搭建、代码逻辑、结果验证到重点易错点,全方位拆解案例,帮你建立清晰的开发思路。
1. 基础概念铺垫:先搞懂 “为什么”
在写代码前,必须先明白 Nacos 的核心价值和角色,否则代码只是 “抄作业”,无法灵活复用。
1.1 为什么需要 Nacos?
-
第一代 Spring Cloud(Spring Cloud Netflix)的很多组件(如 Eureka、Zuul)已停更维护,无法满足新需求;
-
微服务架构中,需要解决两个核心问题:
-
服务注册发现:服务 A 要调用服务 B,怎么找到服务 B 的 IP / 端口(总不能硬编码吧?);
-
配置管理:多个服务、多个环境(开发 / 测试 / 生产)的配置(如数据库地址)怎么统一管理(总不能每个服务改配置文件吧?);
-
-
Nacos 是 “注册中心 + 配置中心” 的结合体,一站式解决上述问题,且是 Spring Cloud Alibaba 生态的核心组件,兼容性强。
1.2 什么是 “服务治理”?
-
微服务数量多(比如几十个服务),人工维护 “谁在哪里、能不能用” 成本极高;
-
服务治理的核心是 “自动化”:
-
服务提供者(如 ServiceOne)启动时,主动把自己的信息(服务名、IP、端口、健康状态)注册到 Nacos;
-
服务消费者(如 ServiceThree)需要调用时,从 Nacos 查询 “目标服务的可用实例列表”,无需关心具体 IP;
-
Nacos 会自动检测服务健康状态,剔除故障实例,避免请求发到不可用的服务。
-
1.3 Nacos 的 3 个核心角色
案例中所有代码都是围绕这 3 个角色设计的,必须对应上:
| 角色 | 对应案例组件 | 核心作用 |
|---|---|---|
| 服务注册中心 | Nacos Server(你安装的 Nacos) | 接收服务注册、存储服务信息、提供服务查询、健康检查 |
| 服务提供者 | ServiceOne、ServiceTwo | 对外提供接口(如/serviceOne),并将自己注册到 Nacos |
| 服务消费者(兼提供者) | ServiceThree | 1. 作为消费者:调用 ServiceOne/ServiceTwo 的接口;2. 作为提供者:提供/serviceThree接口 |
2. 项目整体架构:先看清 “骨架”
案例采用 “父项目 + 子项目” 的 Maven 多模块结构,这种结构的核心目的是 “统一管理”(版本、依赖、插件),避免每个子项目重复配置。
2.1 架构图
父项目(springcloud-parent) // 统一管理依赖版本、公共依赖、打包插件├─ 子项目1:ServiceOne // 服务提供者1,端口8001,提供接口`/serviceOne`├─ 子项目2:ServiceTwo // 服务提供者2,端口8002,提供接口`/serviceTwo`└─ 子项目3:ServiceThree // 服务消费者+提供者,端口8003,提供3个接口(含调用其他服务的接口)
3. 分步实现指南:从 “搭建” 到 “编码”
3.1 第一步:搭建父项目(springcloud-parent)
父项目本身不写业务代码,仅做 “管理工作”,重点是pom.xml配置。
3.1.1 操作步骤
-
用 IDEA 新建 “Maven 项目”(选择 “Create from archetype”→ 取消勾选,创建空白 Maven 项目);
-
删除父项目的
src文件夹(父项目不需要源码); -
配置
pom.xml,核心是 3 个部分:统一版本、继承 SpringBoot 父依赖、管理子项目依赖。
3.1.2 父项目 pom.xml 代码解析
<?xml version="1.0" encoding="UTF-8"?><project xmlns="http://maven.apache.org/POM/4.0.0"xmlns:xsi="http://www.w3.org/2001/XMLSchema-instance"xsi:schemaLocation="http://maven.apache.org/POM/4.0.0 http://maven.apache.org/xsd/maven-4.0.0.xsd"><modelVersion>4.0.0</modelVersion><!-- 1. 父项目的GAV(坐标):子项目会继承这个坐标 --><groupId>com.lh</groupId> <!-- 你的包名,比如com.你的名字 --><artifactId>springcloud-parent</artifactId><version>1.0-SNAPSHOT</version><packaging>pom</packaging> <!-- 父项目必须是pom打包方式 --><!-- 2. 统一版本管理:子项目引入依赖时,无需写版本号 --><properties><maven.compiler.source>17</maven.compiler.source> <!-- JDK版本,文档用17 --><maven.compiler.target>17</maven.compiler.target><project.build.sourceEncoding>UTF-8</project.build.sourceEncoding><spring-cloud.version>2021.0.1</spring-cloud.version> <!-- Spring Cloud版本 --><spring-cloud-alibaba.version>2021.0.1.0</spring-cloud-alibaba.version> <!-- Spring Cloud Alibaba版本 --></properties><!-- 3. 继承SpringBoot父依赖:所有SpringBoot项目都需要这个 --><parent><groupId>org.springframework.boot</groupId><artifactId>spring-boot-starter-parent</artifactId><version>2.6.3</version> <!-- SpringBoot版本,需与Spring Cloud版本兼容 --><relativePath/> <!-- 从Maven仓库找,不找本地 --></parent><!-- 4. 关键:dependencyManagement(依赖管理) --><!-- 作用:统一管理子项目的依赖版本,子项目引入依赖时不用写version --><!-- 注意:这里只是“声明”版本,不会实际引入依赖,子项目需要手动引入 --><dependencyManagement><dependencies><!-- Spring Cloud核心依赖:子项目引入Spring Cloud组件时用 --><dependency><groupId>org.springframework.cloud</groupId><artifactId>spring-cloud-dependencies</artifactId><version>${spring-cloud.version}</version><type>pom</type><scope>import</scope> <!-- 父项目特有,导入依赖列表 --></dependency><!-- Spring Cloud Alibaba依赖:子项目引入Nacos等组件时用 --><dependency><groupId>com.alibaba.cloud</groupId><artifactId>spring-cloud-alibaba-dependencies</artifactId><version>${spring-cloud-alibaba.version}</version><type>pom</type><scope>import</scope></dependency></dependencies></dependencyManagement><!-- 5. 公共依赖:所有子项目都会继承这些依赖,不用重复引入 --><dependencies><!-- Spring Boot Web:支持HTTP接口(所有微服务都需要) --><dependency><groupId>org.springframework.boot</groupId><artifactId>spring-boot-starter-web</artifactId></dependency><!-- Alibaba FastJSON:处理JSON数据(接口返回JSON需要) --><dependency><groupId>com.alibaba</groupId><artifactId>fastjson</artifactId><version>2.0.14</version> <!-- 这里写版本,因为没在dependencyManagement声明 --></dependency></dependencies><!-- 6. 统一打包插件:子项目打包时会继承这个配置 --><build><plugins><plugin><groupId>org.apache.maven.plugins</groupId><artifactId>maven-compiler-plugin</artifactId><!-- 编译JDK版本,与properties中的一致 --><configuration><source>${maven.compiler.source}</source><target>${maven.compiler.target}</target></configuration></plugin></plugins></build></project>3.1.3 核心疑问解答
-
为什么用
dependencyManagement?避免子项目依赖版本混乱。比如子项目 A 和 B 都用 Nacos,若父项目声明版本为 2021.0.1.0,子项目引入时不用写版本,后续要升级只需改父项目。
-
spring-boot-starter-web是干嘛的?提供 Spring MVC 核心功能(如@RestController、@RequestMapping),支持开发 HTTP 接口,没有它就无法写接口。
-
为什么要引入 FastJSON?
接口需要返回 JSON 格式数据,JSONObject是 FastJSON 提供的工具类,用于快速构建 JSON 响应。
3.2 第二步:搭建服务提供者(ServiceOne & ServiceTwo)
ServiceOne 和 ServiceTwo 功能完全一致(仅端口和服务名不同),这里以 ServiceOne 为例讲解。
3.2.1 操作步骤
-
在父项目上右键 → New → Module → 选择 “Maven” → 输入 ArtifactId(ServiceOne);
-
配置子项目的
pom.xml(引入 Nacos 依赖); -
编写
application.yml(配置端口、服务名、Nacos 地址); -
编写主类(开启服务注册发现);
-
编写 Controller(提供 HTTP 接口)。
3.2.2 1. ServiceOne 的 pom.xml 配置
<?xml version="1.0" encoding="UTF-8"?><project xmlns="http://maven.apache.org/POM/4.0.0"xmlns:xsi="http://www.w3.org/2001/XMLSchema-instance"xsi:schemaLocation="http://maven.apache.org/POM/4.0.0 http://maven.apache.org/xsd/maven-4.0.0.xsd"><!-- 关键:继承父项目 --><parent><groupId>com.lh</groupId><artifactId>springcloud-parent</artifactId><version>1.0-SNAPSHOT</version></parent><modelVersion>4.0.0</modelVersion><artifactId>ServiceOne</artifactId> <!-- 子项目的ArtifactId --><dependencies><!-- 核心:引入Nacos服务发现依赖 --><!-- 作用:让ServiceOne能注册到Nacos,也能从Nacos发现其他服务 --><dependency><groupId>com.alibaba.cloud</groupId><artifactId>spring-cloud-starter-alibaba-nacos-discovery</artifactId><!-- 不用写版本:父项目的dependencyManagement已声明 --></dependency></dependencies></project>-
为什么要引入
spring-cloud-starter-alibaba-nacos-discovery?这是 Nacos 的服务发现 starter,包含了:
-
服务注册逻辑:服务启动时自动把信息发给 Nacos;
-
服务发现逻辑:提供
DiscoveryClient接口,用于查询其他服务; -
与 Spring Cloud 的适配:让
@EnableDiscoveryClient注解生效。
-
3.2.3 2. ServiceOne 的 application.yml 配置
# 服务端口:每个服务端口必须唯一,避免冲突(ServiceOne用8001,ServiceTwo用8002)server:port: 8001spring:application:# 服务名:核心!注册到Nacos的唯一标识,后续调用时要靠这个名字找服务# 重点:不能有下划线!否则后续用负载均衡或Gateway网关会报错name: service-onecloud:nacos:# Nacos服务发现配置discovery:server-addr: 127.0.0.1:8848 # Nacos Server的地址(本地启动的Nacos)service: ${spring.application.name} # 注册到Nacos的服务名(和上面一致,可省略)-
服务名为什么不能有下划线?
Spring Cloud 的负载均衡(如 Ribbon)、网关(如 Gateway)对服务名的格式有要求,下划线会导致 URL 解析错误,推荐用中划线(service-one)。
-
server-addr为什么是 127.0.0.1:8848?这是本地启动的 Nacos 默认地址和端口(Nacos 默认端口 8848,源自珠峰高度,好记)。如果 Nacos 部署在其他服务器,要改这里的 IP。
3.2.4 3. ServiceOne 的主类(ServiceOneApplication)
package com.lh.serviceone; // 包名:对应你的项目结构import org.springframework.boot.SpringApplication;import org.springframework.boot.autoconfigure.SpringBootApplication;import org.springframework.cloud.client.discovery.EnableDiscoveryClient;// 1. @SpringBootApplication:Spring Boot的核心注解,包含3个功能:// - @Configuration:标记为配置类// - @EnableAutoConfiguration:开启自动配置(比如自动配置Tomcat、Spring MVC)// - @ComponentScan:扫描当前包及子包的组件(如@RestController)@SpringBootApplication// 2. @EnableDiscoveryClient:开启服务注册与发现功能// 作用:让ServiceOne启动时自动注册到Nacos,同时具备从Nacos发现其他服务的能力@EnableDiscoveryClientpublic class ServiceOneApplication {public static void main(String[] args) {// 启动Spring Boot应用:加载配置、初始化Spring容器SpringApplication.run(ServiceOneApplication.class, args);}}-
没有
@EnableDiscoveryClient会怎么样?服务启动后不会注册到 Nacos,Nacos 控制台看不到service-one,其他服务也找不到它。
3.2.5 4. ServiceOne 的 Controller(ServiceOneController)
package com.lh.serviceone.controller;import com.alibaba.fastjson.JSONObject;import org.springframework.web.bind.annotation.RequestMapping;import org.springframework.web.bind.annotation.RestController;// 1. @RestController:复合注解 = @Controller + @ResponseBody// - @Controller:标记此类为“控制器”,接收HTTP请求// - @ResponseBody:自动将方法返回值转为JSON格式,写入HTTP响应体@RestControllerpublic class ServiceOneController {// 2. @RequestMapping("/serviceOne"):映射HTTP请求路径// 作用:当客户端访问 http://localhost:8001/serviceOne 时,会执行这个方法// 默认支持GET、POST等所有HTTP方法,推荐用@GetMapping(只支持GET)更明确@RequestMapping("/serviceOne")public JSONObject serviceOne() {// 3. 用FastJSON的JSONObject构建响应数据JSONObject ret = new JSONObject();ret.put("code", 0); // 状态码:0通常表示“成功”(自定义约定)ret.put("message", "Service one method return!"); // 提示信息return ret; // 自动转为JSON响应:{"code":0,"message":"Service one method return!"}}}-
@RestController和@Controller的区别?如果用@Controller,方法需要加@ResponseBody才会返回 JSON;
用@RestController不用加,更简洁。
-
访问这个接口的地址是什么?
格式:http://{服务IP}:{服务端口}/{接口路径}→ 本地访问:http://localhost:8001/serviceOne。
3.2.6 ServiceTwo 的配置(与 ServiceOne 对比)
ServiceTwo 仅 3 处不同,其他完全一致:
| 配置项 | ServiceOne | ServiceTwo |
|---|---|---|
| 子项目 ArtifactId | ServiceOne | ServiceTwo |
| application.yml 端口 | 8001 | 8002 |
| application.yml 服务名 | service-one | service-two |
| 主类名 | ServiceOneApplication | ServiceTwoApplication |
| Controller 方法 message | "Service one method return!" | "Service two method return!" |
3.3 第三步:搭建服务消费者(ServiceThree)
ServiceThree 是 “双重身份”:
-
作为服务提供者:提供
/serviceThree接口; -
作为服务消费者:提供
/serviceThree_toOne(调用 ServiceOne)、/serviceThree_toTwo(调用 ServiceTwo)接口。
它的配置比前两个服务多了 “RestTemplate配置”(用于发起 HTTP 请求调用其他服务)。
3.3.1 1. ServiceThree 的 pom.xml 配置
与 ServiceOne 完全一致(只需引入 Nacos 服务发现依赖):
<?xml version="1.0" encoding="UTF-8"?><project xmlns="http://maven.apache.org/POM/4.0.0"xmlns:xsi="http://www.w3.org/2001/XMLSchema-instance"xsi:schemaLocation="http://maven.apache.org/POM/4.0.0 http://maven.apache.org/xsd/maven-4.0.0.xsd"><parent><groupId>com.lh</groupId><artifactId>springcloud-parent</artifactId><version>1.0-SNAPSHOT</version></parent><modelVersion>4.0.0</modelVersion><artifactId>ServiceThree</artifactId><dependencies><!-- Nacos服务发现依赖 --><dependency><groupId>com.alibaba.cloud</groupId><artifactId>spring-cloud-starter-alibaba-nacos-discovery</artifactId></dependency></dependencies></project>3.3.2 2. ServiceThree 的 application.yml 配置
仅端口和服务名不同,其他与 ServiceOne 一致:
server:port: 8003 # ServiceThree的端口,唯一spring:application:name: service-three # 服务名,注册到Nacos的标识cloud:nacos:discovery:server-addr: 127.0.0.1:8848 # Nacos地址3.3.3 3. ServiceThree 的主类(ServiceThreeApplication)
核心差异:多了RestTemplate的@Bean配置:
package com.lh.servicethree;import org.springframework.boot.SpringApplication;import org.springframework.boot.autoconfigure.SpringBootApplication;import org.springframework.cloud.client.discovery.EnableDiscoveryClient;import org.springframework.context.annotation.Bean;import org.springframework.web.client.RestTemplate;@SpringBootApplication@EnableDiscoveryClientpublic class ServiceThreeApplication {// 1. @Bean:将RestTemplate对象交给Spring容器管理// 作用:后续在Controller中可以用@Autowired注入这个对象,不用自己new@Beanpublic RestTemplate getRestTemplate() {// 2. RestTemplate:Spring提供的HTTP客户端工具,用于调用其他服务的HTTP接口return new RestTemplate();}public static void main(String[] args) {SpringApplication.run(ServiceThreeApplication.class, args);}}-
为什么要配置
RestTemplate?要调用其他服务的接口(如 ServiceOne 的/serviceOne),需要发起 HTTP 请求。
RestTemplate简化了 HTTP 请求的代码(不用手动写HttpURLConnection或 OkHttp)。
-
不配置
@Bean直接在 Controller 里 new 可以吗?可以,但不推荐。Spring 容器管理的 Bean 是单例的,避免重复创建对象浪费资源;且后续方便扩展(如添加拦截器、配置超时时间)。
3.3.4 4. ServiceThree 的 Controller(ServiceThreeController)
核心逻辑:注入RestTemplate和DiscoveryClient,调用其他服务接口:
package com.zh.servicethree.controller;import com.alibaba.fastjson.JSONObject;import org.springframework.beans.factory.annotation.Autowired;import org.springframework.cloud.client.ServiceInstance;import org.springframework.cloud.client.discovery.DiscoveryClient;import org.springframework.web.bind.annotation.RequestMapping;import org.springframework.web.bind.annotation.RestController;import org.springframework.web.client.RestTemplate;import java.util.List;import java.net.URI;@RestControllerpublic class ServiceThreeController {// 1. 注入RestTemplate:从Spring容器中获取(主类中@Bean配置的)@Autowiredprivate RestTemplate restTemplate;// 2. 注入DiscoveryClient:Spring Cloud提供的服务发现客户端// 作用:从Nacos获取其他服务的实例列表(IP、端口等)@Autowiredprivate DiscoveryClient discoveryClient;// 接口1:调用ServiceOne的/serviceOne接口@RequestMapping("/serviceThree_toOne")public JSONObject serviceThree_toOne() {// 步骤1:从Nacos获取service-one的所有可用实例// 参数:服务名(必须和ServiceOne的spring.application.name一致)List<ServiceInstance> serviceInstanceList = discoveryClient.getInstances("service-one");// 步骤2:取第一个实例(简化处理,实际项目需加负载均衡)ServiceInstance serviceInstance = serviceInstanceList.get(0);// 步骤3:获取实例的URI(包含IP和端口,如 http://127.0.0.1:8001)URI serviceOneUri = serviceInstance.getUri();// 步骤4:拼接目标接口的完整URL(URI + 接口路径)String serviceOneUrl = serviceOneUri + "/serviceOne";// 步骤5:用RestTemplate调用ServiceOne的接口// 第一个参数:目标URL;第二个参数:响应数据类型(这里是String,后续可转JSON)String strRet = restTemplate.getForObject(serviceOneUrl, String.class);// 步骤6:包装自己的响应,将ServiceOne的响应作为data字段返回JSONObject ret = new JSONObject();ret.put("code", 0);ret.put("message", "Service three to one method return!");ret.put("data", strRet); // 包含ServiceOne的响应:{"code":0,"message":"Service one method return!"}return ret;}// 接口2:调用ServiceTwo的/serviceTwo接口(逻辑与上面完全一致)@RequestMapping("/serviceThree_toTwo")public JSONObject serviceThree_toTwo() {List<ServiceInstance> serviceInstanceList = discoveryClient.getInstances("service-two");ServiceInstance serviceInstance = serviceInstanceList.get(0);URI serviceTwoUri = serviceInstance.getUri();String serviceTwoUrl = serviceTwoUri + "/serviceTwo";String strRet = restTemplate.getForObject(serviceTwoUrl, String.class);JSONObject ret = new JSONObject();ret.put("code", 0);ret.put("message", "Service three to two method return!");ret.put("data", strRet);return ret;}// 接口3:自身作为服务提供者,提供的基础接口@RequestMapping("/serviceThree")public JSONObject serviceThree() {JSONObject ret = new JSONObject();ret.put("code", 0);ret.put("message", "Service three method return!");return ret;}}关键逻辑拆解
-
DiscoveryClient的作用:-
是 Spring Cloud 的 “服务发现客户端接口”,Nacos 实现了这个接口,所以能从 Nacos 获取服务实例;
-
getInstances("service-one"):返回所有注册到 Nacos 的service-one实例(如果 ServiceOne 启动多个实例,这里会有多个元素)。
-
-
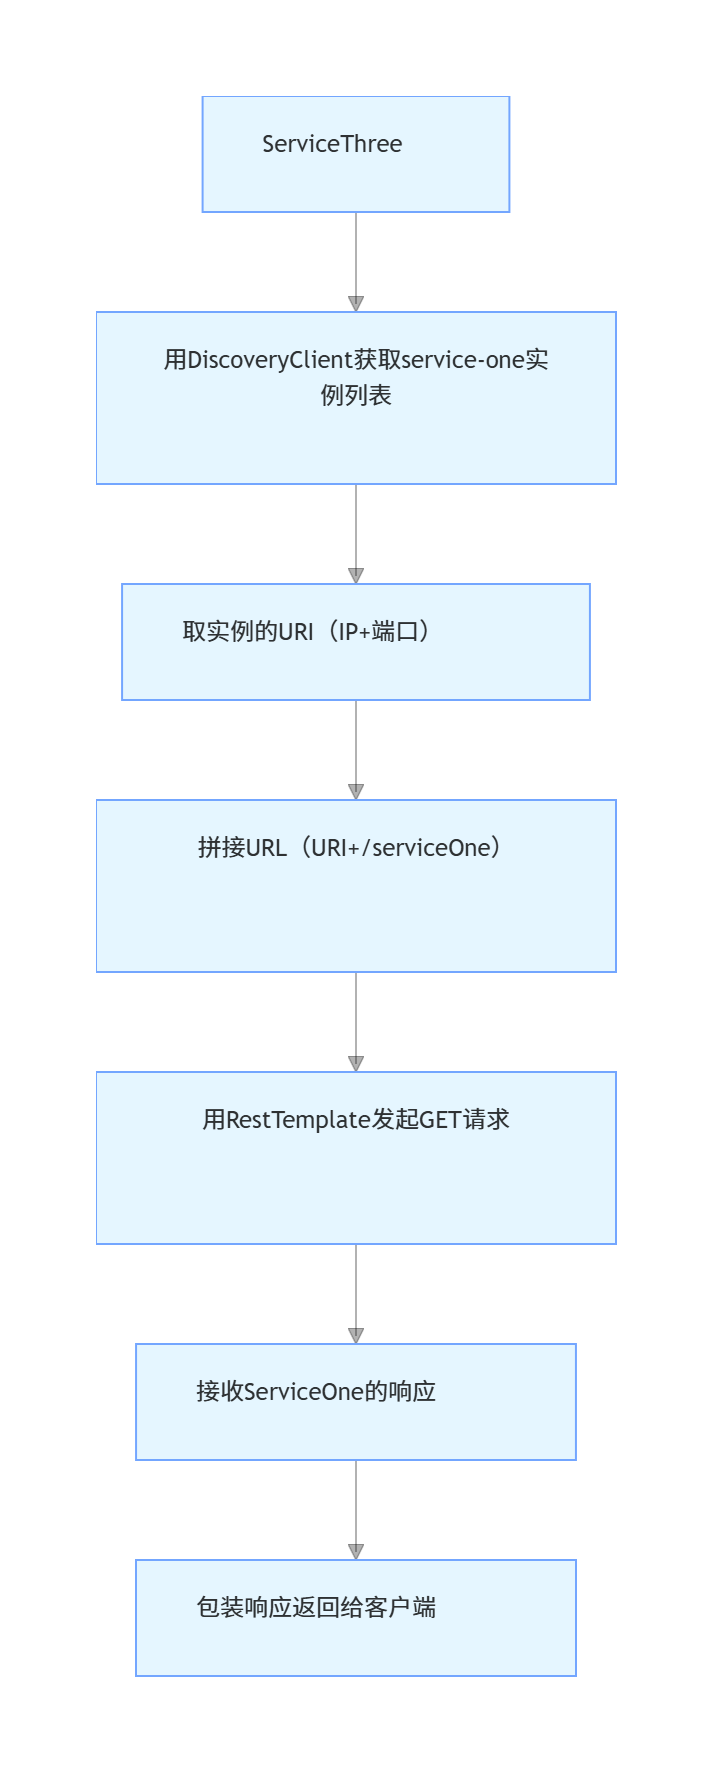
调用其他服务的核心流程:
ServiceThree用DiscoveryClient获取service-one实例列表取实例的URI(IP+端口)拼接URL(URI+/serviceOne)用RestTemplate发起GET请求接收ServiceOne的响应包装响应返回给客户端
-
为什么不用硬编码 IP 和端口?如果硬编码
http://127.0.0.1:8001/serviceOne,当 ServiceOne 扩容(启动多个实例)或地址变更(IP / 端口改了),代码必须重新修改、部署。用服务发现则自动适应变化,无需改代码。
4. 结果验证:确保代码跑通
4.1 前提:启动 Nacos Server
-
下载 Nacos(文档地址:https://github.com/alibaba/nacos/releases,选 3.0.3 版本);
-
解压到非中文目录;
-
启动 Nacos(单机模式,初学者必用):
-
打开 CMD,进入 Nacos 的
bin目录; -
执行命令:
startup.cmd -m standalone(Windows)或sh startup.sh -m standalone(Linux/Mac);
-
-
访问 Nacos 控制台:打开浏览器输入
http://127.0.0.1:8848/nacos,默认用户名 / 密码都是nacos。
4.2 步骤 1:启动三个微服务
在 IDEA 中分别启动:
-
ServiceOneApplication(端口 8001);
-
ServiceTwoApplication(端口 8002);
-
ServiceThreeApplication(端口 8003)。
启动成功的标志:控制台没有报错,且 Nacos 控制台 “服务列表” 能看到三个服务:
| 服务名 | 实例数 | 健康实例数 |
|---|---|---|
| service-one | 1 | 1 |
| service-two | 1 | 1 |
| service-three | 1 | 1 |
4.3 步骤 2:验证各个接口
用浏览器或 Postman 访问以下地址,查看响应是否符合预期:
1. 验证 ServiceOne 接口
-
地址:
http://localhost:8001/serviceOne -
预期响应:
{"code": 0,"message": "Service one method return!"}
2. 验证 ServiceTwo 接口
-
地址:
http://localhost:8002/serviceTwo -
预期响应:
{"code": 0,"message": "Service two method return!"}
3. 验证 ServiceThree 的基础接口
-
地址:
http://localhost:8003/serviceThree -
预期响应:
{"code": 0,"message": "Service three method return!"}
4. 验证 ServiceThree 调用 ServiceOne
-
地址:
http://localhost:8003/serviceThree_toOne -
预期响应(包含 ServiceOne 的响应):
{"code": 0,"message": "Service three to one method return!","data": "{\"code\":0,\"message\":\"Service one method return!\"}"}
5. 验证 ServiceThree 调用 ServiceTwo
-
地址:
http://localhost:8003/serviceThree_toTwo -
预期响应(包含 ServiceTwo 的响应):
{"code": 0,"message": "Service three to two method return!","data": "{\"code\":0,\"message\":\"Service two method return!\"}"}
5. 核心逻辑关联关系梳理
很多初学者会混淆 “配置” 和 “代码” 的对应关系,这里用表格明确:
| 关联项 | 对应内容 |
|---|---|
| 服务注册的关键 | 1. 子项目 pom 引入nacos-discovery依赖;2. 主类加@EnableDiscoveryClient;3. application.yml 配置spring.application.name和nacos.discovery.server-addr |
| 服务调用的关键 | 1. 主类配置RestTemplate的@Bean;2. Controller 注入RestTemplate和DiscoveryClient;3. DiscoveryClient.getInstances(服务名)获取实例 |
| 接口访问地址的构成 | http://{服务IP}:{server.port}/{@RequestMapping路径} |
| Nacos 服务名的对应 | ServiceOne 的spring.application.name=service-one ↔ ServiceThree 的discoveryClient.getInstances("service-one") |
| JSON 响应的关键 | 1. 父项目引入 FastJSON 依赖;2. Controller 加@RestController;3. 用JSONObject构建响应 |
6. 重点 & 易错点总结
这部分是初学者最容易踩坑的地方,务必牢记!
6.1 重点知识
-
父项目的
dependencyManagementvsdependencies:-
dependencyManagement:只声明版本,不引入依赖,子项目需手动引入; -
dependencies:实际引入依赖,所有子项目会继承。
-
-
@EnableDiscoveryClient的作用:必须加在主类上,否则服务不注册到 Nacos。 -
服务名的格式:不能有下划线,用中划线(如
service-one)。 -
RestTemplate的配置:作为消费者的服务(如 ServiceThree)必须配置@Bean,否则无法注入。
6.2 易错点 & 解决方案
| 易错点描述 | 解决方案 |
|---|---|
启动 Nacos 时没加-m standalone,报错 “集群模式需要配置数据库” | 启动命令必须加单机模式:startup.cmd -m standalone |
Controller 中用JSONObject时报 “类未找到” | 父项目或子项目必须引入 FastJSON 依赖(文档中父项目已引入,无需重复) |
| 服务启动后 Nacos 控制台看不到服务 | 1. 检查主类是否加@EnableDiscoveryClient;2. 检查 application.yml 的nacos.discovery.server-addr是否正确;3. 检查服务是否启动成功 |
| ServiceThree 调用时报错 “IndexOutOfBoundsException”(列表越界) | discoveryClient.getInstances("service-one")返回空列表,原因:1. ServiceOne 没启动;2. 服务名写错(如写成serviceone) |
| 访问接口时 404(找不到资源) | 1. 检查@RequestMapping的路径是否正确;2. 检查服务端口是否正确;3. 检查 Controller 所在包是否在主类的包或子包下(@ComponentScan扫描范围) |
服务名用了下划线(如service_one),后续用负载均衡报错 | 把服务名改成中划线(service-one),重新启动服务 |
7. 后续学习方向
掌握本案例后,你已经理解了 Nacos 的核心功能(服务注册与发现),后续可以学习:
-
Nacos 配置中心:统一管理多环境配置,实现配置动态更新(不用重启服务);
-
负载均衡:在 ServiceThree 中用
@LoadBalanced注解优化RestTemplate,实现多实例负载均衡(不用手动取第一个实例); -
服务熔断降级:用 Sentinel(Spring Cloud Alibaba 组件)处理服务调用超时或故障,避免级联失败;
-
网关:用 Spring Cloud Gateway 统一入口,路由请求到不同服务(不用记多个服务的 IP 和端口)。
通过本案例的拆解,希望你能从 “抄代码” 转变为 “理解代码逻辑”,后续遇到类似需求时,能独立搭建和调试 Nacos 相关的微服务。