Custom SRP 11 - Post Processing
https://catlikecoding.com/unity/tutorials/custom-srp/post-processing/
- 创建简单的 post-FX stack
- 修改渲染结果
- 根据需要执行后效
- 实现 bloom 效果
1 Post-FX Stack
渲染的图片最终呈现到屏幕前,经常需要进行一些处理,即后效,包括 bloom, color grading, depth-of-field, motion blur, tone mapping 等。这些效果按照顺序依次应用,像一个栈。
1.1 Settings Asset
后效有很多层,需要配置,开关,因此需要一个 asset 来保存这些参数。创建一个 ScriptableObject 的子类来完成,并为其添加专门的 Asset 右键菜单。然后为 pipeline asset 定义配置对象,并在渲染时向后续逻辑传递该对象,一直到 CameraRenderer.Render
/////////////////////////////////
// 创建新文件 PosFXSettings.cs
[CreateAssetMenu(menuName ="Rendering/Custom Post FX Settings")]
public class PostFXSettings : ScriptableObject
{}//////////////////////////////
// 为 CustomRenderPipelineAsset 创建属性:
[SerializeField]PostFXSettings postFXSettings = default;![]()
1.2 Stack Object
应用一个后效到 image,其实就是以特定的材质(shader)渲染覆盖整个 Image 的矩形。
我们将后效实现在专门的 PostFXStack 对象中,创建新文件 PostFXStack.cs
public class PostFXStack
{const string bufferName = "Post FX";CommandBuffer buffer = new CommandBuffer() { name = bufferName };ScriptableRenderContext context;Camera camera;PostFXSettings settings;public void Setup(ScriptableRenderContext context, Camera camera, PostFXSettings settings){this.context = context;this.camera = camera;this.settings = settings;}// 是否激活后处理public bool IsActive => settings != null;public void Render(int sourceId){buffer.Blit(sourceId, BuiltinRenderTextureType.CameraTarget);context.ExecuteCommandBuffer(buffer);buffer.Clear();}
}
1.3 Using the Stack
Post-FX Stack 对象向 Image 应用后效,最后绘制到屏幕上,因此如果开启了后效,就要创建 Render Texture,并将场景渲染上去。同时创建的 RenderTexture 的内容是不确定的,因此必须要清理颜色。
对于 Gizmos,Unity 定义了后效前和后效后的 Gizmos 渲染,因此我们也将 Gizmos 渲染分成两个阶段进行渲染
在 CameraRenderer.cs 中
// 后效
PostFXStack postFXStack = new PostFXStack();// 如果开启后效,则需要一个临时的渲染目标
static int frameBufferId = Shader.PropertyToID("_CameraFrameBuffer");public void Render(ScriptableRenderContext context, Camera camera, bool useDynamicBatching, bool useGPUInstancing, bool usePerObjectLights, ShadowSettings shadows,PostFXSettings postFXSettings)
{...// 设置后处理相关参数postFXStack.Setup(context, camera, postFXSettings);buffer.EndSample(SampleName);Setup();DrawVisibleGeometry(useDynamicBatching, useGPUInstancing, usePerObjectLights);DrawUnsupportedShaders();// 绘制需要在后先前绘制的 GizmosDrawGizmosBeforeFX();// 后处理if (postFXStack.IsActive)postFXStack.Render(frameBufferId);// 绘制需要在后处理后绘制的 GizmosDrawGizmosAfterFX();Cleanup();Submit();
}void Setup()
{context.SetupCameraProperties(camera);CameraClearFlags clearFlags = camera.clearFlags;// 如果开启了后处理,则渲染到临时 RT 上if (postFXStack.IsActive){// 获取的 RenderTexture 数据是随机的,因此要清除if (clearFlags > CameraClearFlags.Color)clearFlags = CameraClearFlags.Color;buffer.GetTemporaryRT(frameBufferId, camera.pixelWidth, camera.pixelHeight,32, FilterMode.Bilinear, RenderTextureFormat.Default);buffer.SetRenderTarget(frameBufferId, RenderBufferLoadAction.DontCare, RenderBufferStoreAction.Store);}// 清除屏幕buffer.ClearRenderTarget(clearFlags <= CameraClearFlags.Depth, clearFlags == CameraClearFlags.Color, clearFlags == CameraClearFlags.Color ? camera.backgroundColor.linear : Color.clear);buffer.BeginSample(SampleName);ExecuteBuffer();
}
到此,我们把整个场景,用 Post-FX Stack 对象绘制到了屏幕上,当然因为后效没有内容,因此画面没什么不同。
1.4 Custom Drawing
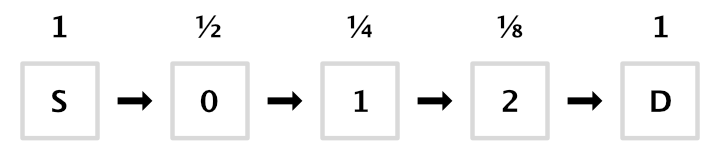
绘制后效时,并不是绘制一个矩形,通常是绘制一个三角形,然后将图像“放置”到三角形内部
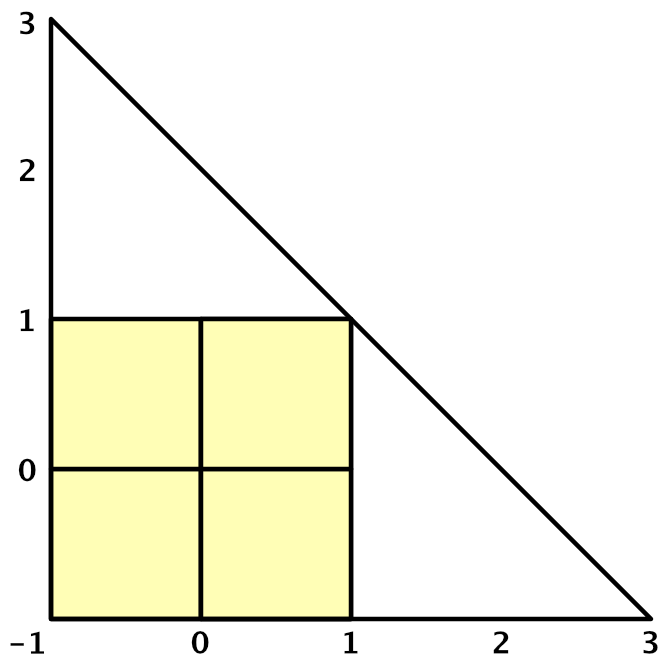
三角形三个顶点,仅需要裁剪空间的坐标和UV
裁剪空间坐标分别为:[-1,-1] [-1,3] [3,-1],这样仅 -1,1 空间是在裁剪区域内的
UV 坐标为:[0,0] [0,2] [2,0] ,这样保证了UV 坐标在 0,1 之间
创建 Shaders/PostFXStackPasses.hlsl
TEXTURE2D(_PostFXSource);
SAMPLER(sampler_linear_clamp);struct Varyings
{float4 positionCS : SV_POSITION;float2 screenUV : VAR_SCREEN_UV;
};Varyings DefaultPassVertex(uint vertexID : SV_VertexID)
{Varyings output;output.positionCS = float4(vertexID <= 1 ? -1.0 : 3.0,vertexID == 1 ? 3.0 : -1.0,0.0, 1.0);output.screenUV = float2(vertexID <= 1 ? 0.0 : 2.0,vertexID == 1 ? 2.0 : 0.0);// 处理Y轴翻转if (_ProjectionParams.x < 0.0){output.positionCS.y = -output.positionCS.y;}return output;
}float4 GetSource(float2 screenUV)
{// 不需要mip映射,因此lod设为0SAMPLE_TEXTURE2D_LOD(_PostFXSource, sampler_linear_clamp, screenUV, 0);)
}float4 DefaultPassFragment(Varyings input) : SV_TARGET
{// 调试输出屏幕坐标//return float4(input.screenUV, 0.0, 1.0);// 正常输出采样颜色return GetSource(input.screenUV);
}
创建 PostFXStack.shader
因为所有的 pass 都不需要裁剪,忽略深度,因此将相关渲染状态定义在 SubShader 中。
因为不希望用户手动创建该材质,因此路径设置为 Hidden/
Shader "Hidden/Custom RP/Post FX Stack"
{Properties { }SubShader{Cull OffZTest AlwaysZWrite OffHLSLINCLUDE#include "../ShaderLibrary/Common.hlsl"#include "PostFXStackPasses.hlsl"ENDHLSLPass{Name "Copy"HLSLPROGRAM#pragma target 3.5#pragma vertex DefaultPassVertex#pragma fragment CopyPassFragmentENDHLSL}}
}
为 PostFXSettings 定义 shader 属性,并关联上面的 shader。并提供接口,需要时创建材质并返回。
[CreateAssetMenu(menuName ="Rendering/Custom Post FX Settings")]
public class PostFXSettings : ScriptableObject
{[SerializeField]Shader shader = default;// 运行时根据需要创建材质,不需序列化[System.NonSerialized]Material material;public Material Material{get{if (material == null && shader != null){material = new Material(shader);material.hideFlags = HideFlags.HideAndDontSave;}return material;}}
}![]()
然后定义 Draw 接口,并以此完成绘制。目前只是简单的将图拷贝到屏幕
// shader 中处理的源纹理
int fxSourceID = Shader.PropertyToID("_PostFXSource");// 定义枚举,便于管理Pass
// 这里枚举是值,必须与Shader中的Pass顺序对应
public enum Pass
{Copy
}
...
public void Render(int sourceId)
{Draw(sourceId, BuiltinRenderTextureType.CameraTarget, Pass.Copy);context.ExecuteCommandBuffer(buffer);buffer.Clear();
}// 绘制后效
// from: 后效输入
// to: 后效输出
// pass: 使用的Pass
void Draw(RenderTargetIdentifier from, RenderTargetIdentifier to, Pass pass)
{buffer.SetGlobalTexture(fxSourceID, from);buffer.SetRenderTarget(to, RenderBufferLoadAction.DontCare, RenderBufferStoreAction.Store);// 不提供 vb ib,直接绘制三角形buffer.DrawProcedural(Matrix4x4.identity, settings.Material, (int)pass, MeshTopology.Triangles, 3);
}
将 DefaultPassFragment 中的调试输出打开,会发现,后效被应用到了所有的场景,包括 Scene, Game, 甚至缩略图,需要增加一些判断条件,仅在 Game 下应用后效。在Scene 下,根据 Scene 工具条设置来决定是否应用后效。
/////////////////////////////////
// 定义PostFXStack.Editor.cs 部分类
public partial class PostFXStack
{partial void ApplySceneViewState();
#if UNITY_EDITORpartial void ApplySceneViewState(){// Scene视图中根据工具栏选项决定是否显示后效if (camera.cameraType == CameraType.SceneView && !SceneView.currentDrawingSceneView.sceneViewState.showImageEffects)settings = null;}
#endif
}////////////////////////////////////
// 在 PostFXStack.cs 中调用上面的 ApplySceneViewStatepublic void Setup(ScriptableRenderContext context, Camera camera, PostFXSettings settings)
{this.context = context;this.camera = camera;// 只在Scene视图和Game视图中启用后效this.settings = camera.cameraType <= CameraType.SceneView ? settings : null;ApplySceneViewState();
}
2 Bloom
Bloom 是让场景看起来“发光”的效果。我们用这个效果来展示 PostFXStack。
2.1 Bloom Pyramid
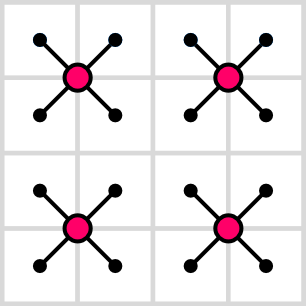
Bloom 模拟的是颜色的分散,可以通过模糊图像来实现。亮的像素会渗透到相邻的暗的像素,因此看起来“发光”。最简单的方法是将图像拷贝到宽高都是一半的另一张图上,通过 bilinear 过滤器,每次采样将采样2x2的4个像素。如下图将4x4通过 bilinear 采样,变成2x2,这也叫 down sampling 下采样
每次拷贝,会将图像模糊一点,因此需要重复多次,直到达到我们希望的效果,最终构建了一个贴图的金字塔:
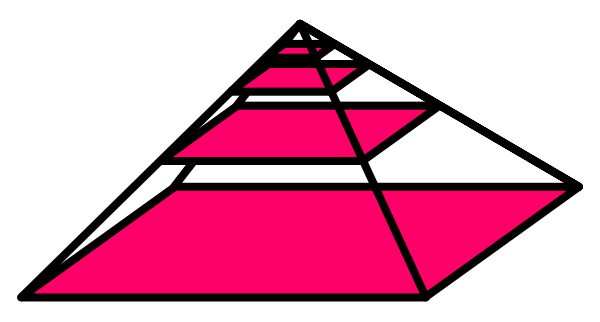
这些贴图(RT)需要被跟踪,具体有多少,取决于金字塔中有多少级,也即原始图的尺寸。这里我们定义最大级别为 16,足以将 65536x65536 的贴图模糊成 1x1。
下采样时,贴图尺寸以 1/2 递减
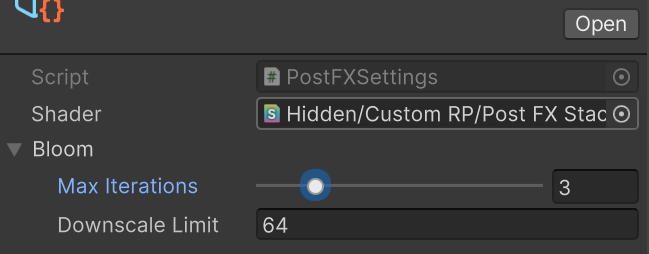
为了控制效果,需要定义迭代(下采样)次数,以及最小目标尺寸,因此定义 BloomSettings 来进行配置
[CreateAssetMenu(menuName ="Rendering/Custom Post FX Settings")]
public class PostFXSettings : ScriptableObject
{[SerializeField]Shader shader = default;// 运行时根据需要创建材质,不需序列化[System.NonSerialized]Material material;public Material Material{get{if (material == null && shader != null){material = new Material(shader);material.hideFlags = HideFlags.HideAndDontSave;}return material;}}[System.Serializable]public struct BloomSettings{[Range(0f,16f)]public int maxIterations;[Min(1f)]public int downscaleLimit;}[SerializeField]BloomSettings bloom = new BloomSettings{maxIterations = 8,downscaleLimit = 2};  public BloomSettings Bloom => bloom;
}
需要这些贴图的ID来跟踪它们,我们将这些贴图命名为 _BloomPyramid0, _BloomPyramid1,...。但是我们不需要定义这么多变量记录它们,我们只需要记录第一个。因为将 _BloomPyramid0 的 ID 记录下来后,后续其它 ID 都是顺序的,并且ID 的分配是递增的,且不会被再次分配,在第一个ID的基础上加上偏移,就可以获得其它的 ID。然后定义 DoBloom 方法,根据配置执行多次下采样 Copy Pass。在 PostFXStack.cs 中
public partial class PostFXStack
{...// 最大 bloom 层数const int maxBloomPyramidLevels = 16;// bloom 第一张 RTint bloomPyramidID = Shader.PropertyToID("_BloomPyramid0");public PostFXStack(){// bloom RT IDs// 只需要记录第一个ID,后续的ID可以通过偏移量计算得到bloomPyramidID = Shader.PropertyToID("_BloomPyramid0");for(int i = 1; i < maxBloomPyramidLevels; i++){Shader.PropertyToID("_BloomPyramid" + i);}}void Draw(RenderTargetIdentifier from, RenderTargetIdentifier to, Pass pass){buffer.SetGlobalTexture(fxSourceID, from);buffer.SetRenderTarget(to, RenderBufferLoadAction.DontCare, RenderBufferStoreAction.Store);// 不提供 vb ib,直接绘制三角形buffer.DrawProcedural(Matrix4x4.identity, settings.Material, (int)pass, MeshTopology.Triangles, 3);}void DoBloom(int sourceId){buffer.BeginSample("Bloom");int width = camera.pixelWidth / 2;int height = camera.pixelHeight / 2;RenderTextureFormat format = RenderTextureFormat.Default;int fromId = sourceId;int toId = bloomPyramidID;int i;// 循环下采样for(i = 0; i < settings.Bloom.maxIterations; i++){if (height < settings.Bloom.downscaleLimit || width < settings.Bloom.downscaleLimit)break;buffer.GetTemporaryRT(toId, width, height, 0, FilterMode.Bilinear, format);Draw(fromId, toId, Pass.Copy);fromId = toId;toId++;width /= 2;height /= 2;}// 绘制到屏幕Draw(fromId, BuiltinRenderTextureType.CameraTarget, Pass.Copy);// 释放RTfor(i-=1; i >= 0; i--)buffer.ReleaseTemporaryRT(bloomPyramidID + i);buffer.EndSample("Bloom");}
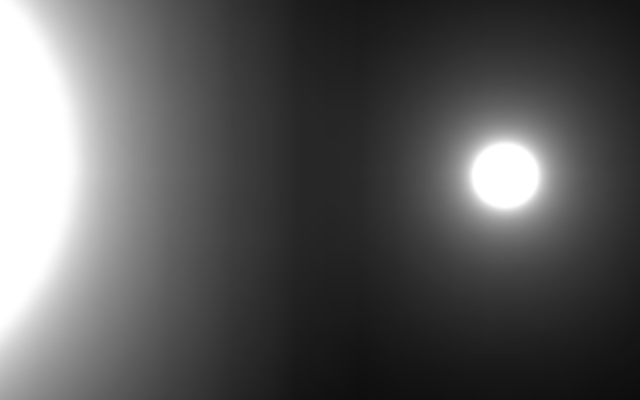
} 下面是我们的效果

2.2 Gaussian Filtering
上图中的效果,有明显的色块。其实 bloom 也不是上面那样实现的,上面只是介绍 bloom 的原理。
通常 bloom 是通过 9x9 的高斯核来执行卷积,进行模糊,在加上 bilinear 下采样,实际是 18x18 。
9x9 最终需要 81 次采样,因为每次采样都是独立的,所以可以将采样分成水平和垂直方向上各9次,总共18次采样达到同样效果,且大大提升效率。当然,这需要定义两个 fragment shader 分别处理水平和垂直 blur。同时需要的 RT 数量也要 *2。
实际上在下采样时,已经进行了 blur 了,因此可以进一步,将高斯核缩减到 5x5
// PostFXStackPass.hlsl// 像素大小
float4 _PostFXSource_TexelSize;float4 GetSourceTexelSize()
{return _PostFXSource_TexelSize;
}... float4 BloomHorizontalPassFragment(Varyings input) : SV_Target
{float3 color = 0.0;float offsets[] ={-3.23076923, -1.38461538, 0.0, 1.38461538, 3.23076923};float weights[] ={0.07027027, 0.31621622, 0.22702703, 0.31621622, 0.07027027};for (int i = 0; i < 5; ++i){float offset = offsets[i] * _PostFXSource_TexelSize.x;color += GetSource(input.screenUV + float2(offset, 0.0)).rgb * weights[i];}return float4(color, 1.0);
}float4 BloomVerticalPassFragment(Varyings input) : SV_Target
{float3 color = 0.0;float offsets[] ={-3.23076923, -1.38461538, 0.0, 1.38461538, 3.23076923};float weights[] ={0.07027027, 0.31621622, 0.22702703, 0.31621622, 0.07027027};for (int i = 0; i < 5; ++i){float offset = offsets[i] * _PostFXSource_TexelSize.y;color += GetSource(input.screenUV + float2(0.0, offset)).rgb * weights[i];}return float4(color, 1.0);
}
定义渲染用的 pass
// PostFXStack.shaderPass{Name "Bloom Horizontal"HLSLPROGRAM#pragma target 3.5#pragma vertex DefaultPassVertex#pragma fragment BloomHorizontalPassFragmentENDHLSL}Pass{Name "Bloom Vertical"HLSLPROGRAM#pragma target 3.5#pragma vertex DefaultPassVertex#pragma fragment BloomVerticalPassFragmentENDHLSL}实现渲染逻辑
public partial class PostFXStack
{...// 最大 bloom 层数const int maxBloomPyramidLevels = 16;// bloom 第一张 RTint bloomPyramidID = Shader.PropertyToID("_BloomPyramid0");// 定义枚举,便于管理Pass// 这里枚举是值,必须与Shader中的Pass顺序对应public enum Pass{Copy,BloomHorizontal,BloomVertical,}public PostFXStack(){// bloom RT IDs// 只需要记录第一个ID,后续的ID可以通过偏移量计算得到bloomPyramidID = Shader.PropertyToID("_BloomPyramid0");// bloom 分成水平和垂直两个Pass,因此需要的RT数量是2倍for (int i = 1; i < maxBloomPyramidLevels*2; i++){Shader.PropertyToID("_BloomPyramid" + i);}}...public void Render(int sourceId){//Draw(sourceId, BuiltinRenderTextureType.CameraTarget, Pass.Copy);DoBloom(sourceId);context.ExecuteCommandBuffer(buffer);buffer.Clear();}// 绘制后效// from: 后效输入// to: 后效输出// pass: 使用的Passvoid Draw(RenderTargetIdentifier from, RenderTargetIdentifier to, Pass pass){buffer.SetGlobalTexture(fxSourceID, from);buffer.SetRenderTarget(to, RenderBufferLoadAction.DontCare, RenderBufferStoreAction.Store);// 不提供 vb ib,直接绘制三角形buffer.DrawProcedural(Matrix4x4.identity, settings.Material, (int)pass, MeshTopology.Triangles, 3);}void DoBloom(int sourceId){buffer.BeginSample("Bloom");int width = camera.pixelWidth / 2;int height = camera.pixelHeight / 2;RenderTextureFormat format = RenderTextureFormat.Default;int fromId = sourceId;int toId = bloomPyramidID;int i;// 循环下采样for(i = 0; i < settings.Bloom.maxIterations; i++){if (height < settings.Bloom.downscaleLimit || width < settings.Bloom.downscaleLimit)break;// 水平 blurbuffer.GetTemporaryRT(toId, width, height, 0, FilterMode.Bilinear, format);Draw(fromId, toId, Pass.BloomHorizontal);fromId = toId;toId++;// 垂直 blurbuffer.GetTemporaryRT(toId, width, height, 0, FilterMode.Bilinear, format);Draw(fromId, toId, Pass.BloomVertical);fromId = toId;toId++;width /= 2;height /= 2;}// 绘制到屏幕Draw(fromId, BuiltinRenderTextureType.CameraTarget, Pass.Copy);// 释放RTfor(i-=1; i >= 0; i--)buffer.ReleaseTemporaryRT(bloomPyramidID + i);buffer.EndSample("Bloom");}
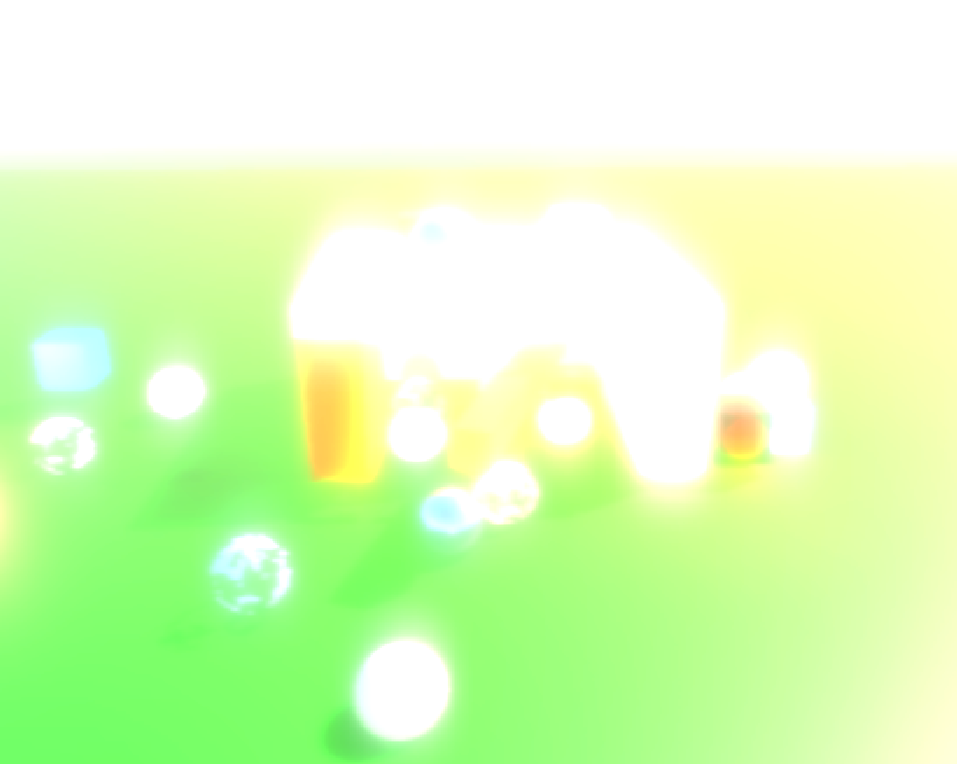
}贴上我们的效果

2.3 Additive Blurring
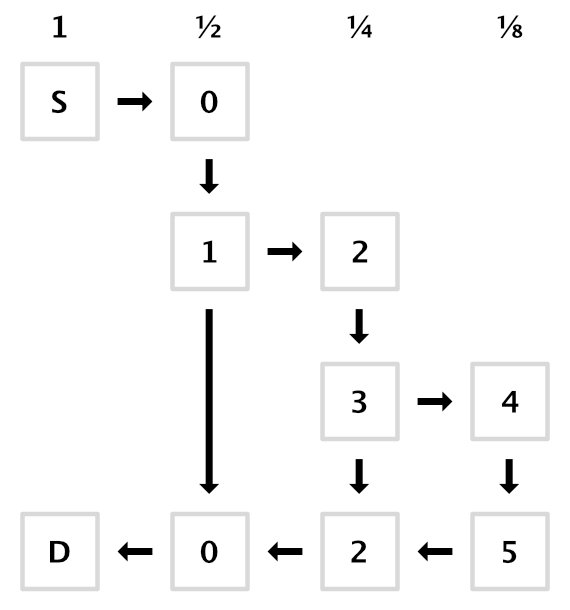
到目前为止,我们的效果只有模糊,没有发光。为了实现发光效果,我们可以进行“上采样”,并在该过程中叠加两个RT的颜色,该过程重用了下采样时的RT,策略如下:
// PostFXStackPasses.hlslTEXTURE2D(_PostFXSource);
TEXTURE2D(_PostFXSource2);
SAMPLER(sampler_linear_clamp);
...
float4 GetSource2(float2 screenUV)
{// 不需要mip映射,因此lod设为0return SAMPLE_TEXTURE2D_LOD(_PostFXSource2, sampler_linear_clamp, screenUV, 0);
}
...
float4 BloomCombinePassFragment(Varyings input) : SV_TARGET
{float3 lowRes = GetSource(input.screenUV).rgb;float3 highRes = GetSource2(input.screenUV).rgb;return float4(lowRes + highRes, 1.0);
}
// PostFXStack.shader 中定义新的 pass
Pass
{Name "Bloom Combine"HLSLPROGRAM#pragma target 3.5#pragma vertex DefaultPassVertex#pragma fragment BloomCombinePassFragmentENDHLSL
}
public partial class PostFXStack
{...// shader 中处理的源纹理int fxSourceID = Shader.PropertyToID("_PostFXSource");int fxSource2ID = Shader.PropertyToID("_PostFXSource2");...// 定义枚举,便于管理Pass// 这里枚举是值,必须与Shader中的Pass顺序对应public enum Pass{Copy,BloomHorizontal,BloomVertical,BloomCombine,}...void DoBloom(int sourceId){buffer.BeginSample("Bloom");var bloom = settings.Bloom;int width = camera.pixelWidth / 2;int height = camera.pixelHeight / 2;// 如果不需要 bloom,直接拷贝,返回if (bloom.maxIterations == 0 || width < bloom.downscaleLimit || height < bloom.downscaleLimit){Draw(sourceId, BuiltinRenderTextureType.CameraTarget, Pass.Copy);buffer.EndSample("Bloom");return;}RenderTextureFormat format = RenderTextureFormat.Default;int fromId = sourceId;int toId = bloomPyramidID;int i;// 循环下采样for(i = 0; i < bloom.maxIterations; i++){if (height < bloom.downscaleLimit || width < bloom.downscaleLimit)break;// 水平 blurbuffer.GetTemporaryRT(toId, width, height, 0, FilterMode.Bilinear, format);Draw(fromId, toId, Pass.BloomHorizontal);fromId = toId;toId++;// 垂直 blurbuffer.GetTemporaryRT(toId, width, height, 0, FilterMode.Bilinear, format);Draw(fromId, toId, Pass.BloomVertical);fromId = toId;toId++;width /= 2;height /= 2;}// 传递 bicubic upsampling 开关buffer.SetGlobalFloat(bloomBicubicUpsamplingID, bloom.bicubicUpsampling ? 1f : 0f);// 上采样至少需要执行2次迭代才可以if (i > 1){// 释放最后一次迭代的水平 blur RTbuffer.ReleaseTemporaryRT(fromId - 1);// 循环上采样,叠加颜色toId -= 5;for (i -= 1; i > 0; i--){buffer.SetGlobalTexture(fxSource2ID, toId + 1);Draw(fromId, toId, Pass.BloomCombine);buffer.ReleaseTemporaryRT(fromId);buffer.ReleaseTemporaryRT(toId + 1);fromId = toId;toId -= 2;}}else{buffer.ReleaseTemporaryRT(bloomPyramidID);}buffer.SetGlobalTexture(fxSource2ID, sourceId);// 绘制到屏幕Draw(fromId, BuiltinRenderTextureType.CameraTarget, Pass.BloomCombine);buffer.ReleaseTemporaryRT(fromId);buffer.EndSample("Bloom");}
}
贴上现在的效果:
2.4 Bicubic Upsampling 双立方体上采样
尽管依赖高斯过滤器可以获得平滑的结果,但是由于双线性采样,依然会有方块感,如下图:
可以通过 bicubic 过滤来消除这种效果。当前的硬件不支持 bicubic 过滤器,但是 Core RP Library 中提供了函数 SampleTexture2DBicubic 函数来实现,效果如下图:

我们将会在执行 upsampling 时,使用 bicubic filter。同时该采样由4次采样完成,因此消耗比较大,所以我们还需要提供一个配置参数,来开关该特性
// PostFXStackPasses.hlsl
#include "Packages/com.unity.render-pipelines.core/ShaderLibrary/Filtering.hlsl"
...
float4 _PostFXSource_TexelSize;
// 是否开启 bicubic upsampling
bool _BloomBicubicUpsampling;
...
float4 GetSourceBicubic(float2 screenUV)
{return SampleTexture2DBicubic(TEXTURE2D_ARGS(_PostFXSource, sampler_linear_clamp), screenUV, _PostFXSource_TexelSize.zwxy, 1.0, 0.0);
}
...
float4 BloomCombinePassFragment(Varyings input) : SV_TARGET
{float3 lowRes;if (_BloomBicubicUpsampling)lowRes = GetSourceBicubic(input.screenUV).rgb;else lowRes = GetSource(input.screenUV).rgb;float3 highRes = GetSource2(input.screenUV).rgb;return float4(lowRes + highRes, 1.0);
}
// PostFXStack.cspublic partial class PostFXStack
{...// bloom 第一张 RT,后面的 RT ID 通过偏移量计算得到int bloomPyramidID = Shader.PropertyToID("_BloomPyramid0");// bicubic upsampling 开关int bloomBicubicUpsamplingID = Shader.PropertyToID("_BloomBicubicUpsampling");...void DoBloom(int sourceId){...// 传递 bicubic upsampling 开关buffer.SetGlobalFloat(bloomBicubicUpsamplingID, bloom.bicubicUpsampling ? 1f : 0f);// 上采样至少需要执行2次迭代才可以if (i > 1){...}
2.5 Half Resolution
由于过多的绘制和采样次数,bloom 消耗很高。一种简单的降低消耗的办法是跳过第一次迭代,直接从半分辨率开始 bloom,因此我们在执行 bloom 之前,先将原图拷贝到半分辨率的图上。
...
// bloom 第一张 RT,后面的 RT ID 通过偏移量计算得到
int bloomPyramidID = Shader.PropertyToID("_BloomPyramid0");
// bloom 半分辨率渲染目标贴图
int bloomPreFilterID = Shader.PropertyToID("_BloomPreFilter");
...
void DoBloom(int sourceId)
{buffer.BeginSample("Bloom");var bloom = settings.Bloom;int width = camera.pixelWidth / 2;int height = camera.pixelHeight / 2;// 如果不需要 bloom,直接拷贝,返回// *2 是因为我们要跳过第一次迭代,从半分辨率开始if (bloom.maxIterations == 0 || width < bloom.downscaleLimit*2 || height < bloom.downscaleLimit * 2){Draw(sourceId, BuiltinRenderTextureType.CameraTarget, Pass.Copy);buffer.EndSample("Bloom");return;}RenderTextureFormat format = RenderTextureFormat.Default;// 源图 -> 半分辨率图buffer.GetTemporaryRT(bloomPreFilterID, width, height, 0, FilterMode.Bilinear, format);Draw(sourceId, bloomPreFilterID, Pass.Copy);width /= 2;height /= 2;int fromId = bloomPreFilterID;int toId = bloomPyramidID;...buffer.ReleaseTemporaryRT(bloomPreFilterID);buffer.EndSample("Bloom");
}
2.6 Threshold and Intensity
Threshold
现在整个屏幕都是“发光”的,但其实我们只是希望让亮度高的地方“发光”,因此需要引入一个 threshold 来控制亮度达到多少的像素才会参与 bloom。
我们需要设计一条跟像素亮度相关的曲线函数w作为系数,来淡出 bloom:。b 是亮度,我们简单的取RGB中最大的分量。t 是配置的阈值,当 t 是 0 时,w 的结果是 1 ,使待叠加的颜色不变,导致叠加后产生 bloom,随着 t 的增加,w 值会逐步趋向0,当b <=t 时等于0,使待叠加颜色变成0,得到一个无叠加的效果,没有 bloom。这条曲线看起来像人弯曲的膝盖,因此常被叫做拐点/膝点曲线。
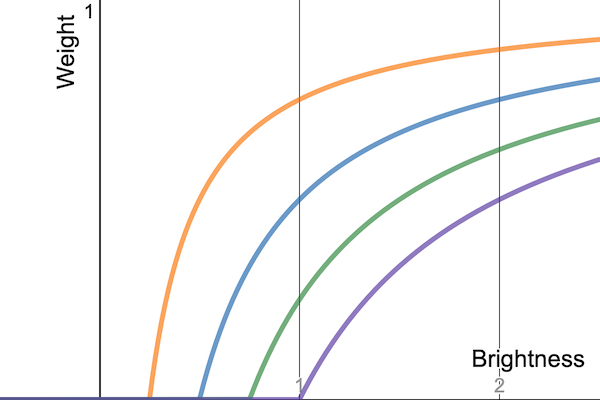
上面的曲线以一定的角度到达0点,比 clamp 要平滑,但是仍然有一个突然的截止点,因此这又叫“硬拐”。我们可以增加一个控制参数k,使,
,knee slider 参数 k 为 0-1,得到如下曲线:
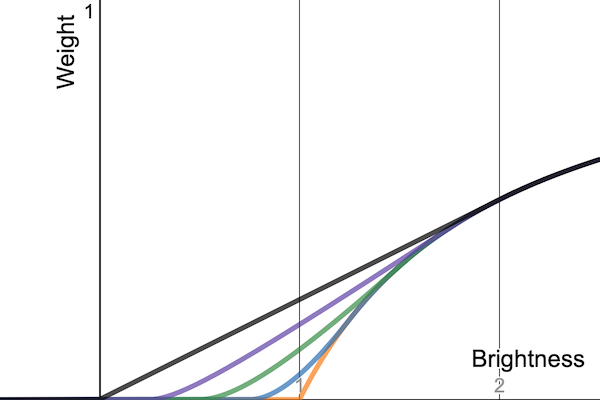
在 PostFXSettings.BloomSettings 中增加参数 t 和 k。定义 float4 类型的 shader 常量,将上面公式中不变的部分 [t, -t+tk, 2tk, ] 传递给 shader。控制曲线将被应用到 prefilter 阶段,因需要为其建立新的 pass
Intensity
增加一个强度参数,控制 upsampling 叠加过程的强度。同时如果 intensity 为0,跳过 bloom。
    [System.Serializable]public struct BloomSettings{...// 阈值[Min(0f)]public float threshold;// 阈值过渡区域[Range(0f,1f)]public float thresholdKnee;// 强度[Min(0f)]public float intensity;        }public partial class PostFXStack
{...// bicubic upsampling 开关int bloomBicubicUpsamplingID = Shader.PropertyToID("_BloomBicubicUpsampling");// bloom 阈值 [t, -t+tk, 2tk, 1/(4tk+0.00001)]int bloomThresholdID = Shader.PropertyToID("_BloomThreshold");// 定义枚举,便于管理Pass// 这里枚举是值,必须与Shader中的Pass顺序对应public enum Pass{...BloomPrefilter}...void DoBloom(int sourceId){...if (bloom.intensity == 0 ||     // 强度为0,不需要 bloombloom.maxIterations == 0 || // 最大迭代次数为0,不需要 bloomwidth < bloom.downscaleLimit * 2 || height < bloom.downscaleLimit * 2){Draw(sourceId, BuiltinRenderTextureType.CameraTarget, Pass.Copy);buffer.EndSample("Bloom");return;}// 设置 bloom 阈值Vector4 threshold;threshold.x = Mathf.GammaToLinearSpace(bloom.threshold);threshold.y = threshold.x * bloom.thresholdKnee;threshold.z = 2f * threshold.y;threshold.w = 0.25f / (threshold.y + 0.00001f);threshold.y -= threshold.x;buffer.SetGlobalVector(bloomThresholdID, threshold);RenderTextureFormat format = RenderTextureFormat.Default;// 源图 -> 半分辨率图buffer.GetTemporaryRT(bloomPreFilterID, width, height, 0, FilterMode.Bilinear, format);Draw(sourceId, bloomPreFilterID, Pass.BloomPrefilter);...// 传递 bicubic upsampling 开关buffer.SetGlobalFloat(bloomBicubicUpsamplingID, bloom.bicubicUpsampling ? 1f : 0f);// 传递 bloom 强度buffer.SetGlobalFloat(bloomIntensityID, bloom.intensity);// 上采样至少需要执行2次迭代才可以if (i > 1)}
}
// PostFXStackPasses.hlsl...
// 是否开启 bicubic upsampling
bool _BloomBicubicUpsampling;
// [t, -t+tk, 2tk, 1/(4tk+0.00001)]
float4 _BloomThreshold;
// 强度
float _BloomIntensity;
...
float4 BloomCombinePassFragment(Varyings input) : SV_TARGET
{float3 lowRes;if (_BloomBicubicUpsampling)lowRes = GetSourceBicubic(input.screenUV).rgb;else lowRes = GetSource(input.screenUV).rgb;float3 highRes = GetSource2(input.screenUV).rgb;return float4(lowRes * _BloomIntensity + highRes, 1.0);
}float3 ApplyBloomThreshold(float3 color)
{float brightness = Max3(color.r, color.g, color.b);float soft = brightness + _BloomThreshold.y;soft = clamp(soft, 0.0, _BloomThreshold.z);soft = soft * soft * _BloomThreshold.w;float contribution = max(soft, brightness - _BloomThreshold.x);contribution /= max(brightness, 0.00001);return color * contribution;
}float4 BloomPrefilterPassFragment(Varyings input) : SV_Target
{float3 color = GetSource(input.screenUV).rgb;color = ApplyBloomThreshold(color);return float4(color, 1.0);
}// PostFXStack.shaderPass{Name "Bloom Prefilter"HLSLPROGRAM#pragma target 3.5#pragma vertex DefaultPassVertex#pragma fragment BloomPrefilterPassFragmentENDHLSL}