【开发AI】Spring AI Alibaba:集成AI应用的Java项目实战
【开发AI】Spring AI Alibaba:集成AI应用的Java项目实战
- 一、技术背景与框架概述
- 1.1 Spring AI Alibaba简介
- 1.2 核心特性
- 1.3 与其他方案的比较
- 二、环境准备与项目配置
- 2.1 开发环境要求
- 2.2 创建项目基础结构
- 三、项目配置与依赖设置
- 3.1 Maven依赖配置
- 3.2 API密钥配置
- 四、Spring AI Alibaba核心概念
- 4.1 ChatClient接口
- 4.2 模型适配器
- 4.3 工具调用(Function Calling)
- 五、基于Java开发的AI多轮对话应用实战(支持DeepSeek、SiliconFlow、Gemini等多种模型切换)
- 5.1 项目介绍
- 1.功能特性
- 2.技术栈
- 5.2 pom和yaml文件
- 1.完整版pom文件如下:
- 2.完整版yml文件如下(需替换api-key):
- 5.3 核心代码如下:
- 1.基础类(请求体、响应体、消息对象)
- 2.核心服务代码
- 3.接口控制器
- 5.4 效果演示
- 1.启动后端服务
- 2.启动前端服务
- 3.首页及配置展示
- 4.普通聊天和流式聊天(带有记忆功能)
- 5.5 完整版代码下载(即拿即用)
- 六、实现工具调用功能
- 6.1 创建工具服务
- 6.2 工具调用控制器
- 6.3 工具调用演示页面
- 七、实现RAG知识库功能
- 7.1 依赖配置
- 7.2 配置向量数据库
- 7.3 文档处理与向量化服务
- 7.4 RAG控制器
- 7.5 RAG功能演示页面
- 八、Spring AI Alibaba的高级特性
- 8.1 多智能体(Multi-Agent)支持
- 8.2 与Spring生态的深度集成
- 九、性能优化与最佳实践
- 9.1 性能优化策略
- 9.2 代码优化示例
- 9.3 异常处理与重试机制
- 十、应用场景与案例分析
- 10.1 客户智能服务体系
- 10.2 金融交易分析系统
- 十一、总结与展望
- 11.1 Spring AI Alibaba的优势总结
- 11.2 未来发展方向
- 结语
在当今AI技术快速发展的时代,Java开发者也希望能够轻松地在自己的应用中集成先进的AI能力。Spring AI Alibaba作为一个专为Java开发者设计的AI应用框架,让这一目标变得简单而直接。本篇文章将通过一个完整的实战项目,带领你体验如何使用Spring AI Alibaba快速构建具有AI能力的Java应用。
一、技术背景与框架概述
1.1 Spring AI Alibaba简介
Spring AI Alibaba是基于Spring Boot和Spring AI构建的AI应用框架,专为Java开发者量身打造。它提供了统一的API抽象层,简化了AI模型的集成和调用过程。官方地址:Spring AI Alibaba 官网、Spring AI Alibaba 仓库
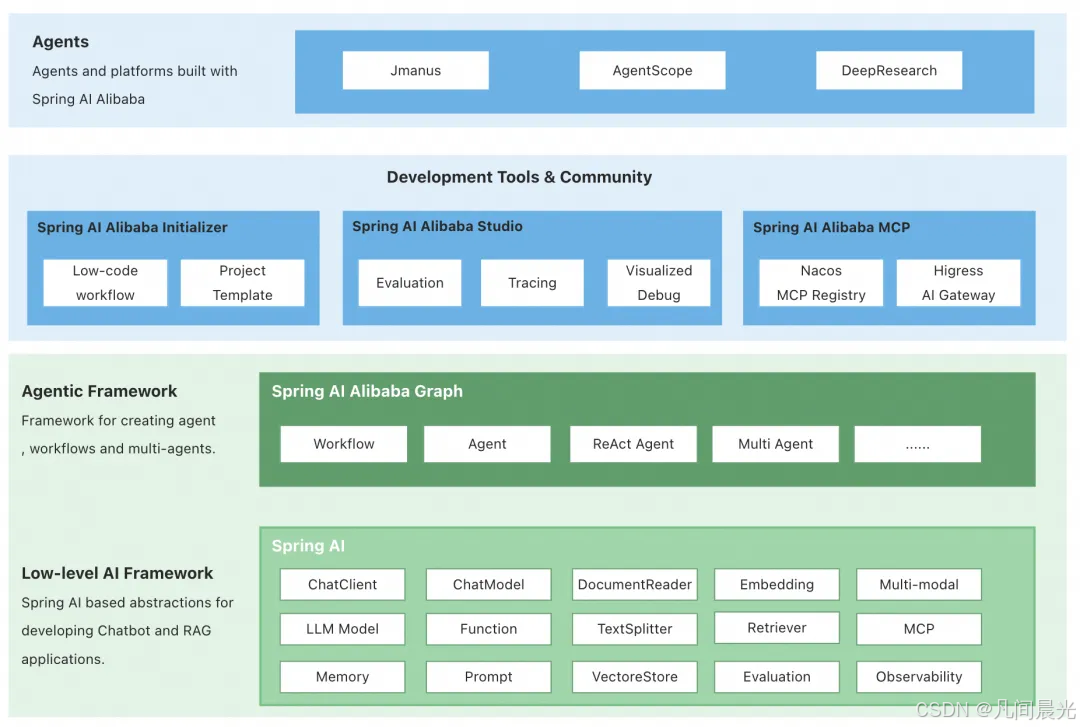
1.2 核心特性
Spring AI Alibaba框架具有以下核心特性:
- 统一抽象层:屏蔽不同AI服务提供商的接口差异
- 阿里云百炼大模型集成:便捷接入通义千问等阿里系AI服务
- 工具调用机制:支持Function Calling,让AI能够调用实际代码功能
- 可观测性支持:与ARMS等监控工具无缝集成
- RAG知识库解决方案:集成向量数据库,支持检索增强生成
1.3 与其他方案的比较
下表比较了Spring AI Alibaba与其他几种AI集成方案:
| 特性 | Spring AI Alibaba | 原生Spring Boot集成 | LangChain4j | Spring Cloud Alibaba AI |
|---|---|---|---|---|
| 集成难度 | 简单(开箱即用) | 复杂(需自行处理) | 中等 | 中等 |
| 配置项 | 最少 | 最多 | 中等 | 中等 |
| 百炼大模型支持 | 完全支持 | 需手动实现 | 部分支持 | 完全支持 |
| 工具调用 | 原生支持 | 需额外开发 | 需额外开发 | 支持 |
| 可观测性 | 内置支持 | 需自行集成 | 有限支持 | 内置支持 |
对于Java开发者而言,Spring AI Alibaba提供了最平缓的学习曲线和最便捷的开发体验。
二、环境准备与项目配置
2.1 开发环境要求
在开始之前,请确保你的开发环境满足以下要求:
- JDK 17+
- Maven 3.6+
- IDE(推荐IntelliJ IDEA或各类基于VsCode的IDE)
- 阿里云账号(用于获取API密钥)
- 阿里云百炼大模型访问权限
2.2 创建项目基础结构
首先,创建一个基本的Spring Boot项目。你可以使用Spring Initializr(https://start.spring.io/)创建一个包含以下基础依赖的项目:
- Spring Web
- Spring Boot DevTools
- Lombok(可选,简化代码)
三、项目配置与依赖设置
3.1 Maven依赖配置
在项目的pom.xml文件中添加必要的依赖和仓库配置:
<?xml version="1.0" encoding="UTF-8"?>
<project xmlns="http://maven.apache.org/POM/4.0.0"xmlns:xsi="http://www.w3.org/2001/XMLSchema-instance"xsi:schemaLocation="http://maven.apache.org/POM/4.0.0 http://maven.apache.org/xsd/maven-4.0.0.xsd"><modelVersion>4.0.0</modelVersion><groupId>com.example</groupId><artifactId>spring-ai-alibaba-demo</artifactId><version>1.0.0</version><packaging>jar</packaging><name>spring-ai-alibaba-demo</name><properties><java.version>17</java.version><spring-boot.version>3.5.3</spring-boot.version><spring-ai-alibaba.version>1.0.0</spring-ai-alibaba.version></properties><dependencies><!-- Spring Boot Web依赖 --><dependency><groupId>org.springframework.boot</groupId><artifactId>spring-boot-starter-web</artifactId><version>${spring-boot.version}</version></dependency><!-- Spring AI Alibaba核心依赖 --><dependency><groupId>com.alibaba.cloud.ai</groupId><artifactId>spring-ai-alibaba-starter</artifactId><version>${spring-ai-alibaba.version}</version></dependency><!-- Spring AI Alibaba - 百炼大模型集成 --><dependency><groupId>com.alibaba.cloud.ai</groupId><artifactId>spring-ai-alibaba-starter-dashscope</artifactId><version>${spring-ai-alibaba.version}</version></dependency><!-- Lombok(可选,简化代码) --><dependency><groupId>org.projectlombok</groupId><artifactId>lombok</artifactId><version>1.18.28</version><scope>provided</scope></dependency></dependencies><repositories><!-- 阿里云Maven仓库 --><repository><id>alimaven</id><name>Alibaba Maven Repository</name><url>https://maven.aliyun.com/repository/public</url></repository></repositories><build><plugins><plugin><groupId>org.springframework.boot</groupId><artifactId>spring-boot-maven-plugin</artifactId><version>${spring-boot.version}</version></plugin></plugins></build>
</project>
3.2 API密钥配置
访问阿里云百炼大模型控制台,创建一个API密钥。获取到AccessKey ID和AccessKey Secret后,在项目的application.yml文件中进行配置:
spring:ai:alibaba:dashscope:api-key: your-api-key-here
四、Spring AI Alibaba核心概念
在深入编码之前,我们需要了解Spring AI Alibaba的几个核心概念:
4.1 ChatClient接口
ChatClient是Spring AI Alibaba与AI模型交互的核心接口。它提供了两种主要方法:
StreamType stream(StreamRequest request):以流的形式获取AI模型的响应StringType say(SayRequest request):获取AI模型的完整响应
4.2 模型适配器
模型适配器负责将Spring AI Alibaba的API转换为具体AI服务的调用。对于阿里云百炼大模型,我们主要使用DashscopeChatClient。
4.3 工具调用(Function Calling)
工具调用是让AI模型调用实际代码功能的机制。Spring AI Alibaba通过@Tool注解支持这一功能,可以实现:
- 让AI智能体执行数据库操作
- 调用外部API
- 处理文件和数据
- 与其他服务交互
五、基于Java开发的AI多轮对话应用实战(支持DeepSeek、SiliconFlow、Gemini等多种模型切换)
5.1 项目介绍
1.功能特性
基于 Spring Boot 和 Vue 3 的 AI 聊天应用:
- 🤖 支持多种 AI 模型(DeepSeek、SiliconFlow、Gemini)
- 💬 实时聊天界面
- 📱 响应式设计
- 🎨 现代化 UI 设计
- 📝 Markdown 渲染支持
- 🔄 流式响应支持
2.技术栈
1.环境要求
- Java 17+
- Node.js 18+
- Maven 3.6+
2.后端
- Spring Boot 3.2.0
- Spring AI 1.0.0-M4
- DeepSeek API
- SiliconFlow API
- WebFlux (响应式编程)
3.前端
- Vue 3 + TypeScript
- Vite
- Vue Markdown Renderer
- Element Plus Icons
5.2 pom和yaml文件
1.完整版pom文件如下:
<?xml version="1.0" encoding="UTF-8"?>
<project xmlns="http://maven.apache.org/POM/4.0.0"xmlns:xsi="http://www.w3.org/2001/XMLSchema-instance"xsi:schemaLocation="http://maven.apache.org/POM/4.0.0 http://maven.apache.org/xsd/maven-4.0.0.xsd"><modelVersion>4.0.0</modelVersion><groupId>com.alibaba.cloud.ai</groupId><artifactId>my-deepseek-chat</artifactId><version>1.0.0</version><packaging>jar</packaging><name>My DeepSeek Chat</name><description>AI多轮对话应用,支持多种模型切换</description><properties><maven.compiler.source>17</maven.compiler.source><maven.compiler.target>17</maven.compiler.target><project.build.sourceEncoding>UTF-8</project.build.sourceEncoding><spring-boot.version>3.4.0</spring-boot.version><spring-ai.version>1.0.0</spring-ai.version><spring-ai-alibaba.version>1.0.0.3</spring-ai-alibaba.version><!-- Node and npm --><node.version>v20.12.2</node.version><npm.version>10.9.2</npm.version><npm.build.skip>true</npm.build.skip></properties><dependencies><!-- Spring Boot Starter --><dependency><groupId>org.springframework.boot</groupId><artifactId>spring-boot-starter-web</artifactId></dependency><dependency><groupId>org.springframework.boot</groupId><artifactId>spring-boot-starter-webflux</artifactId></dependency><!-- Spring AI Models --><dependency><groupId>org.springframework.ai</groupId><artifactId>spring-ai-starter-model-deepseek</artifactId></dependency><dependency><groupId>org.springframework.ai</groupId><artifactId>spring-ai-starter-model-openai</artifactId></dependency><!-- 启用Vertex AI Gemini和阿里云DashScope支持 --><dependency><groupId>org.springframework.ai</groupId><artifactId>spring-ai-starter-model-vertex-ai-gemini</artifactId></dependency><dependency><groupId>com.alibaba.cloud.ai</groupId><artifactId>spring-ai-alibaba-starter-dashscope</artifactId><version>${spring-ai-alibaba.version}</version></dependency><!-- JSON处理 --><dependency><groupId>com.fasterxml.jackson.core</groupId><artifactId>jackson-databind</artifactId></dependency><!--Lombok插件--><dependency><groupId>org.projectlombok</groupId><artifactId>lombok</artifactId><version>1.18.30</version><optional>true</optional></dependency><!--knife4j依赖库 - 适配Spring Boot 3.x--><dependency><groupId>com.github.xiaoymin</groupId><artifactId>knife4j-openapi3-jakarta-spring-boot-starter</artifactId><version>4.4.0</version></dependency></dependencies><dependencyManagement><dependencies><dependency><groupId>org.springframework.boot</groupId><artifactId>spring-boot-dependencies</artifactId><version>${spring-boot.version}</version><type>pom</type><scope>import</scope></dependency><dependency><groupId>org.springframework.ai</groupId><artifactId>spring-ai-bom</artifactId><version>${spring-ai.version}</version><type>pom</type><scope>import</scope></dependency><dependency><groupId>com.alibaba.cloud.ai</groupId><artifactId>spring-ai-alibaba-bom</artifactId><version>${spring-ai-alibaba.version}</version><type>pom</type><scope>import</scope></dependency></dependencies></dependencyManagement><build><finalName>my-deepseek-chat</finalName><plugins><plugin><groupId>org.springframework.boot</groupId><artifactId>spring-boot-maven-plugin</artifactId><version>${spring-boot.version}</version><executions><execution><goals><goal>repackage</goal></goals></execution></executions></plugin><!-- Frontend Maven Plugin --><plugin><groupId>com.github.eirslett</groupId><artifactId>frontend-maven-plugin</artifactId><version>1.11.0</version><executions><execution><id>install node and npm</id><goals><goal>install-node-and-npm</goal></goals><configuration><skip>${npm.build.skip}</skip><nodeVersion>${node.version}</nodeVersion><npmVersion>${npm.version}</npmVersion><workingDirectory>ui</workingDirectory></configuration></execution><execution><id>npm install</id><goals><goal>npm</goal></goals><configuration><skip>${npm.build.skip}</skip><arguments>install</arguments><workingDirectory>ui</workingDirectory></configuration></execution><execution><id>npm build</id><goals><goal>npm</goal></goals><phase>generate-resources</phase><configuration><skip>${npm.build.skip}</skip><arguments>run build</arguments><workingDirectory>ui</workingDirectory></configuration></execution></executions></plugin><!-- Copy frontend resources --><plugin><artifactId>maven-resources-plugin</artifactId><version>3.2.0</version><executions><execution><id>copy-react-build</id><phase>process-resources</phase><goals><goal>copy-resources</goal></goals><configuration><skip>${npm.build.skip}</skip><outputDirectory>${project.build.outputDirectory}/static</outputDirectory><resources><resource><directory>ui/dist</directory><filtering>false</filtering></resource></resources></configuration></execution></executions></plugin><!-- Maven Compiler Plugin --><plugin><groupId>org.apache.maven.plugins</groupId><artifactId>maven-compiler-plugin</artifactId><version>3.11.0</version><configuration><source>17</source><target>17</target><encoding>UTF-8</encoding></configuration></plugin></plugins></build><repositories><repository><id>spring-milestones</id><name>Spring Milestones</name><url>https://repo.spring.io/milestone</url><snapshots><enabled>false</enabled></snapshots></repository><repository><id>aliyunmaven</id><name>aliyun</name><url>https://maven.aliyun.com/repository/public</url></repository></repositories></project>
2.完整版yml文件如下(需替换api-key):
server:port: "10517"spring:application:name: my-deepseek-chatai:# DeepSeek配置deepseek:api-key: sk-base-url: "https://api.deepseek.com"chat:options:model: deepseek-chattemperature: 0.7max-tokens: 2048# OpenAI配置 (用于SiliconFlow)openai:api-key: sk-base-url: "https://api.siliconflow.cn/v1"chat:options:# 硅基流动常用模型名称model: "deepseek-ai/DeepSeek-V2.5"temperature: 0.7max-tokens: 2048# 硅基流动特定配置user: "spring-ai-siliconflow"completions-path: "/chat/completions"# OpenRouter配置openrouter:api-key: sk-base-url: "https://openrouter.ai/api/v1"chat:options:model: "meta-llama/llama-3.1-8b-instruct:free"temperature: 0.7max-tokens: 2048completions-path: "/chat/completions"# 阿里云百炼配置aliyunbailian:api-key: sk-base-url: "https://dashscope.aliyuncs.com/api/v1"chat:options:model: "qwen-turbo"temperature: 0.7max-tokens: 2048completions-path: "/services/aigc/text-generation/generation"# Vertex AI Gemini配置vertex:ai:gemini:project-id: "801245353276"location: "us-central1"api-key: xxxxxbase-url: "https://generativelanguage.googleapis.com/v1beta"chat:options:model: "gemini-1.5-flash"temperature: 0.7max-output-tokens: 2048# 注意:如需使用其他模型,请取消注释并配置相应的API key# DashScope配置 (阿里云通义千问)dashscope:api-key: sk-chat:options:model: qwen-plustemperature: 0.7max-tokens: 2048# Vertex AI Gemini配置# vertex:#   ai:#     gemini:#       project-id: your-project-id#       location: us-central1#       api-key: your-vertex-ai-api-key#       chat:#         options:#           model: gemini-1.5-flash#           temperature: 0.7#           max-output-tokens: 2048# 日志配置
logging:level:"[com.alibaba.cloud.ai]": DEBUG"[org.springframework.ai]": DEBUGroot: INFOpattern:console: "%d{yyyy-MM-dd HH:mm:ss} [%thread] %-5level %logger{36} - %msg%n"
5.3 核心代码如下:
1.基础类(请求体、响应体、消息对象)
package com.alibaba.cloud.ai.chat.model;import io.swagger.v3.oas.annotations.media.Schema;
import lombok.AllArgsConstructor;
import lombok.Builder;
import lombok.Data;
import lombok.NoArgsConstructor;import java.util.List;
@Data
@Builder
@AllArgsConstructor
@NoArgsConstructor
@Schema(description = "聊天请求参数")
public class ChatRequest {@Schema(description = "用户消息内容", required = true, example = "你好,请介绍一下自己")private String message;@Schema(description = "使用的AI模型名称", example = "siliconflow", defaultValue = "siliconflow")@Builder.Defaultprivate String model = "siliconflow";@Schema(description = "历史对话记录,用于保持上下文")private List<ChatMessage> history;@Schema(description = "是否使用流式响应", example = "false")@Builder.Defaultprivate boolean stream = false;}
package com.alibaba.cloud.ai.chat.model;import com.fasterxml.jackson.annotation.JsonFormat;
import io.swagger.v3.oas.annotations.media.Schema;
import lombok.AllArgsConstructor;
import lombok.Builder;
import lombok.Data;
import lombok.NoArgsConstructor;import java.time.LocalDateTime;@Schema(description = "聊天消息")
@Data
@Builder
@AllArgsConstructor
@NoArgsConstructor
public class ChatMessage {@Schema(description = "消息唯一标识")private String id;@Schema(description = "消息角色", example = "user", allowableValues = {"user", "assistant", "system"})private String role;@Schema(description = "消息内容", required = true, example = "你好,请介绍一下自己")private String content;@JsonFormat(pattern = "yyyy-MM-dd HH:mm:ss")@Schema(description = "消息时间戳", example = "2023-12-21 10:30:00")private LocalDateTime timestamp;@Schema(description = "使用的AI模型名称", example = "siliconflow")private String model;}
package com.alibaba.cloud.ai.chat.model;import io.swagger.v3.oas.annotations.media.Schema;
import lombok.AllArgsConstructor;
import lombok.Builder;
import lombok.Data;
import lombok.NoArgsConstructor;@Data
@Builder
@AllArgsConstructor
@Schema(description = "聊天响应结果")
public class ChatResponse {@Schema(description = "AI回复的消息内容", example = "你好!我是AI助手,很高兴为您服务。")private String message;@Schema(description = "使用的AI模型名称", example = "siliconflow")private String model;@Schema(description = "请求是否成功", example = "true")private boolean success;@Schema(description = "错误信息(仅在success为false时有值)")private String error;@Schema(description = "响应时间戳", example = "1703123456789")private long timestamp;public ChatResponse() {this.success = true;this.timestamp = System.currentTimeMillis();}public ChatResponse(String message, String model) {this();this.message = message;this.model = model;}public static ChatResponse success(String message, String model) {return new ChatResponse(message, model);}public static ChatResponse error(String error) {ChatResponse response = new ChatResponse();response.setSuccess(false);response.setError(error);return response;}}
2.核心服务代码
package com.alibaba.cloud.ai.chat.service;import com.alibaba.cloud.ai.chat.model.ChatMessage;
import com.alibaba.cloud.ai.chat.model.ChatRequest;
import com.alibaba.cloud.ai.chat.model.ChatResponse;
import com.alibaba.cloud.ai.dashscope.chat.DashScopeChatModel;
import org.slf4j.Logger;
import org.slf4j.LoggerFactory;
import org.springframework.ai.chat.client.ChatClient;
import org.springframework.ai.chat.messages.AssistantMessage;
import org.springframework.ai.chat.messages.Message;
import org.springframework.ai.chat.messages.UserMessage;
import org.springframework.ai.deepseek.DeepSeekChatModel;
import org.springframework.ai.openai.OpenAiChatModel;
import org.springframework.ai.vertexai.gemini.VertexAiGeminiChatModel;
import org.springframework.beans.factory.annotation.Autowired;
import org.springframework.beans.factory.annotation.Qualifier;
import org.springframework.stereotype.Service;
import reactor.core.publisher.Flux;import java.util.ArrayList;
import java.util.List;@Service
public class ChatService {private static final Logger logger = LoggerFactory.getLogger(ChatService.class);@Autowired(required = false)private DeepSeekChatModel deepSeekChatModel;@Autowired(required = false)private OpenAiChatModel openAiChatModel;@Autowired(required = false)private VertexAiGeminiChatModel vertexAiGeminiChatModel;@Autowired(required = false)private DashScopeChatModel dashScopeChatModel;public ChatResponse chat(ChatRequest request) {logger.info("收到聊天请求,模型: 【{}】, 消息: {}", request.getModel(), request.getMessage());try {ChatClient chatClient = getChatClient(request.getModel());if (chatClient == null) {return ChatResponse.error("不支持的模型: " + request.getModel());}// 构建消息列表List<Message> messages = buildMessages(request);// 调用AI模型String response = chatClient.prompt().messages(messages).call().content();logger.info("AI响应: {}", response);return ChatResponse.success(response, request.getModel());} catch (Exception e) {logger.error("聊天请求处理失败", e);return ChatResponse.error("处理请求时发生错误: " + e.getMessage());}}public Flux<String> chatStream(ChatRequest request) {logger.info("收到流式聊天请求,模型: 【{}】, 消息: {}", request.getModel(), request.getMessage());try {ChatClient chatClient = getChatClient(request.getModel());if (chatClient == null) {return Flux.error(new RuntimeException("不支持的模型: " + request.getModel()));}// 构建消息列表List<Message> messages = buildMessages(request);// 用于收集完整内容StringBuilder contentBuilder = new StringBuilder();// 调用AI模型流式接口return chatClient.prompt().messages(messages).stream().content().doOnNext(content -> {
//                        logger.info("ChatService接收到流式内容片段: [{}]", content);contentBuilder.append(content);}).doOnComplete(() -> {String completeContent = contentBuilder.toString();logger.info("ChatService流式内容传输完成,完整内容: [{}]", completeContent);}).doOnError(error -> logger.error("ChatService流式传输错误: ", error));} catch (Exception e) {logger.error("流式聊天请求处理失败", e);return Flux.error(e);}}private ChatClient getChatClient(String model) {logger.debug("获取ChatClient,模型: 【{}】", model);switch (model.toLowerCase()) {case "deepseek":if (deepSeekChatModel != null) {logger.debug("使用【DeepSeek】模型");return ChatClient.create(deepSeekChatModel);} else {logger.warn("DeepSeek模型未配置或不可用");return null;}case "siliconflow":case "openai":case "openrouter":if (openAiChatModel != null) {logger.debug("使用OpenAI兼容模型 【{}】", model);return ChatClient.create(openAiChatModel);} else {logger.warn("OpenAI模型未配置或不可用");return null;}case "aliyunbailian":if (dashScopeChatModel != null) {logger.debug("使用DashScope模型 【阿里云百炼】");return ChatClient.create(dashScopeChatModel);} else {logger.warn("阿里云百炼模型未配置或不可用");return null;}case "gemini":if (vertexAiGeminiChatModel != null) {logger.debug("使用【Vertex AI Gemini】模型");return ChatClient.create(vertexAiGeminiChatModel);} else {logger.warn("Gemini模型未配置或不可用");return null;}default:logger.warn("不支持的模型类型: 【{}】", model);return null;}}private List<Message> buildMessages(ChatRequest request) {List<Message> messages = new ArrayList<>();// 添加历史消息if (request.getHistory() != null && !request.getHistory().isEmpty()) {for (ChatMessage historyMsg : request.getHistory()) {if ("user".equals(historyMsg.getRole())) {messages.add(new UserMessage(historyMsg.getContent()));} else if ("assistant".equals(historyMsg.getRole())) {messages.add(new AssistantMessage(historyMsg.getContent()));}}}// 添加当前用户消息messages.add(new UserMessage(request.getMessage()));return messages;}public List<String> getAvailableModels() {List<String> models = new ArrayList<>();if (deepSeekChatModel != null) {models.add("deepseek");}if (openAiChatModel != null) {models.add("siliconflow");// 暂时使用同一个OpenAI模型支持多个服务models.add("openrouter");}if (dashScopeChatModel != null) {models.add("aliyunbailian");}if (vertexAiGeminiChatModel != null) {models.add("gemini");}return models;}
}
3.接口控制器
package com.alibaba.cloud.ai.chat.controller;import com.alibaba.cloud.ai.chat.model.ChatRequest;
import com.alibaba.cloud.ai.chat.model.ChatResponse;
import com.alibaba.cloud.ai.chat.service.ChatService;
import com.alibaba.cloud.ai.chat.util.ModelTestUtil;
import com.alibaba.cloud.ai.chat.util.SiliconFlowValidator;
import com.fasterxml.jackson.core.JsonProcessingException;
import com.fasterxml.jackson.databind.ObjectMapper;
import com.fasterxml.jackson.databind.node.JsonNodeFactory;
import com.fasterxml.jackson.databind.node.ObjectNode;
import io.swagger.v3.oas.annotations.Operation;
import io.swagger.v3.oas.annotations.Parameter;
import io.swagger.v3.oas.annotations.responses.ApiResponse;
import io.swagger.v3.oas.annotations.responses.ApiResponses;
import io.swagger.v3.oas.annotations.tags.Tag;
import org.slf4j.Logger;
import org.slf4j.LoggerFactory;
import org.springframework.beans.factory.annotation.Autowired;
import org.springframework.web.bind.annotation.*;
import org.springframework.http.MediaType;
import reactor.core.publisher.Flux;
import reactor.core.publisher.Mono;import java.util.List;
import java.util.Map;@RestController
@RequestMapping("/api/chat")
@CrossOrigin(origins = "*")
@Tag(name = "聊天管理", description = "提供AI聊天相关的接口服务")
public class ChatController {private static final Logger logger = LoggerFactory.getLogger(ChatController.class);// 重用ObjectMapper实例private static final ObjectMapper objectMapper = new ObjectMapper();@Autowiredprivate ChatService chatService;@Autowiredprivate ModelTestUtil modelTestUtil;@Autowiredprivate SiliconFlowValidator siliconFlowValidator;@PostMapping("/message")@Operation(summary = "普通聊天", description = "发送消息给AI并获取回复,支持历史对话上下文")@ApiResponses({@ApiResponse(responseCode = "200", description = "聊天成功"),@ApiResponse(responseCode = "400", description = "请求参数错误"),@ApiResponse(responseCode = "500", description = "服务器内部错误")})public ChatResponse chat(@Parameter(description = "聊天请求参数", required = true) @RequestBody ChatRequest request) {logger.info("收到聊天请求: {}", request.getMessage());return chatService.chat(request);}@PostMapping(value = "/stream", produces = MediaType.TEXT_EVENT_STREAM_VALUE)@Operation(summary = "流式聊天", description = "发送消息给AI并以流式方式获取回复,适用于长文本生成场景")@ApiResponses({@ApiResponse(responseCode = "200", description = "流式响应成功"),@ApiResponse(responseCode = "400", description = "请求参数错误"),@ApiResponse(responseCode = "500", description = "服务器内部错误")})public Flux<String> chatStream(@Parameter(description = "聊天请求参数", required = true) @RequestBody ChatRequest request) {logger.info("收到流式聊天请求: {}", request.getMessage());return chatService.chatStream(request).map(content -> {// 使用类级别的ObjectMapper实例ObjectNode jsonNode = JsonNodeFactory.instance.objectNode();jsonNode.put("content", content);try {String jsonData = objectMapper.writeValueAsString(jsonNode);logger.debug("发送SSE数据: {}", jsonData);return jsonData;} catch (JsonProcessingException e) {logger.error("JSON序列化失败", e);return "{\"content:\"\"}";}}).concatWith(Mono.just("[DONE]")).onErrorResume(e -> {logger.error("处理流式请求时发生错误", e);ObjectNode errorNode = JsonNodeFactory.instance.objectNode();errorNode.put("error", "处理请求时发生错误");try {return Mono.just(objectMapper.writeValueAsString(errorNode));} catch (JsonProcessingException ex) {return Mono.just("{\"error\":\"系统错误\"}");}});}@GetMapping("/models")@Operation(summary = "获取可用模型", description = "获取当前系统支持的所有AI模型列表")@ApiResponses({@ApiResponse(responseCode = "200", description = "获取成功"),@ApiResponse(responseCode = "500", description = "服务器内部错误")})public Map<String, Object> getModels() {List<String> models = chatService.getAvailableModels();return Map.of("success", true,"models", models,"count", models.size());}@GetMapping("/health")@Operation(summary = "健康检查", description = "检查聊天服务的运行状态")@ApiResponses({@ApiResponse(responseCode = "200", description = "服务正常"),@ApiResponse(responseCode = "503", description = "服务不可用")})public Map<String, Object> health() {return Map.of("status", "ok","timestamp", System.currentTimeMillis(),"service", "my-deepseek-chat");}@GetMapping("/test-models")@Operation(summary = "测试模型连接", description = "测试所有配置的AI模型的连接状态")@ApiResponses({@ApiResponse(responseCode = "200", description = "测试完成"),@ApiResponse(responseCode = "500", description = "测试失败")})public Map<String, Object> testModels() {try {Map<String, String> testResults = modelTestUtil.testAllModels();return Map.of("success", true,"timestamp", System.currentTimeMillis(),"results", testResults);} catch (Exception e) {logger.error("模型测试失败", e);return Map.of("success", false,"error", e.getMessage(),"timestamp", System.currentTimeMillis());}}@GetMapping("/validate-siliconflow")@Operation(summary = "验证硅基流动配置", description = "详细验证硅基流动API的配置和连接状态")@ApiResponses({@ApiResponse(responseCode = "200", description = "验证完成"),@ApiResponse(responseCode = "500", description = "验证失败")})public Map<String, Object> validateSiliconFlow() {try {Map<String, Object> validationResults = siliconFlowValidator.validateSiliconFlow();return Map.of("success", true,"timestamp", System.currentTimeMillis(),"validation", validationResults);} catch (Exception e) {logger.error("硅基流动验证失败", e);return Map.of("success", false,"error", e.getMessage(),"timestamp", System.currentTimeMillis());}}
}
5.4 效果演示
1.启动后端服务
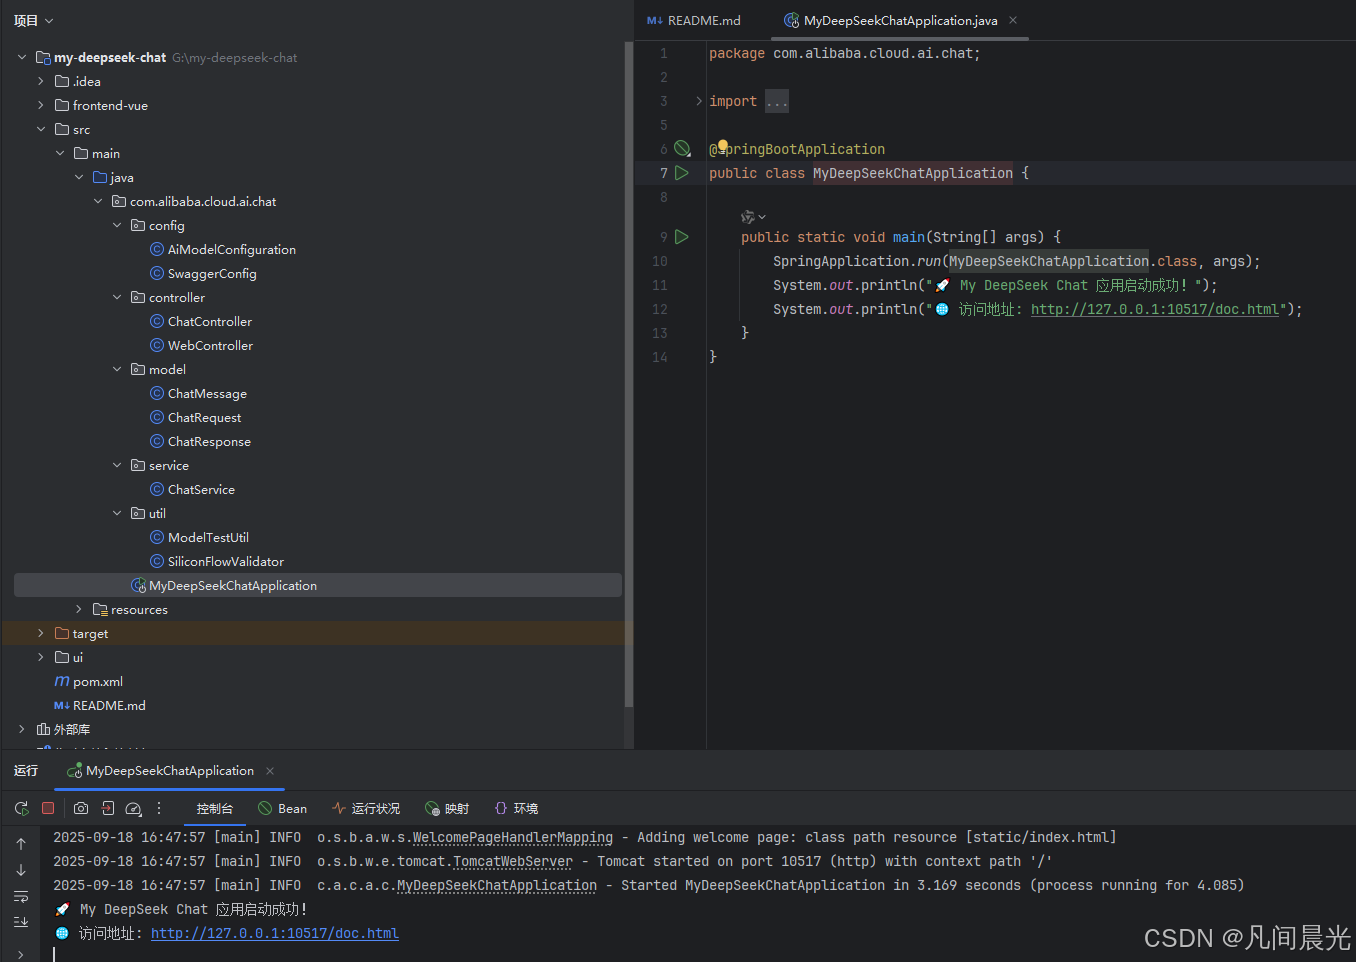
2.启动前端服务

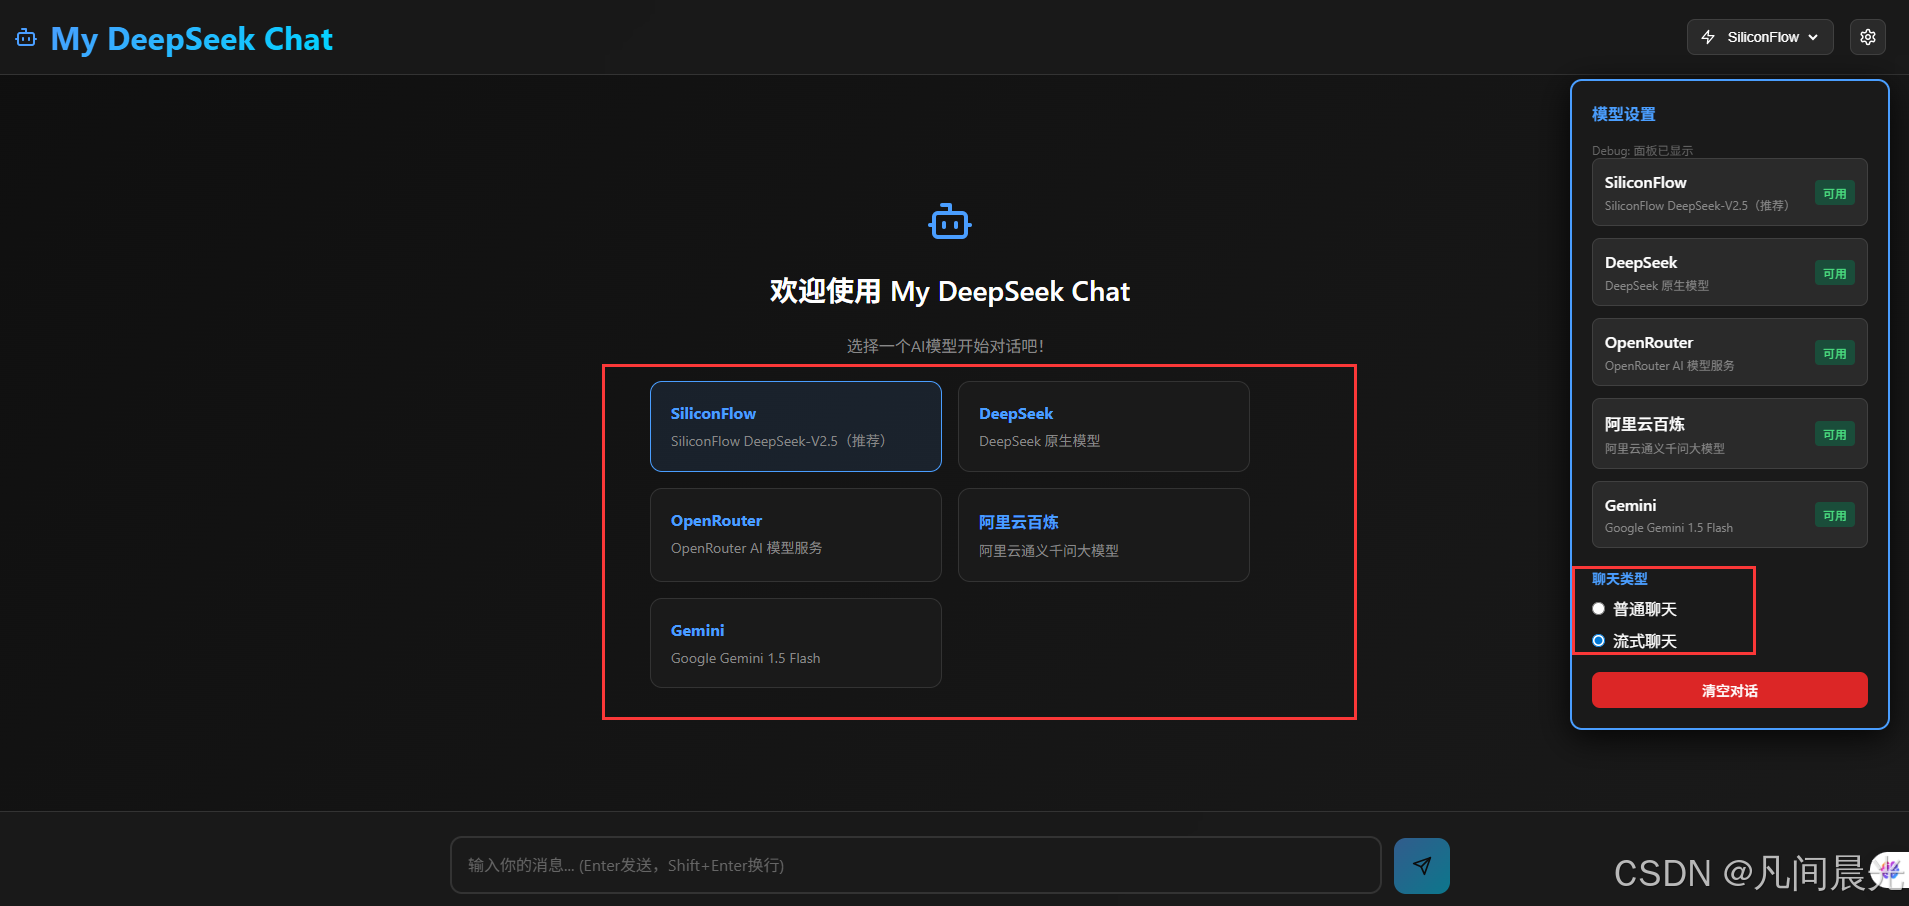
3.首页及配置展示
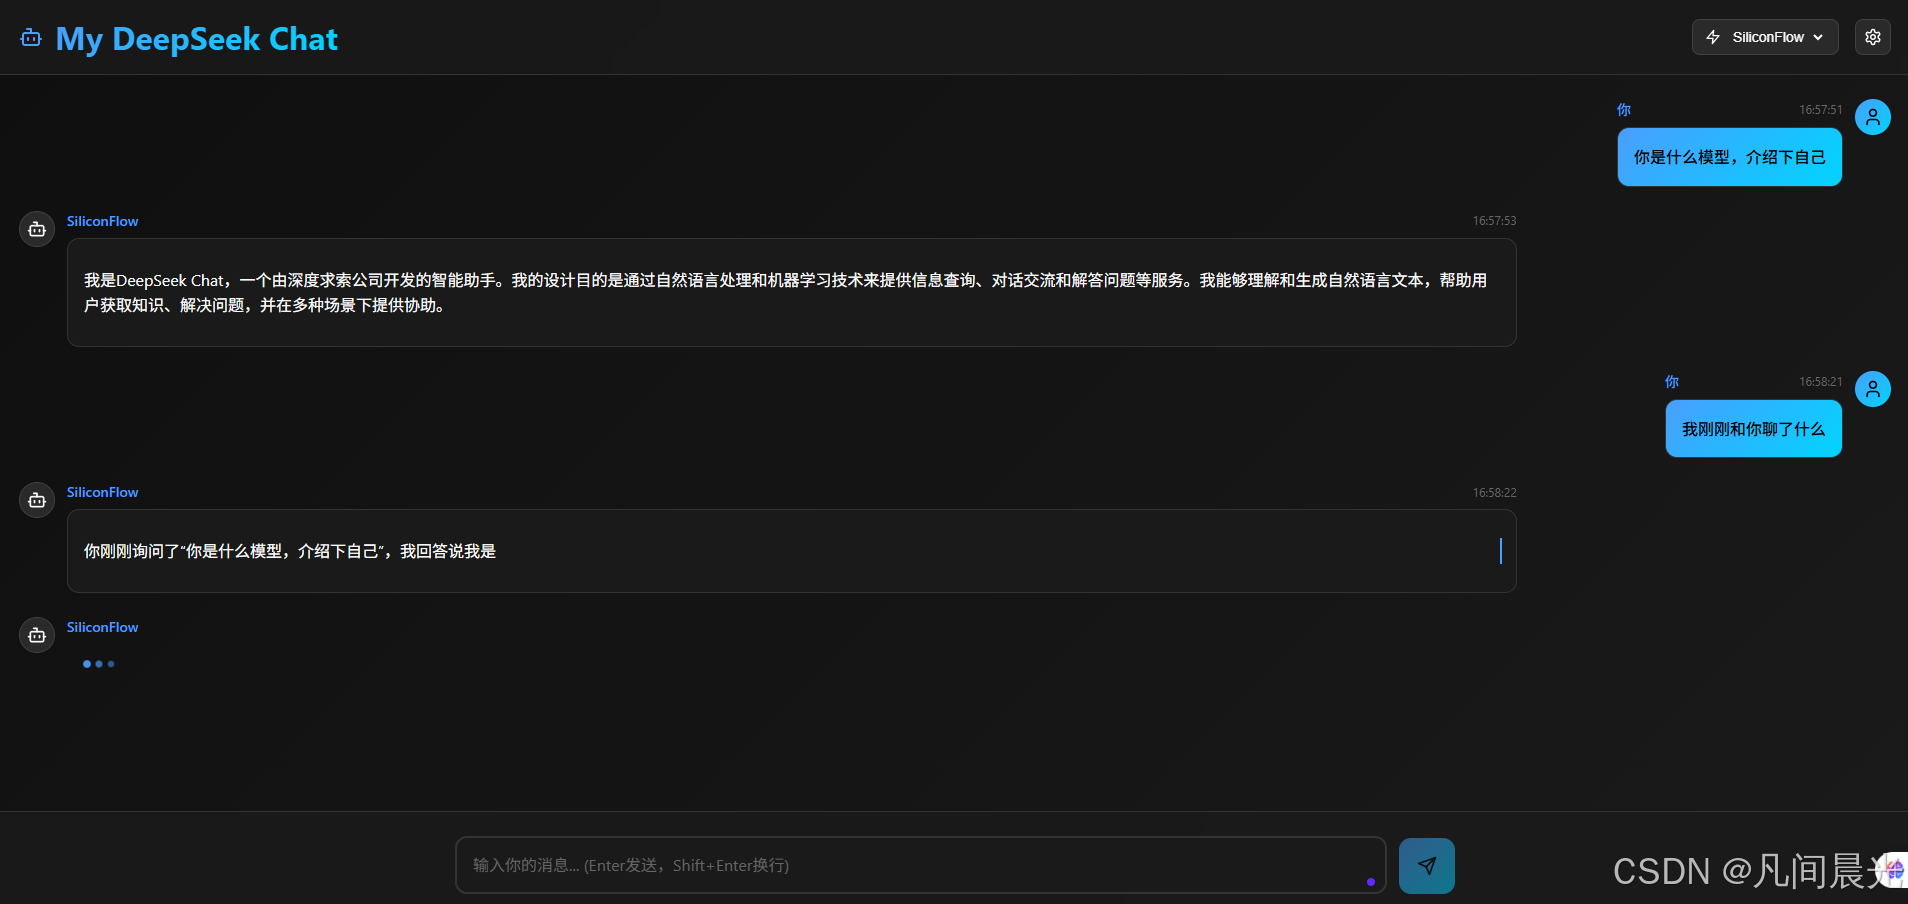
4.普通聊天和流式聊天(带有记忆功能)
5.5 完整版代码下载(即拿即用)
https://download.csdn.net/download/weixin_44330367/91962077
六、实现工具调用功能
工具调用是让AI模型调用实际代码功能的关键机制。Spring AI Alibaba通过@Tool注解简化了这一过程。
6.1 创建工具服务
package com.example.springaialibabademo.service;import com.alibaba.cloud.ai.annotation.Tool;
import com.alibaba.cloud.ai.annotation.Tools;
import com.alibaba.cloud.ai.tool.ToolCallback;
import com.alibaba.cloud.ai.tool.ToolContext;
import com.alibaba.cloud.ai.tool.annotation.ToolMethod;
import org.springframework.stereotype.Service;@Service
@Tools({@Tool(name = "calculator", description = "计算器工具,可以进行基本的数学运算")
})
public class ToolService {@ToolMethod(name = "add",description = "两个数字相加",parameters = """{"type": "object", "properties": {"a": {"type": "number", "description": "第一个加数"},"b": {"type": "number", "description": "第二个加数"}}}""")public double add(double a, double b) {return a + b;}@ToolMethod(name = "subtract",description = "两个数字相减",parameters = """{"type": "object", "properties": {"a": {"type": "number", "description": "被减数"},"b": {"type": "number", "description": "减数"}}}""")public double subtract(double a, double b) {return a - b;}@ToolMethod(name = "multiply",description = "两个数字相乘",parameters = """{"type": "object", "properties": {"a": {"type": "number", "description": "第一个乘数"},"b": {"type": "number", "description": "第二个乘数"}}}""")public double multiply(double a, double b) {return a * b;}@ToolMethod(name = "divide",description = "两个数字相除",parameters = """{"type": "object", "properties": {"a": {"type": "number", "description": "被除数"},"b": {"type": "number", "description": "除数"}}}""")public double divide(double a, double b) {if (b == 0) {throw new IllegalArgumentException("除数不能为0");}return a / b;}@ToolMethod(name = "calculateExpression",description = "计算数学表达式,支持+、-、*、/和括号",parameters = """{"type": "object", "properties": {"expression": {"type": "string", "description": "要计算的数学表达式"}}}""")public double calculateExpression(String expression) {// 这里使用简单的JavaScript引擎来计算表达式// 注意:在生产环境中应使用更安全的表达式计算库try {return (double) new javax.script.ScriptEngineManager().getEngineByName("javascript").eval(expression);} catch (Exception e) {throw new IllegalArgumentException("无效的表达式: " + expression);}}
}
6.2 工具调用控制器
package com.example.springaialibabademo.controller;import com.alibaba.cloud.ai.ChatClient;
import com.alibaba.cloud.ai.annotation.OpenAIApiKey;
import com.alibaba.cloud.ai.annotation.Tool;
import com.alibaba.cloud.ai.callback.ToolCallback;
import com.alibaba.cloud.ai.request.MessageRequest;
import com.alibaba.cloud.ai.request.SayRequest;
import com.alibaba.cloud.ai.response.StringType;
import org.springframework.web.bind.annotation.*;import javax.annotation.Resource;
import java.util.ArrayList;
import java.util.List;@RestController
@RequestMapping("/api/ai/tools")
public class ToolAIController {@Resourceprivate ChatClient chatClient;@PostMapping("/calculate")public StringType calculate(@RequestBody CalculatorRequest request) {// 构建提示,让AI使用工具进行计算List<MessageRequest> messages = new ArrayList<>();messages.add(MessageRequest.builder().role("user").content("请计算以下表达式:" + request.getExpression()).build());// 调用AI模型,让它决定是否需要使用工具return chatClient.say(SayRequest.builder().model("qwen-max").messages(messages).build());}// 请求参数类record CalculatorRequest(String expression) {}
}
6.3 工具调用演示页面
<!DOCTYPE html>
<html xmlns:th="http://www.thymeleaf.org">
<head><title>AI工具调用演示</title><style>body { font-family: Arial, sans-serif; max-width: 800px; margin: 0 auto; padding: 20px; }#result-area { border: 1px solid #ccc; margin: 10px 0; padding: 15px; height: 150px; overflow-y: auto; }#expression-input { width: 70%; padding: 10px; }#calculate-btn { padding: 10px 20px; }.error { color: red; }</style>
</head>
<body><h1>Spring AI Alibaba 工具调用演示</h1><div><input type="text" id="expression-input" placeholder="输入数学表达式,如 "3 + 5 * 2""/><button id="calculate-btn">计算</button></div><div id="result-area"></div><div id="error-message" class="error"></div><script>document.getElementById('calculate-btn').addEventListener('click', function() {const input = document.getElementById('expression-input');const resultArea = document.getElementById('result-area');const errorMessage = document.getElementById('error-message');const expression = input.value.trim();if (!expression) return;// 清空错误信息errorMessage.textContent = '';// 清空结果区域resultArea.innerHTML = '计算中...';// 清空输入框input.value = '';fetch('/api/ai/tools/calculate', {method: 'POST',headers: {'Content-Type': 'application/json'},body: JSON.stringify({ expression: expression })}).then(response => response.json()).then(data => {resultArea.innerHTML = `<strong>表达式:</strong> ${expression}<br/><strong>结果:</strong> ${data.value}`}).catch(error => {resultArea.textContent = '';errorMessage.textContent = '计算失败,请检查表达式是否正确。';console.error('AI工具调用错误:', error);});});</script>
</body>
</html>
七、实现RAG知识库功能
检索增强生成(RAG)是结合向量数据库和AI模型,实现知识密集型任务的重要技术。Spring AI Alibaba简化了这一过程。
7.1 依赖配置
首先,在pom.xml中添加向量数据库支持:
<dependency><groupId>com.alibaba.cloud.ai</groupId><artifactId>spring-ai-alibaba-starter-vector</artifactId><version>${spring-ai-alibaba.version}</version>
</dependency>
<dependency><groupId>com.alibaba.cloud.ai</groupId><artifactId>spring-ai-alibaba-starter-vector-qdrant</artifactId><version>${spring-ai-alibaba.version}</version>
</dependency>
7.2 配置向量数据库
在application.yml中添加向量数据库配置:
spring:ai:alibaba:vector:qdrant:url: http://localhost:6333api-key: admin
7.3 文档处理与向量化服务
package com.example.springaialibabademo.service;import com.alibaba.cloud.ai.vector.Document;
import com.alibaba.cloud.ai.vector.VectorStore;
import com.alibaba.cloud.ai.vector.qdrant.QdrantVectorStore;
import org.springframework.stereotype.Service;
import org.springframework.web.multipart.MultipartFile;import java.io.BufferedReader;
import java.io.IOException;
import java.io.InputStreamReader;
import java.util.ArrayList;
import java.util.List;@Service
public class KnowledgeService {private final VectorStore vectorStore;public KnowledgeService(QdrantVectorStore vectorStore) {this.vectorStore = vectorStore;}/*** 上传文档到知识库*/public void uploadDocument(MultipartFile file, String fileName) throws IOException {try (BufferedReader reader = new BufferedReader(new InputStreamReader(file.getInputStream()))) {StringBuilder contentBuilder = new StringBuilder();String line;while ((line = reader.readLine()) != null) {contentBuilder.append(line).append("\n");}// 创建文档Document document = Document.builder().id(fileName).text(contentBuilder.toString()).build();// 向量化并存储vectorStore.putDocument(document);}}/*** 从知识库中检索相关信息*/public List<Document> retrieve相关信息(String query, int topK) {// 创建查询文档Document queryDocument = Document.builder().text(query).build();// 执行检索return vectorStore.similaritySearch(queryDocument, topK);}
}
7.4 RAG控制器
package com.example.springaialibabademo.controller;import com.alibaba.cloud.ai.ChatClient;
import com.alibaba.cloud.ai.request.MessageRequest;
import com.alibaba.cloud.ai.request.SayRequest;
import com.alibaba.cloud.ai.response.StringType;
import com.example.springaialibabademo.service.KnowledgeService;
import org.springframework.http.ResponseEntity;
import org.springframework.web.bind.annotation.*;
import org.springframework.web.multipart.MultipartFile;import javax.annotation.Resource;
import java.util.List;
import java.util.stream.Collectors;@RestController
@RequestMapping("/api/ai/knowledge")
public class KnowledgeController {@Resourceprivate ChatClient chatClient;@Resourceprivate KnowledgeService knowledgeService;@PostMapping("/upload")public ResponseEntity<String> uploadDocument(@RequestParam("file") MultipartFile file,@RequestParam("fileName") String fileName) {try {knowledgeService.uploadDocument(file, fileName);return ResponseEntity.ok("文档上传成功");} catch (Exception e) {return ResponseEntity.badRequest().body("上传失败: " + e.getMessage());}}@PostMapping("/query")public ResponseEntity<?> queryKnowledge(@RequestBody KnowledgeQueryRequest request) {try {// 从知识库检索相关内容List<Document> relevantDocuments = knowledgeService.retrieve相关信息(request.getQuery(), 3);// 如果有相关文档,将其内容整合到提示中String enrichedQuery = request.getQuery();if (!relevantDocuments.isEmpty()) {String context = relevantDocuments.stream().map(Document::getText).collect(Collectors.joining(" "));enrichedQuery = """请基于以下知识回答问题。如果问题无法从提供的知识中回答,请明确指出。知识:%s问题:%s""".formatted(context, request.getQuery());}// 调用AI模型StringType response = chatClient.say(SayRequest.builder().model("qwen-max").messages(MessageRequest.builder().role("user").content(enrichedQuery).build()).build());return ResponseEntity.ok(response);} catch (Exception e) {return ResponseEntity.badRequest().body("查询失败: " + e.getMessage());}}// 请求参数类record KnowledgeQueryRequest(String query) {}
}
7.5 RAG功能演示页面
<!DOCTYPE html>
<html xmlns:th="http://www.thymeleaf.org">
<head><title>RAG知识库演示</title><style>body { font-family: Arial, sans-serif; max-width: 800px; margin: 0 auto; padding: 20px; }.tab { margin-bottom: 20px; display: flex; border: 1px solid #ccc; border-radius: 4px; overflow: hidden; }.tab-button { padding: 10px 20px; background-color: #f0f0f0; cursor: pointer; border: none; outline: none; }.tab-button.active { background-color: white; font-weight: bold; }.tab-content { display: none; padding: 15px; border: 1px solid #ccc; border-top: none; }.upload-area { display: flex; flex-direction: column; gap: 10px; }#knowledge-result { border: 1px solid #ccc; margin: 10px 0; padding: 15px; height: 250px; overflow-y: auto; }.error { color: red; }</style>
</head>
<body><h1>Spring AI Alibaba RAG知识库演示</h1><div class="tab"><button class="tab-button active" id="upload-tab">上传文档</button><button class="tab-button" id="query-tab">知识查询</button></div><div class="tab-content active" id="upload-tab-content"><div class="upload-area"><input type="file" id="file-input"/><input type="text" id="file-name" placeholder="请输入文件名"/><button id="upload-btn">上传文档</button></div><div id="upload-status"></div></div><div class="tab-content" id="query-tab-content"><input type="text" id="knowledge-query" placeholder="输入你的问题..."/><button id="query-btn">查询知识</button><div id="knowledge-result"></div></div><div id="error-message" class="error"></div><script>// 标签切换逻辑document.getElementById('upload-tab').addEventListener('click', function() {document.getElementById('upload-tab').classList.add('active');document.getElementById('query-tab').classList.remove('active');document.getElementById('upload-tab-content').classList.add('active');document.getElementById('query-tab-content').classList.remove('active');});document.getElementById('query-tab').addEventListener('click', function() {document.getElementById('query-tab').classList.add('active');document.getElementById('upload-tab').classList.remove('active');document.getElementById('query-tab-content').classList.add('active');document.getElementById('upload-tab-content').classList.remove('active');});// 上传文档功能document.getElementById('upload-btn').addEventListener('click', function() {const fileInput = document.getElementById('file-input');const fileName = document.getElementById('file-name').value;const uploadStatus = document.getElementById('upload-status');const errorMessage = document.getElementById('error-message');if (!fileInput.files.length) {errorMessage.textContent = '请选择一个文件';return;}if (!fileName) {errorMessage.textContent = '请输入文件名';return;}const file = fileInput.files[0];const formData = new FormData();formData.append('file', file);formData.append('fileName', fileName);uploadStatus.textContent = '上传中...';errorMessage.textContent = '';fetch('/api/ai/knowledge/upload', {method: 'POST',body: formData}).then(response => {if (response.ok) {return response.text();} else {return response.json().then(data => ({ error: data.message }));}}).then(data => {if (data.error) {throw new Error(data.error);}uploadStatus.textContent = data;}).catch(error => {uploadStatus.textContent = '';errorMessage.textContent = '上传失败: ' + error.message;});});// 知识查询功能document.getElementById('query-btn').addEventListener('click', function() {const queryInput = document.getElementById('knowledge-query');const resultArea = document.getElementById('knowledge-result');const errorMessage = document.getElementById('error-message');const query = queryInput.value.trim();if (!query) return;// 清空错误信息errorMessage.textContent = '';// 清空结果区域resultArea.innerHTML = '查询中...';// 清空输入框queryInput.value = '';fetch('/api/ai/knowledge/query', {method: 'POST',headers: {'Content-Type': 'application/json'},body: JSON.stringify({ query: query })}).then(response => response.json()).then(data => {resultArea.innerHTML = `<strong>回答:</strong><br/>${data.value}`;}).catch(error => {resultArea.textContent = '';errorMessage.textContent = '查询失败,请重试。';console.error('知识查询错误:', error);});});</script>
</body>
</html>
八、Spring AI Alibaba的高级特性
8.1 多智能体(Multi-Agent)支持
Spring AI Alibaba提供了强大的多智能体支持,可以构建复杂的AI协作系统:
@Service
public class MultiAgentService {@Resourceprivate ChatClient chatClient;public StringType collaborate(String... prompts) {List<MessageRequest> messages = new ArrayList<>();// 创建多个智能体for (int i = 0; i < prompts.length; i++) {messages.add(MessageRequest.builder().role("assistant").name("Agent " + (i + 1)).content(prompts[i]).build());}// 用户提示messages.add(MessageRequest.builder().role("user").content("请各位智能体协作解决上述问题").build());return chatClient.say(SayRequest.builder().model("qwen-max").messages(messages).build());}
}
8.2 与Spring生态的深度集成
Spring AI Alibaba设计为与Spring生态无缝集成:
@RestController
@RequestMapping("/api/transactions")
public class TransactionController {@Resourceprivate TransactionService transactionService;@Resourceprivate ChatClient chatClient;@PostMapping("/analyze")public ResponseEntity<?> analyzeTransactions(@RequestBody List<Transaction> transactions) {try {// 业务逻辑处理TransactionAnalysis analysis = transactionService.analyze(transactions);// 准备上下文信息String context = """分析了%d笔交易,发现以下异常情况:%s""" .formatted(transactions.size(),analysis.getIssues().isEmpty() ? "无异常" : analysis.getIssues().toString());// 使用AI提供自然语言解释StringType explanation = chatClient.say(SayRequest.builder().model("qwen-max").messages(MessageRequest.builder().role("system").content("你是一个交易分析师,需要用通俗易懂的中文解释交易分析结果").build(),MessageRequest.builder().role("user").content("请根据以下交易分析结果,用自然语言提供详细解释:" + context).build()).build(););// 将解释合并到结果中analysis.setExplanation(explanation.getValue());return ResponseEntity.ok(analysis);} catch (Exception e) {return ResponseEntity.status(500).body(Map.of("error", e.getMessage()));}}
}
九、性能优化与最佳实践
9.1 性能优化策略
| 优化点 | 建议方案 | 适用场景 |
|---|---|---|
| 模型调用成本优化 | 实现响应缓存机制,避免重复调用 | 高频相同查询的场景 |
| 上下文长度优化 | 使用上下文压缩技术,减少token使用 | 长文本处理场景 |
| 工具调用优化 | 实现智能体预过滤,减少不必要的工具调用 | 复杂多步骤任务 |
| 向量检索优化 | 调整向量相似度阈值,减少无关文档检索 | 大规模知识库 |
| 异步处理 | 对非实时请求使用消息队列异步处理 | 批量处理场景 |
9.2 代码优化示例
@Service
public class OptimizedAIService {@Resourceprivate ChatClient chatClient;@Resourceprivate CacheManager cacheManager;private final ConcurrentMap<String, String> responseCache = new ConcurrentHashMap<>();/*** 带缓存的AI调用*/public StringType generateWithCache(String prompt, int ttlSeconds) {// 生成缓存键String cacheKey = "ai-response:" + prompt;// 先检查缓存String cachedResponse = responseCache.get(cacheKey);if (cachedResponse != null) {return StringType.builder().value(cachedResponse).build();}// 调用AI模型StringType response = chatClient.say(SayRequest.builder().model("qwen-max").messages(MessageRequest.builder().role("user").content(prompt).build()).build());// 缓存结果responseCache.put(cacheKey, response.getValue());// 设置ttl后清除缓存cacheManager.getCache("default").put(cacheKey, response.getValue(), ttlSeconds, TimeUnit.SECONDS);return response;}/*** 上下文压缩*/public StringType generateWithContextCompression(String context, String query) {// 实现简单的上下文压缩逻辑String compressedContext = compressContext(context, 500); // 限制token数量return chatClient.say(SayRequest.builder().model("qwen-max").messages(MessageRequest.builder().role("system").content("你是一个上下文压缩专家,擅长从长文本中提取关键信息").build(),MessageRequest.builder().role("user").content("基于以下压缩上下文回答问题:\n上下文:" + compressedContext + "\n问题:" + query).build()).build());}private String compressContext(String context, int maxTokens) {// 简单的压缩逻辑,实际应用中应使用更复杂的算法或token计数器if (context.length() <= maxTokens) {return context;}// 保留开始和结束的部分,中间用省略号连接return context.substring(0, maxTokens/2) + " [...] " + context.substring(context.length() - maxTokens/2);}
}
9.3 异常处理与重试机制
@Service
public class ResilientAIService {@Resourceprivate ChatClient chatClient;@Resourceprivate RetryTemplate retryTemplate;@Resourceprivate CircuitBreaker circuitBreaker;public StringType generateWithRetryAndCircuit(String prompt) {// 使用断路器保护return circuitBreaker.run(() -> {try {// 使用重试模板return retryTemplate.execute(context -> generateAIResponse(prompt),context -> {if (context.getRetryCount() >= 3) {return null; // 达到最大重试次数,返回null}// 可以记录重试信息return true; // 继续重试});} catch (Exception e) {throw new AIInvocationException("AI调用失败", e);}});}private StringType generateAIResponse(String prompt) {return chatClient.say(SayRequest.builder().model("qwen-max").messages(MessageRequest.builder().role("user").content(prompt).build()).build());}
}
十、应用场景与案例分析
10.1 客户智能服务体系
一家电子商务公司希望通过Spring AI Alibaba构建智能客服系统,实现:
- 自动回答客户关于订单、产品、物流的问题
- 根据客户历史购买行为提供个性化推荐
- 处理退款和投诉,必要时自动升级给人工客服
解决方案:
- 使用Spring AI Alibaba集成通义千问大模型
- 通过工具调用接入订单系统、产品数据库
- 实现多智能体协作,包括"客服专员"、“产品专家”、“订单处理专家”
- 与现有CRM系统集成,记录所有AI客服交互
技术架构:
10.2 金融交易分析系统
一家金融服务公司希望利用Spring AI Alibaba构建交易监控和分析系统:
- 自动检测异常交易模式
- 生成合规报告
- 在发现可疑活动时报警
- 提供自然语言解释
解决方案:
- 使用Spring AI Alibaba处理交易数据
- 通过RAG技术接入内部合规政策文档
- 实现多智能体协作,包括"交易分析智能体"、“合规检查智能体”、“风险评估智能体”
- 与警报系统和报告生成系统集成
技术架构:
十一、总结与展望
11.1 Spring AI Alibaba的优势总结
通过本实战项目的探索,我们可以看到Spring AI Alibaba具有以下显著优势:
- 降低集成门槛:通过统一的API抽象,Java开发者无需深入了解AI模型细节即可快速集成AI能力
- 与Spring生态无缝集成:可以轻松与现有的Spring Boot应用结合,享受Spring框架的所有特性
- 丰富的AI功能支持:从基础的对话交互到复杂的工具调用、多智能体协作,一应俱全
- 阿里云生态优势:与阿里云百炼大模型的深度集成,享受云原生AI服务
- 可观测性内置:支持与ARMS等监控工具集成,便于生产环境运维
11.2 未来发展方向
随着AI技术的不断进步,Spring AI Alibaba也将持续演进:
- 更丰富的模型支持:预计会支持更多第三方AI模型和服务
- 更强大的多模态能力:不仅处理文本,还将支持图像、音频、视频等多模态数据
- 更深入的工具调用:提供更安全、更高效的函数调用机制
- 更完善的Agent框架:支持更复杂的智能体协作和决策机制
- 企业级特性增强:包括更强大的安全控制、审计能力、企业级集成能力
结语
Spring AI Alibaba为Java开发者打开了一扇通往AI应用开发的大门。无论你是想要在现有应用中添加智能特性,还是从零构建AI原生应用,Spring AI Alibaba都提供了理想的开发框架。通过与阿里云百炼大模型的深度集成,Java开发者现在可以轻松构建具有竞争力的AI应用,再次证明了Java在现代应用开发中的强大生命力。
希望本实战项目能帮助你快速掌握Spring AI Alibaba的使用方法,开启你的Java AI应用开发之旅!