Android SystemServer 系列专题【AttentionManagerService】
AttentionManagerService是framework中用来实现屏幕感知的一个系统级服务,他继承于systemserver。我们可以通过dumpsys attention来获取他的一些信息。
如下针对屏幕感知的功能的引入来针对这个服务进行一个介绍。
1、屏幕感知Settings UI实现
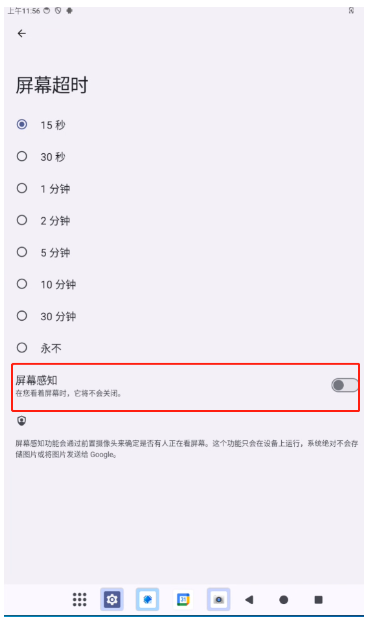
屏幕感知的功能在A14上面默认都支持,其入口在设置->显示->屏幕超时->屏幕感知。
根据其描述他会检测到如果你在定制屏幕看,就会阻止屏幕超时息屏。
Settings UI控制代码:AdaptiveSleepPreferenceController.java
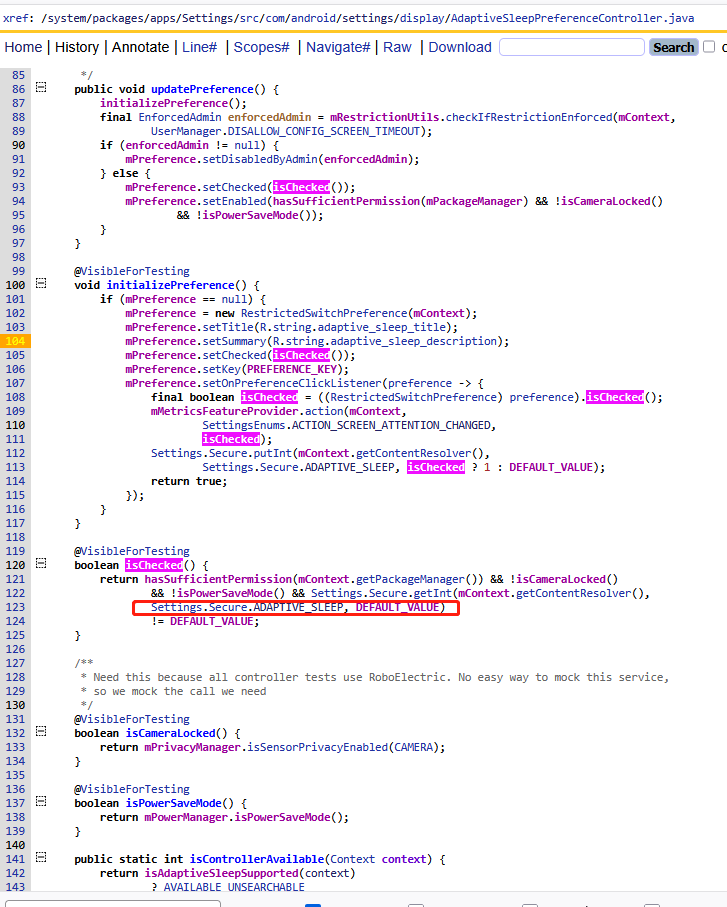
如上的开关看起来是在isChecked这里实现,主要判断了一些条件来进行显示,这个开关的key是:adaptive_sleep,为1表示此功能开启
2、屏幕感知FW Client实现
通过搜索ADAPTIVE_SLEEP发现fw只有如下一个地方在使用:
//frameworks/base/services/core/java/com/android/server/power/AttentionDetector.java
public class AttentionDetector {private static final String TAG = "AttentionDetector";private static final boolean DEBUG = false;private Context mContext;private boolean mIsSettingEnabled;@VisibleForTestingAttentionCallbackInternalImpl mCallback;public AttentionDetector(Runnable onUserAttention, Object lock) {mOnUserAttention = onUserAttention;mLock = lock;mRequested = new AtomicBoolean(false);mRequestId = 0;// Device starts with an awake state upon boot.mWakefulness = PowerManagerInternal.WAKEFULNESS_AWAKE;}@VisibleForTestingvoid updateEnabledFromSettings(Context context) {//判断Settings的屏幕感知功能是否使能mIsSettingEnabled = Settings.Secure.getIntForUser(context.getContentResolver(),Settings.Secure.ADAPTIVE_SLEEP, 0, UserHandle.USER_CURRENT) == 1;}//屏幕感知核心功能,PowerManagerService#updateUserActivitySummaryLocked会调用到这里//即PowerManagerService在进行屏幕唤醒或者息屏以及应用锁持有计算的时候进行调用,因此这里会影响屏幕超时息屏的逻辑 To be called in {@link PowerManagerService#updateUserActivitySummaryLocked} public long updateUserActivity(long nextScreenDimming, long dimDurationMillis) {// 1. 前置条件检查:满足任一条件则直接返回原定的变暗时间if (nextScreenDimming == mLastActedOnNextScreenDimming  // 已处理过相同变暗时间|| !mIsSettingEnabled           // 功能未启用|| !isAttentionServiceSupported() // 设备不支持注意力检测服务|| mWindowManager.isKeyguardShowingAndNotOccluded()) { // 当前处于锁屏状态return nextScreenDimming;}// 2. 计算关键时间节点final long now = SystemClock.uptimeMillis(); // 当前系统启动时间(毫秒)final long whenToCheck = nextScreenDimming - mPreDimCheckDurationMillis; // 检测触发时间(变暗前提前量)final long whenToStopExtending = mLastUserActivityTime + mMaximumExtensionMillis; // 最长可延时时限// 3. 时间窗口判断逻辑if (now < whenToCheck) { // 未到检测时间:返回下次应检测的时间点(DEBUG模式输出日志)if (DEBUG) Slog.d(TAG, "Do not check for attention yet, wait " + (whenToCheck - now));return whenToCheck;} else if (whenToStopExtending < whenToCheck) {// 超过最大延时时长:放弃检测直接允许变暗(安全策略)if (DEBUG) Slog.d(TAG, "Let device sleep to avoid false results...");return nextScreenDimming;} else if (mRequested.get()) {// 已有未完成的检测请求:等待当前请求完成if (DEBUG) Slog.d(TAG, "Pending attention callback with ID=" + mCallback.mId + ", wait.");return whenToCheck;}// 4. 发起屏幕感知检测请求mRequested.set(true); // 标记请求状态mRequestId++;         // 生成唯一请求IDmLastActedOnNextScreenDimming = nextScreenDimming; // 记录当前处理的变暗时间mCallback = new AttentionCallbackInternalImpl(mRequestId); // 创建回调实例// 5. 计算实际检测超时时间(取配置值与剩余变暗时间的较小值)mEffectivePostDimTimeoutMillis = Math.min(mRequestedPostDimTimeoutMillis, dimDurationMillis);// 6. 调用系统服务检测用户注意力Slog.v(TAG, "Checking user attention, ID: " + mRequestId);final boolean sent = mAttentionManager.checkAttention(mPreDimCheckDurationMillis + mEffectivePostDimTimeoutMillis,mCallback);// 7. 请求失败处理if (!sent) {mRequested.set(false); // 重置请求状态}return whenToCheck; // 返回建议的下次检测时间}
}
综上最核心的方法如下:
1)Attention注意力检查请求
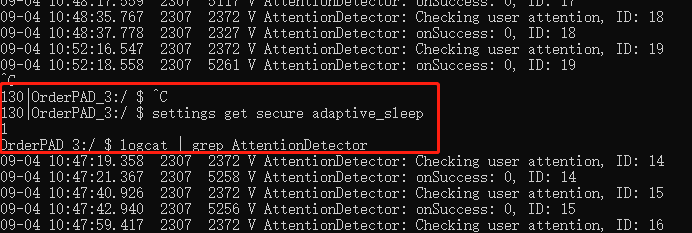
每次从pms那边过来就会请求一次是否有人眼盯着屏幕看,每次请求都有唯一标准ID,可以参考如下日志:
130|OrderPAD_3:/ $ logcat | grep -E "AttentionManagerService|AttentionDetector"
09-04 11:22:26.250  2307  2372 V AttentionDetector: Checking user attention, ID: 40
09-04 11:22:28.258  2307  3160 V AttentionDetector: onSuccess: 0, ID: 40
09-04 11:23:08.249  2307  2372 V AttentionDetector: Checking user attention, ID: 41
09-04 11:23:10.258  2307  2409 V AttentionDetector: onSuccess: 0, ID: 41
09-04 11:23:42.238  2307  2372 V AttentionDetector: Checking user attention, ID: 42
09-04 11:23:44.246  2307  4514 V AttentionDetector: onSuccess: 0, ID: 42
09-04 11:27:38.810  2307  2372 V AttentionDetector: Checking user attention, ID: 43
09-04 11:27:40.831  2307  3177 V AttentionDetector: onSuccess: 0, ID: 43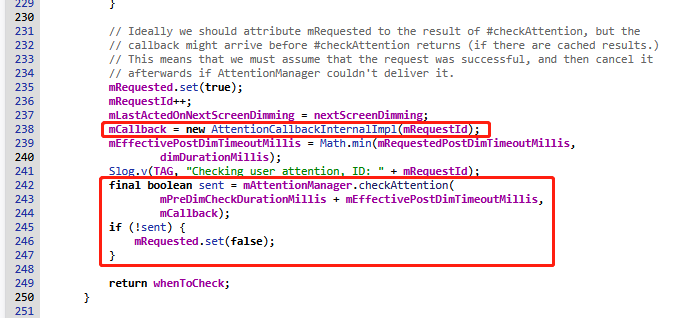
2)Attention检查结果返回
//frameworks/base/services/core/java/com/android/server/power/AttentionDetector.java
@Override
public void onSuccess(int result, long timestamp) {// 1. 日志记录检测结果(VERBOSE级别日志,包含结果码和请求ID)Slog.v(TAG, "onSuccess: " + result + ", ID: " + mId);// 2. 防循环处理:验证请求ID有效性并原子性重置请求状态// - mId == mRequestId:确保回调匹配当前最新请求(避免旧请求干扰)// - mRequested.getAndSet(false):原子操作标记请求已完成if (mId == mRequestId && mRequested.getAndSet(false)) {// 3. 同步锁保护关键代码块(防止多线程竞争条件)synchronized (mLock) {// 4. 设备状态检查:若非唤醒状态则直接返回(如已进入休眠)if (mWakefulness != PowerManagerInternal.WAKEFULNESS_AWAKE) {if (DEBUG) Slog.d(TAG, "Device slept before receiving callback.");return;}// 5. 根据检测结果执行分支逻辑if (result == AttentionService.ATTENTION_SUCCESS_PRESENT) {// 5.1 检测到用户注意力:触发延屏操作(如执行mOnUserAttention回调)mOnUserAttention.run();} else {// 5.2 未检测到注意力:重置连续延屏计数(统计上报逻辑)resetConsecutiveExtensionCount();}}}
}
3、屏幕感知FW Service实现
在此回到attention的检查请求,是直接调用了mAttentionManager.checkAttention,根据经验,其实就是调用到了AttentionManagerService.java如下代码:
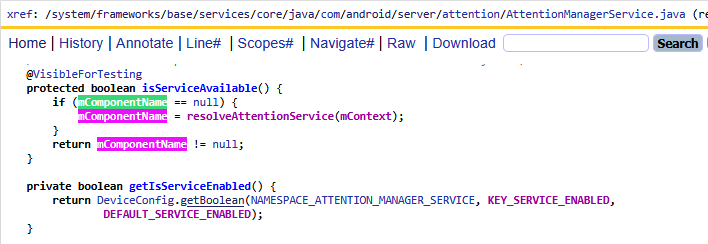
//frameworks/base/services/core/java/com/android/server/attention/AttentionManagerService.java
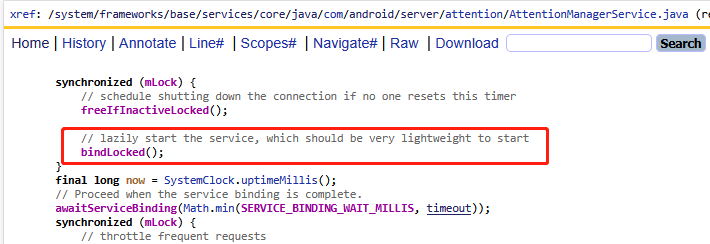
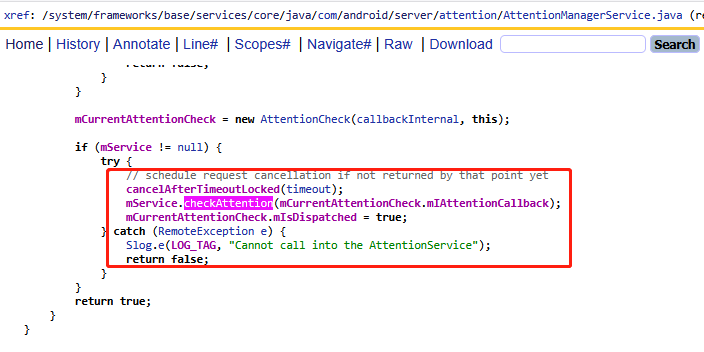
boolean checkAttention(long timeout, AttentionCallbackInternal callbackInternal) {Objects.requireNonNull(callbackInternal);//流程1:服务可用性检查(三级防御式编程)if (!mIsServiceEnabled) { // 设备硬件不支持该服务Slog.w(LOG_TAG, "Trying to call checkAttention() on an unsupported device.");return false;}if (!isServiceAvailable()) { // 服务进程未就绪Slog.w(LOG_TAG, "Service is not available at this moment.");return false;}// 摄像头被系统级禁用if (mPrivacyManager.isSensorPrivacyEnabled(SensorPrivacyManager.Sensors.CAMERA)) {Slog.w(LOG_TAG, "Camera is locked by a toggle.");return false;}// 电源状态检查:屏幕关闭或省电模式下禁止检测if (!mPowerManager.isInteractive() || mPowerManager.isPowerSaveMode()) {return false;}//流程2: 服务绑定与缓存管理(线程安全),这里其实要去发送intent移交其他组件来实现Attention检查synchronized (mLock) {freeIfInactiveLocked();bindLocked();}// 阻塞等待intent那边组件完全启动final long now = SystemClock.uptimeMillis();awaitServiceBinding(Math.min(SERVICE_BINDING_WAIT_MILLIS, timeout));//流程3:核心业务逻synchronized (mLock) {final AttentionCheckCache cache = mAttentionCheckCacheBuffer == null ? null : mAttentionCheckCacheBuffer.getLast();if (cache != null && now < cache.mLastComputed + mStaleAfterMillis) {callbackInternal.onSuccess(cache.mResult, cache.mTimestamp); return true;}//请求限流:同一时间只允许一个未完成的请求if (mCurrentAttentionCheck != null) {if (!mCurrentAttentionCheck.mIsDispatched || ! mCurrentAttentionCheck.mIsFulfilled) return false;}//创建新检测请求:其实把Attention请求的实现转移给到了前面流程2启动的intent的组件来实现mCurrentAttentionCheck = new AttentionCheck(callbackInternal, this);if (mService != null) {try {cancelAfterTimeoutLocked(timeout); mService.checkAttention(mCurrentAttentionCheck.mIAttentionCallback); mCurrentAttentionCheck.mIsDispatched = true;} catch (RemoteException e) {Slog.e(LOG_TAG, "Cannot call into the AttentionService");return false;}}return true;}
}
AttentionManagerService实现的checkAttention方法来看,貌似他也没有来实现具体逻辑,而是作为一个中间人也去调用了一个mService.checkAttention里面去进行调用,它已经是一个系统级服务了,为什么还存在一个mService呢?先剧透一下,他其实依赖其他com.google.android.as来完成attention注意力感知的逻辑实现。
1)绑定google as服务
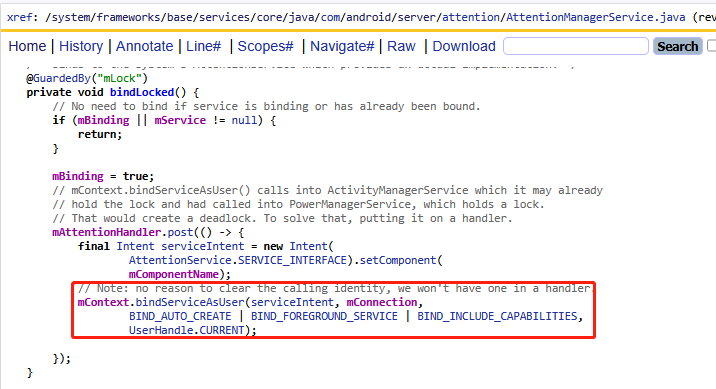
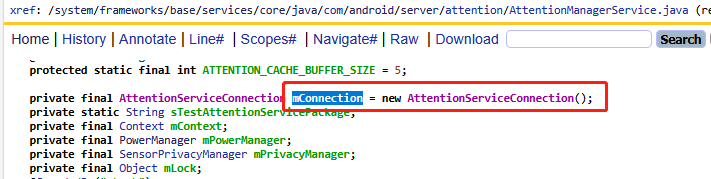
在checkAttention方法中通过bindLocked去绑定google as服务,其实就是普通的一个服务绑定,这里传递了mConnection来接收Binder对端,他的定义如下:
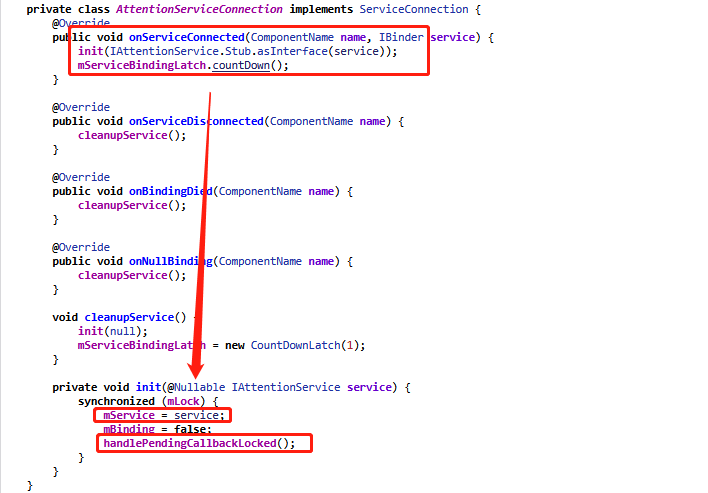
google as服务绑定成功,拿到service并赋值给mService,后续的checkAttention通过google as服务区实现
2)调用google as服务
这里发现了两处去调用google as服务的,但是基本实现逻辑基本一致:
- 服务绑定成功的时候触发一次handlePendingCallbackLocked

- PMS间歇式调用checkAttention/如果mService不为null直接请求
如上两种场景其实就是绑定服务后的第一次触发和后面的轮询触发。原理都一致。
3)为什么是google as服务?
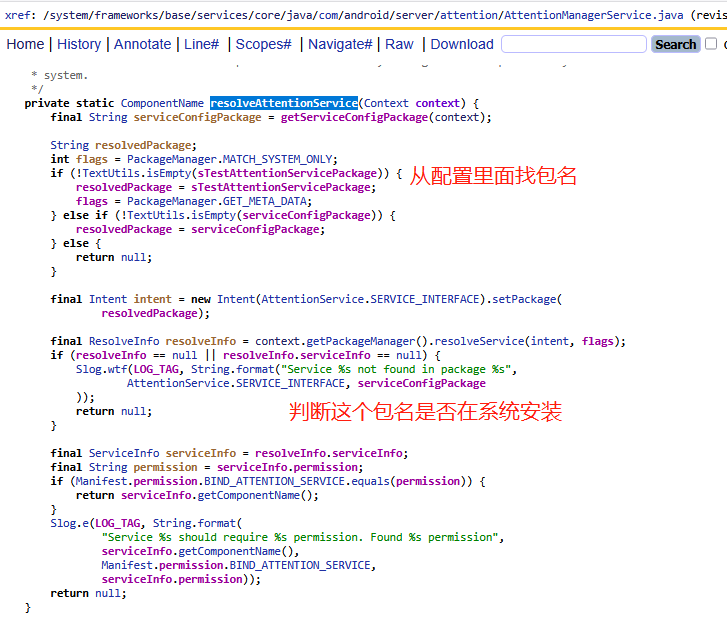
从第一小节的bindLocked方法可以看到她并不是隐式的去启动attention服务,而是直接指定了包名:
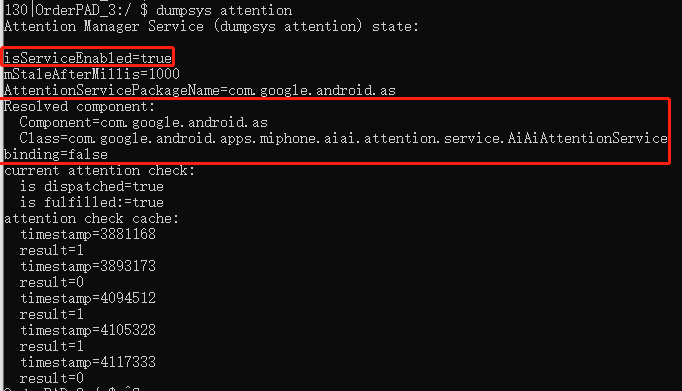
final Intent serviceIntent = new Intent(AttentionService.SERVICE_INTERFACE).setComponent(mComponentName);这里的mComponentName到底是谁?通过dump出来的答案就是
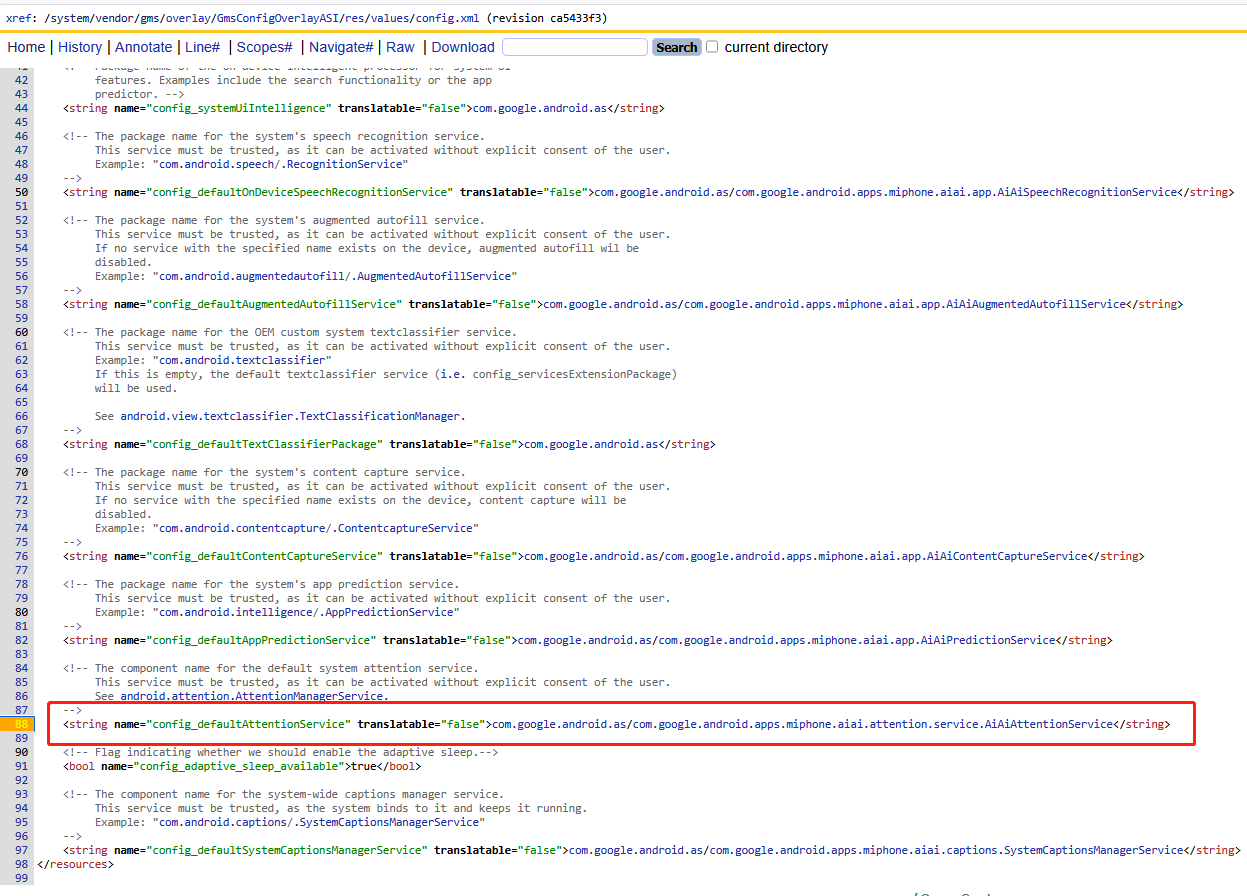
AttentionServicePackageName=com.google.android.as
Resolved component:Component=com.google.android.asClass=com.google.android.apps.miphone.aiai.attention.service.AiAiAttentionService
我们接着来研究一下为什么是google as: