数据库高可用全方案:Keepalived 故障切换 + LVS (DR) 模式 + MariaDB 主主同步实战案例
文章目录
- Keepalived + LVS(DR) + MariaDB 主主
- 项目背景
- 业务场景与数据库核心诉求
- 传统数据库架构的痛点与局限
- 技术方案的选型逻辑
- 项目价值与预期目标
- MariaDB 复制原理
- 项目实践
- 项目环境
- 基础配置
- 配置 router
- 配置免密登录-可选
- MariaDB 安装和初始化
- 配置 db1
- 配置 db2
- MariaDB 主从:db2->db1
- MariaDB 主从:db1->db2
- 配置 LVS-RS
- 配置 HA 和 LVS-DS
- 配置 ha1
- 配置 ha2
- 测试
Keepalived + LVS(DR) + MariaDB 主主
项目背景
业务场景与数据库核心诉求
在企业级应用中,数据库作为业务数据的 “核心载体”,其高可用性、读写性能、数据一致性直接决定业务能否稳定运行。无论是电商交易系统(订单生成、库存扣减)、金融支付平台(交易对账、资金流转),还是政务管理系统(数据上报、业务审批),均对数据库提出以下刚性需求:
-
无间断服务(高可用)
数据库需实现 24×7 小时不间断运行,避免因单点故障(如数据库服务器宕机、磁盘损坏、网络中断)导致业务中断。例如:电商平台秒杀活动中,若数据库不可用,将直接导致订单无法生成,每中断 1 分钟可能造成数万元营收损失;金融系统中,数据库故障可能引发交易对账异常,甚至触发合规风险。
-
高并发承载(读写性能)
随着用户规模增长,数据库面临的读写请求呈指数级上升(如日均 SQL 执行量从 100 万次增至 1 亿次)。单台数据库服务器的 CPU、内存、IO 能力易成为瓶颈:读请求过多会导致查询延迟(如用户查询订单列表超时),写请求集中会造成事务阻塞(如多用户同时提交订单导致库存更新排队)。
-
数据零丢失(可靠性)
业务数据需具备 “抗丢失” 能力,即使遭遇硬件故障或软件异常,也需保证数据不损坏、不丢失。例如:用户充值记录、订单信息若因数据库故障丢失,将直接引发用户投诉与信任危机;同时,多节点间的数据需实时同步,避免出现 “主库数据已更新,从库仍展示旧数据” 的一致性问题。
-
灵活扩展(可扩展性)
业务增长过程中,需支持 “按需扩展” 数据库能力:读压力增大时可快速新增读节点,写压力上升时可优化写分发策略,避免因架构僵化导致 “业务倒逼重构” 的被动局面。
传统数据库架构的痛点与局限
在采用《Keepalived + LVS(DR)+ MariaDB 主主》方案前,多数企业曾使用 “单节点数据库” 或 “简单主从架构”,但面临以下难以突破的瓶颈:
-
单节点数据库:单点故障风险致命
-
问题核心:数据库仅部署在一台服务器上,一旦服务器硬件故障(如电源损坏、磁盘坏道)或软件崩溃(如 MariaDB 进程异常退出),将导致全量业务中断。
- 恢复效率低:依赖人工干预恢复(如更换服务器、重建数据库、恢复备份),平均恢复时间(MTTR)通常超过 30 分钟,远无法满足 “秒级切换” 的业务需求;若备份数据不完整,还可能导致部分业务数据永久丢失。
-
-
简单主从架构(一主一从):读写瓶颈与切换缺陷
-
读性能局限:虽然通过 “主库写、从库读” 分摊读压力,但从库仅能扩展读能力,无法缓解主库的写压力(如大量订单写入仍集中在主库);且从库数量增多时,缺乏统一的读请求分发机制,易导致部分从库过载(如某台从库承担 80% 读请求)、部分从库空闲。
- 高可用缺陷:主库故障时,需手动将从库提升为新主库,再修改业务系统的数据库连接地址,切换过程耗时且易出错(如忘记同步从库未应用的 binlog 导致数据不一致);同时,从库仅作为 “备用节点”,写请求始终依赖主库,主库写瓶颈无法突破。
-
无负载均衡:请求分发混乱
-
部分企业尝试用 “业务层硬编码连接地址” 实现读写分离(如读请求连从库 IP,写请求连主库 IP),但存在两大问题:
① 缺乏故障检测机制:若某台从库宕机,业务层无法实时感知,仍会将读请求分发至故障节点,导致部分读业务失败;
② 扩展性差:新增读节点时,需修改业务代码中的连接地址列表,重启服务才能生效,不符合 “无感知扩展” 的运维需求。
-
-
数据同步与一致性风险
- 传统主从架构依赖 MariaDB 原生的 binlog 同步,若网络延迟或主库 binlog 丢失,会导致从库数据滞后或同步失败;且主库故障时,若从库未完全同步主库数据,强制切换会造成 “数据断层”(如主库已提交的订单,从库未记录)。
技术方案的选型逻辑
针对上述痛点,需构建一套 “高可用负载均衡 + 双主互备 + 读写协同” 的数据库架构,而《Keepalived + LVS(DR)+ MariaDB 主主》组合正是基于以下核心诉求选型:
-
MariaDB 主主:突破写瓶颈与双活备份
-
采用 “双主互备” 模式(两台 MariaDB 均为主库,可同时处理写请求),彻底解决传统主从架构的 “写依赖单主” 问题,写性能理论上提升 2 倍;
-
两台主库实时同步数据(通过 binlog 双向同步),任一主库故障时,另一主库已拥有完整数据,避免数据丢失;同时,支持 “读写请求均分发至双主”,进一步提升整体并发能力。
-
-
LVS(DR 模式):高效分发读写请求
-
LVS 作为四层负载均衡器,基于 IP 和端口转发请求,具备超高并发承载能力(单机可支撑 10 万 + 并发连接),远超 Nginx 等七层负载均衡器;
-
采用 DR(直接路由)模式,请求仅经过 LVS 转发至后端 MariaDB 节点,响应数据直接从 MariaDB 返回给客户端,避免 “请求回程流量” 占用 LVS 带宽,转发效率接近物理机直连;
-
支持 “健康检查”,实时检测 MariaDB 节点状态,若某台主库宕机,LVS 自动将请求分发至另一台健康主库,避免业务访问故障节点。
-
-
Keepalived:负载均衡层高可用
-
LVS 作为请求分发核心,若自身单点故障,将导致全量数据库请求无法转发。通过 Keepalived 的 VRRP 协议实现 LVS 主备高可用:主 LVS 节点故障时,备 LVS 节点可在 1-3 秒内自动接管虚拟 IP(VIP),实现 “无感知切换”,彻底消除负载均衡层单点风险;
-
支持 “优先级配置”,可根据 LVS 节点性能设置主备角色,确保高性能节点优先承担转发任务。
-
项目价值与预期目标
通过部署《Keepalived + LVS(DR)+ MariaDB 主主》架构,预期实现以下技术与业务价值:
-
高可用升级:数据库层可用性从 99.9% 提升至 99.99%,年均故障中断时间从 8.76 小时降至 52.56 分钟,核心业务(如订单、支付)无服务中断风险;
-
性能翻倍:写性能从单主 500 TPS 提升至双主 1000+ TPS,读性能支持通过新增从节点无限扩展(LVS 统一分发读请求),95% SQL 查询响应时间<200ms;
-
数据可靠:双主实时同步数据,任一节点故障无数据丢失;LVS 健康检查 + Keepalived 主备切换,实现 “故障自动转移”,无需人工干预;
-
运维高效:新增数据库节点时,仅需接入 LVS 集群,无需修改业务代码;负载均衡与数据库节点状态可通过监控平台实时查看,故障定位效率提升 70%。
MariaDB 复制原理
简单的说就是把 一个服务器上执行过的sql语句在别的服务器上也重复执行一遍, 这样只要两个数据库的初态是一样的,那么它们就能一直同步。这种复制和重复都是 mysql 自动实现的,我们只需要配置即可。
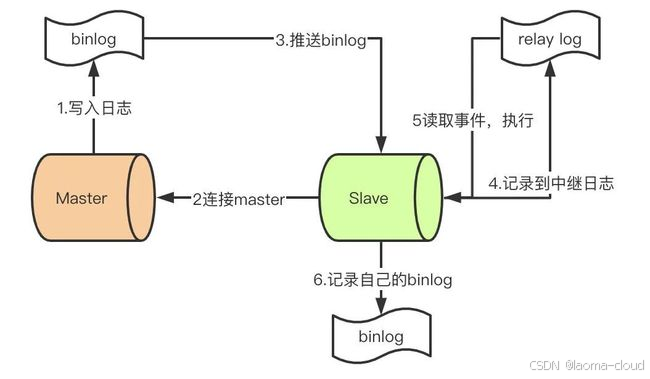
以上是一个主从复制的工作原理流程图, 主-主复制只需要把上面的例子反过来再做一遍。
项目实践
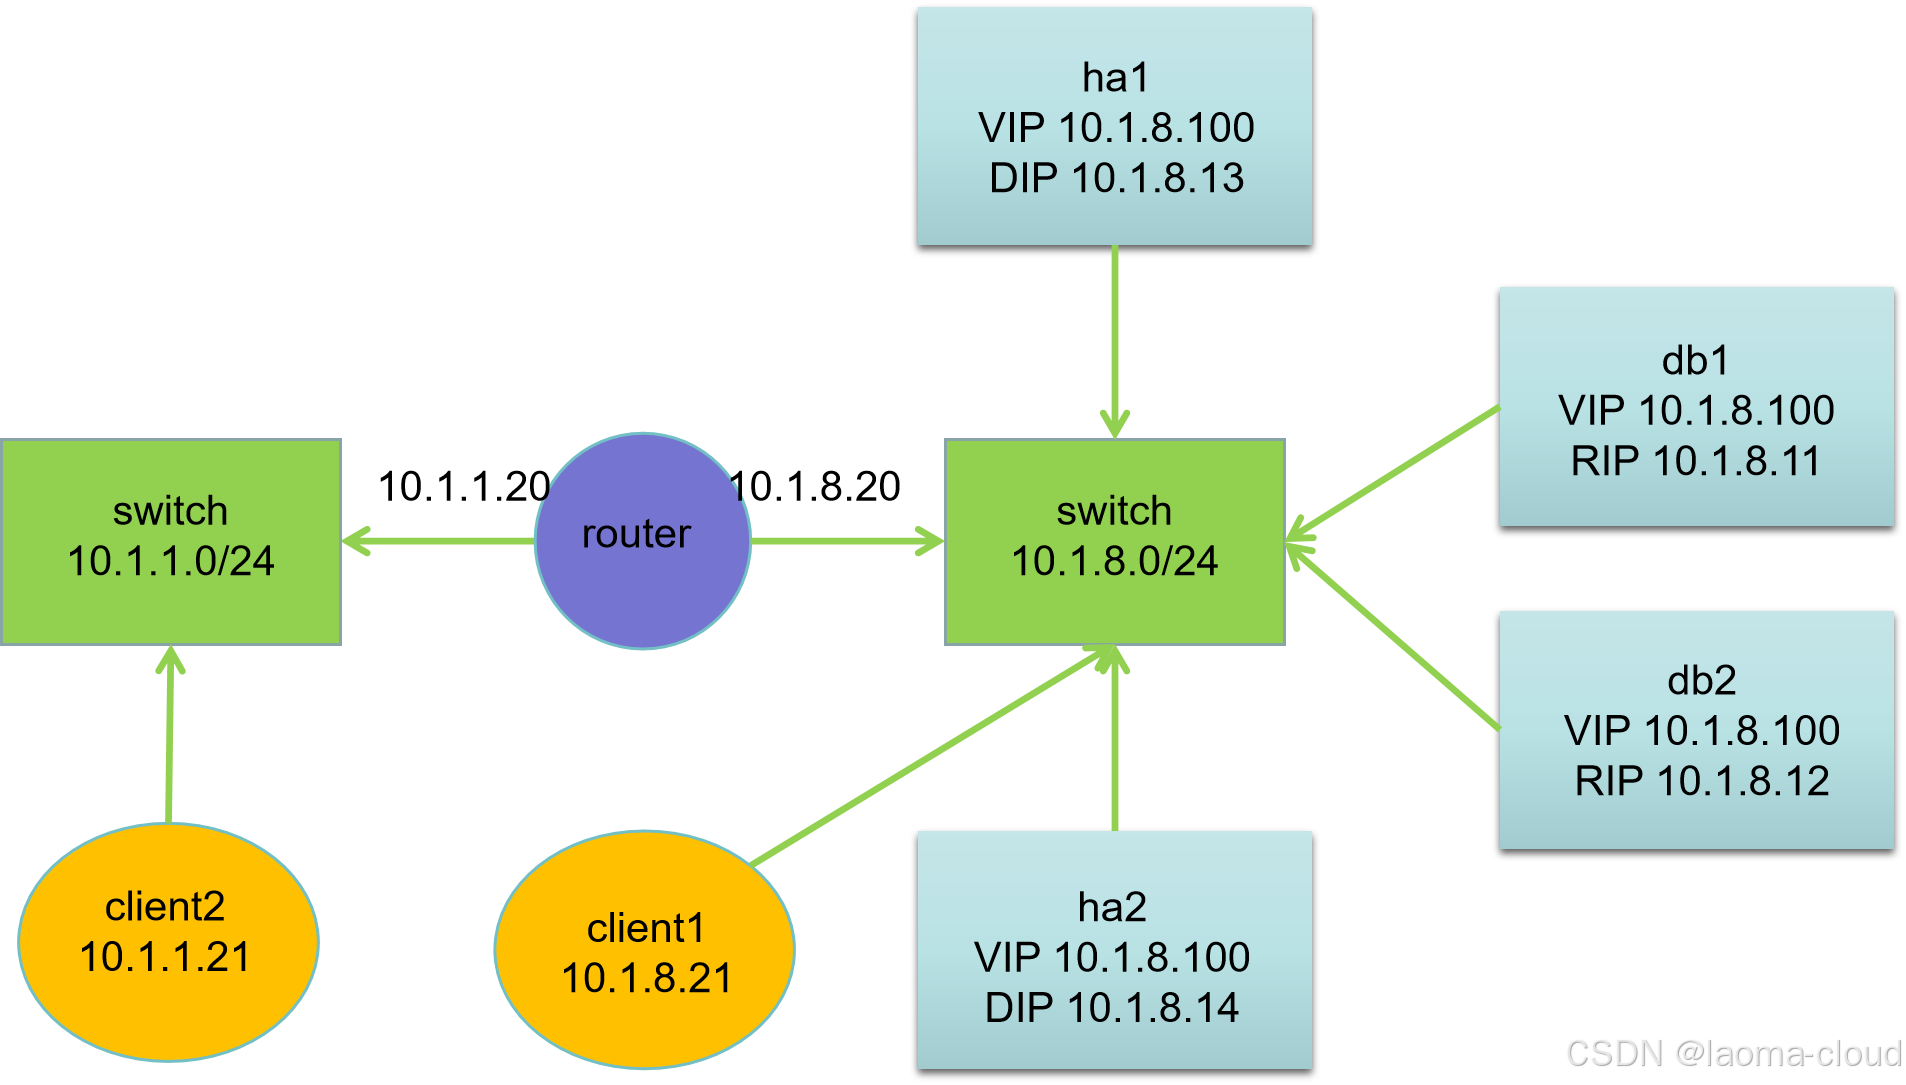
项目环境
| 主机名 | IP 地址 | VIP 地址 | 服务器角色 |
|---|---|---|---|
| client2.laoma.cloud | 10.1.1.21 | 无 | 客户端 |
| client1.laoma.cloud | 10.1.8.21 | 无 | 客户端 |
| router.laoma.cloud | 10.1.1.20, 10.1.8.20 | 无 | 路由器 |
| ha1.laoma.cloud | 10.1.8.13 | 10.1.8.100 | HA 和 LVS 服务器 |
| ha2.laoma.cloud | 10.1.8.14 | 10.1.8.100 | HA 和 LVS 服务器 |
| db1.laoma.cloud | 10.1.8.11, 10.1.2.11 | 10.1.8.100 | db 服务器 |
| db2.laoma.cloud | 10.1.8.12, 10.1.2.12 | 10.1.8.100 | db 服务器 |
基础配置
-
主机名
-
IP 地址
-
网关
# 网关配置命令参考# 10.1.1.0/24 网段网关为10.1.1.20
nmcli connection modify ens33 ipv4.gateway 10.1.8.20
nmcli connection up ens33# 10.1.8.0/24 网段网关为10.1.8.20
nmcli connection modify ens33 ipv4.gateway 10.1.1.20
nmcli connection up ens33
配置 router
# 开启路由
echo "net.ipv4.ip_forward=1" >> /etc/sysctl.conf
# 或者
# sed -i "s/ip_forward=0/ip_forward=1/g" /etc/sysctl.conf
sysctl -p
配置免密登录-可选
[root@web1 ~]#
echo 'StrictHostKeyChecking no' >> /etc/ssh/ssh_config
ssh-keygen -t rsa -f .ssh/id_rsa -N ''
for host in server{2..4}; do ssh-copy-id root@$host; done
for host in server{2..4}; do scp /etc/ssh/ssh_config root@$host:/etc/ssh/ssh_config; done
MariaDB 安装和初始化
配置 db1
# 安装软件包
yum install -y mariadb-server# 开启二进制日志
vim /etc/my.cnf.d/mariadb-server.cnf
[mysqld]
# 在mysqld块最后添加如下内容
server-id=1
log_bin=mysql-bin
relay_log=mysql-relay-bin# 忽略以下两个数据日志
binlog-ignore-db=information_schema
binlog-ignore-db=performance_schema# 启用并启动服务
systemctl enable mariadb --now# 安全初始化
mysql_secure_installationNOTE: RUNNING ALL PARTS OF THIS SCRIPT IS RECOMMENDED FOR ALL MariaDBSERVERS IN PRODUCTION USE!  PLEASE READ EACH STEP CAREFULLY!In order to log into MariaDB to secure it, we'll need the current
password for the root user.  If you've just installed MariaDB, and
you haven't set the root password yet, the password will be blank,
so you should just press enter here.Enter current password for root (enter for none): `回车`
OK, successfully used password, moving on...Setting the root password ensures that nobody can log into the MariaDB
root user without the proper authorisation.Set root password? [Y/n] `回车`
New password: `redhat`
Re-enter new password: `redhat`
Password updated successfully!
Reloading privilege tables..... Success!By default, a MariaDB installation has an anonymous user, allowing anyone
to log into MariaDB without having to have a user account created for
them.  This is intended only for testing, and to make the installation
go a bit smoother.  You should remove them before moving into a
production environment.Remove anonymous users? [Y/n] `回车`... Success!Normally, root should only be allowed to connect from 'localhost'.  This
ensures that someone cannot guess at the root password from the network.Disallow root login remotely? [Y/n] `回车` ... Success!By default, MariaDB comes with a database named 'test' that anyone can
access.  This is also intended only for testing, and should be removed
before moving into a production environment.Remove test database and access to it? [Y/n] `回车`- Dropping test database...... Success!- Removing privileges on test database...... Success!Reloading the privilege tables will ensure that all changes made so far
will take effect immediately.Reload privilege tables now? [Y/n] `回车`... Success!Cleaning up...All done!  If you've completed all of the above steps, your MariaDB
installation should now be secure.Thanks for using MariaDB!
配置 db2
# 安装软件包
yum install -y mariadb-server# 开启二进制日志
vim /etc/my.cnf.d/mariadb-server.cnf
[mysqld]
# 在mysqld块最后添加如下内容
server-id=2
log_bin=mysql-bin
relay_log=mysql-relay-binbinlog-ignore-db=information_schema
binlog-ignore-db=performance_schema# 启用并启动服务
systemctl enable mariadb --now# 安全初始化
mysql_secure_installationNOTE: RUNNING ALL PARTS OF THIS SCRIPT IS RECOMMENDED FOR ALL MariaDBSERVERS IN PRODUCTION USE!  PLEASE READ EACH STEP CAREFULLY!In order to log into MariaDB to secure it, we'll need the current
password for the root user.  If you've just installed MariaDB, and
you haven't set the root password yet, the password will be blank,
so you should just press enter here.Enter current password for root (enter for none): `回车`
OK, successfully used password, moving on...Setting the root password ensures that nobody can log into the MariaDB
root user without the proper authorisation.Set root password? [Y/n] `回车`
New password: `redhat`
Re-enter new password: `redhat`
Password updated successfully!
Reloading privilege tables..... Success!By default, a MariaDB installation has an anonymous user, allowing anyone
to log into MariaDB without having to have a user account created for
them.  This is intended only for testing, and to make the installation
go a bit smoother.  You should remove them before moving into a
production environment.Remove anonymous users? [Y/n] `回车`... Success!Normally, root should only be allowed to connect from 'localhost'.  This
ensures that someone cannot guess at the root password from the network.Disallow root login remotely? [Y/n] `回车` ... Success!By default, MariaDB comes with a database named 'test' that anyone can
access.  This is also intended only for testing, and should be removed
before moving into a production environment.Remove test database and access to it? [Y/n] `回车`- Dropping test database...... Success!- Removing privileges on test database...... Success!Reloading the privilege tables will ensure that all changes made so far
will take effect immediately.Reload privilege tables now? [Y/n] `回车`... Success!Cleaning up...All done!  If you've completed all of the above steps, your MariaDB
installation should now be secure.Thanks for using MariaDB!
MariaDB 主从:db2->db1
主库:db1,从库:db2
# 配置主数据库
[root@db1 ~]# mysql -uroot -predhat
MariaDB [(none)]> grant replication slave, replication client on *.* to 'repl'@'10.1.8.12' identified by 'redhat';
MariaDB [(none)]> flush privileges;MariaDB [(none)]> show master status\G;
*************************** 1. row ***************************File: mysql-bin.000003Position: 327Binlog_Do_DB:
Binlog_Ignore_DB: mysql,information_schema,performance_schema
1 row in set (0.00 sec)ERROR: No query specifiedMariaDB [(none)]> # 配置从数据库
[root@db2 ~]# mysql -uroot -predhat
MariaDB [(none)]> change master to master_host='10.1.8.11',master_user='repl',master_password='redhat',master_port=3306,master_log_file='mysql-bin.000003',master_log_pos=327,master_connect_retry=30;
Query OK, 0 rows affected (0.01 sec)MariaDB [(none)]> show slave status\G;
*************************** 1. row ***************************Slave_IO_State: Master_Host: 10.1.8.11Master_User: replMaster_Port: 3306Connect_Retry: 30Master_Log_File: mysql-bin.000003Read_Master_Log_Pos: 327Relay_Log_File: mysql-relay-bin.000001Relay_Log_Pos: 4Relay_Master_Log_File: mysql-bin.000003Slave_IO_Running: No
......
1 row in set (0.00 sec)ERROR: No query specified# 启动同步,再次查看状态
MariaDB [(none)]> start slave;
Query OK, 0 rows affected (0.01 sec)MariaDB [(none)]> show slave status\G;
*************************** 1. row ***************************Slave_IO_State: Waiting for master to send eventMaster_Host: 10.1.8.11Master_User: replMaster_Port: 3306Connect_Retry: 30Master_Log_File: mysql-bin.000003Read_Master_Log_Pos: 327Relay_Log_File: mysql-relay-bin.000002Relay_Log_Pos: 537Relay_Master_Log_File: mysql-bin.000003Slave_IO_Running: YesSlave_SQL_Running: Yes
......ERROR: No query specified
# 确保 Slave_IO_Running 和 Slave_SQL_Running 状态为Y es。
MariaDB [(none)]> # 主库写入数据
[root@db1 ~]# mysql -uroot -predhat
create database test;
use test;
create table linux(username varchar(15) not null,password varchar(15) not null);
insert into linux values ('laoma1', 'redhat');
insert into linux values ('laoma2', 'redhat');
insert into linux values ('laoma3', 'redhat');
commit;
select * from linux;# 从库查询
[root@db2 ~]# mysql -uroot -predhat
MariaDB [(none)]> select * from test.linux;
+----------+----------+
| username | password |
+----------+----------+
| laoma1   | redhat   |
| laoma2   | redhat   |
| laoma3   | redhat   |
+----------+----------+
3 rows in set (0.00 sec)
MariaDB 主从:db1->db2
主库:db2,从库:db1
# 配置主数据库
[root@db2 ~]# mysql -uroot -predhat
MariaDB [(none)]> grant replication slave, replication client on *.* to 'repl'@'10.1.8.11' identified by 'redhat';
MariaDB [(none)]> flush privileges;MariaDB [(none)]> show master status\G;
*************************** 1. row ***************************File: mysql-bin.000002Position: 1769Binlog_Do_DB:
Binlog_Ignore_DB: mysql,information_schema,performance_schema
1 row in set (0.00 sec)ERROR: No query specified# 配置从数据库
[root@db1 ~]# mysql -uroot -predhat
MariaDB [(none)]> change master to master_host='10.1.8.12',master_user='repl',master_password='redhat',master_port=3306,master_log_file='mysql-bin.000002',master_log_pos=1769,master_connect_retry=30;
Query OK, 0 rows affected (0.01 sec)MariaDB [(none)]> start slave;
Query OK, 0 rows affected (0.00 sec)MariaDB [(none)]> show slave status\G;
*************************** 1. row ***************************Slave_IO_State: Waiting for master to send eventMaster_Host: 10.1.8.12Master_User: replMaster_Port: 3306Connect_Retry: 30Master_Log_File: mysql-bin.000002Read_Master_Log_Pos: 1769Relay_Log_File: mysql-relay-bin.000002Relay_Log_Pos: 537Relay_Master_Log_File: mysql-bin.000002Slave_IO_Running: YesSlave_SQL_Running: Yes
......ERROR: No query specified# 主数据库创建数据
MariaDB [(none)]> create database laoma;
Query OK, 1 row affected (0.00 sec)# 从数据库查看
MariaDB [(none)]> show databases;
+--------------------+
| Database           |
+--------------------+
| information_schema |
| laoma              |
| mysql              |
| performance_schema |
| test               |
+--------------------+
5 rows in set (0.00 sec)
配置 LVS-RS
所有后端主机都要做相同配置。
[root@db1-2 ~]## 增加虚拟网卡
nmcli connection add type dummy ifname dummy con-name dummy ipv4.method manual ipv4.addresses 10.1.8.100/32
nmcli connection up dummy# 配置arp参数,关闭arp对dummy网卡的解析
cat >> /etc/sysctl.conf << EOF
net.ipv4.conf.all.arp_ignore = 1
net.ipv4.conf.all.arp_announce = 2
net.ipv4.conf.dummy.arp_ignore = 1
net.ipv4.conf.dummy.arp_announce = 2
EOF
sysctl -p
配置 HA 和 LVS-DS
配置 ha1
yum install -y keepalived ipvsadm
cp /etc/keepalived/keepalived.conf{,.bak}
vim /etc/keepalived/keepalived.conf
! Configuration File for keepalivedglobal_defs {router_id ha1
}vrrp_instance db {state MASTERinterface ens33virtual_router_id 51priority 110advert_int 1authentication {auth_type PASSauth_pass laoma@123}virtual_ipaddress {10.1.8.100/24}
}virtual_server 10.1.8.100 3306 {delay_loop 6lb_algo rrlb_kind DRpersistence_timeout 50protocol TCPreal_server 10.1.8.11 3306 {weight 1TCP_CHECK {connect_timeout 3retry 3delay_before_retry 3}}real_server 10.1.8.12 3306 {weight 1TCP_CHECK {connect_timeout 3retry 3delay_before_retry 3}}
}
systemctl enable keepalived.service --now
在 keepalived+LVS 配置中,后端 real_server 后端服务器不支持直接使用域名,必须指定 IP 地址。这是由 LVS 的工作原理和 Keepalived 的配置机制决定的。
原因:
- LVS 工作在四层(传输层):LVS 基于 IP 地址和端口进行负载均衡转发,不涉及 DNS 解析,无法识别域名。
- Keepalived 配置特性:Keepalived 的
real_server配置项要求明确的 IP 地址(address参数),其语法解析器不支持域名格式,会直接将域名视为无效配置。- 启动验证失败:若强行在
real_server中填写域名,Keepalived 启动时会报错(如invalid IP address),导致配置加载失败。替代方案:通过脚本动态更新配置。
配置 ha2
yum install -y keepalived ipvsadm
cp /etc/keepalived/keepalived.conf{,.bak}
vim /etc/keepalived/keepalived.conf
! Configuration File for keepalivedglobal_defs {router_id ha2
}vrrp_instance db {state BACKUPinterface ens33virtual_router_id 51priority 100advert_int 1authentication {auth_type PASSauth_pass laoma@123}virtual_ipaddress {10.1.8.100/24}
}virtual_server 10.1.8.100 3306 {delay_loop 6lb_algo rrlb_kind DRprotocol TCPreal_server 10.1.8.11 3306 {weight 1TCP_CHECK {connect_timeout 3retry 3delay_before_retry 3}}real_server 10.1.8.12 3306 {weight 2TCP_CHECK {connect_timeout 3retry 3delay_before_retry 3}}
}
systemctl enable keepalived.service --now
测试
# 创建测试账户
[root@db1 ~]# mysql -uroot -p
MariaDB [(none)]> grant ALL PRIVILEGES on *.* to 'laoma'@'%' identified by 'redhat';
MariaDB [(none)]> FLUSH PRIVILEGES;
MariaDB [(none)]> quit
Bye[root@client ~]# mysql -u laoma -p -h 10.1.8.100 -e 'show databases';# 停止ha1上Keepalived服务,测试mysql连接
[root@ha1 ~]# systemctl stop keepalived.service# 启动ha1上Keepalived服务,测试mysql连接
[root@ha1 ~]# systemctl start keepalived.service# 停止db1上mariadb服务,测试mysql连接
[root@db1 ~]# systemctl stop mariadb