机器人控制器开发(人形机器人产品设计)
我想做一个单机版的自主学习和自动部署模型的智能双臂机器人,
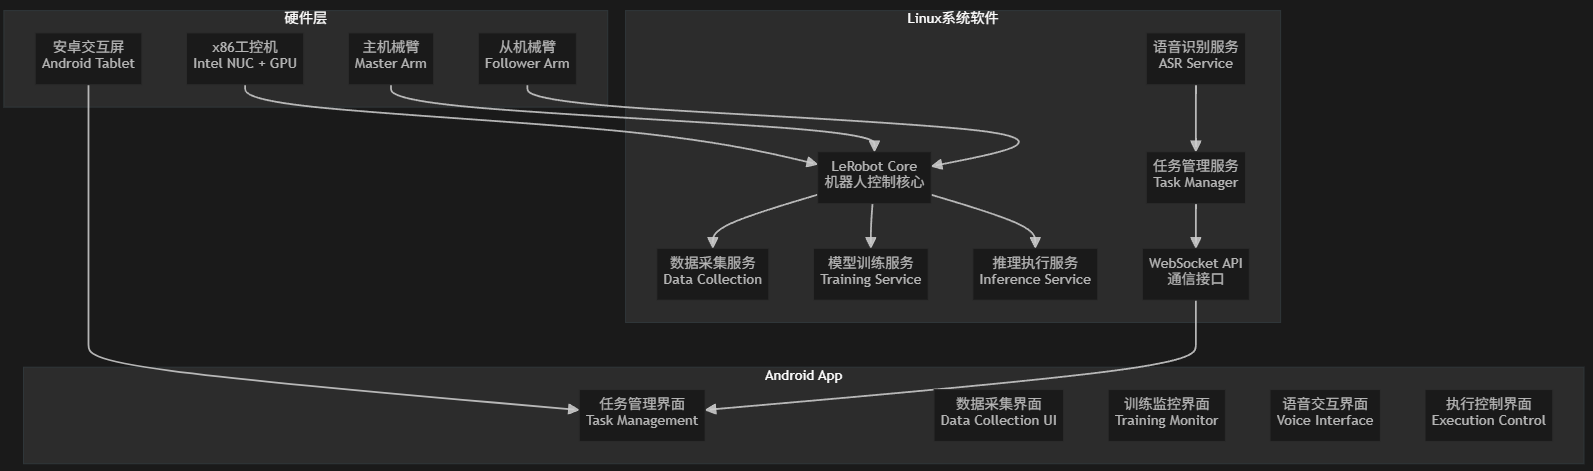
产品的硬件部分包括 主机械臂、从机械臂、含GPU的x86工控机,安卓人机交互一体屏。
需要开发linux系统中的软件和android App。
作为单机版的智能双臂机器人,需要用户能够进行傻瓜操作和快速部署落地。
机器人内部基于Lerobot开源框架,实现了训练服务、数据采集服务、模型推理服务、语音识别交互服务等。
用户开发安卓APP,点击创建新任务,输入任务的名称和数据集相关信息,并点击开始采集数据,可以不断采集数据,数据的视频会实时显示在安卓屏幕上。进行多轮数据采集后,点击结束采集。数据采集服务会对数据进行实时处理和存储。
用户点击训练按钮,设置训练的策略和轮次,开始训练,APP会实时显示训练的进度条,训练完成后会自动将模型保存并自动完成一个智能任务的部署。
用户可以点击应用该模型,便可马上启用这个技能,同时通过语言对话服务实现多模态交互操作。
🎯 产品架构总览
📋 详细实现流程
阶段1:硬件集成与LeRobot适配
1.1 创建自定义机器人配置
# src/lerobot/robots/custom_dual_arm/robot.py
class CustomDualArmRobot(Robot):def __init__(self, config):super().__init__(config)self.master_arm = self._init_master_arm()self.follower_arm = self._init_follower_arm()def connect(self):# 连接主从机械臂passdef teleop_step(self, action):# 遥操作步骤pass
1.2 电机和传感器集成
# 基于LeRobot的电机总线系统
from lerobot.motors.motors_bus import MotorsBus
from lerobot.cameras.camera import Cameraclass CustomMotorsBus(MotorsBus):# 适配自定义电机协议passclass CustomCamera(Camera):# 适配自定义相机pass
阶段2:Linux系统软件开发
2.1 核心服务架构
# services/robot_service.py
class RobotService:def __init__(self):self.robot = Noneself.data_collector = DataCollectionService()self.trainer = TrainingService()self.inference = InferenceService()self.task_manager = TaskManager()async def initialize_robot(self):# 初始化机器人硬件passasync def start_data_collection(self, task_id):# 开始数据采集pass
2.2 数据采集服务
# services/data_collection_service.py
class DataCollectionService:def __init__(self):self.buffer = OnlineBuffer()self.recording = Falseasync def start_recording(self, task_name):"""开始记录演示数据"""self.recording = True# 基于LeRobot的数据采集流程dataset = self._create_dataset(task_name)while self.recording:# 获取机器人状态和相机图像observation = await self._get_observation()action = await self._get_action()# 保存到数据集dataset.add_frame(observation, action)def stop_recording(self):self.recording = Falsereturn self._save_dataset()
2.3 模型训练服务
# services/training_service.py
class TrainingService:def __init__(self):self.training_process = Noneasync def train_model(self, dataset_path, task_config):"""基于LeRobot训练模型"""# 使用LeRobot的训练配置train_config = TrainPipelineConfig(policy_name="act",  # 或其他策略dataset_repo_id=dataset_path,training_steps=10000,# ... 其他配置)# 启动训练进程self.training_process = await self._start_training_process(train_config)def get_training_progress(self):"""获取训练进度"""if self.training_process:return self._parse_training_logs()
2.4 推理执行服务
# services/inference_service.py
class InferenceService:def __init__(self):self.loaded_models = {}async def load_model(self, model_path, task_name):"""加载训练好的模型"""policy = PreTrainedPolicy.from_pretrained(model_path)self.loaded_models[task_name] = policyasync def execute_task(self, task_name, duration=None):"""执行指定任务"""if task_name not in self.loaded_models:raise ValueError(f"Model for task {task_name} not loaded")policy = self.loaded_models[task_name]# 执行推理循环for step in range(duration or 1000):observation = await self._get_current_observation()action = policy.select_action(observation)await self._execute_action(action)
2.5 语音识别与NLP服务
# services/voice_service.py
class VoiceService:def __init__(self):self.asr_model = self._load_asr_model()self.nlp_processor = self._load_nlp_model()async def process_voice_command(self, audio_data):"""处理语音指令"""# 语音转文字text = self.asr_model.transcribe(audio_data)# 意图识别和任务映射intent = self.nlp_processor.extract_intent(text)task_name = self._map_intent_to_task(intent)return {"text": text,"intent": intent,"task_name": task_name}
2.6 WebSocket API服务
# api/websocket_server.py
from fastapi import FastAPI, WebSocket
import asyncioapp = FastAPI()class WebSocketManager:def __init__(self):self.active_connections = []self.robot_service = RobotService()async def connect(self, websocket: WebSocket):await websocket.accept()self.active_connections.append(websocket)async def handle_message(self, websocket: WebSocket, message: dict):command = message.get("command")if command == "start_data_collection":task_id = message.get("task_id")await self.robot_service.start_data_collection(task_id)elif command == "stop_data_collection":result = await self.robot_service.stop_data_collection()await websocket.send_json({"type": "data_saved", "data": result})elif command == "start_training":config = message.get("config")await self.robot_service.start_training(config)elif command == "execute_task":task_name = message.get("task_name")await self.robot_service.execute_task(task_name)@app.websocket("/ws")
async def websocket_endpoint(websocket: WebSocket):manager = WebSocketManager()await manager.connect(websocket)try:while True:data = await websocket.receive_json()await manager.handle_message(websocket, data)except Exception as e:print(f"Connection error: {e}")
阶段3:Android App开发
3.1 主界面架构
// MainActivity.kt
class MainActivity : AppCompatActivity() {private lateinit var webSocketClient: WebSocketClientprivate lateinit var taskManager: TaskManageroverride fun onCreate(savedInstanceState: Bundle?) {super.onCreate(savedInstanceState)setContentView(R.layout.activity_main)initializeWebSocket()setupUI()}private fun initializeWebSocket() {webSocketClient = WebSocketClient("ws://localhost:8000/ws")webSocketClient.connect()}
}
3.2 任务管理界面
// TaskManagementFragment.kt
class TaskManagementFragment : Fragment() {private lateinit var taskAdapter: TaskAdapterprivate val tasks = mutableListOf<Task>()override fun onCreateView(inflater: LayoutInflater, container: ViewGroup?, savedInstanceState: Bundle?): View? {val view = inflater.inflate(R.layout.fragment_task_management, container, false)setupRecyclerView(view)setupButtons(view)return view}private fun createNewTask() {val dialog = CreateTaskDialog()dialog.setOnTaskCreatedListener { taskName ->val newTask = Task(taskName, TaskStatus.CREATED)tasks.add(newTask)taskAdapter.notifyDataSetChanged()}dialog.show(parentFragmentManager, "CreateTaskDialog")}
}
3.3 数据采集界面
// DataCollectionFragment.kt
class DataCollectionFragment : Fragment() {private var isRecording = falseprivate lateinit var recordButton: Buttonprivate lateinit var statusText: TextViewoverride fun onCreateView(inflater: LayoutInflater, container: ViewGroup?, savedInstanceState: Bundle?): View? {val view = inflater.inflate(R.layout.fragment_data_collection, container, false)recordButton = view.findViewById(R.id.record_button)statusText = view.findViewById(R.id.status_text)recordButton.setOnClickListener {if (isRecording) {stopRecording()} else {startRecording()}}return view}private fun startRecording() {isRecording = truerecordButton.text = "停止录制"statusText.text = "正在录制演示数据..."// 发送开始录制命令val message = JSONObject().apply {put("command", "start_data_collection")put("task_id", getCurrentTaskId())}webSocketClient.send(message.toString())}private fun stopRecording() {isRecording = falserecordButton.text = "开始录制"statusText.text = "录制完成"// 发送停止录制命令val message = JSONObject().apply {put("command", "stop_data_collection")}webSocketClient.send(message.toString())}
}
3.4 训练监控界面
// TrainingMonitorFragment.kt
class TrainingMonitorFragment : Fragment() {private lateinit var progressBar: ProgressBarprivate lateinit var lossChart: LineChartprivate lateinit var startTrainingButton: Buttonprivate fun startTraining() {val config = TrainingConfig(policyName = "act",trainingSteps = 10000,batchSize = 8,learningRate = 1e-4)val message = JSONObject().apply {put("command", "start_training")put("config", config.toJson())}webSocketClient.send(message.toString())// 开始监控训练进度startProgressMonitoring()}private fun startProgressMonitoring() {val handler = Handler(Looper.getMainLooper())val runnable = object : Runnable {override fun run() {requestTrainingProgress()handler.postDelayed(this, 1000) // 每秒更新一次}}handler.post(runnable)}
}
3.5 语音交互界面
// VoiceInteractionFragment.kt
class VoiceInteractionFragment : Fragment() {private lateinit var speechRecognizer: SpeechRecognizerprivate lateinit var voiceButton: ImageButtonprivate lateinit var responseText: TextViewprivate fun startVoiceRecognition() {val intent = Intent(RecognizerIntent.ACTION_RECOGNIZE_SPEECH).apply {putExtra(RecognizerIntent.EXTRA_LANGUAGE_MODEL, RecognizerIntent.LANGUAGE_MODEL_FREE_FORM)putExtra(RecognizerIntent.EXTRA_LANGUAGE, Locale.getDefault())putExtra(RecognizerIntent.EXTRA_PROMPT, "请说出您的指令...")}speechRecognizer.startListening(intent)}private val recognitionListener = object : RecognitionListener {override fun onResults(results: Bundle?) {val matches = results?.getStringArrayList(SpeechRecognizer.RESULTS_RECOGNITION)if (matches != null && matches.isNotEmpty()) {val spokenText = matches[0]processVoiceCommand(spokenText)}}}private fun processVoiceCommand(command: String) {val message = JSONObject().apply {put("command", "process_voice")put("text", command)}webSocketClient.send(message.toString())}
}
阶段4:系统集成与优化
4.1 系统启动脚本
#!/bin/bash
# start_robot_system.sh# 启动LeRobot核心服务
cd /opt/lerobot
python -m lerobot.services.robot_service &# 启动WebSocket API服务
python -m lerobot.api.websocket_server &# 启动语音服务
python -m lerobot.services.voice_service &# 等待所有服务启动
sleep 5echo "机器人系统已启动"
4.2 配置管理
# config/robot_config.yaml
robot:type: "custom_dual_arm"master_arm:port: "/dev/ttyUSB0"baudrate: 1000000follower_arm:port: "/dev/ttyUSB1"baudrate: 1000000cameras:- name: "wrist_cam"type: "realsense"resolution: [640, 480]- name: "top_cam"type: "opencv"device_id: 0training:default_policy: "act"default_steps: 10000checkpoint_frequency: 1000api:websocket_port: 8000max_connections: 10
4.3 数据流优化
# utils/data_pipeline.py
class OptimizedDataPipeline:def __init__(self):self.frame_queue = asyncio.Queue(maxsize=100)self.compression_enabled = Trueasync def process_frame(self, frame_data):"""优化的帧处理"""if self.compression_enabled:frame_data = self._compress_frame(frame_data)await self.frame_queue.put(frame_data)async def batch_save_frames(self):"""批量保存帧数据"""batch = []while len(batch) < 32:  # 批量大小try:frame = await asyncio.wait_for(self.frame_queue.get(), timeout=0.1)batch.append(frame)except asyncio.TimeoutError:breakif batch:await self._save_batch_to_disk(batch)
🚀 部署与运维
系统部署流程
- 硬件连接:连接主从机械臂、相机、工控机
- 系统安装:安装Ubuntu + LeRobot + 自定义服务
- 硬件标定:使用LeRobot标定工具标定电机和相机
- 服务启动:启动所有后台服务
- App安装:在安卓屏上安装并配置App
- 系统测试:端到端功能测试
用户操作流程
- 创建任务 → Android App创建新任务
- 数据录入 → 用户演示操作,系统记录数据
- 数据训练 → 系统自动训练模型
- 任务执行 → 语音指令或手动触发执行
- 持续学习 → 根据执行结果优化模型
这个架构充分利用了LeRobot的模块化设计,通过标准化的接口集成自定义硬件,实现了一个完整的商业化智能机械臂产品。