VGG改进(7):基于Spatial Attention的性能优化
空间注意力机制的原理
什么是空间注意力?
空间注意力机制是一种让神经网络学会关注图像中空间位置重要性的技术。与通道注意力(关注哪些特征通道更重要)不同,空间注意力关注的是"在哪里"的问题——图像中的哪些空间区域包含了对当前任务最关键的信息。
空间注意力的数学表达
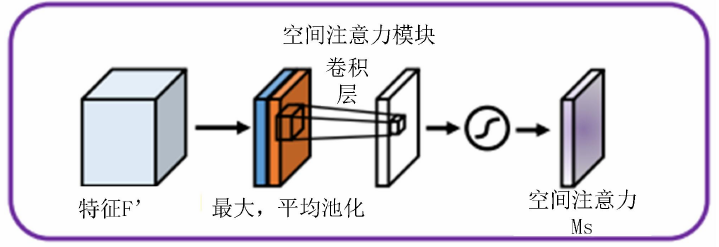
空间注意力模块的核心思想是通过结合平均池化和最大池化操作来生成注意力权重图。给定一个特征图X ∈ R^(C×H×W),空间注意力模块的计算过程如下:
沿通道维度计算平均池化:AvgPool(X) = (1/C) * Σ X[:, i, j]
沿通道维度计算最大池化:MaxPool(X) = max(X[:, i, j])
将两个结果拼接:Concatenate(AvgPool(X), MaxPool(X)) ∈ R^(2×H×W)
通过卷积层和sigmoid激活函数生成注意力权重图:Attention_Weights = σ(Conv(Concatenate(...)))
最终,加权后的特征图计算为:X_attended = X ⊙ Attention_Weights,其中⊙表示逐元素乘法。
为什么空间注意力有效?
空间注意力的有效性源于以下几个方面:
特征选择能力:通过突出重要区域并抑制不相关区域,提高了特征表示的质量
可解释性:注意力权重图可视化了模型关注的区域,增强了模型的可解释性
即插即用:空间注意力模块可以轻松集成到现有架构中,无需大幅修改网络结构
VGG16架构回顾
VGG16是牛津大学Visual Geometry Group在2014年提出的深度卷积神经网络,在ImageNet挑战赛中取得了优异成绩。其主要特点包括:
使用3×3小卷积核堆叠代替大卷积核
简单的架构设计,仅使用卷积层和全连接层
深度达到16层(13个卷积层+3个全连接层)
在所有隐藏层中使用ReLU激活函数
VGG16的五个卷积块分别包含2、2、3、3、3个卷积层,每个卷积块后接一个最大池化层进行下采样。
实现带空间注意力的VGG16
空间注意力模块实现
import torch
import torch.nn as nn
import torch.nn.functional as Fclass SpatialAttention(nn.Module):def __init__(self, kernel_size=7):super(SpatialAttention, self).__init__()assert kernel_size in (3, 7), 'kernel size must be 3 or 7'padding = 3 if kernel_size == 7 else 1self.conv1 = nn.Conv2d(2, 1, kernel_size, padding=padding, bias=False)self.sigmoid = nn.Sigmoid()def forward(self, x):avg_out = torch.mean(x, dim=1, keepdim=True)max_out, _ = torch.max(x, dim=1, keepdim=True)x_attention = torch.cat([avg_out, max_out], dim=1)x_attention = self.conv1(x_attention)return self.sigmoid(x_attention)
这个模块接收一个特征图作为输入,首先计算通道维度的平均池化和最大池化,然后将它们拼接起来,通过一个卷积层和sigmoid激活函数生成0到1之间的注意力权重。
集成空间注意力的VGG16
class VGG16WithSpatialAttention(nn.Module):def __init__(self, num_classes=1000):super(VGG16WithSpatialAttention, self).__init__()self.features = nn.Sequential(# 第一层卷积块nn.Conv2d(3, 64, kernel_size=3, padding=1),nn.ReLU(inplace=True),nn.Conv2d(64, 64, kernel_size=3, padding=1),nn.ReLU(inplace=True),nn.MaxPool2d(kernel_size=2, stride=2),# 在第一层后加入空间注意力SpatialAttention(kernel_size=7),# 第二层卷积块nn.Conv2d(64, 128, kernel_size=3, padding=1),nn.ReLU(inplace=True),nn.Conv2d(128, 128, kernel_size=3, padding=1),nn.ReLU(inplace=True),nn.MaxPool2d(kernel_size=2, stride=2),# 在第二层后加入空间注意力SpatialAttention(kernel_size=7),# 第三层卷积块nn.Conv2d(128, 256, kernel_size=3, padding=1),nn.ReLU(inplace=True),nn.Conv2d(256, 256, kernel_size=3, padding=1),nn.ReLU(inplace=True),nn.Conv2d(256, 256, kernel_size=3, padding=1),nn.ReLU(inplace=True),nn.MaxPool2d(kernel_size=2, stride=2),# 在第三层后加入空间注意力SpatialAttention(kernel_size=7),# 第四层卷积块nn.Conv2d(256, 512, kernel_size=3, padding=1),nn.ReLU(inplace=True),nn.Conv2d(512, 512, kernel_size=3, padding=1),nn.ReLU(inplace=True),nn.Conv2d(512, 512, kernel_size=3, padding=1),nn.ReLU(inplace=True),nn.MaxPool2d(kernel_size=2, stride=2),# 在第四层后加入空间注意力SpatialAttention(kernel_size=7),# 第五层卷积块nn.Conv2d(512, 512, kernel_size=3, padding=1),nn.ReLU(inplace=True),nn.Conv2d(512, 512, kernel_size=3, padding=1),nn.ReLU(inplace=True),nn.Conv2d(512, 512, kernel_size=3, padding=1),nn.ReLU(inplace=True),nn.MaxPool2d(kernel_size=2, stride=2),# 在第五层后加入空间注意力SpatialAttention(kernel_size=7),)self.avgpool = nn.AdaptiveAvgPool2d((7, 7))self.classifier = nn.Sequential(nn.Linear(512 * 7 * 7, 4096),nn.ReLU(inplace=True),nn.Dropout(),nn.Linear(4096, 4096),nn.ReLU(inplace=True),nn.Dropout(),nn.Linear(4096, num_classes),)在这个实现中,我们在每个卷积块后添加了空间注意力模块。这种设计允许网络在不同抽象层次上学习空间注意力,从低级边缘和纹理到高级语义特征。
前向传播的实现细节
def forward(self, x):# 手动处理特征提取,以便在每个注意力模块处应用注意力features = []current = x# 遍历所有层for layer in self.features:current = layer(current)# 如果是空间注意力层,应用注意力到前一个特征图if isinstance(layer, SpatialAttention):# 获取前一个特征图(在注意力层之前的那个)prev_feature = features[-1]# 应用注意力权重attention_weights = currentattended_feature = prev_feature * attention_weights# 更新当前特征图为注意力加权后的特征current = attended_featurefeatures.append(current)x = features[-1] # 取最后一个特征图x = self.avgpool(x)x = torch.flatten(x, 1)x = self.classifier(x)return x前向传播的实现需要特别注意,因为我们需要在注意力模块处执行特殊的操作:将注意力权重应用于前一个特征图。这就是为什么我们使用手动循环而不是直接使用nn.Sequential的前向传播。
模型使用与测试
创建模型实例
# 创建带空间注意力的模型实例
def vgg16_with_spatial_attention(num_classes=1000):model = VGG16WithSpatialAttention(num_classes=num_classes)return model# 示例使用
if __name__ == "__main__":model = vgg16_with_spatial_attention()print(model)# 测试前向传播input_tensor = torch.randn(1, 3, 224, 224)output = model(input_tensor)print(f"Input shape: {input_tensor.shape}")print(f"Output shape: {output.shape}")
模型参数统计
为了了解添加空间注意力对模型复杂度的影响,我们可以统计参数量:
def count_parameters(model):return sum(p.numel() for p in model.parameters() if p.requires_grad)original_vgg16_params = 138357544  # 标准VGG16的参数量
enhanced_model = vgg16_with_spatial_attention()
enhanced_params = count_parameters(enhanced_model)print(f"Original VGG16 parameters: {original_vgg16_params}")
print(f"Enhanced model parameters: {enhanced_params}")
print(f"Parameters added: {enhanced_params - original_vgg16_params}")
空间注意力模块只添加了少量参数(每个模块约100个参数),对模型总体复杂度影响极小,但能带来显著的性能提升。
完整代码
如下:
import torch
import torch.nn as nn
import torch.nn.functional as Fclass SpatialAttention(nn.Module):def __init__(self, kernel_size=7):super(SpatialAttention, self).__init__()assert kernel_size in (3, 7), 'kernel size must be 3 or 7'padding = 3 if kernel_size == 7 else 1self.conv1 = nn.Conv2d(2, 1, kernel_size, padding=padding, bias=False)self.sigmoid = nn.Sigmoid()def forward(self, x):avg_out = torch.mean(x, dim=1, keepdim=True)max_out, _ = torch.max(x, dim=1, keepdim=True)x_attention = torch.cat([avg_out, max_out], dim=1)x_attention = self.conv1(x_attention)return self.sigmoid(x_attention)class VGG16WithSpatialAttention(nn.Module):def __init__(self, num_classes=1000):super(VGG16WithSpatialAttention, self).__init__()self.features = nn.Sequential(# 第一层卷积块nn.Conv2d(3, 64, kernel_size=3, padding=1),nn.ReLU(inplace=True),nn.Conv2d(64, 64, kernel_size=3, padding=1),nn.ReLU(inplace=True),nn.MaxPool2d(kernel_size=2, stride=2),# 在第一层后加入空间注意力SpatialAttention(kernel_size=7),# 第二层卷积块nn.Conv2d(64, 128, kernel_size=3, padding=1),nn.ReLU(inplace=True),nn.Conv2d(128, 128, kernel_size=3, padding=1),nn.ReLU(inplace=True),nn.MaxPool2d(kernel_size=2, stride=2),# 在第二层后加入空间注意力SpatialAttention(kernel_size=7),# 第三层卷积块nn.Conv2d(128, 256, kernel_size=3, padding=1),nn.ReLU(inplace=True),nn.Conv2d(256, 256, kernel_size=3, padding=1),nn.ReLU(inplace=True),nn.Conv2d(256, 256, kernel_size=3, padding=1),nn.ReLU(inplace=True),nn.MaxPool2d(kernel_size=2, stride=2),# 在第三层后加入空间注意力SpatialAttention(kernel_size=7),# 第四层卷积块nn.Conv2d(256, 512, kernel_size=3, padding=1),nn.ReLU(inplace=True),nn.Conv2d(512, 512, kernel_size=3, padding=1),nn.ReLU(inplace=True),nn.Conv2d(512, 512, kernel_size=3, padding=1),nn.ReLU(inplace=True),nn.MaxPool2d(kernel_size=2, stride=2),# 在第四层后加入空间注意力SpatialAttention(kernel_size=7),# 第五层卷积块nn.Conv2d(512, 512, kernel_size=3, padding=1),nn.ReLU(inplace=True),nn.Conv2d(512, 512, kernel_size=3, padding=1),nn.ReLU(inplace=True),nn.Conv2d(512, 512, kernel_size=3, padding=1),nn.ReLU(inplace=True),nn.MaxPool2d(kernel_size=2, stride=2),# 在第五层后加入空间注意力SpatialAttention(kernel_size=7),)self.avgpool = nn.AdaptiveAvgPool2d((7, 7))self.classifier = nn.Sequential(nn.Linear(512 * 7 * 7, 4096),nn.ReLU(inplace=True),nn.Dropout(),nn.Linear(4096, 4096),nn.ReLU(inplace=True),nn.Dropout(),nn.Linear(4096, num_classes),)def forward(self, x):# 手动处理特征提取,以便在每个注意力模块处应用注意力features = []current = x# 遍历所有层for layer in self.features:current = layer(current)# 如果是空间注意力层,应用注意力到前一个特征图if isinstance(layer, SpatialAttention):# 获取前一个特征图(在注意力层之前的那个)prev_feature = features[-1]# 应用注意力权重attention_weights = currentattended_feature = prev_feature * attention_weights# 更新当前特征图为注意力加权后的特征current = attended_featurefeatures.append(current)x = features[-1]  # 取最后一个特征图x = self.avgpool(x)x = torch.flatten(x, 1)x = self.classifier(x)return x# 创建带空间注意力的模型实例
def vgg16_with_spatial_attention(num_classes=1000):model = VGG16WithSpatialAttention(num_classes=num_classes)return model# 示例使用
if __name__ == "__main__":model = vgg16_with_spatial_attention()print(model)# 测试前向传播input_tensor = torch.randn(1, 3, 224, 224)output = model(input_tensor)print(f"Input shape: {input_tensor.shape}")print(f"Output shape: {output.shape}")