EKS上部署gpu服务利用karpenter实现自动扩缩(s3作为共享存储)
背景
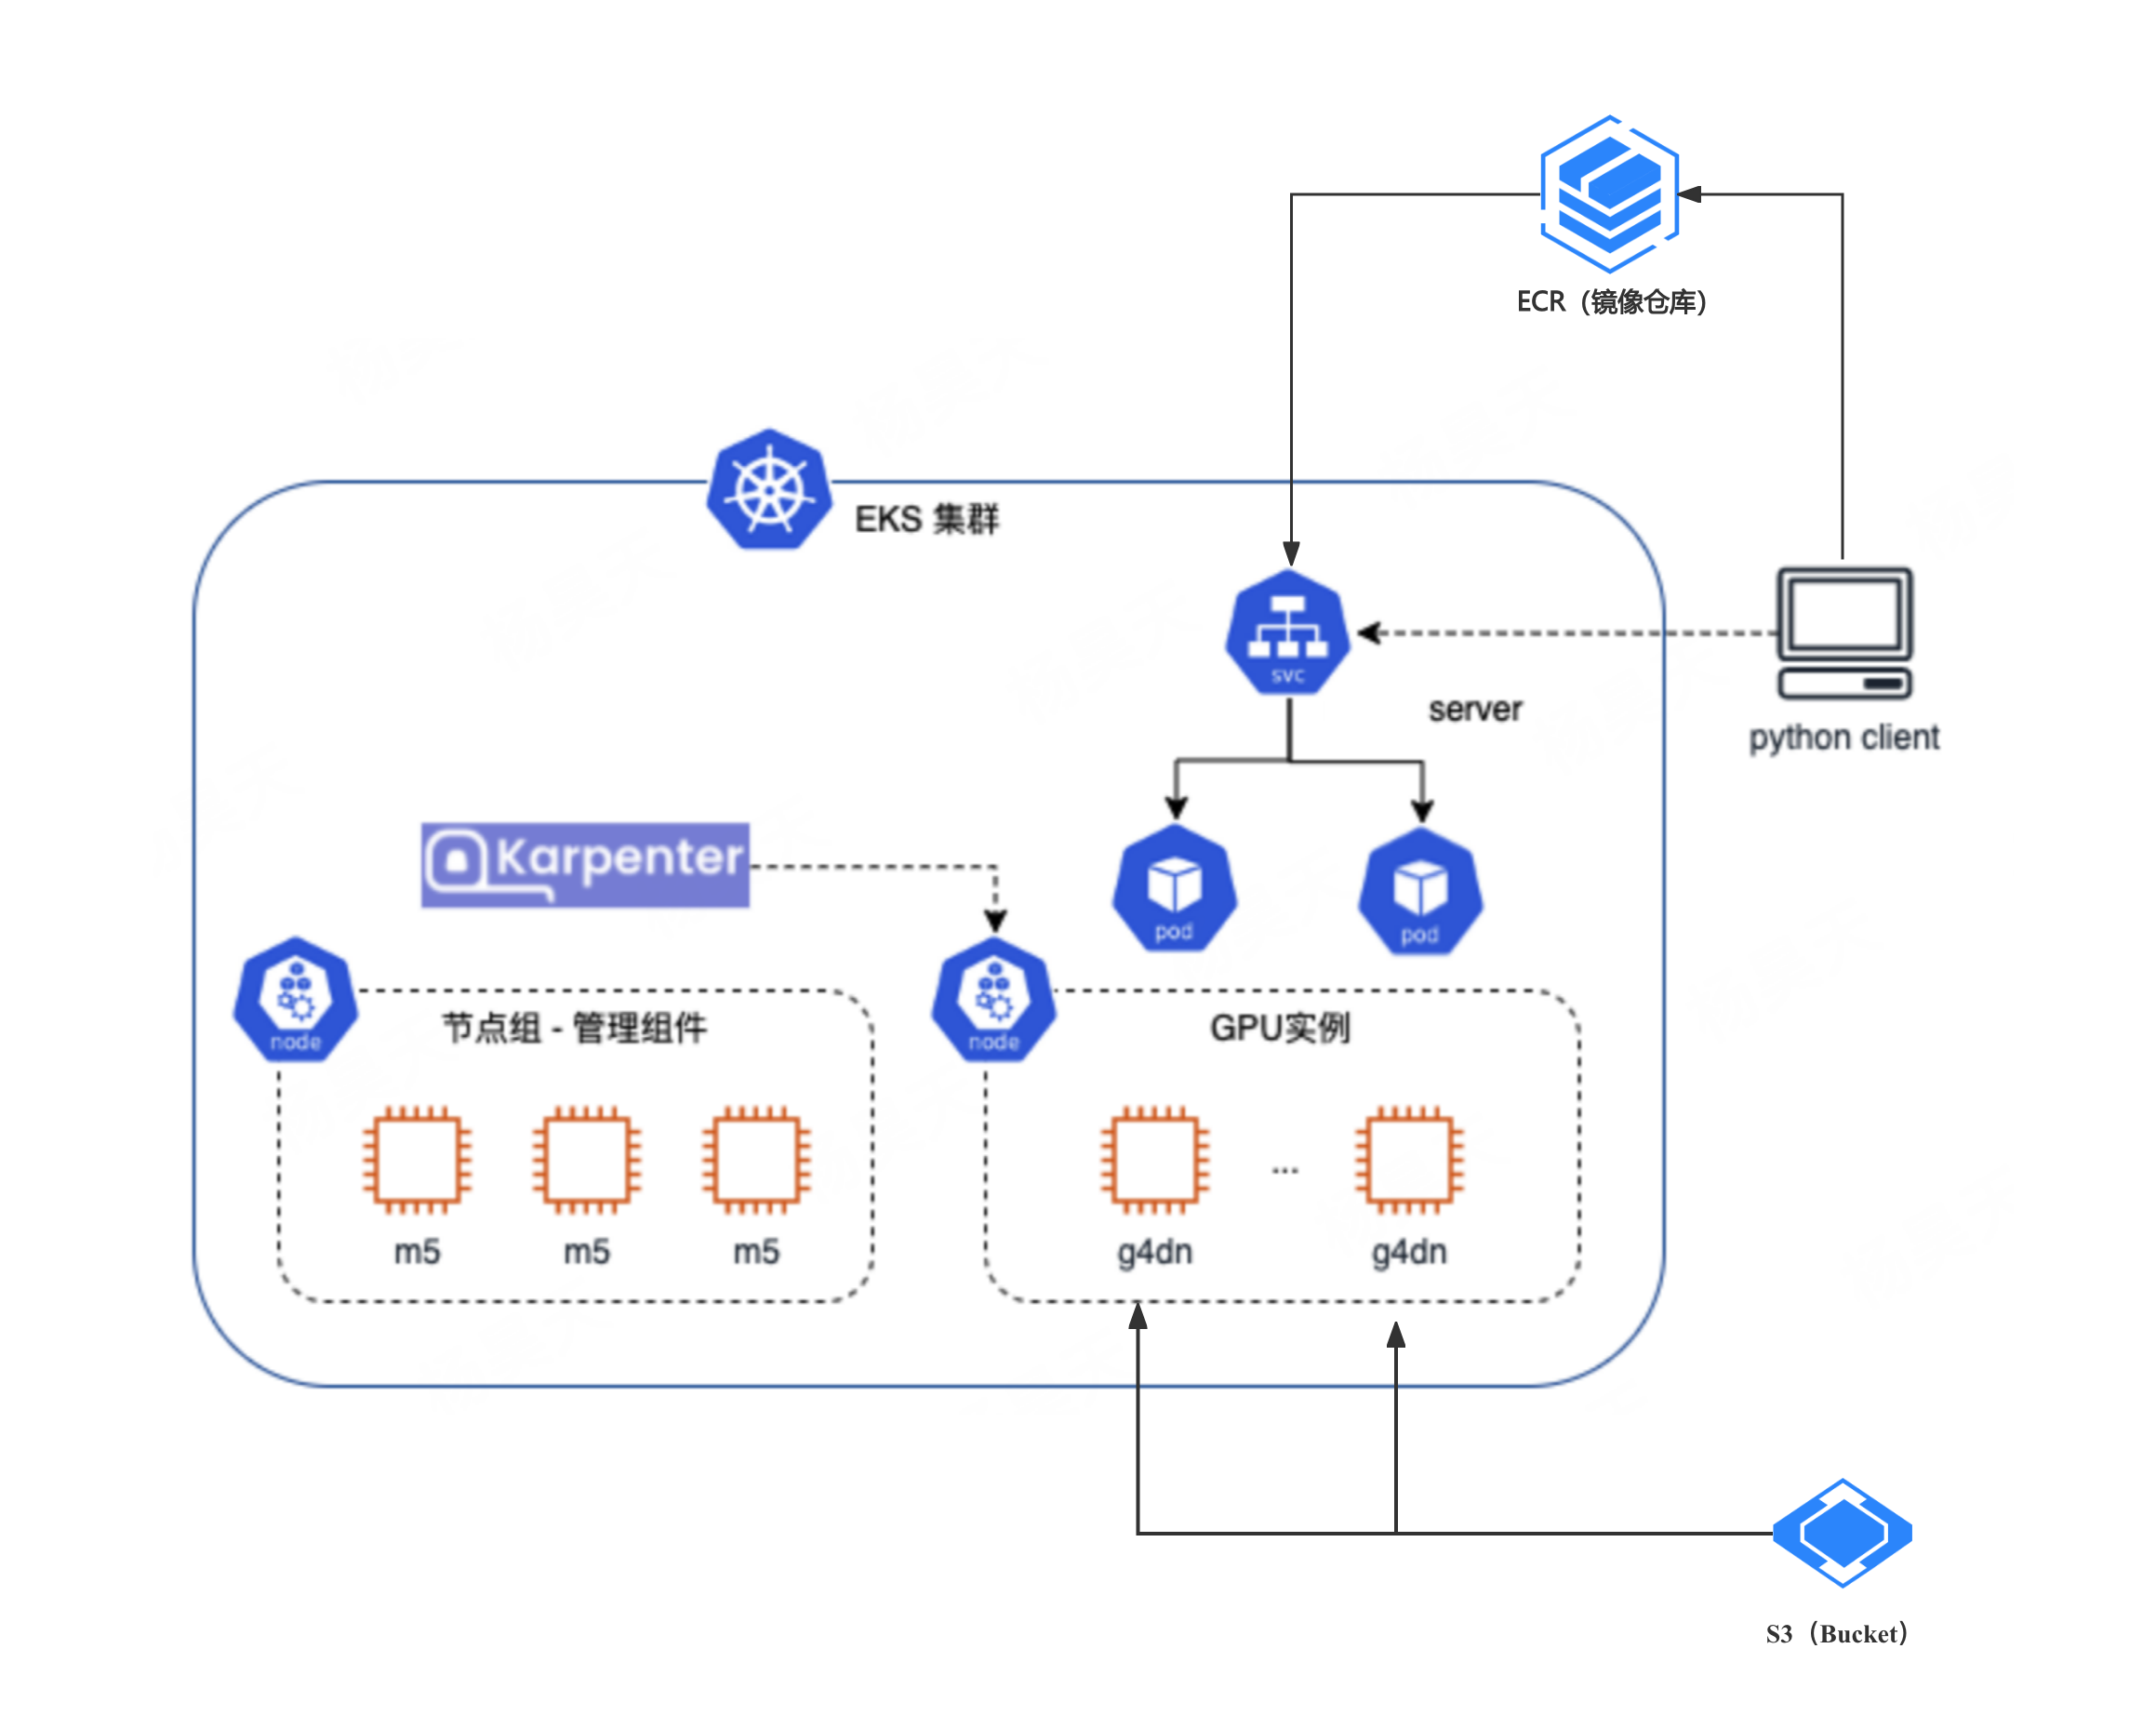
工程项目中需要使用的基于gpu的相关服务,但是gpu资源比较昂贵,期望能够实现自动扩缩操作以达到节省算力的目的,但同时还能保证服务的安全稳定,考虑到多人应用并能实现共享存储。于是选择了eks+karpenter+s3作为共享存储的架构。
整体架构设计
参考
1.aws官方示例(git) https://github.com/aws-solutions-library-samples/guidance-for-asynchronous-inference-with-stable-diffusion-on-aws
2.aws官方指导教程 https://aws-solutions-library-samples.github.io/ai-ml/asynchronous-image-generation-with-stable-diffusion-on-aws-zh.html(缺少新版本依赖教程 在AWS上快速部署基于Stable Diffusion的异步图像生成解决方案)
3.https://docs.aws.amazon.com/zh_cn/zh_cn/eks/latest/userguide/ml-realtime-inference-cluster.html#_6_optional_prepare_and_upload_model_artifacts_for_deployment(本文主要依赖)
3.2 https://aws.amazon.com/cn/blogs/china/kubernetes-node-elastic-scaling-open-source-component-karpenter-practice-deploying-gpu-inference-applications/(和本文差不多架构,可以借鉴的方案)
4.https://aws.amazon.com/cn/blogs/china/kubernetes-node-elastic-scaling-open-source-component-karpenter-practice-cost-optimization-using-spot-instance/(Kubernetes 节点弹性伸缩开源组件 Karpenter 实践:使用 Spot 实例进行成本优化。以后可能用到的技术)
相关工具安装
安装提醒,踩过最大的坑就是karpenter和kubectl版本要对照,但是网上的教程基本上都是karpenter旧版本,但是就版本的karpenter一直下载不下来,所以要提前规划好版本以及去琢磨看到的教程是哪个版本,版本问题参考https://karpenter.sh/v0.32/upgrading/compatibility/

安装AWS CLI并配置您的AWS凭证
参考:
1.官方文档 https://docs.aws.amazon.com/zh_cn/cli/v1/userguide/cli-configure-files.html
2.csdn通俗参考 https://blog.csdn.net/Tiger_lin1/article/details/136241854
凭证配置
# aws cli安装
curl "https://awscli.amazonaws.com/awscli-exe-linux-x86_64.zip" -o "awscliv2.zip"
unzip awscliv2.zip
./aws/install
ln -s /usr/local/bin/aws /usr/bin/aws# 版本查看
aws --version
aws-cli/2.28.2 Python/3.13.4 Linux/5.15.0-151-generic exe/x86_64.ubuntu.22
us-east-1
us-west-1
# 配置信息
aws configure --profile product
AWS Access Key ID [None]: AKIA5*****DZP6C
AWS Secret Access Key [None]: vo+AJwW*******nEUlK
Default region name [None]: eu-north-1
Default output format [None]:
安装kubectl
参考: https://blog.csdn.net/weixin_41335923/article/details/121330978
# 注:版本可以改成自己的版本就行
curl -LO https://dl.k8s.io/release/v1.28.0/bin/linux/amd64/kubectl
chmod +x kubectl
sudo mv kubectl /usr/local/bin/# 查看版本是否安装成功
kubectl version --client
创建集群
准备工作
- 检查您的凭证
检查您的 AWS CLI 凭证是否有效以及是否能够使用 AWS 服务进行身份验证:
aws sts get-caller-identity
# 结果返回
{"UserId": "9054**93","Account": "9054***393","Arn": "arn:aws:iam::9054***393:root"
}
如果成功,该 CLI 将返回有关您的 AWS 身份的详细信息(用户 ID、账户和 Arn)。
- 检查实例可用性
G5 实例类型并非在所有区域中都可用。请检查离您最近的区域。例如:
aws ec2 describe-instance-types --instance-types g5.xlarge g5.2xlarge --region us-east-1
# 结果返回
"InstanceTypes": [{"InstanceType": "g5.2xlarge","CurrentGeneration": true,"FreeTierEligible": false,"SupportedUsageClasses": ["on-demand","spot"],
如果成功,将在您指定的区域中提供 G5 实例类型。
Bottlerocket AMI 并未在所有区域提供。通过检索离您最近的区域的 Bottlerocket AMI ID 进行检查。例如:
aws ssm get-parameter --name /aws/service/bottlerocket/aws-k8s-1.33/arm64/latest/image_id \--region us-east-1 --query "Parameter.Value" --output text如果成功,将在您指定的区域提供 Bottlerocket AMI。
准备环境
1. 定义变量
export TEMPOUT="$(mktemp)"
export K8S_VERSION=1.33
export KARPENTER_VERSION="1.5.0"
export AWS_REGION="us-east-1"
export EKS_CLUSTER_NAME="eks-rt-inference-${AWS_REGION}"
export S3_BUCKET_NAME="eks-rt-inference-models-${AWS_REGION}-$(date +%s)"
export NVIDIA_BOTTLEROCKET_AMI="$(aws ssm get-parameter --name /aws/service/bottlerocket/aws-k8s-${K8S_VERSION}-nvidia/x86_64/latest/image_id --query Parameter.Value --output text)"
export STANDARD_BOTTLEROCKET_AMI="$(aws ssm get-parameter --name /aws/service/bottlerocket/aws-k8s-${K8S_VERSION}/arm64/latest/image_id --query Parameter.Value --output text)"
export AWS_ACCOUNT_ID="$(aws sts get-caller-identity --query Account --output text)"
export ALIAS_VERSION="$(aws ssm get-parameter --name "/aws/service/eks/optimized-ami/${K8S_VERSION}/amazon-linux-2023/x86_64/standard/recommended/image_id" --query Parameter.Value | xargs aws ec2 describe-images --query 'Images[0].Name' --image-ids | sed -r 's/^.*(v[[:digit:]]+).*$/\1/')"
2.创建所需的角色和策略
Karpenter 需要特定的 IAM 角色和策略(例如 Karpenter 控制器 IAM 角色、实例配置文件和策略)来管理作为 Kubernetes Worker 节点的 EC2 实例。它使用这些角色来执行如启动和终止 EC2 实例、标记资源以及与其他 AWS 服务交互之类的操作。使用 Karpenter 的 cloudformation.yaml 创建 Karpenter 角色和策略:
curl -fsSL https://raw.githubusercontent.com/aws/karpenter-provider-aws/v${KARPENTER_VERSION}/website/content/en/preview/getting-started/getting-started-with-karpenter/cloudformation.yaml > "${TEMPOUT}" \
&& aws cloudformation deploy \--stack-name "Karpenter-${EKS_CLUSTER_NAME}" \--template-file "${TEMPOUT}" \--capabilities CAPABILITY_NAMED_IAM \--parameter-overrides "ClusterName=${EKS_CLUSTER_NAME}"
AWS LBC 需要权限才能预置和管理 AWS 负载均衡器,例如为 Ingress 资源创建 ALB 或为类型为 LoadBalancer 的服务创建 NLB。我们将在创建集群的过程中指定此权限策略。在创建集群的过程中,我们将在 ClusterConfig 中使用 eksctl 创建服务账户。创建 LBC IAM 策略:
aws iam create-policy \--policy-name AWSLoadBalancerControllerIAMPolicy \--policy-document "$(curl -fsSL https://raw.githubusercontent.com/kubernetes-sigs/aws-load-balancer-controller/v2.13.0/docs/install/iam_policy.json)"
安装 Mountpoint S3 CSI 驱动程序后,其 DaemonSet 容器组(pod)将配置为使用服务账户执行。Mountpoint S3 CSI 驱动程序的挂载点需要权限才能与您在本指南后面部分创建的 Amazon S3 存储桶进行交互。我们将在创建集群的过程中指定此权限策略。在创建集群的过程中,我们将在 ClusterConfig 中使用 eksctl 创建服务账户。创建 S3 IAM 策略:
aws iam create-policy \--policy-name S3CSIDriverPolicy \--policy-document "{\"Version\": \"2012-10-17\", \"Statement\": [{\"Effect\": \"Allow\", \"Action\": [\"s3:GetObject\", \"s3:PutObject\", \"s3:AbortMultipartUpload\", \"s3:DeleteObject\", \"s3:ListBucket\"], \"Resource\": [\"arn:aws:s3:::${S3_BUCKET_NAME}\", \"arn:aws:s3:::${S3_BUCKET_NAME}/*\"]}]}"
注意:如果已存在使用此名称的角色,请为该角色指定不同的名称。我们在此步骤中创建的角色专用于您的集群和 S3 存储桶。
创建集群
在此模板中,eksctl 会自动为 EKS 容器组身份、节点监控代理、CoreDNS、Kubeproxy、VPC CNI 插件创建 Kubernetes 服务账户。到目前为止,Mountpoint S3 CSI 驱动程序尚未支持 EKS 容器组身份,因此我们创建了一个服务账户 IAM 角色(IRSA)和一个 OIDC 端点。此外,我们还为 AWS 负载均衡器控制器(LBC)创建了一个服务账户。要访问 Bottlerocket 节点,eksctl 会为 Bottlerocket 自动附加 AmazonSSMManagedInstanceCore,以允许通过 SSM 进行安全的 Shell 会话。
需要注意:这里为了节省资源,使用的cpu是m7g.xlarge。
在设置环境变量的同一终端,运行以下命令块创建集群:
eksctl create cluster -f - <<EOF
---
apiVersion: eksctl.io/v1alpha5
kind: ClusterConfig
metadata:name: ${EKS_CLUSTER_NAME}region: ${AWS_REGION}version: "${K8S_VERSION}"tags:karpenter.sh/discovery: ${EKS_CLUSTER_NAME}# Add more tags if needed for billing
iam:# Creates an OIDC endpoint and IRSA service account for the Mountpoint S3 CSI Driver# Uses the S3 CSI Driver policy for permissionswithOIDC: truepodIdentityAssociations:# Creates the pod identity association and service account# Uses the Karpenter controller IAM policy for permissions- namespace: "kube-system"serviceAccountName: karpenterroleName: ${EKS_CLUSTER_NAME}-karpenterpermissionPolicyARNs:- arn:aws:iam::${AWS_ACCOUNT_ID}:policy/KarpenterControllerPolicy-${EKS_CLUSTER_NAME}# Creates the pod identity association and service account# Uses the AWS LBC policy for permissions- namespace: kube-systemserviceAccountName: aws-load-balancer-controllercreateServiceAccount: trueroleName: AmazonEKSLoadBalancerControllerRolepermissionPolicyARNs:- arn:aws:iam::${AWS_ACCOUNT_ID}:policy/AWSLoadBalancerControllerIAMPolicy
iamIdentityMappings:
- arn: "arn:aws:iam::${AWS_ACCOUNT_ID}:role/KarpenterNodeRole-${EKS_CLUSTER_NAME}"username: system:node:{{EC2PrivateDNSName}}groups:- system:bootstrappers- system:nodes
managedNodeGroups:# Creates 2 CPU nodes for lightweight system tasks- name: ${EKS_CLUSTER_NAME}-m7-cpuinstanceType: m7g.xlargeamiFamily: BottlerocketdesiredCapacity: 2minSize: 1maxSize: 10labels:role: cpu-worker
# Enable automatic Pod Identity associations for VPC CNI Driver, coreDNS, kube-proxy
addonsConfig:autoApplyPodIdentityAssociations: true
addons:# Installs the S3 CSI Driver addon and creates IAM role# Uses the S3 CSI Driver policy for IRSA permissions- name: aws-mountpoint-s3-csi-driverattachPolicyARNs:- "arn:aws:iam::${AWS_ACCOUNT_ID}:policy/S3CSIDriverPolicy"- name: eks-pod-identity-agent- name: eks-node-monitoring-agent- name: coredns- name: kube-proxy- name: vpc-cni
EOF
部署示例容器组(pod)
开始部署
cat <<EOF | envsubst | kubectl apply -f -
apiVersion: v1
kind: Pod
metadata:name: gpu-nvidia-smi
spec:restartPolicy: OnFailuretolerations:- key: "nvidia.com/gpu"operator: "Exists"effect: "NoSchedule"nodeSelector:role: gpu-worker  # Matches GPU NodePool's labelcontainers:- name: cuda-containerimage: nvidia/cuda:12.9.1-base-ubuntu20.04command: ["nvidia-smi"]resources:limits:nvidia.com/gpu: 1requests:nvidia.com/gpu: 1
EOF
预期输出应如下所示:
pod/gpu-ndivia-smi created
稍等片刻,然后检查容器组(pod)状态是否为“Pending”、“ContainerCreating”、“Running”,然后变为“Completed”:
kubectl get pod gpu-nvidia-smi -w
验证容器组(pod)的节点是否属于 GPU 节点池:
kubectl get node $(kubectl get pod gpu-nvidia-smi -o jsonpath='{.spec.nodeName}') -o custom-columns="Name:.metadata.name,Nodepool:.metadata.labels.karpenter\.sh/nodepool"
预期输出应如下所示:
Name                             Nodepool
ip-192-168-83-245.ec2.internal   gpu-a10g-inference-g5
检查容器组(pod)的日志:
kubectl logs gpu-nvidia-smi
预期输出应如下所示:
Thu Jul 17 04:31:33 2025
+---------------------------------------------------------------------------------------+
| NVIDIA-SMI 570.148.08                 Driver Version: 570.148.08         CUDA Version: 12.9 |
|-----------------------------------------+----------------------+----------------------+
| GPU  Name                 Persistence-M | Bus-Id        Disp.A | Volatile Uncorr. ECC |
| Fan  Temp   Perf          Pwr:Usage/Cap |         Memory-Usage | GPU-Util  Compute M. |
|                                         |                      |               MIG M. |
|=========================================+======================+======================|
|   0  NVIDIA A10G                    On  | 00000000:00:1E.0 Off |                    0 |
|  0%   30C    P8               9W / 300W |      0MiB / 23028MiB |      0%      Default |
|                                         |                      |                  N/A |
+---------------------------------------------------------------------------------------++---------------------------------------------------------------------------------------+
| Processes:                                                                            |
|  GPU        GI     CI        PID   Type   Process name                  GPU Memory    |
|                     ID        ID                                         Usage        |
|=======================================================================================|
|  No running processes found                                                           |
+---------------------------------------------------------------------------------------+
注意事项
- pod没有启动起来,调度失败FailedScheduling,显示如下报错
Warning FailedScheduling 12m default-scheduler 0/2 nodes are available: 2 node(s) didn't match Pod's node affinity/selector. preemption: 0/2 nodes are available: 2 Preemption is not helpful for scheduling.Warning FailedScheduling 12m (x2 over 12m) default-scheduler 0/3 nodes are available: 1 node(s) had untolerated taint {karpenter.sh/unregistered: }, 2 node(s) didn't match Pod's node affinity/selector. preemption: 0/3 nodes are available: 3 Preemption is not helpful for scheduling.Warning FailedScheduling 12m default-scheduler 0/3 nodes are available: 1 node(s) had untolerated taint {node.kubernetes.io/not-ready: }, 2 node(s) didn't match Pod's node affinity/selector. preemption: 0/3 nodes are available: 3 Preemption is not helpful for scheduling.Warning FailedScheduling 11m default-scheduler 0/3 nodes are available: 1 node(s) had untolerated taint {node.kubernetes.io/not-ready: }, 2 node(s) didn't match Pod's node affinity/selector. preemption: 0/3 nodes are available: 3 Preemption is not helpful for scheduling.Normal Scheduled 11m default-scheduler Successfully assigned default/gpu-nvidia-smi to ip-192-168-122-116.ec2.internalNormal Nominated 12m karpenter Pod should schedule on: nodeclaim/gpu-a10g-inference-g5-z9m24Normal Pulling 11m kubelet Pulling image "nvidia/cuda:12.9.1-base-ubuntu20.04"Normal Pulled 11m kubelet Successfully pulled image "nvidia/cuda:12.9.1-base-ubuntu20.04" in 3.043s (3.043s including waiting). Image size: 139021193 bytes.
不要慌,gpu资源没到尾,首先去看下gpu节点池是设置的on-demand还是spot,spot是抢占模式,去看下自己是不是设置了抢占请求。要么就是需要的gpu资源比较紧缺导致的。
镜像构建及推送
镜像本地调试
# 查看镜像
docker images
lora-scripts                          latest        3549af81cb97   4 days ago      21.1GB# 启动镜像(端口映射, 便于本地调试,挂载本地文件,保证输入输出)
docker run -it -p 28000:28000  --gpus all -v /roo*ode/lora-scripts:/app/lora-scripts lora-scripts:latest# 进入镜像,处理问题
docker ps
docker exec -it 275815fb(容器id) bash
容器转镜像并上传ecr
参考上一篇博客https://blog.csdn.net/weixin_41973200/article/details/140899450?spm=1001.2014.3001.5502
docker commit 275815fb976b 905417995393.dkr.ecr.us-east-1.amazonaws.com/lora-scripts:250831REPOSITORY                                                  TAG           IMAGE ID       CREATED         SIZE
905417995393.dkr.ecr.us-east-1.amazonaws.com/lora-scripts   250831        998d813b62b8   3 minutes ago   22.7GB# ecr创建存储
aws ecr create-repository --repository-name lora-scripts --region ${AWS_REGION}# 上传ekr
docker push 905417995393.dkr.ecr.us-east-1.amazonaws.com/lora-scripts:250831
容器需要挂载的信息上传到s3中
准备工作
开始之前,请检查 Kubernetes 服务账户的权限:
kubectl get serviceaccount s3-csi-driver-sa -n kube-system -o yamlapiVersion: v1
kind: ServiceAccount
metadata:annotations:eks.amazonaws.com/role-arn: arn:aws:iam::143095308808:role/eksctl-eks-rt-inference-us-east-1-addon-aws-m-Role1-fpXXjRYdKN8rcreationTimestamp: "2025-07-17T03:55:29Z"labels:app.kubernetes.io/component: csi-driverapp.kubernetes.io/instance: aws-mountpoint-s3-csi-driverapp.kubernetes.io/managed-by: EKSapp.kubernetes.io/name: aws-mountpoint-s3-csi-drivername: s3-csi-driver-sanamespace: kube-systemresourceVersion: "2278"uid: 50b36272-6716-4c68-bdc3-c4054df1177c
添加容忍
S3 CSI 驱动程序作为 DaemonSet 在所有节点上运行。容器组(pod)使用这些节点上的 CSI 驱动程序来挂载 S3 卷。要允许其在有污点的 GPU 节点上进行调度,请向 DaemonSet 添加容忍:
kubectl patch daemonset s3-csi-node -n kube-system --type='json' -p='[{"op": "add", "path": "/spec/template/spec/tolerations/-", "value": {"key": "nvidia.com/gpu", "operator": "Exists", "effect": "NoSchedule"}}]'
# 预期输出应如下所示:
daemonset.apps/s3-csi-node patched
创建s3
在此步骤中,您将创建一个 Amazon S3 存储桶,从 NVIDIA GPU Cloud(NGC)下载 GPUNet-0 模型权重,然后将其上传到存储桶。我们的应用程序将在运行时访问这些权重以进行推理。创建您的 Amazon S3 存储桶:
aws s3 mb s3://${S3_BUCKET_NAME} --region ${AWS_REGION}
为存储桶启用 S3 版本控制,以防止意外删除和覆盖导致即使和永久的数据丢失:
aws s3api put-bucket-versioning --bucket ${S3_BUCKET_NAME} --versioning-configuration Status=Enabled
对存储桶应用生命周期规则,以便在覆盖或删除的对象版本变为非最新版本 14 天后将其移除,移除过期的删除标记,并在 7 天后移除未完成的分段上传。要了解更多信息,请参阅 S3 生命周期配置的示例。
aws s3api put-bucket-lifecycle-configuration --bucket $S3_BUCKET_NAME --lifecycle-configuration '{"Rules":[{"ID":"LifecycleRule","Status":"Enabled","Filter":{},"Expiration":{"ExpiredObjectDeleteMarker":true},"NoncurrentVersionExpiration":{"NoncurrentDays":14},"AbortIncompleteMultipartUpload":{"DaysAfterInitiation":7}}]}'
上传s3
本地文件上传
mv ~/downloads/gpunet_0_pyt_ckpt_v21.12.0_amp/0.65ms.pth.tar gpunet-0.pth
在 AWS CLI 中启用 AWS 通用运行时以优化 S3 吞吐量:
aws configure set s3.preferred_transfer_client crt
将模型权重上传到 S3 存储桶:
aws s3 cp gpunet-0.pth s3://${S3_BUCKET_NAME}/gpunet-0.pth
预期输出应如下所示:
upload: ./gpunet-0.pth to s3://eks-rt-inference-models-us-east-1-1752722786/gpunet-0.pth
本地文件夹上传
aws s3 cp /root/duanran/code/lora-scripts s3://eks-rt-inference-models-us-east-1-1756438847/lora-scripts --recursive
通过挂载到本地磁盘,快速随意上传
参考:https://www.scaleway.com/en/docs/tutorials/object-storage-s3fs/
# echo ACCESS_KEY:SECRET_KEY > $HOME/.passwd-s3fs
echo AKIA****vz+nCjkYjR/e***Gfzl > $HOME/.passwd-s3fschmod 600 $HOME/.passwd-s3fs# mkdir -p /path/to/mountpoint
mkdir -p /project_data_backup# s3fs BUCKET_NAME /path/to/mountpoint \
# -o allow_other \
# -o passwd_file=$HOME/.passwd-s3fs \
# -o use_path_request_style \
# -o endpoint=fr-par \
# -o parallel_count=15 \
# -o multipart_size=128 \
# -o nocopyapi \
# -o url=https://s3.fr-par.scw.cloud
# Replace:
# BUCKET_NAME: Your bucket name.
# /path/to/mountpoint: Path to mount the bucket.
# fr-par: Replace with your bucket's region (nl-ams, pl-waw).
# s3.fr-par.scw.cloud: Replace with the endpoint URL matching the region of your bucket.s3fs eks-rt-inference-models-us-east-1-1756438847 /project_data_backup \
-o passwd_file=$HOME/.passwd-s3fs \
-o url="https://s3.fr-par.scw.cloud"
eks服务启用
利用kaepenter创建gpu调度节点池
实现作用:
1.设置gpu的类型,和模式(抢占或者按需),on-demand比较贵,但是比较好拿到,spot比较便宜,但是不好拿到
2.设置本地存储,解决因磁盘空间不够拉取存储的问题。karpenter.k8s.aws/instance-local-nvme
# 设置gpu节点池(并确保可以有一定的存储)
https://github.com/aws/karpenter-provider-aws/blob/main/examples/v1/instance-store-ephemeral-storage.yamlcat <<EOF | envsubst | kubectl apply -f -
apiVersion: karpenter.sh/v1
kind: NodePool
metadata:name: gpu-a10g-inference-g5
spec:template:metadata:labels:role: gpu-workergpu-type: nvidia-a10gspec:requirements:- key: node.kubernetes.io/instance-typeoperator: Invalues: ["g5.xlarge","g5.2xlarge"]- key: "karpenter.sh/capacity-type"operator: Invalues: ["on-demand"]- key: karpenter.k8s.aws/instance-local-nvmeoperator: Gtvalues: ["100"]taints:- key: nvidia.com/gpuvalue: "true"effect: NoSchedulenodeClassRef:name: gpu-a10g-inference-ec2group: karpenter.k8s.awskind: EC2NodeClassexpireAfter: 720hlimits:cpu: "80"memory: "320Gi"nvidia.com/gpu: "10"disruption:consolidationPolicy: WhenEmptyconsolidateAfter: 30m
---
apiVersion: karpenter.k8s.aws/v1
kind: EC2NodeClass
metadata:name: gpu-a10g-inference-ec2
spec:instanceStorePolicy: "RAID0"  amiFamily: BottlerocketamiSelectorTerms:- id: ${NVIDIA_BOTTLEROCKET_AMI}role: "KarpenterNodeRole-${EKS_CLUSTER_NAME}"subnetSelectorTerms:- tags:karpenter.sh/discovery: "${EKS_CLUSTER_NAME}"securityGroupSelectorTerms:- tags:karpenter.sh/discovery: "${EKS_CLUSTER_NAME}"tags:nvidia.com/gpu: "true"
EOF
设置deployment启动服务并挂在磁盘
详见:https://docs.aws.amazon.com/zh_cn/zh_cn/eks/latest/userguide/ml-realtime-inference-cluster.html#_7_optional_expose_the_model_service
创建pv
cat <<EOF | envsubst | kubectl apply -f -
apiVersion: v1
kind: PersistentVolume
metadata:name: s3-model-pv
spec:capacity:storage: 5Gi  # Ignored by the driver; can be any valueaccessModes:- ReadOnlyMany  # Read onlypersistentVolumeReclaimPolicy: RetainstorageClassName: ""  # Required for static provisioningclaimRef:namespace: default  # Adjust if you prefer a different namespacename: s3-model-pvcmountOptions:- allow-other  # Enables multi-user access (useful for non-root pods)- region ${AWS_REGION} # Optional, include if your bucket is in a different region than the clustercsi:driver: s3.csi.aws.comvolumeHandle: gpunet-model-volume  # Must be unique across all PVsvolumeAttributes:bucketName: ${S3_BUCKET_NAME}
EOF
创建pvc
cat <<EOF | envsubst | kubectl apply -f -
apiVersion: v1
kind: PersistentVolume
metadata:name: s3-model-pv
spec:capacity:storage: 5Gi  # Ignored by the driver; can be any valueaccessModes:- ReadOnlyMany  # Read onlypersistentVolumeReclaimPolicy: RetainstorageClassName: ""  # Required for static provisioningclaimRef:namespace: default  # Adjust if you prefer a different namespacename: s3-model-pvcmountOptions:- allow-other  # Enables multi-user access (useful for non-root pods)- region ${AWS_REGION} # Optional, include if your bucket is in a different region than the clustercsi:driver: s3.csi.aws.comvolumeHandle: gpunet-model-volume  # Must be unique across all PVsvolumeAttributes:bucketName: ${S3_BUCKET_NAME}
EOF
创建服务
# 测试deployment进入容器是否可以
cat <<EOF | envsubst | kubectl apply -f -
apiVersion: apps/v1
kind: Deployment
metadata:name: lora-scripts
spec:replicas: 1selector:matchLabels:app: lora-scriptstemplate:metadata:labels:app: lora-scriptsspec:tolerations:- key: "nvidia.com/gpu"operator: "Exists"effect: "NoSchedule"nodeSelector:role: gpu-workercontainers:- name: inferenceimage: 905417995393.dkr.ecr.us-east-1.amazonaws.com/lora-scripts:250831ports:- containerPort: 28000command: ["/bin/bash", "-c"] args: ["cd lora-scripts; sh run_gui.sh;"]resources:limits:nvidia.com/gpu: 1requests:nvidia.com/gpu: 1volumeMounts:- name: model-volumemountPath: /app/lora-scriptsreadOnly: truevolumes:- name: model-volumepersistentVolumeClaim:claimName: s3-model-pvc
EOF
# 查看状态
kubectl get pods -l app=lora-scripts
NAME                           READY   STATUS    RESTARTS   AGE
lora-scripts-68dd9455b-5x5jv   1/1     Running   0          25s# 进入pod容器中调试
kubectl exec -it gpunet-inference-app-cb557f887-srg44 -- /bin/bash
创建网络出口
- 使用 Ingress 和负载均衡器公开服务
cat <<EOF | envsubst | kubectl apply -f -
apiVersion: v1
kind: Service
metadata:name: lora-scripts-service
spec:type: ClusterIPports:- port: 80targetPort: 28000selector:app: lora-scripts
EOF
创建 Ingress 资源,通过 AWS LBC 预置面向互联网的应用程序负载均衡器(ALB),将外部流量路由到推理服务:
cat <<EOF | envsubst | kubectl apply -f -
apiVersion: networking.k8s.io/v1
kind: Ingress
metadata:name: lora-scripts-ingressannotations:alb.ingress.kubernetes.io/scheme: internet-facingalb.ingress.kubernetes.io/target-type: ip
spec:ingressClassName: albrules:- http:paths:- path: /pathType: Prefixbackend:service:name: lora-scripts-serviceport:number: 80
EOF
等待几分钟,以便应用程序负载均衡器(ALB)完成预置。监控 Ingress 资源状态,确认 ALB 已完成预置:
kubectl get ingress lora-scripts-ingress
# 预期的输出应如下所示(已填充 ADDRESS 字段):
NAME                   CLASS   HOSTS   ADDRESS                                         PORTS   AGE
gpunet-model-ingress   alb     *       k8s-default-gpunetmo-183de3f819-516310036.us-east-1.elb.amazonaws.com   80      6m58s
# 从 Ingress 状态中提取并导出 ALB 主机名,以供后续测试使用:
export ALB_HOSTNAME=$(kubectl get ingress lora-scripts-ingress -o jsonpath='{.status.loadBalancer.ingress[0].hostname}')
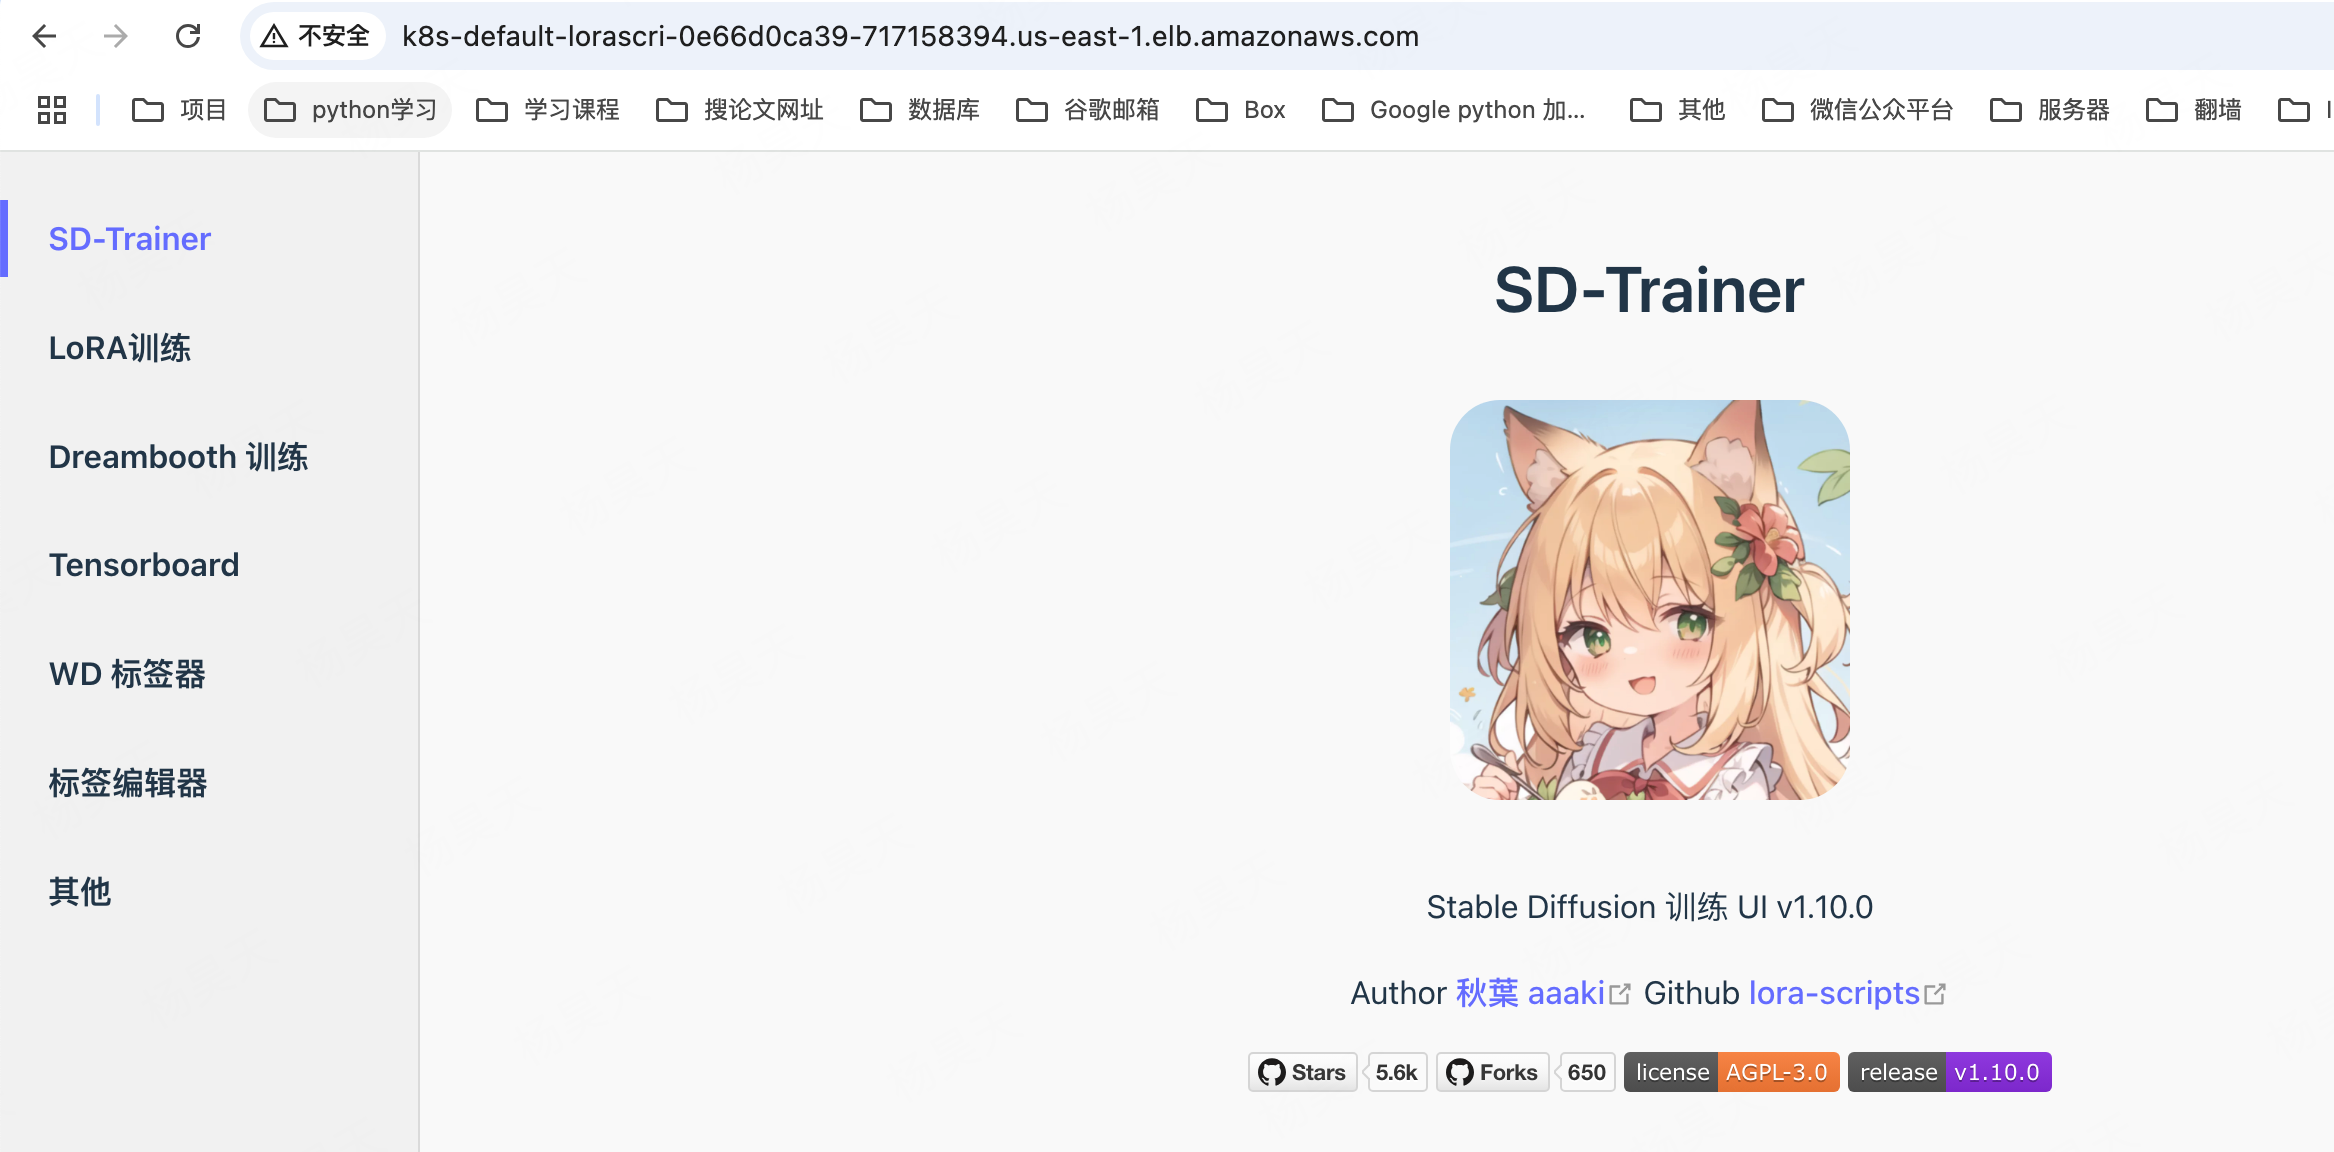
测试模型服务
测试服务是否可以打开
浏览器输入url:k8s-default-lorascri-0e66d0ca39-717158394.us-east-1.elb.amazonaws.com
服务如何增加pod或者减少pod观察是否可以自动扩缩节点
接下来我们增加Pod数量以便触发节点扩容:
kubectl scale deployment lora-scripts --replicas 2
通过查询 Karpenter Controller 的日志我们可以看到扩容时的具体运行逻辑:
kubectl logs -f -n kube-system -l app.kubernetes.io/name=karpenter -c controller
由于每个Pod需求一块GPU卡,因此新增的1个Pod无法在原来的G4实例上创建而处于Pending状态。这时候Karpenter会汇总这1个Pod的资源需求,并判断使用哪种(或多种)类型的实例更加合适。结合我们前面的Provisioner的配置,Karpenter会自动额外创建1个g5.xlarge的On-Demand实例来运行这1个Pod。针对On-Demand实例,Provisioner会自动选择价格最低的可以满足需求的实例。
在实例创建出来后,Karpenter会立即将Pod绑定到相对应的节点,因此在节点启动后Pod即可开始拉取镜像等动作。传统使用托管节点组+Cluster AutoScaler的方式,需要等到节点处于Ready状态后 Kubernetes Scheduler 才会将 Pod 调度至目标节点并开始创建动作,相比之下 Karpenter 会更加高效。
接着我们删除所有的Pod,观察Karpenter如何处理节点缩容的场景.
运维及调试### kubectl常用运维命令
详见:https://cloud.tencent.com/developer/article/1140076
[root@master1 ~]# kubectl --helpkubectl --version
Kubernetes v1.5.2[[email protected] ~]# kubectl get po        //查看所有的pods
NAME        READY     STATUS    RESTARTS   AGE
pod-redis   1/1       Running   0          24s
[[email protected] ~]# kubectl get nodes     //查看所有的nodes
NAME      STATUS    AGE
node1     Ready     2d
node2     Ready     2d
[[email protected] ~]# kubectl get pods -o wide      //查看所有的pods更详细些
NAME        READY     STATUS    RESTARTS   AGE       IP         NODE
pod-redis   1/1       Running   0          1m        10.0.8.2   node1
[[email protected] ~]# kubectl get nodes -o wide
NAME      STATUS    AGE       EXTERNAL-IP
node1     Ready     2d        <none>
node2     Ready     2d        <none>
[[email protected] ~]# kubectl get po --all-namespaces       //查看所有的namespace
NAMESPACE     NAME                        READY     STATUS             RESTARTS   AGE
default       pod-redis                   1/1       Running            0          6m
karpenter调用gpu失败
kubectl logs -f -n kube-system -l app.kubernetes.io/name=karpenter -c controller
{"level":"ERROR","time":"2025-08-29T06:10:29.331Z","logger":"controller","message":"Reconciler error","commit":"9458bb5","controller":"nodeclaim.lifecycle","controllerGroup":"karpenter.sh","controllerKind":"NodeClaim","NodeClaim":{"name":"gpu-a10g-inference-g5-z9m24"},"namespace":"","name":"gpu-a10g-inference-g5-z9m24","reconcileID":"4b39b952-78b3-4b5f-baef-298e3aad1714","aws-error-code":"UnfulfillableCapacity","aws-operation-name":"CreateFleet","aws-request-id":"82ac36b4-6d12-45c2-9743-b167989681e2","aws-service-name":"EC2","aws-status-code":200,"error":"launching nodeclaim, creating instance, creating nodeclaim, InvalidParameter: Security group sg-0036d4f7baea6cb79 and subnet subnet-0a02bb9806e30a83d belong to different networks. (aws-error-code=UnfulfillableCapacity, aws-operation-name=CreateFleet, aws-request-id=82ac36b4-6d12-45c2-9743-b167989681e2, aws-service-name=EC2, aws-status-code=200)"}
{"level":"ERROR","time":"2025-08-29T06:10:31.404Z","logger":"controller","message":"failed launching nodeclaim","commit":"9458bb5","controller":"nodeclaim.lifecycle","controllerGroup":"karpenter.sh","controllerKind":"NodeClaim","NodeClaim":{"name":"gpu-a10g-inference-g5-z9m24"},"namespace":"","name":"gpu-a10g-inference-g5-z9m24","reconcileID":"426a48ef-bfe5-413b-8be9-8d781409b618","aws-error-code":"UnfulfillableCapacity","aws-operation-name":"CreateFleet","aws-request-id":"e00dcddc-5a13-4351-98df-e0457882fdc1","aws-service-name":"EC2","aws-status-code":200,"error":"creating instance, insufficient capacity, with fleet error(s), MaxSpotInstanceCountExceeded: Max spot instance count exceeded (aws-error-code=UnfulfillableCapacity, aws-operation-name=CreateFleet, aws-request-id=e00dcddc-5a13-4351-98df-e0457882fdc1, aws-service-name=EC2, aws-status-code=200)"}
参考:https://github.com/aws/karpenter-provider-aws/blob/main/examples/v1/instance-store-ephemeral-storage.yaml
利用提供的方案,创建本地临时存储,确保每次都可以打开
s3 bucket作为的pv pvs挂载eks失败
原理:iam权限不足
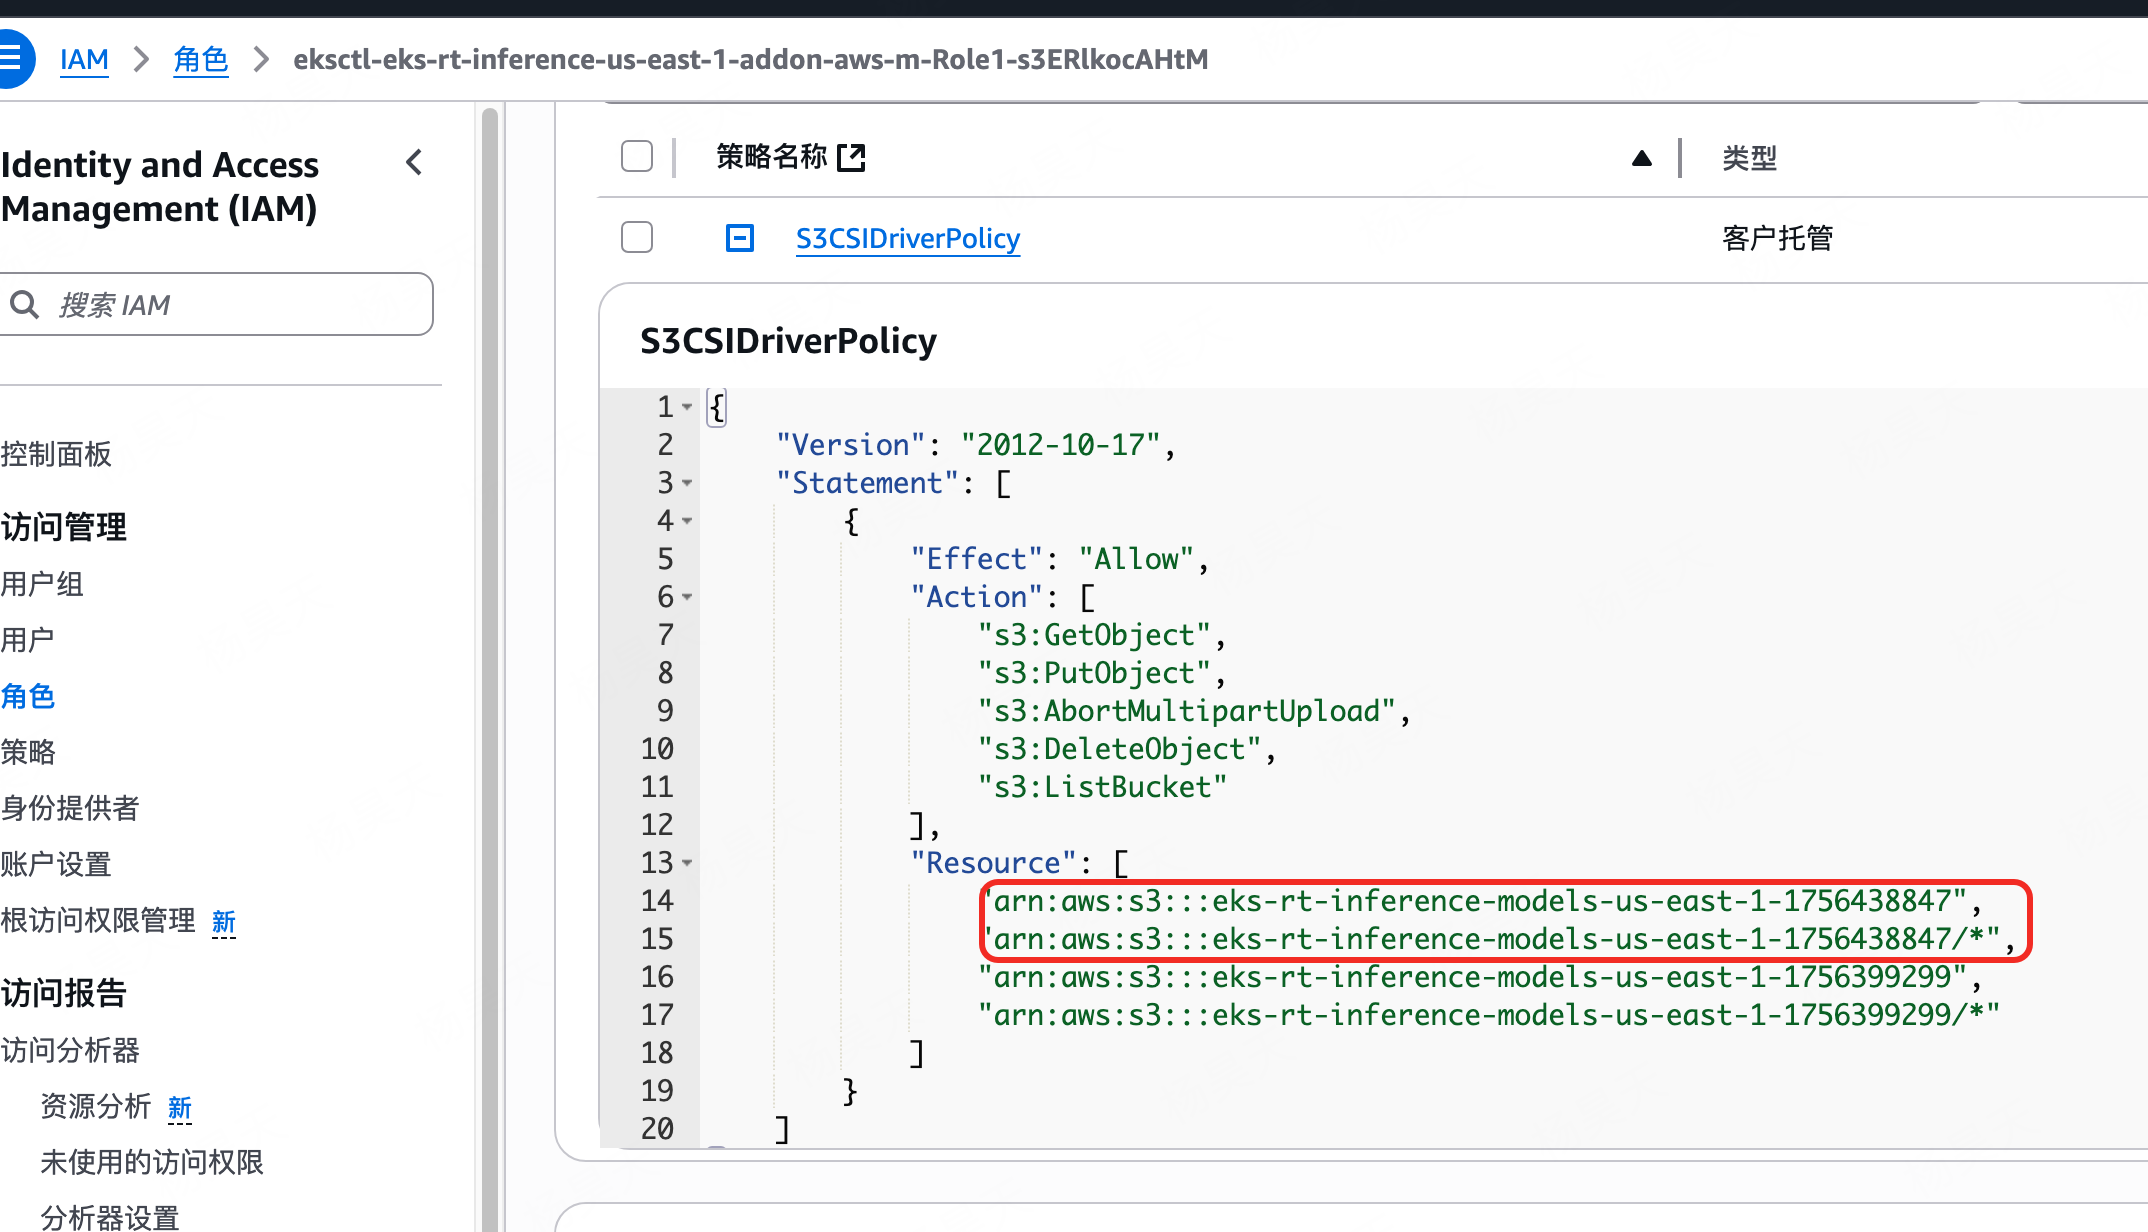
Normal Scheduled 41s default-scheduler Successfully assigned default/gpunet-inference-app-67d98c7645-52tmc to ip-192-168-122-116.ec2.internalWarning FailedMount 41s kubelet MountVolume.SetUp failed for volume "s3-model-pv" : rpc error: code = Internal desc = Could not mount "eks-rt-inference-models-us-east-1-1756438847" at "/var/lib/kubelet/pods/8f48de4d-8969-4512-880f-f2368b3f9ed7/volumes/kubernetes.io~csi/s3-model-pv/mount": Mount failed: Failed to start service output: Error: Failed to create S3 client Caused by: 0: initial ListObjectsV2 failed for bucket eks-rt-inference-models-us-east-1-1756438847 in region us-east-1 1: Client error 2: Forbidden: User: arn:aws:sts::905417995393:assumed-role/eksctl-eks-rt-inference-us-east-1-addon-aws-m-Role1-s3ERlkocAHtM/ca0f3d96-6cf2-a973-deb2-703739456a86 is not authorized to perform: s3:ListBucket on resource: "arn:aws:s3:::eks-rt-inference-models-us-east-1-1756438847" because no identity-based policy allows the s3:ListBucket action Error: Failed to create mount process
问题分析:
1.报错里提到的eks-rt-inference-models-us-east-1-1756438847是s3的名字
2.报错里提到的arn:aws:sts::905417995393:assumed-role/eksctl-eks-rt-inference-us-east-1-addon-aws-m-Role1-s3ERlkocAHtM/ca0f3d96-6cf2-a973-deb2-703739456a86是角色,去角色里查看发现存储桶的关系没有对上,于是我们加上
这里分析下为什么没有加上的原因,export S3_BUCKET_NAME="eks-rt-inference-models-${AWS_REGION}-$(date +%s)"最初在这里命名,
后来在这里的时候又重新运行了下export S3_BUCKET_NAME="eks-rt-inference-models-${AWS_REGION}-$(date +%s)"导致结果和之前的不一样
aws iam create-policy \--policy-name S3CSIDriverPolicy \--policy-document "{\"Version\": \"2012-10-17\", \"Statement\": [{\"Effect\": \"Allow\", \"Action\": [\"s3:GetObject\", \"s3:PutObject\", \"s3:AbortMultipartUpload\", \"s3:DeleteObject\", \"s3:ListBucket\"], \"Resource\": [\"arn:aws:s3:::${S3_BUCKET_NAME}\", \"arn:aws:s3:::${S3_BUCKET_NAME}/*\"]}]}"
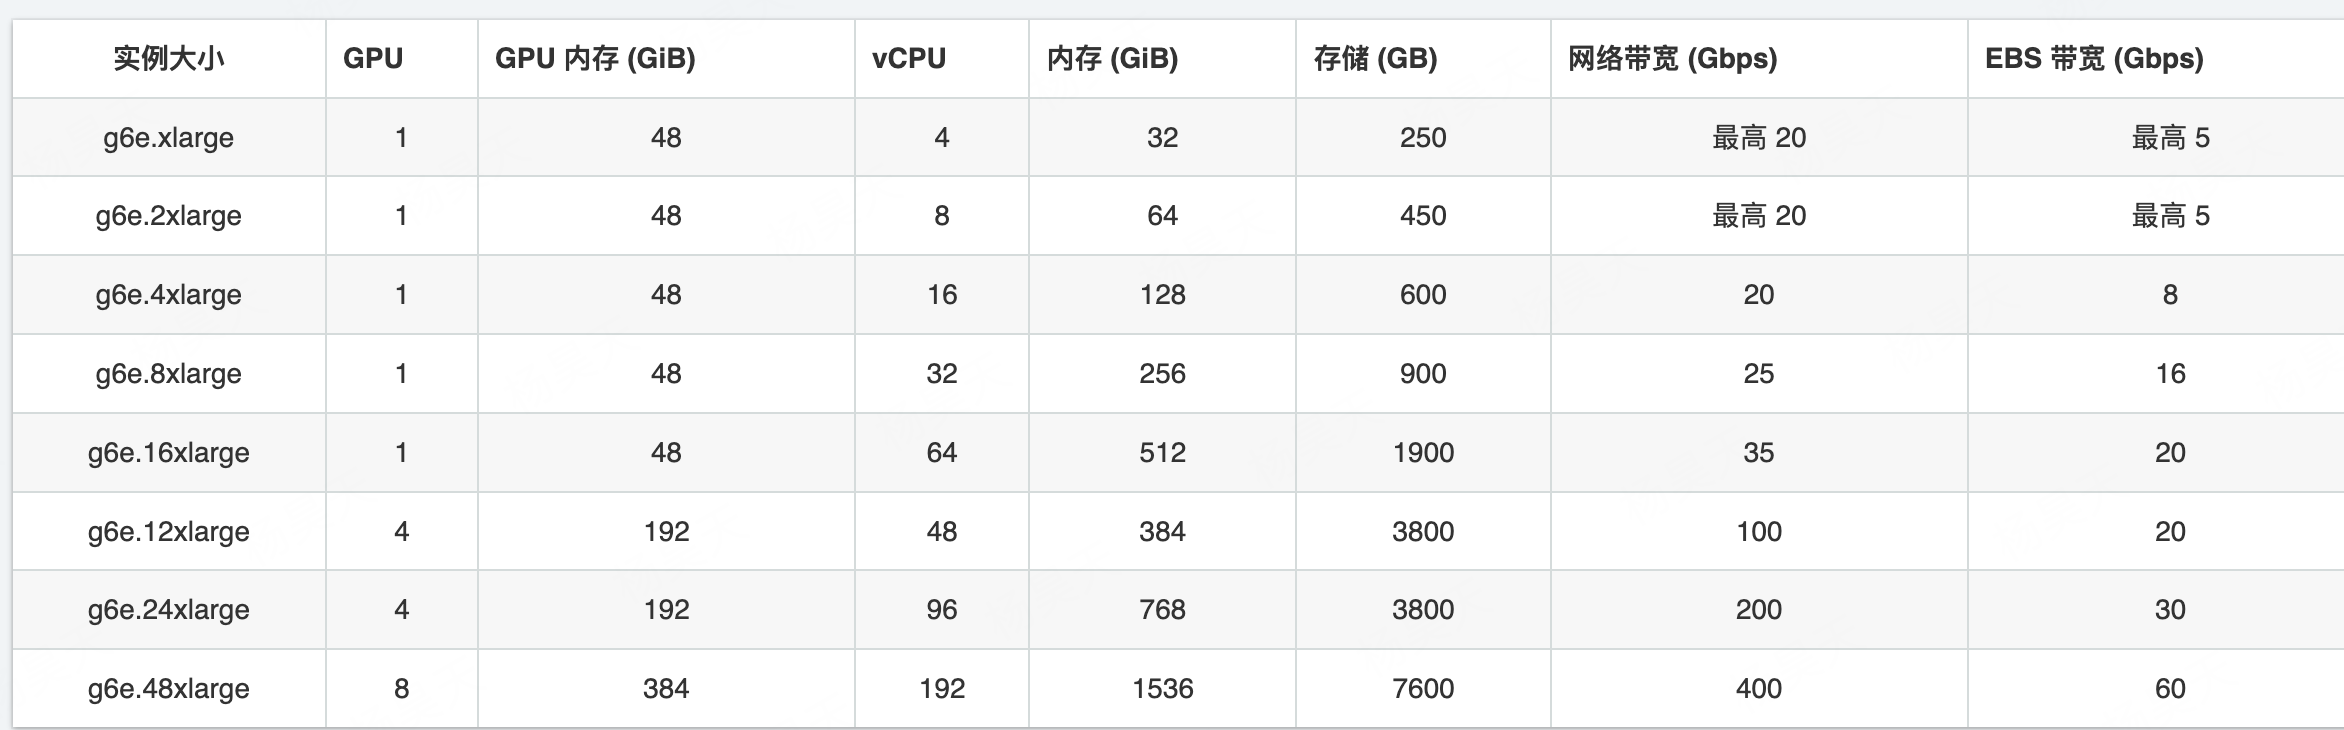
镜像过大,拉取镜像显示内存不足
Failed to pull image "905417995393.dkr.ecr.us-east-1.amazonaws.com/kohya_ss:latest": failed to pull and unpack image "905417995393.dkr.ecr.us-east-1.amazonaws.com/kohya_ss:latest": failed to copy: write /var/lib/containerd/io.containerd.content.v1.content/ingest/196745c524c4fe85bcf37fd14b93983230e3b000123a28fe9d0f2c1ade85fc44/data: no space left on device
解决方案:
1.最笨的方案,选择存储大的gpu 比如g6e.xlarge https://aws.amazon.com/cn/ec2/instance-types/g6e/
调试脚本
1.进入pod容器中进行调试
随便创建个挂载s3的进入
cat <<EOF | envsubst | kubectl apply -f -
apiVersion: apps/v1
kind: Deployment
metadata:name: gpunet-inference-app
spec:replicas: 1selector:matchLabels:app: gpunet-inference-apptemplate:metadata:labels:app: gpunet-inference-appspec:tolerations:- key: "nvidia.com/gpu"operator: "Exists"effect: "NoSchedule"nodeSelector:role: gpu-workercontainers:- name: inferenceimage: nvidia/cuda:12.9.1-base-ubuntu20.04# 方法1 command: ["sleep", "99999"]# 方法2command: ["/bin/bash", "-c"] args: ["while true; do sleep infinity; done;"] resources:limits:nvidia.com/gpu: 1requests:nvidia.com/gpu: 1volumeMounts:- name: model-volumemountPath: /modelsreadOnly: truevolumes:- name: model-volumepersistentVolumeClaim:claimName: s3-model-pvc
EOF
# 查看pod信息
kubectl get pod
NAME                                   READY   STATUS    RESTARTS   AGE
gpunet-inference-app-cb557f887-srg44   1/1     Running   0          3m40s
# 进入pod容器中
kubectl exec -it gpunet-inference-app-cb557f887-srg44 -- /bin/bash