【OpenGL】LearnOpenGL学习笔记17 - Cubemap、Skybox、环境映射(反射、折射)
上接:https://blog.csdn.net/weixin_44506615/article/details/150935025?spm=1001.2014.3001.5501
完整代码:https://gitee.com/Duo1J/learn-open-gl | https://github.com/Duo1J/LearnOpenGL
一、立方体贴图 (Cubemap)
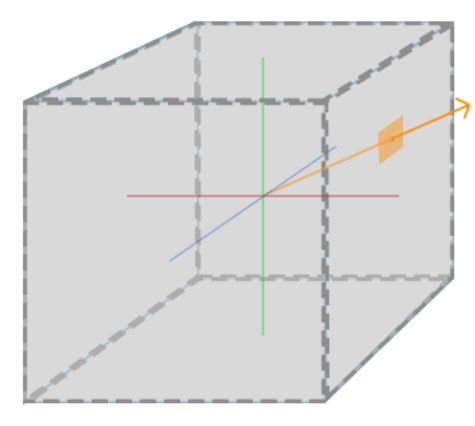
立方体贴图就是一个包含了6张2D纹理的纹理,不同于2D纹理使用UV来采样,我们使用一个方向向量来对Cubemap进行采样,如下图所示 (图片来自于LearnOpenGL)
创建Cubemap
unsigned int cubemapID;
glGenTextures(1, &cubemapID);
glBindTexture(GL_TEXTURE_CUBE_MAP, cubemapID);
要绑定纹理数据,之前我们使用 glTexImage2D ,对于Cubemap我们则需要调用6次
// faces: Cubemap纹理路径数组
for (unsigned int i = 0; i < faces.size(); i++)
{const char* path = faces[i].c_str();unsigned char* data = stbi_load(path, &width, &height, &channel, 0);if (data){glTexImage2D(GL_TEXTURE_CUBE_MAP_POSITIVE_X + i, 0, GL_RGB, width, height, 0, GL_RGB, GL_UNSIGNED_BYTE, data);stbi_image_free(data);std::cout << "Load cubmap(" << GL_TEXTURE_CUBE_MAP_POSITIVE_X + i << "): " << path << " success, with: " << width << " height: " << height << " channel: " << channel << " ID: " << textureID << std::endl;}else{std::cout << "[Error] Failed to load cubemap: " << path << std::endl;}
}
这里第一位参数我们在2D纹理中传入的是 GL_TEXTURE_2D
对于Cubemap我们则需要通过这个参数来表明它是哪一个面的纹理,如下表所示
| 目标 | 方向 | 枚举值 |
|---|---|---|
| GL_TEXTURE_CUBE_MAP_POSITIVE_X | 右 | 0x8515 |
| GL_TEXTURE_CUBE_MAP_NEGATIVE_X | 左 | 0x8516 |
| GL_TEXTURE_CUBE_MAP_POSITIVE_Y | 上 | 0x8517 |
| GL_TEXTURE_CUBE_MAP_NEGATIVE_Y | 下 | 0x8518 |
| GL_TEXTURE_CUBE_MAP_POSITIVE_Z | 后 | 0x8519 |
| GL_TEXTURE_CUBE_MAP_NEGATIVE_Z | 前 | 0x851A |
由于枚举值连续,所以我们在设置 faces 的时候边可以按 右左上下前后 的顺序传入
接下来我们来包装一个立方体纹理类来管理Cubemap
TextureCube.h 新建
#pragma once#include <iostream>
#include <vector>#include <glad/glad.h>
#include <GLFW/glfw3.h>
#include "stb_image.h"class TextureCube
{
public:explicit TextureCube(std::vector<std::string> faces);/*** 获取纹理ID*/unsigned int GetTextureID();private:/*** 纹理ID*/unsigned int textureID = 0;/*** 六面路径* 顺序 Right - Left - Top - Bottom - Front - Back*/std::vector<std::string> faces;/*** 加载*/void LoadCubemap();
};
TextureCube.cpp 新建
#include "TextureCube.h"TextureCube::TextureCube(std::vector<std::string> faces)
{this->faces = faces;LoadCubemap();
}void TextureCube::LoadCubemap()
{glGenTextures(1, &textureID);glBindTexture(GL_TEXTURE_CUBE_MAP, textureID);stbi_set_flip_vertically_on_load(false);int width, height, channel;for (unsigned int i = 0; i < faces.size(); i++){const char* path = faces[i].c_str();unsigned char* data = stbi_load(path, &width, &height, &channel, 0);if (data){glTexImage2D(GL_TEXTURE_CUBE_MAP_POSITIVE_X + i, 0, GL_RGB, width, height, 0, GL_RGB, GL_UNSIGNED_BYTE, data);stbi_image_free(data);std::cout << "Load cubmap(" << GL_TEXTURE_CUBE_MAP_POSITIVE_X + i << "): " << path << " success, with: " << width << " height: " << height << " channel: " << channel << " ID: " << textureID << std::endl;}else{std::cout << "[Error] Failed to load cubemap: " << path << std::endl;}}stbi_set_flip_vertically_on_load(true);glTexParameteri(GL_TEXTURE_CUBE_MAP, GL_TEXTURE_MIN_FILTER, GL_LINEAR);glTexParameteri(GL_TEXTURE_CUBE_MAP, GL_TEXTURE_MAG_FILTER, GL_LINEAR);glTexParameteri(GL_TEXTURE_CUBE_MAP, GL_TEXTURE_WRAP_S, GL_CLAMP_TO_EDGE);glTexParameteri(GL_TEXTURE_CUBE_MAP, GL_TEXTURE_WRAP_T, GL_CLAMP_TO_EDGE);glTexParameteri(GL_TEXTURE_CUBE_MAP, GL_TEXTURE_WRAP_R, GL_CLAMP_TO_EDGE);
}unsigned int TextureCube::GetTextureID()
{return textureID;
}
二、天空盒
接下来我们应用Cubemap来创建一个天空盒,天空盒就是一个包围场景的大立方体
首先我们可以在这里或是顶部git仓库中的 Resource/skybox 目录中获取到天空盒资源
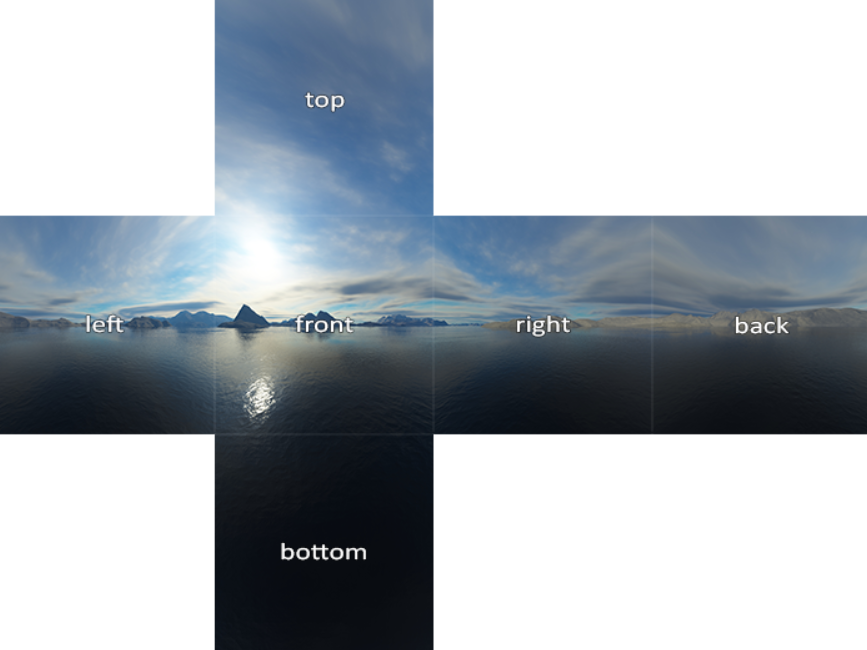
接着定义天空盒Cube的顶点数据以及天空盒纹理的路径
Main.cpp
// 天空盒纹理
std::vector<std::string> skyboxFaces
{"F:/Scripts/Cpp/LearnOpenGL/learn-open-gl/Resource/skybox/T_Right.jpg","F:/Scripts/Cpp/LearnOpenGL/learn-open-gl/Resource/skybox/T_Left.jpg","F:/Scripts/Cpp/LearnOpenGL/learn-open-gl/Resource/skybox/T_Top.jpg","F:/Scripts/Cpp/LearnOpenGL/learn-open-gl/Resource/skybox/T_Bottom.jpg","F:/Scripts/Cpp/LearnOpenGL/learn-open-gl/Resource/skybox/T_Front.jpg","F:/Scripts/Cpp/LearnOpenGL/learn-open-gl/Resource/skybox/T_Back.jpg"
};// 天空盒Cube顶点
float skyboxVertices[] = {// positions          -1.0f,  1.0f, -1.0f,-1.0f, -1.0f, -1.0f,1.0f, -1.0f, -1.0f,1.0f, -1.0f, -1.0f,1.0f,  1.0f, -1.0f,-1.0f,  1.0f, -1.0f,-1.0f, -1.0f,  1.0f,-1.0f, -1.0f, -1.0f,-1.0f,  1.0f, -1.0f,-1.0f,  1.0f, -1.0f,-1.0f,  1.0f,  1.0f,-1.0f, -1.0f,  1.0f,1.0f, -1.0f, -1.0f,1.0f, -1.0f,  1.0f,1.0f,  1.0f,  1.0f,1.0f,  1.0f,  1.0f,1.0f,  1.0f, -1.0f,1.0f, -1.0f, -1.0f,-1.0f, -1.0f,  1.0f,-1.0f,  1.0f,  1.0f,1.0f,  1.0f,  1.0f,1.0f,  1.0f,  1.0f,1.0f, -1.0f,  1.0f,-1.0f, -1.0f,  1.0f,-1.0f,  1.0f, -1.0f,1.0f,  1.0f, -1.0f,1.0f,  1.0f,  1.0f,1.0f,  1.0f,  1.0f,-1.0f,  1.0f,  1.0f,-1.0f,  1.0f, -1.0f,-1.0f, -1.0f, -1.0f,-1.0f, -1.0f,  1.0f,1.0f, -1.0f, -1.0f,1.0f, -1.0f, -1.0f,-1.0f, -1.0f,  1.0f,1.0f, -1.0f,  1.0f
};
然后编写天空盒的顶点和片段着色器
SkyboxVertex.glsl 新建
这里我们使用了pos.xyww来作为顶点着色器的输出,之后在透视除法时,z分量会w / w = 1,表示深度值为1,以便后续利用深度缓冲优化天空盒的绘制 (除此之外我们可以把天空盒放在第一个绘制,并禁用深度写入来达到一样的效果,但是性能会劣于以上方法)
#version 330 corelayout (location = 0) in vec3 aPos;out vec3 Direction;uniform mat4 projection;
uniform mat4 view;void main()
{Direction = aPos;vec4 pos = projection * view * vec4(aPos, 1.0);gl_Position = pos.xyww;
}
SkyboxFragment.glsl 新建
直接用方向向量对天空盒Cubemap进行采样
#version 330 coreout vec4 FragColor;in vec3 Direction;uniform samplerCube skybox;void main()
{FragColor = texture(skybox, Direction);
}
接着准备绘制天空盒
Main.cpp
// 天空盒缓冲
unsigned int skyboxVAO, skyboxVBO;
glGenVertexArrays(1, &skyboxVAO);
glGenBuffers(1, &skyboxVBO);
glBindVertexArray(skyboxVAO);
glBindBuffer(GL_ARRAY_BUFFER, skyboxVBO);
glBufferData(GL_ARRAY_BUFFER, sizeof(skyboxVertices), &skyboxVertices, GL_STATIC_DRAW);
glEnableVertexAttribArray(0);
glVertexAttribPointer(0, 3, GL_FLOAT, GL_FALSE, 3 * sizeof(float), (void*)0);// 天空盒Cubemap
TextureCube skyboxCubemap(skyboxFaces);// 天空盒Shader
Shader skyboxShader("Shader/SkyboxVertex.glsl", "Shader/SkyboxFragment.glsl");// 主循环
// 绘制不透明物体// 绘制天空盒
// 注意要设置为小于等于,因为天空盒深度为1
glDepthFunc(GL_LEQUAL);
skyboxShader.Use();
// 天空盒是固定的,去掉位移
skyboxShader.SetMat4("view", glm::mat4(glm::mat3(view)));
skyboxShader.SetMat4("projection", projection);
skyboxShader.SetInt("skybox", 0);
glBindVertexArray(skyboxVAO);
glActiveTexture(GL_TEXTURE0);
glBindTexture(GL_TEXTURE_CUBE_MAP, skyboxCubemap.GetTextureID());
glDrawArrays(GL_TRIANGLES, 0, 36);
glBindVertexArray(0);
glDepthFunc(GL_LESS);// 绘制半透明物体
// 屏幕后处理
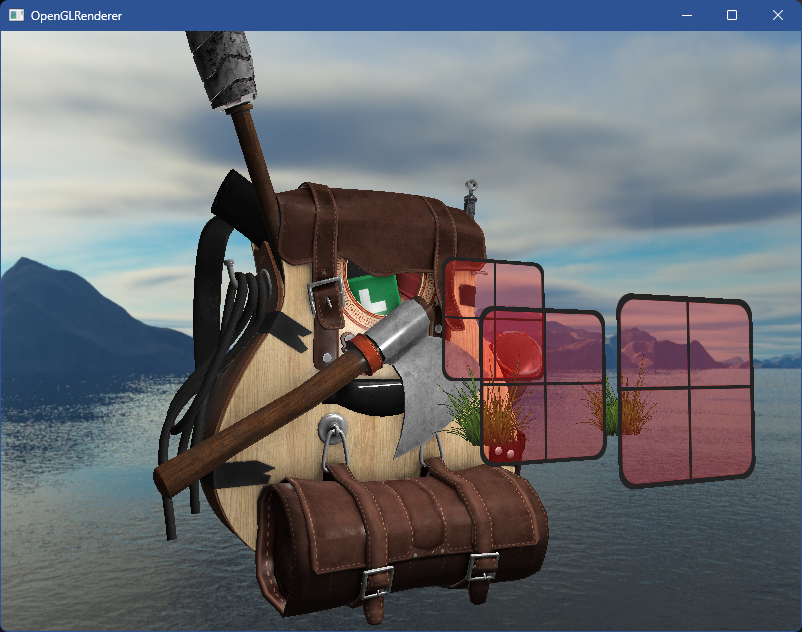
编译运行,顺利的话可以看见以下图像
三、环境映射
我们将周围的环境映射到了Cubemap上,除了天空盒还可以做更多需要依赖环境信息的消息,例如反射 (Reflection)和折射 (Refraction)
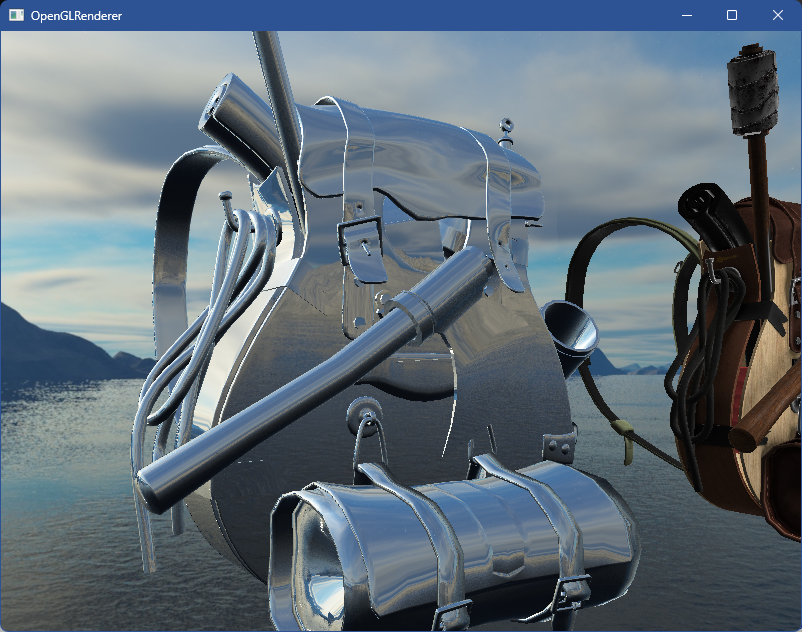
反射 (Reflect)
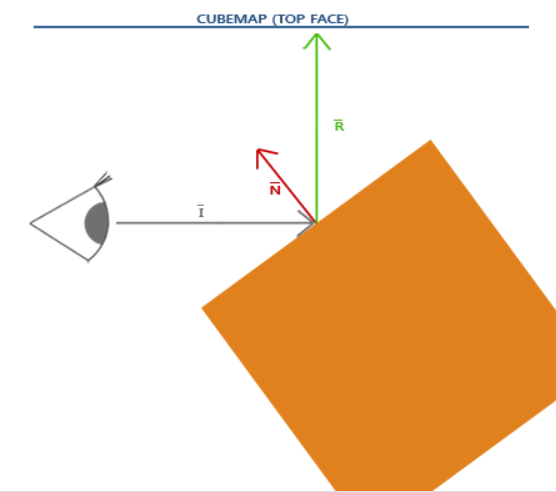
我们可以通过计算 反射后的方向R 来对Cubemap进行采样,从而获得物体表面的反射颜色,如下图所示 (图片来自于LearnOpenGL)
首先编写Shader,我们复用并修改背包的顶点着色器,并新增反射专用的片段着色器
Main.cpp
Shader reflectShader("Shader/VertexShader.glsl", "Shader/ReflectFragment.glsl");
VertexShader.glsl
#version 330 corelayout (location = 0) in vec3 aPos;
layout (location = 1) in vec3 aNormal;
layout (location = 2) in vec2 aTexCoords;out vec3 FragPos;
out vec3 Normal;
out vec2 TexCoords;
// 新增顶点世界空间位置
out vec3 Position;uniform mat4 model;
uniform mat4 view;
uniform mat4 projection;void main()
{gl_Position = projection * view * model * vec4(aPos, 1.0);FragPos = vec3(model * vec4(aPos, 1.0));Normal = mat3(transpose(inverse(model))) * aNormal;TexCoords = aTexCoords;// model乘以aPos得到世界空间位置Position = vec3(model * vec4(aPos, 1.0));
}
ReflectFragment.glsl 新增
#version 330 coreout vec4 FragColor;in vec3 Normal;
in vec3 Position;uniform vec3 cameraPos;
uniform samplerCube skybox;void main()
{vec3 I = normalize(Position - cameraPos);// 计算视线反射后的向量Rvec3 R = reflect(I, normalize(Normal));// 采样skyboxFragColor = vec4(texture(skybox, R).rgb, 1.0);
}
接下来使用新创建的着色器进行绘制
// 绘制背包之后// 反射
modelMatrix = glm::translate(modelMatrix, glm::vec3(-5.0f, 0.0f, 0.0f));
reflectShader.Use();
reflectShader.SetMat4("view", view);
reflectShader.SetMat4("projection", projection);
reflectShader.SetMat4("model", modelMatrix);
reflectShader.SetVec3("cameraPos", camera.transform.position);
reflectShader.SetInt("skybox", 0);
glBindTexture(GL_TEXTURE_CUBE_MAP, skyboxCubemap.GetTextureID());
model.Draw(shader);
编译运行,顺利的话可以看见如下图像,一个镜子一样的背包
折射 (Refract)
和反射的实现方式类似,我们可以通过计算视线折射后的方向来对Cubemap进行采样,如下图所示 (图片来自于LearnOpenGL)
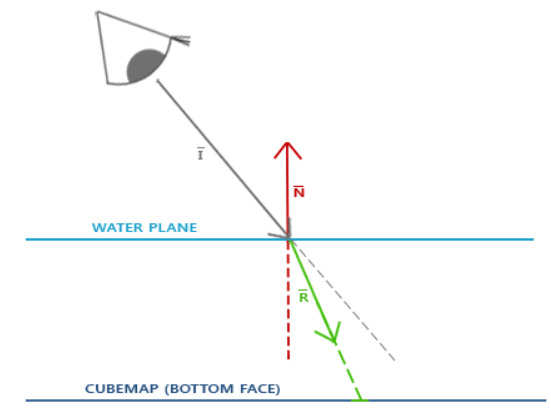
计算折射同样可以使用GLSL提供的 refract 函数来实现,最后一位参数我们需要传入折射率,以下是一些常见材质的折射率
| 材质 | 折射率 |
|---|---|
| 空气 | 1.00 |
| 水 | 1.33 |
| 冰 | 1.309 |
| 玻璃 | 1.52 |
| 钻石 | 2.42 |
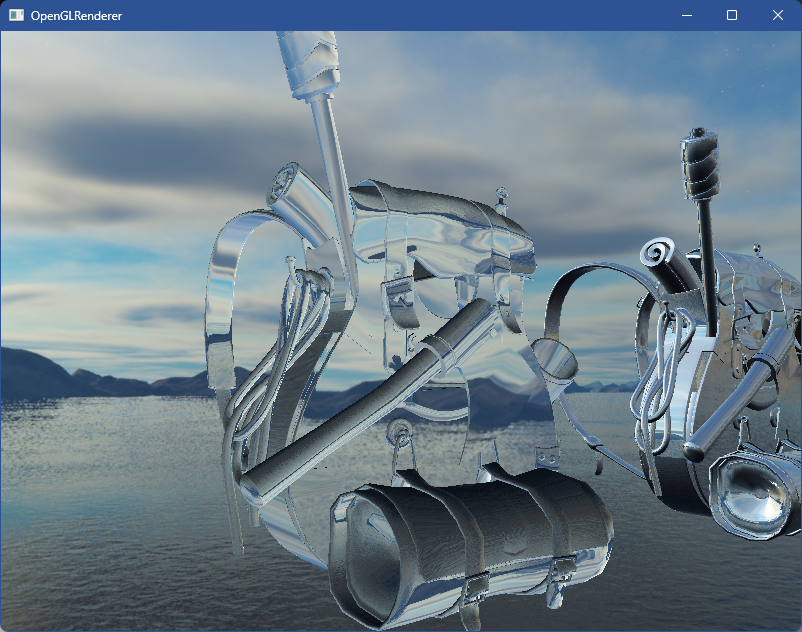
这里我们使用玻璃的折射率来渲染一个玻璃背包,只考虑从空气进入玻璃发生的折射,那么比值 ratio = 1.00 / 1.52 = 0.658
RefractFragment.glsl 新建
#version 330 coreout vec4 FragColor;in vec3 Normal;
in vec3 Position;uniform vec3 cameraPos;
uniform samplerCube skybox;void main()
{float ratio = 1 / 1.52;vec3 I = normalize(Position - cameraPos);vec3 R = refract(I, normalize(Normal), ratio);FragColor = vec4(texture(skybox, R).rgb, 1.0);
}
Main.cpp
// 折射
Shader refractShader("Shader/VertexShader.glsl", "Shader/RefractFragment.glsl");// 绘制背包之后// 折射
modelMatrix = glm::translate(modelMatrix, glm::vec3(-5.0f, 0.0f, 0.0f));
refractShader.Use();
refractShader.SetMat4("view", view);
refractShader.SetMat4("projection", projection);
refractShader.SetMat4("model", modelMatrix);
refractShader.SetVec3("cameraPos", camera.transform.position);
refractShader.SetInt("skybox", 0);
model.Draw(shader);
编译运行,顺利的话可以看见以下图像,一个玻璃背包
完整代码可在顶部git仓库中找到