Vue学习Ⅳ
Vuex案例
index.js
//该文件用于创建Vuex中最为核心的store
import Vue from "vue";
//引入Vuex
import Vuex from 'vuex'
//应用Vuex插件
Vue.use(Vuex)//准备actions——用于响应组件中的动作
const actions = {jia(context,value){context.commit('JIA',value)},jian(context,value){context.commit('JIAN',value)}
}
//准备mutations——用于操作数据(state)
const mutations = {JIA(state,value){state.sum += value},JIAN(state,value){state.sum -= value},
}
//准备state——用于存储数据
const state = {sum:0 //当前的和
}//创建并暴露store
export default new Vuex.Store({actions,mutations,state,
})
Count.vue
<template><div class="category"><h1>当前求和为:{{$store.state.sum}}</h1><select v-model.number="n"><option value="1">1</option><option value="2">2</option><option value="3">3</option></select><button @click="increment">+</button><button @click="decrement">-</button><button @click="incrementOdd">当前求和为奇数再加</button><button @click="incrementWait">等一等再加</button></div>
</template><script>
export default {name:'Count',data() {return {n:1,}},methods: {increment(){this.$store.dispatch('jia',this.n)},decrement() {this.$st/ore.dispatch('jian',this.n)},incrementOdd(){if(this.$store.state.sum % 2){this.$store.dispatch('jia',this.n)}},incrementWait() {setTimeout(()=>{this.$store.dispatch('jia',this.n)},500)}},mounted() {// console.log('Count',this)// console.log('Count store:', this.$store) // 检查组件中的 store}
}
</script><style lang="css">button{margin-left: 5px;}
</style>
模板里不用写this,脚本里前要加this。
getters配置项
1、概念:当state中的数据需要经过加工后再使用时,可以使用getters加工。
2、在store/index.js中追加getters配置
//准备getters——用于将state中的数据进行加工
const getters = {bigSum(state){return state.sum*10}
}//创建并暴露store
export default new Vuex.Store({actions,mutations,state,getters,
})
3、组件Count.vue中读取数据:$store.getters.bigSum
<h3>当前求和放大10倍为:{{ $store.getters.bigSum }}</h3>简单化模板语法
模板里最好用简洁的语法,如
<h1>当前求和为:{{$store.state.sum}}</h1>简化为
<h1>当前求和为:{{sum}}</h1>在脚本里需要使用计算属性,追加如下
computed:{sum(){return this.$store.state.sum}},以上还是太复杂
mapState mapGetters
import { mapGetters, mapState } from 'vuex'computed计算属性中追加以下内容,可在模板内直接使用sum,school等属性。
//借助mapState生成计算属性,从state中读取数据。(对象写法)...mapState({he:'sum',xuexiao:'school',xueke:'subject'}),//借助mapState生成计算属性,从state中读取数据。(数组写法)...mapState(['sum','school','subject']),//借助mapGetters生成计算属性,从getters中读取数据。(对象写法)...mapGetters({bigSum:'bigSum'}),//借助mapGetters生成计算属性,从getters中读取数据。(数组写法)...mapGetters(['bigSum']),mapMutations
mapMutations 是 Vuex 提供的辅助函数,它像一个快捷键生成器,让你能直接在组件中调用 mutations(状态修改器),而不用每次都写 this.$store.commit('mutation名') 这种冗长的代码。
// 传统写法
this.$store.commit('increment')// 使用 mapMutations 后
this.increment() // 直接调用!
mapActions
mapActions 是 Vuex 中用于简化组件与 Vuex actions 交互的一个重要工具,它使得组件能够以一种简洁的方式调用 Vuex 中定义的 actions。
//程序员亲自写的方法incrementOdd(){if(this.$store.state.sum % 2){this.$store.dispatch('jia',this.n)}},incrementWait() {setTimeout(()=>{this.$store.dispatch('jia',this.n)},500)},//借助mapActions生成对应的方法,方法中会调用dispatch去联系actiosn(对象写法)
...mapActions({incrementOdd:'jiaOdd',incrementWait:'jiaWait'})
多组件共享数据
Count.vue
<template><div class="category"><h1>当前求和为:{{he}}</h1><h3>当前求和放大10倍为:{{ bigSum }}</h3><h3>我在{{ xuexiao }},学习{{ xueke }}</h3><h3>下方组件的总人数是:{{ personList.length }}</h3><select v-model.number="n"><option value="1">1</option><option value="2">2</option><option value="3">3</option></select><button @click="increment(n)">+</button><button @click="decrement(n)">-</button><button @click="incrementOdd(n)">当前求和为奇数再加</button><button @click="incrementWait(n)">等一等再加</button></div>
</template><script>
import { mapActions, mapGetters, mapMutations, mapState } from 'vuex'export default {name:'Count',data() {return {n:1,}},methods: {//借助mapMutuions生成对应的方法,方法中会调用commit去联系mutitaions(对象写法)...mapMutations({increment:'JIA',decrement:'JIAN'}),//借助mapActions生成对应的方法,方法中会调用dispatch去联系actiosn(对象写法)...mapActions({incrementOdd:'jiaOdd',incrementWait:'jiaWait'})},computed:{//借助mapState生成计算属性,从state中读取数据。(对象写法)...mapState({he:'sum',xuexiao:'school',xueke:'subject',personList:'personList'}),//借助mapGetters生成计算属性,从getters中读取数据。(对象写法)...mapGetters({bigSum:'bigSum'}),},mounted() {}
}
</script><style lang="css">button{margin-left: 5px;}
</style>
Person.vue
<template><div><h1>人员列表</h1><h3>Count组件求和为:{{ sum }}</h3><input type="text" placeholder="请输入名字" v-model="name"><button @click="add">添加</button><ul><li v-for="p in personList" :key="p.id">{{ p.name }}</li></ul></div>
</template><script>
import { name } from 'pubsub-js';
import { nanoid } from 'nanoid';export default {name:'Person',data() {return {name:''}},computed:{personList(){return this.$store.state.personList},sum(){return this.$store.state.sum}},methods:{add(){const personObj = {id:nanoid(),name:this.name}this.$store.commit('ADD_PERSON',personObj)this.name = ''}}
}
</script>
index.js
//该文件用于创建Vuex中最为核心的store
import { name } from "pubsub-js";
import Vue from "vue";
//引入Vuex
import Vuex from 'vuex'
//应用Vuex插件
Vue.use(Vuex)//准备actions——用于响应组件中的动作
const actions = {jia(context,value){context.commit('JIA',value)},jian(context,value){context.commit('JIAN',value)},jiaOdd({ commit, state }, value) {if (state.sum % 2 === 1) {commit('JIA', value);}},jiaWait({ commit }, value) {setTimeout(() => {commit('JIA', value);}, 500);},
}
//准备mutations——用于操作数据(state)
const mutations = {JIA(state,value){state.sum += value},JIAN(state,value){state.sum -= value},ADD_PERSON(state,value){console.log('mutations中的ADD_PERSON被调用了'),state.personList.unshift(value)}
}
//准备state——用于存储数据
const state = {sum:0, //当前的和school:'zzuli',subject:'Vue',personList:[{id:'001',name:'张三'}]
}//准备getters——用于将state中的数据进行加工
const getters = {bigSum(state){return state.sum*10}
}//创建并暴露store
export default new Vuex.Store({actions,mutations,state,getters,
})
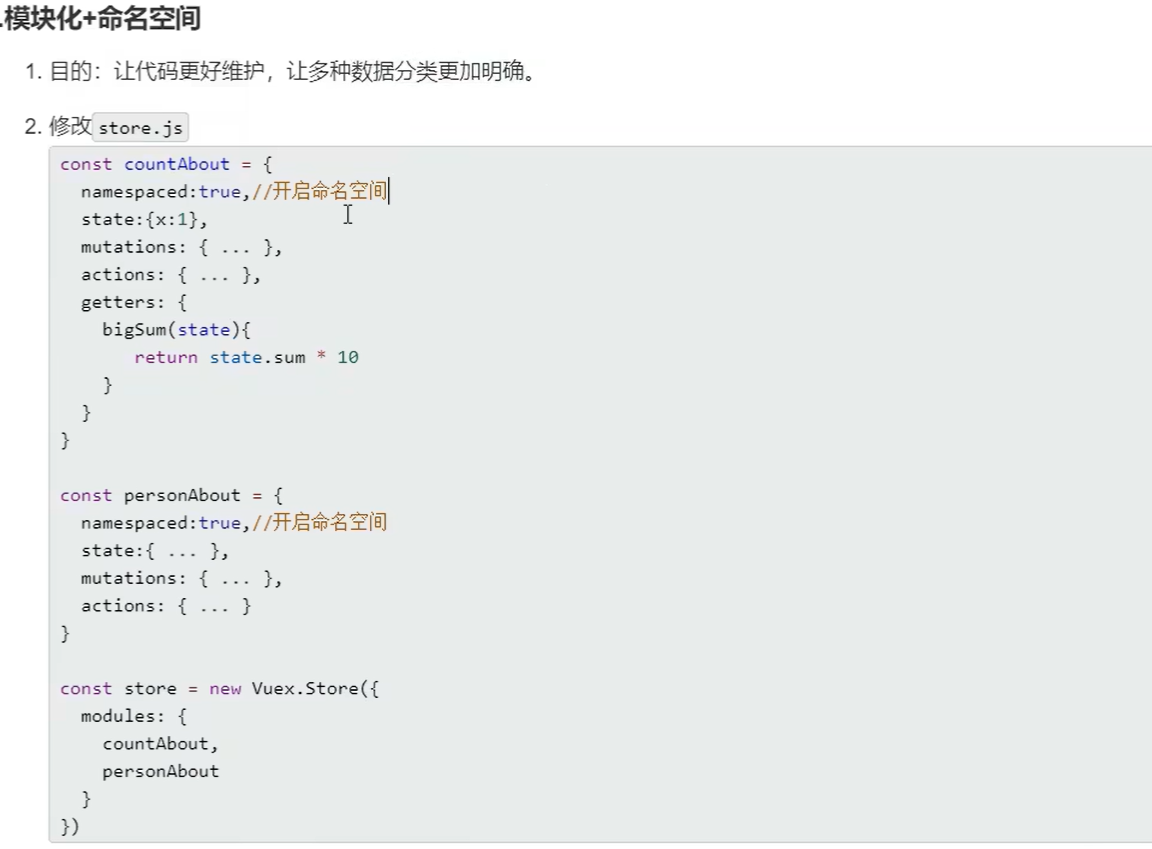
vuex模块化+namespace
创建模块化的 Vuex store:将功能拆分为独立模块(count 和 person)
使用命名空间:每个模块开启
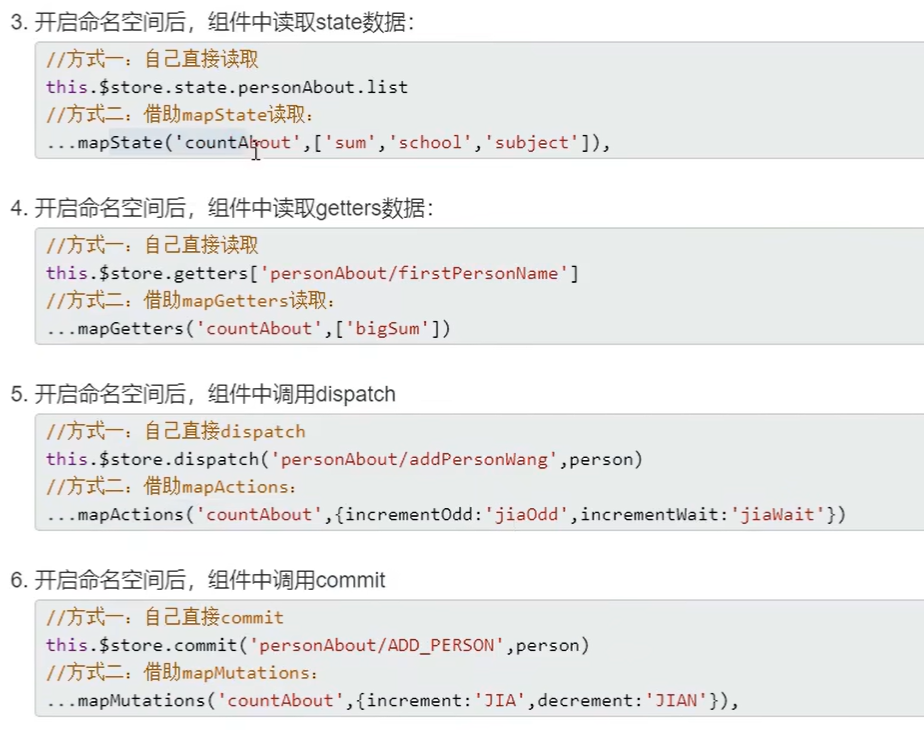
namespaced: true组件中正确访问模块:使用带命名空间的映射方法
处理响应式问题:确保所有模板变量都已正确定义
Count.vue
methods: {//借助mapMutuions生成对应的方法,方法中会调用commit去联系mutitaions(对象写法)...mapMutations('countAbout',{increment:'JIA',decrement:'JIAN'}),//借助mapActions生成对应的方法,方法中会调用dispatch去联系actiosn(对象写法)...mapActions('countAbout',{incrementOdd:'jiaOdd',incrementWait:'jiaWait'})},computed:{//借助mapState生成计算属性,从state中读取数据。(对象写法)...mapState('countAbout',['sum','school','subject']),...mapState('personAbout',['personList']),//借助mapGetters生成计算属性,从getters中读取数据。(对象写法)...mapGetters('countAbout',['bigSum']),},index.js
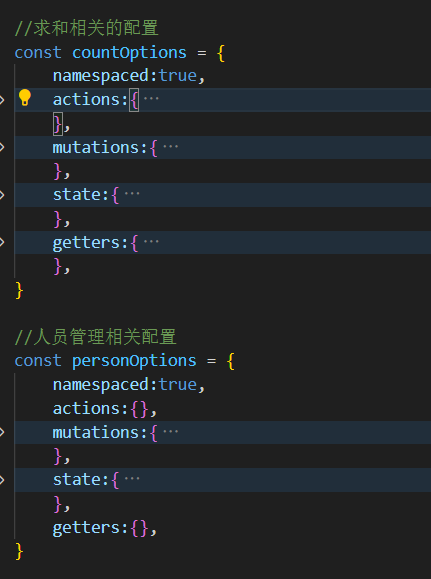
//人员管理相关配置
const personOptions = {namespaced:true,actions:{},mutations:{ADD_PERSON(state,value){console.log('mutations中的ADD_PERSON被调用了'),state.personList.unshift(value)}},state:{personList:[{id:'001',name:'张三'}]},getters:{},
}//创建并暴露store
export default new Vuex.Store({modules:{countAbout:countOptions,personAbout:personOptions}
})
路由
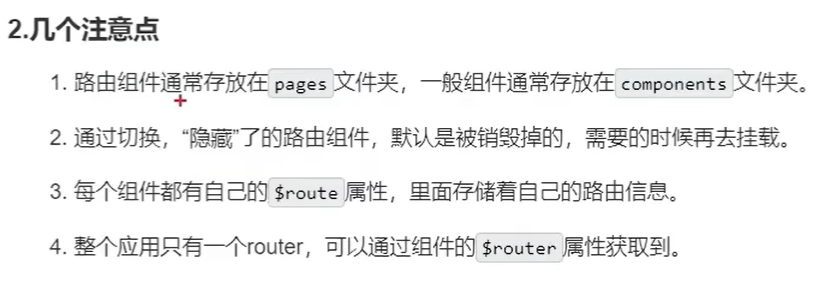
pages 文件放路由组件 components放一般组件
嵌套路由
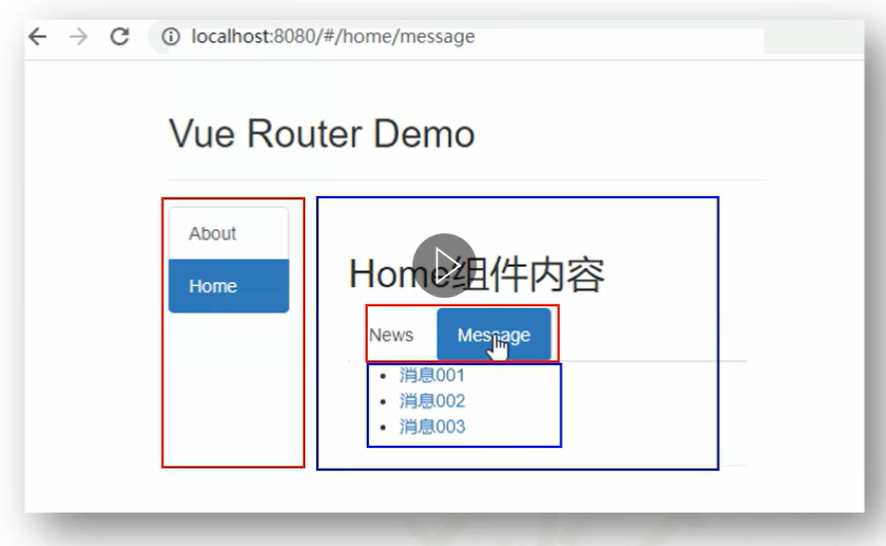
父路由组件:包含
<router-view>作为子组件的容器子路由配置:在路由对象的
children属性中定义路由出口:子内容会渲染在父组件的
<router-view>中
路径不以
/开头:嵌套路由的路径不应添加起始/(如path: 'posts'正确,path: '/posts'错误)组件复用:当仅参数变化时,使用
onBeforeRouteUpdate监听变化布局组合:可与命名视图结合实现复杂布局
// 该文件专门用于创建整个应用的路由器
import About from '@/pages/About.vue'
import Home from '@/pages/Home.vue'
import News from '@/pages/News.vue'
import Message from '@/pages/Message.vue'
import VueRouter from 'vue-router'
import Detail from '@/pages/Detail.vue'
//引入组件//创建并暴露一个路由器
export default new VueRouter({routes:[{path:'/about',component:About},{path:'/home',component:Home,children:[{path:'news',component:News,},{path:'message',component:Message,children:[{path:'detail',component:Detail,}]}]}]
})
路由传参
<!-- 字符串形式(不推荐) -->
<router-link to="/detail?id=123&title=消息标题">详情</router-link><!-- 对象形式(推荐) -->
<router-link :to="{path: '/detail',query: {id: 123,title: '消息标题'}
}">详情</router-link>
获取query参数
export default {mounted() {console.log('ID:', this.$route.query.id);console.log('Title:', this.$route.query.title);}
}
例子
<template><div><ul><li v-for="m in messageList" :key="m.id"><!-- 跳转路由并携带query参数,to的字符串写法 --><!-- <router-link :to="`/home/message/detail?id=${m.id}&title=${m.title}`">{{ m.title }}</router-link> --><!-- 跳转路由并携带query参数,to的对象写法 --><router-link :to="{path:'/home/message/detail',query:{id:m.id,title:m.title}}">{{ m.title }}</router-link></li></ul><hr><router-view></router-view></div>
</template><script>export default {name:'Message',data(){return {messageList:[{id:'001',title:'消息001'},{id:'002',title:'消息002'},{id:'003',title:'消息003'},]}}}
</script>命名路由
核心用法
1. 路由配置中定义命名路由
// router.js
import { createRouter, createWebHistory } from 'vue-router'const routes = [{path: '/',name: 'Home', // 命名路由component: HomeView},{path: '/about',name: 'About',component: AboutView},{path: '/user/:id',name: 'UserProfile', // 带参数命名路由component: UserProfile,props: true // 启用props接收参数}
]const router = createRouter({history: createWebHistory(),routes
})export default router
2. 在组件中使用命名路由
在模板中
<router-link :to="{ name: 'Home' }">首页</router-link>
<router-link :to="{ name: 'UserProfile', params: { id: 123 } }">用户资料
</router-link>
路由的params参数
与 query 参数的对比
| 区别点 | params | query |
|---|---|---|
| URL 位置 | 路径中 (/user/123) | ? 后 (/user?id=123) |
| 命名路由要求 | 必需 | 可选 |
| 参数保留 | 刷新后消失(需配合历史状态管理) | 刷新后保留在 URL 中 |
| 使用场景 | 资源标识(如用户 ID) | 可选过滤条件(如排序、分页) |
定义方式:
// 路由配置中声明动态参数 (冒号开头) const routes = [{ path: '/user/:id', component: User }, // 路径参数{ name: 'profile', path: '/user/:id/profile' } // 命名路由参数 ]传递方式:
// 编程式导航 router.push({ name: 'profile', // 必须用命名路由params: { id: 123 } // 参数对象 })// 或声明式导航 <router-link :to="{ name: 'profile', params: { id: 123 }}">获取参数(在目标组件内):
// 通过 $route 对象获取
this.$route.params.id  // 输出 123
路由的props参数
props 参数允许你将路由参数直接作为组件的 props 传递,而不是在组件内部通过 $route.params 或 $route.query 访问。
children:[{path:'news',component:News,},{path:'message',component:Message,children:[{name:'xiangqing',path:'detail/:id/:title',component:Detail,//props的第一种写法,值为对象,该对象中的所有key-value都会以props的形式传给Detail组件// props:{a:1,b:'hello'}//props的第二种写法,值为布尔值,若布尔值为真,就会把该路由组件收到的所有params参数,以props的形式传给Detail组件// props:true//props的第三种写法,值为函数props($route){return {id:$route.query.id,title:$route.query.title}}}]}]
<template><ul><li>消息编号:{{id}}</li><li>消息标题:{{title}}</li></ul>
</template><script>export default {name:'Detail',props:['id','title'],mounted() {console.log(this.$route)}}
</script>
<router-link>的place属性

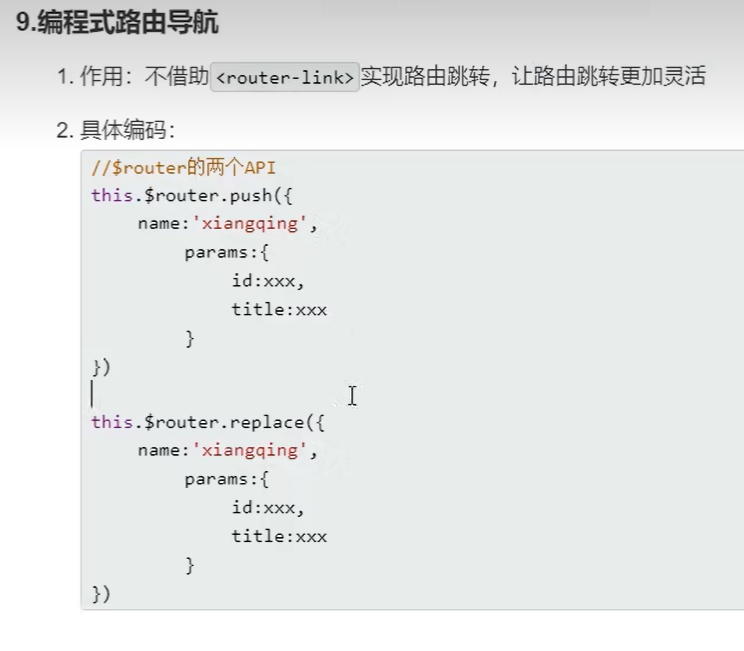
编程式路由导航
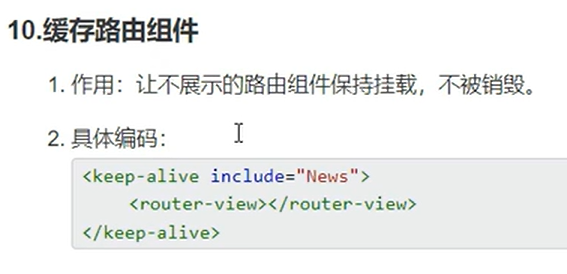
缓存路由组件
两个新的生命周期钩子
activated() {console.log('News组件即将被激活了')this.timer = setInterval(() => {this.opacity -=0.01if(this.opacity <= 0) this.opacity = 1},16)},deactivated() {console.log('News组件失活了')clearInterval(this.timer)}路由守卫
用于在路由跳转前后执行逻辑。根据执行时机,可分为前置守卫(在路由跳转前执行)和后置守卫(在路由跳转后执行)
全局守卫
beforeEach:检查用户是否登录,保护需要认证的路由afterEach:记录导航完成日志并更新页面标题
//全局前置路由守卫——初始化的时候被调用、每次切换的时候被调用
router.beforeEach((to,from,next)=>{console.log('前置路由守卫',to,from)// if(to.path === '/home/news' || to.path === '/home/message'){if(to.meta.isAuth){  //判断是否需要鉴权if(localStorage.getItem('school') === 'mengg'){document.title = to.meta.title || '俺的系统'next()}else{alert('学校名字不对,无权限查看!')}}else{next()}
})//全局后置路由守卫——初始化的时候被调用、每次切换的时候被调用
router.afterEach((to,from)=>{console.log('后置路由守卫',to,from)document.title = to.meta.title || '俺的系统'
})
独享路由守卫
某一路由单独使用的守卫。
在
/admin路由上使用beforeEnter守卫检查用户是否具有管理员权限
无权限用户会被重定向到首页
在日志中清晰展示守卫执行过程
{name:'xinwen',path:'news',component:News,meta:{isAuth:true,title:'新闻'},//独享路由守卫beforeEnter: (to,from, next) =>{console.log('前置路由守卫',to,from)if(to.meta.isAuth){if(localStorage.getItem('school') === 'mengg'){next()}else{alert('学校名字不对,无权限查看!')}}else{next()}}},组件内守卫
在编辑页面使用
beforeRouteLeave守卫检测未保存的更改并提示用户确认
防止用户意外离开导致数据丢失
//通过路由规则,(通过点击)进入该组件时被调用beforeRouteEnter(to, from, next) {console.log('About---beforeRouteEnter',to,from)if(to.meta.isAuth){if(localStorage.getItem('school') === 'mengg'){next()}else{alert('学校名字不对,无权限查看!')}}else{next()}},//通过路由规则,离开该组件时被调用beforeRouteLeave(to,from,next) {console.log('About---beforeRouteLeave',to,from)next()}使用说明
在首页登录(任意用户名和密码)
尝试访问不同页面:
个人资料:需要登录(全局守卫保护)
管理面板:需要管理员权限(独享守卫保护)
编辑页面:尝试修改内容后离开(组件内守卫)
查看页面底部的守卫执行日志
使用导航菜单在不同页面间切换
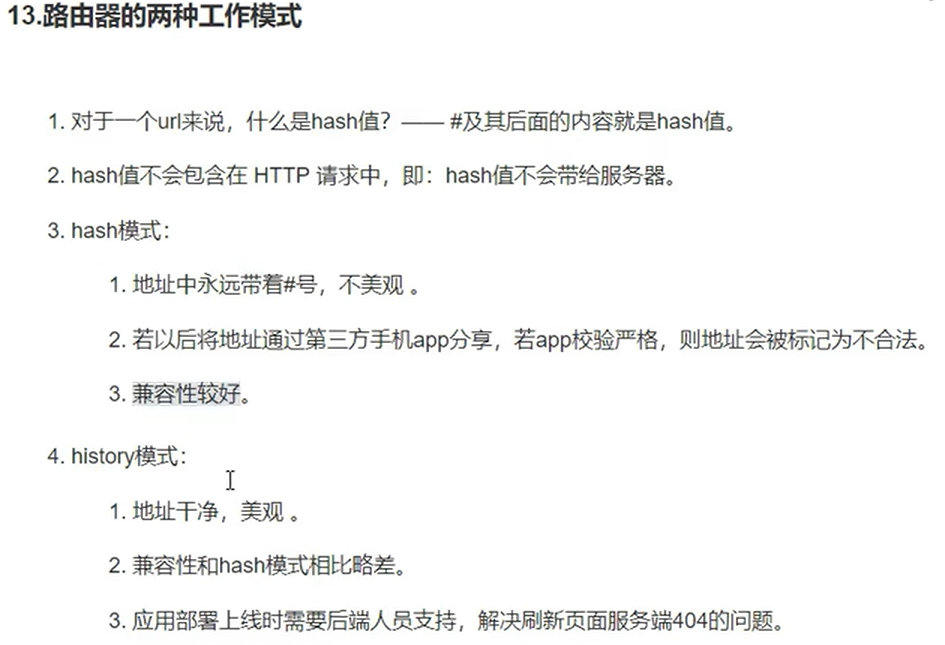
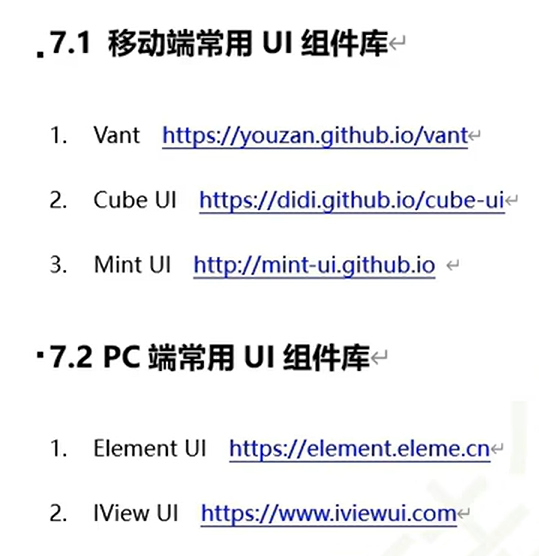
Vue UI 组件库
注意
1、出现以下报错说明文件目录不对
找到pasckage.json所在目录,
cd 'D:\school project homework\Project\Vue\vue_test'
切换到所在目录后重新启动即可

2、运行失败时,此时把launch.json文件删掉,然后把刚刚打开的启动调试的页面关掉,在visual studio 中选择运行---->启动调试。
