Vue生命周期以及自定义钩子和路由
Vue生命周期常用的onMounted挂载后执行和onUnmounted卸载前以及onupdated更新后实际上用react对比就是useEffect,而且挂载顺序也是子组件先于父组件然后往外的栈结构,先进后出。
1.Vue的生命周期
<template><h2>当前求和为{{ sum }}</h2><button @click="add">点为sum+1</button>
</template>
<script setup name="Person" lang="ts">import { ref,onBeforeMount,onMounted, onUpdated,onBeforeUpdate,onBeforeUnmount,onUnmounted} from 'vue';let sum =ref(0)const add=()=>{sum.value+=1}//创建console.log('组件创建');//挂载onBeforeMount(()=>{console.log('租借挂载之前');})//挂载完毕onMounted(()=>{console.log('person挂载完毕');})//更新前onBeforeUpdate(()=>{console.log('更新前');})//更新完毕onUpdated(()=>{console.log(' 更新后', )})//卸载前onBeforeUnmount(()=>{console.log(' 卸载前', )})//卸载后onUnmounted(()=>{console.log(' 卸载后', )})
</script>
<!-- scoped局部样式 类似于module.css -->
<style scoped>
</style>
这些就是vue3的生命周期常用的挂载前挂载后以及更新后。
2.watchEffect
watch监听方法可以监听多个需要用[{}]这样写法,而且如果对象的属性需要函数式也就是()=>person.car这种。
watchEffect可以自己分析监听数据,只要里面的数据发生改变就会重新执行函数而且上来就会执行一次。
<template><h1>水位达到60度或者水位达到80cm 服务器发送请求</h1><h2>当前水温为{{ temp }}</h2><h2>当前水位{{ height}}</h2><button @click="changetemp">水温加10</button><button @click="changeheight">水位加10</button>
</template>
<script setup name="Person" lang="ts">import { ref,watch,watchEffect } from 'vue';let temp =ref(10)let height=ref(0)const changetemp=()=>{temp.value+=10}const changeheight=()=>{height.value+=10}//监视//watch必须指定监视谁// watch([temp,height],(value)=>{// let [newtemp,newheight] = value// if(newtemp>=60||newheight>=80){// console.log('发送请求');// }// })//watchEffect可以直接用回自己分析监视谁?// 响应式的追踪其依赖 并且依赖更改之后重新执行函数//上来就会执行一次watchEffect(()=>{if(temp.value>=60||height.value>=80){console.log('发送请求'); }})
</script>
<style>
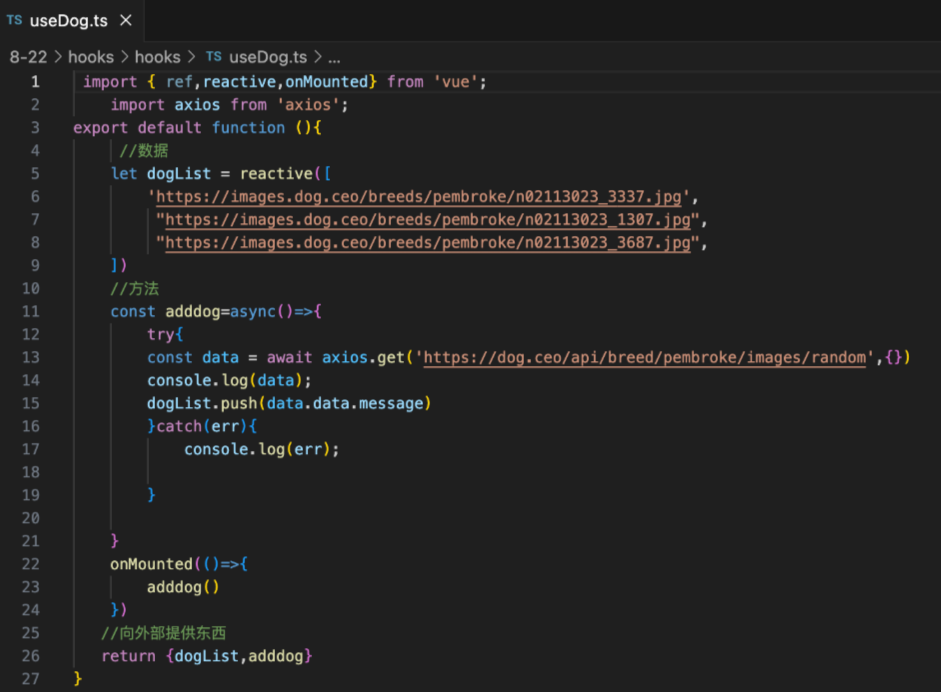
</style>3.hooks和props传递
hooks当我们操作的方法和数据很多组件要使用或者很明显重复代码过多,那么就可以提取到一个ts文件也就是包裹一个匿名函数里面,文件名use开头。
组件之间的props传递也是和react一样,只不过需要用defineProps()传递如果没有指定类型那么就需要指定接收的属性名,如果指名了接收的数据类型就可以参数可以为().
<template><ul><li v-for="item in x.personlist" :key="item.id">{{ item.name }}--{{ item.age }}</li></ul><h2>{{ x.a }}</h2>
</template>
<script setup name="Person" lang="ts">import { ref,watch,watchEffect,defineExpose,defineProps,withDefaults} from 'vue';import type { Person } from '@/types';//接收数组并且保存到x变量上//let x = defineProps(['personlist'])//可以声明类型 这里传什么接收什么//let x = defineProps<{personlist:Person[],a:number}>()//可以设置默认值let x =withDefaults(defineProps<{personlist?:Person[],a:number}>(),{personlist:()=>[{id:'a',name:'s',age:1}],a:2})
</script>
<!-- scoped局部样式 类似于module.css -->
<style scoped>
</style>
4.路由组件的参数传递
vue3的路由组件定义以及跳转连接link和react几乎一致,
//创建一个路由器并且暴露出去
import { createRouter,createWebHistory } from "vue-router";
//创建路由器
import Home from "@/components/Home.vue";
import News from "@/components/News.vue";
import About from "@/components/About.vue";
import Detail from "@/components/Detail.vue";
const router = createRouter({history:createWebHistory(),routes:[//一个个路由规则{path:'/home',component:Home},{path:'/about',component:About},{path:'/news',component:News,children:[{name:'xiang',path:'detail',component:Detail,//第一种写法//props:true//将所有params参数作为props传递给组件//第二种写法 可以指定queryprops(route){return  route.query}}]}]
})
/*history两种模式url更加美观 接近传统完整的url 不加#vue3 createWebhistrry() React缺点 上线需要服务端配合 否则刷新会404<createBrowserRouter></createBrowserRouter><Router Provider></Router>hash模式url带有# SEO优化方面相对较差createWebHashhsitory
*/
//暴露操作
export default router
也是两种路由表模式一种是createWebhistory另一种是hash模式多了个#和react的createBrowserRouter以及createHashrouter差不多,然后嵌套路由也是直接children直接写。
子路由展示区域需要用RouterView,React用outlet组件。RouterLinkl跳转路径组件,然后就是传递参数,父路由组件路由像子路由组件传递参数。比较繁琐而且在写项目的时候没有使用过,只是前端像后端发送请求会携带参数,比如/:id不过一般都是在get('',{id;})这样携带,params参数。
<template><h1>我是news</h1><ul><li v-for="item in newslist" :key="item.id"><!-- 第一种写法 query传递参数 --><RouterLink :to="/news/detail?id=${item.id}&title=${item.title}">{{ item.title }}--{{ item.content }}</RouterLink><!-- 第二种写法query --><!-- <RouterLink :to="{path:'/news/detail',query:{id:item.id,title:item.title}}">{{ item.title }}--{{ item.content }}</RouterLink> --><!-- params传递 第一种写法 params传递需要占位--><!-- <RouterLink :to="/news/detail/${item.id}/${item.title}">{{ item.title }}--{{ item.content }}</RouterLink>  --><!-- 需要在定义路由的时候接收/:id/:title --><!-- 第二种写法 如果使用to的对象写法必须使用name配置项不能用path 需要用name 不能传数组--><!-- <RouterLink :to="{name:'xiang',params:{id:item.id,title:item.title}}">{{ item.title }}--{{ item.content }}</RouterLink>  --><!-- 路由规则props配置 props:true --></li></ul><div><RouterView></RouterView></div></template><script setup name="News" lang="ts">import { reactive } from 'vue';import { RouterView, RouterLink} from 'vue-router';const newslist=reactive([{id:1,title:'十种食物',content:'系懒觉'},{id:2,title:'十种测试',content:'系懒觉'},{id:3,title:'好消息',content:'震惊'},{id:4,title:'坏消息',content:'周一'}])
</script>
<style>
</style>
两种一种是query一种是params,写法是固定的,不用记忆。接收的话用useRoute钩子
<template><ul><!-- <li>{{ query.id }}</li><li>{{ query.title }}</li> --><li>{{ x.id }}</li><li>{{ x.title }}</li></ul>
</template><script setup name="Detail" lang="ts">import { reactive, toRefs ,defineProps} from 'vue';//从响应式对象结构属性需要加toRefs包裹不然丢失响应功能import { RouterView, useRoute} from 'vue-router';//获取父路由组件通过路径传递query的参数// let data = useRoute()// let {query}=toRefs(data)//获取params参数// let data = useRoute()// let {params}=toRefs(data)let x = defineProps(['id','title'])console.log(x);</script>
<style>
</style>
如果在定义路由组件规则的时候声明props:true那么可以用接收props的方式接收params参数,如果props(route){return route.query}可以用接收props方式接收query参数。