Apollo 凭什么能 “干掉” 本地配置?
案例
案例一:本地propreties配置文件配置配置项
定义了一个 HelloController,这里面通过 @Value 注解注入了一个 hello.msg 配置的值。在 ApolloStudyApplication 启动类上通过注解 @EnableApolloConfig 开启 Apollo 配置。代码如下:
@SpringBootApplication
@EnableApolloConfig
public class ApolloStudyApplication {  public static void main(String[] args) {  SpringApplication.run(ApolloStudyApplication.class, args);  }  }@RestController
public class HelloController {  @Value("${hello.msg}")  private String msg;  @GetMapping("/hello")  public String hello() {  return msg;  }
}
在 application.properties 中的配置如下,在 Apollo 配置中心未配置该配置项:
server.port=9091
spring.application.name=apollostudy
app.id=SampleApp
apollo.config-service=http://192.168.33.123:8080
hello.msg=hello-local
apollo.bootstrap.eagerLoad.enabled=true
apollo.bootstrap.enabled=true
然后访问 Controller,可以看到是可以获取到配置文件中配置的值的。结果如下:

案例二:Apollo和本地propreties配置文件都配置配置项
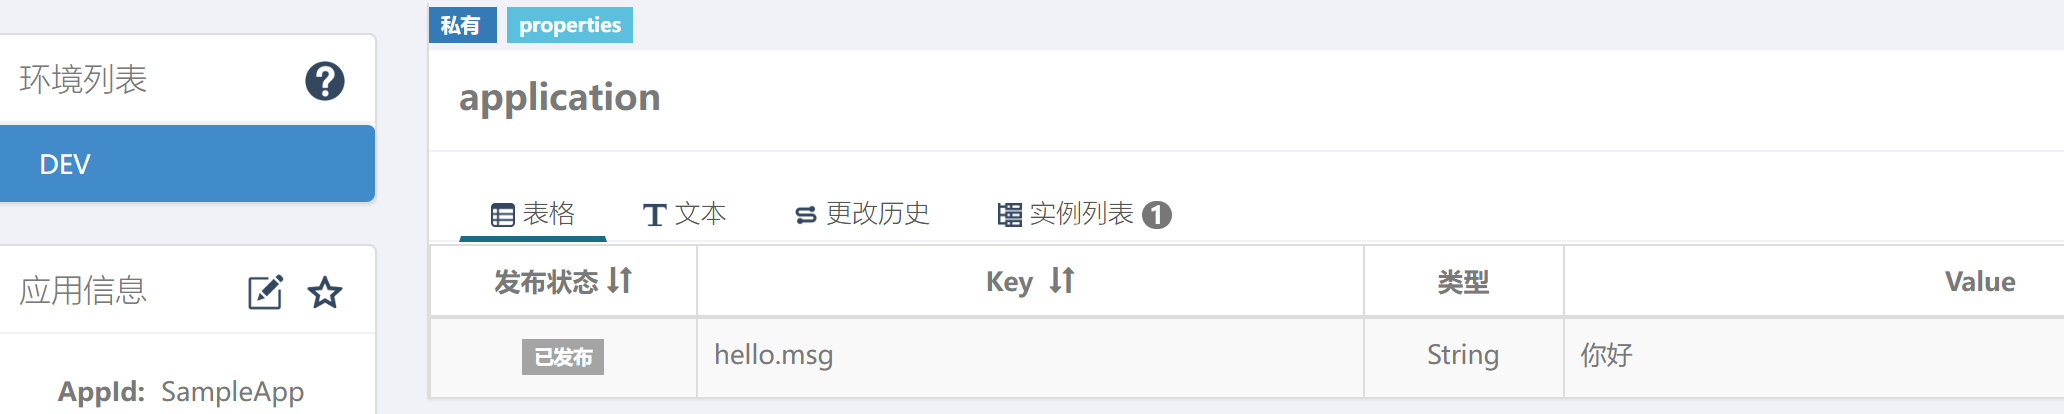
首先在 Apollo 配置中心将 hello.msg 的先配置为「你好」,然后访问 Controller,结果如下:

然后在 Apollo 配置中将 hello.msg 的先配置为「hello」,然后访问 Controller,结果如下:


从上面的两个案例可以看到当本地配置文件和 Apollo 配置中心都有相同的配置的时候,Apollo 配置中心的值会覆盖本地配置文件的值;当 Apollo 配置中心的值变化时,通过 @Value 注解注入该值的地方可以感知到变化并及时更新。
那 Apollo 配置中心的值是如何做到覆盖本地配置的值并能够及时更新的呢?接下来将从源码的角度分析一下原理。先说下结论:
Apollo 配置客户端在启动的时候会构造一个 PropertySource,并将这个对象放到 Environment 对象的最前面,而 Spring 查找属性的时候是按照顺序先后查找的,如果在前面的 PropertySource 中查找到了就直接返回了,Apollo 正是通过放在最前面这个操作来实现覆盖的。
Apollo 配置客户端在启动的时候会获取所有有 @Value 注解修饰的字段并缓存起来,然后通过长轮询获取服务端的配置变更,然后通过反射的方式更新字段的值,从而实现感知变化并及时更新的。
源码分析
Spring 中提供了 EnvironmentPostProcessor 接口,它有一个 postProcessEnvironment() 方法,它的核心作用是允许你在应用程序启动过程中,在 ApplicationContext 被刷新之前修改 Environment 对象。前面的文章搞懂这两个组件,Spring 配置问题少一半!中介绍过 xxx.properties 配置文件的内容最终会被加载并放置到 Environment 中保存的,而 Apollo 就是利用 postProcessEnvironment() 可以修改 Environment 对象来实现配置的覆盖。代码如下:
@FunctionalInterface
public interface EnvironmentPostProcessor {void postProcessEnvironment(ConfigurableEnvironment environment, SpringApplication application);}
Apollo 提供了一个 ApolloApplicationContextInitializer 类实现了 EnvironmentPostProcessor 接口,在它的 postProcessEnvironment() 方法中会判断 apollo.bootstrap.eagerLoad.enabled 和 apollo.bootstrap.enabled 配置项是否为 true,如果为 true 才会继续往下进行初始化。实际的初始化在 initialize() 方法中实现的。
在该方法中将每个 namespace 的配置包装为一个 Config 对象,然后再基于它创建一个 ProperySource 对象,然后添加到 CompositePropertySource 对象中,最后把 CompositePropertySource 对象添加到 Environment 对象的最前面,这个就是实现 Apollo 配置覆盖本地配置文件配置的关键。代码如下:
public void postProcessEnvironment(ConfigurableEnvironment configurableEnvironment, SpringApplication springApplication) { // 省略代码// 查看apollo.bootstrap.eagerLoad.enabled配置项是否配置为true,为true才会继续往下走Boolean eagerLoadEnabled = configurableEnvironment.getProperty(PropertySourcesConstants.APOLLO_BOOTSTRAP_EAGER_LOAD_ENABLED, Boolean.class, false);System.setProperty(PropertySourcesConstants.APOLLO_BOOTSTRAP_EAGER_LOAD_ENABLED, String.valueOf(eagerLoadEnabled));if (!eagerLoadEnabled) {return;}// 查看apollo.bootstrap.enabled配置项是否配置为true,为true才会继续往下走Boolean bootstrapEnabled = configurableEnvironment.getProperty(PropertySourcesConstants.APOLLO_BOOTSTRAP_ENABLED, Boolean.class, false);System.setProperty(PropertySourcesConstants.APOLLO_BOOTSTRAP_ENABLED, String.valueOf(bootstrapEnabled));if (bootstrapEnabled) {DeferredLogger.enable();// 调用initialize()方法initialize(configurableEnvironment);} }protected void initialize(ConfigurableEnvironment environment) {final ConfigUtil configUtil = ApolloInjector.getInstance(ConfigUtil.class);if (environment.getPropertySources().contains(PropertySourcesConstants.APOLLO_BOOTSTRAP_PROPERTY_SOURCE_NAME)) {//already initialized, replay the logs that were printed before the logging system was initializedDeferredLogger.replayTo();if (configUtil.isOverrideSystemProperties()) {// ensure ApolloBootstrapPropertySources is still the firstPropertySourcesUtil.ensureBootstrapPropertyPrecedence(environment);}return;}String namespaces = environment.getProperty(PropertySourcesConstants.APOLLO_BOOTSTRAP_NAMESPACES, ConfigConsts.NAMESPACE_APPLICATION);System.setProperty(PropertySourcesConstants.APOLLO_BOOTSTRAP_NAMESPACES, namespaces);logger.debug("Apollo bootstrap namespaces: {}", namespaces);List<String> namespaceList = NAMESPACE_SPLITTER.splitToList(namespaces);// 这里创建一个 CompositePropertySource 对象CompositePropertySource composite;if (configUtil.isPropertyNamesCacheEnabled()) {composite = new CachedCompositePropertySource(PropertySourcesConstants.APOLLO_BOOTSTRAP_PROPERTY_SOURCE_NAME);} else {composite = new CompositePropertySource(PropertySourcesConstants.APOLLO_BOOTSTRAP_PROPERTY_SOURCE_NAME);}for (String namespace : namespaceList) {// 这里将每一个namespace的配置包装为一个Config对象Config config = ConfigService.getConfig(namespace);// 然后基于Config对象构造一个ProperySource对象添加到CompositePropertySource中composite.addPropertySource(configPropertySourceFactory.getConfigPropertySource(namespace, config));}if (!configUtil.isOverrideSystemProperties()) {if (environment.getPropertySources().contains(StandardEnvironment.SYSTEM_ENVIRONMENT_PROPERTY_SOURCE_NAME)) {environment.getPropertySources().addAfter(StandardEnvironment.SYSTEM_ENVIRONMENT_PROPERTY_SOURCE_NAME, composite);return;}}// 这行代码很关键,这里将CompositePropertySource添加到了environment的最前面environment.getPropertySources().addFirst(composite);}
Apollo 还提供了一个 ApolloProcessor 实现了 BeanPostProcessor 接口,在它的 postProcessBeforeInitialization() 方法中,会查找所有有 @Value 注解修饰的字段,然后提取它里面配置项的名称,然后构造 SpringValue 对象然后注册到 SpringValueRegistry 中,在这里相当于缓存了所有有 @Value 注解修饰的字段。代码如下:
public abstract class ApolloProcessor implements BeanPostProcessor, PriorityOrdered {public Object postProcessBeforeInitialization(Object bean, String beanName)throws BeansException {Class<?> clazz = bean.getClass();for (Field field : findAllField(clazz)) {processField(bean, beanName, field);}// 省略代码return bean;  }
}public class SpringValueProcessor extends ApolloProcessor implements BeanFactoryPostProcessor, BeanFactoryAware {protected void processField(Object bean, String beanName, Field field) {// register @Value on fieldValue value = field.getAnnotation(Value.class);if (value == null) {return;}doRegister(bean, beanName, field, value);}private void doRegister(Object bean, String beanName, Member member, Value value) {Set<String> keys = placeholderHelper.extractPlaceholderKeys(value.value());if (keys.isEmpty()) {return;}for (String key : keys) {SpringValue springValue;if (member instanceof Field) {Field field = (Field) member;springValue = new SpringValue(key, value.value(), bean, beanName, field, false);} else if (member instanceof Method) {Method method = (Method) member;springValue = new SpringValue(key, value.value(), bean, beanName, method, false);} else {logger.error("Apollo @Value annotation currently only support to be used on methods and fields, "+ "but is used on {}", member.getClass());return;}springValueRegistry.register(beanFactory, key, springValue);logger.info("Monitoring {}", springValue);}}
}
Apollo 提供了一个 AutoUpdateConfigChangeListener 监听器,在它的 onChange() 方法中根据发生变化的配置项作为 key 从之前的缓存获取对应的 SpringValue 列表,即被 @Value 注解修饰的字段,然后通过反射的方式更新其值。代码如下:
public class AutoUpdateConfigChangeListener implements ConfigChangeListener,ApplicationListener<ApolloConfigChangeEvent>, ApplicationContextAware {@Overridepublic void onChange(ConfigChangeEvent changeEvent) {// 获取发生变化的配置项Set<String> keys = changeEvent.changedKeys();if (CollectionUtils.isEmpty(keys)) {return;}for (String key : keys) {// 获取配置项关联的@Value注解修饰的字段Collection<SpringValue> targetValues = springValueRegistry.get(beanFactory, key);if (targetValues == null || targetValues.isEmpty()) {continue;}// 2. update the valuefor (SpringValue val : targetValues) {updateSpringValue(val);}}}private void updateSpringValue(SpringValue springValue) {try {Object value = resolvePropertyValue(springValue);// 更新字段的值springValue.update(value);logger.info("Auto update apollo changed value successfully, new value: {}, {}", value,springValue);} catch (Throwable ex) {logger.error("Auto update apollo changed value failed, {}", springValue.toString(), ex);}}
}
而获取变更则是通过长轮询来实现的。在 RemoteConfigLongPollService 中有一个 startLongPolling() 方法,它会提交一个轮询任务,这个轮询任务会周期性地拉取最新的变更信息。代码如下:
private void startLongPolling(String sysAppId) {if (Boolean.TRUE.equals(m_longPollStarted.putIfAbsent(sysAppId, true))) {//already startedreturn;}try {final String appId = sysAppId;final String cluster = m_configUtil.getCluster();final String dataCenter = m_configUtil.getDataCenter();final String secret = m_configUtil.getAccessKeySecret(appId);final long longPollingInitialDelayInMills = m_configUtil.getLongPollingInitialDelayInMills();m_longPollingService.submit(new Runnable() {@Overridepublic void run() {if (longPollingInitialDelayInMills > 0) {try {logger.debug("Long polling will start in {} ms.", longPollingInitialDelayInMills);TimeUnit.MILLISECONDS.sleep(longPollingInitialDelayInMills);} catch (InterruptedException e) {//ignore}}// 轮询一次doLongPollingRefresh(appId, cluster, dataCenter, secret);}});} catch (Throwable ex) {// 省略代码}
}