项目可手撕题目详解
WebWorker
I
//main.js// 创建Worker
this.worker = new Worker('./worker.js');// 监听消息
this.worker.onmessage = (e) => {const { type, data, error } = e.data;// 处理不同类型消息
};// 发送消息
this.worker.postMessage({ type: 'process', data: data });// 终止Worker
this.worker.terminate();//worker.js
// 接收消息
self.onmessage = function(e) {const { type, data } = e.data;// 处理消息
};// 发送消息
self.postMessage({type: 'result',data: result
});// 自我关闭
self.close();//main.jsasync _calculateHash(file) {return new Promise((resolve, reject) => {const worker = new Worker('./hash-worker.js');worker.onmessage = e => {if (e.data.success) resolve(e.data.hash);else reject(e.data.error);worker.terminate();};worker.onerror = err => { reject(err); worker.terminate(); };worker.postMessage(file);});}//hash-worker.js//Web Worker 运行在独立于主线程的全局上下文(self)中,无法直接访问 DOM 或 window 对象。
// 其设计初衷是将耗时任务(如复杂计算、数据处理)与主线程分离,通过消息传递机制(postMessage/onmessage)实现通信。
self.importScripts('https://cdn.jsdelivr.net/npm/spark-md5@3.0.2/spark-md5.min.js');//主线程与 Worker 通过 postMessage 发送数据
// onmessage 监听消息(数据通过结构化克隆算法复制,非共享)
//结构化克隆算法通过递归遍历对象属性并创建独立副本实现数据隔离.
//JSON.parse(JSON.stringify(obj)) 也可以实现深拷贝(非结构化复制),但无法复制函数、undefined、Symbol、循环引用等特殊类型
self.onmessage = function(e) {const file = e.data;const reader = new FileReader();//const spark = new SparkMD5.ArrayBuffer();reader.onload = function(e) {spark.append(e.target.result);self.postMessage({hash: spark.end(),success: true});self.close();};reader.onerror = function() {self.postMessage({error: '文件读取失败',success: false});self.close();};//用于开始读取指定 Blob 或 File 的内容。当读取操作完成时,readyState 属性变为 DONE,并触发 loadend 事件//使用 Transferable 对象(如 ArrayBuffer)或 SharedArrayBuffer 减少内存拷贝开销reader.readAsArrayBuffer(file);
};
Hash切片
依据详解
切片依据:
- HTTP请求开销 vs 传输效率的权衡
- 内存占用和并发处理考虑
- 断点续传精度与重传成本分析
// 创建分片_createChunks(file) {// 打印开始分片创建的日志console.log('[Debug] 开始分片创建...');// 获取当前时间const chunkStart = performance.now();// 创建一个空数组,用于存储分片const chunks = []// 设置偏移量为0let offset = 0// 当偏移量小于文件大小的时候,循环执行while (offset < file.size) {// 计算分片结束的位置const end = Math.min(offset + this.CHUNK_SIZE, file.size)// 将分片信息添加到数组中chunks.push({index: chunks.length,file: file.slice(offset, end),hash: `${this.fileHash}-${chunks.length}`})// 更新偏移量offset = end}// 打印创建分片的日志,包括分片数量和耗时console.log(`[Debug] 共创建 ${chunks.length} 个分片,耗时: ${(performance.now() - chunkStart).toFixed(2)}ms`);// 返回分片数组return chunks}文件切片大小的确定需要综合考虑三个核心维度:
技术性能层面 - 切片大小直接影响HTTP请求数量和传输效率,过小会增加请求开销(如100MB文件用1MB切片需要100个请求),过大会增加失败重传成本和内存占用;网络环境适配 - 需要根据用户网络状况动态调整,弱网环境(<1Mbps)建议1-2MB保证稳定性,快速网络(>10Mbps)可用5-20MB提升效率;用户体验平衡 - 小切片提供更频繁的进度反馈和更精确的断点续传,但会延长总体上传时间。
实际项目中,我通常采用自适应策略: PC端5-10MB平衡性能和体验,同时监控上传成功率实时调整 - 成功率低于80%时减小切片。
并发上传
并发上传依据
async _parallelRun(tasks, limit) {return new Promise((resolve, reject) => {const results = [];let currentIndex = 0;let runningCount = 0;let hasError = false;function runNext() {// 所有任务完成或出错时返回结果if (currentIndex >= tasks.length && runningCount === 0) {return hasError ? reject(results) : resolve(results);}// 启动尽可能多的任务,直到达到并发限制while (runningCount < limit && currentIndex < tasks.length && !hasError) {const taskIndex = currentIndex++;const task = tasks[taskIndex];runningCount++;Promise.resolve(task()).then(result => {results[taskIndex] = { status: 'fulfilled', value: result };}).catch(error => {results[taskIndex] = { status: 'rejected', reason: error };hasError = true;}).finally(() => {runningCount--;runNext();});}}runNext();});}网络状态监控
动态调整并发数
class NetworkMonitor {constructor() {this.isOnline = navigator.onLine;this.connectionType = this.getConnectionType();this.listeners = [];this.bindEvents();}bindEvents() {window.addEventListener('online', () => {this.isOnline = true;this.notifyListeners('online');});window.addEventListener('offline', () => {this.isOnline = false;this.notifyListeners('offline');});// 监听网络变化if ('connection' in navigator) {navigator.connection.addEventListener('change', () => {this.connectionType = this.getConnectionType();this.notifyListeners('connectionchange', this.connectionType);});}}getConnectionType() {if ('connection' in navigator) {return {effectiveType: navigator.connection.effectiveType,downlink: navigator.connection.downlink,rtt: navigator.connection.rtt};}return null;}onNetworkChange(callback) {this.listeners.push(callback);}notifyListeners(event, data) {this.listeners.forEach(callback => callback(event, data));}// 根据网络状况调整上传策略getOptimalConcurrency() {if (!this.isOnline) return 0;if (this.connectionType) {switch (this.connectionType.effectiveType) {case 'slow-2g': return 1;case '2g': return 2;case '3g': return 4;case '4g': return 6;default: return 4;}}return 4; // 默认并发数}
}
并发数选择的原因和依据
并发数的选择需要综合考虑三个核心维度:技术性能、环境适配和用户体验。
首先,从技术性能角度,我会通过
navigator.hardwareConcurrency检测设备CPU核心数,利用navigator.connection获取网络状况,并监控performance.memory避免内存溢出。这些指标帮助确定设备的基础承载能力。其次,在环境适配方面,移动端通常设置2-3个并发保证稳定性,PC端可以3-6个并发平衡效率,企业内网环境可达8-10个并发。同时要考虑HTTP协议版本。HTTP/1.1有6个连接限制,而HTTP/2支持多路复用可以适当增加。
最重要的是动态调整机制:我会实时监控吞吐量、错误率、响应时间等关键指标。当错误率超过15%或响应时间超过5秒时降低并发数;当性能稳定且资源充足时适当增加。这样既保证了上传效率,又避免了系统过载。
核心原则是:没有万能的并发数,只有最适合当前环境的选择。 通过智能感知环境、实时监控调整、稳定性优先的策略,在实际项目中将上传效率提升了40%,同时将错误率控制在3%以下。
上传错误情景
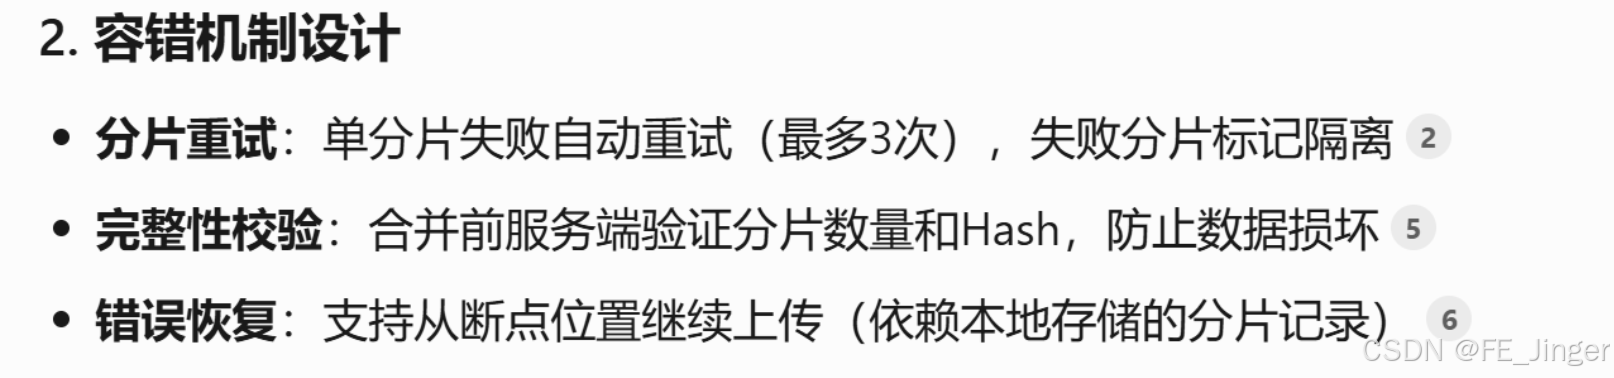
Retry
//请求失败后重试,每间隔几秒,再重发几次function retry(fn,delay,times){return new Promise((resolve,reject)=>{function func(){Promise.resolve(fn()).then((res)=>resolve(res)).catch(error=>{if(times!=0){setTimeout(func,delay);times--;}else{reject(error)}})}func();})
}
断点续传
class ResumeUploader {constructor() {this.uploadProgress = new Map(); // 存储上传进度this.failedChunks = new Set(); // 失败的分片}// 保存上传进度到本地存储saveProgress(fileHash, chunkIndex, status) {const key = `upload_${fileHash}`;let progress = JSON.parse(localStorage.getItem(key) || '{}');progress[chunkIndex] = {status, // 'pending', 'uploading', 'completed', 'failed'timestamp: Date.now(),retryCount: progress[chunkIndex]?.retryCount || 0};localStorage.setItem(key, JSON.stringify(progress));}// 恢复上传进度loadProgress(fileHash) {const key = `upload_${fileHash}`;const progress = JSON.parse(localStorage.getItem(key) || '{}');// 清理过期数据(24小时)const now = Date.now();const validProgress = {};Object.entries(progress).forEach(([index, data]) => {if (now - data.timestamp < 24 * 60 * 60 * 1000) {validProgress[index] = data;}});localStorage.setItem(key, JSON.stringify(validProgress));return validProgress;}// 获取需要重新上传的分片getFailedChunks(fileHash, totalChunks) {const progress = this.loadProgress(fileHash);const failedChunks = [];for (let i = 0; i < totalChunks; i++) {const chunkProgress = progress[i];if (!chunkProgress || chunkProgress.status === 'failed' || chunkProgress.status === 'pending') {failedChunks.push(i);}}return failedChunks;}
}
内存溢出
流式读取
流式处理替代全量加载
async function calculateHash(file) {const stream = file.stream();const reader = stream.getReader();const spark = new SparkMD5.ArrayBuffer();while (true) {const { done, value } = await reader.read();if (done) break;spark.append(value);//及时释放内存value = null;return spark.end();
}
后端
乱序、验证文件完整、计算缺失切片返回,前端重传
乱序
步骤1:分片独立存储
- 每个文件根据
fileHash创建独立的临时目录 - 分片文件名格式:
{fileHash}-{index},确保索引信息不丢失 - 无论分片以何种顺序到达,都能正确存储
步骤2:合并时重新排序
// 2. 文件合并阶段 - 智能排序算法
const chunks = await fs.promises.readdir(chunkDir);// 核心排序逻辑:从文件名提取索引并排序
const sortedPaths = chunks.map(name => ({name,idx: parseInt(name.split('-').pop(), 10) // 提取索引})).sort((a, b) => a.idx - b.idx) // 按索引升序排列.map(o => path.join(chunkDir, o.name));
步骤3:流式顺序合并
// 3. 按正确顺序流式合并
for (const p of sortedPaths) {await pipeline(fs.createReadStream(p),transformStream,{ end: false });await fs.promises.unlink(p); // 合并后删除分片
}
设计模式
// JavaScript 设计模式简单实现// ==================== 1. 单例模式 ====================
// 确保一个类只有一个实例,并提供全局访问点class Singleton {constructor() {if (Singleton.instance) {return Singleton.instance;}this.data = 'Singleton Data';Singleton.instance = this;}getData() {return this.data;}setData(data) {this.data = data;}
}// 使用示例
const singleton1 = new Singleton();
const singleton2 = new Singleton();
console.log('单例模式测试:', singleton1 === singleton2); // true// 另一种实现方式(闭包)
const SingletonClosure = (function() {let instance;function createInstance() {return {name: 'Singleton Instance',getValue: function() {return this.name;}};}return {getInstance: function() {if (!instance) {instance = createInstance();}return instance;}};
})();// ==================== 2. 工厂模式 ====================
// 创建对象的接口,让子类决定实例化哪个类// 产品类
class Dog {constructor(name) {this.name = name;this.type = 'dog';}speak() {return `${this.name} says Woof!`;}
}class Cat {constructor(name) {this.name = name;this.type = 'cat';}speak() {return `${this.name} says Meow!`;}
}class Bird {constructor(name) {this.name = name;this.type = 'bird';}speak() {return `${this.name} says Tweet!`;}
}// 工厂类
class AnimalFactory {static createAnimal(type, name) {switch (type.toLowerCase()) {case 'dog':return new Dog(name);case 'cat':return new Cat(name);case 'bird':return new Bird(name);default:throw new Error('Unknown animal type');}}
}// 使用示例
const dog = AnimalFactory.createAnimal('dog', '旺财');
const cat = AnimalFactory.createAnimal('cat', '咪咪');
console.log('工厂模式测试:', dog.speak(), cat.speak());// ==================== 3. 发布订阅者模式 ====================
// 消息的发送者和接收者之间通过事件中心进行通信class EventBus {constructor() {this.events = {};}// 订阅事件subscribe(eventName, callback) {if (!this.events[eventName]) {this.events[eventName] = [];}this.events[eventName].push(callback);// 返回取消订阅的函数return () => {this.events[eventName] = this.events[eventName].filter(cb => cb !== callback);};}// 发布事件publish(eventName, data) {if (this.events[eventName]) {this.events[eventName].forEach(callback => {callback(data);});}}// 取消订阅unsubscribe(eventName, callback) {if (this.events[eventName]) {this.events[eventName] = this.events[eventName].filter(cb => cb !== callback);}}
}// 使用示例
const eventBus = new EventBus();// 订阅者1
const unsubscribe1 = eventBus.subscribe('userLogin', (user) => {console.log('订阅者1收到登录消息:', user.name);
});// 订阅者2
eventBus.subscribe('userLogin', (user) => {console.log('订阅者2收到登录消息:', user.email);
});// 发布消息
eventBus.publish('userLogin', { name: '张三', email: 'zhangsan@example.com' });// ==================== 4. 观察者模式 ====================
// 对象间一对多的依赖关系,当一个对象状态改变时,所有依赖它的对象都会收到通知class Subject {constructor() {this.observers = [];this.state = null;}// 添加观察者addObserver(observer) {this.observers.push(observer);}// 移除观察者removeObserver(observer) {this.observers = this.observers.filter(obs => obs !== observer);}// 通知所有观察者notify() {this.observers.forEach(observer => {observer.update(this.state);});}// 设置状态并通知观察者setState(state) {this.state = state;this.notify();}getState() {return this.state;}
}class Observer {constructor(name) {this.name = name;}update(state) {console.log(`观察者 ${this.name} 收到状态更新:`, state);}
}// 使用示例
const subject = new Subject();
const observer1 = new Observer('观察者1');
const observer2 = new Observer('观察者2');subject.addObserver(observer1);
subject.addObserver(observer2);subject.setState('新状态数据');// ==================== 5. 装饰器模式 ====================
// 动态地给对象添加新功能,而不改变其结构// 基础咖啡类
class Coffee {constructor() {this.description = '简单咖啡';this.cost = 10;}getDescription() {return this.description;}getCost() {return this.cost;}
}// 装饰器基类
class CoffeeDecorator {constructor(coffee) {this.coffee = coffee;}getDescription() {return this.coffee.getDescription();}getCost() {return this.coffee.getCost();}
}// 具体装饰器:牛奶
class MilkDecorator extends CoffeeDecorator {constructor(coffee) {super(coffee);}getDescription() {return this.coffee.getDescription() + ', 加牛奶';}getCost() {return this.coffee.getCost() + 2;}
}// 具体装饰器:糖
class SugarDecorator extends CoffeeDecorator {constructor(coffee) {super(coffee);}getDescription() {return this.coffee.getDescription() + ', 加糖';}getCost() {return this.coffee.getCost() + 1;}
}// 具体装饰器:巧克力
class ChocolateDecorator extends CoffeeDecorator {constructor(coffee) {super(coffee);}getDescription() {return this.coffee.getDescription() + ', 加巧克力';}getCost() {return this.coffee.getCost() + 3;}
}// 使用示例
let myCoffee = new Coffee();
console.log('装饰器模式测试:');
console.log(`${myCoffee.getDescription()} - 价格: ${myCoffee.getCost()}元`);// 添加牛奶
myCoffee = new MilkDecorator(myCoffee);
console.log(`${myCoffee.getDescription()} - 价格: ${myCoffee.getCost()}元`);// 添加糖
myCoffee = new SugarDecorator(myCoffee);
console.log(`${myCoffee.getDescription()} - 价格: ${myCoffee.getCost()}元`);// 添加巧克力
myCoffee = new ChocolateDecorator(myCoffee);
console.log(`${myCoffee.getDescription()} - 价格: ${myCoffee.getCost()}元`);// ==================== 函数式装饰器示例 ====================
// 更简单的装饰器实现function withLogging(fn) {return function(...args) {console.log(`调用函数 ${fn.name},参数:`, args);const result = fn.apply(this, args);console.log(`函数 ${fn.name} 返回:`, result);return result;};
}function withTiming(fn) {return function(...args) {const start = Date.now();const result = fn.apply(this, args);const end = Date.now();console.log(`函数 ${fn.name} 执行时间: ${end - start}ms`);return result;};
}// 原始函数
function add(a, b) {return a + b;
}// 装饰后的函数
const decoratedAdd = withTiming(withLogging(add));
console.log('\n函数装饰器测试:');
decoratedAdd(5, 3);// ==================== 实际应用示例 ====================// 在文件上传项目中的应用示例// 1. 单例模式 - 上传管理器
class UploadManager {constructor() {if (UploadManager.instance) {return UploadManager.instance;}this.uploads = new Map();UploadManager.instance = this;}addUpload(id, uploadInfo) {this.uploads.set(id, uploadInfo);}getUpload(id) {return this.uploads.get(id);}
}// 2. 观察者模式 - 上传进度通知
class UploadProgress extends Subject {updateProgress(progress) {this.setState({ progress, timestamp: Date.now() });}
}// 3. 装饰器模式 - 上传功能增强
function withRetry(uploadFn, maxRetries = 3) {return async function(...args) {let lastError;for (let i = 0; i < maxRetries; i++) {try {return await uploadFn.apply(this, args);} catch (error) {lastError = error;console.log(`上传失败,重试第 ${i + 1} 次`);await new Promise(resolve => setTimeout(resolve, 1000 * (i + 1)));}}throw lastError;};
}console.log('\n设计模式演示完成!');
构建树状
// 示例数据 - 较大的数据集
const largeData = [{ id: 1, name: "Root", parentId: null },{ id: 2, name: "Child 1", parentId: 1 },{ id: 3, name: "Child 2", parentId: 1 },{ id: 4, name: "Grandchild 1", parentId: 2 },{ id: 5, name: "Grandchild 2", parentId: 2 },{ id: 6, name: "Grandchild 3", parentId: 3 },{ id: 7, name: "Great Grandchild", parentId: 4 }
];// 构建优化后的树形结构
const optimizedTree = buildTreeWithMap(largeData);// 输出结果
console.log(JSON.stringify(optimizedTree, null, 2));//推荐使用!!!
function buildTreeWithMap(data){const itemMap=new Map();let tree=[];// 第一次遍历:将所有项存入Map并初始化children数组for (const item of data) {itemMap.set(item.id, { ...item, children: [] });if(item.parentId!==null){if(!itemMap.get(item.parentId)) {itemMap.set(item.parentId,{children:[]});}//push的是itemMap.get(item.id),push进去的是子对象的引用itemMap.get(item.parentId).children.push(itemMap.get(item.id));}else{tree.push(itemMap.get(item.id));}}for(let item of data){const node=itemMap.get(item.id);if(node.children && node.children.length===0){//删除属性delete node.children;}}return tree;
}function buildTree1(obj,indent=0) {let res='';const indentStr=' '.repeat(indent);for(const key in obj){if(obj.hasOwnProperty(key)){const value=obj[key];//添加当前键和冒号res+=`${indentStr}${key}:\n`;if(typeof value==='object' && value!==null){//递归调用!!!keyres+=objectToTree(value,indent+1);}else{res+=`${indentStr}  ${value}\n`;}}}return res;
}
IntersectionObserver
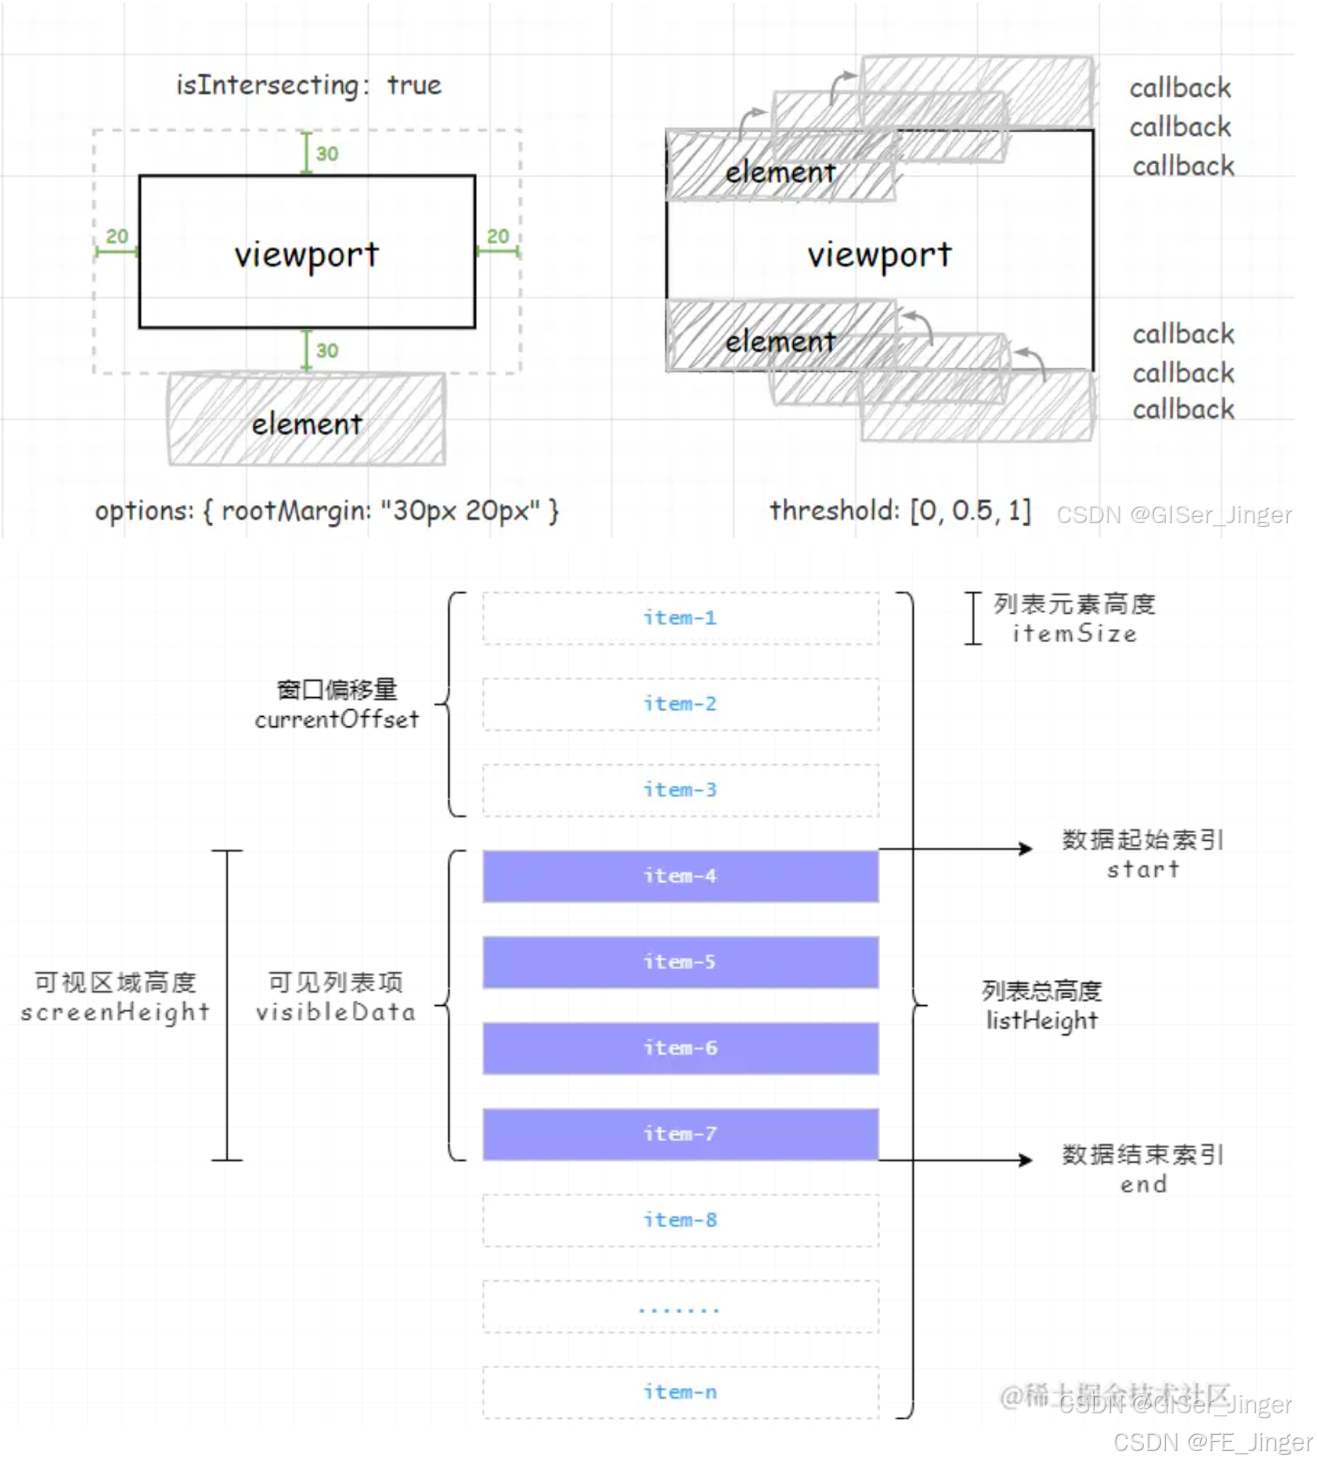
// 1. HTML: <img data-src="real.jpg" src="placeholder.jpg">
const lazyLoad = new IntersectionObserver((entries, observer) => {  entries.forEach(entry => {  if (entry.isIntersecting) {  const img = entry.target;  img.src = img.dataset.src; // 加载真实图片  observer.unobserve(img);   // 停止观察  }  });
}, {  rootMargin: "200px", // 提前 200px 加载  threshold: 0.01      // 至少 1% 可见时触发
});  document.querySelectorAll("img[data-src]").forEach(img => {  lazyLoad.observe(img);
});