计算机视觉实战:用YOLO打造智能停车场空位雷达
计算机视觉实战:用YOLO打造智能停车场空位雷达
工业级解决方案:从算法原理到部署全流程解析
一、停车场管理痛点与解决方案
停车场数据统计:
- 全球停车场数量:500万+
- 平均找车位时间:10-15分钟
- 停车场利用率:60-75%
- 因找车位浪费的燃油:$67亿/年
- 智能停车系统市场:$50亿(2025年预测)

二、技术选型:YOLO为何成为最佳选择
1. 目标检测算法对比
| 算法 | 速度(FPS) | 精度(mAP) | 模型大小 | 适用场景 |
|---|---|---|---|---|
| R-CNN | 5 | 78% | 200MB | 高精度要求 |
| SSD | 22 | 75% | 25MB | 平衡场景 |
| YOLOv3 | 45 | 76% | 35MB | 实时检测 |
| YOLOv5 | 140 | 76.8% | 14MB | 工业级应用 |
| YOLOv8 | 160 | 78.5% | 12MB | 最新最优 |
2. YOLO架构演进

三、系统架构:智能停车场雷达设计
1. 整体架构图
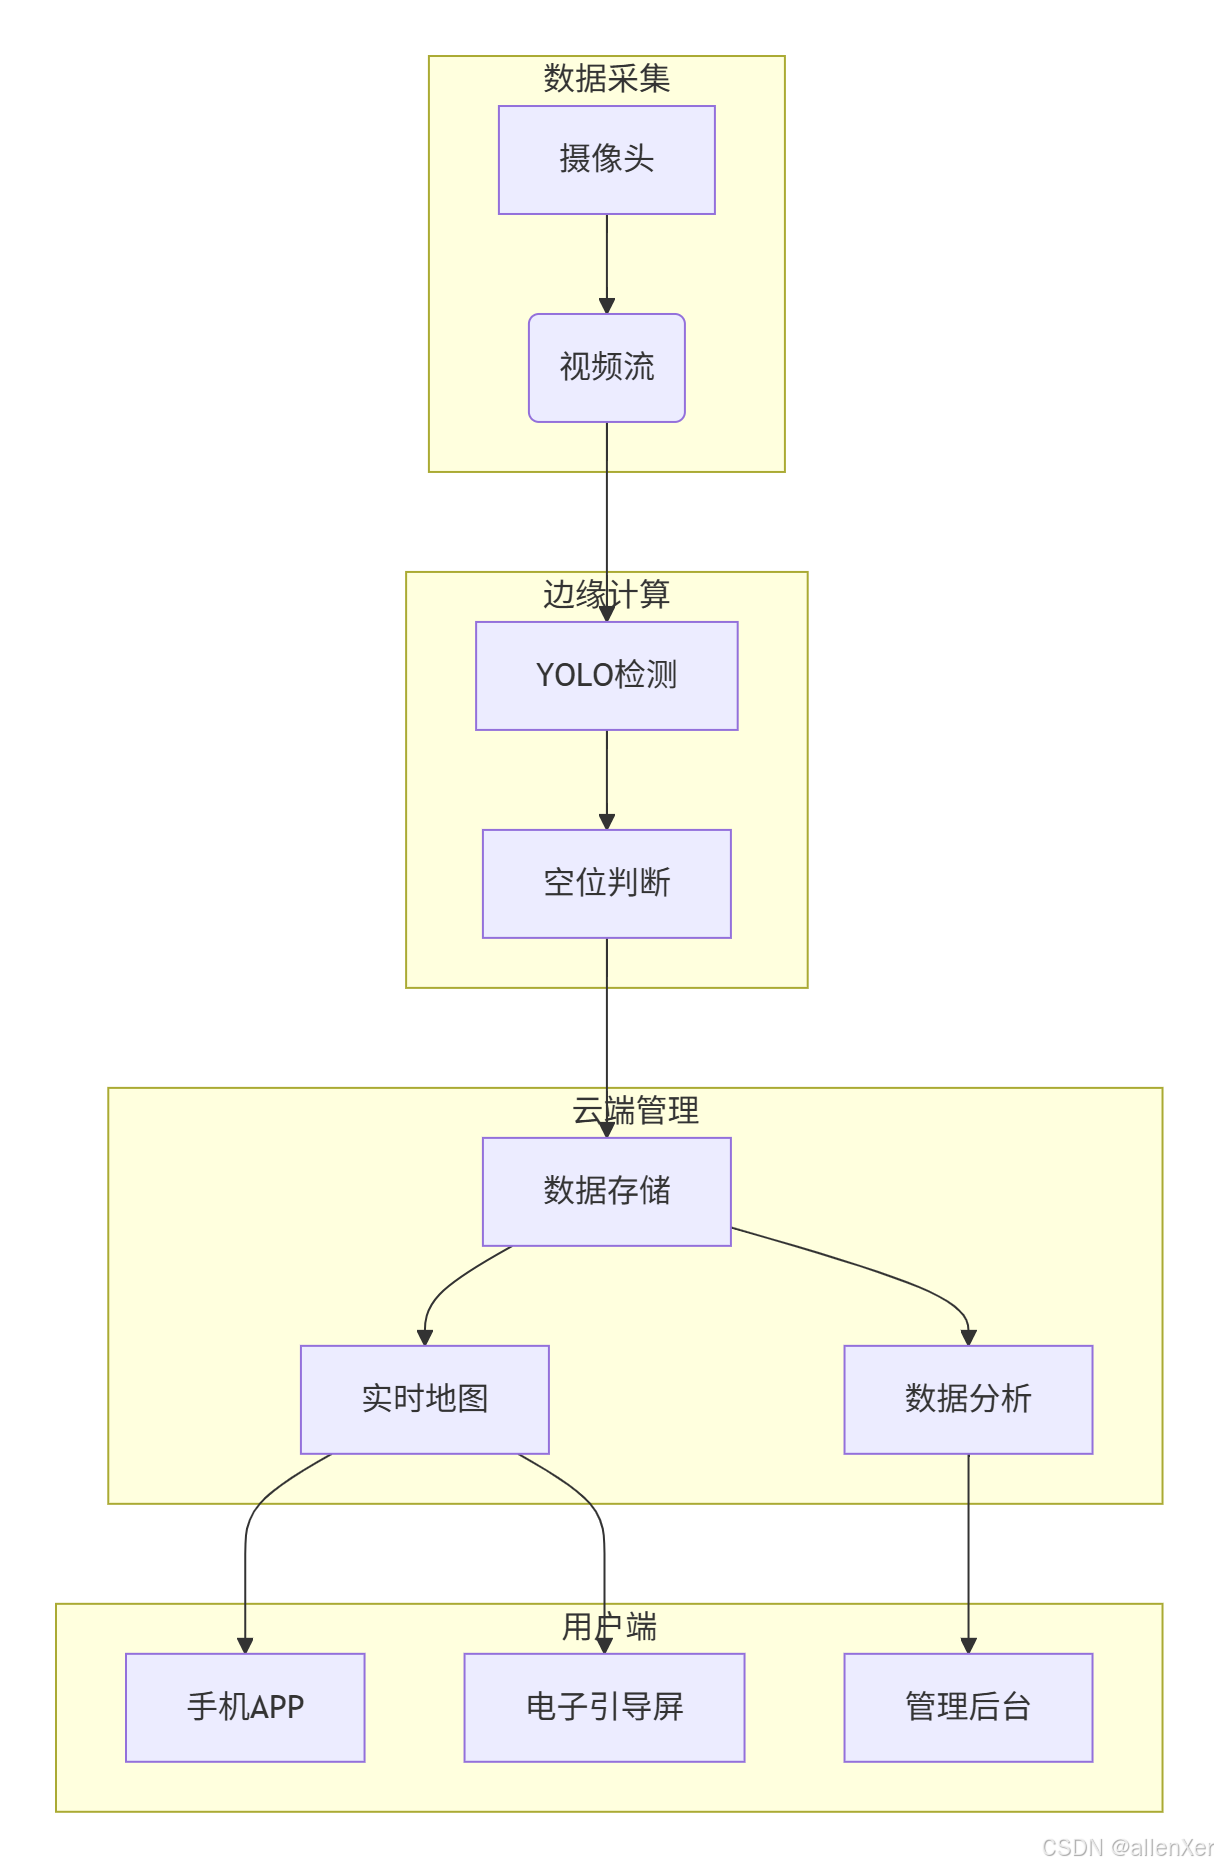
2. 硬件部署方案

四、数据集准备:构建停车场专用数据集
1. 数据采集策略
import cv2
import os
import timedef capture_parking_data(camera_ip, output_dir, interval=10):"""定时采集停车场图像"""cap = cv2.VideoCapture(camera_ip)if not cap.isOpened():print("无法连接摄像头")returnos.makedirs(output_dir, exist_ok=True)count = 0while True:ret, frame = cap.read()if not ret:print("读取帧失败")break# 每10秒保存一帧if count % interval == 0:timestamp = time.strftime("%Y%m%d_%H%M%S")filename = os.path.join(output_dir, f"parking_{timestamp}.jpg")cv2.imwrite(filename, frame)print(f"保存图像: {filename}")count += 1time.sleep(1)cap.release()# 示例:采集商场停车场数据
# capture_parking_data('rtsp://admin:password@192.168.1.64', 'data/parking_images')
2. 数据标注工具
from labelImg import LabelImg
import subprocessdef annotate_images(image_dir, output_dir):"""使用LabelImg标注图像"""# 创建标注目录os.makedirs(output_dir, exist_ok=True)# 启动LabelImgcmd = f"labelImg {image_dir} {output_dir}"subprocess.run(cmd, shell=True)print("标注完成,生成XML文件")# 转换标注格式
def convert_to_yolo_format(xml_dir, output_dir, classes):"""将XML标注转换为YOLO格式"""os.makedirs(output_dir, exist_ok=True)for xml_file in os.listdir(xml_dir):if xml_file.endswith('.xml'):# 解析XMLtree = ET.parse(os.path.join(xml_dir, xml_file))root = tree.getroot()# 获取图像尺寸size = root.find('size')width = int(size.find('width').text)height = int(size.find('height').text)# 创建YOLO格式文件txt_file = os.path.splitext(xml_file)[0] + '.txt'with open(os.path.join(output_dir, txt_file), 'w') as f:for obj in root.iter('object'):cls = obj.find('name').textif cls not in classes:continuecls_id = classes.index(cls)xmlbox = obj.find('bndbox')xmin = int(xmlbox.find('xmin').text)ymin = int(xmlbox.find('ymin').text)xmax = int(xmlbox.find('xmax').text)ymax = int(xmlbox.find('ymax').text)# 转换为YOLO格式x_center = (xmin + xmax) / 2 / widthy_center = (ymin + ymax) / 2 / heightw = (xmax - xmin) / widthh = (ymax - ymin) / heightf.write(f"{cls_id} {x_center} {y_center} {w} {h}\n")print("转换完成,生成YOLO格式标注")
五、模型训练:定制YOLOv8停车场检测器
1. 训练环境配置
# 安装依赖
pip install ultralytics torch torchvision# 创建数据集目录结构
dataset/
├── images/
│   ├── train/
│   └── val/
└── labels/├── train/└── val/
2. 训练配置文件
# parking.yaml
path: ../dataset
train: images/train
val: images/valnames:0: car1: truck2: motorcycle3: empty
3. 训练代码
from ultralytics import YOLO
import torchdef train_yolo_model():"""训练YOLOv8模型"""# 检查GPUdevice = 'cuda' if torch.cuda.is_available() else 'cpu'print(f"使用设备: {device}")# 加载预训练模型model = YOLO('yolov8n.pt')# 训练参数params = {'data': 'config/parking.yaml','epochs': 100,'imgsz': 640,'batch': 16,'device': device,'optimizer': 'auto','lr0': 0.01,'cos_lr': True,'patience': 20,'project': 'parking_detection','name': 'yolov8_parking'}# 开始训练results = model.train(**params)# 导出模型model.export(format='onnx')return results# 训练模型
train_results = train_yolo_model()
4. 模型评估
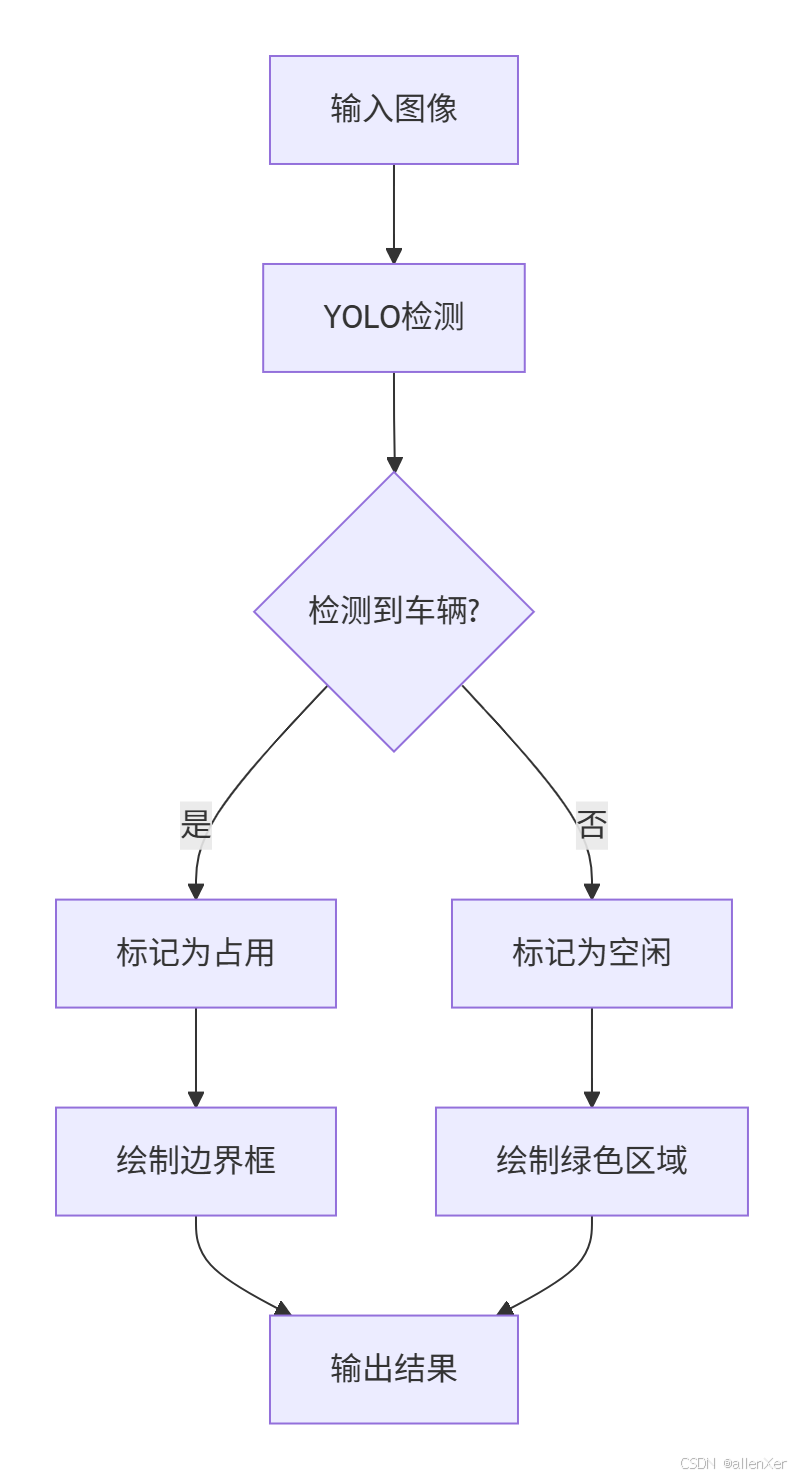
def evaluate_model(model_path, data_dir):"""评估模型性能"""model = YOLO(model_path)# 验证集评估metrics = model.val(data='config/parking.yaml',split='val',imgsz=640,conf=0.25,iou=0.6)print(f"mAP50-95: {metrics.box.map:.4f}")print(f"mAP50: {metrics.box.map50:.4f}")# 可视化结果for img_file in os.listdir(os.path.join(data_dir, 'val')):img_path = os.path.join(data_dir, 'val', img_file)results = model.predict(img_path, save=True, conf=0.5)return metrics六、空位检测算法:从检测到状态判断
1. 车位状态判断流程
2. 车位映射算法
import numpy as np
import cv2class ParkingSpaceMapper:"""车位映射管理器"""def __init__(self, config_file):self.spaces = self.load_config(config_file)self.space_status = {id: 'unknown' for id in self.spaces.keys()}def load_config(self, file_path):"""加载车位配置"""spaces = {}with open(file_path, 'r') as f:for line in f:if line.strip():parts = line.split(',')space_id = int(parts[0])coords = np.array([float(x) for x in parts[1:]]).reshape(-1, 2)spaces[space_id] = coordsreturn spacesdef draw_spaces(self, image):"""在图像上绘制车位"""for space_id, points in self.spaces.items():color = (0, 255, 0) if self.space_status[space_id] == 'empty' else (0, 0, 255)cv2.polylines(image, [points.astype(int)], True, color, 2)cv2.putText(image, str(space_id), tuple(points[0].astype(int)), cv2.FONT_HERSHEY_SIMPLEX, 0.5, (255, 255, 255), 1)return imagedef update_status(self, detections):"""根据检测结果更新车位状态"""for space_id, points in self.spaces.items():# 创建车位掩码mask = np.zeros(image.shape[:2], dtype=np.uint8)cv2.fillPoly(mask, [points.astype(int)], 255)# 检查车位内是否有车辆occupied = Falsefor det in detections:if det['class'] in ['car', 'truck', 'motorcycle']:# 计算检测框与车位的IOUbox_mask = np.zeros(image.shape[:2], dtype=np.uint8)x1, y1, x2, y2 = det['bbox']cv2.rectangle(box_mask, (x1, y1), (x2, y2), 255, -1)# 计算重叠区域overlap = cv2.bitwise_and(mask, box_mask)overlap_area = np.count_nonzero(overlap)mask_area = np.count_nonzero(mask)# 如果重叠超过20%,则认为车位被占用if overlap_area > 0.2 * mask_area:occupied = Truebreakself.space_status[space_id] = 'occupied' if occupied else 'empty'def get_vacant_spaces(self):"""获取空闲车位"""return [id for id, status in self.space_status.items() if status == 'empty']
七、工业级部署:边缘计算优化
1. TensorRT加速
import tensorrt as trtdef convert_to_tensorrt(onnx_path, engine_path):"""将ONNX模型转换为TensorRT引擎"""logger = trt.Logger(trt.Logger.INFO)builder = trt.Builder(logger)network = builder.create_network(1 << int(trt.NetworkDefinitionCreationFlag.EXPLICIT_BATCH))parser = trt.OnnxParser(network, logger)# 解析ONNX模型with open(onnx_path, 'rb') as model:if not parser.parse(model.read()):print("解析错误:")for error in range(parser.num_errors):print(parser.get_error(error))return None# 配置构建器config = builder.create_builder_config()config.set_memory_pool_limit(trt.MemoryPoolType.WORKSPACE, 1 << 30)  # 1GB# 设置精度if builder.platform_has_fast_fp16:config.set_flag(trt.BuilderFlag.FP16)# 构建引擎engine = builder.build_engine(network, config)with open(engine_path, 'wb') as f:f.write(engine.serialize())return engine# 转换模型
convert_to_tensorrt('yolov8_parking.onnx', 'yolov8_parking.engine')
2. 边缘推理代码
import pycuda.driver as cuda
import pycuda.autoinit
import numpy as npclass YOLOTRTInference:"""TensorRT推理引擎"""def __init__(self, engine_path):self.logger = trt.Logger(trt.Logger.INFO)self.engine = self.load_engine(engine_path)self.context = self.engine.create_execution_context()# 分配内存self.inputs, self.outputs, self.bindings, self.stream = self.allocate_buffers()def load_engine(self, engine_path):"""加载TensorRT引擎"""with open(engine_path, 'rb') as f:runtime = trt.Runtime(self.logger)return runtime.deserialize_cuda_engine(f.read())def allocate_buffers(self):"""分配输入输出内存"""inputs = []outputs = []bindings = []stream = cuda.Stream()for binding in self.engine:size = trt.volume(self.engine.get_binding_shape(binding)) * self.engine.max_batch_sizedtype = trt.nptype(self.engine.get_binding_dtype(binding))# 分配内存host_mem = cuda.pagelocked_empty(size, dtype)device_mem = cuda.mem_alloc(host_mem.nbytes)bindings.append(int(device_mem))if self.engine.binding_is_input(binding):inputs.append({'host': host_mem, 'device': device_mem})else:outputs.append({'host': host_mem, 'device': device_mem})return inputs, outputs, bindings, streamdef inference(self, image):"""执行推理"""# 预处理图像input_data = self.preprocess(image)# 复制数据到设备np.copyto(self.inputs[0]['host'], input_data.ravel())cuda.memcpy_htod_async(self.inputs[0]['device'], self.inputs[0]['host'], self.stream)# 执行推理self.context.execute_async_v2(bindings=self.bindings, stream_handle=self.stream.handle)# 复制结果回主机cuda.memcpy_dtoh_async(self.outputs[0]['host'], self.outputs[0]['device'], self.stream)self.stream.synchronize()# 后处理return self.postprocess(self.outputs[0]['host'])def preprocess(self, image):"""图像预处理"""# 调整大小img = cv2.resize(image, (640, 640))# 归一化img = img.astype(np.float32) / 255.0# 通道转换img = img.transpose(2, 0, 1)  # HWC to CHW# 添加批次维度img = np.expand_dims(img, axis=0)return imgdef postprocess(self, output):"""后处理检测结果"""# 解析输出num_detections = int(output[0])boxes = output[1:1+num_detections*4].reshape(-1, 4)scores = output[1+num_detections*4:1+num_detections*5]classes = output[1+num_detections*5:1+num_detections*6].astype(int)# 转换为检测结果detections = []for i in range(num_detections):if scores[i] > 0.5:  # 置信度阈值x1, y1, x2, y2 = boxes[i]detections.append({'bbox': [int(x1), int(y1), int(x2), int(y2)],'score': float(scores[i]),'class': self.class_names[classes[i]]})return detections
八、系统集成:完整停车场解决方案
1. 实时处理流程
import cv2
import time
from parking_mapper import ParkingSpaceMapper
from yolotrt_inference import YOLOTRTInferenceclass ParkingSystem:"""智能停车场系统"""def __init__(self, camera_url, config_file, engine_path):self.camera_url = camera_urlself.mapper = ParkingSpaceMapper(config_file)self.detector = YOLOTRTInference(engine_path)self.vacant_count = 0self.total_count = len(self.mapper.spaces)def run(self):"""运行系统"""cap = cv2.VideoCapture(self.camera_url)if not cap.isOpened():print("无法连接摄像头")returnwhile True:start_time = time.time()# 读取帧ret, frame = cap.read()if not ret:print("读取帧失败")time.sleep(1)continue# 执行检测detections = self.detector.inference(frame)# 更新车位状态self.mapper.update_status(detections)# 绘制结果result_frame = self.mapper.draw_spaces(frame)# 显示空闲车位数量self.vacant_count = len(self.mapper.get_vacant_spaces())cv2.putText(result_frame, f"空闲车位: {self.vacant_count}/{self.total_count}", (20, 40), cv2.FONT_HERSHEY_SIMPLEX, 1, (0, 255, 0), 2)# 计算FPSfps = 1 / (time.time() - start_time)cv2.putText(result_frame, f"FPS: {fps:.1f}", (20, 80), cv2.FONT_HERSHEY_SIMPLEX, 1, (0, 255, 0), 2)# 显示结果cv2.imshow('Parking System', result_frame)# 退出检测if cv2.waitKey(1) & 0xFF == ord('q'):breakcap.release()cv2.destroyAllWindows()def get_vacant_spaces(self):"""获取空闲车位列表"""return self.mapper.get_vacant_spaces()def get_vacant_count(self):"""获取空闲车位数量"""return self.vacant_count# 启动系统
if __name__ == "__main__":system = ParkingSystem(camera_url='rtsp://admin:password@192.168.1.64',config_file='parking_spaces.txt',engine_path='yolov8_parking.engine')system.run()
2. 云端数据集成
import requests
import json
import timeclass CloudIntegration:"""云端数据集成"""def __init__(self, api_url, api_key):self.api_url = api_urlself.headers = {'Authorization': f'Bearer {api_key}'}def send_parking_data(self, vacant_count, total_count, vacant_list):"""发送停车场数据到云端"""data = {'timestamp': int(time.time()),'vacant_count': vacant_count,'total_count': total_count,'vacant_list': vacant_list}try:response = requests.post(f"{self.api_url}/parking/update",headers=self.headers,json=data,timeout=5)if response.status_code == 200:return Trueelse:print(f"上传失败: {response.status_code}")return Falseexcept Exception as e:print(f"上传错误: {str(e)}")return False# 集成到主系统
class ParkingSystemWithCloud(ParkingSystem):def __init__(self, camera_url, config_file, engine_path, cloud_api):super().__init__(camera_url, config_file, engine_path)self.cloud = CloudIntegration(cloud_api['url'], cloud_api['key'])self.last_update = 0def run(self):while True:# ... 原有处理逻辑 ...# 每分钟上传一次数据current_time = time.time()if current_time - self.last_update > 60:vacant_list = self.get_vacant_spaces()self.cloud.send_parking_data(self.vacant_count, self.total_count, vacant_list)self.last_update = current_time
九、真实案例:成功与失败分析
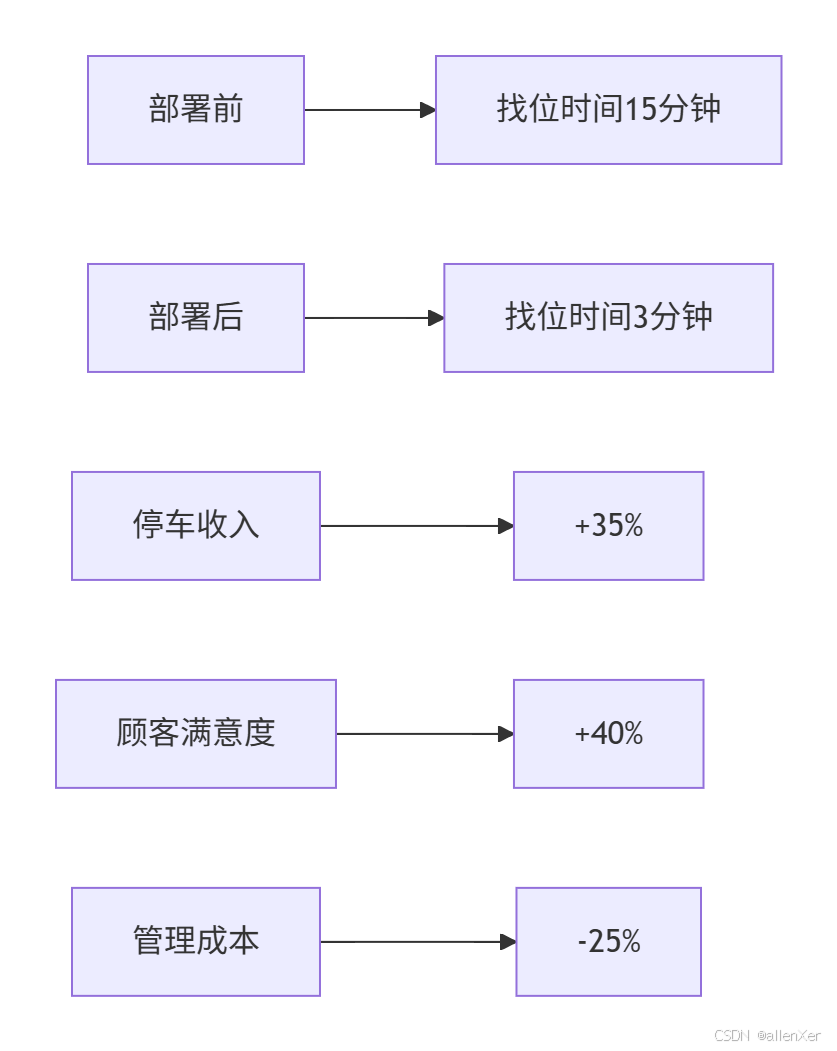
1. 成功案例:大型购物中心部署
项目背景:
- 地点:上海某购物中心
- 车位数量:1200个
- 摄像头:12台
- 部署时间:3天
实施效果:
技术亮点:
# 多摄像头融合算法
def fuse_camera_detections(camera_detections):"""融合多摄像头检测结果"""fused = {}for cam_id, detections in camera_detections.items():for det in detections:# 转换到全局坐标系global_bbox = transform_coordinates(det['bbox'], cam_id)# 检查是否已存在existing = Falsefor fid, fdet in fused.items():if calculate_iou(global_bbox, fdet['bbox']) > 0.7:# 合并检测结果fused[fid]['bbox'] = merge_boxes(global_bbox, fdet['bbox'])fused[fid]['score'] = max(det['score'], fdet['score'])existing = Truebreakif not existing:fused_id = len(fused) + 1fused[fused_id] = {'bbox': global_bbox,'score': det['score'],'class': det['class']}return fused
2. 失败案例:露天停车场误检
问题分析:
- 光照变化导致检测失败
- 阴影误判为车辆
- 雨天反光影响
- 树影移动造成误报
解决方案:
- 添加光照不变性预处理
- 使用多帧验证机制
- 引入红外传感器辅助
- 部署天气自适应模型
十、工业级优化:全天候可靠检测
1. 光照不变性处理
def adaptive_illumination(image):"""自适应光照处理"""# 转换到LAB颜色空间lab = cv2.cvtColor(image, cv2.COLOR_BGR2LAB)# 分离通道l, a, b = cv2.split(lab)# CLAHE增强L通道clahe = cv2.createCLAHE(clipLimit=3.0, tileGridSize=(8,8))cl = clahe.apply(l)# 合并通道limg = cv2.merge((cl, a, b))# 转换回BGRenhanced = cv2.cvtColor(limg, cv2.COLOR_LAB2BGR)return enhanced2. 多帧验证机制
class DetectionValidator:"""检测结果验证器"""def __init__(self, threshold=3):self.history = {}self.threshold = thresholddef validate(self, detections):"""验证检测结果"""valid_detections = []# 更新历史记录for det in detections:box = det['bbox']center = ((box[0]+box[2])//2, (box[1]+box[3])//2)# 查找匹配的历史检测matched = Falsefor track_id, history in self.history.items():last_center = history['centers'][-1]distance = np.sqrt((center[0]-last_center[0])**2 + (center[1]-last_center[1])**2)if distance < 50: # 匹配阈值history['centers'].append(center)history['count'] += 1history['last_seen'] = 0# 连续检测超过阈值则确认if history['count'] >= self.threshold:valid_detections.append(det)matched = Truebreakif not matched:# 新检测track_id = len(self.history) + 1self.history[track_id] = {'centers': [center],'count': 1,'last_seen': 0}# 更新未匹配的历史for track_id in list(self.history.keys()):self.history[track_id]['last_seen'] += 1if self.history[track_id]['last_seen'] > 5: # 5帧未出现则删除del self.history[track_id]return valid_detections3. 模型热更新系统
import requestsclass ModelUpdater:"""模型热更新系统"""def __init__(self, model_path, update_url):self.model_path = model_pathself.update_url = update_urlself.last_check = 0self.check_interval = 86400 # 每天检查一次def check_update(self):"""检查模型更新"""current_time = time.time()if current_time - self.last_check < self.check_interval:return Falsetry:response = requests.get(f"{self.update_url}/check_version", timeout=5)if response.status_code == 200:data = response.json()local_version = self.get_local_version()if data['version'] > local_version:print(f"发现新模型版本: {data['version']}")return self.download_model(data['model_url'])except Exception as e:print(f"检查更新失败: {str(e)}")self.last_check = current_timereturn Falsedef download_model(self, model_url):"""下载新模型"""try:response = requests.get(model_url, stream=True)if response.status_code == 200:temp_path = self.model_path + ".tmp"with open(temp_path, 'wb') as f:for chunk in response.iter_content(chunk_size=8192):f.write(chunk)# 替换旧模型os.replace(temp_path, self.model_path)print("模型更新成功")return Trueexcept Exception as e:print(f"下载模型失败: {str(e)}")return Falsedef get_local_version(self):"""获取本地模型版本"""version_file = os.path.join(os.path.dirname(self.model_path), "version.txt")if os.path.exists(version_file):with open(version_file, 'r') as f:return int(f.read().strip())return 0十一、完整可运行系统
# 完整停车场系统
import cv2
import time
import numpy as np
from yolotrt_inference import YOLOTRTInference
from parking_mapper import ParkingSpaceMapper
from detection_validator import DetectionValidator
from cloud_integration import CloudIntegrationclass AdvancedParkingSystem:"""高级停车场系统"""def __init__(self, config):self.camera_url = config['camera_url']self.mapper = ParkingSpaceMapper(config['space_config'])self.detector = YOLOTRTInference(config['model_path'])self.validator = DetectionValidator()self.cloud = CloudIntegration(config['cloud_api'])self.illumination_adapter = config.get('illumination_adapter', True)self.total_count = len(self.mapper.spaces)self.vacant_count = 0self.fps = 0self.frame_count = 0self.start_time = time.time()def run(self):"""运行系统"""cap = cv2.VideoCapture(self.camera_url)if not cap.isOpened():print("无法连接摄像头")return# 创建显示窗口cv2.namedWindow('智能停车场系统', cv2.WINDOW_NORMAL)cv2.resizeWindow('智能停车场系统', 1200, 800)while True:frame_start = time.time()# 读取帧ret, frame = cap.read()if not ret:print("读取帧失败")time.sleep(1)continue# 光照自适应if self.illumination_adapter:frame = self.adapt_illumination(frame)# 执行检测detections = self.detector.inference(frame)# 验证检测结果valid_detections = self.validator.validate(detections)# 更新车位状态self.mapper.update_status(valid_detections)# 绘制结果result_frame = self.mapper.draw_spaces(frame)# 更新空闲车位计数self.vacant_count = len(self.mapper.get_vacant_spaces())# 显示统计信息self.display_stats(result_frame)# 显示结果cv2.imshow('智能停车场系统', result_frame)# 更新FPS计算self.update_fps(frame_start)# 每分钟上传数据到云端if self.frame_count % 1800 == 0:  # 30fps * 60s = 1800帧self.upload_to_cloud()# 退出检测if cv2.waitKey(1) & 0xFF == ord('q'):breakcap.release()cv2.destroyAllWindows()def adapt_illumination(self, image):"""自适应光照处理"""# 使用CLAHE增强对比度lab = cv2.cvtColor(image, cv2.COLOR_BGR2LAB)l, a, b = cv2.split(lab)clahe = cv2.createCLAHE(clipLimit=3.0, tileGridSize=(8,8))cl = clahe.apply(l)limg = cv2.merge((cl, a, b))return cv2.cvtColor(limg, cv2.COLOR_LAB2BGR)def display_stats(self, frame):"""显示统计信息"""# 空闲车位cv2.putText(frame, f"空闲车位: {self.vacant_count}/{self.total_count}", (20, 40), cv2.FONT_HERSHEY_SIMPLEX, 1, (0, 255, 0), 2)# FPScv2.putText(frame, f"FPS: {self.fps:.1f}", (20, 80), cv2.FONT_HERSHEY_SIMPLEX, 1, (0, 255, 0), 2)# 系统运行时间elapsed = time.time() - self.start_timehours = int(elapsed // 3600)minutes = int((elapsed % 3600) // 60)cv2.putText(frame, f"运行时间: {hours}h{minutes}m", (20, 120), cv2.FONT_HERSHEY_SIMPLEX, 1, (0, 255, 0), 2)def update_fps(self, frame_start):"""更新FPS计算"""self.frame_count += 1frame_time = time.time() - frame_startself.fps = 1 / frame_time if frame_time > 0 else 0def upload_to_cloud(self):"""上传数据到云端"""vacant_list = self.mapper.get_vacant_spaces()self.cloud.send_parking_data(self.vacant_count, self.total_count, vacant_list)# 配置参数
config = {'camera_url': 'rtsp://admin:password@192.168.1.64','space_config': 'config/parking_spaces.txt','model_path': 'models/yolov8_parking.engine','cloud_api': {'url': 'https://api.example.com','key': 'your_api_key'},'illumination_adapter': True
}# 启动系统
if __name__ == "__main__":system = AdvancedParkingSystem(config)system.run()
结语:打造智慧城市新基建
通过本指南,您已掌握:
- 🚗 YOLO目标检测核心技术
- 📍 车位映射与状态判断
- ⚡ 边缘计算优化部署
- ☁️ 云端数据集成
- 🌦️ 全天候可靠检测方案
下一步行动:
- 部署到本地停车场
- 集成车牌识别功能
- 添加停车时长分析
- 开发用户导航APP
- 扩展至城市级停车网络
"在智慧城市的蓝图中,每一个车位都是数据节点。掌握计算机视觉,你就能连接这些节点,构建智能交通新生态。"