debian 10 安装apache2 zabbix
nginx 可以略过,改为apache2
apt update

apt-get install nginx -y

nginx -v
nginx version: nginx/1.14.2
- mysql 安装参考linux debian10 安装mysql5.7_debian apt install mysql5.7-CSDN博客
-
Install and configure Zabbix for your platform
-
a. Install Zabbix repository
Documentation
wget https://repo.zabbix.com/zabbix/5.0/debian/pool/main/z/zabbix-release/zabbix-release_5.0-1+buster_all.deb
dpkg -i zabbix-release_5.0-1+buster_all.deb
apt update
b. Install Zabbix server, frontend, agent
apt install zabbix-server-mysql zabbix-frontend-php zabbix-apache-conf zabbix-agentc. Create initial database
Documentation
Make sure you have database server up and running.
Run the following on your database host.
mysql -uroot -p
password
mysql> create database zabbix character set utf8 collate utf8_bin;
mysql> create user zabbix@localhost identified by 'password';
mysql> grant all privileges on zabbix.* to zabbix@localhost;
mysql> set global log_bin_trust_function_creators = 1;
mysql> quit;
On Zabbix server host import initial schema and data. You will be prompted to enter your newly created password.
zcat /usr/share/doc/zabbix-server-mysql*/create.sql.gz | mysql -uzabbix -p zabbixDisable log_bin_trust_function_creators option after importing database schema.
mysql -uroot -p
password
mysql> set global log_bin_trust_function_creators = 0;
mysql> quit;
d. Configure the database for Zabbix server
Edit file /etc/zabbix/zabbix_server.conf
DBPassword=passworde. Configure PHP for Zabbix frontend
Edit file /etc/zabbix/apache.conf uncomment and set the right timezone for you.
php_value date.timezone Europe/Rigaf. Start Zabbix server and agent processes
Start Zabbix server and agent processes and make it start at system boot.
systemctl restart zabbix-server zabbix-agent apache2 systemctl enable zabbix-server zabbix-agent apache2 -
Start using Zabbix
如果没有其它应用占用80端口 此步略过
vim /etc/apache2/ports.conf
Listen 81
systemctl restart apache2
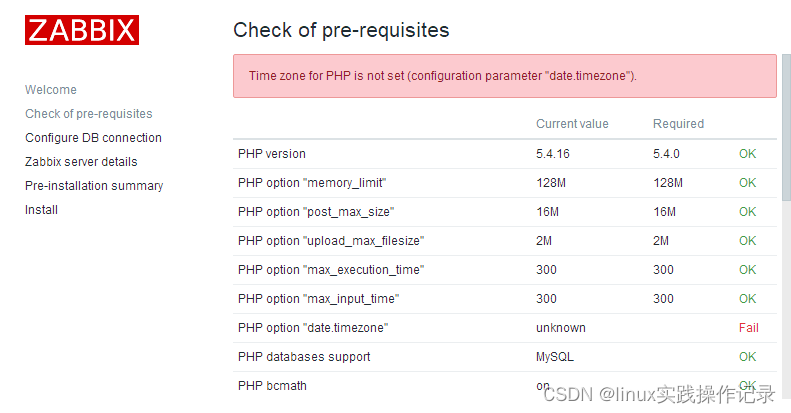
vim /etc/php/7.3/apache2/php.ini
[Date]
; Defines the default timezone used by the date functions
; http://php.net/date.timezone
date.timezone = Asia/Shanghai
systemctl restart zabbix-server zabbix-agent apache2