FPGA设计思想与验证方法学系列学习笔记003
Q1:模块的例化,只讨论方法,不讨论代码功能。
在 Verilog 中,模块实例化是将一个模块作为组件使用在另一个模块中。这类似于在编程中调用一个函数或在硬件设计中使用一个子电路。通过实例化,可以将复杂的设计分解为更小的、可复用的模块[1]。
模块的定义
module add32(input wire [31:0] in1,input wire [31:0] in2,output wire [31:0] out
);// 直接使用运算符,综合工具自动优化assign out = in1 + in2;
endmodule
顶层模块top_module
module top_module(input wire [31:0] a,input wire [31:0] b,output wire [31:0] sum
);// 实例化 add32 模块add32 u_add32 (.in1(a), // 将顶层模块的输入 a 连接到子模块 add32 的 in1 端口.in2(b), // 将顶层模块的输入 b 连接到子模块 add32 的 in2 端口.out(sum) // 将子模块 add32 的输出 out 连接到顶层模块的输出 sum);
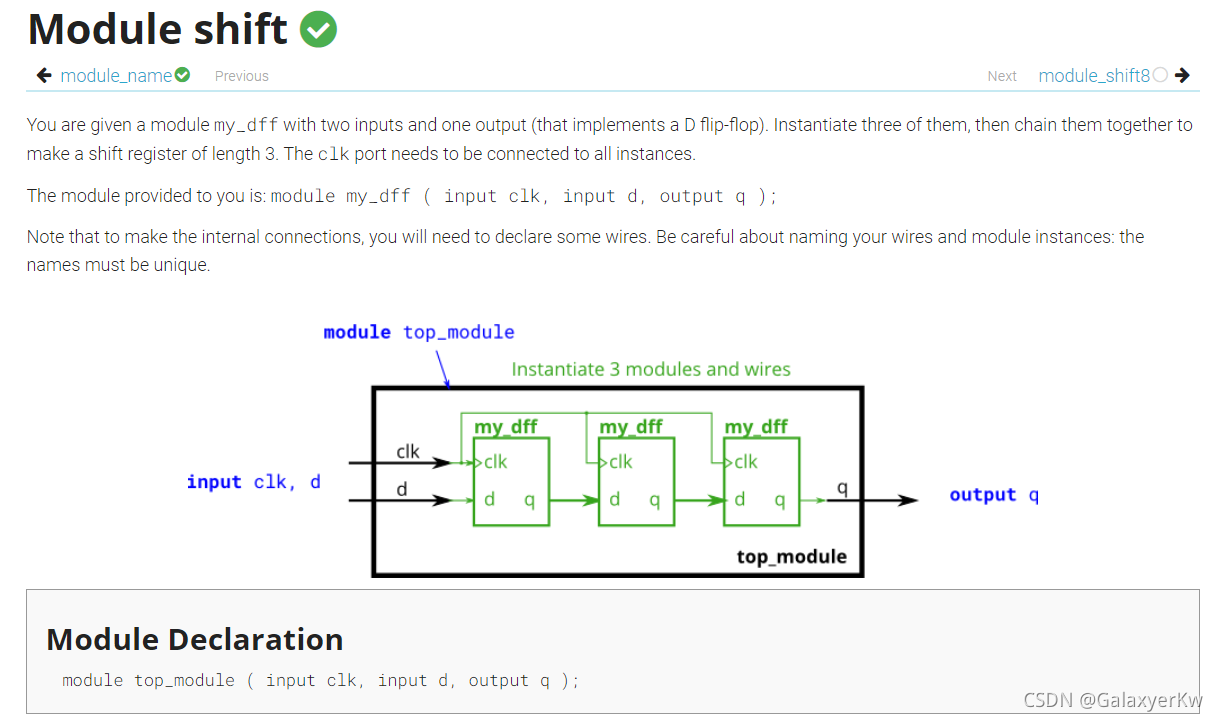
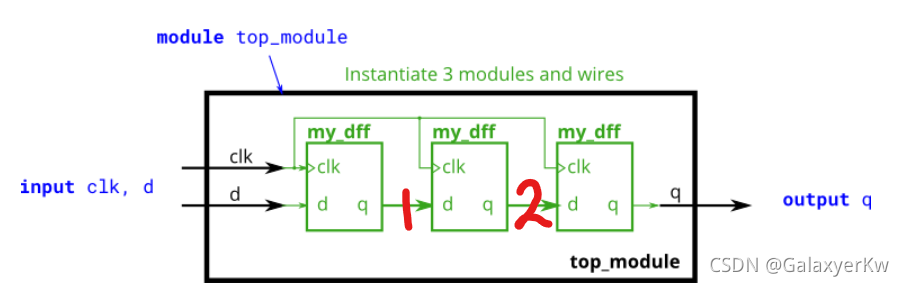
endmoduleYou are given a module my_dff with two inputs and one output (that implements a D flip-flop). Instantiate three of them, then chain them together to make a shift register of length 3. The clk port needs to be connected to all instances.
The moduleprovided to you is:module my_dff (input clk, input d, output q ):
Note that to make the internal connections, you will need to declare some wires. Be careful about naming your wires and module instances: the names must be unique[2].
模块定义
// 带流水线寄存器的加法器
module pipelined_add32(input wire clk,input wire rst_n,input wire [31:0] in1,input wire [31:0] in2,output reg [31:0] out
);reg [31:0] sum_pre;always @(*) beginsum_pre = in1 + in2;endalways @(posedge clk or negedge rst_n) beginif (!rst_n) out <= 0;else out <= sum_pre;end
endmodule
顶层模块
多个模块的定义
// 级联加法模块
module multi_add_chain(input wire clk,input wire rst_n,input wire [31:0] a, b, c, d, e,output wire [31:0] result
);wire [31:0] sum1, sum2, sum3;//第一级级联 pipelined_add32 add1 (.clk(clk),.rst_n(rst_n),.in1(a),.in2(b),.out(sum1));// 第二级级联pipelined_add32 add2 (.clk(clk),.rst_n(rst_n),.in1(sum1),.in2(c),.out(sum2));// 第三级级联pipelined_add32 add3 (.clk(clk),.rst_n(rst_n),.in1(sum2),.in2(d),.out(sum3));// 第四级级联pipelined_add32 add4 (.clk(clk),.rst_n(rst_n),.in1(sum3),.in2(e),.out(result));
endmodule
多个模块的例化,还有一种比较有效的方法:
generate for
generatefor (genvar i=0; i<4; i++) begin : gen_block  //块名"gen_block"add32 u_add32 (.din(din[i]),.dout(dout[i]));end
endgenerate
module generate_for_example (input wire [7:0] a,output wire [7:0] b
);genvar i;generatefor (i = 0; i < 8; i = i + 1) begin : gen_blockassign b[i] = a[i];endendgenerate
endmodule
生成的实例路径为top.gen_block[0].u_add32、top.gen_block[1].u_add32等。
Q2: 使用参数
参数化模块可以提高模块的灵活性,允许在实例化时指定参数值。
《韩非子·卷十五·难一》:兵不厌诈。
下面的代码会直观的告诉你答案:
adder模块中自带参数,这个参数可以接受top层下达的旨意。喵喵。
module adder #(parameter WIDTH = 4) (input wire [WIDTH-1:0] a,input wire [WIDTH-1:0] b,output wire [WIDTH-1:0] sum
);assign sum = a + b;
endmodule// 实例化带参数的模块
module top;wire [7:0] sum;adder #(8) my_adder (.a(8'b00001111),.b(8'b00000001),.sum(sum));
endmodule
参数可分为两大类:局部参数和普通参数,分别由关键词local_parameter和parameter声明。它们俩的区别在于,局部参数不允许使用defparam语句或在模块实例化时(在elaboration阶段)进行参数覆盖,普通参数在满足一定条件时允许参数覆盖。需要注意的是参数代表常量,在运行时修改它们的值是非法的[4]。
local_parameter可以在下面这些位置声明:
module example_module (input wire clk,input wire rst,output wire [3:0] out
);localparam integer WIDTH = 4;  // 在模块中声明localparam
localparam [WIDTH-1:0] MAX_VALUE = 15;reg [WIDTH-1:0] counter;always @(posedge clk or posedge rst) beginif (rst) begincounter <= 0;end else if (counter < MAX_VALUE) begincounter <= counter + 1;end else begincounter <= 0;end
endassign out = counter;endmodule
参考文献:
【1】【Verilog入门】模块的实例化(巨巨巨巨详细讲解)_verilog实例化-CSDN博客
【2】【Verilog】子模块连接相关问题(加法器及其优化)_verilog怎么把两个模块连接-CSDN博客
【3】 verilog常用技巧 (个人总结版)_verilog技巧-CSDN博客
【4】Verilog基础:参数(parameter)的使用_verilog parameter-CSDN博客