Android 之 网络通信(HTTP/TCP/UDP/JSON)
1.HTTP请求
OkHttp
OkHttpUtils 的全面使用指南,整合多个来源的最佳实践,涵盖依赖配置、基础请求、文件操作、高级功能及注意事项,帮助开发者快速上手并避免常见问题。
一、依赖配置
在项目的 build.gradle 中添加依赖:
dependencies {// 核心库(必选)implementation 'com.lzy.net:okhttputils:3.0.4'// 扩展库(按需添加)implementation 'com.lzy.net:okrx2:2.0.2'      // RxJava2 支持implementation 'com.lzy.net:okserver:2.0.5'    // 下载/上传管理
}二、基本使用
1. GET 请求
OkHttpUtils.get("https://api.example.com/data").tag(this) // 设置请求标签(用于取消).params("page", "1") // 添加URL参数.headers("Authorization", "token123") // 添加请求头.execute(new StringCallback() {@Overridepublic void onSuccess(Response<String> response) {// 请求成功处理String data = response.body();}@Overridepublic void onError(Response<String> response) {// 请求失败处理}});2. POST 请求(表单)
Map<String, String> params = new HashMap<>();
params.put("username", "admin");
params.put("password", "123456");OkHttpUtils.post("https://api.example.com/login").tag(this).params(params) // 添加表单参数.execute(new JsonCallback<User>(User.class) { // 自动解析为JavaBean@Overridepublic void onSuccess(Response<User> response) {User user = response.body();}});3. POST JSON 数据
String json = new Gson().toJson(new User("admin", "123456"));
OkHttpUtils.post("https://api.example.com/login").postJson(json)                     // 直接提交JSON字符串.execute(new StringCallback());
4. 文件上传
File file = new File(Environment.getExternalStorageDirectory(), "test.jpg");
OkHttpUtils.post("https://api.example.com/upload").addFile("file", file.getName(), file) // 参数名、文件名、文件对象.execute(new StringCallback() {@Overridepublic void onSuccess(Response<String> response) {// 上传成功}});5.文件下载
OkHttpUtils.get("https://example.com/file.zip").execute(new FileCallback("/sdcard/download/", "file.zip") {@Overridepublic void onSuccess(Response<File> response) {File file = response.body(); // 下载完成}@Overridepublic void downloadProgress(long currentSize, long totalSize, float progress) {// 进度回调(UI线程)progressBar.setProgress((int) (100 * progress));}});6.高级功能,全局配置
public class MyApp extends Application {@Overridepublic void onCreate() {super.onCreate();OkHttpUtils.init(this);OkHttpUtils.getInstance().setConnectTimeout(30_000)    // 连接超时.setReadTimeout(30_000)       // 读取超时.addCommonHeader("App-Version", BuildConfig.VERSION_NAME) // 公共请求头.setCertificates(getAssets().open("server.cer")); // HTTPS自签名证书[1](@ref)}
}
7.高级功能,配置拦截器
public class TokenInterceptor implements Interceptor {@Overridepublic Response intercept(Chain chain) throws IOException {Request request = chain.request().newBuilder().header("token", "user_token").build();return chain.proceed(request);}
}// 配置拦截器
OkHttpClient client = OkHttpUtils.getInstance().getOkHttpClient().newBuilder().addInterceptor(new TokenInterceptor()).build();
OkHttpUtils.initClient(client);
Retrofit
一、依赖配置
dependencies {// Retrofit 核心库implementation 'com.squareup.retrofit2:retrofit:2.9.0'  // [2,3,4](@ref)// Gson 转换器(JSON 解析)implementation 'com.squareup.retrofit2:converter-gson:2.9.0'  // [1,3,4](@ref)// OkHttp 底层支持(含日志拦截器)implementation 'com.squareup.okhttp3:okhttp:4.12.0'implementation 'com.squareup.okhttp3:logging-interceptor:4.12.0'  // [1,8](@ref)
}二、基本使用
1.封装实现(核心类)
public class RetrofitClient {private static final int TIMEOUT = 30; // 超时时间(秒)private static volatile Retrofit retrofit;// 构建全局唯一 Retrofit 实例public static Retrofit getInstance(String baseUrl) {if (retrofit == null) {synchronized (RetrofitClient.class) {if (retrofit == null) {retrofit = new Retrofit.Builder().baseUrl(baseUrl).client(initOkHttpClient()) // 配置OkHttp.addConverterFactory(GsonConverterFactory.create()).addCallAdapterFactory(RxJava2CallAdapterFactory.create()) // 支持RxJava.build();}}}return retrofit;}// 配置OkHttp(含日志拦截器+超时设置)private static OkHttpClient initOkHttpClient() {return new OkHttpClient.Builder().addInterceptor(new HttpLoggingInterceptor().setLevel(HttpLoggingInterceptor.Level.BODY)).connectTimeout(TIMEOUT, TimeUnit.SECONDS).readTimeout(TIMEOUT, TimeUnit.SECONDS).writeTimeout(TIMEOUT, TimeUnit.SECONDS).build();}
}关键特性:双检锁单例模式确保线程安全
统一超时和日志拦截配置
支持 RxJava 响应式编程2. API 服务接口定义
public interface ApiService {@GET("users/{id}")Observable<User> getUserById(@Path("id") int userId); // RxJava Observable@POST("login")@FormUrlEncodedObservable<LoginResponse> login(@Field("username") String username,@Field("password") String password);
}
3. 网络请求基类(封装通用逻辑)
public abstract class BaseRepository {protected ApiService apiService;public BaseRepository() {apiService = RetrofitClient.getInstance("https://api.example.com/").create(ApiService.class);}// 统一错误处理protected <T> Observable<T> handleRequest(Observable<T> observable) {return observable.subscribeOn(Schedulers.io()).observeOn(AndroidSchedulers.mainThread()).onErrorResumeNext(throwable -> {// 统一转换网络错误if (throwable instanceof SocketTimeoutException) {return Observable.error(new NetworkException("连接超时"));} else if (throwable instanceof ConnectException) {return Observable.error(new NetworkException("服务器不可达"));}return Observable.error(throwable);});}
}
4.调用示例
public class UserRepository extends BaseRepository {// 获取用户信息public Observable<User> getUser(int userId) {return handleRequest(apiService.getUserById(userId));}// 登录操作public Observable<LoginResponse> login(String username, String password) {return handleRequest(apiService.login(username, password));}
}
5. Activity 中调用
public class MainActivity extends AppCompatActivity {private CompositeDisposable disposables = new CompositeDisposable();@Overrideprotected void onCreate(Bundle savedInstanceState) {UserRepository userRepo = new UserRepository();// 请求用户数据disposables.add(userRepo.getUser(123).subscribe(user -> {Log.d("MainActivity", "用户名称: " + user.getName());}, error -> {Toast.makeText(this, error.getMessage(), Toast.LENGTH_SHORT).show();}));// 登录请求userRepo.login("admin", "123456").subscribe(response -> {if (response.isSuccess()) {startActivity(new Intent(this, HomeActivity.class));}});}@Overrideprotected void onDestroy() {disposables.clear(); // 防止内存泄漏super.onDestroy();}
}
6.文件上传/下载
@Multipart
@POST("upload")
Observable<ResponseBody> uploadFile(@Part MultipartBody.Part file);// 调用示例:
File file = new File("/sdcard/photo.jpg");
RequestBody requestFile = RequestBody.create(MediaType.parse("image/*"), file);
MultipartBody.Part body = MultipartBody.Part.createFormData("file", file.getName(), requestFile);
apiService.uploadFile(body);
2.Json解析
Gson
基于Gson封装的工具类及使用示例,支持复杂数据结构(嵌套对象、泛型集合等),并包含详细注释和最佳实践
一、依赖配置
在项目的 build.gradle 中添加依赖:
dependencies {implementation 'com.google.code.gson:gson:2.10.1'
}二、基本使用
1.工具类封装
import com.google.gson.Gson;
import com.google.gson.GsonBuilder;
import com.google.gson.reflect.TypeToken;
import java.lang.reflect.Type;
import java.util.List;
import java.util.Map;/*** Gson工具类(线程安全)* 功能:对象与JSON互转、泛型集合处理、格式化输出*/
public class GsonUtils {// 单例模式 + 自定义配置(格式化/序列化空值)private static final Gson GSON = new GsonBuilder().setPrettyPrinting()    // 格式化JSON(便于阅读).serializeNulls()       // 序列化null值字段.create();/*** 对象转JSON字符串* @param object Java对象* @return JSON字符串*/public static String toJson(Object object) {return GSON.toJson(object);}/*** JSON字符串转对象* @param json  JSON字符串* @param clazz 目标对象的Class* @param <T>   目标类型* @return 解析后的对象*/public static <T> T fromJson(String json, Class<T> clazz) {return GSON.fromJson(json, clazz);}/*** JSON转List(支持泛型)* @param json  JSON字符串* @param clazz List元素的Class* @param <T>   元素类型* @return 解析后的List*/public static <T> List<T> fromJsonToList(String json, Class<T> clazz) {Type type = TypeToken.getParameterized(List.class, clazz).getType();return GSON.fromJson(json, type);}/*** JSON转Map(支持泛型)* @param json JSON字符串* @return 解析后的Map*/public static <K, V> Map<K, V> fromJsonToMap(String json) {Type type = new TypeToken<Map<K, V>>() {}.getType();return GSON.fromJson(json, type);}
}
2.使用示例(含复杂数据结构)
public class User {private String name;private int age;private Address address;          // 嵌套对象private List<String> hobbies;     // List字段private Map<String, String> metadata; // Map字段// 必须有无参构造方法(Gson反序列化需要)[2](@ref)public User() {}// Getter/Setter方法省略(实际开发中需补充)
}public class Address {private String city;private String zipCode;public Address() {}// Getter/Setter省略
}
3. 序列化(对象 → JSON)
// 构建复杂对象
Address address = new Address("New York", "10001");
List<String> hobbies = Arrays.asList("Reading", "Traveling");
Map<String, String> metadata = new HashMap<>();
metadata.put("role", "admin");
metadata.put("department", "IT");User user = new User("John", 25, "john@example.com", address, hobbies, metadata);// 转换为JSON(格式化输出)
String json = GsonUtils.toJson(user);
System.out.println(json);4.输出结果
{"name": "John","age": 25,"email": "john@example.com","address": {"city": "New York","zipCode": "10001"},"hobbies": ["Reading", "Traveling"],"metadata": {"role": "admin","department": "IT"}
}
5. 反序列化(JSON → 对象)
// JSON字符串转对象
String json = "{\"name\":\"Alice\",\"age\":30,\"address\":{\"city\":\"Paris\"}}";
User user = GsonUtils.fromJson(json, User.class);
System.out.println(user.getAddress().getCity()); // 输出:Paris// JSON转List(泛型支持)
String listJson = "[{\"name\":\"Bob\"}, {\"name\":\"Charlie\"}]";
List<User> userList = GsonUtils.fromJsonToList(listJson, User.class);
System.out.println(userList.size()); // 输出:2// JSON转Map
String mapJson = "{\"key1\":\"value1\", \"key2\":\"value2\"}";
Map<String, String> map = GsonUtils.fromJsonToMap(mapJson);
System.out.println(map.get("key2")); // 输出:value2
6.日常使用
1.定制工具类public final class JSONUtils {//解析jsonobject,以{}开头和结尾public static <T> T parseJSON(String jsonStr, Class<T> t) {Gson gson = new Gson();T bean = gson.fromJson(jsonStr, t);return bean;}/*** //jsonarry,以[]开头和结尾* @param response* @param type*           Type type = new TypeToken< ArrayList<实体类名>>() {  }.getType();//							 *          * @return*/public static <T> T parseJSONArray(String response, Type type) {Gson gson = new Gson();T data = gson.fromJson(response, type);return data;}//把map转为String,很少用public static <T> String mapToJson(Map<String, T> map) {Gson gson = new Gson();String jsonStr = gson.toJson(map);return jsonStr;}}2.Java Beanpublic class Man {/*** name : 张三* age : 18*/private String name;private int age;public String getName() {return name;}public void setName(String name) {this.name = name;}public int getAge() {return age;}public void setAge(int age) {this.age = age;}
}2.准备字符串数据{"error_code":10005,"reason":"应用未审核超时,请提交认证"}3.解析字符串数据Man man = JSONUtils.parseJSON(ST, Man.class);//获得错误码int error_code = man.getError_code();//错误原因String reason = man.getReason();4.准备数组数据
[{"name": "张三","age": 18},{"name": "李四","age": 19}
]5.解析数组数据Type type = new TypeToken<ArrayList<Man>>() {  }.getType();//获得了一个Man(类名)的集合ArrayList<Man> first  = JSONUtils.parseJSONArray(st, type);//获得第一个人的年龄int age = first.get(0).getAge();Log.e("888", ""+age);打印下是18岁哦!注意导包导这个,不然会出错
import java.lang.reflect.Type;
import com.google.gson.reflect.TypeToken;
Jackson
一、依赖配置
在项目的 build.gradle 中添加依赖:
//jackson-databind:核心库(自动包含jackson-core和jackson-annotations)
//jackson-datatype-jsr310:支持LocalDateTime等Java 8日期类型dependencies {implementation 'com.fasterxml.jackson.core:jackson-databind:2.15.2'implementation 'com.fasterxml.jackson.datatype:jackson-datatype-jsr310:2.15.2'
}二、基本使用
1.工具类封装
import com.fasterxml.jackson.core.JsonProcessingException;
import com.fasterxml.jackson.core.type.TypeReference;
import com.fasterxml.jackson.databind.*;
import com.fasterxml.jackson.datatype.jsr310.JavaTimeModule;
import java.text.SimpleDateFormat;
import java.util.List;
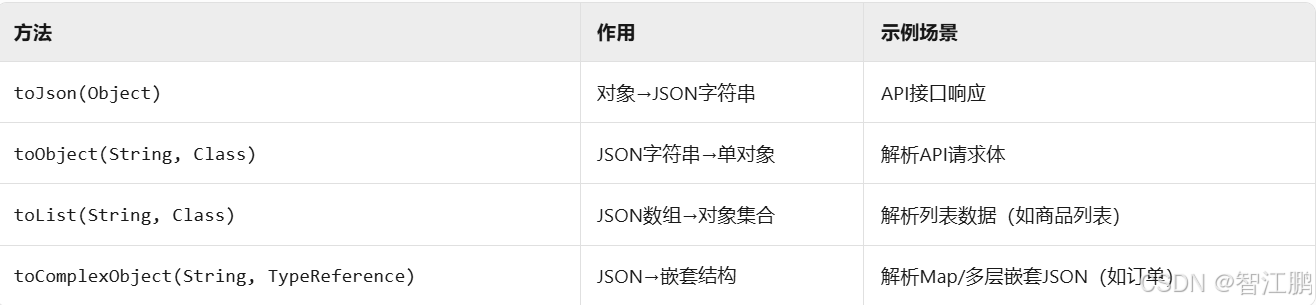
import java.util.Map;public class JacksonUtil {private static final ObjectMapper mapper = new ObjectMapper();static {// 基础配置mapper.configure(DeserializationFeature.FAIL_ON_UNKNOWN_PROPERTIES, false); // 忽略未知字段[6](@ref)mapper.setSerializationInclusion(JsonInclude.Include.NON_NULL); // 忽略null字段[7](@ref)mapper.setDateFormat(new SimpleDateFormat("yyyy-MM-dd HH:mm:ss")); // 统一日期格式// 注册Java 8日期模块mapper.registerModule(new JavaTimeModule()); mapper.disable(SerializationFeature.WRITE_DATES_AS_TIMESTAMPS); // 禁用时间戳格式[7](@ref)}// 对象 → JSON字符串public static String toJson(Object obj) {try {return mapper.writeValueAsString(obj);} catch (JsonProcessingException e) {throw new RuntimeException("JSON序列化失败", e);}}// JSON字符串 → 对象public static <T> T toObject(String json, Class<T> clazz) {try {return mapper.readValue(json, clazz);} catch (JsonProcessingException e) {throw new RuntimeException("JSON反序列化失败", e);}}// JSON字符串 → 复杂集合(如List<User>)public static <T> List<T> toList(String json, Class<T> elementClass) {try {return mapper.readValue(json, mapper.getTypeFactory().constructCollectionType(List.class, elementClass));} catch (JsonProcessingException e) {throw new RuntimeException("JSON转List失败", e);}}// JSON字符串 → 嵌套结构(如Map<String, List<Order>>)public static <T> T toComplexObject(String json, TypeReference<T> typeRef) {try {return mapper.readValue(json, typeRef);} catch (JsonProcessingException e) {throw new RuntimeException("复杂结构转换失败", e);}}
}2.基础对象转换
// 定义实体类
public class User {private String name;private Integer age;private LocalDateTime createTime;// Getter/Setter省略
}// 序列化对象 → JSON
User user = new User("张三", 25, LocalDateTime.now());
String json = JacksonUtil.toJson(user);
// 输出: {"name":"张三","age":25,"createTime":"2025-08-03 14:30:00"} [3](@ref)// 反序列化 JSON → 对象
User parsedUser = JacksonUtil.toObject(json, User.class);
System.out.println(parsedUser.getName()); // 输出: 张三
3.集合处理
// List序列化
List<User> userList = Arrays.asList(new User("李四", 30, null),new User("王五", 28, LocalDateTime.now())
);
String listJson = JacksonUtil.toJson(userList);
// 输出: [{"name":"李四","age":30},{"name":"王五","age":28,"createTime":"2025-08-03 14:35:00"}]// List反序列化
List<User> parsedList = JacksonUtil.toList(listJson, User.class);
4. 工具类方法总结
fastjson
一、依赖配置
在项目的 build.gradle 中添加依赖:
//jackson-databind:核心库(自动包含jackson-core和jackson-annotations)
//jackson-datatype-jsr310:支持LocalDateTime等Java 8日期类型dependencies {implementation 'com.alibaba:fastjson:2.0.39'
}二、基本使用
1.工具类封装
import com.alibaba.fastjson2.*;
import com.alibaba.fastjson2.filter.Filter;
import java.util.List;public class FastJsonUtil {private static final ParserConfig SAFE_PARSER_CONFIG;static {// 安全配置:启用安全模式,禁止反序列化任意类 [7](@ref)SAFE_PARSER_CONFIG = new ParserConfig();SAFE_PARSER_CONFIG.setSafeMode(true);// 可选:设置白名单(仅允许指定包下的类)[7](@ref)SAFE_PARSER_CONFIG.addAccept("com.yourpackage.model.");}// 对象 → JSON 字符串(默认配置)public static String toJson(Object obj) {return JSON.toJSONString(obj);}// 对象 → JSON 字符串(自定义配置)public static String toJson(Object obj, JSONWriter.Feature... features) {return JSON.toJSONString(obj, features);}// JSON 字符串 → 对象(安全模式)public static <T> T toBean(String json, Class<T> clazz) {return JSON.parseObject(json, clazz, SAFE_PARSER_CONFIG);}// JSON 字符串 → 泛型集合(如 List<User>)public static <T> List<T> toList(String json, Class<T> clazz) {return JSON.parseArray(json, clazz, SAFE_PARSER_CONFIG);}// JSON 字符串 → 复杂嵌套结构(如 Map<String, List>)public static <T> T toComplexType(String json, TypeReference<T> typeRef) {return JSON.parseObject(json, typeRef, SAFE_PARSER_CONFIG);}
}
2. 基础对象转换
// 定义实体类
public class User {@JSONField(name = "user_name") // 自定义字段名 [6,7](@ref)private String name;@JSONField(serialize = false) // 忽略序列化 [6](@ref)private String password;@JSONField(format = "yyyy-MM-dd") // 日期格式化 [7](@ref)private Date birthDate;// Getter/Setter 省略
}// 序列化对象 → JSON
User user = new User("张三", "123456", new Date());
String json = FastJsonUtil.toJson(user);
// 输出:{"user_name":"张三","birthDate":"2025-08-03"}// 反序列化 JSON → 对象
User parsedUser = FastJsonUtil.toBean(json, User.class);
System.out.println(parsedUser.getName()); // 输出:张三
3. 集合处理
// List 序列化与反序列化
List<User> userList = Arrays.asList(new User("李四", null, null),new User("王五", "abc", new Date())
);
String listJson = FastJsonUtil.toJson(userList, JSONWriter.Feature.PrettyFormat);List<User> parsedList = FastJsonUtil.toList(listJson, User.class);
3.TCP通信
netty
一、依赖配置
在build.gradle中配置最新Netty依赖:
dependencies {implementation 'io.netty:netty-all:4.1.97.Final' // 截至2025年8月最新稳定版[4,6](@ref)
}二、基本使用
1. 封装工具类
import io.netty.bootstrap.Bootstrap;
import io.netty.channel.*;
import io.netty.channel.nio.NioEventLoopGroup;
import io.netty.channel.socket.SocketChannel;
import io.netty.channel.socket.nio.NioSocketChannel;
import io.netty.handler.codec.string.StringDecoder;
import io.netty.handler.codec.string.StringEncoder;
import io.netty.util.concurrent.Future;
import java.util.concurrent.TimeUnit;public class NettyClient {private static final int RECONNECT_DELAY = 3; // 重连间隔(秒)private EventLoopGroup workerGroup;private Channel channel;private final String host;private final int port;private NettyListener listener;public NettyClient(String host, int port) {this.host = host;this.port = port;}// 初始化连接public void connect() {workerGroup = new NioEventLoopGroup();try {Bootstrap bootstrap = new Bootstrap();bootstrap.group(workerGroup).channel(NioSocketChannel.class).option(ChannelOption.SO_KEEPALIVE, true).handler(new ChannelInitializer<SocketChannel>() {@Overrideprotected void initChannel(SocketChannel ch) {ChannelPipeline pipeline = ch.pipeline();pipeline.addLast(new StringDecoder());   // 字符串解码pipeline.addLast(new StringEncoder());   // 字符串编码pipeline.addLast(new ClientHandler(listener)); // 业务处理器}});// 异步连接ChannelFuture future = bootstrap.connect(host, port).addListener((ChannelFutureListener) f -> {if (!f.isSuccess()) scheduleReconnect(); // 连接失败触发重连});channel = future.sync().channel();} catch (InterruptedException e) {Thread.currentThread().interrupt();}}// 消息发送public void sendMessage(String msg) {if (channel != null && channel.isActive()) {channel.writeAndFlush(msg);}}// 重连机制private void scheduleReconnect() {workerGroup.schedule(this::connect, RECONNECT_DELAY, TimeUnit.SECONDS);}// 释放资源public void shutdown() {if (channel != null) channel.close();if (workerGroup != null) {Future<?> future = workerGroup.shutdownGracefully();future.syncUninterruptibly();}}// 设置消息监听器public void setListener(NettyListener listener) {this.listener = listener;}// 内部处理器private static class ClientHandler extends SimpleChannelInboundHandler<String> {private final NettyListener listener;ClientHandler(NettyListener listener) {this.listener = listener;}@Overrideprotected void channelRead0(ChannelHandlerContext ctx, String msg) {if (listener != null) listener.onMessageReceived(msg); // 消息回调}@Overridepublic void channelActive(ChannelHandlerContext ctx) {if (listener != null) listener.onConnectionStatusChanged(true); // 连接建立}@Overridepublic void channelInactive(ChannelHandlerContext ctx) {if (listener != null) listener.onConnectionStatusChanged(false); // 连接断开}}// 状态监听接口public interface NettyListener {void onMessageReceived(String message);void onConnectionStatusChanged(boolean isConnected);}
}
2. Activity调用示例
public class MainActivity extends AppCompatActivity implements NettyClient.NettyListener {private NettyClient nettyClient;@Overrideprotected void onCreate(Bundle savedInstanceState) {super.onCreate(savedInstanceState);setContentView(R.layout.activity_main);// 初始化Netty客户端nettyClient = new NettyClient("192.168.1.100", 8080);nettyClient.setListener(this);new Thread(() -> nettyClient.connect()).start(); // 在子线程启动连接// 发送消息示例findViewById(R.id.btn_send).setOnClickListener(v -> {String msg = "Hello Server!";nettyClient.sendMessage(msg);});}// 实现监听回调@Overridepublic void onMessageReceived(final String message) {runOnUiThread(() -> {TextView tv = findViewById(R.id.tv_response);tv.setText("收到: " + message); // 主线程更新UI});}@Overridepublic void onConnectionStatusChanged(final boolean isConnected) {runOnUiThread(() -> {String status = isConnected ? "已连接" : "连接断开";Toast.makeText(this, "状态: " + status, Toast.LENGTH_SHORT).show();});}@Overrideprotected void onDestroy() {nettyClient.shutdown(); // 释放资源防止内存泄漏super.onDestroy();}
}
4.心跳保活
在ClientHandler中添加:
// 每30秒发送心跳
ctx.executor().scheduleAtFixedRate(() -> ctx.writeAndFlush("HEARTBEAT"), 0, 30, TimeUnit.SECONDS
);
4.UDP通信
netty
一、依赖配置
在build.gradle中配置最新Netty依赖:
dependencies {implementation 'io.netty:netty-all:4.1.97.Final' // 截至2025年8月最新稳定版[4,6](@ref)
}二、基本使用
1. UDP工具类封装
import io.netty.bootstrap.Bootstrap;
import io.netty.buffer.ByteBuf;
import io.netty.buffer.Unpooled;
import io.netty.channel.*;
import io.netty.channel.nio.NioEventLoopGroup;
import io.netty.channel.socket.DatagramPacket;
import io.netty.channel.socket.nio.NioDatagramChannel;
import io.netty.util.CharsetUtil;
import java.net.InetSocketAddress;
import java.util.concurrent.ExecutorService;
import java.util.concurrent.Executors;/*** Netty UDP 客户端工具类* 功能:消息发送、接收回调、资源释放*/
public class UdpClient {private final Bootstrap bootstrap;private final NioEventLoopGroup group;private Channel channel;private final ExecutorService threadPool;private UdpListener listener;public UdpClient() {group = new NioEventLoopGroup();bootstrap = new Bootstrap();threadPool = Executors.newSingleThreadExecutor();bootstrap.group(group).channel(NioDatagramChannel.class).option(ChannelOption.SO_BROADCAST, true) // 支持广播.handler(new ChannelInitializer<NioDatagramChannel>() {@Overrideprotected void initChannel(NioDatagramChannel ch) {ch.pipeline().addLast(new SimpleChannelInboundHandler<DatagramPacket>() {@Overrideprotected void channelRead0(ChannelHandlerContext ctx, DatagramPacket packet) {// 主线程回调 → 子线程处理threadPool.execute(() -> {String msg = packet.content().toString(CharsetUtil.UTF_8);if (listener != null) {listener.onMessageReceived(msg);}});}});}});}/*** 绑定本地端口(Android需动态申请端口)* @param port 本地端口(0表示随机端口)*/public void bind(int port) {threadPool.execute(() -> {try {ChannelFuture future = bootstrap.bind(port).sync();channel = future.channel();if (listener != null) listener.onBindSuccess(port);} catch (Exception e) {if (listener != null) listener.onError(e);}});}/*** 发送消息* @param targetIp   目标IP* @param targetPort 目标端口* @param message    消息内容*/public void send(String targetIp, int targetPort, String message) {if (channel == null || !channel.isActive()) return;threadPool.execute(() -> {try {ByteBuf buf = Unpooled.copiedBuffer(message, CharsetUtil.UTF_8);InetSocketAddress target = new InetSocketAddress(targetIp, targetPort);channel.writeAndFlush(new DatagramPacket(buf, target));} catch (Exception e) {if (listener != null) listener.onError(e);}});}/*** 释放资源*/public void shutdown() {if (channel != null) channel.close();group.shutdownGracefully();threadPool.shutdown();}/*** 设置事件监听*/public void setListener(UdpListener listener) {this.listener = listener;}public interface UdpListener {void onBindSuccess(int localPort); // 绑定成功void onMessageReceived(String msg); // 收到消息void onError(Throwable cause);      // 发生异常}
}2. Activity调用示例
public class MainActivity extends AppCompatActivity implements UdpClient.UdpListener {private UdpClient udpClient;private TextView tvStatus;@Overrideprotected void onCreate(Bundle savedInstanceState) {super.onCreate(savedInstanceState);setContentView(R.layout.activity_main);tvStatus = findViewById(R.id.tv_status);// 1. 初始化UDP客户端udpClient = new UdpClient();udpClient.setListener(this);udpClient.bind(0); // 绑定随机端口// 2. 发送消息示例findViewById(R.id.btn_send).setOnClickListener(v -> {String ip = "192.168.1.100"; // 目标服务器IPint port = 8080;            // 目标服务器端口String msg = "Hello UDP!";udpClient.send(ip, port, msg);});}// 3. 实现监听回调@Overridepublic void onBindSuccess(final int localPort) {runOnUiThread(() -> tvStatus.setText("本地端口: " + localPort));}@Overridepublic void onMessageReceived(final String msg) {runOnUiThread(() -> Toast.makeText(this, "收到: " + msg, Toast.LENGTH_SHORT).show());}@Overridepublic void onError(final Throwable cause) {runOnUiThread(() -> tvStatus.setText("错误: " + cause.getMessage()));}@Overrideprotected void onDestroy() {udpClient.shutdown(); // 释放资源super.onDestroy();}
}
3.注意权限
<uses-permission android:name="android.permission.INTERNET" />
<uses-permission android:name="android.permission.ACCESS_WIFI_STATE" />
4.注意
Android 9+ 默认禁用UDP广播,需在代码中开启:
bootstrap.option(ChannelOption.SO_BROADCAST, true);5.WebService
ksoap2-android
一、依赖配置
在build.gradle中配置最新Netty依赖:
implementation 'com.google.code.ksoap2-android:ksoap2-android:3.6.4'二、基本使用
1. 封装工具类
import org.ksoap2.SoapEnvelope;
import org.ksoap2.serialization.SoapObject;
import org.ksoap2.serialization.SoapSerializationEnvelope;
import org.ksoap2.transport.HttpTransportSE;
import java.util.Map;
import java.util.concurrent.ExecutorService;
import java.util.concurrent.Executors;public class SoapClientUtil {private static final String DEFAULT_NAMESPACE = "http://example.com/";private static final String DEFAULT_URL = "http://example.com/soap-endpoint";private static final int THREAD_POOL_SIZE = 5;private static ExecutorService threadPool = Executors.newFixedThreadPool(THREAD_POOL_SIZE);// 异步请求(推荐)public static void callAsync(String methodName, Map<String, Object> params, boolean isDotNet, SoapCallback callback) {threadPool.submit(() -> {try {Object result = callSync(methodName, params, isDotNet);callback.onSuccess(result);} catch (Exception e) {callback.onError(e);}});}// 同步请求public static Object callSync(String methodName, Map<String, Object> params, boolean isDotNet) throws Exception {SoapObject request = new SoapObject(DEFAULT_NAMESPACE, methodName);// 添加请求参数if (params != null) {for (Map.Entry<String, Object> entry : params.entrySet()) {request.addProperty(entry.getKey(), entry.getValue());}}SoapSerializationEnvelope envelope = new SoapSerializationEnvelope(SoapEnvelope.VER11);envelope.setOutputSoapObject(request);envelope.dotNet = isDotNet; // 适配 .NET 平台HttpTransportSE transport = new HttpTransportSE(DEFAULT_URL);transport.debug = true; // 开启调试日志try {transport.call(DEFAULT_NAMESPACE + methodName, envelope);return envelope.getResponse(); // 返回原始响应(可转为 SoapObject/String)} catch (Exception e) {throw new RuntimeException("SOAP请求失败: " + e.getMessage());}}// 回调接口public interface SoapCallback {void onSuccess(Object result);void onError(Exception e);}
}
2. Activity调用示例
// 初始化参数
String methodName = "getWeather";
Map<String, Object> params = new HashMap<>();
params.put("cityName", "Beijing");
boolean isDotNet = true; // .NET 服务需设为 true// 发起异步请求
SoapClientUtil.callAsync(methodName, params, isDotNet, new SoapClientUtil.SoapCallback() {@Overridepublic void onSuccess(Object result) {if (result instanceof SoapObject) {SoapObject response = (SoapObject) result;String temperature = response.getPropertyAsString("temperature");String weather = response.getPropertyAsString("weather");Log.d("SOAP", "北京天气: " + weather + ",温度: " + temperature);}}@Overridepublic void onError(Exception e) {Log.e("SOAP", "请求失败: " + e.getMessage());}
});