【Rust多进程】征服CPU的艺术:Rust多进程实战指南

✨✨ 欢迎大家来到景天科技苑✨✨
🎈🎈 养成好习惯,先赞后看哦~🎈🎈
🏆 作者简介:景天科技苑
🏆《头衔》:大厂架构师,华为云开发者社区专家博主,阿里云开发者社区专家博主,CSDN全栈领域优质创作者,掘金优秀博主,51CTO博客专家等。
🏆《博客》:Rust开发,Python全栈,Golang开发,云原生开发,PyQt5和Tkinter桌面开发,小程序开发,人工智能,js逆向,App逆向,网络系统安全,数据分析,Django,fastapi,flask等框架,云原生K8S,linux,shell脚本等实操经验,网站搭建,数据库等分享。所属的专栏:Rust高性能并发编程
景天的主页:景天科技苑

文章目录
- Rust多进程
- 一、Rust进程
- 二、std::process 模块简介
- 三、创建子进程(Command 和 spawn)
- 3.1 最简单的例子
- 3.2 Command 的常用方法
- 四、捕获输出(Output 和管道)
- 4.1 与 spawn() 的对比
- 4.2 异步读取子进程输出
- 五、标准流重定向(Stdio)
- 5.1 基本用法
- 5.2 写入子进程 stdin
- 六、进程状态与控制
- 6.1 等待进程退出
- 6.2 检查是否退出
- 6.3 强制终止子进程
- 七、进程返回值与错误处理
- 7.1 ExitStatus 检查
- 7.2 处理执行失败
- 八、跨平台注意事项
- 九、高级进程控制
- 9.1 管道组合多个子进程
- 9.2 与异步库结合(Tokio)
- 9.3 超时控制
- 十、实战:实现一个 shell-like 管道程序
- 十一、常见错误排查
- 十二、总结
Rust多进程
一、Rust进程
在系统编程中,进程(Process)是一个基本而重要的概念。在 Rust 中,我们可以使用标准库 std::process 来启动、管理和与子进程进行通信。
本文将深入讲解如何在 Rust 中使用 std::process 模块创建和控制子进程,并提供实际案例帮助你掌握其用法。
二、std::process 模块简介
Rust 提供了以下几个核心类型用于进程管理:
std::process::Command:用于配置和启动新进程
std::process::Child:表示运行中的子进程
std::process::ExitStatus:子进程的退出状态
std::process::Output:表示完整子进程输出
std::process::Stdio:用于标准输入输出重定向
这些类型构成了 Rust 进程操作的主干。
三、创建子进程(Command 和 spawn)
3.1 最简单的例子
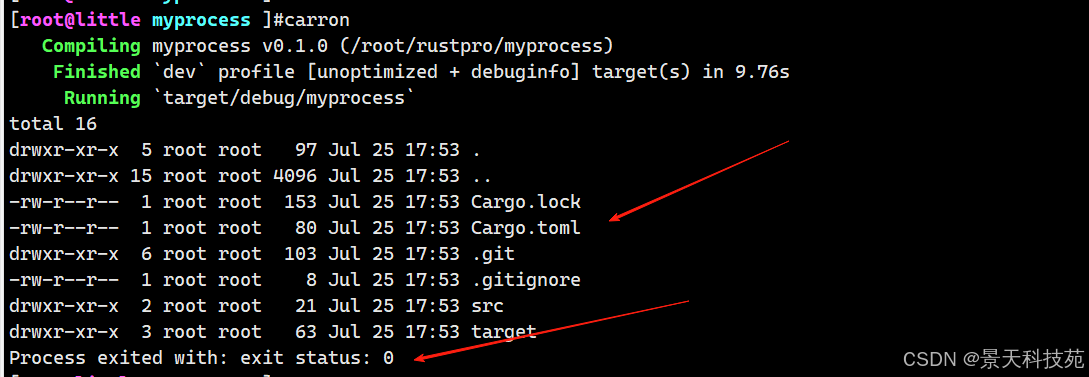
use std::process::Command;fn main() {//创建子进程//Command::new()的参数是要执行的命令//arg()的参数是命令的参数//status()返回一个Result<ExitStatus, io::Error>let status = Command::new("ls").arg("-la").status().expect("failed to execute process");//打印子进程的退出状态println!("Process exited with: {}", status);
}
包含退出状态码和命令执行的标准输出结果
该代码会启动 ls -la 子进程并等待其退出。
3.2 Command 的常用方法
arg(&str) 添加单个参数
args(&[&str]) 添加多个参数
env() 设置环境变量
envs(iter) 批量设置多个环境变量(接受 key-val 对)
env_remove(key) 移除一个环境变量
env_clear() 清除继承的环境变量
current_dir() 设置工作目录
stdin(Stdio) 配置子进程的标准输入
stdout(Stdio) 配置子进程的标准输出
stderr(Stdio) 配置子进程的标准错误
常用的 Stdio 构造函数:
Stdio::inherit():继承父进程(默认行为)
Stdio::piped():用管道连接,可以读写
Stdio::null():忽略该流
Command::new(“cat”).stdin(Stdio::piped());
执行进程的方法
spawn() std::process::Child 启动子进程(非阻塞)
status() std::process::ExitStatus 等待进程完成并返回状态
output() std::process::Output 等待进程并捕获 stdout 和 stderr
arg0() 设置 argv[0](对程序看到的名称)
其他辅助方法
arg0(name) 设置 argv[0],用于伪装程序名
uid(uid: u32) 设置子进程的用户 ID(Unix)
gid(gid: u32) 设置组 ID(Unix)
before_exec() 设置进程启动前的钩子(危险,需 unsafe)
这些方法仅在特定平台(如 Unix)生效。
示例:设置环境变量和工作目录
Command::new("echo").arg("$MY_VAR").env("MY_VAR", "HelloRust").current_dir("/tmp").status().expect("failed");
四、捕获输出(Output 和管道)
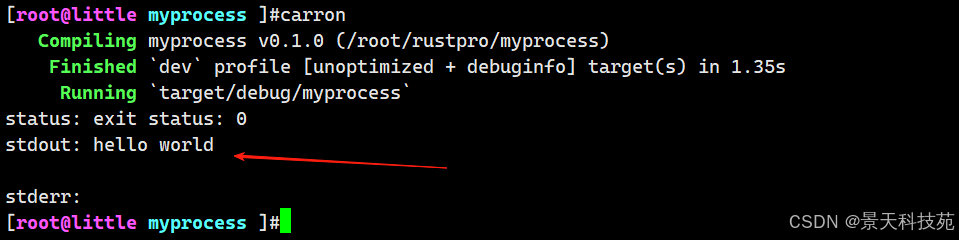
使用 output() 方法可以捕获 stdout 和 stderr:
use std::process::Command;fn main() {//获取子进程的输出let output = Command::new("echo").arg("hello world").output().expect("failed to execute");//打印子进程状态println!("status: {}", output.status);//打印子进程的标准输出println!("stdout: {}", String::from_utf8_lossy(&output.stdout));//打印子进程的标准错误println!("stderr: {}", String::from_utf8_lossy(&output.stderr));
}
4.1 与 spawn() 的对比
output():阻塞直到进程退出并返回所有输出
spawn():返回 Child,可以异步控制进程
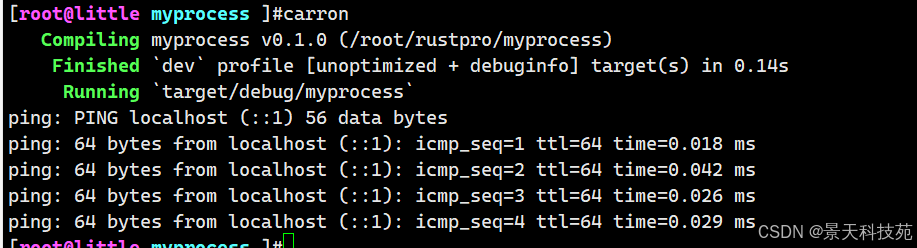
4.2 异步读取子进程输出
use std::process::{ Command, Stdio };
use std::io::{ BufReader, BufRead };fn main() {// 创建子进程let mut child = Command::new("ping").arg("localhost").stdout(Stdio::piped()) // 重定向子进程的标准输出到管道.spawn().expect("failed to start ping");// 读取子进程的输出let stdout = child.stdout.take().unwrap();let reader = BufReader::new(stdout);// 打印前5行输出for line in reader.lines().take(5) {println!("ping: {}", line.unwrap());}child.kill().unwrap(); // 停止 ping
}
五、标准流重定向(Stdio)
5.1 基本用法
Stdio::inherit() 继承父进程流
Stdio::piped() 使用管道进行通信
Stdio::null() 忽略输入输出
use std::process::{Command, Stdio};fn main() {Command::new("myapp").stdout(Stdio::null())  // 忽略输出.stderr(Stdio::inherit())  // 输出错误到终端.spawn().expect("fail");
}
5.2 写入子进程 stdin
use std::process::{ Command, Stdio };
use std::io::Write;fn main() {//创建子进程let mut child = Command::new("cat").stdin(Stdio::piped()).stdout(Stdio::inherit()) //将子进程的输出重定向到父进程的输出.spawn().expect("fail");//获取子进程的输入流let mut stdin = child.stdin.take().unwrap();//主进程向子进程写入数据stdin.write_all(b"Hello from parent!\n").unwrap();
}

六、进程状态与控制
6.1 等待进程退出
let mut child = Command::new("sleep").arg("2").spawn().unwrap();let status = child.wait().unwrap();
println!("Exited with: {}", status);
6.2 检查是否退出
if let Some(status) = child.try_wait().unwrap() {println!("Exited: {}", status);
} else {println!("Still running");
}
6.3 强制终止子进程
child.kill().unwrap();
七、进程返回值与错误处理
7.1 ExitStatus 检查
if status.success() {println!("Process succeeded");
} else {println!("Exit code: {:?}", status.code());
}
7.2 处理执行失败
match Command::new("not_exist_app").status() {Ok(status) => println!("Exit code: {}", status),Err(e) => eprintln!("Failed to run: {}", e),
}
八、跨平台注意事项
Windows 与 Unix 指令不同,如 dir vs ls
有些应用需要 .cmd 扩展名
路径分隔符差异(\ vs /)
Windows 可能不支持 stdout.piped() 某些行为
跨平台建议使用:
#[cfg(target_os = "windows")]
let cmd = "cmd";
#[cfg(target_os = "linux")]
let cmd = "sh";
九、高级进程控制
9.1 管道组合多个子进程
echo “foo bar baz”|grep foo这个命令会创建两个子进程,一个作为生产者,一个作为消费者。生产者进程会将数据写入管道,而消费者进程会从管道中读取数据。
use std::process::{ Command, Stdio };fn main() {let mut grep = Command::new("grep").arg("foo").stdin(Stdio::piped()).stdout(Stdio::piped()).spawn().unwrap();let stdin = grep.stdin.take().unwrap(); // 提前 move 掉// echo 会把 stdout 重定向到 grep 的 stdinlet mut echo = Command::new("echo").arg("foo bar baz").stdout(stdin).spawn().unwrap();echo.wait().unwrap(); // 等 echo 结束let output = grep.wait_with_output().unwrap(); // 等 grep 结束println!("{}", String::from_utf8_lossy(&output.stdout));
}

代码解读
这段代码是一个典型的 Rust 进程管道通信 示例,相当于在 shell 中执行:
echo “foo bar baz” | grep foo
也就是把 echo 命令的输出,作为 grep 命令的输入,并读取 grep 的输出。
✅ 分段讲解
use std::process::{Command, Stdio};
use std::io::Write;
引入 Command 和 Stdio 来启动子进程和配置标准流。
引入 Write 是为了可以写入 stdin(虽然本例没直接使用写操作,但是预备的)。
启动 grep 子进程,并配置好标准流
let mut grep = Command::new("grep").arg("foo").stdin(Stdio::piped()) // grep 的 stdin 用管道接收输入.stdout(Stdio::piped()) // grep 的 stdout 用管道输出.spawn().unwrap();
这就创建了一个 grep foo 的子进程,准备接收数据、过滤包含 “foo” 的内容。
拿到 grep 的标准输入端
let grep_stdin = grep.stdin.take().unwrap();
grep.stdin 是一个 Option<ChildStdin>。
take() 会把它移出,让我们可以传给另一个进程作为输出目标。
启动 echo 子进程,把 stdout 接到 grep 的 stdin
let mut echo = Command::new("echo").arg("foo bar baz").stdout(grep_stdin) // 把 echo 的输出直接作为 grep 的输入.spawn().unwrap();
关键点:stdout(grep_stdin) 表示:
echo 的标准输出会写入 grep 的标准输入。
形成管道效果(echo --> grep)。
等待 echo 完成
echo.wait().unwrap();
等待 echo 输出完成,确保数据已经写入 grep。
获取 grep 的输出结果
let output = grep.wait_with_output().unwrap();
println!(“输出: {}”, String::from_utf8_lossy(&output.stdout));
等待 grep 处理完数据并退出。
打印 grep 的输出结果(过滤后的数据)。
✅ 运行结果
这个例子的最终输出将是:
foo bar baz
因为:
echo 输出的是 “foo bar baz”
grep foo 过滤后,保留这行
9.2 与异步库结合(Tokio)
添加依赖Cargo.toml
[dependencies]
tokio = { version = "1.47.0", features = ["full"] }
use tokio::process::Command;#[tokio::main]
async fn main() {let output = Command::new("echo").arg("hello async").output().await.expect("fail");println!("stdout: {}", String::from_utf8_lossy(&output.stdout));
}

9.3 超时控制
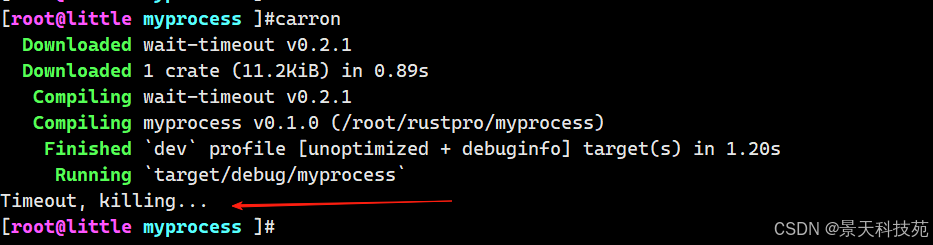
使用 wait_timeout crate:
use wait_timeout::ChildExt;
use std::time::Duration;
use std::process::Command;fn main() {//创建子进程let mut child = Command::new("sleep").arg("10").spawn().unwrap();//等待子进程,如果在3秒内没有结束,则杀死子进程let status = child.wait_timeout(Duration::from_secs(3)).unwrap();//判断子进程是否结束if let Some(status) = status {//如果子进程正常结束,则打印退出码println!("Exit: {:?}", status.code());} else {//如果子进程超时,则打印超时信息并杀死子进程println!("Timeout, killing...");child.kill().unwrap();}
}
十、实战:实现一个 shell-like 管道程序
use std::process::{ Command, Stdio };fn main() {let ps = Command::new("ps").arg("aux").stdout(Stdio::piped()).spawn().unwrap();let grep = Command::new("grep").arg("docker").stdin(ps.stdout.unwrap()).stdout(Stdio::piped()).spawn().unwrap();let output = grep.wait_with_output().unwrap();println!("{}", String::from_utf8_lossy(&output.stdout));
}

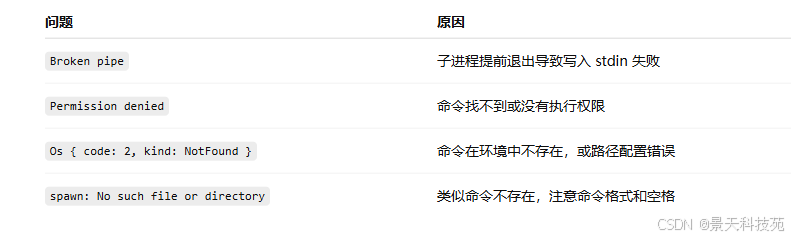
十一、常见错误排查
十二、总结
Rust 提供的 std::process 是一个强大、安全且跨平台的进程管理工具。
通过 Command 配置、spawn 启动、标准流重定向、错误处理、异步集成,我们可以构建高效的进程管控机制,非常适合系统编程和构建 CLI 工具。